1
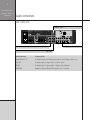
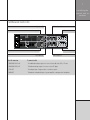
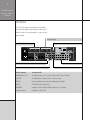
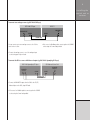
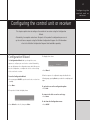
G Series Control Unit and Receiver
Installation Guide
ii
Preface
Important safety instructions
• Read the instructions.
• Keep these instructions.
• Follow all instructions.
• Do not use this apparatus near water.
• Clean only with a dry cloth.
• Install only in accordance with the manufacturer’s instructions.
• Refer all servicing to approved service personnel.
To avoid interference
Do not position the product:
• Near strong magnetic radiation, such as near a power amplifier.
• Near to a television, or where connecting cables may be subject
to or cause interference.
WARNING: TO REDUCE THE RISK OF FIRE OR ELECTRIC SHOCK,
Radio interference
DO NOT EXPOSE THIS APPARATUS TO RAIN OR MOISTURE
FCC Warning: This equipment generates and can radiate radio
frequency energy and if not installed and used correctly in
Safety warnings
accordance with our instructions may cause interference to radio
• Do not expose the product to dripping or splashing.
tested and complies with the limits set out in Subpart J, Part 15 of
• Do not place any object filled with liquid, such as a vase, on the
product.
• Do not place naked flame sources, such as lighted candles, on the
product.
communications or radio and television reception. It has been typeFCC rules for a Class B computing device. These limits are intended
to provide reasonable protection against such interference in home
installations.
EEC: This product has been designed and type-tested to comply
To avoid overheating
Do not position the product:
• In direct sunlight.
• Near heat sources, such as a radiator.
• Directly on top of heat producing equipment, such as a power
amplifier.
The product normally runs warm to the touch.
with the limits set out in EN55013 and EN55020.
iii
Contents
Introduction
Contents
1
Provides information about the available control unit
and receiver models, a description of each product, and
technical specifications.
Control unit and receiver models
1
Specifications
4
Installing the control unit or receiver
5
Describes how to install the control unit or receiver and
connect it to the other equipment in your system.
Unpacking
5
Audio connections
6
Tuner (G01/G51 only) and communications
connections
Configuring the control unit or
receiver
13
17
Explains how to configure the control unit or receiver using
the front-panel controls.
Configuration Wizard
17
Stage 1: Resetting the product
18
Stage 2: Configuring sources
19
Stage 3: Configuring other settings
21
Configuring the sensitivity of each source
23
Troubleshooting
25
Provides suggested solutions to problems while installing,
configuring, or operating the product.
Maintenance
27
Service and guarantee
28
Index
29
iv
Preface
Copyright and acknowledgements
Sales and service in the UK
Sales and service in the USA
Meridian Audio Ltd
Meridian America Inc
Stonehill
3800 Camp Creek Parkway
Stukeley Meadows
Building 2400
Cambridgeshire
Suite 122
PE29 6EX
Atlanta
England
GA30331
Tel +44 (0)1480 445678
Tel +1 (404) 344 7111
Fax +44 (0)1480 445686
Fax +1 (404) 346 7111
World Wide Web – http://www.meridian-audio.com/
Boothroyd|Stuart Meridian, Meridian, and Meridian Digital Theatre
are registered trademarks of Meridian Audio Ltd.
Copyright © 2003 Meridian Audio Ltd
This guide was produced by Human-Computer Interface Ltd,
Designed and manufactured in the UK by Meridian Audio Ltd.
Meridian Audio reserves the right to make changes and
improvements to any of the products described in this document
without prior notice.
Part no: GCU/1
http://www.interface.co.uk/
1
Introduction
Introduction
This guide provides full information about unpacking the control unit or receiver, connecting it
to the other equipment in the system, and configuring it using the front panel.
Once you have connected and configured the product, refer to the G Series System Guide for
information about operating it.
Control unit and receiver
models
This Installation Guide applies to the G01 Control Unit, G02
Balanced Control Unit, and G51 Receiver. The main differences
between each of these products are given in the following table:
Product
Preamplifier
Power amplifier
AM/FM tuner
G01
Stereo
No
Yes
G02
Dual mono/balanced
No
No
G51
Stereo
100W stereo
Yes
2
Introduction
G01 Control Unit
The Meridian G01 is a fully-integrated analogue control unit which
includes a sensitive AM/FM tuner module. It is an ideal complement
to the G Series power amplifiers.
Incorporating both a preamplifier and controller, the G01 Control
Unit provides seven stereo analogue inputs plus an AM/FM tuner
module with RDS capability. The inputs are nominally designated
Aux (phono), CD, TV, Tape, Disc, DVD, and VCR.
Two sets of stereo tape outputs are provided, along with
two preamp output pairs, allowing maximum flexibility in the
configuration of tape/decoder loops, multi-room, and amplification/
bi-amplification. In addition to the main outputs, a stereo
headphone socket is provided on the back panel for personal
listening.
G02 Balanced Control Unit
The Meridian G02 is a true dual-mono analogue control unit/
preamplifier with an extremely high-quality power supply for
ultra-low noise and distortion. Featuring a fully-balanced signal
path throughout, it is an ideal complement to the G Series power
amplifiers and is particularly suited to those who wish to maintain
a balanced analogue signal path at the very highest quality of
reproduction.
Balanced operation has always been preferred in the professional
audio industry, as it can significantly reduce hum and noise and
make the system less prone to interference. The G02 brings this
philosophy to the G Series. Incorporating both a preamplifier and
controller, the G02 Balanced Control Unit provides seven twochannel analogue inputs. Four of these – nominally designated
Aux (phono), Radio, TV, and VCR – are unbalanced, while the
remaining three – CD, Tape, and Disc – offer balanced inputs on
XLR connectors.
The internal architecture of the G02 is balanced throughout, and
the first thing that happens to an unbalanced input is electronic
balancing for maximum quality throughout the signal chain.
Two sets of unbalanced stereo tape outputs are included on the
back panel, allowing maximum flexibility in the configuration of
tape/decoder loops and multi-room capabilities. The outputs can be
configured as a single balanced output by using a suitable breakout cable.
Two sets of main outputs are provided: the primary outputs are
balanced on XLR male connectors, while unbalanced outputs are
also included on phono connectors.
G51 Receiver
Incorporating a preamplifier, controller, and a power amplifier that
features a unique low-feedback topology and extremely low output
impedance, the G51 Receiver provides seven stereo analogue
inputs plus an AM/FM tuner module with RDS capability. The inputs
are nominally designated Aux (phono), CD, TV, Tape, Disc, DVD, and
VCR.
3
Introduction
Two sets of stereo tape outputs are provided, along with two
Two sets of outputs per channel are provided on sturdy binding
preamp out pairs, one of which is normally jumpered to the
posts colour-coded for easy reference. The output terminals are
adjacent power amplifier input sockets. This allows, for example, a
connected to the amplifiers by Van den Hul silver-strand cable to
bi-amped configuration with an additional two-channel amplifier
minimise signal loss.
such as the G56.
In addition to the main outputs, a stereo headphone socket is
The two-channel amplifier includes the latest power amp
provided on the back panel for personal listening, in conjunction
developments from Meridian, used in the flagship DSP8000 digital
with a ‘speaker off’ facility.
loudspeaker systems.
The amplifiers feature active bias control throughout, with thermal
sensing that carefully manages the temperature and current flow at
different volume levels. Fully DC-coupled, the signal path contains
no unnecessary capacitors, while those in the power supplies are
audiophile grade components.
The amplifiers are of a unique low-feedback design for minimum
transient and interface intermodulation distortion, offering superb
clarity and transparency right across the audible range, with an
output impedance that is close to zero and delivers a solid 100W
continuous mean power per channel into 8Ω suitable for virtually
any high-quality passive loudspeaker system.
The amplifier, when in standby mode, maintains a standing
voltage on the power rails, reducing the time taken for optimum
performance to be delivered after power-up from tens of minutes
to a few seconds.
General
Each of the products provides a front-panel volume knob (press
to mute), which activates a specially-designed dual differentiallybalanced volume control circuit. This ensures perfect stereo tracking
and full frequency range performance at all volume levels.
In all products the sensitivity of each input can be individually
adjusted as desired.
The Aux input can be configured for either moving coil or moving
magnet cartridge operation by the addition of appropriate phono
modules.
All phono connectors are gold plated for maximum transparency.
4
Introduction
Specifications
G01
G02
G51
Distortion
Less than 0.002%.
Less than 0.002%.
Less than 0.002%.
Signal/Noise
Better than –96dB (2V output) for
Better than –100dB (2V output) for
Better than –96dB (2V output) for
normal inputs.
normal inputs.
normal inputs.
Better than –70dB for MM input,
Better than –70dB for MM input,
Better than –70dB for MM input,
–60dB for MC input.
–60dB for MC input.
–60dB for MC input.
MM option
Sensitivity adjustable 0.5–3mV for 5cm/s @ 1kHz. Overload point 47mV @ 1kHz. Cartridge load 47kΩ + 100pF.
MC option
Sensitivity adjustable 38–1200µV for 5cm/s @ 1kHz. Cartridge load 220Ω + 10nF.
Inputs
7 unbalanced phono inputs,
4 unbalanced phono inputs,
7 unbalanced phono inputs,
0.5-2.5V RMS, 4 sensitivity settings,
3 balanced XLR, 0.5-2.5V RMS
0.5-2.5V RMS, 4 sensitivity settings,
impedance 20kΩ.
per output, 4 sensitivity settings,
impedance 20kΩ.
impedance 20kΩ.
Outputs
Tape outputs
2 unbalanced phono outputs,
1 unbalanced, phono outputs,
2 outputs 100W per channel into
0–3V RMS maximum. Impedance
0–3V RMS. 1 balanced XLR output,
8Ω, 160W per channel into 4Ω.
47Ω.
0–6V RMS. Impedance 47Ω.
Volume control 99 steps of 1dB.
2 unbalanced outputs 1.5V RMS,
2 unbalanced outputs 1.5V RMS,
2 unbalanced outputs 1.5V RMS,
impedance 470Ω.
impedance 470Ω.
impedance 470Ω.
Headphone
2V RMS maximum output.
None.
2V RMS maximum output.
Trigger output
12VDC.
8VDC.
12VDC.
Comms
2 5-pin 240° DIN sockets, BNC socket, RS232 interface.
Construction
Meridian black or silver finish.
Dimensions
440mm x 90mm x 350mm (17.32" x 3.54" x 13.78") WHD.
Weight
8.5kg (19lbs) approx.
Controls
Front-panel soft keys include control of Source, Copy, Mute, Display, etc. Power button, volume control. Full remote
Meridian black or silver finish.
8.5kg (19lbs) approx.
control of all features via MSR+.
Display
Multi-character dot-matrix Vacuum Fluorescent Display.
Meridian black or silver finish.
13kg (29lbs) approx.
5
Installing the
control unit or
receiver
Installing the control unit or receiver
This chapter explains how to install the control unit or receiver. It describes what you should
find when you unpack the product, and how you should connect it to the other equipment in
the system.
You should not make any connections to the product or to any other component in the system
while the AC power supply is connected and switched on.
Unpacking
The G01 Control Unit, G02 Balanced Control Unit, and G51
Receiver are supplied with the following accessories:
• MSR+ remote control with batteries, manual, and spare key caps.
• Meridian Comms lead.
• Pre-Power jumpers preinstalled (G51 only).
• AM antenna (G01 and G51).
• FM antenna (G01 and G51).
• 2 FM antenna (Belling-Lee) adaptors (G01 and G51).
• Power cord.
• This manual.
• Meridian G Series System Guide.
If any of these items are missing please contact your dealer.
Note: You should retain the packaging in case you need to
transport the unit.
6
Installing the
receiver
Audio connections
G01 Control Unit
Headphone output
G01 CONTROL UNIT
ON
OFF
CAUTION REPLACE WITH SAME TYPE FUSE
T160mAL for 100 - 120V T80mAL for 220 - 240V
POWER INPUT ~50-60Hz 30 - 40VA MAX
control unit or
DESIGNED AND MADE IN ENGLAND BY
MERIDIAN AUDIO LTD
DESIGN AND COPYRIGHT 2003
WARNING SHOCK HAZARD
DO NOT OPEN
NO USER SERVICEABLE PARTS INSIDE
VOLTAGE
MAINTENANCE
RS232
USB
HEADPHONE
ANTENNA
FM
AM
SERIAL NUMBER
TESTED
GND
PRE OUT
MERIDIAN COMMS
TRIGGER
+12V
100mA
COPY OUT
ANALOGUE INPUT
MM
MC
L
L
R
IR IN
R
A7 VCR1
Preamplifier outputs
TECHNICAL
GROUND
A6 DVD
A5 DISC
A4 TAPE
A3 TV
A2 CD
A1 AUX
Analogue inputs
Copy outputs
Use this connector
To connect to this
ANALOGUE IN A1 to A7
The analogue outputs of a DVD player, tape recorder, TV tuner, CD player, or similar source.
COPY OUT
The analogue inputs of a tape recorder or second-zone system.
PRE OUT
The analogue inputs of a power amplifier or analogue active loudspeakers.
HEADPHONE
Headphones of between 8Ω and 15Ω fitted with a stereo 1⁄4" jack plug.
7
Installing the
control unit or
receiver
G02 Balanced Control Unit
Balanced inputs (L)
Copy outputs (L)
Unbalanced inputs (L)
Main outputs (L)
ON
OFF
MAIN OUTPUT
LEFT
CAUTION REPLACE WITH SAME TYPE FUSE
T160mAL for 100 - 120V; T80mAL for 220 - 240V
POWER INPUT ~50-60Hz 40VA MAX
G02 BALANCED CONTROL UNIT
DESIGNED AND MADE IN ENGLAND BY
MERIDIAN AUDIO LTD
DESIGN AND COPYRIGHT 2003
VOLTAGE
TESTED
WARNING SHOCK HAZARD
DO NOT OPEN
NO USER SERVICEABLE PARTS INSIDE
A7
L1
+
DISC
A6
TAPE
ANALOGUE INPUT LEFT
A5
CD
A4
VCR1
A3
TV
RADIO
MM
MC
A1
AUX
L2
TECHNICAL
GROUND
COPY OUT
MAINTENANCE
USB
RS232
TRIGGER
+12V
100mA
MERIDIAN COMMS
MAIN OUTPUT
RIGHT
A7
R1
+
DISC
A6
TAPE
A5
CD
ANALOGUE INPUT RIGHT
A4
VCR1
A3
TV
A2
RADIO
A1
AUX
R2
IR IN
Unbalanced inputs (R)
Main outputs (R)
Copy outputs (R)
Use this connector
A2
SERIAL NUMBER
Balanced inputs (R)
To connect to this
ANALOGUE IN A1 to A4
The unbalanced analogue outputs of a source such as a radio tuner, VCR, or TV tuner.
ANALOGUE IN A5 to A7
The balanced analogue outputs of a source such as a CD player.
COPY OUT
The analogue inputs of a tape recorder or second-zone system.
MAIN OUT
The balanced or unbalanced inputs of a power amplifier or analogue active loudspeakers.
8
Installing the
control unit or
receiver
G51 Receiver
The G51 Receiver integrates a preamplifier and power amplifier,
and it provides preamplifier outputs and power amplifier inputs to
allow these stages to be used independently, or together using the
jumpers provided.
Left speaker outputs
Headphone output
OFF
CAUTION REPLACE WITH SAME TYPE FUSE
T6.3A for 100 - 120V T3.15A for 220 - 240V
POWER INPUT ~50-60Hz 30 - 400VA MAX
ON
RIGHT
RIGHT
LEFT
HEADPHONE
LEFT
G51 RECEIVER
ANTENNA
FM
AM
DESIGNED AND MADE IN ENGLAND BY
MERIDIAN AUDIO LTD
DESIGN AND COPYRIGHT 2003
VOLTAGE
GND
MAINTENANCE
RS232
USB
MERIDIAN COMMS
AMP IN
TRIGGER
+12V
100mA
PRE OUT
COPY OUT
ANALOGUE INPUT
MM
L
L
R
IR IN
A6 DVD
A5 DISC
A4 TAPE
A3 TV
A2 CD
A1 AUX
Analogue inputs
Power amplifier input
Preamplifier outputs
TECHNICAL
GROUND
R
A7 VCR1
TESTED
MC
Copy outputs
Use this connector
To connect to this
ANALOGUE IN A1 to A7
The analogue outputs of a source such as a tape recorder, TV tuner, or CD player.
COPY OUT
The analogue inputs of a tape recorder or second-zone system.
PRE OUT
The power amplifier input, and an optional additional power amplifier.
AMP IN
The PRE OUT using the jumpers fitted.
HEADPHONE
Headphones of between 8Ω and 15Ω fitted with a stereo 1⁄4" jack plug.
Loudspeaker outputs
Loudspeakers of 2Ω to 16Ω.
SERIAL NUMBER
Right speaker outputs
9
Installing the
control unit or
receiver
To connect to an analogue source (eg G07 24-bit CD Player)
�������
��� ������ �� ������
�������� ���
�����
�����
�������� ��
��
����� ����
����� �����
You can connect up to seven analogue sources to the G Series
• If the source is a Meridian product connect together the COMMS
control unit or receiver.
sockets using the Comms lead provided.
• Connect the analogue source to one of the analogue input
sockets using a pair of phono leads.
To connect the G02 to a source with balanced outputs (eg G08 24-bit Upsampling CD Player)
G08 24-bit Upsampling CD Player
BALANCED
OUTPUTS
BALANCED
INPUT A5
COMMS
COMMS LEAD
XLR LEADS
• Connect the BALANCED outputs from the G08 to the A5 (CD)
balanced input on the G02, using XLR leads.
• If the source is a Meridian product connect together the COMMS
sockets using the Comms lead provided.
G02 Balanced Control Unit
COMMS
10
Installing the
control unit or
receiver
To connect to a turntable
G01/G02/G51
Turntable
ANALOGUE IN
TECHNICAL
A1 AUX
GROUND
OUTPUT
PHONO LEADS
The A1 (AUX) input can be fitted with a moving coil or moving
magnet input stage. Contact your dealer for details.
• Connect the turntable ground connection to the TECHNICAL
GROUND terminal, to avoid hum
• Connect the cartridge output to the A1 AUX input.
To connect to a tape recorder
�������� ���� ��������
�������
���
�����������
������
��
���� ���
����� �����
����� �����
• Connect one pair of COPY OUT sockets from the G01/G02/G51
to the analogue record input on the tape recorder using a pair of
phono leads.
• Connect the analogue monitor output from the tape recorder to
the A4 TAPE input on the G01/G51 or input A6 on the G02 using
a pair of phono leads.
�������� ��
�����
11
Installing the
control unit or
receiver
To connect a second-zone system
���
�����������
�����
��������� ���
�����
�������� ��
�� ����
����� ����
����� �����
The G01, G02, or G51 makes an ideal controller for a second zone.
• Connect the COMMS sockets using the Comms lead provided.
You can connect it to the COPY or ZONE OUT of the controller in
• Configure the control unit or receiver in the second zone to
the main room to allow you to copy a source from the main room
the Type setting for a second zone; see Stage 1:Resetting the
to the second zone.
product, page 18.
• Connect one pair of COPY or ZONE OUT sockets from the
For more information see the Meridian Three Room Plus guide at
controller in the main room (eg G01, G02, or G68) to the A4
www.meridian-audio.com.
TAPE inputs on the second-zone controller.
To connect the G01 to an unbalanced power amplifier or active analogue loudspeakers (eg Meridian M33s)
���
���
���
��� ���
����� ����
• Connect the PRE OUT sockets from the G01 to the inputs of a
power amplifier, or to active analogue loudspeakers such as the
Meridian M33s.
����� ����
12
Installing the
control unit or
receiver
To connect the G02 to a balanced power amplifier (eg Meridian G56 or G57 Two-channel Power Amplifier)
�������������������������
�����������������������������������
��������
��������
OFF
��������
��������
• Connect the BALANCED MAIN OUT sockets from the G02 to the
balanced inputs of the power amplifier.
To connect the G51 to loudspeakers
The G51 Receiver provides two pairs of outputs for each channel
Alternatively, a single pair of loudspeaker cables can be used for
so you can bi-wire separately to the bass/mid and treble drivers in
each channel.
each speaker, for higher quality.
To bi-wire the G51 to loudspeakers
Loudspeaker
Loudspeaker
G51 Receiver
Treble
–
–
+
+
RIGHT
LEFT
+ – + – + – + –
+
+
Bass/mid
Bass/mid
• Connect one pair of + and – terminals from the right-channel
Treble
–
–
• Connect the other pair of + and – terminals from the right-
outputs of the G51 to the treble input of the right loudspeaker,
channel outputs of the G51 to the bass/mid inputs of the right
checking the orientation of the + and – connections carefully.
loudspeaker.
• Connect the left channel to the left loudspeaker in the same way.
13
Installing the
Tuner (G01/G51 only) and communications connections
FM tuner aerial
AM tuner aerial
Trigger output
G01 CONTROL UNIT
OFF
DESIGNED AND MADE IN ENGLAND BY
MERIDIAN AUDIO LTD
DESIGN AND COPYRIGHT 2003
CAUTION REPLACE WITH SAME TYPE FUSE
T160mAL for 100 - 120V T80mAL for 220 - 240V
POWER INPUT ~50-60Hz 30 - 40VA MAX
ON
WARNING SHOCK HAZARD
DO NOT OPEN
NO USER SERVICEABLE PARTS INSIDE
VOLTAGE
MAINTENANCE
RS232
USB
HEADPHONE
ANTENNA
FM
AM
SERIAL NUMBER
TESTED
GND
PRE OUT
MERIDIAN COMMS
TRIGGER
+12V
100mA
COPY OUT
ANALOGUE INPUT
MM
MC
L
L
R
IR IN
R
A7 VCR1
Power and fuse
TECHNICAL
GROUND
A6 DVD
A5 DISC
A4 TAPE
A3 TV
A2 CD
A1 AUX
Meridian BNC Comms connection
RS232 connection
Meridian DIN Comms connections
USB connection
Infra-red repeater input
Use this connection
To connect to this
DIN COMMS
Other Meridian G Series, 500 Series, or 800 Series equipment, or Meridian DSP loudspeakers.
BNC COMMS
Future Meridian components.
RS232 connection
A computer, for configuring the control unit or receiver.
USB connection
A computer, in future applications.
IR IN
A G12 IR Receiver, or approved alternative infra-red repeater. Contact your dealer for details.
TUNER AM, FM
AM and FM antennae.
TRIGGER OUTPUT
Other equipment, via a mono 3.5mm jack output (centre pin hot) that provides 12VDC (8VDC on G02). It is
always low in standby. By default it is high for all sources, so can be used to bring a G56 or G57 Twochannel Power Amplifier out of standby. Alternatively you can program it to be high for specific sources; eg to
control a projection screen.
control unit or
receiver
14
Installing the
control unit or
receiver
To connect to other Meridian G Series, 500 Series, or 800 Series equipment
G01/G02/G51
G Series, 500 Series, or 800 Series unit
COMMS
COMMS
COMMS LEAD
In a system of Meridian products, one of the products acts as
COMMS LEAD
One unit will then be designated as the controller, and display:
the controller for the system, receiving infra-red commands from
the MSR+, and then, if appropriate, relaying them to the other
Con.
products via the Comms link.
The following procedure should be used to set up the Comms
correctly between several products:
All the other units will be configured as non-controllers, and
display:
• Connect one of the DIN COMMS sockets on the back panel
of the control unit or receiver to one of the COMMS sockets
on another G Series, 500 Series, or 800 Series unit, using the
Not Con.
Comms leads provided with the products.
The sytem is now ready for use.
The sequence in which you connect the units is not important.
If the automatic setup does not work, first make sure you are
• Switch all the units to standby.
operating the MSR+ from a position where all the units can receive
• Press Clear (MSR+).
the infra-red, and try again. Then:
Each unit will display:
• Check that none of the units have been configured to be IR
Controller; see Other settings, page 22. Either all products should
Auto
be set to Auto, or one should be configured as Controller and the
others as Not Controller.
15
Installing the
control unit or
receiver
Note: Do not, under any circumstances, connect any equipment
other than Meridian G Series, 500 Series, or 800 Series to any
socket marked COMMS on the back of the product.
To connect FM and AM antennae (G01 and G51 only)
�������
�� ��
• Connect an FM antenna or split-flex dipole to the FM Coax
connector, if necessary using the adaptor provided.
The product is supplied with an indoor loop antenna. This is
directional, and for best results you will need to orient it, and this
may be station dependent.
In the UK use a female Belling-Lee (VCR) connector.
• Place the antenna as far away from other electrical equipment
Although the FM tuner is very sensitive, the FM antenna is
and as high as possible.
supplied for basic installation only, and for best performance and
lowest noise use a high-quality antenna placed as high as possible
For best AM results use an external AM antenna.
and oriented towards the transmitter.
Note: For AM you must fit a good ground as well as an antenna.
Note: For all outdoor antennae we strongly recommend you use a
qualified installer who will comply with local safety regulations.
The tuner can be used with most proprietary indoor AM, FM, or
combi (AM/FM) antennae. It is possible in some cases to use a
• Connect an AM antenna to the AM connector by pressing
trigger output from the product to power such devices. For more
the tabs and inserting a bare wire into each hole. The ground
details, look at the Library/Applications sections of the Meridian
connection (black on the supplied AM antenna) should be
web site at www.meridian-audio.com/lib-apps.htm.
connected to the socket marked GND.
16
Installing the
control unit or
receiver
17
Configuring the
control unit or
receiver
Configuring the control unit or receiver
This chapter explains how to configure the control unit or receiver using the Configuration
Wizard.
Alternatively, for complete control over all aspects of the product’s configuration you can set
up the unit from a computer using the Meridian Configuration Program. For full information
refer to the Meridian Configuration Program Guide available separately.
Configuration Wizard
The displays then shows:
The Configuration Wizard leads you through the correct
sequence to configure your control unit or receiver. Alternatively,
Version
you can skip between the configuration stages, which allow you to
reset the configuration, or configure the sources or other settings
of the control unit or receiver.
Wizard
Lock
• Press Wizard.
Follow the sequence of configuration stages described in the
To run the Configuration Wizard
• If necessary press On/Off to put the control unit or receiver into
standby.
• Press More.
following pages, pressing Next to proceed after completing each
stage.
To go back to an earlier configuration option
• Press Back.
If the product is locked the display shows:
To return to the title screen for each stage
• Press Home.
Version
Unlock
To exit from the Configuration menus
• Press Unlock to unlock it, then press More.
• Press On/Off.
18
Configuring the
control unit or
receiver
Stage 1: Resetting the product
The control unit or receiver provides several alternative standard
The display shows the current Type:
settings, called Types, which configure all aspects of the product
into the most commonly needed configurations.
Main System
Type 1
Back
Choosing one of the Types overrides any other configuration you
may have performed, and so can be used to reset the configuration
of the unit.
Next
óòô
öõú
• Press A or V to step through the available Types.
A description of each type is shown on the top line of the display.
To reset the configuration
As you select each Type the control unit or receiver is reset to that
• Press Wizard.
Type.
The display shows the title screen for stage 1:
When you have selected the Type you want:
Press More for Help
1: Reset settings
Back
Next
Skip
• Press Next to proceed or Skip to go stage 2.
If you pressed Next the display shows:
Reset all settings?
Back
Yes
• Press Yes to proceed or Back to exit.
Either:
• Press Next to proceed to configuring sources, as described in the
next section.
Or:
• Press On/Off to return to standby.
Types
The following table lists the available types:
Type
Description
Type 1
Main system.
Type 2
Second zone system.
19
Configuring the
control unit or
Stage 2: Configuring sources
The control unit or receiver provides up to 12 sources
receiver
The display shows the title screen for stage 2:
corresponding to the 12 source keys on the MSR+:
Press More for Help
2: Configure sources
CD, RADIO, DVD, AUX, DISC, TAPE, TV, CABLE, SAT, VCR1, VCR2,
Back
GAME.
For each source the Configure sources stage allows you to
configure:
• Whether it is in use.
Next
Skip
• Press Next to proceed or Skip to go to stage 3.
The display shows the first source and the first configuration option
for that source: whether it is in use:
• The label used for it on the front-panel display, of up to five
This source is:
characters.
Radio
Source Back
• The audio input it selects.
in use
Next
óòô
öõú
• The TRIGGER output level it selects.
• The Comms type and address, to identify other Meridian
• Press Next or Back to step between options.
equipment.
A description of each option is shown on the top line of the
The procedure for doing this is as follows.
display, and its current value is shown to the right of the source
name.
To configure a source
Either:
• Press Next after resetting the product; see page 18.
Or:
• Press Wizard; see page 17.
• Press Skip to skip past the Reset settings menu.
When changing the source name, Next and Back step between
character positions.
The options are summarised in the table on the next page.
To change an option
• Press A or V to step through the alternative values for the
option.
20
Configuring the
control unit or
receiver
To move to the next source
• Press Source.
When you have finished configuring sources:
Either:
• Press Next on the last option of the last source (Game) to
proceed to configuring settings, as described in the next section.
Or:
• Press On/Off to return to standby.
Source options
The following table summarises the source options:
Option
Values
Description
in use
in use, not in use
Whether the source is enabled.
Audio Input
A1-A7, Tuner (not G02), Last Valid*
The audio input used for the source.
Source Name
Any name of up to five characters.
Trigger
Low, High
Trigger output for the source.
Comms Type
CD 1C, Tuner 2C, DVD 3C, 4C-8C,
The type of Meridian product that the source is.
No Comms NC
Comms Address
1A-8A
Allows you to individually control up to eight identical sources.
*A1-A7 correspond to the seven analogue inputs. Tuner corresponds to the internal tuner. Last Valid means that selecting the source will
not switch the input, but leave it set to the last valid input choice.
21
Configuring the
control unit or
Stage 3: Configuring other settings
receiver
The final stage allows you to configure other aspects of the
A description of each setting is shown on the top line of the
product’s operation.
display, and its current value is shown to the right of the display.
To configure other settings
The settings are summarised in the table on the next page.
Either:
• Press Next after configuring the sources; see page 19.
To change a setting
• Press A or V to step through the alternative values for the
setting.
Or:
• Press Wizard; see page 17.
• Press Skip to skip past the Reset settings and Configure
sources stages.
When you have finished configuring the settings:
• Press Next to complete the Wizard.
The display shows the title screen for stage 3:
The display shows:
Press More for Help
Press More for Help
3: Other settings
Back
Next
Skip
• Press Next to proceed.
Back
Exit
Restart
Either:
• Press Exit to return to standby.
The first setting is displayed:
Tuner region:
Europe
Back
Wizard Complete
Next
óòô
öõú
Or:
• Press Restart to return to stage 1; see page 18.
22
Configuring the
control unit or
receiver
Other settings
The following table summarises the product settings:
Option
Values
Description
Tuner region (not G02)
Europe, USA
Band selection (MW/LW or AM), tuning steps, and FM deemphasis
standard. For all countries except the USA use the Europe setting.
IR Controller?
Auto, Controller, Not Controller
Whether the product is the infra-red controller for the system.
Main System Address
1-8
Advanced setting.
Copy System Address
1-8
Advanced setting.
Product Address
1-8
Advanced setting.
23
Configuring the
Configuring the sensitivity of each source
You can adjust the sensitivity of each source to accommodate
differences in their levels.
To adjust the sensitivity of the current source
• Unlock the product; see Configuration Wizard, page 17.
• Select the analogue source you want to adjust.
• Press More until the Gain command is displayed.
• Press Gain.
The display shows the available sensitivities:
CD
0.5V
1V
65
1.4V
• Choose the sensitivity for the source.
• Press Home to exit.
2V
2.8V
control unit or
receiver
24
Configuring the
control unit or
receiver
25
Tr o u b l e s h o o t i n g
Troubleshooting
We expect you to achieve superb results with the control unit or receiver. If, however, you
encounter any problems, either when installing and configuring it, or during operation, please
check the following pages for suggested solutions.
If these suggestions fail to cure the problem, please contact your Meridian dealer for further
assistance.
General operating problems
No blue light is displayed when switching on
• Check that the AC power supply is connected correctly.
• Check that the ON OFF switch on the back panel is in the ON
position.
The sound has cut out and there is no display (G51)
The G51 Receiver includes electronic protection, which will protect
the output if the connections are accidentally shorted.
The amplifier may have tripped the mains due to a source with an
excessive DC level.
• Check that the fuse on the product’s back panel and the fuse in
the unit’s power plug have not blown; see To change the mains
• Unplug the source.
fuse, page 27.
• Turn off the power, and then turn it on again.
There is no sound (G51)
If this restores normal operation check the source. Otherwise there
• Check the jumpers are fitted between the preamplifier outputs
may be a fault with the receiver, and you should consult your
and power amplifier inputs.
dealer.
26
Tr o u b l e s h o o t i n g
The sound has cut out and the display shows Hot
(G51 only)
This indicates that the power amplifier stage of the receiver has
turned off due to overheating.
• Allow the receiver to cool down.
If the problem continues to occur there may be a fault with the
receiver, and you should consult your dealer.
Communication is not working between the G01/G02/G51
and other Meridian products
• Check that all products are interconnected using the correct
Comms leads.
• Ensure that one of the products is the controller; see To connect
to other Meridian G Series, 500 Series, or 800 Series equipment,
see page 14.
• If the problem continues, reset the product; see Stage 1:
Resetting the product, page 18. Warning: All settings will be
lost.
Radio tuner problems
FM tuner reception is poor
To obtain high-quality stereo reception on FM a good aerial is
essential. Try positioning the antenna at different points in a room;
generally performance is best high up and near a window.
In some areas a fixed antenna installation will be necessary. This
can be placed in a loft or mounted externally.
Note: For all outdoor antennae we strongly recommend you use a
qualified installer who will comply with local safety regulations.
AM tuner reception is poor
Position the antenna to maximise the strength of the station you
want to receive and to reduce interference from other stations on
nearby frequencies.
Position the antenna away from items that generate electrical
interference, such as fluorescent tubes and televisions.
RDS station names are not being received
There is hum on an input
Not all stations transmit the station name in all areas.
• Check your other equipment.
• For turntables, check the TECHNICAL GROUND connection.
• If you are unable to cure the problem consult your dealer.
If the station name is not available you can define a preset station
with a name; see the G Series System Guide.
27
Maintenance
Cleaning
To clean the case, display panel, and keypad
• Disconnect the power cord before cleaning the unit.
The exterior surfaces of Meridian G Series products are made from
solid anodised aluminium, powder coated steel, thermoplastic
rubber, and glass.
They are designed to be easily wiped clean with a dry, lint free
cloth. Greasy marks should be removed by light rubbing with a
slightly damp cloth and a trace of proprietary glass cleaner. Do
not use any other solvent or abrasive based cleaners. Dust can be
removed from the disc drive tray with a small dry brush when the
drawer is open.
Ensure that no liquid enters the casework and that the product is
completely dry before re-connection.
To clean the audio connections
The audio sockets on the back of the product are gold plated and
do not need to be cleaned if gold-plated plugs are used. Otherwise,
it is recommended that you unplug and reconnect the plugs at
least once a year. A proprietary contact cleaner can be used to
some advantage.
Tr o u b l e s h o o t i n g
To change the mains fuse
• Remove the mains connector, and pull out the drawer above the
power input to access the fuse.
Before replacing a blown fuse, it is best to ascertain the cause of
the failure.
The fuse drawer includes a spare fuse. This should be replaced by a
fuse of the same rating.
28
Tr o u b l e s h o o t i n g
Service and guarantee
Service
Guarantee
The Meridian G Series of hi-fi components has been carefully
The product is guaranteed against defects in material and
designed to give years of untroubled service. There are no user-
workmanship for two years from the date of purchase.
serviceable parts inside the case, nor do the units require any form
of maintenance.
The guarantee is void if the product has been subject to misuse,
accident, or negligence, or has been tampered with or modified
In the unlikely event that your product fails to function correctly,
in any way without the written authorisation of Meridian Audio
it should be returned, in its original packaging, to your Meridian
Limited. Note: Connecting anything other than the correct network
dealer.
lead to the Comms sockets may cause damage to the product
which will not be covered by this guarantee. Attempted servicing
In case of difficulty within the UK or USA please contact the
by unauthorised people may also invalidate this guarantee. Labour
appropriate sales and service address shown on page iv.
and carriage charges are not covered unless by local agreement.
In case of difficulty outside the UK or USA, contact the importing
Outside the UK, local warranty liability is restricted to equipment
agent for the territory. A list of Meridian agents outside the UK is
purchased within the territory. Our agents outside the UK are only
available from Meridian Audio.
under contractual obligation to service under-guarantee equipment
sold through them. They are entitled to make a non-refundable
No responsibility can be accepted for the product whilst in transit
charge for any service carried out on other equipment.
to the factory or an agent, and customers are therefore advised to
insure the unit. When seeking service under guarantee, proof of the
This guarantee does not limit your statutory rights within the
date of purchase will be required.
country of purchase.
29
Index
Index
A
accessories 5
G08, connecting to 9
G51 Receiver 1
audio connections 8
antennae, connecting 15
automatic setup 14
C
cleaning 27
COMMS, connecting 14
specifications 4
guarantee 28
L
loudspeakers, connecting to 12
configuration, resetting 18
Configuration Wizard 17
configuring
settings 21
sources 19
source sensitivities 23
connections
audio 6
cleaning 27
M
mains fuse, changing 27
Meridian M33 loudspeakers, connecting to 11
models 1
R
resetting the product 18
communications 13
Controller, setting 14
S
safety warnings ii
G
G01 Control Unit 1
audio connections 6
specificatons 4
G02 Balanced Control Unit 1
audio connections 7
specifications 4
G07, connecting to 9
second-zone system, connecting 11
sensitivity of sources, adjusting 23
settings, configuring 21
sources, configuring 19
source options 20
specifications 4
30
Index
T
tape recorder, connecting to 10
troubleshooting 25
Types 18