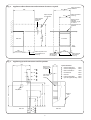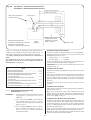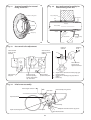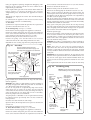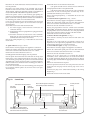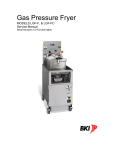
1
Highflow 400
RSF
FLOOR STANDING COMBINATION APPLIANCE FOR CENTRAL
HEATING AND MAINS FED DOMESTIC HOT WATER
INSTALLATION AND
SERVICING INSTRUCTIONS
GC NUMBER 47 311 18
BOILER OUTPUT
To Hot Water On/Off Control
Maximum 24.0 kW (82,000 Btu/h)
To Central Heating On/Off Control Range Rated
Minimum 8.8 kW (30,000 Btu/h)
Maximum 24.0 kW (82,000 Btu/h)
IMPORTANT: THIS APPLIANCE IS FOR USE WITH NATURAL GAS ONLY
THESE INSTRUCTIONS APPLY IN THE UK ONLY
THESE INSTRUCTIONS ARE TO BE LEFT WITH THE USER OR AT THE GAS METER
This appliance must be installed by a competent person in accordance
with the Gas Safety (Installation and Use) Regulations 1994
Contents
1.
2.
3.
4.
5a.
5b.
5c.
6.
7.
8.
Installation Requirements .......................................... Page 2
General Information .................................................... Page 2
Data Tables .................................................................... Page 5
Siting the Appliance .................................................... Page 8
Flue Terminal Position ................................................ Page 8
Flue Options .................................................................. Page 8
Vertical Flue .................................................................. Page 10
Air Supply .................................................................... Page 10
Sealed System .............................................................. Page 11
Open Vent System ...................................................... Page 12
9.
10.
11.
12.
13.
14.
15.
16.
17.
18.
Domestic Hot Water Supply ...................................... Page 13
Electrical ...................................................................... Page 14
Installing the Appliance ............................................ Page 16
Commissioning the Appliance .................................. Page 31
Instructions to the User ............................................ Page 33
Inspection and Service .............................................. Page 33
Replacement of Parts ................................................ Page 34
Operational Flow Diagrams ...................................... Page 48
Fault Finding ................................................................ Page 50
Component Parts List ................................................ Page 55
2.3 The control circuit provides automatic ignition. A permanent
pilot is not used.
2.4 PRINCIPLE APPLIANCE COMPONENTS.
A low thermal capacity Gas to Water heat exchanger
A water to water heat exchanger to provide domestic hot water.
A heatbank having a nominal capacity of 60 litres of circulating
primary hot water positioned in the lower half of the appliance.
A water diverter valve to direct the boiler output either to
domestic hot water or central heating as required.
Multifunctional gas valve and electrical control system to
individually control the domestic hot water and central heating.
An integral circulating pump.
Boiler and hot water temperature control thermostats providing
control for central heating and domestic hot water.
A User’s Operating Switch for selection of water only or heating
and water.
A by-pass for central heating system.
An electronic control board which enables the pump to run on
for a period of about five minutes to allow the boiler section to
cool after each operating cycle.
An expansion vessel, pressure gauge and pressure relief valve.
Temperature safety cut-out controls.
An optional extra facia mounted programmer.
A water flow regulator and flow switch in the domestic supply.
A standard horizontal rear flue kit to accommodate a flue length
of 100 mm to 500 mm
Alternatively, a standard horizontal side flue kit to accommodate
a flue length of 100 mm to 1000 mm.
Optional extra flue kits to provide for flue lengths up to a
maximum of 3000 mm.
Optional extra 90° flue bends to redirect the flue to the right, left
or upwards.
N.B. Maximum flue length reduces when a flue bend or bends
are fitted .
An optional vertical balanced flue system.
2.5 ELECTRICAL SUPPLY.
Mains supply: 230V ~ 50Hz, 270watts. External fuse 3A.
Internal fuse 3.15A (20mm) fast blow.
2.6 GAS SUPPLY.
The boiler requires 2.8 m3/h ( 98.5 ft3/hr ) of gas with a calorific
value of 38.7 MJ/m3. (1038 Btu/h.) The gas meter and supply
pipes must be capable of supplying this quantity of gas in
addition to the demand from any other appliances being served.
The following table gives an indication of limiting gas pipe
lengths and the allowance to be made for fittings. Refer to
BS6891 for further information.
The meter governor should deliver a dynamic pressure of
20mbar (8in wg.) at the appliance.
1. Installation Requirements
1.1 Gas Safety (Installation and Use) Regulations 1994 as
Ammended in 1996: All gas appliances must be installed by a
competent person in accordance with the above regulations.
Failure to install appliances correctly could lead to prosecution.
1.2 The manufacturers notes must not be taken, in any way, as
overriding statutory obligations.
1.3 The compliance with a British Standard does not, of itself,
confer immunity from legal obligations. In particular the
installation of this appliance must be in accordance with the
relevant requirements of the following: Gas Safety (Installation
and Use) Regulations 1994 (as Amended in 1996), current IEE
Wiring Regulations, local Building Regulations, Building
Standards (Scotland) (Consolidation), byelaws of the local Water
Company and Health and Safety Document No. 635 (Electricity
at Work Regulations 1989). The British Gas Material and
Installation Specification for central heating and hot water. It
should be in accordance with the relevant recommendations of
the following British Standards:
BS 6798:1987 Specification for Installation of gas fired hot water
boilers of rated input not exceeding 60 kW
BS 5449:1990 Central Heating for Domestic Premises
BS 5546:1990 Installation of gas hot water supplies for domestic
purposes.
BS 5440:1:1990 Flues and Ventilation for gas appliances of rated
input not exceeding 60kW: Flues.
BS 5440:2:1989 Flues and ventilation for gas appliances of rated
input not exceeding 60kW: Air Supply.
BS 6891:1988 Installation of low pressure gas pipework
installations up to 28mm (R1)
1.4 To ensure that the installation will perform to the highest
standards, the system and components should conform to any
other relevant British Standards in addition to those mentioned
in the instructions.
1.5 The appliance complies with the Essential Requirements of
the Gas Appliance Directive and other Directives currently
applicable.
1.6 This appliance contains no asbestos products. There is no
potential hazard due to the appliance being electrically unsafe.
There are no substances used that are a potential hazard in
relation to the COSHH Regulations 1988.
2. General Information
2.1 This appliance is not suitable for external installation.
2.2 The appliance controls are set to provide a maximum output
of 24 kW for the domestic hot water and a central heating load
of up to 24 kW.
2
The complete installation including the gas meter must be tested
for soundness and purged. See BS 6891.
Gas
Discharge
Rate (m3/hr)
Total Length of Gas Supply Pipe (metres)
3
6
9
8.7
5.8
4.6
18.0
12.0
9.4
2.11 SYSTEM NOTES.
WARNING:
CHECK THAT NO DIRT IS LEFT IN EITHER THE GAS OR WATER
PIPEWORK AS THIS COULD CAUSE DAMAGE TO THE APPLIANCE.
THOROUGHLY FLUSH THE HEATING SYSTEM, AND THE WATER
SUPPLY IN ACCORDANCE WITH THE RECOMMENDATIONS OF
BS 7593:1992.
PURGE THE GAS SUPPLY BEFORE FINALLY CONNECTING THE
APPLIANCE.
The water pipe connections throughout a sealed system must be
capable of sustaining a pressure of up to 3 bar.
Radiator valves must conform to the requirements of
BS2767(10):1972.
The relief valve drain outlet must be directed away from any
electrical components or where it would cause a hazard to the
user.
A drain cock to BS 2879 must be fitted to the lowest point of the
system.
For circuit design purposes it is important that due note is taken
of the information given in Table 4 relating to the available pump
head.
2.12 SHOWERS, BIDETS, TAPS AND MIXING VALVES.
Hot and cold taps and mixing valves used in the system must be
suitable for operating at mains pressure.
Thermostatically controlled or pressure equalising shower valves
will guard against the flow of water at too high a temperature.
Hot and cold mains fed water can be supplied direct to an overrim flushing bidet subject to local water company requirements.
With all mains fed systems the flow of water from the individual
taps will vary with the number of outlets operated
simultaneously and the cold water mains supply pressure to the
property. Flow balancing using ‘Ball-o-Fix’ type valves is
recommended to avoid an excessive reduction in flow to
individual outlets. For further information contact Worcester
Heat Systems Ltd.
2.13 SAFETY CONSIDERATIONS.
The appliance must not be operated in a waterless condition.
The appliance must not be operated with the boiler inner casing
cover removed.
Work must not be carried out on the appliance without the gas
and electricity supplies being turned off.
Checks must be made to ensure that the ventilation openings
made into walls and partitions are of the correct size and are not
obstructed.
2.14 OPERATION. See Fig. 1.
HOT WATER MODE:
With the appliance in a standby condition, i.e. heatbank at the
temperature set by the hot water control thermostat, burner off,
fan off, pump off and a demand is made for hot water:
The flow switch will energise the pump and circulate primary hot
water around the boiler and water to water heat exchanger. The
burner will light at its maximum setting, to maintain the
temperature of the heatbank and the fan will operate.
When hot water is no longer required the appliance will continue
to operate, the burner will cycle a number of times, until the
heatbank has returned to temperature. The pump will continue
to run for about five minutes to dissipate the residual heat from
the appliance.
NOTE: The appliance may be used for Hot Water only before the
central heating circuit is completed.
Pipe
Diameter
(mm)
22
28
2.7 PACKING.
The appliance and flue components are packed in separate
cartons.
2.8 GENERAL INSTALLATION.
The appliance is supplied for connection to a sealed system but
is suitable for use with an open system.
The specified ventilation openings made into a wall or
compartment door must not be obstructed.
If the appliance is to be fitted into a compartment then the
compartment must conform to the requirements of BS
6798:1987: Section 6.
The clearances specified for installation and servicing must be
maintained.
2.9 FLUE.
The appliance has a multi-directional balanced fanned flue
system : rear, right or left.
A terminal guard, Type K2, GC 393 553, is available from Tower
Flue Components, Vale Rise, Tonbridge,TN9 1TB.
The standard horizontal flue assembly length is from 100 mm to
500 mm when the appliance is flued to the rear. When flued to
the side the standard flue length is from 100 mm to 1000 mm.
Extended flue lengths up to 3000 mm are available in 1000 mm
lengths as optional extras.
To flue the appliance right, left or upwards 90° flue bends are
available as optional extras.
A maximum of three 90° flue bends are available for the flue
system.
N.B. When using an extra 90° flue bend or bends the maximum
flue length is reduced. See Section 5b.
Do not allow the flue terminal fitted to the outside wall to
become obstructed or damaged.
An optional extra internal flue fixing kit is available. When
ordering the kit the following part number must be quoted
ZEGAS206. For fitting instructions refer to section 11.7.
A vertical balanced flue is available with a flue length from 100
mm to 4500 mm
2.10 CONTROLS.
The electronic control system via the gas valve operates the heat
input in response to the central heating and domestic hot water
temperature settings.
The Operating switch provides for the selection of domestic hot
water (WATER) only or central heating and domestic hot water
(HEATING and WATER) or Off.
A facia mounted programmer is available as an optional extra. A
remote mounted programmer may be connected to the
appliance.
The control thermostats for central heating and domestic hot
water are mounted on the integral facia.
There is provision for the connection of a mains voltage room
thermostat. Refer to Section 10.
Frost Protection.
When the appliance and heating system are exposed to low
temperatures it is advised to fit a frost thermostat Refer to
Section 10.
Thermostatic radiator valves can be used in the system. The
appliance incorporates an adjustable by-pass between the
central heating flow and return.
CENTRAL HEATING MODE:
With the appliance in a standby condition and a demand is
made for heating:
The water diverter valve will open, pump will energise and
circulate primary water around the heating system, burner will
light to the nominal setting pressure and the fan will operate.
3
With the system at the temperature set by the Temperature
Control Knob,on the facia, the burner will cycle to maintain
output to the system.
If the system no longer requires output to maintain the desired
room temperature, the burner will extinguish. The pump will
continue to run for about five minutes to dissipate the residual
heat from the appliance and then switch off.
When the primary water has cooled sufficiently below the
temperature set by the Temperature Control Knob, the burner
will light, pump will energise and process repeated.
Fig. 1.
HOT WATER AND CENTRAL HEATING MODE:
The appliance will supply heat to the central heating system as
required. A demand for hot water at a tap or shower will override
the central heating function for the period of the hot water
demand.
When hot water is no longer required the burner and pump will
continue to operate until the heatbank is back to the required
temperature.
The appliance will return to the central heating state and its
normal mode of operation.
Appliance water flow diagram.
Central
Heating
Flow
5
Mains Cold
Automatic Air
Central Domestic
Water In
Vent
Heating Hot Water
Water Flow
Return
Flow Switch
Out
Regulator
Water Filter
Return Valve
Flow Valve
Appliance
Cabinet
Water Manifold
Gas to Water
Heat Exchanger
(Top Section)
Manual Air Vent
2
Pressure Relief
Valve
1
By-Pass
Adjuster
Boiler
Water to Water
Heat Exchanger
Water Manifold
(Bottom Section)
Sealed System
Expansion
Vessel
Water Diverter
Valve
3
Open Vent
Position
Drain
4
Heat-Bank
(Secondary Water)
Capacity 60 Litres
Circulating
Pump
Drain
(Primary Water)
1
C.H. Thermostat
ZAGAS041
4
Heatbank Overheat Thermostat
ZAGAS044
2
Safety Temperature Limiter
ZAGAS043
5
H.W. Limit High Thermostat
ZAMAJ 223
3
H.W. Thermostat
ZAGAS042
4
3. Technical Data
See Fig. 2 and 3.
The Data Plate is fixed to the top of the control box casing.
Table 1
NOMINAL BOILER RATINGS (10 minutes after lighting the appliance)
BURNER SETTING
OUTPUT
INPUT
PRESSURE
MODE
GAS RATE
kW
Btu/h
kW
Btu/h
m bar.
in. wg.
m3/h
ft3/h
8.8
(30,000)
12.1
(41,300)
1.0
0.4
1.11
40.0
11.0
(37,000)
15.0
(51,000)
3.5
1.4
1.45
51.0
13.0
(44,350)
17.4
(59,400)
5.2
2.1
1.55
54.5
HEATING
15.0
(51,200)
19.7
(67,000)
5.5
2.2
1.90
67.5
RANGE
17.0
(58,000)
22.2
(75,700)
7.5
3.0
2.15
76.0
19.0
(64,800)
24.5
(83,500)
9.5
3.8
2.40
84.0
21.0
(71,500)
27.0
(92,000)
11.0
4.4
2.60
92.5
23.0
(78,500)
29.2
(99,500)
14.0
5.6
2.80
100.0
24.0
(82,000)
30.0
(102,000)
14.5
5.8
2.90
102.0
24.0
(82,000)
30.0
(102,000)
14.5
5.8
2.90
102.2
HOT WATER
NOTE: The appliance is factory pre-set to satisfy a central heating requirement of 15 kW (51,200 Btu/h). The output must be adjusted to
suit the heating system when commissioning the appliance.
Table 2: Multi-Directional Flue System.
FLUE DETAILS
mm
inches
WALL HOLE DIAMETER
120
4.5
WALL HOLE DIAMETER FOR OPTIONAL EXTRA INTERNAL FLUE FIXING KIT
150
6.0
STANDARD HORIZONTAL FLUE MINIMUM LENGTH SIDE AND REAR
100
4.0
STANDARD HORIZONTAL FLUE MAXIMUM LENGTHS
EXTENDED HORIZONTAL FLUE MAXIMUM LENGTH
–
–
REAR
500
19.6
–
SIDE
1000
39.3
3000
118
SIDE AND REAR
NOTE: 1. THE STANDARD HORIZONTAL REAR FLUE KIT IS SUITABLE FOR REAR FLUE APPLICATION ONLY. A FLUE ADAPTOR IS INCLUDED IN
THE KIT.
NOTE: 2. THE STANDARD HORIZONTAL SIDE FLUE KIT IS SUITABLE FOR SIDE FLUE APPLICATIONS ONLY. A 90° FLUE BEND IS INCLUDED IN
THE KIT.
NOTE: 3. OPTIONAL EXTRA FLUE BENDS ARE AVAILABLE. THE MAXIMUM FLUE LENGTH IS REDUCED WHEN AN EXTRA FLUE BEND OR
BENDS ARE USED. Refer to Note 4 and 5.
NOTE: 4. WHEN USING TWO FLUE BENDS THE MAXIMUM EXTENDED STRAIGHT FLUE LENGTH MUST NOT EXCEED 2300 mm.
NOTE: 5. WHEN USING THREE FLUE BENDS THE MAXIMUM EXTENDED STRAIGHT FLUE LENGTH MUST EXCEED 1000 MM .
NOTE: 6. SEE SECTION 5b “FLUE OPTIONS” FOR FURTHER INFORMATION.
NOTE: 7. NO MORE THAN THREE 90° FLUE BENDS CAN BE USED.
VERTICAL BALANCED FLUE.
Instructions describing the fitting of the vertical balanced flue
system are sent with the vertical flue kit.
Table 3
VERTICAL BALANCED FLUE DETAILS
IMPORTANT: It will be necessary to purchase at least one 90°
flue bend when installing the vertical balanced flue system. See
Section 5b “Flue Options” for further information.
NOTE: The maximum overall height of the vertical balanced flue
measured from the top of the appliance casing to the top of the
vertical balanced flue terminal is 5500 mm.
5
mm
inches
CEILING HOLE DIAMETER
130
5.0
MINIMUM AIR DUCT LENGTH
100
4.0
MAXIMUM AIR DUCT LENGTH
4500
177.0
Table 4
AVAILABLE PUMP HEAD
BOILER OUTPUT
HEAD
MIN. FLOW RATE
kW
Btu/h
Metres
Feet
L/min.
Gal/Min.
8.8
(30,000)
6.1
20.0
11.5
2.5
11.0
(37,000)
5.4
17.5
14.0
3.1
13.0
(44,350)
4.9
16.0
17.0
3.7
HEATING
15.0
(51,200)
4.2
13.5
19.5
4.3
RANGE
17.0
(58,000)
5.3
17.0
15.0
3.3
19.0
(64,800)
4.85
16.0
17.0
3.7
21.0
(71,500)
4.4
14.5
19.0
4.2
23.0
(78,500)
5.2
17.0
16.0
3.5
24.0
(82,000)
5.0
16.5
16.5
3.6
TEMPERATURE RISE
ACROSS HEATING
FLOW AND RETURN
11°C (20°F)
16°C (24°F)
21°C (38°F)
Table 5: Nominal Weight of Appliance
DRY WEIGHT OF APPLIANCE
96kg
(212lb)
PACKAGED WEIGHT OF APPLIANCE
98kg
(216lb)
MAXIMUM INSTALLATION WEIGHT
156kg
(344lb)
Table 6:
SPECIFICATIONS
CENTRAL HEATING FLOW
22 mm Copper Tube
CENTRAL HEATING RETURN
22 mm Copper Tube
COLD WATER MAINS INLET
15 mm Copper Tube
DOMESTIC HOT WATER OUTLET
22 mm Copper Tube
GAS INLET
22 mm Copper Tube
PRESSURE RELIEF VALVE DRAIN CONNECTION
22 mm Copper Tube
OVERALL CASING HEIGHT
860 mm (33.8 in.)
OVERALL CASING WIDTH
600 mm (23.6 in.)
OVERALL CASING DEPTH
600 mm (23.6 in.)
Table 7
SPECIFICATIONS
PRIMARY CAPACITY INCLUDING HEATBANK
MAXIMUM INLET DOMESTIC WATER PRESSURE
MINIMUM INLET DOMESTIC WATER PRESSURE (WORKING)
FOR MAXIMUM HOT WATER FLOW
MINIMUM INLET DOMESTIC WATER PRESSURE (WORKING)
TO OPERATE THE APPLIANCE
MAXIMUM CENTRAL HEATING FLOW TEMPERATURE
MAXIMUM STATIC HEAD – PRIMARY
MINIMUM STATIC HEAD – PRIMARY
OUTPUT TO DOMESTIC HOT WATER
OUTPUT TO CENTRAL HEATING
60 Litres (13.2 galls.)
10 Bar (150 psi)
1.0 Bar (15.0 psi)
0.1 Bar (1.5 psi)
MAXIMUM DOMESTIC HOT WATER FLOW RATE FROM THE APPLIANCE
EQUIVALENT HOT WATER FLOW RATE FROM THIS APPLIANCE TO GIVE
30°C RISE (SPECIFIC RATE)
6
Nominally 82°C (180°F)
30m (97ft.)
1.0m (3.3ft.)
24.0kW (82,000 Btu/h)
8.8 to 24.0kW (Adjustable)
(30,000 to 82,000 Btu/h)
Nominally 18.0 l/min. ± 15% (3.96 gall/m)
20 l/min. (4 gall/m)
Fig. 2. Appliance cabinet dimensions and minimum clearances required.
1200
Space required for
installation
910
Space required
for installation
Space required for
servicing
610
Space required
under fixed
surface
Side View
1310
860
Cabinet Height
Wall
10
450
Surface may be
fixed after
installation. A gap
of 10mm is
required above the
appliance
Front View
Floor
Level
600
600
Cabinet Depth
600
300
Space required in front
for installation and
servicing
5
Cabinet Width
Space required
left-hand side
for installation
Space required
each side for
servicing
Fig. 3. Appliance pipework connections and flue position.
600
=
170
Pipe Connections
1 Central Heating Flow
2 Central Heating Return
3 Mains Cold Water In
4 Hot Water Out
5 Gas Inlet
6 Pressure Relief Drain
7 Open Vent (optional extra)
All pipes set in
25mm from rear
of appliance
=
120 3
95 4
25
75 2
Flue position on
rear of inner
casing
25 1
830
Appliance
Front
Rear View
335
275
550
715
785
Flue position
30 5
Side View
50 6
115 7
7
22mm
22mm
15mm
22mm
22mm
22mm
22mm
4. Siting The Appliance
4.1 THE APPLIANCE MAY BE INSTALLED IN ANY ROOM
ALTHOUGH PARTICULAR ATTENTION IS DRAWN TO THE
REQUIREMENTS OF THE CURRENT I.E.E. WIRING REGULATIONS
AND, IN SCOTLAND, THE ELECTRICAL PROVISIONS OF THE
BUILDING REGULATIONS APPLICABLE IN SCOTLAND, WITH
RESPECT TO THE INSTALLATION OF APPLIANCES IN ROOMS
CONTAINING BATHS OR SHOWERS.
Installation
Service
Above the appliance
450 mm
10 mm
In front
600 mm
600 mm
5 mm
5 mm
300 mm
5 mm
Right side
Left side
4.7 The appliance can be installed in a cupboard to be used for
airing clothes provided that the requirements of BS 6798 and BS
5440:2 are strictly followed.
4.8 The airing space must be separated from the boiler space by
a perforated non-combustible partition. Expanded metal or rigid
wire mesh are acceptable provided that the major dimension is
less than 13mm. See BS 6798:1987.
4.9 No combustible surface must be within 75mm of the casing.
See BS476:4.
4.10 The distance between the inner face of a cupboard door
and the cabinet front should not be less than 75mm.
4.11 Always consider the possible need to disconnect the pipes
from the appliance after installation.
4.12 The appliance has a vertical flue option. Refer to Section 5c.
4.13 L.P.G. Installation: The appliance shall not be installed in a
room or internal space below ground level when it is intended for
use with L.P.G. This does not preclude the installation into rooms
which are basements with respect to one side of the building but
open to ground level on the opposite side.
WHERE A ROOM SEALED APPLIANCE IS INSTALLED IN A ROOM
CONTAINING A BATH OR SHOWER, ANY ELECTRICAL SWITCH OR
APPLIANCE CONTROL USING MAINS ELECTRICITY MUST NOT BE
ABLE TO BE TOUCHED BY A PERSON USING THE BATH OR
SHOWER.
4.2 The appliance is not suitable for external installation.
4.3 The appliance is floor standing, the floor must be firm and
level. Special floor protection is not required.
4.4 The floor must be capable of supporting the weight of the
appliance. Refer to Section 3 Table 5.
4.5 If the appliance is to be fitted in a timber framed building
refer to the British Gas publication “Guide for Gas Installations in
Timber Framed Housing”.
4.6 The following clearances must be available for installation
and for servicing, (See Fig. 2).
Fig. 4. Siting of the flue terminal.
TERMINAL POSITION
MINIMUM SITING DIMENSIONS FOR POSITIONING THE BALANCED
FLUE TERMINAL
A
G
D
BC
L
HI
L
F
A
K
F
K
E
F
J
G
M
A– directly below an openable window or
other opening e.g. air brick.
B– Below gutters, soil pipes or drain pipes.
C– Below eaves.
D– Below balconies or car port roof.
E– From vertical drain pipes and soil pipes.
F– From internal or external corners.
G– Above ground, roof or balcony level.
H– From a surface facing a terminal.
I– From a terminal facing a terminal
J– From an opening in a car port (e.g. door
window) into dwelling.
K– Vertically from a terminal on the same
wall.
L– Horizontally from a terminal on the same
wall.
M– From door, window or air vent (achieve
where possible).
MIN. DISTANCE
300 mm (12 in.)
75 mm (3 in.)
25 mm (1 in.)
25 mm (1 in.)
25 mm (1 in.)
25 mm (1 in.)
300 mm (12 in.)
600 mm (24 in.)
1200 mm (47 in.)
1200 mm (47 in.)
150 mm (6 in.)
300 mm (12 in.)
150 mm (6 in.)
5a.6 The terminal guard must be evenly spaced about the flue
terminal and fixed to the wall using plated screws
5a.7 In certain weather conditions a terminal may steam and
siting where this could cause a nuisance should be avoided.
5a.8 Take care to ensure that combustion products do not enter
ventilated roof voids.
NB. For siting the Vertical Balanced Flue Terminal refer to the
Installation and Servicing Instructions packed with the vertical flue kit.
5a. Flue Terminal Position
Note: Some flue options must have fitted a flue restrictor ring of
the correct size. For more information refer to Section 11.3
page 20 and Fig. 24.
5a.1 The flue must be installed as specified by BS 5440:Part 1.
5a.2 TERMINAL POSITION. See Fig. 4.
5a.3 The terminal must not cause an obstruction nor the
discharge a nuisance.
5b. Flue Options
5a.4 If the terminal is fitted within 850mm of a plastic or painted
gutter or within 450mm of painted eaves then an aluminium
shield at least 750mm long should be fitted to the underside of
the gutter or painted surface.
See Fig. 5.
Two standard flue kits are available for the appliance:
5b.1 STANDARD HORIZONTAL REAR FLUE KIT.
See Fig. 5 Frame 1.
The maximum flue length when measured from the REAR of the
appliance casing is 500 mm. The flue will project horizontally
only from the rear of the appliance.
5a.5 If a terminal is fitted less than 2 metres above a surface to
which people have access then a guard must be fitted. Refer to
Section 2, Item 2.9.
8
Fig. 5. Flue options.
90° flue bend
Standard flue length
100 to 500mm
Standard flue length
100 to 950mm
Appliance
Appliance
Frame 1: Flue Option 1. Standard Horizontal Rear Flue.
Frame 2: Flue Option 2. Standard Horizontal Side Flue.
90° flue bend
Maximum flue length
3000mm
Maximum flue length
3000mm
Appliance
Appliance
Frame 3: Flue Option 3. Extension Horizontal Rear Flue.
Frame 4: Flue Option 4. Extension Horizontal Side Flue.
First 90° flue bend
Second 90°
flue bend
Appliance
Str
ai
len ght
gth
Second 90°
flue bend
Straight
lengths
ight
Stra th
n
e
l g
First 90° flue bend
Appliance
Total straight flue length
2300mm maximum
Total straight flue length
2300mm maximum
Frame 6: Flue Option 6. Extension upwards and
Horizontal Flue using a second 90° Flue Bend.
Frame 5: Flue Option 5. Extension Horizontal Flue using a
second 90° Flue Bend.
Second 90°
flue bend
First 90°
flue bend
Second 90°
flue bend
Third 90°
flue bend
Straight
length
Appliance
Total straight flue length
1000mm maximum
Straight
lengths
Appliance
Total straight flue length
1000mm maximum
Frame 8: Flue Option 8. Extension upward and Horizontal
Flue using a second and third 90° Flue Bend.
Straight length must be
included when working
out the total straight
flue length
Flue
terminal
When deciding the flue length required, always
measure to the outside of the wall where the flue
terminal will be fixed.
Appliance
side view
When measuring between the centre lines of the
flue ducts, allow 83mm for each flue bend.
Appliance
Straight
lengths
First 90°
flue bend
Frame 7: Flue Option 7. Extension Horizontal Flue using a
second and third 90° Flue Bend.
First 90°
flue bend
Third 90°
flue bend
83mm
Note: A flue adaptor
must be fitted when a
horizontal section of
flue duct is required
before the first flue
bend.
Frame 9: Flue Option 9. To fit a horizontal section of flue duct
before the first 90° Flue Bend for Flue Options
2, 4, 5, 6, 7 and 8.
Frame 10
9
Straight flue
length
Flue length
83mm
Outside
wall
The following items are included in this flue kit:
1 – Air duct 700 mm long (including fixing length inside
appliance cabinet).
1 – Flue duct 700 mm long (including fixing length inside
appliance cabinet).
1 – Balanced Flue Terminal.
1 – Flue Adaptor.
2 – Fixing screws.
1 – Tube of silicone sealant.
5b.2 Standard Horizontal Side Flue Kit. See Fig. 5 Frame 2.
The maximum flue length when measured from the RIGHT or
LEFT-HAND side of the appliance cabinet is 950 mm. The flue
will project horizontally from the right or left-hand side of the
appliance.
The following items are included in this flue kit:
1 – Air duct 1170 mm long (including fixing length inside
appliance casing.)
1 – Flue duct 1170 mm long (including fixing length inside
appliance casing.)
1 – Balanced Flue Terminal.
1 – 90° Flue Bend.
4 – Fixing screws.
1 – Tube of silicone sealant.
Notes:
a). The following items referred to in this section are supplied as
optional extras. The site must be surveyed and the items made
available before the installation is commenced. When ordering
extras the relevant part numbers must be quoted:
Optional Extra
Part Number
Extension Flue kit 1000 mm long
ZAGAS177
Flue Adaptor.
ZAGAS179
90° Flue Bend
ZAGAS178
Flue Spacer
ZAGAS174
Air Duct Support Bracket
ZAGAS180
b). When determining the flue length required, always measure
to the outside of the wall where the flue terminal will be fixed.
See Fig. 5. Frame 10.
c). When measuring between the centre lines of flue ducts, allow
83 mm for each flue bend. See Fig. 5. Frame 10.
5b.3 EXTENSION HORIZONTAL REAR FLUE.
Extension flue lengths may be added to the rear of the appliance.
The flue must be assembled from the Standard Horizontal Rear
Flue Kit and extension flue kits. The flue may be any length
providing it does not exceed 3000 mm measured from the rear
of the appliance cabinet. See Fig. 5. Frame 3.
The flue assembly must remain horizontal when installed.
5b.4 EXTENSION HORIZONTAL SIDE FLUE.
Extension flue lengths may be added horizontally to the right or
left hand side of the appliance. The flue must be assembled from
the standard flue supplied, one 90° flue bend and extension flue
kits. The flue may be any length providing the total straight
length does not exceed 3000 mm. See Fig. 5. Frame 4.
The flue assembly must remain horizontal when installed.
5b.5 EXTENSION HORIZONTAL FLUE USING A SECOND 90°
FLUE BEND.
Extension flue lengths may be added horizontally and include a
second 90° flue bend. The flue system must be assembled from
the Standard Horizontal Side Flue Kit, extension flue kits and a
second 90° flue bend. The flue may be any length providing the
total straight length does not exceed 2300 mm when measured
from the side of the appliance cabinet. See Fig. 5. Frame 5.
The flue including the second 90° flue bend may be positioned
in any horizontal direction to suit the installation.
5b.6 EXTENSION UPWARDS AND HORIZONTAL FLUE USING A
SECOND 90° FLUE BEND.
Extension flue lengths may be added upwards and horizontally
and include a second 90°flue bend. The flue system must be
assembled from the Standard Horizontal Side Flue Kit, extension
flue kits and a second 90° flue bend. The flue may be any length
providing the total straight length does not exceed 2300 mm
when measured from the appliance cabinet. See Fig. 5. Frame 6.
The horizontal section of flue and second 90° flue bend may be
positioned in any horizontal direction to suit the installation.
5b.7 EXTENSION HORIZONTAL FLUE USING A SECOND AND
THIRD 90° FLUE BEND.
Extension flue lengths may be added horizontally and include a
second and third 90° flue bend. The flue system must be
assembled from the Standard Horizontal Side Flue Kit, extension
flue kits,second and third 90° flue bends. The flue may be any
length providing the total straight length does not exceed 1000 mm
when measured from the appliance cabinet. See Fig. 5. Frame 7.
The flue including the second and third 90° flue bends may be
positioned in any horizontal direction to suit the installation.
5b.8 EXTENSION UPWARDS AND HORIZONTAL FLUE USING A
SECOND AND THIRD 90° FLUE BEND.
Extension flue lengths may be added upwards and horizontally
and include a second and third 90° flue bend. The flue system
must be assembled from the Standard Horizontal Side Flue Kit,
extension flue kits, a second and third 90° flue bend. The flue
may be any length providing the total straight length does not
exceed 1000 mm when measured from the appliance cabinet.
See Fig. 5. Frame 8.
The horizontal section of flue, second and third 90° flue bend
may be positioned in any horizontal direction to suit the
installation.
5b.9 EXTENSION HORIZONTAL FLUE FITTED BEFORE THE
FIRST 90° FLUE BEND.
For Flue Options 2, 4, 5, 6, 7 and 8.
It may be required, because of site conditions, to fit a straight
section of flue duct before the first 90° flue bend. A flue adaptor
is required.
IMPORTANT: This section of flue duct must be included when
working out the total straight flue length for each Flue Option.
See Fig. 5. Frame 9.
5c. Vertical Flue System
5c.1. A vertical balanced flue system with a length of between
100 mm and 4500 mm can be fitted to the appliance.
5c.2. Instructions describing the fitting of the vertical balanced
flue system are packed with the vertical flue terminal assembly.
5c.3. The maximum overall height of the vertical balanced flue
measured from the top of the appliance cabinet to the top of the
vertical balanced flue terminal is 5500 mm.
6. Air Supply
6.1 The appliance does not require a separate vent for
combustion air.
6.2 Installations in cupboards or compartments require
permanent vents for cooling purposes, one at high level and one
at low level, either direct to outside air or to a room. Both vents
must pass to the same room or be on the same wall to the
outside air.
6.3 There must be sufficient clearance around the appliance to
allow proper circulation of ventilation air. Refer to Section 4.
Item 4.6.
6.4 The minimum free areas required are given below:
POSITION OF
VENTS
AIR FROM
THE ROOM
AIR DIRECT
FROM OUTSIDE
HIGH LEVEL
264 cm2
(41 in2)
264 cm2
(41 in2)
132 cm2
(20.5 in2)
132 cm2
(20.5 in2)
LOW LEVEL
6.5 Refer to BS 6798 and BS 5440:2 for additional information.
10
should be made in the central heating return as close to the
appliance as possible.
7.9 The make-up vessel must be fitted with a non-return valve.
7.10 Repeated venting loses water from the system. It is
essential that this water is replaced and the system pressure
maintained.
7.11 There must be no connection to the mains water without
the authority of the local Water Company.
7.12 The pump is set at maximum and must not be adjusted.
7.13 Connections in the system must resist a pressure of up to
3 bar.
7.14 Radiator valves must conform to BS 2767(10): 1972.
7.15 Other valves used should conform to the requirements of
BS 1010.
7. Sealed System
See Fig. 6 and 7.
7.1 The system must comply with the requirements of BS 6798
and BS 5449:1.
7.2 The appliance must not be operated without the system
being full of water, properly vented and pressurised.
7.3 The safety valve operates at 3bar (45lb/in2). The discharge
must be directed away from electrical items or where it might be
a hazard to the user.
7.4 The pressure gauge indicates the system pressure which
must be maintained.
7.5 The 12 litre expansion vessel is charged to 0.5 bar and is
suitable for a static head of 5m (17.5ft). The pressure can be
increased if the static head is greater than 5m (17.5ft).
7.6 With an initial system pressure of 0.5 bar, a system capacity
of about 104 litres can be accommodated.Refer to BS 7074 Part 1
for more information.
7.7 The filling point must be at low level. See Fig 6.
7.8 Water loss must be replaced. See Fig 7. The connection
Fig. 6. Sealed primary water system.
Hot Water
Out
Top-up Bottle
Mains
Cold
Water
Non-Return
Valve
Spherical Plug Ball Valve for
appliance servicing
Appliance
(Refer to
Fig. 1
for appliance
Water Flow
diagram)
Lockshield Valve
Radiator Valve
British Standard Stop
Valve.
Fixed spindle type
NOTE: A drain cock should
be installed at the lowest
point of the heating circuit and
beneath the appliance.
Heating Flow
Heating Return
Water Main
Fig. 7. System filling and make-up.
Make up
vessel
Heating return
Heating return
Auto
air vent
Non return Non return
valve
valve
Hose union
Non return
valve
Stop
cock
Stop cock
Test cock
Fill point
Temporary hose
11
300 mm (12 in) min.
above the highest
point of the system.
8.4 The feed and vent pipe must rise continuously from the
appliance to the feed and expansion cistern.
8.5 A safety valve is not required on an open vented system.
With the safety valve left in position a pipe must be fitted which
terminates such that any discharge does not cause a hazard to
the occupants or damage to electrical components.
8.6 Air within the appliance will be expelled via the feed and
vent connection or dissipated into the rest of the system which
must be fitted with manual air vents at any high point.
8.7 The pump is set to maximum and must not be reset.
8. Open Vent Primary System
See Fig. 8.
8.1 The appliance is supplied suitable for connection to a sealed
system. If it is to be used with an open vent system then the
instructions given below must be followed.
8.2 A 22 mm preformed combined feed and vent pipe
available as an optional extra must be connected to the
appliance. See Section 11.3 and Fig. 18.
Note: Refer to Section 2 – Table 4, for the sizes of the flow and
return pipework.
8.3 The feed and expansion cistern should be arranged so that a
minimum static head of 1.0m (39 in) above the top of the
appliance or above the highest point in the heating circuit,
whichever is the highest, is achieved. See Fig. 8.
Fig. 8. Open vent water system.
Hot Water
Out
Mains
Cold
Water
Combined feed and vent
pipe (22mm).
Must rise continuously.
S.H.
Minimum Static Head 1.0m (3ft). Measured
from the top surface of the appliance or the
highest point in the heating system to the
water level in the feed and expansion tank.
S.H.
STATIC HEAD (S.H.)
Appliance
(Refer to
Fig. 1
for appliance
Water Flow
diagram)
Lockshield Valve
Radiator Valve
Part view
showing
Vent Pipe
connection
NOTE: A Drain Cock should be
installed at the lowest point of the
heating circuit and beneath the
appliance.
Spherical Plug Ball Valve for
appliance servicing
Heating
Return
Heating Flow
Disconnect the flexible hose from behind the
circulating pump. The expansion vessel and
flexible hose are not required in the open vent
system and may be discarded. Fit the 22mm
vent pipe supplied as on optional extra.
12
British Standard Stop
Valve.
Fixed spindle type
Water Main
22mm dia. Vent Pipe
Circulating Pump
9.11 The supply of hot and cold mains water direct to a bidet is
permitted, subject to local Water Company requirements,
provided that the bidet is of the over-rim flushing type. The
outlet(s) should be shrouded and unable to have any temporary
hand held spray attached. No anti-syphonage arrangements are
necessary.
9.12 As the maximum temperature of the hot water heat
exchanger is limited by the control circuit, there is normally no
need for water treatment to prevent scale accumulation. In
exceptional circumstances a device to prevent scale formation
can be fitted.
9.13 Installation of a scale inhibitor assembly should be in
accordance with the requirements of the local Water Company.
An isolating valve to allow servicing should be fitted.
9.14 The water hardness can be determined using a standard
test paper or by reference to the local water company.
9.15 A miniature expansion vessel (Zilmet R1/2, 160ml, 15bar),
available as an optional extra, may be fitted into the domestic
water supply circuit if there is evidence of water hammer.
To fit the expansion vessel :
(i) Remove the front cover. Refer to Section 14 paragraph
14.2a, and Fig. 14.
(ii) Unscrew the hexagon headed screw located below the
flow switch. See Fig. 16.
(iv) Screw the expansion vessel into the connection using
thread sealant compatible with potable water.
9. Domestic Water Supply
9.1 The final 600mm of the mains cold water connection to the
appliance should be made in copper tube only.
9.2 The appliance is suitable for a mains pressure of up to 10 bar
(150 lb/in2).
9.3 The appliance is fitted with a mains supply isolating valve.
9.4 The maximum hot water flow rate is 18 l/m ±15% (3.9
gall/min ).
9.5 In winter, when the mains inlet water temperature is lower a
reduced flow rate, achieved at the tap, will increase the required
delivery temperature.
9.6 It is suggested that long pipe runs to the taps or shower
should be insulated to prevent the rapid cooling of hot water
after the tap or shower has been turned off.
9.7 Hot and cold taps and mixing valves used with this
appliance must be suitable for operating at a pressure of up to
10 bar (150 lb/in2).
9.8 Anti-syphonage arrangements are normally not necessary.
See paragraph 9.10 following.
9.9 Thermostatically controlled or pressure equalising shower
valves will guard against the flow of water at too high a
temperature.
9.10 The head of a loose head shower must not fall closer than
25mm (1in) above the top edge of the bath to prevent its
immersion in bath water. Alternatively the shower must be fitted
with an anti-syphonage device at the point of the flexible hose
connections.
13
anchorage, the current carrying conductors become taut before
the Earth conductor. For access refer to Section 14.
10.6 The wiring between the appliance and the electrical supply
shall comply with current IEE Wiring Regulations, and any local
regulations which apply.
10.7 If a room and/or frost thermostat is to be fitted refer to
Fig. 11.
10.8 The thermostats must be suitable for use on mains voltage.
10.9 A facia mounted programmer is available as an optional
extra. Instructions are supplied with the programmer kit.
See Fig. 12.
10.10 A timeswitch or programmer can be fitted externally to
the appliance.
10.11 SAFETY CHECK.
After installation or in the event of an electrical fault the
electrical system shall be checked for short circuits, fuse failure,
incorrect polarity of connections, earth continuity and resistance
to earth.
10. Electrical
Refer to Figs. 9, 10, 11 and 12.
10.1 Mains Supply 230V ~ 50Hz 270 watts. External Fuse 3A.
Internal Fuse 3.15A fast blow 20mm long.
10.2 The electrical supply must be connected by a qualified
electrician.
10.3 A fused double pole isolator with a contact separation of
3mm in all poles MUST be used to supply the appliance and
controls.
10.4 The appliance must be earthed.
10.5 Mains Cable: PVC insulated 0.75mm2 (24x0.20mm) to BS
6141 Table 15. If a new cable is needed it must be connected into
the terminals marked L (Brown or Red lead), N (Blue or Black
lead) and (Green/Yellow or Green) and be held securely in the
cable clamp. Ensure the Earth conductor is longer than the
current carrying conductor, so that if the cable slips in its
Fig. 9. Wiring diagram.
OPERATING
SWITCH
STANDBY
INDICATOR
HEATING
CONTROL STAT
HOT WATER
CONTROL STAT
w
br
DEMAND
INDICATOR
g
w
CONTROL
FACIA
br
ROOM
THERMOSTAT
(OPTIONAL)
FROST
THERMOSTAT
(OPTIONAL)
EARTH PLATE
gy
X12
g
pk pk
w
br
X13
gy
gy bl
1
bk bk
1 X2 X7 bl br X15
X4
br
CN3
bl
CN2
g
w
br
CONTROL
BOARD
br
X10
1
gy
bl
bk bk bk bk
X8
1
X5
1
bl
gy
1
X14
X11
r
r
X1
br
bl
CN4
br
HT
TAG
CN5
bl gy br
y
1 br
X3
1
br
MAINS
IN
1
w w 1 X16 1
1
1
br bl
or or
IGNITION
BOARD
CN1
X6
br w g
SAFETY LIMIT
STAT
HEATBANK
OVERHEAT
STAT
NC NO
C
AIR
PRESSURE
SWITCH
HOT WATER
HIGH LIMIT
STAT
FAN
FLOW
SWITCH
PUMP
ELECTRODE
DIVERTER
VALVE
PILOT
HILO
GAS VALVE
14
MAIN
5
5
Live
4
4
3
3
2
2
Remove link
Room thermostat
black
red
X14
(PIN 1)
N
brown
X12
(PIN 2)
grey
HOT
WATER
white
X12
(PIN3)
OPTIONAL
LINK
Fig. 11. Room/frost thermostats and programmer.
Switched live
Neutral
Connector X13
on control board
Frost thermostat
1
Connector X13
on control board
1
15
N
Switched central
heating from
programmer
Switched hot
water from
programmer
Live supply
to programmer
Neutral
Plug-in
connector
DEMAND
INDICATOR
pink
X2
(PIN 3)
X3 (PIN 5)
N
HOT WATER
CONTROL
THERMOSTAT
pink
X2
(PIN 1)
black
X1
(PIN 1)
blue
X13
(PIN 2)
HOT WATER
FLOW
SWITCH
brown
X1
(PIN 3)
X13
(PIN 3)
HEATING X12 (PIN 4)
X13 (PIN1)
X13 (PIN 4)
ROOM THERMOSTAT
(IF FITTED)
X13 (PIN 5)
FROST THERMOSTAT (IF FITTED)
X3 (PIN 4)
OPERATOR
SWITCH OR
PROGRAMMER
HEATBANK
OVERHEAT
STAT
red
X14
(PIN 4)
FUSE
3.15A
QUICK
BLOW
LIVE
SUPPLY
X11
(PIN 4)
L
STANDBY
INDICATOR
HOT WATER
HIGH LIMIT
STAT
black
X16
(PIN 2)
black
X16 (PIN 1)
ELECTRONICS
RLB
ELECTRONICS
WITH
5 MINS' OFF
DELAY
RLA
13
6
5
1
N
RLC
14
10
9
N
orange
X8
(PIN 1)
X15 (PIN 3)
WHITE
N
HIGH/LOW
GAS VALVE
X4
(PIN 1)
brown
N
orange
X8
(PIN 2)
SAFETY LIMIT
STAT
X7 (PIN 3)
X15 (PIN 2)
WHITE
brown
X10 (PIN 1)
DIVERTER
VALVE
brown
N
HEATING
CONTROL
STAT
PUMP
VDR
(SUPPRESSOR)
CONTROL
BOARD
X6
(PIN 1)
brown
IGNITION
BOARD
N
CN1 (PIN L)
RELAY K2
NO C
NC
RELAY K1
brown
CN5
(PIN FL)
grey
brown
CN4
(PIN ML)
CN3
(PIN PL)
brown
AIR FLOW
PRESSURE
SWITCH
brown
CN2
(PIN L3)
(SPARK
IGNITION
AND
FLAME SENSE)
SAFETY
CIRCUITS
CN2
(PIN L1)
white
CN2
(PIN L2)
N
MAIN
GAS
VALVE
PILOT
GAS
VALVE
FAN
N
N
N
Fig. 10. Functional flow diagram.
Fig. 12. External programmer connections.
To External Programmer
4
Connector
3 X12 on
control
2 board
1
Note: If programmer fails, link
connector terminals, as shown by
dotted line, to create temporary
heat availability.
Before continuing with the installation it will be necessary to
decide which flue option is suitable. Refer to Section 5b and
Fig. 5.
Having decided upon the most suitable flue option for the
installation, the position of the hole for the flue must now be
marked on the wall/walls.
FLUE OPTION 1. See Fig. 5.
The location of the centre point position for the Rear Flue is
obtained from the flue centre-lines previously marked.
This is the Rear Flue centre point position. See Fig. 13.
FLUE OPTION 2. See Fig. 5.
Draw a horizontal line from the Rear Flue centre point position in
the appropriate direction along the wall. Check that it remains
horizontal. Measure 94 mm from the junction of the walls and
make a short vertical line. Extend the horizontal line to intersect
the vertical line and mark the position.
This is the Side Flue centre point position. See Fig. 13.
FLUE OPTION 3. See Fig. 5.
The location of the centre point position for the Rear Flue is
obtained from the flue centre-lines previously marked.
If the flue duct extends through other walls ensure it remains
horizontal.
Measure the rear flue centre point position from the floor and
transfer this dimension to the appropriate wall where the flue
will terminate. Mark the wall to suit the installation.
This is the Rear Flue Extension centre point position. See Fig. 13.
FLUE OPTION 4. See Fig. 5.
Draw a horizontal line from the Rear Flue centre point position,
previously marked, in the appropriate direction along the
wall/walls. Ensure it remains horizontal.
If the flue system extends through other walls or the appliance is
not installed close to a wall, ensure it remains horizontal.
Measure the rear flue centre point position from the floor and
transfer this dimension to the appropriate wall where the flue
will terminate.
Measure 94 mm from the junction of the walls if the appliance is
installed against a wall and make a short vertical line.
If the appliance is NOT installed against a wall, measure the
distance from the junction of the walls, make a short vertical line
to suit the installation. Extend the horizontal line to intersect the
vertical line and mark the position.
This is the Side Flue Extension centre point position. See Fig. 13.
11. Installing The Appliance
The appliance is supplied suitable for fitting to a sealed system. If
it is to be fitted to an open vent system refer to paragraph 11.3
and Section 8.
11.1 FLUE OPTIONS: Refer to Section 5b and Fig. 5..
IMPORTANT: Two standard flue kits are available for the
appliance:
1) Standard Horizontal Rear Flue Kit.
The maximum flue length when measured from the REAR of the
appliance casing is 500 mm. See Fig. 5 Frame 1.
2) Standard Horizontal Side Flue Kit.
The maximum flue length when measured from the SIDE of the
appliance casing is 950 mm. See Fig. 5 Frame 2.
EXTENSION FLUE KITS.
Extension flue kits and 90° flue bends are available to increase
the length and redirect the flue as follows:
(a) From the standard flue length up to 3000 mm straight flue.
(b) From the standard flue length to up 2300 mm when a
second 90° flue bend is required.
(c) From the standard flue length up to 1000 mm when a
second and third 90° flue bend is required.
Refer to Section 3, Table 2 and Section 5b, Flue Options, to
determine whether an extension flue kit or kits and an extra 90°
flue bend or bends are required.
IMPORTANT: Extension flue kits,extra 90° flue bends, flue
adaptor, flue spacer and air duct supports are all optional extras.
All the extras required for the installation must be available
before continuing. Refer to Section 5b.
VERTICAL BALANCED FLUE OPTION.
A vertical balanced flue option is available. Instructions
describing the fitting of the vertical balanced flue system are
sent with the vertical flue terminal assembly.
The flue must be installed as specified in BS 5440 Part 1.
11.2 GENERAL FITTING.
The following description covers one method of installation.
Extra space may be required for installation if connections are
made in a different way.
Compression fittings may be used on all water connections to
allow for the fitting of the appliance and servicing.
Pipework must be routed so as not to obstruct access to the
circulating pump, diverting valve, gas valve, water to water heat
exchanger or heat bank.
Removable sections are provided in the cabinet top panel to
facilitate vertical pipe connections and the flue system,if
required.
Alternatively, removable sections are provided in the side panels
to accommodate the side flue system.
Check the appliance carton contains :
Installer’s Instruction Pack.
User’s Information Pack.
Hardware Pack with flue restrictor rings.
Appliance.
Carefully remove the appliance from the cardboard package and
plinth.
Check the position chosen for the appliance is in accordance with
the instructions given in Sections 4 and 5a. Also refer to Fig. 2.
Do not place the appliance in its final position at this stage.
For all flue options from the dimensions given in Fig. 13 carefully
mark out:
(i) the wall with the centre-lines for the Rear Flue centre point
position.
(ii) the floor with the base outline of the appliance.
FLUE OPTION 5. See Fig. 5.
Draw a horizontal line from the Rear Flue centre point position,
previously marked, in the appropriate direction along the
wall/walls. Check that it remains horizontal.
If the flue system extends through other walls or the appliance is
not installed close to a wall, ensure it remains horizontal.
Measure the rear flue centre point position from the floor and
transfer this dimension to the appropriate wall as necessary.
Mark the wall where the flue will terminate to suit the
installation.
This is the Side Flue Extension centre point position. See Fig. 13.
FLUE OPTION 6. See Fig. 5.
Draw a vertical line upwards from the Rear Flue centre point
position previously marked. Extend the line, approximately 250
mm, above the position required for the centre-line of the
horizontal flue duct. See Fig. 13.
Mark the position on the vertical line to coincide with the centreline position of the horizontal duct.
This is the Rear Flue Upwards Extension centre point
position. See Fig. 13.
FLUE OPTION 7. See Fig. 5.
Follow the procedure as described in Flue Option 5 ensure the
flue system remains horizontal.
16
The position for the hole/holes for the flue should be marked on
the wall/walls.
Mark the wall where the flue will terminate to suit the
installation.
This is the Side Flue Extension centre point position. See Fig. 13.
FLUE OPTION 8. See Fig. 5.
Follow the procedure as described in Flue Option 6 ensure the
flue system remains vertical and horizontal.
Mark the wall where the flue will terminate to suit the
installation.
This is the Rear Flue Upwards Extension centre point
position. See Fig. 13.
FLUE OPTION 9. See Fig. 5.
NOTE: A flue adaptor is required for these flue options.
Refer to Flue Options: 2, 4, 5, 6, 7 and 8.
For installations that require a straight section of flue duct before
the first 90° flue bend, follow the procedure as described in the
appropriate Flue Option. Mark the flue centre point position.
Drill the flue hole/holes 120 mm (4.5in.) diameter, ensure it is
horizontal,through the wall/walls.
If the internal flue fitting kit is used the hole must be 150 mm
(6 in.) diameter.
Depending on site conditions it may be helpful to pre-plumb the
appliance before moving it into position. Fitting unions or stub
pipes to the appliance pipework should be done at this stage.
Refer to Section 3 and Fig. 3.
Pipework must be arranged to clear the flue system. See Section
5b and Fig. 5.
Before the appliance is fitted to the central heating system,
thoroughly flush the heating system and the mains cold water
supply pipe.
Flue Option 4.
Side flue
extension centre
point position
94
Mark on the floor the base
outline of the appliance
Flue Option 2.
Side flue centre point
position
94
Flue Option 7.
Side flue centre point
position. Mark to suit
the installation. Refer
to Flue Option 5
Flue Option 6.
Centre-line position for
horizontal duct
600
Side flue application:
Draw a horizontal line from
the rear flue centre point
position in the appropriate
direction
Extend the vertical line
250mm approx. above the
position for the flue bend
Corner
Flue Option 5.
Side flue extension centre
point position. Mark to suit
installation
Flue Option 8.
Rear flue upward
extension centre point
position. Mark to suit
the installation. Refer
to Flue Option 6
Corner
Fig. 13. Marking the flue positions for all flue options.
715
ALL INSTALLATIONS
MUST BE COMMENCED
BY MARKING THIS
POSITION
Flue Option 1.
Rear flue centre
point position. For
all flue options
mark this position
Flue Option 3.
Rear flue extension
centre point
position
60
0
17
11.3 FIXING THE APPLIANCE FOR ALL FLUE OPTIONS.
To gain access to the appliance remove the cabinet front and top
panel and place the facia and control box in the Service Position :
i) Lift the cabinet front panel off the top location and clear
the lower return over the kick strip. See Fig. 14.
ii) Unscrew the two screws securing the facia to the outer
edges of the cabinet accessible under the facia. Ease the
facia and control box forwards on the slide rails until fully
extended. See Fig. 14.
iii) Lift the assembly upwards through 90° into Service
Position. Lodge in the Service Position on the outer
locations. See Fig. 14.
iv) Unscrew the two screws behind the control panel securing
the cabinet top panel. See Fig. 14.
v) Lower the facia and control box to the fully extended
position. Ease the cabinet top panel forwards
approximately 20 mm and lift clear of the appliance.
See Fig. 14. Return the facia and control box to the Service
Position.
NOTE: The weight of the appliance empty is 96 Kg (212 lb), more
than one person will be required when moving the appliance.
When the appliance is flued to the rear ensure the flue position,
located on the rear of the appliance, is directly in line with the
hole in the wall.
For all other flue applications, the centre of the flue position must
be in line with the centre-lines for the Rear Flue position,
previously marked. See Fig. 13.
Always support the appliance pipework when tightening.
SEALED SYSTEM.
Connect a 22 mm copper drain pipe to the discharge connection
at the rear of the appliance.
Ensure: i) any discharge does not fall onto electrical
components or where it might be a hazard to the
user. See Fig. 15.
ii) the drain pipe must fall throughout its length.
OPEN VENT SYSTEM.
If the appliance is to used on an open vent system the expansion
vessel and flexible hose are not required. Remove from the
bottom manifold connection and discard. Fit the 22 mm copper
vent pipe, supplied as an optional extra, to this connection. See
Fig. 18.
To access the open vent connection remove the pump head.
Fig. 14. Cabinet, facia, control box and flue assembly fixing screws.
C
To gain access to the appliance:
1. Lift cabinet front panel L off top
location and clear the return edge over
the kick strip.
2. Remove screws A and ease facia and
control box forwards on the slide rails.
3. Remove screws B, accessible under
cabinet top panel. Ease panel
forwards clear of location C and
remove.
4. Lift facia and control box through 90°
into the service position. Lodge in
position on the outer locations.
B
E
G
A
F
To gain access to the control box
from the service position:
1. Pull the thermostat knobs F and G
clear of the facia.
2. Remove screws E.
3. Ease facia out of control box. Take
care not to over stretch the capilary
tubes or wiring.
4. Support the facia out of the control box
when carrying out installation or
service operations.
L
K
M
J
H
D
A
B
C
D
E
F
G
H
J
K
L
M
E
Lift facia and control box
into the service position
18
Facia and control box fixing screws
Cabinet top panel fixing screws
Cabinet to panel fixing lugs
Flue assembly clamping screw
Facia fixing screws
Hot water control thermostat knob
Heating control thermostat knob
Kick strip fixing screws
Cabinet side panel front location
Cabinet side panel fixing lugs
Cabinet front panel (no fastenings)
Primary system drain. Remove kick
strip for access
Fig. 15. Discharge pipe connection for sealed
system.
Fig. 17. Central heating flow and return valves,
by-pass adjustment, pressure relief and
manual air vent.
Cabinet side
panel
Central Heating
Flow Valve
Rear view of
appliance
Central Heating
Return Valve
Pressure relief
drain connection
Manual Air
Vent
Base plate
Discharge pipe must be 22mm
copper fall continuously throughout
its length and discharge to a safe
visible position
By-pass Adjusting
Screw.
Turn clockwise
to close
Pressure Relief
Valve
Fig. 16. Layout of components with expansion vessel in service position.
Heatbank overheat
thermostat reset button
Refer to figure 17 for
details of this area
Mains cold water inlet
valve
Facia
Safety temperature limiter
thermostat reset button
Control Box
Central heating return
valve
Central heating flow valve
Inner casing fixing screws (4)
Primary manual air vent
Pressure relief valve
To lower the expansion vessel
follow instructions 1 to 4:
1. Remove cabinet front panel.
Refer to Fig. 12.
2. Raise facia and control box
into the service position.
Refer to Fig. 12.
3. Unscrew one fixing screw.
4. Lower expansion vessel to
rest on the floow.
By-pass adjusting screw
Domestic water expansion
vessel connection
Circulating pump
Water diverter valve
Gas valve
Flexible hose
Gas service cock
Expansion vessel lowered into
service position
Domestic drain
Hot water and heatbank
overheat thermostat pocket
Hinge
Heatbank
System pressure
gauge
Gas valve electrical supply plug
Fig. 18. Open vent position and pipework.
Disconnect the flexible hose from the bottom
manifold and fit the open vent pipe supplied as
an optional extra
Remove securing clip
Ease pump head forwards
off the “O” ring seals
“O” ring seals
Remove securing clip
19
Withdraw the two securing clips from the pump body.
East the pump forwards about 10mm off the “O” ring seals. It is
not necessary to disconnect the electrical cable. The cable is
sufficient to allow the pump head to rest on top of the appliance.
Do not allow the pump head to be suspended by the cable.
Secure the pump head. See Figs. 18 and 45.
NOTE: INTERNAL FLUE FITTING KIT.
If the Internal Flue Fitting Kit is to be used refer to Section 11.7
following describing the assembly of the flue components and
fitting the Internal Flue Kit.
GENERAL INFORMATION AND GUIDE LINES FOR ALL FLUE
OPTIONS.
Check the contents of the standard flue kit and extension flue kit
or kits against the respective packing list.
Remove ALL packaging from the ducts, flue bend or bends and
flue terminal assemble.
N.B. The size of the Air Duct is 100 mm diameter and Flue Duct
60 mm diameter.
IMPORTANT: The air duct, flue duct and flue bend/bends are
manufactured from aluminium and must be handled with care.
Measure and cut the air and flue ducts to length ensure the cuts
are square and free from burrs. Always check the dimensions
before cutting the duct.
Do not cut the expanded end of the extension air or flue ducts
unless instructed otherwise.
The air and flue ducts supplied with the standard flue kits must
be adjacent to the flue adaptor or first flue bend. See Fig. 22 or 23.
The flue adaptor,supplied with the Standard Horizontal Rear Flue
Kit, must be fitted for Flue Option 1 and 3. See Fig. 5.
Other flue options, that require a horizontal section of flue duct
fitted directly to the rear of the appliance, must be fitted with a
flue adaptor. See Fig. 5 Frame 9.
The flue adaptor is also available as an optional extra. See Fig. 5
Frame 9 and refer to Section 5b Option 9.
Fit the flue adaptor into the flue sealing grommet located on the
rear of the inner casing. Ensure it is located correctly against the
stop. Tighten the clamping screw located on top of the inner
casing. See Fig. 14.
When assembling extension air and flue ducts ensure the ducts
are correctly located in the socketed joints. See Fig. 23.
Measure the length of the air and flue ducts from the end that
will be fixed into the adaptor or flue bend fitted to the appliance.
Before cutting the air or flue ducts ensure the final expanded
section is at least 100 mm clear of the flue terminal end or flue
bends. If it is not reduce the length of the adjacent air and flue
ducts by cutting off from the non-expanded end the amount
necessary to give the minimum clearance. See Fig. 23.
Take care to seal all the flue joints where indicated. See Fig. 23.
To seal the flue joints disengage the joint and apply a smear of
silicone sealant around the duct. See Fig. 23.
If the flue assembly is longer than 1500 mm the flue duct must
be supported within the air duct with a flue spacer available as
an optional extra. See Fig. 23.
On final assembly the air duct must be adequately supported.
Air duct support brackets are available as an optional extra.
See Section 5b for flue spacer and air duct support bracket part
number.
Flue
Option
1
2
3
4
5
6
7
8
Flue Length or
Total Straight Flue
Length (mm)
100 to 1000
100 to 1000
1000 to 3000
1000 to 3000
100 to 2300
100 to 2300
100 to 1000
100 to 1000
Flue Restrictor
Size mm (dia.)
72
75
75
77
Not required
Not required
Not required
Not required
See Section 5b for parts identification and part numbers.
Because of site conditions it may be necessary to deviate from
the following method of installation. Joints must be sealed and
fixed where applicable.
Now turn to the appropriate section to install the flue system:
Section 11.4 Standard Horizontal Rear Flue Assembly.
Section 11.5 Standard Horizontal Side Flue Assembly including
one 90° Flue Bend.
Section 11.6 Fitting Extension Flues and Extra 90° Flue Bend or
Bends.
11.4 STANDARD HORIZONTAL REAR FLUE.
(FLUE OPTION 1). See Fig.19.
IMPORTANT: (i) A flue restrictor ring MUST be fitted in the flue
terminal. Refer to Section 11.3 for the correct
size and the following instructions for fixing.
See Fig. 24.
(ii) The flue adaptor MUST be fitted to connect the
flue system to the appliance. See Fig. 21. Refer
to Section 11.3 and the following instructions
for fixing.
AIR AND FLUE DUCT PREPARATION.
The standard flue assembly, supplied with the appliance,
accommodates a maximum flue length of 500 mm measured
from the REAR of the appliance casing. See Fig. 19.
HORIZONTAL REAR FLUE ASSEMBLY.
Measure accurately the distance from the rear of the appliance,
previously marked on the floor, to the outside surface of the wall.
Dimension A. See Fig. 19.
Air duct length = A + 188 mm
Flue duct length = A + 228 mm.
Cut air and flue ducts to length. Do not cut the drilled end of the
air duct.
IMPORTANT: Fit the flue restrictor ring marked 72 into the flue
terminal. See Fig. 24.
Assemble the air duct to the flue terminal. Ensure it fits fully into
the flue terminal and the restrictor ring is located firmly between
the end of the air duct and flue terminal. See Fig. 24.
Drill through the holes in the flue terminal into the air duct with
the drill provided. Apply a smear of silicone sealant to the end of
the air duct and fix into the flue terminal using the screws
provided. See Fig. 21.
Fit the flue duct into the extended end of the flue adaptor, ensure
it is located correctly against the stop. Drill two holes through
the holes in the flue adaptor. See Fig. 21.
Fit the air duct over the outside of the flue duct and onto the flue
adaptor.
Ensure it is located correctly against the stop and the flue duct
fits into the flue terminal. Drill two holes through the holes in the
air duct. See Fig. 21.
Disconnect the air and flue ducts from the flue adaptor.
Flue Restrictor Rings are supplied with the hardware pack. A
restrictor ring must be fitted into the flue terminal the size will
depend on the Flue Option chosen. Refer to the following table for
restrictor size. When fixing the flue restrictor ring refer to Fig. 24.
NOTE: For flue options using two or three flue bends the
restrictor rings are NOT required and MUST be discarded.
The optimum route for the flue must be measured and sufficient
extension flue/flues and other components ordered to install the
flue satisfactory.
Apply a smear of silicone sealant around the outside of the flue
duct.Fit the flue duct into the flue adaptor and fix with the
screws provided. See Fig. 21.
20
Apply a smear silicone sealant around the inside of the air duct.
the end of the air duct and flue terminal. See Fig. 24.
Drill through the holes in the flue terminal into the air duct with
the drill provided. Apply a smear of silicone sealant to the end of
the air duct and fix into the flue terminal using the screws
provided. See Fig. 22.
Fit the flue duct into the flue bend. Ensure it is located correctly
against the stop. Drill two holes through the holes in the flue
bend. See Fig. 22.
Re-assembly the air duct over the flue duct, ensure the flue duct
fits into the flue terminal and the air duct fits over the flue
adaptor. Fix with the screws provided.
The flue system is now assembled. See Fig. 21.
From inside or outside the dwelling pass the flue assembly
through the hole in the wall.
Temporarily support the flue system, ensure it is horizontal and
Fig. 19. Flue Option 1: Standard horizontal rear flue.
Flue Option 2: Extension horizontal rear flue.
65
25
Outside of wall
A
Distance from the
rear of the base
outline of appliance
to the outside
surface of the wall
Air duct
= (A + 188) mm
Flue duct
= (A + 228) mm
Flue adaptor must be fitted
Base outline of appliance
marked on floor
Standard horizontal rear flue.
Flue Option 1: Dimension A = 500 max.
Front of appliance
will align with the flue position on the rear of the inner casing.
Carefully ease the appliance into the position previously marked.
Ensure the flue position located on the rear of the appliance is
correctly aligned with the centre-lines of the flue.
Fit the flue adaptor into the flue grommet located on the rear of
the inner casing. See Fig. 21.
Ensure it is located correctly against the stop. Fully tighten the
clamping screw accessible on top of the inner casing. See Fig. 14.
Note: Do not apply a smear of silicone sealant around the end of
the flue duct that fits into the flue terminal.
Make good the internal and external brickwork or rendering .
11.5 STANDARD HORIZONTAL SIDE FLUE ASSEMBLY
INCLUDING ONE 90° FLUE BEND.
(FLUE OPTION 2). See Fig. 20.
IMPORTANT: A flue restrictor ring MUST be fitted in the flue
terminal. Refer to Section 11.3 for the correct size and the
following instructions for fixing. See Fig. 24.
HORIZONTAL SIDE FLUE ASSEMBLY.
Measure accurately, the distance from the side of the appliance
cabinet, previously marked on the floor, to the outside surface of
the wall. Dimension A. See Fig. 20.
Air duct length = A + 244 mm.
Flue duct length = A + 284 mm.
Cut the air and flue ducts to length. Do not cut the drilled end of
the air duct.
IMPORTANT: Fit the flue restrictor ring marked 75 into the flue
terminal. See Fig. 24.
Assemble the air duct to the flue terminal. Ensure it fits fully into
the flue terminal and the restrictor ring is located firmly between
Extension horizontal rear flue.
Flue Option 3: Dimension A = 3000 max.
Fit the air duct over the outside of the flue duct. Ensure it is
located correctly against the stop. Drill two holes through the
holes in the air duct.
Disconnect the air and flue ducts from the flue bend.
Loosely assemble the flue duct into the air duct and engage in
the flue terminal. From outside the dwelling pass the assembly
through the hole in the wall.
From inside ease the flue duct sufficiently clear of the air duct to
fit the flue bend.
Apply a smear of silicone sealant around the outside of the flue
duct. Fit the flue duct into the flue bend and fix with the screws
provided. See Fig. 22.
Apply a smear of silicone sealant around the outside of the flue
bend.
Assemble the flue bend into the air duct and fix with the two
screws provided. Ensure the flue duct is correctly engaged in the
flue terminal. See Fig. 22.
Note: Do not apply a smear of silicone sealant around the end of
the flue duct that fits into the flue terminal.
The flue system is now assembled. See Fig. 22.
Support the flue system temporarily so that it lines up with the
flue centre-lines previously marked.
Carefully ease the appliance into the position previously marked.
Ensure the flue position, located on the rear of the appliance, is
correctly aligned with the flue centre-lines previously marked.
Fit the flue bend into the flue grommet located on the rear of the
inner casing.
21
Fig. 20. Flue Option 3. Standard horizontal side flue.
Flue Option 4. Extension horizontal side flue.
Flue duct = (A + 284) mm
Air duct = (A + 244) mm
Base outline of appliance
marked on floor
90° flue bend
25
A
Standard horizontal side flue –
Flue Option 2: Dimension A = 1000 max.
Front of
appliance
Distance from the side of
the base outline of the
appliance to the outside
surface of the wall
65
Outside of wall
Extension horizontal side flue –
Flue Option 4: Dimension A = 3000 max.
Ensure it is correctly located against the stop. Fully tighten the
clamping screw accessible on top of the inner casing. See Fig. 14.
Make good the internal and external brickwork or rendering.
11.6 Fitting Extension Flues and Extra 90° Flue Bend or
Bends.
The installation can now be continued by following the
appropriate instructions for the Flue Option listed in the
following table. See also Fig. 5.
HORIZONTAL REAR FLUE ASSEMBLY.
Measure accurately the distance from the rear of the appliance,
previously marked on the floor, to the outside surface of the
wall.Dimension A mm. See Fig. 19.
Air duct length = A + 188 mm,
Flue duct length = A + 288 mm,
Cut the air and flue ducts to length. Do not cut the drilled end of
the air duct that will fit adjacent to the appliance.
IMPORTANT: Fit the flue restrictor marked 75 into the flue
terminal. See Fig. 24.
Option.
Flue
Section
No.
Option
3 Extension horizontal rear flue. . . . . . . . . . . . . . . . . . . . . . . . . . . 11.6.1
4 Extension horizontal side flue. . . . . . . . . . . . . . . . . . . . . . . . . . . 11.6.2
5 Extension horizontal flue using a second 90° flue bend . . . . 11.6.3
6 Extension upwards and horizontal flue using a
second 90° flue bend. . . . . . . . . . . . . . . . . . . . . . . . . . . . . . . . . . 11.6.4
7 Extension horizontal flue using a second and third
90° flue bend. . . . . . . . . . . . . . . . . . . . . . . . . . . . . . . . . . . . . . . . . 11.6.5
8 Extension upwards and horizontal flue using a second
and third 90° flue bend . . . . . . . . . . . . . . . . . . . . . . . . . . . . . . . . 11.6.6
9 To fit a horizontal section of flue duct before the first 90°
flue bend for flue options 2, 4, 5, 6, 7 and 8. . . . . . . . . . . . . . . 11.6.7
ASSEMBLE THE AIR DUCTS.
Continue the installation by following the procedure as described
in Section 11.3.
If necessary, assemble and check the air duct length. Drill two
holes through the holes, in the expanded end of each air duct
with the drill provided. Disengage each air duct and apply a
smear of silicone sealant around of the air duct to seal the joint.
See Fig. 23.
Reassemble and fix the air ducts together with the screws
provided.
ASSEMBLE THE FLUE DUCTS.
Follow the procedure for measuring,cutting,sealing and fixing as
described in Section 11.3.
Note: If the extension is longer than 1500 mm a flue duct
support must be fitted before the ducts are finally assembled.
The flue duct support must be fitted half-way along the flue duct
for effective support. See Fig. 23.
11.6.1. EXTENSION HORIZONTAL REAR FLUE.
(FLUE OPTION 3). See Fig. 19.
IMPORTANT: i) Length of flue when measured from the rear of
the appliance casing must not exceed
3000 mm.
ASSEMBLE THE FLUE DUCT INTO THE AIR DUCT.
Assemble the air and flue ducts into the flue terminal. Ensure the
air duct fits fully into the flue terminal and the restrictor ring is
located firmly between the end of the air duct and flue terminal.
See Fig. 24. Drill through the holes in the flue terminal into the air
duct with the drill provided.
Apply a smear of silicone sealant to the end of the air duct and
fix into the flue terminal using the screws provided. See Fig. 23.
Note: Do not apply a smear of silicone sealant around the end of
the flue duct that fits into the flue terminal.
ii) A flue restrictor ring MUST be fitted into the
flue terminal. Refer to Section 11.3 for the
correct size and the following instructions for
fixing. See Fig. 24.
iii) The flue adaptor MUST be fitted to connect
the flue system to the appliance. See Fig. 21.
Refer to Section 11.3 and the following
instructions for fixing.
22
Fit the flue adaptor to the air and flue ducts and assemble the
flue system. Follow the procedure as described in Section 11.3
and 11.4 to fit the flue adaptor and assemble the flue system.
The flue system is now assembled.
From inside or outside the dwelling pass the flue assembly
through the hole/holes in the wall/walls.
Temporarily support the flue system, ensure it is horizontal and
will align with the flue position, located on the rear of the
appliance.
Carefully ease the appliance into the position previously marked.
Ensure the flue location is correctly aligned with the centre-lines
of the flue.
Fit the flue adaptor into the flue grommet located on the rear of
the inner casing. See Fig. 23.
Ensure it is located correctly against the stop. Fully tighten the
clamping screw accessible on top of the inner casing. See Fig. 14.
NOTE: i) Do not apply a smear of silicone sealant around the
end of the flue duct that fits into the flue terminal.
ii) Flues longer than 1500 mm must be adequately
supported. Air duct support brackets are available
as an optional extra. See Section 5b.
iii) Make good the internal and external brickwork or
rendering.
Apply a smear of silicone sealant to the end of the air duct and
fix into the flue terminal using the screws provided.
Note: Do not apply a smear of silicone sealant around the end of
the flue duct that fits into the flue terminal.
Fit the flue duct into the flue bend. Ensure it is located correctly
against the stop. Drill two holes through the holes in the bend.
See Fig. 23.
Fit the air duct over the outside of the flue bend. Ensure it is
located correctly against the stop. Drill two holes through the
holes in the air duct.
Disconnect the air and flue ducts from the flue bend.
Loosely assemble the flue duct into the air duct and engage in
the flue terminal.
From outside the dwelling pass the assembly through the hole in
the wall.
From inside ease the flue duct sufficiently clear of the air duct to
fit the flue bend.
Apply a smear of silicone sealant around the outside of the flue
duct. Fit the flue duct into the flue bend and fix with the screws
provided. See Fig. 23.
Apply a smear of silicone sealant around the outside of the flue
bend.
Assemble the flue bend into the air duct and fix with the two
screws provided.
Ensure the flue duct is correctly engaged in the flue terminal. See
Fig. 23.
Note: Do not apply a smear of silicone sealant around the end of
the flue duct that fits into the flue terminal.
The flue system is now assembled.
Temporarily support the flue system, ensure it is horizontal and
the flue bend will align with the flue position, located on the rear
of the inner casing. See Fig. 23.
Carefully ease the appliance into the position previously marked.
Ensure the flue position is correctly aligned with the flue centrelines previously marked
Fit the flue bend into the flue grommet located on the rear of the
inner casing See Fig. 23.
Ensure it is located correctly against the stop. Fully tighten the
clamping screw accessible on top of the inner casing. See Fig. 14.
NOTE: i) Do not apply a smear of silicone sealant around the
end of the flue duct that fits into the flue terminal.
ii) Flues longer than 1500 mm must be adequately
supported. Air duct support brackets are available
as an optional extra. See Section 5b.
iii) Make good the internal and external brickwork or
rendering.
11.6.2. EXTENSION HORIZONTAL SIDE FLUE.
(FLUE OPTION 4). See Fig. 20.
IMPORTANT: i) Length of flue when measured from the side of
the appliance casing must not exceed 3000 mm.
ii) A flue restrictor ring MUST be fitted into the
flue terminal. Refer to Section 11.3 for the
correct size and the following instructions for
fixing. See Fig. 24.
iii) A flue adaptor is not required.
HORIZONTAL SIDE FLUE ASSEMBLY.
Measure accurately the distance from the side of the appliance,
previously marked on the floor, to the outside surface of the wall.
Dimension A mm. See Fig. 20.
Air duct length = A + 244 mm,
Flue duct length = A + 284 mm,
Cut the air and flue ducts to length. Do not cut the drilled end of
the air duct that will fit adjacent to the appliance.
IMPORTANT: Fit the flue restrictor ring marked 77 into the flue
terminal. See Fig. 24.
Assemble the air ducts.
Continue the installation by following the procedure as described
in Section 11.3.
If necessary assemble and check the air duct length. Drill two
holes through the holes in the expanded end of each air duct
with the drill provided. Disengage each air duct and apply a
smear of silicone sealant around of the air duct to seal the joint.
See Fig. 23.
Reassemble and fix the air ducts together with the screws
provided.
Assemble the flue ducts.
Follow the procedure for measuring, cutting, sealing and fixing
as described in Section 11.3.
Note: If the extension is longer than 1500 mm a flue duct
support must be fitted before the ducts are finally assembled.
The flue duct support must be fitted half-way along the flue duct
for effective support. See Fig. 23
Assemble the flue duct into the air duct.
Fit the air and flue ducts into the flue terminal. Ensure the air
duct fits fully into the flue terminal and the restrictor ring is
located firmly between the end of the air duct and flue terminal.
See Fig. 24. Drill through the holes in the flue terminal into the air
duct with the drill provided.
11.6.3. EXTENSION HORIZONTAL FLUE USING A SECOND
90° FLUE BEND.
(FLUE OPTION 5). See Fig. 25.
IMPORTANT: i) The two lengths of straight air duct when
added together must not exceed 2300 mm.
ii) A flue restrictor ring is not required.
iii) A flue adaptor is not required.
Refer to the instructions in Section 11.3.
First flue length from the appliance to the second flue bend.
The first flue bend will fit into the flue position located on the rear
of the inner casing. See Fig. 25.
Measure the horizontal distance between the centre of the flue
position located on the rear of the inner casing and the centre of
the second flue bend.
Dimension B. See Fig. 25.
Dimension B must not be less than 210 mm.
Air duct length = B – 166 mm
Flue duct length = B – 152 mm
23
The flue duct must fit correctly between the flue bends. The duct
is trapped between the flue bends and does not require fixing
screws. See Fig. 26.
Follow the procedure for fixing the assembly to the appliance as
described in Section 11.6.2.
The section of horizontal air and flue duct fitted adjacent to the
first flue bend will not require expanded ends. Cut off the
expanded ends from this section.
SECOND FLUE LENGTH.
Measurer the distance between the centre of the second flue bend
and the outside surface of the wall. Dimension C. See Fig. 25.
Air duct length = C – 58 mm.
Flue duct length = C – 14 mm.
Assemble the air and flue ducts as described in Sections 11.3,
11.4 and 11.5 with attention to the following:
Fit the flue terminal and second flue bend to the second flue
length.
Ensure the air duct is fixed at both ends and the flue duct fixed
to the flue bend only. Fix with the screws provided. See Figs. 25
and 26.
Fit the first flue length to this flue bend followed by the first flue
bend.
Ensure the first flue bend is aligned correctly with the appliance.
Fix each end of the air duct to the bends with the screws
provided.
The flue duct must fit correctly between the flue bends. The flue
duct is trapped between the flue bends and does not require
fixing screws. See Fig. 26.
Follow the procedure for fixing the assembly to the appliance as
described in Section 11.6.2.
11.6.5. EXTENSION FLUE HORIZONTAL USING A SECOND
AND THIRD 90° FLUE BEND.
(FLUE OPTION 7). See Fig. 28.
IMPORTANT: i) The three lengths of straight air duct when
added together must not exceed 1000 mm.
ii) A flue restrictor is not required.
iii) A flue adaptor is not required.
Refer to the instructions in Section 11.3.
Refer to Section 11.6.3 and measure Dimension B and C. See Fig. 28.
For this flue option Dimension B is the centre distance between
each flue bend. The dimension may vary between each bend.
The minimum dimension must not be less than 210 mm.
First and second flue lengths:
Air duct length = B – 166 mm.
Flue duct length = B – 152 mm.
Third flue length:
Air duct length = C – 58 mm.
Flue duct length = C – 14 mm.
Assemble the air and flue ducts as described in Section 11.3 and 11.5.
Before fixing each section of duct, ensure each flue bend is
aligned correctly.
Follow the procedure for fixing the assembly to the appliance as
described in Section 11.6.2. See Figs. 26 and 28.
11.6.4. EXTENSION FLUE UPWARDS AND HORIZONTAL
USING A SECOND 90° FLUE BEND.
(FLUE OPTION 6). See Fig. 27.
IMPORTANT: i) The two lengths of straight air duct when
added together must not exceed 2300 mm.
ii) A flue restrictor ring is not required.
iii) The flue adaptor is not required.
Refer to the instructions in Section 11.3
First flue length from the appliance to the second flue bend.
The first flue bend will fit into the flue position located on the rear
of the inner casing.
Measure the distance upwards between the centre of the flue
position located on the rear of the inner casing and the centre of
the second flue bend.
Dimension B See Fig. 27.
Dimension B must not be less than 210 mm.
Air duct length = B – 166
Flue duct length = B – 152
The upward section of air and flue duct fitted adjacent to the first
flue bend will not require expanded ends. Cut off the expanded
ends from this section.
11.6.6. EXTENSION FLUE UPWARDS AND HORIZONTAL
USING A SECOND AND THIRD 90° FLUE BEND.
(FLUE OPTION 8). See Fig. 29.
IMPORTANT: i) The three lengths of straight air duct when
added together must not exceed 1000 mm.
ii) A flue restrictor is not required
iii) A flue adaptor is not required.
Refer to the instructions in Section 11.3.
Follow the instructions in Section 11.6.5.
Refer to Section 11.6.4 and measure Dimension B and C. See Fig. 29.
For this flue option Dimension B is the centre distance between
each flue bend. The dimension may vary between each bend.
The minimum dimension must not be less than 210 mm.
Upwards Section:
Air duct length = B – 166 mm.
Flue duct length = B – 152 mm.
Horizontal Section:
First Section:
Air duct length = B – 166 mm.
Flue duct length = B – 152 mm.
Second Section:
Air duct length = C – 58 mm.
Flue duct length = C – 14 mm.
Assemble the air and flue ducts as described in Section 11.3 and 11.5.
Before fixing each section of duct, ensure each flue bend is
aligned correctly.
Follow the procedure for fixing the assembly to the appliance as
described in Section 11.6.2. See Figs. 26 and 29.
Second flue length.
Measurer the distance between the centre of the second flue
bend and the outside surface of the wall. Dimension C.
Air duct length = C – 58 mm.
Flue duct length = C – 14 mm.
Assemble the air and flue ducts as described in Sections 11.3,
11.4 and 11.5 with attention to the following:
Fit the flue terminal and second flue bend to the second flue
length.
Ensure the air duct is fixed at both ends and the flue duct fixed
to the flue bend only. Fix with the screws provided. See Figs. 26
and 27.
Fit the first flue length to this flue bend followed by the first flue
bend.
Ensure the first flue bend is aligned correctly with the appliance.
Fix each end of the air duct to the flue bends with the screws
provided.
11.6.7. TO FIT A HORIZONTAL SECTION OF FLUE DUCT
BEFORE THE FIRST 90° FLUE BEND FOR FLUE
OPTIONS 2, 4, 5, 6, 7 AND 8.
(FLUE OPTION 9). See Fig. 30.
IMPORTANT: i) The total length of straight flue including this
section MUST not exceed the length stated in
the Flue Option chosen.
24
ii) A flue restrictor ring may be required. Refer to
Section 11.3 to determine the size or whether
the restrictor is necessary.
iii) A flue adaptor MUST be fitted to connect the
flue system to the appliance. Refer to the
instructions in Section 11.4.
Horizontal section of flue duct from the rear of the appliance
casing to the first 90° flue bend.
Fig. 21. Fixing the flue terminal and flue adaptor
to the air duct, flue duct and flue position
located on the rear of the inner casing for rear
flue applications.
Flue terminal
Do not apply silicone
sealant to this joint
Flue restrictor ring
Drill through the holes in the flue
terminal into the air duct. Apply a
smear of silicone sealant to this
joint. Fix together with the screws
provided.
Apply a smear of silicone sealant
to both joints. Fix the air and flue
duct to the flue adaptor with the
screws provided. Ensure that the
air and flue ducts are located
correctly in the flue adaptor.
Ensure the holes in the air and
flue ducts are next to the flue
adaptor
Clamping screw
accessible on top of
the inner casing
Rear of appliance
Flue adaptor
Flue position located
on rear of inner
casing
Do not apply silicone
sealant to the inner joints
Top of appliance inner casing
View on top of appliance
Fig. 22. Fixing the flue terminal
and the flue bend to the air duct,
flue duct and flue position,
located on the rear of the inner
casing for side flue applications.
Rear of appliance
Drill through the holes in the flue terminal into
the air duct. Apply a smear of silicone sealant to
this joint. Fix together with the screws provided.
Flue restrictor ring
Flue terminal
Flue
bend
Apply a smear of silicone
sealant to both joints. Fix
the air and flue duct to the
flue bend with the screws
provided. Ensure that the
air and flue ducts are
located correctly in the flue
bend.
Clamping screw
accessible on top of
the inner casing
Do not apply silicone
sealant to this joint
Top of appliance inner casing
Do not apply silicone
sealant to these joints
View on top of appliance
Rear of appliance
Align the flue bend with the
flue location and fix in
position with the clamping
screw
Top of appliance inner casing
25
the appliance. Ensure the flue outlet or flue bend is correctly
located against the stop. See Fig. 23.
Tighten the clamping screw accessible on top of the inner casing.
See Fig. 14.
Make good the internal brickwork.
11.8 FINAL INSTALLATION.
Check that all the water connections and the gas connection
have been tightened.
Facia Mounted Programmer (where applicable).
Measure accurately the distance from the rear of the appliance,
previously marked on the floor, to the centre of the first 90° flue
bend. Dimension D. See Fig. 30.
The minimum dimension must not be less than 105 mm.
Air duct length = D + 82 mm.
Flue duct length = D + 80 mm.
Cut air and flue ducts to length. Do not cut the drilled end of the
air duct.
Continue the installation by following the procedure for the flue
option chosen. Refer to Section 11.5, 11.6.2, 11.6.3, 11.6.4,
11.6.5, or 11.6.6.
11.7 INTERNAL FLUE FITTING.
If it is required to install the flue system from inside the building
the hole in the wall must be 150 mm ( 6 in ) diameter.
Measure and cut the ducts as previously described. See Section 11.3.
Assemble the air and flue ducts to the flue terminal and flue
bend as previously described. See Section 11.4 and 11.5.
Fit the rubber sealing gasket to the flue terminal. Centralise the
gasket and tighten the clamping ring. See Fig. 31.
Pass the assembly through the wall from inside the building so that
the gasket flange is against the outside face of the wall. See Fig. 32.
Align the flue outlet or flue bend with the flue position on rear of
Remove the facia panel as described in Section 11.3. Refer to Fig. 14.
Unplug the Operating Switch connection at the control board .
Unscrew and retain the four nuts and washers securing the
switch mounting plate to the facia. See Fig. 9. Remove the plate.
Fit the programmer to the facia and fix using the four nuts and
washers.Plug the lead into the connection on the control board.
See Fig. 12. The programmer can be set when the electricity
supply has been turned on at the commissioning stage.
Connect the mains electricity supply to the appliance and
connect any room and/or frost thermostats. Refer to Section 10,
Fig. 9 and 12. The leads from the thermostats must pass through
holes provided in the control box at the right hand side and be
clamped using the strain relief bushes provided in the pack.
Fig. 23. Typical extension horizontal side and rear flue assemblies.
Rear of appliance
Flue bend, air duct and
flue duct fixing screws
Air duct and flue
duct fixing screws
External wall
Air duct terminal
fixing screws
Flue
terminal
Air duct (100mm diameter)
Side Flue
Assembly
Flue
bend
Top of appliance
inner casing
Flue duct (60mm diameter)
Ensure that the ducts are
correctly located into the
socketed joints. Seal the
joints with a smear of
silicone sealant
Do not apply
silicone sealant
at this point
For flue ducts over
1500mm long, fit a flue
support halfway along
the horizontal section
Smear silicone
sealant on the
air and flue duct
joints
Do not apply silicone
sealant at these joints
Rear of appliance
Top of appliance
inner casing
Apply a smear of
silicone sealant to
these joints
External wall
Rear Flue
Assembly
Do not apply
silicone sealant at
these joints
Flue adaptor must be fitted into the flue
position located on the rear of the inner
casing for all rear flue applications or when
a straight section of flue duct is required
before the first flue bend
Flue adaptor
Air duct
See Enlarged Detail
Flue position
located on rear of
inner casing
26
Flue duct
Fig. 24. Fixing the flue restrictor ring into the flue terminal.
Flue
terminal
Flue restrictor
ring. Refer to
Section 11.3
for correct size
Air duct
Fit the flue restrictor ring into the flue terminal.
Ensure the air duct is fully engaged in the flue terminal and the restrictor ring is located firmly
between the end of the air duct and flue terminal.
Drill through the holes in the flue terminal into the
air duct with the drill provided.
Apply a smear of silicone sealant to the outside
end of the air duct and fit into the flue terminal
using the screws provided.
Fig. 25. Flue Option 5. Extension horizontal flue using a second 90° flue bend.
The two flue lengths, when added
together, must not exceed 2300mm
First 90° flue bend
Outside
wall
C
Air duct = (B – 166) mm
Flue duct = (B – 152)
mm
mm m
8) ) m
5
– 14
C –
(
t = (C
uc ct =
d
u
r
Ai ue d
l
F
B 210mm m
inimum
Appliance
Second 90° flue bend
Fig. 26. Fitting the flue bends to the intermediate sections of the flue duct.
Flue elbow and air duct
fixing screws
Flue elbow and air duct
fixing screws
Fixing screws not
required for flue duct
Air duct (100mm diameter)
Flue duct (60mm diameter)
The flue duct does not require fixing screws when
located between the flue bends
27
Ensure that the ducts are correctly
located into the socketed joints.
Seal the joints with a smear of
silicone sealant.
Fig. 27. Flue Option 6. Extension flue upwards and horizontal using a second 90° flue bend.
The two flue lengths, when added
together, must not exceed 2300mm
Second 90° flue bend
Outside
wall
C
Air duct = (B – 166) mm
Flue duct = (B – 152) mm
Air duct = (C – 58) mm
Flue duct = (C – 14) mm
B 210mm minimum
First 90° flue bend
Appliance
Fig. 28. Flue Option 7. Extension flue horizontal using a second and third 90° flue bend.
The three lengths, when added
together, must not exceed 1000mm,
Third 90°
flue bend
C
First 90°
flue bend
Outside wall
B m
0m
21 imum
n
mi
B
210mm minimum
Air duct = (B - 166) mm
Flue duct = (B - 152) mm
Appliance
Air duct = (B - 166) mm
Flue duct = (B - 152) mm
28
Second 90°
flue bend
Air duct = (C - 58) mm
Flue duct = (C - 14) mm
Fig. 29. Flue Option 8. Extension flue upwards and horizontal using a second and third 90° flue bend.
The three lengths, when added
together, must not exceed 1000mm
Second 90°
flue bend
Outside wall
C
Air duct = (B - 166) mm
Flue duct = (B - 152) mm
B 210mm min
imum
Air duct = (C - 58) mm
Flue duct = (C - 14) mm
Air duct = (B - 166) mm
Flue duct = (B - 152) mm
Third 90°
flue bend
210mm
minimum B
First 90°
flue bend
Appliance
Fig. 30. Flue Option 9. Horizontal section of flue duct before the first 90° flue bend.
For Flue Options 2, 4, 5, 6, 7 and 8.
Total length of straight flue
including this section must not
exceed the length stated in the
flue option chosen.
First 90°
flue bend
Air duct = (D - 82) mm
Flue duct = (D - 80) mm
D
105mm minimum
A flue adaptor must be fitted
before the horizontal section
of flue duct.
Appliance
Appliance Side View
29
Horizontal section of
flue duct before the
first 90° flue bend
Fig. 31.
Terminal assembly for internal
fitting of the flue.
Fig. 32.
Rubber sealing gasket
Duct and terminal assembly for
internal fitting of the flue.
Flue centring ring
Flue terminal
Seal
Flue duct
Flue terminal
Duct assembly
Air duct
Clamping ring
External wall
Rubber sealing
gasket
Fig. 33. Gas control valve adjustment.
High/Low
solenoid
230V electrical
supply to pilot
solenoid
230V electrical
supply to On/Off
solenoid
Retaining
screw
B
A
C
230v electrical
supply plug to
High/Low solenoid
Inlet pressure
test point
Fig. 34.
High/Low burner
pressure adjusting
screws under plastic
cap. See below.
Burner setting
pressure test point
A – Adjustment for domestic hot water (High) gas
pressure setting
B – Adjustment for heating (Low) gas pressure
setting
C – Plastic cap
Pilot burner assembly.
Flame length 18-20mm
Pilot head
Pilot assembly fixing screws
Spark electrode
Pilot assembly
Spark electrode guide
Spark electrode location clip groove
Pilot injector
Spark electrode lead
30
The appliance (as despatched) can accommodate a system
volume of about 104 litres. Refer to BS 7074 Part 1. If the system
volume is in excess of that accommodated by the expansion
vessel fitted to the appliance then an extra vessel must be fitted
as close as possible to the central heating return connection of
the appliance.
Any extra vessel fitted must be pressurised to the same figure as
the integral vessel. If the expansion vessel fails then the specified
replacement must be fitted .
12.3 PROGRAMMER.
Any programmer fitted to the appliance should be set up at this
stage following the instructions sent with the programmer.
12.4 APPLIANCE OPERATION.
Check that the electrical supply to the appliance is off.
Turn the room thermostat (if fitted) to maximum.
Set the Operating Switch (or Programmer) to OFF.
In order to thoroughly vent the appliance and system the
appliance may be operated without gas turned on as follows:
Switch on the electricity supply.
NOTE: Immediately the mains electricity is applied to the
appliance the electronic control board is energised causing the
pump to run for about five minutes. This occurs whether or not
the controls are calling for heat. The pump will subsequently
only run in the course of normal operation of the boiler.
Set the Operating switch (or Programmer) to Heating and Water
and the Hot Water thermostat to maximum. The pump and fan
will run, a continuous spark will occur at the pilot electrode, but
the pilot and main burner will not light.
Primary water will circulate around the appliance.
Allow the appliance to operate in this condition for a few
minutes before setting the Hot Water thermostat to the Off
position.
Set the Heating thermostat to maximum and room thermostat (if
fitted) to maximum. The water diverter will open to central
heating and the appliance will operate as previous. See Fig. 16.
Primary water will now circulate around the central heating
system. Allow the appliance to operate in this condition for a few
minutes. Vent all radiators during this period until air is cleared
from the system.
When the system has been vented sufficiently set the Heating
thermostat to the Off position.
Note: The water diverter valve, in the de-energised condition, is
always open to Hot Water. The controls give priority to reheating
the heatbank following a demand for hot water. If the valve fails
to open when energised to the central heating system, hot water
will still be available.
12. Commissioning The Appliance
12.1 The appliance is despatched with the controls set to
provide a maximum output for domestic hot water of 24 kW
(82,000 Btu/h) and satisfy a central heating load of 15 kW
(51,000 Btu/h).
The controls can be reset to increase or decrease the heat load
capability from 8.8 kW (30,000 Btu/h) to 24 kW (82,000 Btu/h).
Refer to Section 12.4 – Appliance Operation (Central Heating
Mode).
HOT WATER SYSTEM
Check that the mains water supply has been fully flushed out at
installation.
CENTRAL HEATING SYSTEM
Check that the central heating system has been fully flushed out
at installation.
GAS SERVICE
The complete system, including the meter, shall be inspected
and tested for soundness and purged as indicated in BS 6891.
12.2 APPLIANCE AND CENTRAL HEATING SYSTEM
PREPARATION.
If the cabinet front panel was replaced on final installation (Refer
to Section 11.8) remove the panel before starting the
commissioning procedure. See Fig. 14.
Check that the gas service and the electrical supply to the
appliance are turned off. See Fig. 3 and 17.
Raise the facia and control box into the Service Position. Refer to
Section 11.3 and Fig. 14.
Lower the expansion vessel into the Service Position and remove
the inner casing front cover. See Fig. 16.
Check that all the water connections throughout the system are tight.
Open the system valves at the appliance. See Figs. 3 and 17.
Open all the radiator valves, fill the system and vent each
radiator in turn.
Vent the heatbank from the manual air vent. See Figs. 16 and 17.
The automatic air vent (fixed to the flow manifold) will vent the
boiler section for sealed systems. Do not replace the inner casing
front cover until instructed in Section 12.4 Appliance Operation.
Check the pressure relief valve operates by turning the knob anticlockwise until it releases. Water should be expelled from the
discharge pipe. See Fig.15.
SEALED SYSTEMS ONLY.
SET THE EXPANSION VESSEL PRESSURE
The charge pressure of the expansion vessel (as supplied) is 0.5
bar, which is equivalent to a static head of 5 metres (17 ft). The
charge pressure must not be less than the static head at the
point of connection. See Fig 6. A Schraider type tyre valve is
fitted to the expansion vessel to allow the charge pressure to be
increased if necessary.
SET THE SYSTEM PRESSURE
Fill the system until the pressure gauge shows 2.5 bar (37 lb/in2)
and check for water soundness. Release water from the system
using the pressure relief valve test knob until the System Design
Pressure is obtained up to a maximum of 1.5 bar.
System Design Pressure in bar = Static Head of the System in
bar + 0.3
Note: 1 bar is equivalent 10.2 metres (33.5 ft) of water
Set the movable pointer on the pressure gauge to coincide with
the indicating pointer,giving a permanent record of the set
system pressure. See Fig. 16.
If the pressure indicated on the pressure gauge is greater than
2.5 bar when operating at the maximum central heating
temperature, an extra expansion vessel must be fitted to the
system as close to the appliance central heating return
connection as possible.
The valve does not have a manually open position.
Set the Operating Switch (or Programmer) to OFF.
Switch off the electrical supply.
The appliance and central heating system should now be vented.
Continue the appliance operation:
Disconnect the electrical supply plug from the solenoid operator
on the gas valve adjacent to the Modureg actuator by
unscrewing the retaining screw. See Fig. 33.
Turn on the gas supply and reconnect the electricity supply.
Put the Operating Switch (or Programmer) to Heating and Water
and turn the Heating thermostat to Max.
A continuous spark will occur until the pilot is alight and sensed
by the control circuit. The fan and pump will run but the main
burner will not light. Test for gas soundness at the joint between
the pilot pipe and the burner with leak detection fluid. See Fig. 34.
Observe the pilot flame. It should be about 20mm (3/4in) long and
envelope the spark electrode tip. See Fig. 34.
Put the Operating Switch (or Programmer) to OFF and disconnect
the electrical supply at the mains.
31
e). If the Heating (Low) Gas Pressure has been changed set the
indicator arrow on the data plate to the new setting.
Balance the system so that the required temperature difference
across the heating flow and return pipes is obtained. See Section
3, Table 4.
Adjust the by-pass valve until the same temperature difference is
obtained. See Fig. 16 and 17. This should be carried out with
only a single radiator operating.
If thermostatic radiator valves are fitted then one radiator should
be left uncontrolled. The bypass valve should never be fully
closed.
Set the room thermostat to minimum and check that the burner
goes out.
Reset the room thermostat to maximum and the burner will relight and follow the normal operating procedure.
Check for the proper ignition of the burner after a break in
the gas supply.
Turn off the gas service cock and wait for 60 seconds. The main
burner and pilot will go out but sparking from the electrode will
continue. Carefully open the gas service cock and observe the
burner re-light and follow the normal sequence of operation.
Put the Operating switch (or Programmer) to OFF. Switch off the
gas service cock and the electrical supply to the appliance.
Drain the heating system whilst the appliance is still hot. Refer to
Fig. 14 for the position of the appliance drain point.
Refill, vent and re-pressurise (sealed systems) as described
previously.
HOT WATER AND CENTRAL HEATING MODE.
Turn on the electricity supply and open the gas supply cock to
the appliance.
Set the Operating Switch (or Programmer) to Heating and Water.
If a programmer is fitted set the Hot Water to Continuous or
24Hrs and the Heating to On.
Set the Hot Water thermostat to MAXIMUM. The pilot will ignite
the main burner smoothly and the boiler will heat the water
stored in the heatbank. Once the heatbank has been satisfied the
appliance will switch off.
Turn on any hot water tap to maximum. After a short period the
burner will re-ignite. If hot water has not yet reached the tap,
wait until it does, then turn the tap off. The boiler will fire until
the heatbank has reheated and switch off.
Set the Operating Switch to Hot Water. If a programmer is fitted
set the Hot Water to Continuous and the Heating Off. Repeat the
previous hot water draw off
Set the Operating Switch to Heating and Hot Water. If a
programmer is fitted set to Continuous or 24 Hrs and the
Heating to ON. Set both appliance thermostats to maximum. The
boiler will fire and commence to heat up the radiators. Allow to
operate for 45 minutes, venting as necessary. Check for water
soundness.
Note: From cold it will take about 12 minutes for the heatbank to
be satisfied before the central heating system will receive heat.
IMPORTANT: The complete appliance must be checked for water
leaks. Should any leaks be found they must be rectified before
proceeding further.
Set the Operating Switch to OFF, or if a programmer is fitted,
switch to OFF. Switch electrical supply off at the mains. Set both
appliance thermostats to OFF.
Drain water from the appliance and the system from the drain
points while the water is still hot.
Refill the appliance and system. Repeat commissioning
operation under “Hot Water and Central Heating mode.”
Check for correct operation of User’s Controls including the room
thermostat (if fitted) and leave set to customer’s requirements.
12.5 COMPLETION OF COMMISSIONING.
Dis-connect the pressure gauge and tighten the test point screw.
Re-start the appliance and check for gas soundness around the
test point screw.
Refit the expansion vessel and cabinet front panel. See Fig. 16.
If the appliance is being passed over to the User immediately
IMPORTANT: Replace the inner casing cover and reposition the
pressure vessel. See Fig. 16.
Reconnect the electrical supply plug to the gas valve. See Fig. 33.
Loosen the burner pressure test point screw and connect a
pressure gauge. See Fig. 33.
HOT WATER MODE.
Set the Operating Switch (or Programmer) to Water. Turn the Hot
Water thermostat to maximum. Turn the Heating thermostat to
Off.
The boiler should light at a burner pressure of between 14 and
14.5 mbar (5.6-5.8in wg). Allow the boiler to fire for at least 10
minutes before checking the gas pressure.
Note: It may be necessary to open a hot tap to maintain the
boiler firing.
If the burner pressure is low check that the supply pressure at
the gas valve is at least 19 mbar (7.6in wg). See Fig. 33.
HOT WATER (HIGH) GAS PRESSURE.
The burner (High) pressure is factory set and should NOT be
adjusted in the Hot Water mode. If the gas supply pressure is
correct but the correct burner pressure is not achieved, contact
Worcester Heat Systems Service Department.
Should the appliance not light, check it is not in the overheat
lock-out state, by pressing the re-set button on bottom right
hand side of the control box. See Fig. 16.
Check several times the main burner lights smoothly and goes
out, by operating the Hot Water thermostat, before proceeding
to check the Heating (Low) gas pressure.
Note: If the electrical supply to the appliance is interupted at the
isolation switch or a power failure occurs whilst the burner is
firing, the boiler will normally relight automatically when the
power is restored. However, depending upon circumstances it
may be necassary to reset the overheat thermostats before the
appliance will operate.
Close the hot water tap (if necessary). The fan will stop and the
pump will continue running until the appliance has cooled to a
preset temperature.
Set the Operating Switch (or Programmer) to Off.
CENTRAL HEATING MODE.
Check that all the radiator valves are open. Set the room
thermostat, if fitted, to maximum and the Heating thermostat to
maximum. Turn the Hot Water thermostat to Off.
Sealed Systems: Check the system is pressurised and set to the
required pressure as indicated on the gauge. See Fig. 16.
Set the Operating Switch (or Programmer) to Heating and Water.
The boiler should light at a burner pressure of 1.0 mbar. (0.4 in wg).
HEATING (LOW) GAS PRESSURE.
The burner (Low) pressure is factory pre-set to satisfy a central
heating demand of up to 15 kW (51,000 Btu/hr). For different
heating requirements the (Low) gas pressure must be adjusted to
suit the installation.
The output to central heating is adjustable from a minimum of
8.8 kw (30,000 Btu/hr) to a maximum of 24 kW (82,000 Btu/hr).
Refer to Section 3, Table 1, for Nominal Boiler Rating.
Allow the boiler to fire for at least 10 minutes before checking the
(Low) gas pressure.
Ensure all the radiators are heating up evenly.
To adjust the Heating (Low) Gas Pressure:
a). Remove the grey plastic cover over the pressure adjustment
screws on the gas valve. Place a small screwdriver in one of the
slots and carefully lift the cap. See Fig. 33.
b). Using a small blade width screwdriver, turn the screw ‘B’
clockwise to increase and counter-clockwise to decrease
pressure until the desired setting is achieved.
c). Operate the Heating thermostat several times to ensure the
main burner ignites smoothly before checking that the gas valve
switches from High to Low pressure correctly.
d). Using the Hot Water and Heating control thermostats, switch
the appliance, from High to Low and back several times to
ensure correct gas pressures. Replace the plastic cap ‘C’.
32
90° into the Service Position. Lodge in the Service Position on the
outer locations. See Fig. 14.
(c) Expansion Vessel.
Unscrew one screw securing the expansion vessel support
bracket to the right hand side panel. Lower the vessel gently
until resting on the floor. See Fig. 16.
(d) Inner Casing Cover.
Repeat operations a, b and c. Unscrew the four screws securing
the cover to the inner casing and lift off. See Fig. 16.
(e) Fan.
Repeat operations a,b,c and d. Ease the two electrical
connections from the fan motor and the two flexible pipes from
the venturi housing. Unscrew the two screws securing the front
of the fan mounting plate to the flue hood. Ease the fan
assembly out of the flue bend or flue adaptor by gently pulling
the mounting plate forwards about 20 mm to clear the flue bend
or flue adaptor. Remove the fan and mounting plate assembly
from the inner casing. Ensure the short leg of the venturi faces
into the fan. See Fig. 35.
(f) Flue Hood.
Repeat operations a,b,c,d and e. Unscrew the two screws
locating the front of the flue hood to the combustion chamber
cover. Ease the flue hood forwards about 15 mm to clear the rear
location. Remove the flue hood off the heat exchanger and clear
of the inner casing. See Fig. 35.
(g) Combustion Chamber Cover.
Repeat operations a,b,c,d,e, and f. Unscrew the four screws
securing the combustion chamber cover and remove the cover.
See Fig. 35.
(h) Burner.
Repeat operations a,b,c,d,e,f and g. Unscrew the two screws
securing the pilot bracket to the burner. Unscrew the two screws
securing the front of the burner to the burner bracket located
inside the inner casing. Remove the burner by easing upwards
and forwards off the main burner injector and clear of the pilot
bracket. See Fig. 35.
(i) Pilot Bracket.
Repeat operations a,b,c,d,e,f and g. Unscrew the two screws
securing the pilot bracket to the burner bracket. Unclip the spark
igniter and remove.
Support the pilot bracket with a suitable tool. Unscrew the pilot
pipe union nut and ease the pipe clear of the bracket. Remove
the pilot injector from the pilot bracket. See Figs. 34 and 35.
refer to Section 13, Users Instructions and set the controls to the
user’s requirements.
If the appliance is to be left inoperative check that the Operating
Switch or programmer is set to OFF. Turn the gas service cock to
off and switch off the electricity supply.
If there is any possibility of the appliance and system being left
inoperative during frosty conditions then drain the appliance
and system.
For short inoperative periods leave the appliance under the
control of a frost thermostat, if fitted, or operating continuously
under the control of a room thermostat set at 6°C.
13. Instructions to the User
13.1 Tell the user how to operate the appliance and hand over
the Users Instructions leaflet.
13.2 Tell the user what to do if the heating system is not to be
used in frosty weather. Also tell the user that if the appliance is
not to be used for long periods during frosty weather, the system
must be drained and the gas and electricity supplies turned off.
13.3 Tell the user the Sealed System set pressure if applicable.
13.4 Tell the user of the importance of regular servicing.
Worcester Heat Systems Ltd offer a comprehensive maintenance
contract.
13.5 Set the system controls to the users requirements.
13.6 If an external programmer has been fitted which has a
programmable hot water facility then instruct the user how to
set up the programme.
14. Inspection and Servicing
To ensure continued efficient operation of the appliance it must
be checked and serviced as necessary at regular intervals. The
frequency of servicing will depend upon the particular
installation conditions and usage, but once per year should
generally be adequate. The extent of the service required by
the appliance is determined by the operating condition of the
appliance when tested by fully qualified engineers.
It is the law that any service work must be carried out by
competent engineers such as British Gas or Corgi registered
personnel.
14.3 Servicing of Components.
14.1 PRE-SERVICE INSPECTION.
Check that the flue terminal and the terminal guard, if fitted, are
clear.
If the appliance is in a compartment check that the ventilation
openings in the compartment door or walls are clear. Refer to
Section 6, Air Supply.
Check the system and remake any joints or fittings which show
signs of leakage. Refill, vent and re-pressurise sealed systems as
described in Section 12, Commissioning.
Operate the appliance and the system taking note of any faults.
WARNING:
Disconnect the electrical supply at the mains and turn off the
gas supply at the gas service cock on the appliance before
servicing the appliance. See Fig.16.
After completing the service always test for gas soundness as
indicated in BS 6891.
14.2 DISMANTLE THE APPLIANCE.
To carry out a full and comprehensive service of the appliance
remove the following parts to gain access to the components
which need to be checked or serviced.
(a) Cabinet Front Panel.
Lift off the top location and clear the lower return over the kick
strip. See Fig. 14.
(b) Facia and Control Box.
Remove the cabinet front panel. Unscrew the two screws
securing the facia to the outer edges of the cabinet, accessible
under the facia. Ease the facia forwards on the slide rails until
fully extended. Lift the facia and control box upwards through
Clean the Fan.
Unscrew the three screws securing the fan mounting plate to the
fan. Unscrew the two screws securing the venturi assembly to
the fan and ease out of the fan outlet. Any dust or fluff
accumulated on the fan or venturi should be removed with a soft
brush or by blowing. Reassemble the venturi and fan mounting
plate in the reverse order. See Fig. 35.
Clean the Burner.
Brush the blade tops and mixing tube with a soft brush and
check that all the flame ports are clear. Remove any blockages
with a non-metallic brush.
Clean the Main Burner Injector.
Inspect the main burner injector located at the rear of the inner
casing. Clean with a soft brush. Do not use a wire brush or
anything likely to cause damage.
Clean the Pilot Bracket.
Brush with a soft brush. Clean the pilot injector by rinsing it in
warm water. Check the condition of the electrode.
Clean the Gas to Water Heat Exchanger.
Cover the main burner injector and pilot bracket with a cloth.
Clean the heat exchanger using a soft brush. Remove the
deposits from the bottom of the combustion chamber. The heat
exchanger is manufactured from copper take care not distort
any of the fins.
Combustion Chamber Insulation.
Examine and replace any pads that are damaged.
33
Controls.
Remove any dust or deposits using a soft brush. Take care not to
mishandle any component connections.
NOTE: Should any of the components be damaged they must be
replaced before the service is completed. Refer to the appropriate
item in Section 15 “Replacement of Parts.”
After servicing, reassemble the appliance in the reverse order.
Check that all components are in place and correctly fixed. See
Fig.16 and 35. Leave the cabinet front panel to be fitted after
checking the operation of the appliance.
14.4 Test the Appliance.
On completion of the service and reassembly of the appliance,
check for gas soundness and the correct operation of the
appliance as described in Section 12 - Commissioning.
Refit the cabinet front panel and reset the controls to the users
requirements.
that as much water as possible is drained from the appliance.
CAUTION: Some water will remain in the expansion vessel,
pump, water diverter valve, water to water heat exchanger and
gas to water heat exchanger. Extra care must be taken when
removing these components.
Place a towel or cloth beneath the component to absorb the
excess system water.
The water will be contaminated and any absorbent material
used must be destroyed or washed thoroughly after any
component has been replaced.
(a) Appliance Heatbank and Heating Circuit:
Turn off the central heating flow and return valves at the
appliance using a flat blade screwdriver. See Fig. 17. Fit a tube to
the drain tap located on the right hand side, front, of the
heatbank and open the tap. See Figs. 16.
NOTE: The heatbank contains about 60 litres (13.5 gallons) of
primary water sufficient time must be allowed to drain the
heatbank. Close the drain tap when the flow has stopped.
(b) Appliance Hot Water Circuit:
Turn off the mains water supply valve at the appliance using a
flat blade screwdriver. See Figs. 16 and17. Fit a tube to the drain
tap located on the left hand side of the gas valve. See Fig. 16.
Open the tap and drain the hot water circuit.
A quantity of water will remain in the water to water heat
exchanger, extra care must be taken when removing this
component.
15.3 COMPONENT REPLACEMENT.
1. Automatic Air Vent. See Figs. 16, 17 and 35.
Check that the electricity supply to the appliance is turned off.
Remove the cabinet front panel, place the facia and control box
in the Service Position, lower the expansion vessel into the
Service Position and remove the inner casing cover, as described
in Section 14.2 a, b, c and d.
Drain the heating circuit as described in Section 15.2 (a).
Unscrew the automatic air vent and discard. Fit the replacement
assembly. Ensure the plastic cap is removed and discarded.
Open the valves, fill and re-pressurise the system as described in
Section 12.2.
Ensure the joint is water tight. Reassemble the appliance in the
reverse order.
2. Fan. See Figs. 9, 16 and 35.
Check that the electricity supply to the appliance is turned off.
Remove the cabinet front panel, place the facia and control box
in the Service Position, lower the expansion vessel into the
Service Position and remove the inner casing cover, as described
in Section 14.2 a,b,c and d.
Remove the fan assembly as described in Section 14.2 (e) and
discard.
Fit the replacement fan in the reverse order.
Reassemble the appliance in the reverse order.
15. Replacement of Parts
WARNING. Switch off the electricity and gas supplies before
replacing any components. After the replacement of any
components check for gas soundness (where relevant) and carry
out functional checks as described in Section 14.
15.1 COMPONENT ACCESS.
To replace components:
It is necessary to remove one or more sections of the cabinet and
cover plates within the appliance. Refer to Section 14.2 a, b, c
and d.
To access the control box:
Place the facia and control box in the Service Position. Refer to
Section 14.2, (b) and Fig. 14. Pull the two thermostat knobs clear
of the facia. Unscrew two fixing screws at the top and two on the
underside securing the facia to the control box. Ease the facia
clear of the control box. Take care not to over stretch the
capillary tubes or wiring. Ensure the facia is supported when out
of the control box. See Fig. 14.
IMPORTANT:
The following components are secured to the appliance with
clips, screws, union fittings or “O “ ring seals to ensure the joints
are water sound. See Fig. 16.
Expansion Vessel.
Circulating Pump.
Water Diverter Valve.
Water to Water Heat Exchanger.
Gas to Water Heat exchanger.
Flow switch.
Gas valve.
Pressure relief valve.
Comprehensive gasket/ O-ring packs are available for the gas
and water connections on the appliance.
Refer to Section 18 - Short Parts List.
When replacing these components the connections must be fully
entered so that the clips can pass completely into the locating
groove. The clips must not be forced into place.
When a component is replaced or disturbed it is recommended
the “O” is replaced.
3. Gas to Water Heat Exchanger. See Figs. 9, 16, 17, 35 and 36.
Check that the electricity supply to the appliance is turned off.
Remove the cabinet front panel, place the facia and control box
in the Service Position, lower the expansion vessel into the
Service Position and remove the inner casing cover, as described
in Section 14.2 a, b, c and d.
Drain the heating circuit as described in Section 15.2 (a).
Remove the fan, flue hood, combustion chamber cover as
described in Sections 14.2 e, f and g. Remove the Safety
Temperature Limiter Thermostat phial from the thermostat
pocket as described in Section 15.3 - 11.
Remove the left hand fibre insulation pad from the combustion
chamber. Remove the access cover in the left hand side of the
combustion chamber held in position with one screw. Unscrew
the front and rear heat exchanger union connections.
Lift the heat exchanger off the right hand side of the combustion
chamber support and clear of the union connections. Remove
The “O” rings can be lubricated with a suitable lubricant (i.e.
silicon based grease or glycerine) which is non-reactive with the
ethylene - propylene nitrile “O” rings.
15.2 Draining The Appliance.
Check that the electricity supply to the appliance is turned off.
Remove the kick strip secured to the cabinet side panels and
base plate with five screws. See Fig. 14.
Before removing any component holding water it is important
34
the heat exchanger clear of the inner casing.
WARNING: There will be a small quantity of water remaining in
the heat exchanger.
Follow the procedure as described in 15.2.
Discard the heat exchanger.
Fit the replacement heat exchanger in the reverse order using
new fibre sealing washers. Ensure the washers are in place and
the heat exchanger correctly aligned.
Tighten the union connections. Refit the access cover to the left
hand side of the combustion chamber and replace the fibre
insulation pad. Refit the combustion chamber cover. Refit the
overheat thermostat phial with a layer of heat sink compound.
Refer to Wiring Diagram Fig. 9). Reassemble the appliance in the
reverse order.
Open the valves, fill and re-pressurise the system as described in
Section 12.2.
Remove the cabinet front panel, place the facia and control box
in the Service Position, lower the expansion vessel into the
Service Position and remove the inner casing cover, as described
in Section 14.2 a, b, c and d.
Remove the combustion chamber cover and main burner
assembly as described in Sections 14.2 g and h.
Discard the burner.
Fig. 37. Combustion chamber insulation.
Gas to water heat exchanger
Combustion chamber
rear insulation pad
4. Combustion Chamber Insulation. See Figs. 9, 16, 17, 35 and 37.
Check that the electricity supply to the appliance is turned off.
Remove the cabinet front panel, place the facia and control box
in the Service Position, lower the expansion vessel into the
Service Position and remove the inner casing cover, as described
in Section 14.2 a, b, c and d.
Main burner
Combustion chamber
side insulation pads
Fig. 36. Gas to water heat exchanger.
Warning: There will be a small quantity of
water remaining in the heat exchanger.
Fit a replacement main burner in the reverse order. Ensure the
main burner is fitted correctly on the main burner injector
located at the back of the inner casing. Reassemble the
appliance in the reverse order.
6. Main Burner Injector. See Figs. 16, 35 and 38.
Check that the electricity supply to the appliance is turned off.
Remove the cabinet front panel, place the facia and control box
in the Service Position, lower the expansion vessel into the
Service Position and remove the inner casing cover, as described
in Section 14.2 a, b, c and d.
Remove the combustion chamber cover and main burner
assembly as described in Sections 14.2 g and h.
Unscrew the brass injector at the rear of the inner casing and
discard.
Fit the replacement injector in the reverse order. Thread sealing
compound is not required. Reassemble the appliance in the
reverse order.
7. Pilot Burner. See Figs. 16, 34, 35 and 39.
Check that the electricity supply to the appliance is turned off.
Remove the cabinet front panel, place the facia and control box
in the Service Position, lower the expansion vessel into the
Service Position and remove the inner casing cover, as described
in Section 14.2 a, b, c and d.
Remove the combustion chamber cover as described in Section
14.2 g.
Unscrew the two screws securing the pilot burner to the main
Front union connection
Fibre sealing washer
Gas to water heat
exchanger
Fibre sealing washer
Remove access cover
Fixing screw
Rear union connection
Remove left-hand fibre insulation pad
Drain the heating circuit as described in Section 15.2 (a).
Remove the combustion chamber cover as described in Section
14.2 (g).
Remove the gas to water heat exchanger as described in Section
15.3 - 3.
Remove the fibre insulation pads from the combustion chamber
side, rear and front sections and discard.
Fit replacement fibre insulation pads in the reverse order.
Note: The fibre pads are fragile take care they are not damaged.
Ensure the insulation pad fitted to the combustion chamber
cover has the pilot observation hole correctly aligned.
Reassemble the appliance in the reverse order.
Open the valves, fill and re-pressurise the system as described in
Section 12.2
5. Main Burner. See Figs. 16, 34 and 35.
Check that the electricity supply to the appliance is turned off.
Fig. 38. Main burner injector.
Rear of inner
casing
Main burner injector
35
Fig. 35. Inner casing assembly.
Venturi connections
–
+
Fan assembly
Water to water
heat exchanger
Fan outlet
Securing clip
Venturi housing
located in fan
outlet
Safety temperature
limiter thermostat
phial
Fan electrical
connections (2)
Flexible pipes (2)
Automatic
air vent
Thermostat
pocket
Thermostat
fixing
Fan assembly
Fan assembly
mounting plate
Flue hood
Gas to water
heat-exchanger
Fan assembly fixing
screws (2)
Sealing cover and
fixing screw
Flue hood fixing
screws (2)
Combustion chamber
cover fixing screws (4)
Combustion chamber cover
Inner casing
Pilot bracket and
fixing screws (2)
Burner
assembly
Pilot pipe union
nut
Pilot tube sealing
grommet
Inner casing flexible
pressure connection
Burner assembly
fixing screws (2)
Spark electrode
Pilot pipe
36
Spark electrode lead
burner. Ease the pilot burner forwards sufficiently to allow a
suitable tool to support it.
The spark electrode is held in position with a clip. Ease the clip
backwards and remove the spark electrode and retain.
Unscrew the union nut securing the pilot pipe and ease the pipe
clear. Remove the pilot injector which is a push fit inside the pilot
burner and retain.
Discard the pilot burner.
Fit a replacement pilot burner in the reverse order. Check the pilot
burner settings and spark electrode gap is as shown in Fig. 39.
Reassemble the appliance in the reverse order.
Carefully pull one end of the lead from the electrode and ease the
other end off the tag on the spark ignition sequence board.
Remove the lead from the appliance and discard.
Fit replacement lead in reverse order, ensure the inner casing is
sealed correctly. Reassemble the appliance in the reverse order.
Check the pilot burner settings and spark electrode gap is 4 to
5mm (0.8in), as shown in Fig. 39. Reassemble the appliance in
the reverse order.
11. Safety Temperature Limiter Thermostat. See Figs. 9, 16,
and 53.
Check that the electricity supply to the appliance is turned off.
Remove the cabinet front panel, place the facia and control box
8. Pilot Injector. See Figs. 16, 34, 35 and 39.
Check that the electricity supply to the appliance is turned off.
Remove the cabinet front panel, place the facia and control box
in the Service Position, lower the expansion vessel into the
Service Position and remove the inner casing cover, as described
in Section 14.2 a, b, c and d.
Remove the combustion chamber cover as described in Section
14.2 g.
Unscrew the two screws securing the pilot burner to the main
burner. Ease the pilot burner forwards sufficiently to allow a
suitable tool to support it.
The spark electrode is held in position with a clip. Ease the clip
backwards and remove the spark electrode and retain.
Unscrew the union nut securing the pilot pipe and ease the pipe
clear. Remove the pilot injector which is a push fit inside the pilot
burner and discard. Fit a replacement pilot injector in the reverse
order. Check the pilot burner settings and spark gap is as shown
in Fig. 39.
Reassemble the appliance in the reverse order.
Fig. 39. Pilot burner setting.
Top of main burner rail
1mm
Main burner
Part view on
arrow ‘A’
er
burn
Main ntre line
ce
mm
35.5
4-5mm
spark gap
9. Spark Electrode. See Figs. 16, 34, 35 and 39.
Check that the electricity supply to the appliance is turned off.
Remove the cabinet front panel, place the facia and control box
in the Service Position, lower the expansion vessel into the
Service Position and remove the inner casing cover, as described
in Section 14.2 a, b, c and d.
Remove the combustion chamber cover as described in Sections
14.2 g.
Unscrew the two screws securing the pilot burner to the main
burner. Ease the pilot burner forwards sufficiently to allow
access.
The spark electrode is held in position with a clip. Ease the clip
backwards and remove the spark electrode. Pull off the spark
electrode cable and discard the spark electrode.
Fit a replacement spark electrode in the reverse order. Check the
pilot burner settings and spark electrode gap is 4 to 5mm (0.8in),
as shown in Fig. 39. Reassemble the appliance in the reverse
order.
‘A’
Spark
electrode
Pilot
burner
Pilot burner
fixing
screws (2)
in the Service Position, lower the expansion vessel into the
Service Position and remove the inner casing cover, as described
in Section 14.2 a, b, c and d.
Remove the facia as described in Section 15.1.
Remove the sealing cover from the inner casing sealing the
capillary tube. Remove the clip and pull the phial from the
pocket on the gas to water heat exchanger. Carefully feed the
capillary tube and phial through the hole in the side of the inner
casing. Pull off the two electrical connections to the safety
temperature limiter thermostat accessible from inside the
control box on the right hand side. Note the position of the
connections. Remove the central clamping nut. Withdraw the
thermostat and thread the capillary through the hole in the
control box. Discard the thermostat.
Fit a new safety temperature limiter thermostat in the reverse
order and ensure the cover is replaced correctly and seals the
inner casing. Ensure the electrical connections are made to the
terminals inside the control box, polarity is not important. Apply
a smear of heat sink compound to the thermostat phial.
Reassemble the appliance in the reverse order.
12. Hot Water Thermostat. See Figs. 9, 16, 40, 53 and 54.
Check that the electricity supply to the appliance is turned off.
Remove the cabinet front panel and place the facia and control
box in the Service Position, as described in Section 14.2 a and b.
10. Spark Electrode Lead. See Figs.16,34,35 and 39.
Check that the electricity supply to the appliance is turned off.
Remove the cabinet front panel, place the facia and control box
in the Service Position, lower the expansion vessel into the
Service Position and remove the inner casing cover, as described
in Section 14.2 a, b, c and d.
Remove the combustion chamber cover as described in Sections
14.2 g.
Unscrew the two screws securing the pilot burner to the main
burner. Ease the pilot burner forwards sufficiently to allow
access.
Remove the pilot tube supply sealing grommet from the front of
the inner casing and retain. Remove the facia as described in
Section 15.1.
37
Remove the facia as described in Section 15.1.
Remove the spring clip from the thermostat pocket located on
the front left hand side of the heatbank.
NB. There are two thermostat phials fitted in the pocket. The Hot
Water thermostat phial is at the front of the pocket. To identify
the phial follow the capillary tube from the thermostat body
located inside the control box (marked on the facia “Hot Water”
thermostat) to the thermostat pocket.
Ease the phial out of the pocket and unclip the capillary from the
left hand side of the cabinet panel.
Unscrew the two screws on the underside of the control box
securing the mounting bracket to the control box. Ease the
bracket out of the control box allowing the capillary tubes to
feed through the slot in the rear of the control box.
Unscrew the left hand central clamping nut. Pull off the two
electrical connections from the rear of the thermostat. Push the
thermostat body back to disengage the spindle from the
mounting bracket. Withdraw the thermostat threading the
capillary through the slot in the rear of the control box and
discard.
Fit a new thermostat and re-assemble in the reverse order. The
capillary of the replacement thermostat must be uncoiled to
assist its passage through the control box opening. Ensure the
capillary is re-clipped to the left hand side panel, clear of any hot
surfaces and without tight bends. Apply a smear of heat sink
compound to the thermostat phial and replace the spring clip
into the thermostat pocket.
Reassemble the appliance in the reverse order.
13. Heating Thermostat. See Figs. 9, 16, 41, 53 and 54.
Check that the electricity supply to the appliance is turned off.
Remove the cabinet front panel, place the facia and control box
in the Service Position, as described in Section 14.2 a and b.
Remove the facia as described in Section 15.1.
Ease the spring wire retaining clip off the top location on the
front of the top manifold assembly. Pull the retaining clip and
capillary gently downwards out of the thermostat pocket located
in the top manifold. Continue pulling gently downwards until the
phial is clear of the thermostat pocket. Remove the spring wire
retaining clip and retain. Unclip the capillary from the left hand
side of the cabinet panel.
Unscrew the two screws on the underside of the control box
securing the mounting bracket to the control box. Ease the
bracket out of the control box allowing the capillary tubes to
feed through the slot in the rear of the control box.
Unscrew the right hand central clamping nut. Pull off the two
electrical connections from the rear of the thermostat. Push the
thermostat body back to disengage the spindle from the
mounting bracket. Withdraw the thermostat threading the
capillary through the slot in the rear of the control box and
discard.
Fit a new thermostat and re-assemble in the reverse order. Apply
a smear of heat sink compound to the thermostat phial. The
capillary of the replacement thermostat must be uncoiled to
assist its passage through the control box opening. Ensure the
capillary is re-clipped to the left hand side panel, clear of any hot
surfaces and without tight bends. The spring wire retaining clip
must be re-located on the capillary and in the thermostat pocket.
Clip back into position on the top of the manifold assembly.
Reassemble the appliance in the reverse order.
14. Water Filter Primary System. See Figs. 9, 16, 41 and 47.
Fig. 41. Heating thermostat & water filter
Top manifold
assembly
Ease spring wire retaining
clip off the top location on
the front of the manifold
Heating thermostat
pocket in underside
of top manifold
Water filter
'O'ring seal
Spring wire retaining clip
Capillary
Heating thermostat phial
Check that the electricity supply to the appliance is turned off.
Remove the cabinet front panel, place the facia and control box in
the Service Position, as described in Section 15.2.a.
NOTE: It is not necessary to drain the complete appliance. Fit a 5mm
dia. plastic pipe to the manual air vent and drain the top manifold.
See Fig. 51.
Remove the heating thermostat phial as described in Section 15.13.
Using a pozi drive 'chubby' type screwdriver remove the screw and
clip securing the heating thermostat pocket into the top manifold.
Retain the screw and clip. See Fig. 41.
Ease the heating thermostat pocket out of the top manifold and
clear of the appliance.
The water filter is located inside the top manifold. Remove the filter
and clean or replace.
Reassemble the appliance in the reverse order using a new 'O' ring
seal. Ensure the securing clip and screw are correctly located and
the heating thermostat phial and retaining clip are correctly
assembled.
15. Hot Water High Limit Thermostat. See Figs. 9, 16, 42 and 53.
Check that the electricity supply to the appliance is turned off.
Remove the cabinet front panel, place the facia and control box
in the Service Position, as described in Section 14.2 a and b.
Remove the facia as described in Section 15.1.
Remove the flow switch and lay to one side. Refer to Section
15.3-30.
Slacken the two M3 taptite screws holding the high limit
thermostat to the hot water flow pipe. Ease the thermostat body
anti-clockwise to release.
Fig. 40. Hot water thermostat and
heatbank overheat thermostat.
Heat bank
Spring clip
Thermostat
pocket
Hot water thermostat
phial
Heat bank overheat
thermostat
Capillary
Heating
thermostat
pocket
Capillary
Unplug the thermostat leads marked, X16 (DHW Overhea),
from the control board and the earth lead from the earthing
38
of heat sink compound to the thermostat phial. Reassemble the
appliance in the reverse order.
17. Air Flow Pressure Switch. See Figs. 9, 35, 43 and 53.
Check that the electricity supply to the appliance is turned off.
Remove the cabinet front panel and place the facia and control
box in the Service Position, as described in Section 14.2 a and b.
Remove the facia as described in Section 15.1.
Carefully pull off the suction tubes and the electrical connections
from the switch.
Note the position of the suction tubes and electrical connections.
Unscrew the two fixing screws from the bottom right hand side
of the control box securing the air pressure switch.
Remove air pressure switch from the control box and discard.
Fit the replacement switch in reverse order. Ensure the electrical
connections have been made to the correct terminals (Brown to
“C” tag, White to “NC” and the Grey to “NO”) and the suction
tubes fitted to the correct connections on the switch. Connect
Tube marked positive (+) to the connection marked “H” and the
tube marked negative (-) to connection marked “L”.
Reassemble the appliance in the reverse order.
bracket located in the control box.
Release the strain relief bush by compressing the loose
section of the bush and carefully withdraw the leads from the
control box. Remove the high limit thermostat and discard.
Fit a new high limit thermostat using the original fixing
screws in the reverse order. Apply a smear of heat sink
compound to the contact surface. Ensure the leads are
connected to the control board and earthing bracket
correctly. Replace the strain relief bush. Reassemble the
appliance in the reverse order.
16. Heat Bank Overheat Thermostat. See Figs. 9, 16, 40, 53 and 54.
Check that the electricity supply to the appliance is turned off.
Remove the cabinet front panel and place the facia and control
box in the Service Position, as described in Section 14.2 a and b.
Remove the facia as described in Section 15.1.
Remove the spring clip from the thermostat pocket located on
the front left hand side of the heatbank.
Note: There are two thermostat phials fitted in the pocket. The
Heat Bank Overheat Thermostat phial is located at the rear of
the pocket. To identify the phial follow the capillary from the
thermostat body inside the control box to the thermostat
pocket.
18. Gas Valve. See Figs. 9, 16, 35 and 44.
Check that the electricity supply to the appliance is turned
off.
Remove the cabinet front panel, place the facia and control
box in the Service Position and lower the expansion vessel
into the Service Position as described in Section 14.2 a, b and
c.
Turn off the gas supply at the service cock.
Disconnect the pilot pipe at the gas valve. Unscrew the
bracket supporting the domestic drain from the left hand side
of the gas valve. Retain bracket and screw.
Unscrew the four M4 extended hexagon headed screws
securing the outlet flange connection to the side of the of the
gas valve. Unscrew the inlet gas union at the gas service
cock. Support the valve and unscrew the retaining screws
from the solenoid electrical connection plugs and pull each
plug off its respective set of terminals.
Ease the first phial clear of the pocket and place to one side. Ease
the overheat thermostat phial clear of the pocket and unclip the
capillary from the left hand side of the cabinet panel.
Fig. 42. Hot water high limit thermostat.
Hot water outlet to
taps
Hot water high limit
thermostat
Enlarged detail
Slacken the fixing
screws and ease the
thermostat body anticlockwise to release.
The thermostat body
incorporates fixing
slots, it is not necessary
to remove the screws.
Fig. 43. Air flow pressure switch.
Control box
Suction
tubes (2)
Top manifold assembly
Unscrew the two screws on the underside of the control box
securing the mounting bracket holding the Hot Water and
Heating thermostats to the control box. To access the Heat Bank
Overheat thermostat ease this bracket sufficiently clear of the
control box allowing the capillary tubes to feed through the slot
in the rear of the control box.
Air flow
pressure
switch
Ease off the two electrical connections from the rear of the
thermostat. Unscrew the central clamping nut. Withdraw the
overheat thermostat and thread the capillary through the hole in
the left hand side of the control box. Discard the thermostat.
Fixing screws (2)
Safety temperature
limiter thermostat
Fit a new thermostat and re-assemble in the reverse order. The
capillary of the replacement thermostat must be uncoiled to
assist its passage through the hole in the control box. Ensure the
capillary is reclipped to the left hand side panel, clear of any hot
surfaces and without tight bends. The spring clip must be
replaced into the thermostat pocket.
NOTE: The plugs are dissimilar and not inter-changeable.
Pull off the pressure compensating tube.
Remove the gas valve and flange sealing washer clear of the
appliance.
Remove the female half of the brass union connector fixed to
the gas valve inlet. Discard the gas valve and sealing washer.
Ensure the electrical connections are made to the terminals
inside the control box, polarity is not important. Apply a smear
39
Service Position, as described in Section 14.2 a, b and c. Remove
the facia as described in Section 15.1 .
Drain the heating circuit as described in Section 15.2 a.
Remove the circulating pump as described in Section 15.3 - 20.
Note: It is not necessary to disconnect the electrical cable. The
cable length is sufficient to allow the pump head to rest on top of
the appliance. Do not allow the pump head to be suspended by
the cable. Secure the pump head.
Pull off the Molex plug marked X7 ‘Diverter Valve’ from the
control board located in the control box. Release the strain relief
bush by compressing the loose section of the bush and carefully
withdraw the lead from the control box.
Using a pair of long nose pliers, remove the two clips securing
the 6 mm copper pressure pipe, to the top left hand corner of the
valve and pump connection. Retain the clips. Ease the pressure
pipe out of the connections and clear of the appliance.
Retain the pressure pipe.
Unscrew the four fixing screws securing the water diverter valve
to the bottom manifold. The bottom right hand screw is
accessible using a “chubby” type screwdriver. Remove the water
diverter valve clear of the appliance. Discard the valve and “O”
ring seals. Retain the fixing screws.
WARNING. There will be a small quantity of water remaining in
the valve and lower manifold. Follow the procedure as described
in 15.2.
NOTE: Three new “O” ring seals are provided with the
replacement valve. Two of the “O” rings are identical in diameter
and cross - section and are required for the outer ports. The third
“O” ring is smaller in diameter and cross-section and will seal the
centre port.
IMPORTANT: Fit the two larger diameter “O” rings into the outer
locations on the replacement valve. Fit the smaller diameter “O”
ring over the centre spigot on the bottom manifold. Ensure the
“O” ring is located correctly against the shoulder on the centre
spigot.
Fit the replacement valve in reverse order ensure the four fixing
Using an approved jointing compound complying with
BS5292 fit the female half of the brass union to the
replacement gas valve inlet.
Fit the replacement gas valve in the reverse order ensure the
flange washer is renewed. Reconnect the pressure
compensating tube. Reassemble the appliance in reverse
order.
Turn on the gas supply at the service cock and check for gas
soundness.
Re-commission the appliance and check the burner setting
pressure. Refer to Section 12: Commissioning.
19. Pilot Filter.
If problems are experienced with the pilot filter fit a replacement
gas valve as described in Section 15.3.-18.
20. Circulating Pump. See Figs. 9, 16 and 45.
Check that the electricity supply to the appliance is turned off.
Remove the cabinet front panel, place the facia and control box
in the Service Position and lower the expansion vessel into the
Service Position, as described in Section 14.2 a, b and c.
Drain the heating circuit as described in Section 15.2 a.
Remove the pump cover and disconnect the electrical
connections. Release the cable clamp and remove the cable.
Withdraw the two securing clips from the pump body. Ease the
Fig. 44. Gas valve.
Unscrew retaining screws from the
solenoid electrical connection plugs. Pull
each plug off its respective set of terminals
Pull off the pressure
compensating tube
Remove extended
hexagonal head
screws (4)
Gas service
cock
Flange
Gas inlet
union fitting
Remove the female half
of the brass union fixed
to the gas valve inlet
Fig. 45. Circulating pump.
Warning: There will be a small quantity of
water remaining in the pump and pipework
Replace the “O” ring
seal when changing
the gas valve
Remove
pump cover
and
disconnect
electrical
connections
Pilot supply tube
pump forwards about 10 mm off the “O” ring seals and remove
from the appliance.
WARNING: There will be a small quantity of water remaining in
the pump and pipework. Follow the procedure as described in
15.2. Discard the pump and “O” ring seals.
Fit new “O” ring seals. Fit a replacement pump in the reverse
order taking care to ensure the securing clips are properly
entered into the slots and not scoring the O-rings on entry. A
smear of lubricant on each O-ring will ease the re-assembly.
Check the pump head is set to maximum.
The pump head is a Grundfos 15/60. A replacement head may
be transferred to the special body. Take care not to mark the
mating surfaces.
Reconnect the cable and refit the cable clamp.
Open the valves, fill and repressurise the system as described in
Section 12.2.
Reassemble the appliance in the reverse order.
21. Water Diverter Valve. See Figs. 9, 16, 45 and 46.
Check that the electricity supply to the appliance is turned off.
Remove the cabinet front panel, place the facia and control box
in the Service Position and lower the expansion vessel into the
Securing
clip
Two “O” ring
seals. Remove
and replace
with new “O”
ring seals
Open vent
pipe (if fitted)
3
Securing
clip –
copper
pressure
pipe
Cable
clamp
4
Copper
pressure
pipe
Pump head. To
remove ease
forwards about
10mm off the “O”
ring seals
40
Open vent
connection
(if fitted)
Flat clip
securing pump
inlet pipe
Securing
clip
screws are correctly engaged. Replace the “O” ring seals and refit
the pressure pipe. Ensure the securing clips are fully engaged in
the locating holes.
Reconnect the electric cable to the control board and replace the
strain relief bush. Replace the circulating pump as described in
Section 15.3-20.
Open the valves, fill and repressurise the system as described in
Section 12.2. Reassemble the appliance in the reverse order.
the manifold to the water to water heat exchanger support
bracket. Retain the screws. See Fig. 47.
Unscrew the flat faced union securing the manifold to the inner
casing pipework. See Fig. 47.
Remove the sealing washer and discard. See Fig. 47.
Ease the manifold assembly downwards, 10 mm approx., until
clear of the heating flow and return pipes and hot water outlet
pipe. See Fig. 47.
Remove the top manifold clear of the appliance and retain.
Unscrew locating screws Nos.11 and 12 two full turns. Unscrew
and remove screws Nos.13 and 14 securing the bottom manifold
to the water to water heat exchanger support bracket. See Figs.
47 and 48. Retain the screws. Unscrew the bracket supporting
the domestic drain from the left hand side of the gas valve. Using
long nose pliers remove the clip securing the drain pipe to the
bottom manifold. Ease the drain pipe downwards out of the
manifold and remove. See Fig. 48.
Retain the clip, screw, bracket and drain pipe.
Ease the bottom manifold and water to water heat exchanger
upwards 10 mm approx. until clear of the heat bank flow and
return pipes. See Fig. 48.
22. Water to Water Heat Exchanger. See Figs. 16, 41, 45, 46, 47,
48, 49, 51 and 52.
Check that the electricity supply to the appliance is turned off.
Remove the cabinet front panel, place the facia and control box
in the Service Position and lower the expansion vessel into the
Service Position, as described in Section 14.2 a, b and c.
Drain the heating circuit as described in Section 15.2 a.
Drain the hot water circuit as described in Section 15.2 b.
WARNING: The weight of the water to water heat exchanger is
2 kg. approx. A quantity of water will remain in the heat
exchanger and pipework. Follow the procedure as described in
15.2.
Remove the circulating pump as described in Section 15.3-20.
Remove the water diverter valve as described in Section 15.3-21.
NOTE: i). It is not necessary to disconnect the electrical cable
from these components. The length of cable is sufficient to allow
them to rest on top of the appliance cabinet. Do not allow them
to be suspended by the cable. Secure the pump head and
diverter valve.
NOTE: ii). Unless otherwise stated all water joints are sealed
with “O” rings. To disconnect twist the pipe and / or ease the
joint apart. When re-connecting the joint a new “O” ring must be
fitted. Silicone grease must be applied to the “O” ring.
Remove the pressure relief valve and manual air vent assembly
as described in Section 15.3-27 and retain. See Fig. 51.
Unscrew locating screw No.1 in the bottom manifold two full
turns. See Fig. 47.
Unscrew the flat faced union fitting below the flow switch.
Remove the sealing washer and discard. See Fig. 52. Move the
cold water inlet pipe to the left to clear the flow switch. Ease the
pipe upwards, 10 mm approx. and remove from the bottom
manifold. Retain the pipe.
Unscrew the union fitting below the cold water inlet valve and
remove the flow switch and water filter assembly. See Fig. 52.
Place the flow switch and water filter assembly on top of the
appliance cabinet and secure.
Unscrew locating screw No. 2 in the top manifold two full turns.
See Fig. 47. Ease the heating return pipe downwards 10 mm
approx. into the slip joint in the bottom manifold.
Move the pipe to the left to clear the top manifold. Ease the pipe
upwards 10 mm approx. and remove the pipe from the bottom
manifold. Retain the pipe.
Remove the heating control thermostat phial as described in
Section 15.3-14. See Fig. 41. Place the phial to one side.
If the appliance is fitted to an open vent system unscrew the
open vent union connection and remove the washer. See Fig. 45.
Remove the flat clip securing the pump inlet pipe to the pump
lower support plate. Retain the clip. See Fig. 45.
Remove the two screws Nos. 3 and 4 securing the pump inlet
pipe support plate and remove the plate. See Fig45.
Unscrew two full turns locating screw No. 5. See Fig. 47. Ease the
pump inlet pipe upwards 10 mm approx. and remove from the
bottom manifold. Retain the pipe, plate and screws.
To access the water to water heat exchanger the top manifold
must first be removed:
Unscrew locating screw Nos. 6, 7 and 8 in the top manifold two
full turns. Unscrew and remove screws Nos. 9 and 10 securing
NOTE: It may be necessary to push down on the flow and return
pipes to release the “O” ring fittings. Before entering the heat
bank the flow and return pipes are fitted into slip joints. The
joints are sealed with “O” rings and allow some movement
forwards or backwards when removing the bottom manifold and
water to water heat exchanger. See Fig.48.
Ease the water to water heat exchanger and bottom manifold
from the support bracket and clear of the appliance.
Release screw No.15 and remove the bottom manifold off the
locations on the water to water heat exchanger. See Figs. 47 and
48. Discard the heat exchanger. Retain the fixing screw.
Remove the two “O” ring seals from the rear of each manifold
and discard.
IMPORTANT: Two new “O” ring seals must be fitted to the rear
of each manifold. See Fig. 49.
If the flow and return pipes to the heat bank have been disturbed
when removing the water to water heat exchanger the “O” ring
seals must be replaced :
Ease the heat bank flow pipe out of the front slip joint and return
pipe out of the rear slip joint and clear of the push in elbows. See
Fig. 48.
Remove and discard the “O” ring seals from each pipe. Replace
with new “O” ring seals.
Pull out the flat clip from the front push in elbow and remove the
elbow. Retain the clip and push in elbow. See Fig. 48.
To release the rear elbow reach under the water to water heat
exchanger bracket and push in fully the flat plate clamp
mechanism. Remove the rear push in elbow and retain. See
Fig.48.
Remove and discard the elbow “O” ring seals. Replace with new
“O” ring seals.
Re-assemble the rear and front push in elbows. Ensure the rear
clamp mechanism is engaged and fully pulled into the location.
Engage the front flat clip into the slot correctly.
Re-assemble the flow and return pipes into the slip joints. The
pipe lengths are not identical, the longest pipe is the rear/return
pipe. See Fig. 48.
Re-assemble the bottom manifold to the replacement water to
water heat exchanger. Ensure the heat exchanger is located
correctly with the internally threaded boss fitting through the
fixing hole in the manifold and the raised section on the manifold
port fitting into the bottom right hand port on the heat
exchanger. See Fig. 49. Replace screw No. 15 and tighten.
Fit the replacement water to water heat exchanger and bottom
manifold assembly into the support bracket. Ensure the heat
bank flow and return connections are fully engaged. Secure the
41
assembly to the support bracket with screw Nos.13 and 14. Fully
tighten the screws fixing the “O” rings Nos. 11 and 12. See Figs.
47 and 48.
Re-assemble the top manifold in the reverse order.
Ensure the heating flow and heating return and hot water pipes
are fully engaged.
Ensure a new sealing washer and ‘“O”’ ring is fitted when reconnecting the union securing the top manifold to the inner
casing pipework. Replace the manifold top fixing screws Nos.9
and 10. Tighten screws Nos. 6, 7 and 8 and manifold union
fitting. See Fig. 47.
Re-assemble the pump outlet pipe and tighten screw No. 5. Re-fit
the pump support plate and secure with screw Nos. 3 and 4.
Ensure the flat clip is re-located.
Re-connect the open vent pipe (if applicable). Ensure a new
sealing washer is fitted. Replace the heating thermostat phial
and wire clip.
Re-assemble the heating return pipe using the slip joint in the
bottom manifold to manoeuvre the pipe into position.
Re-assemble the cold water inlet pipe and flow switch ensure the
sealing washer is renewed. Re-connect the union fitting to the
cold water inlet valve. See Fig. 52.
Re-assemble the pressure relief valve ensure clip is replaced. See
Fig. 51.
Re-assemble the domestic drain pipe renewing the “O” seal. Relocate the securing clip and fixing bracket to the gas valve. See
Fig. 48.
Before continuing ensure screws 1, 2, 5, 6, 7, 8, 11 and 12
are fully engaged. The “O” ring seals must be pushed fully
into the housing.
Re-assemble the water diverter valve. Re-assemble the 6 mm
diameter pressure pipe to the pump inlet pipe and diverter valve
renewing the “O” ring seals. Ensure the securing clips are
replaced.
Re-assemble the circulating pump ensure the securing clips are
re-placed.
Open the valves, fill and repressurise the system as described in
Section 12.2. Reassemble the appliance in the reverse order.
23. Water to Water Heat Exchanger Top Manifold. See Figs. 41,
45, 46, 47, 48, 49, 51 and 52.
Check that the electricity supply to the appliance is turned off.
Remove the cabinet front panel, place the facia and control box
in the Service Position and lower the expansion vessel into the
Service Position, as described in Section 14.2 a, b and c.
Drain the heating and hot water circuit as described in Section
15.2
Refer to Section 15.3-22 and remove the Top Manifold
commencing from the instruction:
WARNING: The weight of the water to water heat exchanger is
2 kg. approx. A quantity of water will remain in the heat
exchanger and pipework. Follow the procedure as described in
15.2.
Remove the manifold clear of the appliance Remove and retain
the brass stub connection and nut from the manifold.
Withdraw the by-pass adjuster retaining clip and unscrew the
adjuster from the manifold retaining both items.
Undo and remove the phial pocket securing clip screw and clip.
Retain both the clip and screw. Extract the phial pocket and
retain.
Unscrew and retain all locating screws.
Before reassembling the appliance refit the by-pass adjuster and
phial pocket in the reverse order using new “O” rings.
Screw all locating screws fully home then unscrew each of them
two full turns. Check that none of the screws protrude into their
relevant bores.
Fig. 46. Water diverter valve.
WARNING: There will be a small
quantity of water remaining in the
water diverter valve and pipework
Copper pressure pipe
Replace the “O” ring seals (2) on
the copper pressure pipe located
either end of the pipe
Bottom manifold
Ensure the “O” ring seal is removed
from the bottom manifold spigot
Securing clip for copper
pressure pipe
When replacing the “O” ring seal to
the centre spigot ensure it is the
correct diameter and cross section.
Locate the “O” ring onto the shoulder
formed on the centre spigot
Unscrew the four fixing screws
securing the valve head to the
bottom manifold
Fixing holes (4)
Before reassembly ensure the
“O” ring seals are in place with
the smaller diameter “O” ring seal
located on the centre spigot of
the bottom manifold
Fit new “O” ring seals in the outer
locations on the rear of the diverter
valve. The “O” ring seals are
identical for the outer connections
Bottom right-hand fixing screw
accessible using a “chubby” type
screwdriver
VIEW ON FRONT OF WATER
DIVERTER VALVE
VIEW ON REAR OF WATER
DIVERTER VALVE
42
Reassemble the manifold in the reverse order using new “O”
rings to replace any “O” rings which have been disturbed. Use
new sealing washers where appropriate.
Ensure that all clips and screws are correctly refitted.
Open the valves, fill and repressurise the system as described in
Section 12.2. Reassemble the appliance in the reverse order.
24. Water to Water Heat Exchanger Bottom Manifold.
Refer to Section 15.3-22 Water to Water Heat Exchanger.
Follow this procedure and replace the bottom manifold after the
bottom manifold/ water to water heat exchanger assembly has
been removed from the appliance. Retain the original water to
water heat exchanger and fit the new manifold using new “O”
rings.
Reassemble the appliance as described in Section 15.3-22.
25. Expansion Vessel. See Figs. 16 and 50.
Check that the electricity supply to the appliance is turned off.
Remove the cabinet front panel, place the facia and control box
in the Service Position and lower the expansion vessel into the
Service Position, as described in Section 14.2 a, b and c.
Drain the heating circuit as described in Section 15.2 a.
Unscrew the union fitting on the right hand side of the expansion
vessel and remove the sealing washer. Ease the expansion vessel
assembly upwards to clear the support bracket and remove from
the appliance. Take care when removing as a small quantity of
water remains inside the vessel. Follow the procedure as
described in 15.2. Discard the expansion vessel.
Fit a replacement expansion vessel into the support bracket and
reconnect the union fitting using a new sealing washer.
Open the valves, fill and repressurise the system as described in
Section 12.2.
Reassemble the appliance in the reverse order.
26. Expansion Vessel Flexible Hose. See Figs. 16 and 50.
Check that the electricity supply to the appliance is turned off.
Remove the cabinet front panel, place the facia and control box
in the Service Position and lower the expansion vessel into the
Service Position, as described in Section 14.2 a, b and c.
Drain the heating circuit as described in Section 15.2 a.
Unscrew the union fitting from behind the pump.
Remove and discard of the sealing washer. Ease the expansion
vessel assembly upwards to clear the support bracket and
remove from the appliance. Take care when removing as a small
quantity of water remains inside the vessel. Follow the procedure
as described in Section 15.2.
Unscrew the union fitting on the right hand side of the expansion
vessel. Remove and discard of the sealing washer.
Reconnect the hose in the reverse order using new sealing
washers. Ensure the orientation of the hose fittings does not
cause twisting or crimping of the hose when the expansion
vessel is repositioned in the boiler.
Open the valves, fill and repressurise the system as described in
Section 12.2.
Reassemble the appliance in the reverse order.
27. Pressure Relief Valve. See Figs. 16 and 51.
Check that the electricity supply to the appliance is turned off.
Remove the cabinet front panel, place the facia and control box
in the Service Position as described in Section 14.2 a, b and c.
Drain the heating circuit as described in Section 15.2 a.
Withdraw the securing clip from the top manifold and ease the
pressure relief valve assembly forwards until clear of the
appliance. Unscrew the manual air vent and disconnect the
overflow pipe. Discard the valve and “O” ring seal.
Re-connect the overflow pipe and manual air vent to the
replacement valve. Fit a new “O” ring seal to the valve.
Re-connect the assembly to the appliance and replace the
securing clip.
Open the valves, fill and re-pressurise the system as described in
Section 12.2. Reassemble the appliance in the reverse order.
28. Manual Air Vent. See Figs. 16 and 51.
Check that the electricity supply to the appliance is turned off.
Remove the cabinet front panel, place the facia and control box
in the Service Position as described in Section 14.2 a, b and c.
Drain the heating circuit as described in Section 15.2 a.
Remove the Pressure Relief Valve as described in Section 15.3-27.
Unscrew the manual Air Vent and discard along with its washer.
Replace with a new Manual Air Vent and washer.
Re-connect in the reverse order using a new “O” ring seal.
Reassemble the appliance in the reverse order.
29. Pressure Gauge. See Fig. 16.
Check that the electricity supply to the appliance is turned off.
Remove the cabinet front panel, place the facia and control box
in the Service Position and lower the expansion vessel into the
Service Position, as described in Section 14.2 a, b and c.
Drain the heating circuit as described in Section 15.2 a.
Unscrew the pressure gauge out of the heat bank. Fit the
replacement pressure gauge using suitable thread sealing
compound. Open the valves, fill and re-pressurise the system as
described in Section 12.2.
Reassemble the appliance in the reverse order.
Fig. 50. Expansion vessel and flexible hose.
Fig. 51. Pressure relief valve and manual
air vent.
Expansion
Vessel
WARNING:
There will be a small
quantity of water
remaining in the
expansion vessel
“O” ring seal
Manual air vent
and fibre washer
Ease Expansion
Vessel upwards to
clear support
bracket
Pressure relief
valve
Support
Bracket
Securing clip
Top
manifold
Fibre Washer
Expansion Vessel
Flexible Hose
Disconnect the
overflow discharge
pipe
Union Fitting
43
Fig. 47. Water to water heat exchanger.
Warning: There will be a small quantity of
water remaining in the pipework and waterto-water heat exchanger.
Note: Screw Nos. 1 2 , 5 6 7 8 , 11 12
unscrew two full turns – Do not remove.
Screw Nos. 3 4 (Refer to Fig. 31) 9 10,
13 14 15 remove and retain.
Ease top manifold downwards
10mm approx. to clear
pipework
6
8
7
Unscrew flat face union securing top
manifold to inner casing pipework.
Remove sealing washer.
9
Top manifold
10
Ease heating return
pipe downwards 10mm
into slip-joint in bottom
manifold. Ease pipe to
the left to clear top
manifold. Ease pipe
upwards 10mm approx.
to clear top manifold
and remove
Slip
joint
8
6
7
8
Support
bracket
6
9
10
7
2
“O” ring
seal
9
2
Heating
return
pipe
10
Water-towater heat
exchanger
Water filter primary system
“O” ring
seal
Slip joint
15
1
5
1
5
13
Drain pipe
securing
clip
13
11
11
12
12
14
14
Front view of water to water heat exchanger
with manifolds in position and fixing screws
numbered
Bottom
manifold
44
Fig. 48. Water to water heat exchanger.
WARNING: There will be a small
quantity of water remaining in the
pipework and water-to-water heat
exchanger
Domestic
drain clip
Ease water to water heat
exchanger and bottom manifold
out of support bracket and clear
of appliance
Move assembly upwards 10mm
approx. to clear flow and return
pipes
15
14
13
Return pipe (longest)
Replace “O” ring seals
Flow pipe (shortest)
Return connection
12
11
Slip joint
Slip joint
Flow connection
Replace
“O” ring
seals
Flat clip
Replace “O”
ring seals
Push in flat plate clamp to
release elbow
Domestic drain. Remove clip and
ease downwards 10mm approx. and
remove from bottom manifold
Remove screw and support
bracket from gas valve
Fig. 49. Replacing the “O” ring seals in top and bottom manifolds.
Replace the “O” ring seals in the top and
bottom manifold. Ensure they are
positioned in the locations provided
Top manifold
Water to water
heat exchanger
IMPORTANT:
Locate raised section of hole into
the water to water heat exchange
port
Locate hole in bottom manifold
over internally threaded boss
15
Water to water
heat exchanger
Before the water diverter
valve is re-assembled ensure
the domestic drain pipe and
clip are fitted to the bottom
manifold. Refer to Fig. 48.
Before tightening screws 11 2
11
12
22 5 6 7 88 11
12
ensure the “O” ring seals are
fully pushed into their
respective housing.
13 and 14,
14
Ensure screws 13
securing the bottom manifold
to the support bracket, are
fully tightened.
Bottom manifold
Replace the “O” ring seals
45
10
Ensure screws 9 and 10,
securing the top manifold to
the support bracket, are fully
tightened.
30. Flow Switch. See Figs. 9, 16, 52 and 53.
Check that the electricity supply to the appliance is turned off.
Remove the cabinet front panel, place the facia and control box
in the Service Position and lower the expansion vessel into the
Service Position, as described in Section 14.2 a, b and c.
Drain the hot water circuit as described in Section 15.2 b.
Remove the facia as described in Section 15.1. Unplug the Molex
plug marked X1 ‘Flow Switch’, from the control board. Release
the strain relief bush by compressing the loose section of the
bush and carefully withdraw the leads from the control box.
Unscrew the two flat faced union fittings connecting the flow
switch body to the mains cold water inlet. Remove the flow
switch, leads and sealing washers clear of the appliance and
discard.
Fit a replacement flow switch in the reverse order. Ensure the
arrow on the end of the black plastic body points downwards
and new sealing washers are fitted.
Reconnect the Molex plug.
Open the valve and fill the hot water circuit.
Reassemble the appliance in the reverse order.
31. Water Filter. See Figs. 16 and 52.
Check that the electricity supply to the appliance is turned off.
Remove the cabinet front panel, place the facia and control box
in the Service Position, as described in
Section 14.2 a, b and c.
Drain the domestic hot water circuit as described in Section 15.2 b.
Undo the flat faced union above the flow switch. Swivel the flow
switch and pipework sideways sufficiently to clear the union.
Remove the sealing washer and discard.
Undo the union below the mains water supply valve and remove
the filter housing clear of the appliance. The water filter is
located in the top of the housing. Remove the filter clean or
replace.
Reassemble in the reverse order and replace the sealing washer.
No sealing compound is required. Open the mains water valve
and fill the hot water circuit.
Reassemble the appliance in the reverse order.
32. Hot Water Flow Regulator. See Figs. 16 and 52.
Check that the electricity supply to the appliance is turned off.
Remove the cabinet front panel, place the facia and control box
in the Service Position, as described in Section 14.2 a, b and c.
Drain the domestic hot water circuit as described in Section 15.2 b.
Undo the flat faced union below the flow switch. Ease the
pipework sideways sufficiently to clear the flow switch. Remove
the sealing washer and discard.
The water flow regulator is located in the union fitting. It may be
necessary to prise the regulator from its housing. Remove and
discard.
Fit a new flow regulator, small diameter section first. Reassemble
in the reverse order and replace the sealing washer. No sealing
compound is required.
Open the mains water valve and fill the hot water circuit.
Reassemble the appliance in the reverse order.
Fig. 52. Flow switch, water filter and hot
water flow regulator.
Water
filter
Mains cold water
inlet valve
33. Inner Casing Cover Seal. See Fig.16.
Check that the electricity supply to the appliance is turned off.
Remove the cabinet front panel, place the facia and control box
in the Service Position and lower the expansion vessel into the
Service Position, as described in Section 14.2 a, b and c.
Remove the inner casing cover as described in Section 14.2 d.
Remove the inner casing cover seal and discard. Fit a
replacement seal using silicon adhesive. Check that the seal
passes completely around the edge of the inner casing cover
leaving no gaps.
Reassemble the appliance in the reverse order.
Water filter housing
Fibre
washer
Flat face union
fitting
Flow switch body
34. Operating Switch. See Figs. 9 and 16.
Check that the electricity supply to the appliance is turned off.
Remove the cabinet front panel, place the facia and control box
in the Service Position as described in
Section 14.2 a and b.
Remove the facia as described in Section 15.1.
Remove the terminals from the rear of the switch making note of
their positions. Squeeze together the two plastic retaining lugs to
remove from the facia. Discard the switch.
Snap in the replacement switch and reconnect the terminals
Refer to the wiring diagram Fig. 9. Reassemble the appliance in
the reverse order.
Ensure arrow
points downwards
Fibre
washer
Hot water flow
regulator
Flow
switch
Flat face union
fitting
35. Control Board. See Figs. 9 and 53.
Check that the electricity supply to the appliance is turned off.
Remove the cabinet front panel, place the facia and control box
in the Service Position as described in
Section 14.2 a and b.
Remove the facia as described in Section 15.1.
Carefully pull off all the Molex plugs, note the positions.
Pipework to bottom
manifold
46
Disconnect the room thermostat and frost thermostat if fitted,
note the positions.
Disconnect the mains supply at the terminal strip located
bottom left hand corner of the control board, marked X11
‘Mains Supply’. Unplug the Operating Switch or programmer if
fitted, from terminal marked X12 ‘‘Programmer/Switch’’.
Release the plastic catch at each mounting post pulling the
printed circuit board forward approximately 3 mm to prevent the
plastic catch from returning. Pull the board off the remainder of
the mounting post until it is free. Discard the board.
Locate the new board over the four mounting posts and push
back squarely until the plastic catch on the end of each post
clicks into place.
Reassemble in the reverse order and ensure that :
i) the mains supply, room and frost thermostat are
connected correctly.
ii) the Operating Switch or programmer is plugged into the
terminal strip.
iii) the Molex connectors are fitted to the correct terminals.
Connectors are not interchangeable and will only fit the
terminals from which they were removed.
Refer to the wiring diagram. Fig. 9 Reassemble the facia in the
reverse order.
Reassemble in the reverse order and ensure that :
i) the spark electrode lead is connected to the terminal at
the top right hand corner of the ignition board.
ii) the Molex connectors are fitted to the correct terminals.
Connectors are not interchangeable and will only fit the
terminals from which they were removed.
Refer to the wiring diagram Fig. 9. Reassemble the facia in the
reverse order.
37. Facia Mounted Programmer. See Fig. 9 and 16.
Check that the electricity supply to the appliance is turned off.
Remove the cabinet front panel, place the facia and control box
in the Service Position as described in Section 14.2 a and b.
Remove the facia as described in Section 15.1.
Unplug the programmer from the control board terminals
marked X12 ‘‘Programmer/Switch’’. Undo the four nuts securing
the programmer to the facia and remove. Fit a new programmer
in the reverse order and connect the plug at the driver board.
Reassemble the facia in the reverse order.
38. Remote Mounted Programmer. See Fig. 9.
Check that the electricity has been turned off and isolate the
programmer.
Disconnect the leads from the programmer noting their
alignment. Fit the replacement programmer and reconnect the
leads checking that they are correctly positioned.
39. Neon Indicator Lights. See Figs. 9, 53, 55 and 56.
Check that the electricity supply to the appliance is turned off.
Remove the cabinet front panel, place the facia and control box
in the Service Position as described in Section 14.2 a and b.
Remove the facia as described in Section 15.1.
Unplug the neon connection at terminal X3 (marked
“Indicators”) on the control board. Use an electrical screwdriver
to carefully push down through the locking clip slot to depress
the locking clips and withdraw the appropriate leads of the failed
neon.
Remove the neon from the facia panel.
Push the replacement neon into the facia panel. Insert the new
neon leads into the plug with the locking clip in the correct
position.
Reconnect the plug to the control board referring to the wiring
diagram Fig. 9.
Reassemble the facia in the reverse order.
36. Ignition Board. See Figs. 9 and 53.
Check that the electricity supply to the appliance is turned off.
Remove the cabinet front panel, place the facia and control box
in the Service Position as described in Section 14.2 a and b.
Remove the facia as described in Section 15.1.
Carefully pull off all the Molex plugs, note the positions.
Ease the spark electrode lead off the connection at the top right
hand corner of the ignition board. Release the plastic catch at
each mounting post pulling the printed circuit board forward
approximately 3 mm to prevent the plastic catch from returning.
Pull the board off the remainder of the mounting post until it is
free. Discard the board.
Locate the new board over the four mounting posts and push
back squarely until the plastic catch on the end of each post
clicks into place.
Fig. 53. Control Box.
Thermostat mounting bracket
Hot water
thermostat
Neon indicator lights connected to
terminal X3 (marked “Indicators”).
Ignition board
Air flow pressure
switch
Heating
thermostat
Control
box
Hot water high limit thermostat.
Unscrew the central clamping nut
and remove from the control box.
Control board
47
Safety temperature limiter
thermostat. Unscrew the central
clamping nut and remove from
the control box.
Fig. 54. Control box and thermostat
bracket.
Fig. 56.
Neon indicator light
connections.
Thermostat
capillaries
Hot water
thermostat
Control box
Connector
X3
Hot water high
limit thermostat
Standby
(Amber)
Heating thermostat
and clamping nut
Clamping
nut
Fixing screws
Fig. 55.
Demand
(Green)
Mounting
bracket
Neon indicator light plugs.
Locking clip slot.
Locking clip
Plug
Connector
Neon Lead.
48
16. Operational Flow Diagrams
Note: The alpha references in these charts are to be used for cross-referencing when fault finding. See Section 17.
Domestic Hot Water Operational Flow Diagram
(CH Selected Off)
Standby
Indicator
On
Heatbank NORMAL
Overheat
Stat
Hot Water
Select
Switch
TRIPPED
Hot Water
Control
Stat
ON
OFF
All
Functions
Stopped
ON
Hot Water
High Limit
Stat
Burner
Heat
Demand
(High Gas
Pressure)
NORMAL
TRIPPED
OFF
Safety
Limit
Stat
TRIPPED
High/Low
Gas Valve F
On
Stop
Burner
Demand
Indicator
On
Flow
Switch
NORMAL
Automatic
Start-up
Sequence
A
H
Pump on.
Continues
5 minutes G
after
Demand Off
ON
Ignition
Sequence
Stopped
I
AUTOMATIC START-UP SEQUENCE
Initiate Sparking
PRESENT
Air Pressure
Switch Test
PASS
Stop Sparking
PRESENT
C
B
Fan
On
Sense Air
Pressure
F AIL
Pilot Valve
Opens
NOT
PRESENT
Sense
Flame
D
NOT
PRESENT
Wait
(Pump &
F an On)
Wait
(Pump On)
Main Gas
Valve Opens
E
Wait
(Pump &
F an On)
Central Heating Operational Flow Diagram
(HW Selected Off and Water Flow Switch off)
ON
Frost
Thermostat
Demand
Indicator
On
Standby
Indicator
On
Heatbank
Overheat
Stat
NORMAL
Heating
Select
Switch
ON
Room
Thermostat
DEMAND
J
Heating
Control
Stat
ON
TRIPPED
All
Functions
Stopped
Pump On.
Continues 5
minutes after
demand off
Diverter
Valve
On
49
Burner
Heat
Demand
(Low Gas
Pressure)
Safety
Limit
Stat
NORMAL
Automatic
Start-up
Sequence
L
Minimum
Burner
Pressure
M
TRIPPED
K
Ignition
Sequence
Stopped
N
This Fault Finding Chart is to be used in conjunction with the Operational Flow
Diagrams in Section 16. To find the fault, locate the point on the flow diagram at
which the appliance has failed, e.g. letter B. Then read the corresponding section
in the fault finding chart, e.g. Failure at point B. Note: Each section assumes
that the appliance operates correctly up to that point.
Note: 1. All voltage measurements are with respect to neutral unless otherwise stated. 2. Before changing any component indicated in the chart, it is essential that
the associated wiring is checked for continuity, condition and correct routing. 3. Preliminary electrical system checks are the first electrical checks to be carried out
during a fault finding procedure. On completion of the Service/Fault Finding task which has required the breaking and remaking of electrical connections, check –
(a) EARTH CONTINUITY, (b) SHORT CIRCUIT CHECK, (c) POLARITY and (d) RESISTANCE TO EARTH.
17. Fault Finding
STANDBY INDICATOR
DOES NOT ILLUMINATE
NO
Switch on the mains
electrical supply. Is the
Standby Indicator
illuminated?
Is there 230V at X11
pin 4? (L)
NO
Check the mains electrical supply and
external wiring.
YES
Is there 230V at the
top end of the fuse?
YES
NO
Fuse has blown. Check condition of cables and all
internal and external electrical components. Repair
fault and replace fuse.
YES
Is there 230V at pin 1 of
terminal X14?
(Left red wire).
Refer to Section:
FAILURE AT POINT A
or
FAILURE AT POINT J
NO
Heatbank Overheat Stat has
tripped. Investigate
reason/reset stat.
YES
Replace the Standby
Indicator.
START OF DOMESTIC HOT WATER TEST
NO
Set the operating
switch (or
programmer) to
WATER and turn the
hot water control stat
to maximum, but
keep the heating
control stat to off.
Does the pump run?
Is there 230V at
pin 3 of terminal
X12?
(D.H.W.).
NO
Is there 230V at
pin 2 of terminal
X12?
(L).
Replace the
control board
YES
YES
Is there 230V at
pin 3 of
terminal X2?
(Right pink wire).
Replace the operating switch
(or programmer)
NO
Is there 230V at
pin 1 of
terminal X2?
(Left pink wire).
YES
YES
FAILURE AT POINT A
NO
Is there 230V at
pin 1 of terminal
X10?
(Brown wire).
YES
YES
Replace the
pump
POINT
B
50
Replace the hot water
control thermostat.
Replace the
control board
NO
Replace the
control board
NO
Does the fan run?
Is there 230V at
pin 1 of
terminal X16?
(Left black wire)
NO
Is there 230V at
pin 2 of
terminal X16?
(Right black wire)
NO
Replace the
control board
YES
YES
Is there 230V at
pin 2 of
terminal X8?
(Left orange wire)
Hot water high limit stat has tripped.
Investigate cause of overheating
and/or replace
NO
FAILURE AT POINT B
YES
NO
Replace the
control board
NO
Fault with
interboard wiring.
Repair or replace
YES
Is there 230V at
pin L2 of
terminal CN2?
(White wire)
NO
Replace the
ignition board
YES
Is there 230V at
pin L3 of
terminal CN2?
(Brown wire)
NO
Replace the air
pressure switch
YES
Gain access to the
fan. Is there 230V
across the fan
terminals?
(Brown and
yellow wires)
NO
Check harness and
repair or replace
YES
FAILURE AT POINT C
Replace the fan
NO
Does sparking occur?
Note: If the appliance is
very cold, sparking may
be delayed because of
poor acceleration of the
fan
YES
YES
YES
Is there a 230V
supply at pin L1 at
terminal CN2?
(Grey wire)
Check for faults on
the electrode lead
and electrode and
repair as necessary.
Does sparking
occur?
POINT
D
51
Replace the
control board
Safety limit stat has tripped. Investigate cause of
overheating and/or replace
YES
Is there 230V at
pin L of
terminal CN1 on the
ignition board?
(Brown wire)
NO
YES
YES
Is there 230V at
pin 1 of
terminal X6?
(Brown wire)
Is there 230V at
pin 1 of
terminal X8?
(Right orange wire)
NO
NO
Check and replace
the air sensing
tubes or replace
the air pressure
switch
Replace the Ignition
board
FAILURE AT POINT D
Can a pilot flame
be seen?
NO
Is there a gas supply
to the appliance?
NO
Turn on the gas supply,
bleed the system and
check the pressure
YES
Is the pilot injector free
from blockage?
NO
Replace the
injector
YES
Replace the
gas valve
YES
Does the main
burner ignite?
NO
Has the sparking
stopped?
NO
NO
Live and Neutral
supply could be
reversed.
Check connections
to both boards
and electrical spur.
Is it correct?
Rectify
incorrect
wiring
FAILURE AT POINT E
YES
YES
Check condition of
spark electrode and
lead.
Is it poor?
YES
Replace as
necessary
YES
Is there 230V at
pin ML of
terminal CN4?
(Brown wire)
NO
Replace the
Ignition Board
YES
FAILURE AT POINT F
Check the gas supply to the appliance.
Check for blockages to the burner or
replace the gas valve
Does the burner instantly
operate at or near
maximum gas pressure?
NO
Is there 230V at pin
1 of
terminal X4?
(Brown wire)
NO
Replace the
control board
YES
YES
POINT
G
Replace the gas valve.
If the problem is not solved, replace cable
to gas valve centre solenoid
52
NO
Replace the
Ignition board.
If problem
persists, check
earth
connections
FAILURE AT
POINT G
NO
Set the operating switch
(or programmer)
to OFF, and turn both
control knobs
anti-clockwise to OFF.
Does the pump continue
to run for approx.
5 minutes?
Whether the pump
stops immediately
or continues
indefinitely the
control board will
be at fault.
Replace control board
YES
FAILURE AT
POINT H
NO
When the pump
has stopped,
turn on fully a
hot water tap.
Does the demand
indicator
illuminate?
Is there 230V at
pin 1 of
terminal X1?
(Blue wire)
YES
Is there approx. 90V
at pin 5 of terminal
X3? (DEM)
Note: Lamp is not
driven directly by
mains voltage
YES
FAILURE AT
POINT I
YES
Does the pump run?
NO
Replace demand
indicator
NO
Replace the
control board
YES
END OF
DOMESTIC HOT
WATER TEST
53
Is there 230V at
pin 3 of
terminal X1?
(Brown wire)
YES
Replace the
flow switch
NO
Replace the
control board
NO
Replace the
control board
START OF CENTRAL HEATING TEST
Before tests ensure
pump has stopped
FAILURE AT POINT J
NO
Set the operating switch
(or programmer)
to HEATING and WATER
and turn the heating
control stat and room
thermostat (if fitted) to
maximum (but keep the
hot water control stat
in the OFF position).
Does the DEMAND
lamp illuminate?
Is there 230V at
pin 4 of
terminal X12?
(C.H.)
NO
Replace the
operating switch
(or programmer)
YES
Is there 230V at
pin 2 of
terminal X13?
(Right roomstat
terminal)
NO
Is there 230V at
pin 3 of
terminal X13?
(Left roomstat
terminal)
NO
Replace the
control board
YES
YES
Is there approx. 90V
at pin 5 of terminal
X3? (DEM).
Note: Lamp is not
supplied directly by
mains voltage
Replace room thermostat
or insert optional link
NO
Replace the
control board
YES
YES
FAILURE
AT POINT K
Replace demand
indicator
Does the pump run?
NO
Replace the
control board
FAILURE AT
POINT L
YES
Does the fan run and an
automatic ignition
sequence occur,
ending in full
burner ignition?
NO
Is there 230V at pin 3
of terminal X15?
(Right white wire)
NO
YES
Is there 230V at pin 2
of terminal X15?
(Left white wire)
YES
Replace the
control board
Replace the
heating control stat.
FAILURE AT POINT M
YES
Does the burner operate
at or near minimum
gas pressure?
NO
Replace the
gas valve
FAILURE AT POINT N
YES
Does the diverter
valve operate?
NOTE: This failure
would cause cold
water at the flow
outlet and the boiler
will cycle on the
heating control stat
NO
Is there 230V at
pin 3 of
terminal X7?
(Brown wire)
YES
Replace the
diverter valve
YES
END OF
CENTRAL HEATING
TEST
54
NO
Replace the
control board
NO
Replace the
control board
Key
No.
1
2
3
4
5
6
7
8
9
10
11
12
13
14
15
16
17
18
19
20
21
22
23
25
26
27
28
29
30
31
32
33
34
35
36
37
38
39
40
GC No.
378 381
379 040
299 324
378 819
379 562
382 850
386 575
324 982
371 542
374 607
E00 717
386 244
378 810
386 224
299 341
299 323
299 329
E01 882
299 330
299 331
173 051
173 052
299 333
386 778
371 539
371 524
371 525
299 338
324 822
378 809
299 336
378 811
299 337
397 569
299 093
299 342
299 343
299 346
Description
BF Burner Replacement Kit NG
Injector
Gas Valve
Air Pressure Switch
Pilot Burner
Pilot Injector
Electrode
Electrode Lead Assembly
Gas to Water Heat Exchanger
Combustion Chamber Insulation
Auto Air Vent
Pressure Gauge
Pressure Relief Valve
Pump
Expansion Vessel
DHW Heat Exchanger
Water Diverter Valve
Driver Board Pump Over-run
Thermal Store Thermostat (BBA)
Safety Temperature Limiter
CH Thermostat
HW Thermostat
HW Limit Thermostat
Operating Switch
Programmer Kit (Optional)
Neon (Green)
Neon (Amber)
Fan Assembly
Gauze Filter
Manual Air Vent
Flow Switch Assembly
Flow Regulator
Flexible Hose
Sequence PCB Board
Inner Casing Seal
Top Manifold Block
Bottom Manifold Block
Gasket Pack
Water Filter Primary System
Manufacturer’s Reference
Aeromatic
(4.4mm diameter)
Honeywell V4600Q2125
Honeywell C6065AH1038
Honeywell Q385A2051 K-Tip
Honeywell 45.004.108.001B
Honeywell 45.900.413.004
(1000mm)
(with washers)
(comlete)
Caleffi Minical 503020
(with washer)
(with ‘O’ rings) Caleffi 314139
Grundfos 15-60 Special
(12 litres with washers)
(with “O” Rings) SWEP
(with “O” rings) Bosch
Pactrol
Ranco LM7 P5079
Ranco LM8 P2041
Ranco K36 P1332
Ranco K36 P1333
Elmwood
Arrow 2004E839 3 position
WHS Single Channel
IMO Ref. NI9L 240R/S Green
IMO Ref. NI9L 240 R/S Amber
1/4 BSP
(with washers) SIKA
Type A 18 L/min±15%, Purple
(with washers)
Pactrol
(with o'rings)
(with 0'rings)
40
55
Qty
1
1
1
1
1
1
1
1
1
1
1
1
1
1
1
1
1
1
1
1
1
1
1
1
1
1
1
1
1
1
1
1
1
1
1
1
1
1
1
WHS Part No.
8 716 142 606 0
8 716 156 337 0
8 716 142 438 0
8 716 142 409 0
8 716 142 612 0
8 716 156 300 0
8 716 142 104 0
8 716 146 641 0
8 716 142 801 0
7 716 192 227 0
8 716 140 500 0
8 716 142 325 0
8 716 142 422 0
8 716 143 103 0
8 716 142 507 0
8 716 142 909 0
8 716 142 482 0
8 716 146 312 0
8 716 142 338 0
8 716 142 339 0
8 716 142 341 0
8 716 142 340 0
8 716 120 817 0
8 716 146 106 0
7 716 192 008 0
8 716 120 862 0
8 716 120 861 0
8 716 120 738 0
8 716 148 401 0
8 716 140 516 0
8 716 120 740 0
8 716 141 142 0
8 716 146 305 0
8 716 140 747 0
8 716 143 017 0
8 716 143 016 0
7 716 192 228 0
Worcester Heat Systems Limited, Cotswold Way, Warndon, Worcester WR4 9SW.
Telephone: (01905) 754624 Fax: (01905) 754619
Technical Helpline (0990) 266241
This booklet is accurate at the date of printing but will be superseded and should be disregarded if specifications and/or appearances are changed in the interests
of continued improvement.
All goods sold are subject to our official Conditions of Sale, a copy of which may be obtained on application.
PUBLICATION 8 716 115 054a (05/08)