1
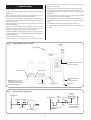
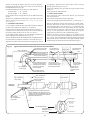
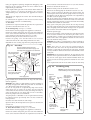
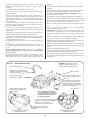
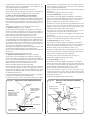
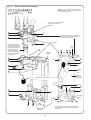
e). If the Heating (Low) Gas Pressure has been changed set the
indicator arrow on the data plate to the new setting.
Balance the system so that the required temperature difference
across the heating flow and return pipes is obtained. See Section
3, Table 4.
Adjust the by-pass valve until the same temperature difference is
obtained. See Fig. 16 and 17. This should be carried out with
only a single radiator operating.
If thermostatic radiator valves are fitted then one radiator should
be left uncontrolled. The bypass valve should never be fully
closed.
Set the room thermostat to minimum and check that the burner
goes out.
Reset the room thermostat to maximum and the burner will relight and follow the normal operating procedure.
Check for the proper ignition of the burner after a break in
the gas supply.
Turn off the gas service cock and wait for 60 seconds. The main
burner and pilot will go out but sparking from the electrode will
continue. Carefully open the gas service cock and observe the
burner re-light and follow the normal sequence of operation.
Put the Operating switch (or Programmer) to OFF. Switch off the
gas service cock and the electrical supply to the appliance.
Drain the heating system whilst the appliance is still hot. Refer to
Fig. 14 for the position of the appliance drain point.
Refill, vent and re-pressurise (sealed systems) as described
previously.
HOT WATER AND CENTRAL HEATING MODE.
Turn on the electricity supply and open the gas supply cock to
the appliance.
Set the Operating Switch (or Programmer) to Heating and Water.
If a programmer is fitted set the Hot Water to Continuous or
24Hrs and the Heating to On.
Set the Hot Water thermostat to MAXIMUM. The pilot will ignite
the main burner smoothly and the boiler will heat the water
stored in the heatbank. Once the heatbank has been satisfied the
appliance will switch off.
Turn on any hot water tap to maximum. After a short period the
burner will re-ignite. If hot water has not yet reached the tap,
wait until it does, then turn the tap off. The boiler will fire until
the heatbank has reheated and switch off.
Set the Operating Switch to Hot Water. If a programmer is fitted
set the Hot Water to Continuous and the Heating Off. Repeat the
previous hot water draw off
Set the Operating Switch to Heating and Hot Water. If a
programmer is fitted set to Continuous or 24 Hrs and the
Heating to ON. Set both appliance thermostats to maximum. The
boiler will fire and commence to heat up the radiators. Allow to
operate for 45 minutes, venting as necessary. Check for water
soundness.
Note: From cold it will take about 12 minutes for the heatbank to
be satisfied before the central heating system will receive heat.
IMPORTANT: The complete appliance must be checked for water
leaks. Should any leaks be found they must be rectified before
proceeding further.
Set the Operating Switch to OFF, or if a programmer is fitted,
switch to OFF. Switch electrical supply off at the mains. Set both
appliance thermostats to OFF.
Drain water from the appliance and the system from the drain
points while the water is still hot.
Refill the appliance and system. Repeat commissioning
operation under “Hot Water and Central Heating mode.”
Check for correct operation of User’s Controls including the room
thermostat (if fitted) and leave set to customer’s requirements.
12.5 COMPLETION OF COMMISSIONING.
Dis-connect the pressure gauge and tighten the test point screw.
Re-start the appliance and check for gas soundness around the
test point screw.
Refit the expansion vessel and cabinet front panel. See Fig. 16.
If the appliance is being passed over to the User immediately
IMPORTANT: Replace the inner casing cover and reposition the
pressure vessel. See Fig. 16.
Reconnect the electrical supply plug to the gas valve. See Fig. 33.
Loosen the burner pressure test point screw and connect a
pressure gauge. See Fig. 33.
HOT WATER MODE.
Set the Operating Switch (or Programmer) to Water. Turn the Hot
Water thermostat to maximum. Turn the Heating thermostat to
Off.
The boiler should light at a burner pressure of between 14 and
14.5 mbar (5.6-5.8in wg). Allow the boiler to fire for at least 10
minutes before checking the gas pressure.
Note: It may be necessary to open a hot tap to maintain the
boiler firing.
If the burner pressure is low check that the supply pressure at
the gas valve is at least 19 mbar (7.6in wg). See Fig. 33.
HOT WATER (HIGH) GAS PRESSURE.
The burner (High) pressure is factory set and should NOT be
adjusted in the Hot Water mode. If the gas supply pressure is
correct but the correct burner pressure is not achieved, contact
Worcester Heat Systems Service Department.
Should the appliance not light, check it is not in the overheat
lock-out state, by pressing the re-set button on bottom right
hand side of the control box. See Fig. 16.
Check several times the main burner lights smoothly and goes
out, by operating the Hot Water thermostat, before proceeding
to check the Heating (Low) gas pressure.
Note: If the electrical supply to the appliance is interupted at the
isolation switch or a power failure occurs whilst the burner is
firing, the boiler will normally relight automatically when the
power is restored. However, depending upon circumstances it
may be necassary to reset the overheat thermostats before the
appliance will operate.
Close the hot water tap (if necessary). The fan will stop and the
pump will continue running until the appliance has cooled to a
preset temperature.
Set the Operating Switch (or Programmer) to Off.
CENTRAL HEATING MODE.
Check that all the radiator valves are open. Set the room
thermostat, if fitted, to maximum and the Heating thermostat to
maximum. Turn the Hot Water thermostat to Off.
Sealed Systems: Check the system is pressurised and set to the
required pressure as indicated on the gauge. See Fig. 16.
Set the Operating Switch (or Programmer) to Heating and Water.
The boiler should light at a burner pressure of 1.0 mbar. (0.4 in wg).
HEATING (LOW) GAS PRESSURE.
The burner (Low) pressure is factory pre-set to satisfy a central
heating demand of up to 15 kW (51,000 Btu/hr). For different
heating requirements the (Low) gas pressure must be adjusted to
suit the installation.
The output to central heating is adjustable from a minimum of
8.8 kw (30,000 Btu/hr) to a maximum of 24 kW (82,000 Btu/hr).
Refer to Section 3, Table 1, for Nominal Boiler Rating.
Allow the boiler to fire for at least 10 minutes before checking the
(Low) gas pressure.
Ensure all the radiators are heating up evenly.
To adjust the Heating (Low) Gas Pressure:
a). Remove the grey plastic cover over the pressure adjustment
screws on the gas valve. Place a small screwdriver in one of the
slots and carefully lift the cap. See Fig. 33.
b). Using a small blade width screwdriver, turn the screw ‘B’
clockwise to increase and counter-clockwise to decrease
pressure until the desired setting is achieved.
c). Operate the Heating thermostat several times to ensure the
main burner ignites smoothly before checking that the gas valve
switches from High to Low pressure correctly.
d). Using the Hot Water and Heating control thermostats, switch
the appliance, from High to Low and back several times to
ensure correct gas pressures. Replace the plastic cap ‘C’.
32