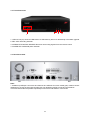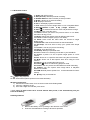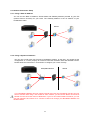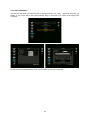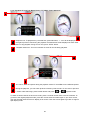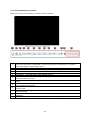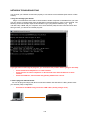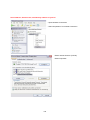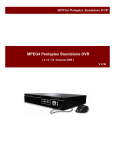
1
INSTRUCTION MANUAL NVR4P (PoE) 4 Channel Network Video Recorder Model : NVR4P Please read this manual thoroughly before use, and keep it handy for future reference. WARNING TO REDUCE THE RISK OF FIRE OR ELECTRIC SHOCK, DO NOT EXPOSE THIS PROCUCT TO RAIN OR MOISTURE. DO NOT INSERT ANY METALLIC OBJECT THROUGH THE VENTILATION GRILLS OR OTHER OPENNINGS ON THE EQUIPMENT. CAUTION EXPLANATION OF GRAPHICAL SYMBOLS The lightning flash with arrowhead symbol, within an equilateral triangle, is intended to alert the user to the presence of uninsulated "dangerous voltage" within the product’s enclosure that may be of sufficient magnitude to constitute a risk of electric shock. The exclamation point within an equilateral triangle is intended to alert the user to the presence of important operating and maintenance (servicing) instructions in the literature accompanying the appliance. PRECAUTIONS Safety -------------------------------------- Installation ------------------------------Should any liquid or solid object fall into the cabinet, unplug the unit and have it checked by the qualified personnel before operating it any further. Do not install the unit in an extremely hot or humid place or in a place subject to excessive dust, mechanical vibration. The unit is not designed to be waterproof. Exposure to rain or water may damage the unit. Unplug the unit from the wall outlet if it is not going to be used for several days or more. To disconnect the cord, pull it out by the plug. Never pull the cord itself. Cleaning --------------------------------- Allow adequate air circulation to prevent internal heat build-up. Do not place the unit on surfaces (rugs, blankets, etc.) or near materials (curtains, draperies) that may block the ventilation holes. Clean the unit with a slightly damp soft cloth. Use a mild household detergent. Never use strong solvents such as thinner or benzene as they might damage the finish of the unit. Height and vertical linearity controls located at the rear panel are for special adjustments by qualified personnel only. Retain the original carton and packing materials for safe transport of this unit in the future. 2 FCC COMPLIANCE STATEMENT INFORMATION TO THE USER: THIS EQUIPMENT HAS BEEN TESTED AND FOUND TO COMPLY WITH THE LIMITS FOR A CLASS A DIGITAL DEVICE, PURSUANT TO PART 15 OF THE FCC RULES. THESE LIMITS ARE DESIGNED TO PROVIDE REASONABLE PROTECTION AGAINST HARMFUL INTERFERENCE WHEN THE EQUIPMENT IS OPERATED IN A COMMERCIAL ENVIRONMENT. THIS EQUIPMENT GENERATES, USES, AND CAN RADIATE RADIO FREQUENCY ENERGY AND IF NOT INSTALLED AND USED IN ACCORDANCE WITH THE INSTRUCTION MANUAL, MAY CAUSE HARMFUL INTERFERENCE TO RADIO COMMUNICATIONS. CAUTION: CHANGES OR MODIFICATIONS NOT EXPRESSLY APPROVED BY THE PARTY RESPONSIBLE FOR COMPLIANCE COULD VOID THE USER'S AUTHORITY TO OPERATE THE EQUIPMENT. THIS CLASS A DIGITAL APPARATUS COMPLIES WITH CANADIAN ICES-003. CET APPAREIL NUMÉRIQUE DE LA CLASSE A EST CONFORME À LA NORME NMB-003 DU CANADA. CE COMPLIANCE STATEMENT WARNING: This is a Class A product. In a domestic environment this product may cause radio interference in which case the user may be required to take adequate measures. 3 IMPORTANT SAFETY INSTRUCTIONS 1. 2. 3. 4. 5. 6. 7. 8. 9. 10. 11. 12. 13. 14. Read these instructions. Keep these instructions. Heed all warnings. Follow all instructions. Do not use this apparatus near water. Clean only with dry cloth. Do not block any ventilation openings. Install in accordance with the manufacturer’s instructions. Do not install near any heat sources such as radiators, heat registers, stoves, or other apparatus (including amplifiers) that produce heat. Do not defeat the safety purpose of the polarized or grounding-type plug. A polarized plug has two blades with one wider than the other. A grounding type plug has two blades and a third grounding prong. The wide blade or the third prong are provided for your safety. If the provided plug does not fit into your outlet, consult an electrician for replacement of the obsolete outlet. Protect the power cord from being walked on or pinched particularly at plugs, convenience receptacles, and the point where they exit from the apparatus. Only use attachments/accessories specified by the manufacturer. Use only with the cart, stand, tripod, bracket, or table specified by the manufacturer, or sold with the apparatus. When a cart is used, use caution when moving the cart/apparatus combination to avoid injury from tip-over. Unplug this apparatus during lightning storms or when unused for long periods of time. Refer all servicing to qualified service personnel. Servicing is required when the apparatus has been damaged in any way, such as powersupply cord or plug is damaged, liquid has been moisture, does not operate normally, or has been dropped. 15. CAUTION – THESE SERVICING INSTRUCTIONS ARE FOR USE BY QUALIFIED SERVICE PERSONNEL ONLY. TO REDUCE THE RISK OF ELECTRIC SHOCK DO NOT PERFORM ANY SERVICING OTHER THAN THAT CONTAINED IN THE OPERATING INSTRUCTIONS UNLESS YOU ARE QUALIFIED TO DO SO. 16. Use satisfying clause 2.5 of IEC60950-1/UL60950-1 or Certified/Listed Class 2 power source only. 17. ITE is to be connected only to PoE networks without routing to the outside plant. 4 Contents Chapter 1. Introduction ------------------------------------------------------------------------------------------------- 10 1.1 Description ------------------------------------------------------------------------------------------------------------- 10 1.2 Components ------------------------------------------------------------------------------------------------------------ 10 1.3 Key Features ----------------------------------------------------------------------------------------------------------- 10 1.4 Basic Security System Configuration ----------------------------------------------------------------------------- 12 1.5 Front Panel View and Keypads------------------------------------------------------------------------------------- 13 1.6 Rear Panel View-------------------------------------------------------------------------------------------------------- 13 1.7 IR Remote Control ---------------------------------------------------------------------------------------------------- 14 Chapter 2. Installation --------------------------------------------------------------------------------------------------- 15 2.1 HDD Installation ------------------------------------------------------------------------------------------------------- 15 2.2 Network Connection Setup --------------------------------------------------------------------------------------- 16 2.2.1 Using a Static IP Address -------------------------------------------------------------------------------------- 16 2.2.2 Using a Dynamic IP Address 2.2.3 Router Configuration 2.2.3.1 WAN Setting -------------------------------------------------------------------------------- 16 ------------------------------------------------------------------------------------------ 17 ----------------------------------------------------------------------------------------------------- 17 2.2.3.2 DHCP & IP Address Setting 2.2.3.3 Virtual Server Setting --------------------------------------------------------------------------------- 17 ---------------------------------------------------------------------------------------- 18 STARTING THE SYSTEM ---------------------------------------------------------------------------------------------- 19 LIVE MENU DESCRIPTION ------------------------------------------------------------------------------------------- 20 SYSTEM INFORMATION ----------------------------------------------------------------------------------------------- 21 LIVE MENU NAVIGATING USING THE MOUSE ----------------------------------------------------------------- 22 LIVE MENU NAVIGATING USE THE REMOTE CONTROL --------------------------------------------------- 23 Chapter 3. Main Menu Setup ----------------------------------------------------------------------------------------- 24 3.1. Video/Audio Setup ---------------------------------------------------------------------------------------------------- 25 3.1.1. Camera (Channel) Name and Display ---------------------------------------------------------------------- 25 3.1.2. IP Camera Registration ------------------------------------------------------------------------------------------- 27 3.1.3. IP Camera Setup ------------------------------------------------------------------------------------------------- 30 3.1.4. Monitor ---------------------------------------------------------------------------------------------------- 34 3.1.5. Sequence/Events Display --------------------------------------------------------------------------------- 35 3.1.6. OSD/Display Position ---------------------------------------------------------------------------------------------- 36 3.1.7. Screen Mode -------------------------------------------------------------------------------------------------------- 37 3.2. Record Setup --------------------------------------------------------------------------------------------------------- 38 3.2.1. Record Policy -------------------------------------------------------------------------------------------------------- 38 5 3.2.2. RECORDING SCHEDULE SETUP ---------------------------------------------------------------------------- 39 3.2.3. Holiday ------------------------------------------------------------------------------------------------------------- 40 3.2.4. Event Record Duration --------------------------------------------------------------------------------------- 41 3.2.5. Record Option ----------------------------------------------------------------------------------------------------- 41 3.3. Device Setup ----------------------------------------------------------------------------------------------------------- 42 3.3.1. Storage ---------------------------------------------------------------------------------------------------------------- 43 3.3.2. Sensor/Video Loss Detection Setup --------------------------------------------------------------------------- 44 3.3.3. Alarm Schedule ----------------------------------------------------------------------------------------------------- 45 3.3.4. PTZ ---------------------------------------------------------------------------------------------------------------- 46 3.3.5. System Controller/Printer Device ------------------------------------------------------------------------------- 46 3.3.6. POS/ATM Device --------------------------------------------------------------------------------------------------- 47 3.3.7. Video Analysis ------------------------------------------------------------------------------------------------------- 48 3.4. System Setup ---------------------------------------------------------------------------------------------------------- 48 3.4.1. Date/Time ------------------------------------------------------------------------------------------------------------- 49 3.4.2. Signal/Language ---------------------------------------------------------------------------------------------------- 49 3.4.3. Config ---------------------------------------------------------------------------------------------------------------- 50 3.4.4. Log Information ----------------------------------------------------------------------------------------------- 51 3.4.5. Authorization Management ----------------------------------------------------------------------------------- 51 3.4.5.1. ADMIN --------------------------------------------------------------------------------------------------------- 52 3.4.5.2. GROUP -------------------------------------------------------------------------------------------------------- 52 3.4.5.3. USER -------------------------------------------------------------------------------------------------------- 53 3.4.5.4. SETUP --------------------------------------------------------------------------------------------------------- 54 3.5. Network Setup --------------------------------------------------------------------------------------------------------- 55 3.5.1. Connection --------------------------------------------------------------------------------------------------------- 55 3.5.2. Port --------------------------------------------------------------------------------------------------------------------- 58 3.5.3 ID & Password ---------------------------------------------------------------------------------------------------- 59 3.5.4. DDNS ------------------------------------------------------------------------------------------------------------------ 60 3.5.5. NAT Traversal ------------------------------------------------------------------------------------------------------- 61 3.5.6. Email/SNS ------------------------------------------------------------------------------------------------------------ 62 3.5.6.1. Email/SNS: SMTP ----------------------------------------------------------------------------------------------- 63 3.5.6.2. Email/SNS: Event ------------------------------------------------------------------------------------------------ 63 3.5.6.3. Email/SNS: Schedule ------------------------------------------------------------------------------------------- 64 3.5.6.4. Email/SNS: Recipient ------------------------------------------------------------------------------------------- 64 3.6. Backup Setup ---------------------------------------------------------------------------------------------------------- 65 Chapter 4. Search Menu Setup --------------------------------------------------------------------------------------- 67 4.1. Time Search --------------------------------------------------------------------------------------------------------- 67 4.2. Event Search -------------------------------------------------------------------------------------------------------- 69 4.3. Protect ------------------------------------------------------------------------------------------------------------------ 69 6 4.4. Capture ------------------------------------------------------------------------------------------------------------------ 70 4.5. POS/ATM Device ------------------------------------------------------------------------------------------------------ 71 4.6. Video Analysis --------------------------------------------------------------------------------------------------------- 71 Chapter 5. General Operation ----------------------------------------------------------------------------------------- 72 5.1. Mouse Menu -------------------------------------------------------------------------------------------------------- 72 5.1.1. Screen Mode -------------------------------------------------------------------------------------------------------- 73 4-Split ----------------------------------------------------------------------------------------------------------------- 73 PIP --------------------------------------------------------------------------------------------------------------------- 73 Auto Sequence ----------------------------------------------------------------------------------------------------- 73 5.1.2. Audio On/Off --------------------------------------------------------------------------------------------------------- 74 5.1.3. Zoom ------------------------------------------------------------------------------------------------------------------ 74 5.1.4. Freeze ----------------------------------------------------------------------------------------------------------------- 75 5.1.5. Stop Alarm ------------------------------------------------------------------------------------------------------------ 75 5.1.6. Record Stop ---------------------------------------------------------------------------------------------------------- 75 5.1.7. Play -------------------------------------------------------------------------------------------------------------------- 76 5.1.8. Search (See Chapter 4) ------------------------------------------------------------------------------------------- 76 5.1.9. Backup ---------------------------------------------------------------------------------------------------------------- 76 5.1.10. Main Menus (See Chapter 3) ---------------------------------------------------------------------------------- 77 5.1.11. Information ---------------------------------------------------------------------------------------------------------- 77 5.1.12. IP Cam Info -------------------------------------------------------------------------------------------------------- 77 5.1.13. EZ (Easy) Setup ------------------------------------------------------------------------------------------------ 78 5.1.14. Shut Down ---------------------------------------------------------------------------------------------------------- 78 5.1.15. Hide/Show Launcher --------------------------------------------------------------------------------------------- 78 5.1.16. Log Out -------------------------------------------------------------------------------------------------------------- 79 5.2. Live Launcher --------------------------------------------------------------------------------------------------------- 79 5.2.1. Control Button Description --------------------------------------------------------------------------------------- 80 5.3. Playback Launcher --------------------------------------------------------------------------------------------------- 81 5.3.1. Control Buttons ------------------------------------------------------------------------------------------------------ 82 5.3.2. Playback & Trap Mode ------------------------------------------------------------------------------------------- 83 5.4. PTZ Control ------------------------------------------------------------------------------------------------------------- 84 Chapter 6. Protect Video/Audio Files ------------------------------------------------------------------------------- 87 6.1. Protect Registration -------------------------------------------------------------------------------------------------- 87 6.2. Playback and Remove Protected File --------------------------------------------------------------------------- 87 6.3. Protected File Backup ----------------------------------------------------------------------------------------------- 88 Chapter 7. Capture Video Still Image ------------------------------------------------------------------------------- 89 7.1. Still Image capture----------------------------------------------------------------------------------------------------- 89 7 7.2. Retrieve and view Captured Images -------------------------------------------------------------------------- 89 7.3. Remove Captured Images -------------------------------------------------------------------------------------- 90 7.4. Backup Captured Image ----------------------------------------------------------------------------------------- 91 Chapter 8. Web Viewer – Connect to NVR via Internet Explorer ------------------------------------------ 92 8.1. System Requirement ---------------------------------------------------------------------------------------------- 92 8.1.1. Network Environment -------------------------------------------------------------------------------------- 92 8.2. Web Viewer-Getting Started ------------------------------------------------------------------------------------- 92 8.2.1. Connect NVR via Web Browser using Direct IP -------------------------------------------- 92 8.2.2 General Web Viewer Operation ------------------------------------------------------------------------- 93 8.2.3. Calendar and Time Search ------------------------------------------------------------------------------ 94 8.2.4. PTZ Control --------------------------------------------------------------------------------------------------------- 95 8.2.5. Connect to NVR via Web Browser using URL -------------------------------------------------------------- 95 Chapter 9. Web Viewer Setup/Web Configuration -------------------------------------------------------------- 96 9.1. Web Configuration -------------------------------------------------------------------------------------------------- 96 9.1.1. Video/Audio ---------------------------------------------------------------------------------------------------------- 96 9.1.1.1. Camera ----------------------------------------------------------------------------------------------------------- 96 9.1.1.2. IP Registration ----------------------------------------------------------------------------------------------- 96 9.1.1.3. IP Camera Setup ------------------------------------------------------------------------------------------- 97 9.1.1.4. Monitor --------------------------------------------------------------------------------------------------------- 97 9.1.1.5. Sequence/Event Display ---------------------------------------------------------------------------------- 97 9.1.1.6. OSD/Display Position ------------------------------------------------------------------------------------- 98 9.1.2. Record ---------------------------------------------------------------------------------------------------------------- 98 9.1.2.1. Policy ------------------------------------------------------------------------------------------------------------- 98 9.1.2.2. Schedule ------------------------------------------------------------------------------------------------------ 98 9.1.2.3. Holiday--------------------------------------------------------------------------------------------------------------- 99 9.1.2.4. Event Record Duration ----------------------------------------------------------------------------------------- 99 9.1.2.5. Record Option ---------------------------------------------------------------------------------------------------- 99 9.1.3. Device --------------------------------------------------------------------------------------------------------------- 100 9.1.3.1 Sensor Detection ------------------------------------------------------------------------------------------------ 100 9.1.3.2. Video Loss Detection ---------------------------------------------------------------------------------------- 100 9.1.3.3. Alarm Schedule ------------------------------------------------------------------------------------------------ 100 9.1.3.4 PTZ ----------------------------------------------------------------------------------------------------- 101 9.1.3.5. System Controller -------------------------------------------------------------------------------------------- 101 9.1.3.6. Storage ----------------------------------------------------------------------------------------------------------- 101 9 . 1 . 4 . S ys t e m - - - - - - - - - - - - - - - - - - - - - - - - - - - - - - - - - - - - - - - - - - - - - - - - - - - - - - - - - - - - - - - - - - - - - - - - - - - - - - 1 0 2 9.1.4.1. Date/Time ------------------------------------------------------------------------------------------------------ 102 9.1.4.2. Time Synchronization Setup--------------------------------------------------------------------------------- 102 8 9.1.4.3. Signal/Language ------------------------------------------------------------------------------------------------ 102 9.1.4.4. System Information -------------------------------------------------------------------------------------------- 103 9.1.4.5. Authorization Management ---------------------------------------------------------------------------------- 103 9.1.5. Ne t wor k - - - - -- - -- - - - -- - - -- - -- - - -- - -- - - -- - - --- - - - -- - - -- - -- - - -- - -- - - -- -- --- - - - --- - -- - -- - - - 105 9.1.5.1. Connection ------------------------------------------------------------------------------------------------------- 105 9.1.5.2. Port --------------------------------------------------------------------------------------------------------- 105 9.1.5.3. DDNS ------------------------------------------------------------------------------------------------------- 105 9.1.5.4. Email/SNS ---------------------------------------------------------------------------------------------- 106 Appendix Product Specifications ----------------------------------------------------------------------------------------- 109 System Keyboard ------------------------------------------------------------------------------------------------------ 111 POS Configuration ----------------------------------------------------------------------------------------------------- 115 ATM Configuration ----------------------------------------------------------------------------------------------------- 117 Network Troubleshooting---------------------------------------------------------------------------------------------- 118 Terms/Icon Glossary --------------------------------------------------------------------------------------------------- 121 NVR Icon Reference -------------------------------------------------------------------------------------------------- 122 How to download Windows Media Player 10+ or VLC Media Player and play AVI files ------------- 123 Dashboard ----------------------------------------------------------------------------------------------------------------124 9 Chapter 1. Introduction 1.1. Description This manual applies to the 4 channel network video recorder. (Model: NVR4P) The network video recorder supports up to 4 network cameras. The NVR can record high quality Full HD images onto the maximum capacity of hard disk drives. The network recorder is extremely straightforward to install and setup, as it detects network cameras and defines the parameters of each through a dedicated configuration wizard. You can start monitoring instantly, as the images are automatically assigned to a layout menu. Based on embedded Linux and high performance, the network NVRs are fully featured for security surveillance and remote monitoring needs. 1.2. Components The system comes with the following components: Network Video Recorder unit IR Remote Control DC Power Adapter Power Cable AAA Battery x 2 HDD Brackets Screw Packet Installation CD including NC-Titanium Software, Installation Guide and User Manual Note: Check your package to make sure that you received the complete system, including all components shown above. 1.3. Key Features The NVR is the most competitive device developed for all industrial applications. In addition to its sleek professional design, it is very reliable and cost effective. Most of all, its real time and crystal clear picture quality with small recording file size and powerful remote control function will become the standard to which other security systems are judged. Also, its VCA (video content analysis) function will offer you the advanced security environment. Major features include: ► Real time live, real time recording ► 4 channels IP camera support (4port High PoE camera input) ► PENTAPLEX: simultaneous Live, Recording, Playback, Backup, Network ► Extremely small recording file size using H.264 compression technology ► Adjustable recording frame rate, resolution and picture quality ► Video / Audio data backup via USB 2.0 or CMS ► Support Authentic Video Image Player ► High speed network transmission ► Dynamic / Static IP address support, Own Client (ATVisionIP or CMS Software) support ► Remote recording, still image capturing and printing ► Multiple NVRs and multiple clients support for CMS application 10 ► PTZ camera control by RS-485 and via network ► Independent color adjustment for each camera input and VGA output ► USB Mouse and IR remote control unit for user interface ► Self-diagnosis system and Hardware Watchdog: error checking and restoring functions ► Powerful event search function (Search by manual, schedule, motion, sensor, network or all) ► Pre-Alarm Recording for motions and sensors ► Protect Video/Audio files from HDD Overwrite ► Still image capturing and printing during live or playback ► System & Event Log files management ► Configuration data copy to other channels for easy setup ► Configuration file Export / Import for easy installation of multiple NVRs ► Control of minimum recording dates by channel ► Mobile (I-Phone, Android, Black Berry, Symbian and Windows mobile) phone support ► E-Map support ► POS/ATM support ► Video Analysis support Notice: The information in this manual was current when published. The manufacturer reserves the right to revise and improve its products. All specifications are therefore subject to change without notice. 11 1.4. Basic Security System Configuration Keyboard-Controller Alarm Out NO Devices DC 30V 1A max AC 125V 0.5A max Sensor Inputs NC/NO Devices scalable TTL Level Input Smartphone Fan Power Switch Amplified Speaker VGA Monitor LOCAL NETWORK OR INTERNET DC Power Adapter HDMI Monitor Client Software Web Browser WebViewer 12 External HDD 1.5. Front Panel View 2 1 3 4 1. USB 2.0 Port (x2): Connect USB mouse or USB memory device for file backup or firmware upgrade. 2. REC LED: Recording indicator. 3. IR REMOTE CONTROL SENSOR: Receives all incoming signals from the remote control 4. POWER LED: DVR/NVR power indicator 1.6. Rear Panel View Note: * Available Input/Output connectors and features are different from each model (part). Please contact distributors to check the exact part number with your desired Input/Out connectors and features. This manual describes all possible Input/Output connectors and features of this series. 13 1.7. IR Remote Control 1. Audio: ON/ OFF function. 2. REC (Record): Start/stop manual recording. 3. Number Buttons: Select camera (channel) number. 4. ID SEL: Allows you to select ID setting. 5. ID: Displays current ID. 6. Info: It will display system information. 7. Print: Allows you to Print image either in Live or Playback Mode. 8. Navigate Buttons: ◀ Left ▲ Up ▶ Right ▼ Down : 9. Enter : To select and save the menu and parameter change. 10. Menu: Enter or exit the menu. 11. Return: Directs you back to the previous menu. In Live Mode, this button will log you out. 12. Mode: Change the display mode to different split screen. 13. Freeze: Freezes images. (Only in Live Mode). 14. Zoom: Zoom in/out the video when the channel is single display mode. 15. Bookmark: It will list all the files that was bookmarked. 16. EZ Setup: You’ll be able to setup your system with simple pages. 17. K-Lock: Locks any keys from functioning. 18. Alarm: Turns the Alarm off. 19. Backup: Backups up desired data. 20. PTZ: Control PTZ camera(s) connected to your DVR/NVR. 21. Preset: A preset is a set of specific target points of a PTZ camera. 22.Tele: Zooms in on a specific area when using the PTZ function. 23. Wide: Zooms out of that specific area when using the PTZ function. 24. Search: Go to recorded file search menu. 25. Pause : Pause a video during playback mode. 26. Protect: You can protect recorded data from HDD overwriting. 27. Capture: You can capture video image either in Playback Mode or Live Mode. 28. REW: Rewind (select speeds from 2x4x8x16x32x64 for faster rewind). 29. ▶ Play: Play a recorded file. 30. ■ Stop: Stop playback. 31. FF: Fast forward (select speeds from 2x4x8x16x32x64). ID Setting Instruction: 1) Press down ID SEL button for 2 seconds to start the ID Setting Mode 2) Input any 2 digits to set ID. 3) Once the 2 digits are selected, press enter. * If no action is taken within the 2 second allowed time period, it will automatically exit you from the ID Setting. Installing batteries 1. Remove the battery cover by sliding in the direction of the arrow. 2. Insert two AAA batteries according to directions provided. 14 3. Replace the battery cover by sliding in the direction of the arrow. 15 Chapter 2. Installation 2.1. HDD Installation Before Installation We recommend setting the current time on your NVR before HDD Installation. Please make sure that the power of NVR is switched off before starting installation. Step 1. Make sure the NVR power is switched OFF Step 2. Open the top cover of NVR using a cross screw driver. Step 3. Take out the HDD mounting plate from NVR. Step 4. Place HDD(s) on the mounting plate and mount it with screws. Step 5. Replace the mounting plate into the NVR and fix it with screws. Step 6. Attach the data and power cable to HDD(s) correctly. Step 7. Replace the top cover of NVR and fix it with screws. After HDD installation Step 8. Turn the NVR power ON. Step 9. NVR will detect HDD(s) during the booting and will format HDD(s). Step 10. After HDD formatting, NVR will be automatically rebooted and will be ready to work with HDD(s). 16 2.2. Network Connection Setup 2.2.1. Using a Static IP Address You can use the Static IP address, Subnet Mask and Gateway address provided by your ISP (Internet Service Provider) for your NVR. The Gateway address is the IP address of your broadband modem. Internet 2.2.2. Using a Dynamic IP Address You can use a router with your Dynamic IP broadband modem. In this case, you should set the configuration of a router properly for network connection between NVR and Net/Web Viewer. Please follow the instructions in next section to configure your router correctly. Home/Office Network Internet If your Broadband Modem does not support internal loop back (port forwarding) function and you want to monitor NVR using a PC located in same Intranet, you should use Direct IP instead of DDVRLS in the connection menu of NetViewer. If your PC is located outside of Intranet, you can use both DDVRLS and Direct IP to connect to NVR even though your Broadband Modem has limited features. 17 2.2.3. Router Configuration If your NVR is connected to the network through a router, you should configure router properly. There are 3 steps as follows. 1. WAN Setting 2. DHCP Setting 3. Virtual Server Setting 2.2.3.1. WAN Setting When you connect to your Router, you can find menu for WAN setting. Please confirm the WAN setting. If you are using DSL service, you should select PPPoE, and you will be directed to a sub-menu to type in DSL user name and password. 2.2.3.2. DHCP & IP Address Setting To assign a unique private IP address to NVR in your intranet environment automatically, you can enable DHCP option in the Network Setup menu of your NVR and your Router. In this case, you can skip the procedures described on this page. We recommend assigning IP address to NVR manually to prevent unexpected change of IP address. *A router from D-Link is quoted as an example in this manual. not always match another router’s setup menu. The images of setup menu above may If you have any problem with DHCP function or want to assign the private IP address, please disable DHCP option in the Network Setup menu of your NVR and check the starting and ending IP used by DHCP server of the Router. You can assign any private IP address to your NVR even if it is out of the DHCP range, but the IP address should match with the one entered in the Network Setup menu of your NVR. 18 2.2.3.3. Virtual Server Setting You should register your NVR as a virtual server. Please enter the information into IP address field of the router (e.g. 192.168.0.110). Protocol Type should be TCP. Private/Public Port numbers should be the same with the Port numbers assigned in NVR. You can change port numbers in Network Setup menu to avoid conflict with other network servers. Your NVR uses 3 port numbers and the default Port numbers are 9350~1 and 80. 9350~1 are for controlling the video, audio and commands of Net Viewer, and 80 is for Web Viewer. You need to register 3 port numbers into the router as network servers. Please make sure that your router does not block those port numbers to/from the NVR with filter and firewall features. 19 STARTING THE SYSTEM When power is turned on, you will see the initializing screen and it may take up to one minute to complete. After initializing is complete, a live screen will appear. To log in, right click any area on the screen and a live menu will appear. Click to any menu and it will prompt you to the login dialog. Enter ID and Password by using the virtual keyboard and click OK. By default, the ID is set at “admin” and the Password is set at “admin” 20 LIVE MENU DESCRIPTION 1 SCREEN MODE Can select how you would like to view screen 2 AUDIO ON/OFF Option to have the audio on or off 3 FREEZE 4 STOP ALARM 5 RECORD STOP 6 PLAY Plays the search result (data). 7 SEARCH Can search for recorded data 8 BACKUP Can backup data via USB drive 9 MAIN MENU 10 INFORMATION 11 IP CAM INFO 12 EZ SETUP (EASY) 13 SHUT DOWN 14 HIDE LAUNCHER 15 LOGOUT Can freeze Playback or Live scene Stops the alarm output and the event monitoring. Refer to "Event Monitoring" Starts/stops the standard recording Access the main menu. Refer to the Using the DVR section This menu will display system information It will display you IP camera information You’ll be able to setup your system with simple pages Will allow you to completely shut down the unit Hides the launcher. You can log out. 21 SYSTEM INFORMATIOIN This menu will display overall system information Network Map: By clicking the Network Map button, it will display a page with all your IP camera status. If the IP camera is connected, then a blue line will be shown. If the camera is disconnected, then a blue line with a red X mark will be shown. If there is a connection error, a solid red line will be shown. By using you mouse, you can navigate to each IP camera to see the camera information. *Network Map feature is only available with PoE NVRs When there’s an exclamation , this indicates that the NVR has not been registered in our DDVRLS server Password will only show half of the registered password. You can enter up to 8 characters max. If four characters are used in the password, it will show as 12**, six characters will show as 123*** and eight character, 1234**** 22 LIVE MENU NAVIGATING USING THE MOUSE Navigating to the different channels by using the mouse. By using the mouse, move the mouse to the far right in the middle of the screen and an arrow button will appear on the screen (see picture above) to navigate to different channels. You can only navigate from one channel to another when viewing in a single screen/channel. If you are viewing from a 4-split screen, you will NOT be able to navigate using the arrow. This feature will only work when viewing from a single screen When viewing from a 4-split screen, you can use your mouse to navigate from channels to channels. When a channel is selected, a yellow border will show indicating the channel selected. By using your mouse, you may go to desired channel. 23 Navigating to different channels by using the remote control. To navigate from one channel to another channel, you must first select the channel and it must be on a single screen view. By pressing the direction button on the remote control ▶, it will take you to the next channel in sequential order. If a channel is selected (has yellow border), you can use the remote control by using the arrow buttons to navigate to individual channels. To select a channel using the remote control, press the enter button and a yellow border will appear on that channel, (see above picture). After the channel has been selected and by using the arrow buttons on the remote control, you can navigate to desired channels. 24 Chapter 3. Main Menu Setup • Go to Main Menu Window using: Remote control – Press MENU, Mouse – Right click and click MENU icon. • To go to desired sub menu: Use direction keys and press ENTER (remote control) or click on sub menu with the mouse • To go to the higher level menu: Remote control – Press MENU, Mouse – Right click Main Menu Tree VIDEO/AUDIO RECORD DEVICE CAMERA POLICY STORAGE IP CAMERA REGISTRATION SCHEDULE SENSOR/VIDEO LOSS DET. IP CAMERA SETUP HOLIDAY ALARM SCHEDULE MONITOR EVENT RECORD DURATION PTZ SEQUENCE/EVENT DISPLAY RECORD OPTION SYSTEM CONTROLLER/ PRINTER DEVICE OSD/DISPLAY POSITION POS/ATM DEVICE SCREEN MODE VIDEO ANALYSIS SYSTEM NETWORK DATE/TIME CONNECTION SIGNAL/LANGUAGE/DEVICE PORT/CONNECTION TEST NAME (PING) CONFIG ID, PASSWORD LOG INFORMATION DDNS AUTHORIZATION MGMT NAT TRAVERSAL EMAIL/SNS 25 BACKUP BACKUP 3.1. Video/Audio Setup There are 5 sub menus under Video/Audio. To exit to main menu, press MENU key again (or right click on the mouse). 3.1.1. Camera (Channel) Name and Display In the Camera menu, you will be able to set up your camera to a desired setting. Click the Camera menu and it will route you to a Camera setup page 1) VIDEO: You may select the video ON, OFF, COVERT 1 or COVERT 2. ON: Pictures/Images and icons will appear on screen as normal. OFF: When the video is switched to OFF, there is no action taken, (no images / pictures, recordings, etc.). COVERT 1: Video/pictures will not appear and will be blank/black, but icons and camera name will appear. Despite being in covert, the NVR will continue to record. COVERT 2: In this mode, the screen will be completely blank including icon, camera names, etc. but will continue to record. 2) AUDIO: You may select the audio ON or OFF position. 3) TITLE: Create your own title for each camera connected to the NVR by using the virtual keyboard (up to 15 characters). If you skip this setup, camera # will be displayed on the screen 26 3.1.1. Camera (Channel) Name and Display – Cont. Screen Input: You can configure your screen to your preference by adjusting the channel. 1) Brightness 2) Contrast 3) Color 4) Click the <Init> to initialize settings back to the default 50. 5) When the desired setting is entered, click <OK>. 27 3.1.2. IP Camera Registration For desired IP camera use, you must first register the IP cameras in the IP Camera Registration menu. ** For ATV IP cameras, you do not need to register. It will automatically register. For Samsung, Axis and other brand IP cameras, you must perform these two tasks, time sync and then register. In the IP Camera Registration menu, a list of IP cameras will appear that have been detected automatically. This will be your default setting, If you wish to manually add IP cameras, click the Auto/Manual button. Auto/Manual: By clicking this button, you will be able to select which channel(s) to register automatically. If unselected/un-checked, then the channel will not register automatically. You can select all channels or specific channel(s). **Only IP cameras that support Zero Config will be able to connect automatically. *Add Camera “Automatically” feature is only available with PoE NVRs Once you have clicked the ADD button, a list of IP cameras will appear on the screen that has been detected automatically. To select the desired IP camera, simply click the Registration tab under Status tab. 28 3.1.2. IP Camera Registration – Cont. IP Camera Registration window will appear. Click the TEST button to see if the connection is successful. If all the information is correct, you will see “SUCCESS” indicating that the camera is ready for operation. If the connection has failed, double check the information entered. Once everything is successful, then click the OK button. When Refresh button is clicked, it will search all the registered IP cameras again. If you would like to add remote site IP camera, click the Add Manual tab. A window will appear to enter IP camera information. Click the TEST button to see if the connection is successful. If it’s successful, click the OK button. By clicking the IP tab, you will be able to edit your IP camera registration. Once you have made the changes, click the TEST button to see if it was successful. 29 3.1.2. IP Camera Registration – Cont. When all IP cameras are registered and ready for use, you can always go back and delete the cameras. Simply by clicking the delete button, a window will appear in the middle of the page asking if you would like to delete. Click OK to delete. PoE Reset: This will power ON/OFF automatically. The advantage of this function is to allow user to power ON/OFF remotely or if the unit has limited accessibility. When a RESET tab is clicked, a popup window will appear to confirm your selection and then proceed. 30 3.1.3. IP Camera Setup In this menu, you will be able to setup your IP camera to desired setting. By clicking the IP Camera Setup tab, you will have five (5) different settings to work with. -PROFILE -RESOLTUION -FPS -QUALITY -GOP (Group of Pictures) Click on any channel and IP camera setup page will appear. Profile: We recommend HIGH profile because it allows the most efficient coding of video. It reduces the required network bandwidth for video. The only profiles that can be enabled are ones supported by the camera. If you cannot enable it, then the camera does not support that particular profile. 31 3.1.3. IP Camera Setup – Cont. Resolution: It will display resolution options supported by the camera. Once the Resolution tab is clicked, a window will appear in the middle of the page. Scroll down on the Resolution bar and select desired resolution setting. FPS: To select desired FPS, click on the FPS bar and scroll down. Maximum FPS allowed is 30. Quality: For desired quality setting, click on the bar next to Quality. Once the bar has been clicked, a virtual keyboard will appear in the middle of the screen. By using the keyboard, enter the desired quality setting. Keep in mind that maximum Kbps is 6000. 32 3.1.3. IP Camera Setup – Cont. GOP: Once you have clicked the GOP tab, click the GOP bar and scroll down to desired GOP setting. Keep in mind the maximum GOP is 30 and that is recommended. Audio: Only support G.711. If the IP camera does not support G.711, then it will display as OFF. KHz: Only support 8KHz (this is audio sampling rate). If the IP camera does not support 8KHz, then it will display as OFF Motion: Default is OFF. If you select ON, it will allow the NVR to receive motion events from the IP camera. Also, when it’s in ON position, the NVR will start event recording. **If you would like to use MOTION recording, you MUST have the EVENT in ON position at all times. The NVR will automatically set the motion area (whole screen) but if the customer wants to set their own motion area, they will need to set the area from the IP camera. To learn how to setup own personal motion area; please refer to our CMS Web-viewer user manual. 33 3.1.3. IP Camera Setup – Cont. Sensor: Default is OFF. If you select ON, it will allow the NVR to receive sensor events from the IP camera. There are 2 different types of sensor positions: (N.O = NORMAL OPEN and N.C. = NORMAL CLOSE). Depending on the IP camera, Sensor 1 and Sensor 2 can be enabled if the IP camera can support two sensors. Secondary: The purpose of secondary is to send low bandwidth stream to remote client software such as smartphone, tablets, etc. It will also display in real-time to multi view mode. You can also setup different settings in secondary such as: - Profile: Select a profile that’s desired. High is recommended. Resolution: Max resolution is 720 x 576 however it all depends on IP camera’s resolution support. FPS: Maximum FPS is 30. Quality: By using the keyboard, enter the desired quality setting. Keep in mind that maximum Kbps is 6000. GOP: Maximum GOP is 30 and recommended. 34 3.1.4. Monitor To select HDMI/VGA resolution setting, click on the Monitor menu. In this menu, you’ll be able to set the desired HDMI/VGA resolution by simply clicking on the resolution scroll down bar and select the setting. To adjust the brightness/contrast/hue/color for monitor, click the Monitor button on the bottom left corner. 35 3.1.5. SEQUENCE / EVENTS DISPLAY The NVR can display each live video channel in full screen (or a group of channels) in sequence mode similar to slide show in PC. Select the interval, channel setup and Duration. SEQUENCE: 1) Interval: You may select OFF position or 30 sec maximum. 2) Single Mode: By clicking the channel setup, you can select individual channel or all. EVENT DISPLAY: When viewing live and an event occurs, an event window will pop up showing all channels that are set in event setting. 1) Duration: You may select OFF or time interval setting. 36 3.1.6. OSD/DISPLAY POSITION You can configure each parameter for on-screen-display using direction keys and ENTER button. To save and exit from this menu, press MENU. 1) CAMERA ID MODE [NUMBER / NAME / OFF] You can display a number or name of your camera on the screen. Select OFF not to display any. 2) BORDER COLOR [WHITE / BLACK / OFF] Select the color of border line on multiple channel display mode. Choose from WHITE/BLACK/OFF. OFF will not display the colored border line. 3) ICON [ON/OFF] Select ON or OFF to display or not display Icon 4) DATE/TIME POSITION [TOP/ BOTTOM/ OFF] Select the position of date/time displayed on the screen. OFF will not display current date/time on the live screen. But the NVR will record the video with time/date stamp. 5) DISPLAY POSITION SETUP: Click the Display Position Setup button to adjust the icon position. 37 3.1.7. SCREEN MODE Configuring the Live screen and Split Screens. 1) Live Screen: Select split modes for the Live screen. 4-split screens, 9-split, 16-split and 25-split screens are included by default. 2) Play Screen: Select split modes for the playback screen. Single screen, 4-split screen, nine and 16 screens are provided by default. 3) When the screen mode setup is done, click OK. Live Screen: Use Secondary Stream. If check marking the Use Secondary Stream the multi view will be second stream. If it is unchecked, then the multi view will be primary stream. For channels, single, PIP and 4-split channel will always be primary stream (1080p). 38 3.2. RECORD SETUP With this menu, you can set all parameters (see the picture as below) related to recording for each camera independently. Use direction keys and ENTER button to select the camera (channel) and change the setup value. 3.2.1. POLICY NVR can record a live video by manual, schedule, event (motion detection and/or external sensor) and by network user’s command. You can set the recording policy for each camera independently. 1) MANUAL (R) [ON / OFF] ON: When turned ON, you can start recording manually by pressing a REC button (or by clicking REC icon on mouse menu). Press REC key again to stop recording. OFF: Manual recording is disabled on selected camera(s). 2) SCHEDULE (S) [ON / OFF] ON: Schedule record enabled OFF: Schedule record disabled on selected camera and NVR will not record by your schedule setup. This will override schedule setup menu. 3) AUDIO [ON/OFF]: Allows user to turn audio record ON or OFF. 39 3.2.2. RECORDING SCHEDULE SETUP This menu allows you to create your own recording schedule and trigger type. To enable this feature, schedule recording feature at RECORD->POLICY->SCHEDULE menu must be turned “ON”. Using direction keys and ENTER button, choose preferred record types (such as ALWAYS, MOTION, SENSOR or MOT+SEN) on the selected time and date. Different color will represent different recording types. 1) CAMERA Select channel for schedule recording. 2) SELECT DAY [DAILY / SUN – SAT] Select the desired day for schedule recording. 3) TIME Move the cursor to desired time and press ENTER key to set it highlighted. Press ENTER again to change schedule recording option by color. You can set different recording schedule and type for each camera (channel) or you can apply current schedule setting to all other cameras by pressing “APPLY TO ALL CH” button. Apply To All Channel: If selected, “Apply to All CH” window will appear. Press OK to apply the setup to all channels. When the recording schedule setup is done, click OK. 40 3.2.3. HOLIDAY You can set specific dates to Holidays according to your preferences. Holidays are applied to <Record Schedule> and < Alarm Schedule> as well. 1) Select Record in Main Menu and click Holiday. 2) A calendar for Holiday setup will appear. 3) By using your mouse or buttons, select year or month and click [OK] or [ENTER]. 4) Select a desired date and click [ENTER] or [OK] 5) You will see the “Setting Holiday” screen. Example: Select March 27 and check on <3/27> only to make every March 27th a holiday. Check both on <3/27> and March 3rd Wed> to make every March 27th and 3rd Wednesday of August holidays. 6) When the Holiday setup is complete, click <OK>. 41 3.2.4. EVENT RECORD DURATION You can set the beginning and ending point of a recording on an event. 1) Pre Event: The recording of an event will start at a pre-determined time prior to the actual occurrence of the event. If it is set to 5 seconds, the recording begins from 5 seconds before the event. 2) Post Event: The recording will continue for a pre-determined time after the actual end of an event. If it is set to 5 seconds, the recording ends in 5 seconds after an event. You can set up the Post Event to maximum of 6 hours. 3) When the event recording duration setup is complete, click <OK>. 3.2.5. RECORD OPTION (OVERWRITE) You can enable/disable HDD overwriting feature and set warning method when HDD is full and overwriting is disabled. 1) HDD OVERWRITE MODE [ON / OFF] If you select “ON”, NVR will delete the old recorded files (from the oldest file) and will record the new video file when the HDD is full. If you select “OFF”, the NVR will stop recording when the HDD(s) is full. If HDD OVERWRITE is OFF when the HDD is full, the NVR will warn you to change the setup or replace the HDD. If DISK WARNING is “ON”, a DISK Full Icon will appear on the screen. If then, enable the HDD overwrite feature or replace your HDD(s) immediately. 42 3.2.5. RECORD OPTION (OVERWRITE) – Cont. 2) AUTO DELETE [ON/OFF]. You can choose this option if you want to delete data on a HDD after an elapse of certain period of time of recording. Once you set it to the “ON” position, go back to “POLICY” menu. You will see “AUTO DELETE” option created on the screen. Click on the box right next to the “AUTO DELETE” option. “AUTO DELETE” window will be displayed. It will ask you if you would like to proceed. If you click OK, you can select number of days to auto delete 3.3. DEVICE SETUP In this Device menu, you can configure the peripherals in your NVR such as PTZ control, printer and POS/ATM 3.3.1. STORAGE HDD: HDD size and percentage used will be shown. nd 2 HDD: 2nd HDD size and percentage used will be shown (if installed). You can have up to 2 internal HDDs. Flash: If the flash capacity exceeds 2TB or more, it will appear as INVALID USB DEVICE. A pop-up window will appear with a message stating: Does not support USB devices that are larger than 2 TB. 43 FORMAT: You can format each HDD if necessary. Select <Format> and a window formatting the HDD will appear. The window will ask you if you want to proceed with formatting. Click OK on the “Manage” confirmation. If another USB device is used, it will display that particular device and you can format it if so desired. ! ALL DATA WILL BE DELETED PERMANENTLY AFTER FORMATTING! If the USB device exceeds 2TB capacity, it will not allow you to select the check box to format S.M.A.R.T: HDD will use the S.M.A.R.T function to display HDD status. If there are many bad blocks, the HDD may be compromised therefore you may need to change the HDD. 44 3.3.2. SENSOR / VIDEO LOSS DETECTION SETUP Select the right type of your external sensors connected to NVR. There are 2 different types of sensors. (N.O.- Normal Open and N.C.- Normal Close). Press ENTER button to change and select the sensor type. 1) CHANNEL [CH1 - CH16] Select the CHANNEL which the sensor is connected to. 2) TYPE [N.O. / N.C.] N.O.: “Normal mode-Open”. Two sensor lines are not connected (=open) in the normal mode. Sensor lines will be connected (=close) in the activation mode. N.C.: “Normal mode-Close”. Two sensor lines are connected (=close) in the normal mode. Sensor lines will be disconnected (=open) in the activation mode. Press MENU to save and exit. 3) Cam: Select a channel to be connected to the sensor. Once the camera is selected, “Cam Preset Setup” window will appear. Select a channel and setup the preset. 4) Video Loss State: Select ON or OFF for each channel 45 3.3.3. ALARM SCHEDULE You can set the conditions and operating hours for scheduled alarms. 1) ON: Marked in Blue, it will always generate alarm on scheduled time. 2) OFF: Marked in Black, no alarm is generated even if an event occurs. 3) Event Sync: Marked in Green, it generates an alarm only when an event occurs. 4) When the alarm is generated on the scheduled time, you can stop the alarm by cancelling the schedule. 5) When the Alarm Schedule setup is complete, click <OK>. 46 3.3.4. PTZ NVR supports Pan, Tilt, Zoom and Focus control for PTZF cameras or servers. It has RS485 port to connect to PTZ cameras and supports most industrial common protocols. 1) 2) 3) 4) ID: You can select an ID number (0-255) for each PTZ camera. PROTOCOL: For direct control of the IP camera, select ONVIF protocol. SPEED: Select the speed of camera movement (1-5). The higher number indicates faster speed. When the PTZ setup is complete, click <OK> 3.3.5. SYSTEM CONTROLLER/PRINTER DEVICE You can set the RS-485 communicator for use of PTZ Camera and system keyboards with the NVR. 1) Set the values of each communication setup of the remote device. 2) Baud rate: Baud rate settings of the NVR, PTZ camera and system keyboard should be matched for proper operations. 3) Make sure to match IDs of the NVR and System Keyboard and click <OK>. 4) Remote Control: You can select to have it ON or OFF and enter ID 5) Printer: You can select whether the printer is USB or Network. *If the PTZ protocol is ONVIF, then RS485 is not necessary. ** Please refer to pages in this manual for System Keyboard details 47 3.3.6. POS /ATM DEVICE You can set properties of POS devices connected to the NVR. 1) By clicking POS USE, your NVR and POS will be connected. If you change settings for the device and press <OK> while the <POS USE> is not checked, the changes for POS will not be saved. 2) POS COMMUNICATION SETUP WITH NVR: This allows communication setups for the POS device and NVR. To set up communication, go to Device Menu under System Controller and select RS-232 to change settings. *See Appendix POS configuration setup* 48 3.3.7. VIDEO ANALYSIS 1) Mode ON: Video Analysis will be activated. Mode OFF: Video Analysis will be deactivated. 2) Protocol: Select device/Protocol (Currently only have ATV / Hitron). Once the Video Analysis is set and complete, you will be able to view events if an action has taken place. You’ll be able to view in Search Menu under Video Analysis. 3.4. SYSTEM SETUP This menu helps you to configure NVR for basic operation. You can set the current time for your area, network parameters, and password for security purposes. 49 3.4.1. DATE/TIME SETUP You can setup the current date and time manually. 1) Date: Sets the date that will appear on the screen. You can select the date format. 2) Time: Sets the time and its format that will appear on the Screen. Select either one from <24 Hours or 12 Hours (AM/PM)> 3) Time Zone: Sets the time zone of your area based on the Greenwich Mean Time (GMT) - GMT is a standard World Time and the basis of world time zones. 4) DST: Set up Daylight Saving Time with its period to make the time earlier than the GMT of its time zone by 1hour during the set period. 3.4.2. SIGNAL [NTSC / PAL] /LANGUAGE /DEVICE NAME NVR supports several languages. Select your preferred language using ENTER button and press MENU to save and exit. Signal: It will display NTSC or PAL. By using the virtual keyboard, enter a preferred Device Name. Changing the video signal setup of the NVR will cause it to reboot. 50 3.4.2. SIGNAL [NTSC / PAL] /LANGUAGE /DEVICE NAME – Cont. 3.4.3. CONFIG With this menu, you can EXPORT, IMPORT, RESET your NVR configuration. You can also upgrade your firmware from this menu. 1) Upgrade: Upgrade NVR firmware with USB memory stick at local USB port. How to upgrade firmware with USB memory stick: - Check the current firmware version before starting upgrade. - Have a newer version of firmware software in a USB memory stick. - Insert a USB memory stick to the USB port on the NVR. - Press Menu button - Go to CONFIG. - Available firmware file will be shown on the screen. Select the right firmware file. - Click UPGRADE - NVR will reboot automatically after update. Please wait until NVR has rebooted automatically. 2) Import Configuration: Import and copy the NVR configuration file from a USB memory stick. 3) Export Configuration: Export current NVR configuration to USB memory stick. You can import this file from other NVR(s) and clone the configuration from other NVR(s). 4) Reset: You can restore all configurations including the IP camera and network settings to factory default values by check-marking in the box. (Except current time) 51 3.4.4. LOG INFORMATION You can browse system and events logs. System Log shows log and timestamp on every system start, system shutdown and any changes on system settings. Event log will show all events that occurred on the log list. You can select by type or channel. You can retrieve log information by calendar by clicking the calendar icon. For those dates that have data, there will be a small checkmark next to the date. 3.4.5. AUTHORIZATION MANAGEMENT You can set permissions of each user for the NVR’s specific function and settings. 52 3.4.5.1. ADMIN. 1) Under Authorization Management Admin, you can change Admin’s ID and Password. By clicking on the ID, a virtual keyboard will appear to type in ID. This also applies to Password and Confirm PW. Once you have entered your ID and PW, click OK. 2) By default, the ID and Password are set to “admin” and “admin” 3.4.5.2. GROUP 1) Select Group and window for Add, Delete, Rename and Group Authority setup appears. 2) Click to a desired item and set the value. - Add, Delete, Rename: You can add, delete, rename a group or modify permissions given to the group. A virtual keyboard will appear when Add or Rename is selected. You can have up to 10 groups. - Add: When you first run the NVR with the admin account, only the admin account exists. Select “Add” to display the virtual keyboard. Enter a group name. You can add up to 10 groups. - Delete: Deletes a user group that is already registered. Selecting Delete will delete all user accounts belonging to that group. - Rename: Renames a group that is already registered. Select Rename to display the virtual keyboard. - Group Authority: Sets permissions to access menu items of each group. Users of a group can access checked functions. 3) When the group setup is complete, press OK. 53 3.4.5.2. GROUP – Cont. You can create user groups and setup permissions for those user groups. You can also register a user group <User> You can set the permissions of the group “users” to access the menu according to the channel. Select a menu to which the group permission is assigned. The menu where the group permission is assigned will be displayed in the Live menu when a group user logs in. 1) 2) 3) 4) Live View Search Backup Menu Select <OK>. Select and assign a group user so that the user can access the specified menu. 3.4.5.3. USER ! Users can be added only if a Group has already been established. 54 3.4.5.3. USER – Cont. 1) When selecting “Add” from the window, a window for “Add User” will appear. You can configure the Network Viewer setting including Name, ID, Select Group and Password. Result of the user setup appears in the User window. To change the user property, use “Edit User”. The “Edit User” window appears when you select a desired item to be changed in the User window. 2) When the user setup is complete, click <OK>. 3.4.5.4. SETUP You can set restricted access for all general users. Items with restrictions will require logging in for use. 1) The Restricted Access, Auto Log out, Manual Input of ID and Auto Log Out setup screen will appear. 2) Click to a desired item and set the value. A) Restricted Access: All menu items allowed for a user can be set with the value. - Checked Box = Restricted/Not Accessible - Unchecked Box = Accessible * If box is checked in Restricted Access, a user can access the item only if the user has permission in Group Authority setting. B) Auto Log Out: period of time. A user will be automatically logged out if there is no operation on NVR for over set 55 3.5. NETWORK SETUP With this menu, you can setup the network for the NVR. Before starting this setup, the NVR must be connected to the router by LAN cable. Also, please make sure that the internet is working properly. Important: If you are not familiar with network configuration and find any difficulties during this setup, please consult with your IT specialist or contact your distributor. You should complete your network setup to control and manage the NVR through the internet or local network just like you are next to the NVR. 3.5.1. CONNECTION LAN Port: There are two selections in LAN port, Network and IP camera. Network Port: - When No Router Is Used 1) Static IP Mode: - Internet Connection: Static IP ADSL, Leased Lines and LAN environments allow connection between the NVR and the remote user. - NVR Network Setting: Set the <Connection Mode> to <Static IP>. 2) Dynamic IP (DHCP) Mode: - Internet Connection: Connect the NVR directly to a cable modem, DHCP ADSL Modem or FTTH network. - NVR Network Settings: Set the <Connection Mode> to <Dynamic IP> 56 3.5.1. CONNECTION – Cont. Network Port: - When A Router Is Used: 1) Setting the NVR with a Static IP: - Internet Connection: You can connect the NVR to a router which is connected to a cable modem or a router in a LAN environment. 2) Setting the NVR Network: - Set the <Connection Mode> to <Static IP>. - Check whether the set IP address is in the Static IP range provided by the IP router. 3) Make sure the Gateway address and Subnet Mask are equal to those set in the IP router. 4) Setting the DHCP IP Address of the IP router: - To access the IP router’s configurations, open a web browser on the local PC that is connected to the IP router and enter the router’s address (ex. http://192.68.1.1). - At this stage, make the local PC’s windows network configurations to the below example: EX.) IP:192.168.1.2 Subnet Mask: 255.255.255.0 Gateway: 192.168.1.1 - Once connected to the IP router, it prompts with password. While entering nothing to the User Name field, enter, “admin” into the password field and press <OK> to access the router configuration - Access the router’s DHCP configuration menu and it’s DHCP server activation and provide the start and end address. Set the start address (192.168.0.100) and end address (192.168.0.200). Setting Router’s Port Forwarding To remotely access/view your camera, it is required to perform port forwarding. It is essential to access the NVR connected to the router from outside of the router’s network. 1) External Port Range: Enter the TCP Port set in the <Port (TCP)> in <Protocol> menu of the connected NVR. If more than one NVRs are connected to the router, the TCP port can be different. 2) Internal PC IP Address: Enter the IP address set to the <IP> in <Connection> menu of the connected NVR. 3) Internal Port Range: Set same range as External Port Range. 57 3.5.1. CONNECTION – Cont. You can set the network connection route and protocol. 1) Connection Mode: Sets the network connection mode. 2) Bandwidth: Sets the maximum data flow to be transferred (Upload speed). Options will vary depending on the selected connection mode. - For Static IP, Dynamic IP: Select one from 50 kbps-2Mbps and unlimited. 3) IP, Gateway, Subnet Mask and DNS - For Static IP: You can directly input IP address, Gateway, Subnet Mask and DNS. - For Dynamic IP: IP Address, Gateway and Subnet Mask are set automatically. 4) When the connection setup is complete, click <OK>. IP Camera Port: You can change IP address for IP camera port. (PoE Port optional) 58 3.5.2. PORT/Connection Test (Ping) 1) Port (TCP): Initially, 9350-9351 is set. It increases/decreased by TCP: It has better stability and lower speed when compared to UDP and recommended for internet environments. 2) WebViewer Port: Enter the port number for the Web Viewer. Initially, it is set to 80. 3) When the port setup is complete, click OK. 4) UPnP: This function will automatically perform port forwarding to your router. By checkmarking the box, it will automatically do port forwarding. If your router does not support UPnP, a FAIL message will appear. If the router can support UPnP, then a SUCCESS message will appear. If the Port is already in use message appears, this indicates that particular port is already in use therefore you must change to a different port. 59 3.5.3. ID & PASSWORD You must enter your Network ID and Password to gain network access. By using the virtual keyboard, you may enter your ID and Password. This Exclamation icon indicates that the DVR/NVR has not been registered to our DDVRLS server. * The Network Default ID and Password are: ID-admin / PW-admin Registration: To use the manufacturer’s NetViewer service the NVR must be registered to the manufacturer’s DDVRLS server. By registering the NVR with this service it will allow connection to the NVR via the secure h264viewer.com web site. From this web site the primary and secondary stream from the NVR can be selected to be decoded and viewed. The registration of the NVR to the manufacturer’s DDVRLS server is not necessary to use a web browser or the supplied ATVisionIP software to connect to the NVR. If this service is desired a unique user ID and password must be entered and accepted by the DDVRLS server. If the ID is already in use, you will see a registration window stating that it’s an invalid ID. You will need to click ok and re-enter ID. 60 3.5.4. DDNS You can set the DDNS site for a remote user’s network connection 1) A virtual keyboard will appear for user input. 2) Once the DDNS setup is complete, click OK. DDNS Setting: DDNS is a short form of Dynamic Domain Naming Systems. DNS (Domain Name System) is a service that routes a Domain name consisting of user friendly characters to an IP consisting of numbers (64.233.189.104). DDNS (Dynamic DNS) is a service that registers a domain name and the floating IP address with the DDNS server so that the domain name can be routed to the IP address even if the IP is changed in a dynamic IP system. Setting DDNS in the NVR Set <Protocol Type> in the <Protocol> menu of the connected NVR to the following: Ex) Protocol Type: TCP Port (TCP): 9350-9351 DDNS Site: Matrix Systems DDNS DDNS Settings of the Router Select the corresponding menu for the network transfer protocol of the router. See page 59 – 3.5.3 PORT/Connection Test (Ping) for setting the TCP Port. 61 3.5.5. NAT TRAVERSAL This function will allow your NVR and PC to communicate by your router. With NAT Traversal, the setting of your router will be done automatically. Keep in mind that your router must support NAT Traversal For the router to set automatically, enter the information by using the keyboard. 62 3.5.6. Email / SNS (Social Network Service) You can send Email / SNS to registered NVR users. SMTP, EVENT, SCHEDULE & RECIPIENT. There are four sub-menus under Email / SNS: 3.5.6.1. Email /SNS: SMTP SMTP mail server. 1) Server Type: Displays the connected server type. 2) Server: Enters a server to connect to. 3) Port: Sets the communication port. 4) User Authentication: Click the check box next to User Authentication if the SMTP server requires user authentication. The account input box will be activated. 5) User: Enter a user to use authentication when connecting to the SMTP server. 6) Password: Enter the password of the SMTP server user. 7) Sender: Use the virtual keyboard to enter the sender’s email address. 8) TEST: Conducts the test on the server settings. 9) When the SMTP setting is complete, click OK. 63 3.5.6.2. EMAIL/SNS: EVENT You can set the interval and type of event that will be sent to the user. You may select Periodic Notification and/or Scheduled Notification. Periodic Notification: 1) Summary Interval: Enable/Check mark the Summary box to set the event summary interval time (5 min – 24 hr.) - A summary of events will be sent out on specified interval time set and one can enable or check mark the box (Picture Transfer) to receive JPG attachment of picture. 2) Use Event Transfer: Select an event type to send if an event occurs. If the selected event occurs, an e-mail will be sent to the group that has the recipient authority. 3) Channel Setup: By clicking the Channel Setup button, you can select desired channels for Event. 64 3.5.6.3. EMAIL/SNS: SCHEDULE Schedule menu will allow one to set schedule to receive notification. You may choose email, SNS or both (Email & SNS). Each notification will have different color association. You may select specific channel for notification or simply click Apply to All CH tab. 3.5.6.4 EMAIL/SNS: RECIPIENT You can add recipients to the email/SNS service. You can add up 100 recipients maximum. Click on the ADD button and an Add Recipient window will appear. Select Type, Email or Twitter. If email is selected, proceed to Name and Email. By using the virtual keyboard, enter name and email information and click OK 65 If Twitter is selected, you will need to type in the email by using the virtual keyboard and click the SEND button. After you have sent the email, you will receive a PIN from Twitter which will allow you access Twitter. 3.6. BACKUP SETUP You can check the backup device and set the backup schedule by channel or by time. You can only backup your data with either a USB Drive or external CD/DVD Writer. 1) Backup Range: Sets the Start and End time for the backup. 2) Overlap: Shows a list of overlapping data on a same time according to the number data. This will appear when one channel has multiple data on a certain time point due to changing of time or time zone. 3) Channel: Sets the channel to back up. You can select more than one channel to backup. 4) Device: Select a backup device from the recognized device. Only USB Drive or external CD/DVD can be used for backup since there is no internal CD/DVD Writer. 5) Type: Sets the backup data format: AVI: Saves the CODEC information provided by the NVR with the recording data and saved data can be played back by using external viewers such as Windows Media Player on a PC. - H4V: You can backup your file with this format. A self player is included with the backup recording. 6) Folder name: You can set the back up file name. 66 7) Check Capacity: Shows that size of the selected back up data used and available capacity of the selected back up device. 8) Remove USB Drive: By clicking this button, a popup window will appear to confirm removal of USB device. 9) When the backup is done, click OK If no available device is recognized for backup, OK button is not activated. 67 CHAPTER 4 : SEARCH MENU 4.1. TIME SEARCH To search by calendar, click the calendar icon. A calendar will appear in the middle of the screen. You can search for recorded data of a desired time. 1) Select a date to search. 2) Recorded data on that date and time will be listed. The display bar is different according to the data type so check the data type for the color in the left pane. 3) Use direction buttons to set the search criteria and press [ENTER] button. 4) Go to First: Moves to the earliest date. 5) Go to Last: Moves to the most recent date. 6) Time: Enter a time to perform the search or use the up/down to select one. 7) Zoom In ( +): The map enlarges in detail It will switch in the sequence of 24 hours-18 hours-8 hour-4 hour. 8) Zoom Out (-): The map will switch in the reverse order of the detailed mode above. 9) Double click a desired time to zoom in/out. 10) Preview: Click <Channel >and select (click, drag)) a time in <Duration> to display a still image for the portion. If the selected channel does not contain any recorded data, it will be marked black. 11) Select a data item and click <Play>. The screen switches to the data playback mode. 12) Bookmark: It will list all of the data that was bookmarked which will allow user to find data with convenience. When viewing the recorded file/data in playback, simply click the bookmark button and it will automatically add it to the bookmark page with date and time. 68 4.1. TIME SEARCH – Cont. 2 1 3 1 There are 6 options to choose from to retrieve recorded data. You can choose to search one at a time, multiple at a time or by all. You can click the “All” tab to view all options or you can click individually. 1) Normal: You can search for data that has been manually recorded. Normal is a reference to when a recording is manually entered by clicking the record button on the NVR. 2) Schedule: You can search for data that has been recorded under the scheduled setting. 3) Motion: You can search for data that has been recorded under motion setting. 4) Alarm: You can search for data that has been recorded under sensor setting. 5) Video Loss: You can search for data that has been recorded under video loss setting. 6) Network: You can search for data that has been recorded under Net Viewer/Network. 2 These buttons allow you to search according to your preference by time. 3 Preview Display window allows you to view the channels and time selected. 69 4.2. EVENT SEARCH Calendar Icon Preview Display / Thumbnail You can search for events by the channel and play them. 1) 2) 3) 4) 5) Use the mouse or direction buttons to set the search criteria and press the [ENTER] button. All recorded events on a specific date will be displayed and can be retrieved. (Normal/Schedule recording included) Date/Time Preview: If you select a data item in the list, the still image of the selected data will be displayed in the left preview pane. Event: Displays the type of the event that occurred Select a data item and click Play. The screen switches to the event data playback mode. You can choose event search by calendar by clicking the Calendar icon. Calendar display will appear. 4.3. PROTECT How to retrieve Protected files: Any recorded files (video/audio) you set as protected will be stored under this list and will no longer be available by regular CALENDAR/TIME search. You can search, playback, backup, remove files using this menu. Click SEARCH -> PROTECT. You will see the file list with recording start Time. Select a file and click PLAY button. Channel (camera) name will be displayed in WHITE to notify you that this is a protected video file (nonprotected file will show channel (camera) name in white during the Playback). 70 4.3. PROTECT – Cont. 4.4. CAPTURE How to retrieve captured image files Click SEARCH -> CAPTURE. You will see the list of captured image files. It will show you captured date, time and a source channel (camera) number. To see the captured image, click on the Date/Time Preview section. The desired image will appear on the preview display pane. To view the image in a normal/enlarged view, click [Play] at the bottom of screen. You can choose to delete the captured image by clicking the <Delete> button or if you would like to backup the captured image, click the <Backup> button. 71 4.5. POS/ATM DEVICE You can search for data in the POS device that is connected to the NVR. 1) Use direction buttons on your remote to set the search criteria and press the Enter button. You can enter specific text to refine your search. 2) Keyword: Use the virtual keyboard to enter a keyword. 3) Search Criteria: Case Sensitive: If selected, search will be performed case-sensitively. Whole Word: If selected, only the exact matches with the keyword will be found. Preview: Select a data item in the list to display the preview image. Information about the image will be displayed on the bottom of the screen. 4) Select a data item and click Play. The screen switches to the POS data playback mode. POS SEARCH VIRTUAL KEYBOARD POS KEYWORD 4.6. VIDEO ANALYSIS You can search for data as a preferred function in a specified preset position. 1) Motion: An object in motion will be detected. 2) Tracking: The camera will track a moving object. 3) Cross: You can detect a moving object crossing a specified virtual line in a preset position. 4) Enter: You can detect a moving object that newly enters in a specified area, (enter box) 5) Abandon: You can detect an object abandoned in a specified area. 6) Removal: You can detect an object removed in a specified area. 72 CHAPTER 5. GENERAL OPERATION 5.1. MOUSE MENU To navigate by using your mouse, right click your mouse given options to choose from. 1) 2) 3) 4) 5) 6) 7) 8) 9) 10) 11) 12) 13) 14) 15) anywhere on the screen and you will be Screen Mode Audio Off Freeze Stop Alarm Record Play Search Backup Main Menu Information IP Camera INFO Easy Setup Shut Down Hide/Show Launcher Logout When a channel is selected, the Mouse Menu options/selections are different than the Mouse Menu when a channel is not selected. 1) 2) 3) 4) 5) 6) 7) 8) 9) 10) 11) 12) 13) 14) 15) Hide/Show Launcher 16) Logout 73 Full Screen Zoom In Audio Freeze Stop Alarm Record Play Search Backup Main Menu Information IP Camera INFO Easy Setup Shut Down 5.1 .1 .Mouse Menu: Screen Mode 4-SPLIT When selecting Scene Mode, you will be given three (3) options 4-Slpit, PIP and Auto Sequence. AUTO SEQUENCE If you activate Auto Display Mode (Sequence Display Mode), live channels (cameras) will be displayed on the monitor screen in accordance with your sequence setup. When Auto Sequence is activated, an auto mode icon will be shown on the upper right corner of the screen until you stop this mode. To activate this mode, press PIP (Picture in Picture) To activate PIP Display Mode, press PIP button. Main channel is displayed on the full monitor screen at the same time as one two or three other channels are displayed in inset window. You can change 1 / 2/ 3 PIP mode with 4 different display positions by pressing direction keys (up and down) button repeatedly. To exit from this mode, press PIP. To change PIP mode and display position with a mouse, right-click and press MULTI icon and select your favorite PIP display. 74 5.1.2. MOUSE MENU: AUDIO ON/OFF You can turn the sound on/off corresponding to the channel in Live Mode. 5.1.3. MOUSE MENU: ZOOM Select Zoom-in and click to enlarge. You can use the direction keys or the mouse to enlarge desired area. Click enter or double click once the desired area is confirmed. ! Zoom is only available in Single-Screen Display Live Mode. In Single Live Mode, select a desired area and use the Zoom function to enlarge. It will enlarge the area X 2! 75 5.1.4. MOUSE MENU: FREEZE This is only available in Live Mode and will temporarily pause Live feeds. 5.1.5. MOUSE MENU: STOP ALARM Stops the alarm output and the event monitoring. 5.1.6. MOUSE MENU: RECORD STOP Will stop all recording. 76 5.1.7. MOUSE MENU: PLAY You can play data stored in the HDD. 5.1.8. MOUSE MENU: SEARCH You can perform search for recorded data by the time or by the search criteria such as an event. Once you click Search from the Mouse Menu, it will direct you to the Search Menu. 5.1.9. MOUSE MENU: BACKUP You can backup the desired data to a connected device. By clicking the Backup tab from the Mouse Menu, it will direct you to the Main Backup Menu. 77 5.1.10. MOUSE MENU: MAIN MENU By clicking the Main Menu on the Mouse Menu, it will direct you to the Main Menu. 5.1.11. MOUSE MENU: INFORMATION This menu will display overall system information. 5.1.12. MOUSE MENU: IP CAM INFO This menu will display your IP camera information. ! For full IP camera information, please refer to your IP Camera Setup in the Main Menu under Video Audio. 78 5.1.13. MOUSE MENU: EZ (EASY) SETUP This menu will allow you setup your NVR with 10 easy steps. 5.1.14. MOUSE MENU: SHUT DOWN This menu will allow you to completely shut down your unit. 5.1.15. MOUSE MENU: HIDE/SHOW LAUNCHER Shows or hides the Launcher 79 5.1.16. MOUSE MENU: LOGOUT Allows you to logout by clicking the Logout button. request to logout. A logout window will appear to confirm your 5.2. LIVE LAUNCHER The Live Launcher menu appears at the bottom of the live screen. Some of the menu buttons will appear in the Live Launcher, Mouse Menu and Playback Launcher for the convenience of not having to go back and forth to navigate to the desired action. 80 5.2.1. Live Launcher Control Button Description 1 2 3 4 5 9 6 10 7 12 11 1 Auto Sequence Mode 8 Zoom 2 PIP ( Picture in Picture) Mode 9 Capture 3 Full Screen Mode 10 Play 4 4-Split Screen Mode 11 Mute 5 Freeze 12 Backup 6 Alarm 13 Record 7 Search 14 Print 81 8 13 14 5.3. PLAYBACK LAUNCHER 1) Select a data item and click <Play> in the Search Menu or in Mouse Menu. The selected data is played and the play launcher appears on the screen. If there is an existing data, <Play> will start immediately without performing the search - You can play up to 4 channels in real time on a 4 CH NVR. - In a split mode, the real time playback may not be supported, depending on the record quality, resolution and number of channels. Some frame rates may be supported. 3) Playback Information: Displays the date and time of the current data in the top corner. 4) Mode Switch: Select a desired play mode or press the [MODE] button to switch the screen mode to 4-split and Single in that sequence. The default channel of the Live Mode is CH1, which can be changed later. 5) 6) Switches to Live Mode. Records all channels. 7) Play Time: Displays the time and date of the current video. 8) Play Bar: Displays the time of recorded data in the selected channel for the past 24 hours; the red gridline indicates the current play time. Speed: Supports various speed options of x1, x2(-2), x4 (-4), x8(-8), x16(-16), x32(-32) and x64(-64). Slow: Supports slow speed options of x1/2(-1/2), x1/4(-1/4) and x1/8(-1/8) 82 5.3.1. Play Launcher Control Button Description 1 2 3 4 1 2 3 4 5 6 7 8 PLAYBAR: Displays the time of recorded data in the selected channel for the past 24 hours PLAYBACK CONTROL BUTTON: Allows user to control playback of desired function. MENU EXPANSIOIN BUTTON: Open or hide menu buttons RECORD: Records all channels in Live Mode. 5 MUTE: 6 PRINT: Allows you to Print image either in Live or Playback Mode 9 CAPTURE: You can capture video image either in Playback Mode or Live Mode 8 PROTECT: You can protect recorded data from HDD overwriting. 10 11 83 11 7 9 Turns off all sound/ Audio off 10 BACKUP: Backup your data by using USB Drive or External HDD BOOKMARK: Bookmark selected data. RETURN BUTTON: Redirects to Search Menu 5.3.2. Playback (P) and Trap Mode (Pause / FF/ REW / Frame Advance) 1 2 Playback Icon: To playback any recorded files, press PB button, ‘▶’. Icon will be displayed on the right-top of the screen during the playback. Recorded time will be displayed in white under current time. To stop playback and go to live view, press “STOP” button. 1 2 Playback Audio Icon: This icon indicates an audio for the file being playback. 4 3 3 You can FF, REW and pause during the playback mode. FF and REW have 6 different speeds. 4 During the playback, you can watch pictures in frame by frame mode. To view next or previous I- Frame video still image, press PAUSE button and press or in pause mode. To watch a certain channel in full screen mode, press a channel number from a remote controller. To go back to the original playback mode, press the current channel number again. If you use a mouse, click the selected channel screen to display in full screen. Click the screen again to go back to original split display mode. 84 5.4. PTZ CONTROL The NVR enables you to adjust the settings of a PTZ camera as well as an ordinary one according to your preference. The PTZ device can be activated only if a channel in connection with the PTZ camera is selected. GETTING STARTED WITH PTZ The PTZ camera is available only if a channel is selected in the following way: 1) Using the Mouse Menu - Click PTZ to display the Mouse Menu 2) Using the right-click menu in Live Mode - Right-click any area on the screen to display the context menu and select PTZ control. 3) Using icons on the live screen - Click the PTZ icon on the live screen. Exit Direction Buttons Zoom In/Out Focus Iris Menu Expansion Button Camera Setup Auto Scan Pattern Preset Edit Delete 85 ! This function is not available for IP camera, USING THE PTZ CAMERA You can use one camera to perform all functions of PAN, TILT & ZOOM (PTZ) for monitoring multiple places and set the preset to your preference in a desired mode. 1) PTZ Direction Button/Wheel : Click to any given direction you wish to view. You will be able to view 360 degree. 2) ZOOM In/Out : You can use the Zoom function of the PTZ camera for closer view. 3) IRIS : Adjusts the intensity of radiation incoming to the iris. 4) FOCUS : Enables you to adjust the focus manually. 5) Auto: The camera automatically runs between the two points that you selected. 6) Scan: The camera moves to the preset points in the specified sequence. If multiple presets are specified, the PTZ camera will automatically move to all of the preset points one at a time sequentially. 7) Pattern: Makes the PTZ camera remember and follow the past route. 8) Edit> : You can change the preset numeric value to personal value/name. 9) Delete Preset> : You can delete the names to go back to the preset numeric value. Before entering the PTZ device control mode, set the Values of the PTZ device in the <Setting the PTZ> menu. PRESET SETTING A preset is a set of specific target points of a PTZ camera and up to 256 presets per camera can be stored. 1) In PTZ Control mode, use the direction buttons to adjust the camera to desired direction. 2) Select the <EDIT> key . A virtual keyboard will appear to input the desired name. 3) Save: You can save the preset settings. 4) Delete> : It will delete the name that was entered and will go back to the preset setting. 5) Click <OK>. The preset will be saved as a name that you entered. If you replace the camera of the channel that stores the Preset list with a new one, you should reset the preset accordingly. 86 Camera Setting A PTZ camera has its own menu system. Optimize the PTZ camera according to the NVR. 1) Connect the PTZ camera to the NVR and reboot the PTZ camera again to display the camera’s protocol setting window. 2) Check the protocol ID of the camera. In <Device> Setting the PTZ, enter the PTZ camera ID in the ID input box of the channel that is connected to the PTZ camera. 3) Select <Camera Setup> in the PTZ Control menu. The camera specific menu appears. You can configure the settings of only the cameras that support the protocols: Hitron, Pelco D/P, Samsung Techwin, Honeywell, Panasonic, and Dongyang. 4) PTZ Direction Button/Wheel> : Allows the user to navigate the desired direction of the camera. 5) Zoom/IRIS/Focus: • Zoom-You can zoom in or out image by using the ZOOM button. • IRIS- You can adjust the entering light amount by using the IRIS button. • Focus- You can adjust the focus by using the FOCUS button. 6) ESC: Allows you to exit the program without saving. 7) Ctrl (Control): By pressing the Direction Button along with the Ctrl button, you change the value of angle. 8) Exit: By clicking the Exit button, it will redirect you to the PTZ control. 87 Chapter 6. Protect Video/Audio File 6.1. Protect Registration You can protect important recorded files from HDD overwriting. Register important files to protect list. How to protect important files from HDD overwriting? During the playback of recorded file, you can transfer current retrieving file to PROTECT LIST. This file will not be erased while it is under PROTECT LIST, which is a safe space on your HDD. With a mouse, right click to pop main menu window. Click PROTECT button. Click YES on the PROTECT LIST REGISTER window. IMPORTANT: 1) You can register up to 5 files per each HDD in your NVR under the PROTECT LIST 2) You cannot register the file still in recording. You must finish recording to register this file to PROTECT LIST. 3) LOCK Button has two functions. During playback, use PROTECT LIST button. In other operation modes, use SECURITY MODE button to enable password mode. 6.2. Playback and Remove Protected File You can manage protected files separately from regular recorded files (clips) stored in HDD. How to search and playback protected files? Press SEARCH button and select PROTECT LIST. It will show start time. Press ENTER to select the file, and press PLAY button to playback. Using a mouse, click SEARCH ->PROTECT. 88 How to delete protected files? To remove old files from PROTECT LIST, go to PROTECT LIST menu. Select file(s) you want to remove. Click DELETE and YES to remove it permanently. IMPORTANT: recovered. If you click YES, the file will be erased from HDD permanently and will not be 6.3. Protected File Backup Protected files are very important and are valuable evidences for any incidents. You can make a copy of protected files on to USB memory same as the ordinary backup function of your NVR. How to backup protected files? 1) Go to PROTECT LIST menu. 2) Select a file to backup 3) Press Backup button. Then, choose External HDD or USB backup. 4) Insert a USB memory stick to USB port 5) You DO NOT have to select the starting/ending time for backup. It will be automatically detected when you select a file for a backup. 6) Select the channel(s), format type, and press OK. You will see the file size for which to be backup. 7) To start bac 3333222222222222222222222222222222222222222222222222222222 2 2 kup, click START button. 89 Chapter 7. Capture Video Still Image 7.1. Still Image Capture You can capture and save up to 100 still images and retrieve, delete, or back them up easily. You can capture videos instantly using a mouse or remote control. How to capture video images? During playback mode (including FF, REW and Pause) or live display, you can capture current video image using a mouse or remote control. Mouse: Click Capture (camera icon) button at the main menu window. Remote controller: Press ENTER button. Front keypads: Press ENTER button. When you click capture button, NVR stores all channels immediately into temporal buffer. Once you click capture, you will see a channel select menu to select channels to save into HDD. Using direction keys or a mouse, and ENTER button, you can designate which channels to save. You can select multiple channels to save. After selecting all desirable channels, press OK button to store pictures into HDD. 7.2. Retrieve and View Captured Image The NVR keeps and manages captured files separately from other video files stored in HDD. You can retrieve them at any time unless you remove them from CAPTURE LIST. You can store up to 100 captured images in master HDD. How to retrieve captured files? When you capture video images, you should go to CAPTURE LIST to search, view, backup or erase captured images. Click SEARCH button and select CAPTURE LIST. Then you will see captured file list which will show you captured time and channel information. 90 How to view captured images? Press SEARCH -> CAPTURE Select a file and press VIEW button. There, you can retrieve selected image. To identify this image from CAPTURE LIST, CAPTURED message will be displayed on leftbottom of the screen. The captured time and channel Information are displayed in white on the screen. 7.3. Remove Captured Image You can save up to 100 captured images into our HDD. You should erase some saved images to save new captured images. How to remove captured image files? IMPORTANT: If there are 100 captured images in your HDD and you try to capture new video images, the oldest image will be erased automatically to save new images. To protect your captured images, please maintain your captured images not to exceed 100 images. 91 To erase image files from CAPTURE LIST, press SEARCH -> CAPTURE. Select a file to remove. Press DELETE button at the bottom. 7.4. Backup Captured Image Captured image files are very important and are valuable evidences for any incidents. You can make a copy of captured files into a USB memory stick. How to backup captured image files? Press SEARCH -> CAPTURE LIST menu. Select a file to backup from captured file list. Insert a USB memory stick to a USB port. Press BACKUP button. When the backup is completed, BACKUP COMPLETED message will be appeared on the screen. 92 Chapter 8. Web Viewer – Connect to NVR via Internet Explorer 8.1. System Requirement - Pentium 4 or above recommended - O/S: Microsoft Windows XP, Vista, Windows 7 - 2GB RAM or above recommended - Super VGA 512M or above (1GB recommended) - 10/100 Base T network card for LAN operation 8.1.1. Network Environment Recommend Client PC More than 3 Mbps NVR More than 3 Mbps 8.2. Web Viewer – Getting Started 8.2.1. Connect NVR via Web Browser using Direct IP. 1) Open your internet browser. 2) Type your NVR’s IP address in your internet browser (ex: http://192.168.0.30). You will be directed to screen as left. 3) At the log in page, type your network ID and password and click Login button. Then you will be directed to the Web Viewer main screen. Default setting is ID: admin / PASSWORD: admin 4) After you have entered your ID and Password, there will be JAVA initializing stage 1. Before running your Webviewer, JAVA will need to initialize. Following a brief initializing, a Security Warning window will appear 2. Security Warning will ask you if you accept to run the application. Click on the box indicating that you accept the risk and want to run this application and click the RUN button. 93 8.2.2. General WebViewer Operation When you connect to your NVR, you will see a screen as below. 1 2 3 4 5 6 7 8 9 10 11 12 13 Connect/Disconnect Button: Connect to NVR which is designated in Login pop-up window. To disconnect or connect to other NVRs please click this button again. Search Button: You will be able to search for data by calendar search. Setup Button: Will allow you to setup you own personal NVR configuration Channel Selection Button: You can choose any channel to display in 1CH display mode Multi Screen Button: You can set display mode in Full (1CH), 4CH, 9CH or 16CH Print Button: You will be able to print selected channel. Previous Button: It will allow you to go back to previous channel or set of split mode channels/multi screen mode. Next Button: It will take you to the next channel or set of split mode channels/multi screen mode. Zoom Button: It will allow you to Zoom IN once a channel is selected. You many select how much and where to Zoom IN. Resolution Button: Able to select resolution and adjustments can only be done in single channel mode. Record Button: Allows you to enable recording on your DVR/NVR. Press it again and will disable recording. PTZ Control Button: You will be able to control your PTZ camera that’s connected to the DVR/NVR. Playback Control Buttons: Rewind, Play, Fast Forward & Stop 94 8.2.3. Calendar and Time Search Button: You can search data from Calendar Search or by Time Search. Click on the Search button at the menu bar. Once you have clicked the Search button, a Calendar Search will appear. The dates that are marked in red color indicates that there are data on that date. To search for data on a specific date, click the date and click the OK button. Once you have clicked the date and the OK button, a time chart with camera (CH) will appear. It will show you all the data recorded on a specific channel in the 24 hour period If you choose to search for data on a specific date and time, simple click the date (in red) and enable the Time Search located at bottom left corner. After it is enabled, select a time that you would like to view the data. After the time is selected, click the OK button. After you have clicked the OK button, your data will appear on the screen indicating the date and time selected 95 8.2.4. PTZ Control You will be able to control your PTZ camera that’s connected to your NVR. Keep in mind that PTZ control function can only be performed in LIVE mode. First select a specific channel to control that is a PTZ camera, then simply click on the PTZ icon/button on the menu bar. Once you have selected a channel and the PTZ button, a PTZ control will appear on the screen. At the top of the PTZ control, it will show you which channel was selected to control the PTZ. 8.2.5. Connect to NVR via Web Browser using URL 1) Make sure your NVR network setup is completed. Registering your Network ID and Password is not required to connect to NVR via web browser. 2) However Network & Password is required to use http://www.h264viewer.com, After entering ID & PW then you will see the screen as below. 3) After click Connect button, type Network ID and Password then click OK button. DO NOT type IP to use DDVRLS server. 96 Chapter 9. Web Viewer – Setup/Web Configuration 9.1. Web Configuration You can remotely control and manage the NVR from your Internet. We strongly recommend not using this function in normal operation. If you change the configuration of the NVR to a wrong value, the NVR may not work properly and can cause unexpected problems. This feature is for professional administrator who manages it from remote site. To control the NVR remotely, simply type in the NVR IP address in the Internet browser. Once you have entered the IP address, a Login window will appear. To gain access, you will need your ID and Password. You will be given two options/functions under Connect Mode, Web Viewer and Setup. To view, simply click the LOGIN button. To configure the NVR, click the down arrow button in the Connect Mode to Setup (See two images above). 9.1.1. Video/Audio 9.1.1.1. Camera 1) VIDEO: You may select the video ON, OFF, COVERT 1 or COVERT 2. 2) AUDIO: You may select the audio ON or OFF position. 3) TITLE/CH NAME: Create your own name/title for each camera. If you skip this setup, camera # will be displayed on the screen. ** For detailed information, please refer to the Main Menu under Video/Audio 9.1.1.2. IP Camera Registration You may register/add IP Cameras. Simply by clicking the ADD button, it will automatically add the IP Camera. ** For detailed information, please refer to the Main Menu under Video/Audio 97 9.1.1.3. IP Camera Setup You will be able to setup your IP camera and select from six different setup menus. 1. Profile 2. Resolution 3. FPS 4. Quality 5. GOP 6. Web Page ** For detailed information, please refer to the Main Menu under Video/Audio To setup your IP camera, click the Setup button. 9.1.1.4. Monitor You may adjust the resolution of main video output and configure the Spot output. ** For detailed information, please refer to the Main Menu under Video/Audio 9.1.1.5. Sequence/Event Display The NVR can display each live video channel in full screen (or a group of channels) in sequence mode similar to slide show in PC. Select the interval, channel, setup and duration. ** For detailed information, please refer to the Main Menu under Video/Audio 98 9.1.1.6. OSD/Display Position You can configure each parameter for on-screendisplay using direction keys and APPLY button. To Save and exit from this menu, press MENU. ** For detailed information, please refer to the Main Menu under Video/Audio 9.1.2. RECORD You can set all parameters related to recording for each camera independently. 9.1.2.1. Policy NVR can record a live video by manual, schedule, event (motion detection and/or external sensor) and by network user’s command. You can set the recording policy for each camera independently. ** For detailed information, please refer to the Main Menu under Record 9.1.2.2. Schedule 1) CAMERA Select channel for schedule recording. 2) SELECT DAY [DAILY / SUN – SAT] Select the desired day for schedule recording. 3) TIME Move the cursor to desired time and press ENTER key to set it highlighted. Press ENTER again to change schedule recording option by color. You can set different recording schedule and type for each camera (channel) or you can apply current schedule setting to all other cameras by pressing APPLY TO ALL CH button. ** For detailed information, please refer to the Main Menu under Record 99 9.1.2.3. Holiday You can set specific dates to Holidays according to your preferences. Holidays are applied to <Record Schedule> and < Alarm Schedule> as well. ** For detailed information, please refer to the Main Menu under Record. 9.1.2.4. Event Record Duration You can set the beginning and ending point of a recording on an event. - Pre Event - Post Event ** For detailed information, please refer to the Main Menu under Record 9.1.2.5. Record Option You can enable/disable HDD overwriting feature. ** For detailed information, please refer to the Main Menu under Record 100 9.1.3. DEVICE You can configure the peripherals in your NVR such as PTZ control and printer 9.1.3.1. Sensor Detection Select the right type of your external sensors connected to the NVR. There are two different types of sensors, (N.O. - Normal Open and N.C. Normal Close). Press APPLY button to change and select the sensor type. ** For detailed information, please refer to the Main Menu under Device 9.1.3.2. Video Loss Detection Video Loss Detection: Select ON or OFF for each channel. ** For detailed information, please refer to the Main Menu under Device 9.1.3.3. Alarm Schedule You can set the conditions and operating hours for scheduled alarms. ** For detailed information, please refer to the Main Menu under Device 101 9.1.3.4. PTZ NVR supports PAN, TILT, ZOOM and FOCUS control for PTZF cameras or servers. It has RS485 port to connect to PTZ camera and supports most industrial common protocols. ** For detailed information, please refer to the Main Menu under Device 9.1.3.5. System Controller You can set the RS-485 communicator for use of PTZ with the NVR. You can set the values of each communication setup of the remote device. ** For detailed information, please refer to the Main Menu under Device 9.1.3.6. Storage This feature will display your storage (HDD) status. ** For detailed information, please refer to the Main Menu under Device 102 9.1.4. SYSTEM The menu will help you to configure DVR for basic operation. 9.1.4.1. Date/Time You can set up the current date and time manually. ** For detailed information, please refer to the Main Menu under System 9.1.4.2. Time Synchronization Setup Auto Time Set (Time Sync.): By clicking the Time Sync. Setup button, you’ll able to automatically set up time. ** For detailed information, please refer to the Main Menu under System 9.1.4.3. Signal/Language NVR supports up to 48 different languages. Select your preferred languages. Video Signal: Select your video signal format type, NTSC or PAL. ** For detailed information, please refer to the Main Menu under System 103 9.1.4.4. System Information This menu will display overall system information 9.1.4.5. Authorization Management You can set permissions of each user over the NVR’s specific function and settings. ** For detailed information, please refer to the Main Menu under System 9.1.4.5.1. Authorization Management: Admin 1) Under Permission Management Admin, you can change Admin ID and Password. By clicking on the ID, a virtual keyboard will appear to type in ID. This also applies to Password and Confirm PW. Once you have entered your ID and PW, click OK. 2) By default, the ID and Password are set to “admin” and “admin” ** For detailed information, please refer to the Main Menu under System 104 9.1.4.5.2. Authorization Management: Group 1) Select Group and window for Add, Delete, Rename and Group Authority setup appears. 2) Click to a desired item and set the value. ** For detailed information, please refer to the Main Menu under System 9.1.4.5.3. Authorization Management: User 1) When selecting Add from the window, a window for “Add User” will appear. You can configure the Network Viewer setting including Name, ID, Select Group and Password. Result of the user setup appears in the User window. To change the use property, use “Edit User”. The “Edit User” window appears when you select a desired item to be changed in the User window. 2) When the user setup is complete, click <OK>. ! Users can be added only if a Group has been already established. ** For detailed information, please refer to the Main Menu under System 9.1.4.4.4. Authorization Management: Setup You can set restricted access for all general users. Items with restrictions will require logging in for use ** For detailed information, please refer to the Main Menu under System 105 9.1.5. NETWORK With this menu, you can setup the network for NVR. Before starting this setup, the NVR must be connected to the router by LAN cable. Also, please make sure that internet is working properly. 9.1.5.1. Connection You can set the network connection route and protocol. ** For detailed information, please refer to the Main Menu under Network 9.1.5.2. Port 1) Port (TCP): Initially, 9350-9351 is set. TCP: It has better stability and lower speed when compared to UDP and recommended for internet environments. 2) Web Viewer Port: Enter the port number for the Web Viewer. Initially, it is set to 80. 3) When the protocol setup is complete, click OK. ** For detailed information, please refer to the Main Menu under System 9.1.5.3. DDNS You can set the DDNS site for a remote user’s network connection. ** For detailed information, please refer to the Main Menu under System 106 9.1.5.4. Email/SNS Receive event notifications by either Email or SNS (Social Networking Service) ** For detailed information, please refer to the Main Menu under System 9.1.5.4.1 Email/SNS: SMTP You can send e-mail to a registered NVR user at a specific time interval or if an events occurs. ** For detailed information, please refer to the Main Menu under System 9.1.5.4.2. Email/SNS: Event You can set the interval and type of event that will be sent to the user. ** For detailed information, please refer to the Main Menu under System 107 9.1.5.4.3. Email/SNS: Schedule Schedule menu will allow one to set schedule to receive notification. You may choose email, SNS or both (Email & SNS). Each notification will have different color association. You may select specific channel for notification or simply click Apply to All CH tab. ** For detailed information, please refer to the Main Menu under System 9.1.5.4.4. Email/SNS: Recipient You can add a user to the mailing service. Click the User Add button and Add recipient window will appear in the middle of the screen. Enter recipient’s name and email address and click OK. ** For detailed information, please refer to the Main Menu under System 108 APPENDIX 109 PRODUCT SPECIFICATIONS CATEGORY IP Camera Input Monitor Output 4 CH (NVR4P) Input 4 x RJ45 camera input port, 1 x IP CAM Port Embedded PoE Switch IEEE 802.3at Resolution VGA/D1/960H/960p/1080p Protocol Onvif v2.3 base HD Video Output VGA, HDMI Main Video Resolution Up to 1920x1080p Screen Split Mode Full, Quad PIP and Zoom PIP / 8x Zoom Audio Output 1 x RCA Pentaplex Mode Simultaneous Live, Recording, Playback, Backup, Network Mobile phone support App for Android and iOS Recording Frame Rate Adjustable frame rate for each camera Recording Ways Manual, Schedule, Event (motion, sensor), Network driven Recording FPS Max 120FPS Protect Video / Audio File Protect Video / Audio from HDD Overwrite Still Image Capture Live or Playback Image Local Capture and Backup for legal evidence Internal Hard Drive SATA, Up to 2 x HDDs External Hard Drive E-SATA Remote View and Control via Gigabit Ethernet Dynamic / Static / Zero Config Support Remote Monitoring / Control Web Viewer and VMS Support NAT Traversal Support Dual Streaming for Live and Recording E-Map support Playback Alarm Control Playback Screen Mode Full, Quad Search Mode Date/Time, Calendar, Event, Motion, Protect, Capture, VCA, Text External Sensor Input 4CH NC / NO Alarm Output Buzzer, OSD, 4 x Relay 2x USB 2.0 Flash Memory Data Backup Others AVI Format for Easy Viewing, Image Authentication Video Content Analysis Yes (with specific cameras) POS / ATM Yes (with VSI/VSSI-Pro) NTP Server / Client Yes System Keyboard USB and Serial support Printer USB or Network Printer Control Private Format for IR Remote Control, USB Mouse, Client software 110 CATEGORY Event Log & Pre-Alarm Record 4 CH (NVR4P) System/Event Log management, Motion/Sensor Pre-recording for Auto Deletion Setup Recording Duration Per Channel Languages 48 Languages Support Power Supply DV 48V / 2.5A Power Consumption Max. 120W Operating Temperature 0°C ~ +45°C (+32°F ~ +113°F) Operating Humidity 0%RH ~ 90%RH Weight (Main unit) 2.5kg without HDD Weight(Packing) 4kg without HDD Dimensions(Main unit) 280 x 260 x 80 mm (11 x 10.2 x 3.1 inch) Dimensions(Packing) 375 x 360 x 195mm (14.7 x 14.1 x 7.6 inch) Conformity Certification FCC, CE Notice: The information in this manual was current when published. The manufacturer reserves the right to revise and improve its products. All specifications are therefore subject to change without notice. 111 INSTALLING SYSTEM KEYBOARD WITH STANDALONE NVR SERIES When user wants to connect with NVR, proceed as the following order. 1. Connect RS232 cable between RS-232 Port of NVR and RS232 of the Keyboard. (This connection enables NVR control remotely from KBD controller) 2. How to setup the KBD controller. A. Turn the Keyboard ON B. Input password (Factory setting is 9999) C. Open the menu of the KBD controller by pressing CTRL + MENU Key. D. Set as below in Network menu. Set Baud Rate RS232 : Com Ports 9600(2400~38400) RS232 : DVR1 3. How to setup NVR RS232 Baud Rate Parity Data Stop 9600(2400~38400) None 8 1 112 KBD controller Keys for NVR [DVR1] Function Key Label Descriptions Id Selection DVR ID Selection. MENU Enter the Quick Setup screen. You will need to enter the administrator password to access the Quick Setup. Pressing the button also closes the current menu or setup dialog box. MACRO (e.g.:1 or 2 + DVR). Record Record on and off. Rewind Play video backward at high speed. Pressing the button again toggles the playback speed from x2 and x64 Reverse Play No operation Play/Pause Live : Search PB : toggles Play / Pause playing Fast Forward Play video forward at high speed. Pressing the button again toggles the playback speed from x2 and x64 STOP During Playback mode returns theNVR to the Live mode. Pause No operation Full Screen Spot output No. + Spot No. + + Displays selected camera in the full-Screen Mode and enter the numbers in the login menu. Toggle on and off sequence mode of the selected spot output. Displays selected camera as spot output of the current NVR Display Mode Toggle between different display formats Sequence When in the live mode, pressing the SEQUENCE button displays another full live channel sequentially. Freeze Freeze the current live screen. Zoom PTZ ZOOM PTZ Zoom the selected live channel.. Enter PTZ control mode the selected live channel.. Alarm First, it will reset the DVR’s outputs including the internal buzzer during an alarm. Second, it will release the live monitoring mode unless there is an active alarm. Enter Select a highlighted item or completes an entry that you have made. Cursor movement + Joystick Up / Down / Left / Right control in the digital zoom and SET UP mode. 113 Shuttle The Shuttle Ring operates in the Playback mode only. Turning the ring clockwise plays video forward. Turning the ring counterclockwise plays video backward. Jog The Jog Dial operates only when playback video has been paused. By turning the jog dial clockwise, you can play video forward image-by-image. Keyboard Setup- For USB To setup the keyboard controllers, the user needs to setup the network, passwords and perform special tasks such as Uploading and Downloading programmed data from the dome cameras. To enter the Keyboard menu, press and hold CTRL and press MENU expressed as CTRL + MENU in the manual. You will see the following menu. Please select 2. Network from the Main Menu Network 1. Baud Rate 2. Com Ports 3. USB 4. MUX Config 5. Set Slave KBD Save and exit Enters the Baud Rate setup submenu. Enters the Communications Ports setup submenu. USB Mode Enable/Disable Set the multiplexer configuration. Select to use the slave keyboard or not. Save the changed settings and return to the previous menu Then select 3. USB and then select the USB to ON position USB Menu Status ON USB OFF Configuration Client Keyboard : Only USB Port(The other ports and slave keyboards are not supported) General Keyboard : Dome1/Dome2/RS232(The USB port is not supported) 114 KBD Controller Keys in USB (DVR/NVR-LIVE) Function Key Label Descriptions Macro Enter the Quick Setup screen. You will need to enter the administrator password to access the Quick Setup. Menu Pressing the button also closes the current menu or setup dialog box. Display Mode Change the display mode to different split screen. PTZ Control PTZ camera(s) connected to your DVR/NVR. Enter Full Screen and Input Number Zoom Freeze Auto Sequence Mode Alarm No.+ Select a highlighted item or completes an entry that you have made Displays selected camera in the full-Screen Mode and enter the numbers in the login menu. From Live display, select the desired channel and click the Zoom In button to activate the Zoom Mode. From Live Display, click the FRE button to activate the Freeze Mode. When in the Live Mode, clicking the SEQ button will display another full live channel sequentially. Will turn off the alarm Record Toggle will start and stop the recording operation Joystick Zoom control (proportional to position). Tilt control, Cursor Up/Down in the menu, Pan control, Cursor Left/Right or Page scroll in the menu. 115 POS Configuration Typical Configuration Black: Video from the camera goes to video in on the VSI-PRO-MAX. This camera typically watches the general area, including the register, counter, employee and customer. Video out from the VSIPRO-MAX goes on to the existing video system. Blue: Most new ECR have a RS232 output or can have an external device tapped, but some low end registers require the installation of an RS-232 board from the register vendor. While others with no RS-232 ability must be fitted with an additional interface module which converts the printer data to RS232 for the VSI-PRO-MAX. Red: Data from each VSI-PRO-MAX is daisy chained to a master VSI-PRO-MAX or Hydra, this data is then consolidated and transmitted to a compatible NVR in an addressable format. Optional: The optional EX function gives you 2 hard alarm outputs to trigger alarming VCR’s, Quads, or other alarming devices for Exception reporting allowing easy review of exceptional sales, or Instant reviewing on NVR’s. 116 VSI-Pro Max Networking The VSI-Pro Max as a slave allows the connection of multiple cash register terminals to a master unit for the purpose of transaction logging. You can connect the NVR with POS or Keyboard through the RS232. With POS systems, the NVR can communicate through RS232 and network. For the POS system, the NVR can integrate the text content and even search the record through the info. The series NVR also support network keyboard operation. You can operate the NVR from the keyboard controls instead of using the control pad on the front of the unit. To connect a Network Keyboard to the NVR: 1. Assemble the keyboard according to the instructions in its accompanying installation manual. 2. Connect the keyboard into the RS232 ports on the NVR or through network. 117 ATM Configuration This is a basic system drawing for the ATM to video interface. Please refer to the diagram above for basic VSSI-PRO connection. 118 NETWORK TROUBLESHOOTING You must set your network environment properly to use remote control software (Net Viewer or Web Viewer). 1.Ping Test through your Router Ping is a command-line tool used to check whether another computer is reachable from your own. You can use the command either from the Windows Command Prompt or from a Linux terminal. The following shows the sample output under Windows: Type “ping NVR IP address” (e.g. ping 192.168.0.26). If NVR and your computer are in same intranet (LAN) and are connected each other through router, you will see successful ping test. If you get time out message at ping test, you should fix this problem before going to next step. • Check if NVR and computer are in same intranet. • Check if there are other computers or devices that have same IP address in same intranet. • Check if IP address, subnet mask and gateway address are correct. 2. Direct ping test without Router You can do ping test simply with direct connection between PC and NVR. If it fails, please check your intranet (LAN) configuration. • Connect PC and NVR using Crossover LAN cable (usually orange color). 119 Set IP address, Subnet mask, and Gateway address of your PC - Open Network Connections - Select Properties of Local Area Connection - Select Internet Protocol (TCP/IP) - Select Properties 120 - Click on Use the following IP address - Type in Subnet mask and Gateway address of NVR into these fields. - Type in IP address like example. • Do ping test again. With the test result, you can figure out whether or not the setup has been successful. 121 TERMS / ICONS GLOSSARY Composite Video - A format of an analog television (picture only) signal before it is combined with a sound signal. DHCP - Dynamic Host Configuration Protocol. A network application protocol used by devices to obtain configuration into for operation in an internet protocol network. Also a source of IP addresses. DSL - Internet connection that can be used at the same time and on the same telephone line with a regular telephone. Dynamic IP Address - IP address used when a computer's IP address is assigned automatically and can change. Fps - Frames per second. H.264 - The latest block-oriented motion-compensation-based codec standard for video compression. IP- Internet Protocol. A set of rules used for communicating data across a packet-switched internetwork) for communication between its nodes IP Address - Internet Protocol Address. A numerical identification and logical address that is assigned to devices participating in a computer network utilizing Internet Protocol (IP). LAN - Local area network. A computer area that is limited to a particular space or area. NTSC - The analog television system that is used in most of the Americas, Japan, South Korea, Taiwan, Burma, and some Pacific island nations and territories. Also the name of U.S. standardization body that adopted the National Television System Committee broadcast standard. PAL - Phase Alternating Line. An analogue television encoding system set in broadcast television systems in large parts of the world. Pentaplex - Multi-channel NVRs that can monitor and record up to 16 separate cameras. PIP - Picture in Picture. PPP - Point-to-Point Protocol. A data link protocol commonly used to establish a direct connection between two networking nodes. It can provide connection authentication, transmission encryption privacy, and compression. PPPoE - Point-to-Point Protocol over Ethernet. A network protocol for encapsulating Point-to-Point Protocol frames inside Ethernet frames. PTZF - Pan, tilt, zoom, focus. S-Video - Analog video signal that carries the video data as two separate signals: luminance & chroma. S-Video carries standard definition video but does not carry audio on the same cable. Spot Monitor - Allows putting of cameras' views in sequence of however order. Static IP Address - IP address used when a computer is configured to use the same IP address each time it powers up. VGA - Video Graphics Array. The lowest common denominator that all PC graphics hardware supports. Allows the computer to project onto the monitor WAN - Wide area network. A computer area that covers a broad area. 122 NVR Icon Reference REGULAR RECORDING RECORDING SENSOR EVENT SCHEDULE RECORDING ZOOM-IN LOG ON EVENT RECORDING MOTION EVENT AUDIO ON AUTO SEQUENCE FTP UPLOAD AUDIO OFF NO DISK PROTEC PROCESSING BACKUP DISK FULL SWAP CIF RESOLUTION PTZ SET: DISK ERROR Half D1 RESOLUTION READY/AVAILABLE FREEZE PTZ: ACTIVATED D1 RESOLUTION EVENT MONITORING TWO WAY AUDIO IP CAMERA CAPTUR POS TEXT OFF POS TEXT ON NVR RECORDING ADD VIDEO SERVER LOCAL RECORDING SPEAKER ON SPEAKER OFF DISCONNECT CONNECT ADD IP CAMERA MICROPHONE ON Net Viewer ADD NVR DEVICE 123 HOW TO DOWNLOAD WINDOWS MEDIA PLAYER 10 OR ABOVE OR VLC MEDIA PLAYER, AND PLAY AVI FILES 1. WINDOWS MEDIA PLAYER 10 OR ABOVE To download Windows Media Player 10 or above, please go to the following link: http://www.microsoft.com/windows/windowsmedia/player/10/default.aspx NOTE: after installation, if audio and/or video are not working normal, install codec “ffdshow.exe” file from the backed up file: 1) Double-click or open the file you backed up 2) Open “codec” folder 3) Implement “ffdshow.exe” file. If recorded time and date are not showing on the screen, please follow the instruction below: 1) Click down arrow key (for access application menu) on the top title. Go to Play ->Captions and Subtitles -> “ON” if available. 2) Click down arrow key (for access application menu) on the top title. Go to Tools -> Options -> Security -> Show local captions when present (or Run scrip commands when present). 2. VLC PLAYER To download and install VLC Media Player, please go to the following link: http://www.downloadvlcplayer.org/ To play with VLC media player, open the back up file -> open “file” folder -> choose a file you want to view and right click -> select “Open with” menu -> choose “VLC media player.” 124 Dashboard Dashboard allows you to manage or monitor the multiple DVR/NVR with single ID from anywhere in the world where you can access the internet. Once you login with your ID, the Dashboard shows the registered DVR/NVR list on the web and enables you to access the DVR/NVR for real-time monitoring and playback. As free internet service, for using the Dashboard, you should setup the DVR/NVR on the Dashboard by registering your ID. 1.1. Setup/Registration For Dashboard setup, you’ll first need to enter important information and register. Scroll down and select New Account. Once you have selected the New Account, you’ll need to enter your ID and Password. To enter your ID and Password, use the virtual keyboard that’s provided. After you have selected and entered your ID and Password, click on to the Register/Add a new device tab to register. If the entered ID and Password are approved, you will receive ID Approved popup window in the middle of the screen. It will also indicate at the bottom of page, Dashboard Registration: SUCCESS. If the ID and Password is not accepted, then it will show as FAIL and you will have to re-enter your ID and Password. 125 1.2. Dashboard Starting To start your Dashboard, you will need to type in: http://h264viewer.com/dashbord in the browser address bar. After entering , click the enter button and Welcome To Dashboard page will appear. To gain access, enter your Username and Password. Your username/ID and Password will be same as the one that you entered when you first registered on Dashboard Setup page. After it has been entered, click the Login button for full access. 1.3. Dashboard Login Once you have logged on, the Dashboard will appear and from here, you’ll be able to view your DVR/NVR information. Click the REMOTE WATCH tab and you’ll be able to access your DVR/NVR and monitor. ① ② ③ 126 ① Refresh: Updates the list of cameras. ② Remote Watch: Access remote viewing from your desired DVR/NVR. A Web Viewer will appear and you can monitor LIVE or do Playback. ③ Video Loss Status: This will show you the camera status and determine whether there is connection to the DVR/NVR. 127 1.4. DVR/NVR Search In your Dashboard, type in the Network ID of your desired DVR/NVR and it directly connect to your DVR/NVR’s webpage. Network ID: Once you have entered the Network ID for desired DVR/NVR, click the GO button. After clicking the GO button, it will route you to the web page login. Once you have entered the Login page, you will then need to enter your ID and Password. Once you have entered your ID and Password, you will then be able to access your DVR/NVR’s setting page. 128 1.5. Remote Login Using your Web Viewer, you will be able to Live Monitor and perform playback from your DVR/NVR. To access your Web Viewer for Live monitoring and Playback, you will need to enter your ID and Password 129