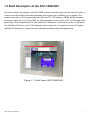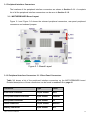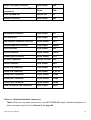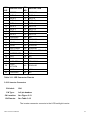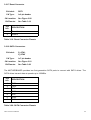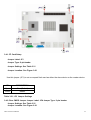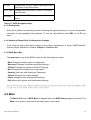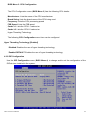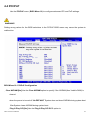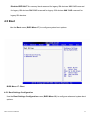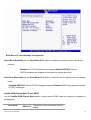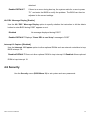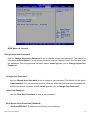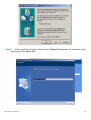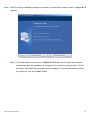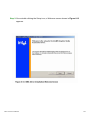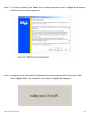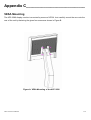
1
APC-3580/3581 Panel PC User Manual Release Date Revision June 2005 ®2005 Aplex Technology, Inc. V1.0 All Rights Reserved. Published in Taiwan Aplex Technology, Inc. 9F-5, No. 2, Jian Pa Road, Chung Ho City, Taipei County, Taiwan Tel: 886-2-82262881 Fax: 886-2-82262883 E-mail: [email protected] URL: www.aplex.com.tw APC-3580 User Manual 1 Warning!___________________________________ This equipment generates, uses and can radiate radio frequency energy and if not installed and used in accordance with the instructions manual, it may cause interference to radio communications. It has been tested and found to comply with the limits for a Class A computing device pursuant to FCC Rules, which are designed to provide reasonable protection against such interference when operated in a commercial environment. Operation of this equipment in a residential area is likely to cause interference in which case the user at his own expense will be required to take whatever measures may be required to correct the interference. Electric Shock Hazard – Do not operate the machine with its back cover removed. There are dangerous high voltages inside. Disclaimer This information in this document is subject to change without notice. In no event shall Aplex Technology Inc. be liable for damages of any kind, whether incidental or consequential, arising from either the use or misuse of information in this document or in any related materials. APC-3580 User Manual 2 Table of Contents______________________ Warning!…………………………………………………………………………….……..….2 Disclaimer………………………………………………………………….…………………2 Chapter 1 Getting Started 1.1 Features…......…………….……………………………………..…..…...…5 1.2 Specifications………………………………………….………………...…..5 1.3 Brief Description of APC-3580/3581………...……………………………7 1.4 Chassis Dimensions..…………………………………………………..…..9 Chapter 2 Installation 2.1 Unfastening of Back Cover……………………………………………..10 2.2 Removal of Back Cover..……………………….……………………....10 2.3 Opening of Back Cover..………………………………….…………….10 2.4 Unfastening of Inside Cover...……………………………………….....11 2.5 Removal of Inside Cover……………………………………….............11 2.6 Fastening of HDD………….…….…..……………………...………......11 2.7 Installation of HDD.….……………….…………………………..……...12 2.8 Connecting HDD Cable………………………………..…………….….12 Chapter 3 3.1 3.2 3.3 3.4 Chapter 4 Mainboard Specifications….…...…...……………………….………………...........13 Internal Periheral Connectors……………………………………….....17 External (Rear Panel) Connectors…………………….…….…….......32 Onboard Jumper …………………….…….…..……………..…….......36 AMI BIOS Setup 4.1 Introduction …………… ……………………………..……………………40 4.2 Main Menu……… ………..………………...…………………...…..41 4.3 Advanced Menu ……….……...……….………………………………….43 4.4 PCI PnP Menu………………………….………………………………….67 4.5 Boot Menu …………………………………………………………...........71 4.6 Security Menu. …………………………………………………………….74 4.7 Chipset Menu………………………………………………………………76 4.8 Power……………………………………………………………………….82 4.9 Exit……….………………………………………………………………….89 APC-3580 User Manual 3 Chapter 5 Software 5.1 Available Software Drivers ...……………………………………………….91 5.2 Chipset Driver Installation ………………………………………………….91 5.3 RealTek Audio Driver Installation.………………………………………….94 5.4 Intel Graphics Media Accelerator Driver ………………………………….98 5.5 LAN Driver Installation……..………………………………………………101 5.6 SATA - ALi RAID Driver Installation.………………………………………103 Chapter 6 Touch Driver Installation 6.1 Windows 2000/XP Driver Installation for Controller Board.……….….113 6.2 Configuring PenMount Windows 2000/XP Driver……………………..117 6.3 Uninstall PenMount Windows 2000/XP Driver…………………………124 Appendix A B C Watchdog Timer…………..….…………..….……………………...…...126 Digital I/O…………………………….…………..………………............128 Panel/VESA Mounting………………………………..…………………131 Figures Figure 1.1: Front View ………………………………………………..…………7 Figure 1.2: Rear View……………………………………………………………8 Figure 1.3 System Layout……………………………………………………….8 Figure 1.4: Chassis Dimensions……………………………..…………………9 Figure 3.1: Board Layout….….………………..….…………….……………..15 Figure A: VESA Mounting…………………………………………………..131 APC-3580 User Manual 4 Chapter 1_____________________________ 1.1 Features z z z z z z z z z Ultra slim stainless steel sealed enclosure Fanless thermal solution Intel® Celeron® M ULV 800MHz CPU up to PentiumM 1.8GHz 15” high-brightness (380nits) TFT LCD display NEMA 4/IP65 compliant front panel VESA 75 Mounting support Space for one 2.5” HDD Optional resistive touch screen DC 11~28V wide range power input 1.2 Specifications System CPU: Intel® Celeron® M ULV 800MHz CPU, Intel® Pentium M CPU Max. Up to 1.8GHz Chipset: Intel® 855GM+ICH4 System Memory: 1 x 200-pin DDR SODIMM HDD Drive: 1 x 2.5” slim type Watchdog: 1~255 secs watchdog timer w/reset and NMI I/O Ports: 2 x COM, 2 x USB, 1 x 100 base-T LAN port, 1 x PS/2 keyboard and mouse port VGA: Built-in Intel 852GM Compact Flash: 1 x compact flash connector Touch Screen (optional) : Resistive Mechanical Specifications APC-3580 User Manual 5 Construction: APC-3580: Sealed stainless steel chassis, NEMA 4X/IP65 rated front panel APC-3581: Sealed painting metal chassis, NEMA 4X/IP65 rated front panel Mounting: VESA 75 mounting holes Operating Temperature: 0~50 degrees C Storage Temperature: -10~75 degrees C Vibration: 5~17Hz, 0.1” double amplitude peak to peak Shock: 10G acceleration peak to peak (11ms) EMC: FCC, CE Class A Dimensions: 383(W) x 52(D) x 316mm(H) Weight: 6.5kgs APC-3580 User Manual 6 1.3 Brief Description of the APC-3580/3581 Out of the ordinary, the chassis of the APC-3580 is made of stainless steel with an ultra slim profile. It is built around the Intel® Celeron® M processor with a clock rate of 600MHz yet it is fanless. The model comes with a 15-inch high-brightness (380 nits) TFT LCD display, a NEMA 4/IP65 compliant front panel, space for one 2.5-inch HDD, an optional resistive touch screen, a DC 11~28V wide range power input. This industrial panel PC also features 2 COM ports (1 reserved for touch), 4 USB ports, one 100 base-T LAN port, and 1 PS/2 keyboard and mouse ports. It is ideal for use as a PC-based controller for Automotive, Logistic Process, Materials Handling, and Kiosk applications. Figure 1.1: Front View of APC-3580/3581 APC-3580 User Manual 7 Figure 1.2: Rear View of APC-3580/3581 Figure 1.3: APC-3580 User Manual System Layout 8 1.4 Chassis Dimensions Figure 1.4: Dimensions of the APC-3580/3581 APC-3580 User Manual 9 Chapter 2_____________________________ 2 Installation 2.1 Unfastening of Back Cover First remove the back cover by loosening the 9 screws as circled in the picture. 2.2 Removal of Back Cover To get the back cover opened up, slightly pull it inward as shown in the picture with your hands and lift it up slowly. Slightly pull inward and lift up to remove Slightly pull inward and lift up to remove 2.3 Opening of Back Cover Please open, with care, the back cover at 45 degrees, making sure the cables inside the enclosure are intact. If the back cover is swiftly opened at 90 degrees, the cables might be ripped apart. To totally remove the back cover from the enclosure, disconnect the three cables as circled. APC-3580 User Manual 10 2.4 Unfastening of Inside Cover Unfasten the 6 screws as circled in the picture to open the inside cover where the system board is. 2.5 Removal of Inside Cover To totally remove the inside cover, place one hand at one corner of the cover as shown by the circle in the picture, and place the other at the other corner, and give it a push in the direction of the arrow as shown in the picture. 2.6 Fastening of HDD Circled in the picture are two HDD brackets used to mount the HDD on the system board. Before doing the mounting, place the brackets by the sides of the HDD and tighten them with the screws as shown by the arrows in the picture. APC-3580 User Manual 11 2.7 Installation of HDD Now mount the HDD with each bracket tightened by its side on the space found in the system board. To put the HDD in place, fasten the four screws as shown in the picture. 2.8 Connecting HDD Cable Lastly, connect one end of the HDD cable to the IDE socket while the other end is connected to the HDD interface, making sure the red stripe found on the cable is correctly connected to Pin 1. *** Please note that to close the back cover of the Panel PC, please follow Steps 2.5, 2.4, 2.3, 2.2 and 2.1 as shown above. Location of DIMM Slot The location of the DIMM slot as circled in the picture is found on the reverse side of the board. DIMM Slot APC-3580 User Manual 12 Chapter 3_____________________________ Mainboard Thank you for choosing the socket 479 (mobile) Pentium M single board computer. The mainboard is equipped with a high-performance processor and multi-mode I/O designed for the system manufacturers and integrators. In addition, the VGA controller of the board’s built-in AGP4X VGA (Intel 852GM) has 3D graphics capability, which provides up to 2048 x 1536 x 32-color resolution. The onboard VGA shares 32MB (max.) system DDR-SDRAM. An advanced high-performance super AT I/O chip -- Winbond W83627HF and Fintek F81216D are used in the mainboard. On-chip UARTs are compatible with the NS16C550. The parallel port and IDE interface are compatible with IBM PC/AT architecture. It has the 82551/541 LAN controller. They are fully integrated 10 base-T, 100 base-TX LAN, or 1000 base-TX solutions with high-performance networking functions and low-power consumption. The board uses Intel® 852GM chipset, which are 100% software compatible and are of PCI 2.2 standard. 3.1 Specifications CPU: Socket 479 for Intel® Pentium® M CPU with 333/400MHz FSB, Max. up to 1.7GHz Onboard ULV Intel® Celeron® M 800MHz with 512KB L2 cache Chipset: Intel® 852GM + ICH4 System Memory: One 200-pin DDR SO-DIMM supporting DDR266 SDRAM up to 1GB Display: Display controller Intel GMCH integrated graphics controller Integrated AGP 4X 2D/3D engine One VGA port for CRT monitor 1600x1200@8bpp, 1280x1024@16bpp APC-3580 User Manual 13 48-bit LVDS port Dual independent displays Shared system memory of up to 32MB (DVMT) Ethernet: Intel 82541ER for 10/100/1000Mbps Ethernet or Intel 82551ER for 10/100Mbps Ethernet I/O Ports: 1 x IDE port 1 x parallel port 1 x PS/2 keyboard/mouse support 1 x RS-232 serial port 1 x RS-232/422/485 port 2 x SATA port 6 x USB 2.0 port (4 by connector, 2 by pin header) Audio: AC’ 97 CODEC Digital I/O: 4 input and 4 output (by pin header) WDT: Software programmable support 1~255 sec system reset Hardware Monitoring: CPU voltage/temperature/fan speed monitor Power Control Function: Meeting ACPI 1.1 specifications Single voltage +12V only Operating Temperature: 0˚~60℃ or 32˚~140℉ Relative Humidity: 5~95%, non-condensing APC-3580 User Manual 14 3.1 Peripheral Interface Connectors The locations of the peripheral interface connectors are shown in Section 3.1.1. A complete list of all the peripheral interface connectors can be seen in Section 3.1.2. 3.1.1 MOTHERBOARD Board Layout Figure 3-1 and Figure 3-2 shows the onboard peripheral connectors, rear panel peripheral connectors and onboard jumpers. Figure 3.1: Board Layout 3.1.2 Peripheral Interface Connectors 3.1.3 Rear Panel Connectors Table 3-1 shows a list of the peripheral interface connectors on the MOTHERBOARD board. Detailed descriptions of these connectors can be found in section 3.2 on page 41. Connector Type Label 4-bit GPIO connector 10-pin header DIO1 ATX power button connector 2-pin header PWRON ATX power connector 3-pin header J2 Audio connector 10-pin header AUDIO1 Battery connector 2-pin header BT1 APC-3580 User Manual 15 Board 12V power connector 4-pin header CN4 CFII connector (Secondary IDE connector) 50-pin CN6 DDR SODIMM slot 200-pin slot J3 Inverter connector 5-pin header CN1 IR interface connector 5-pin header IR1 Fan connector 3-pin header FAN1 IDE interface connector (Primary) 44-pin header IDE1 Keyboard/Mouse connector 6-pin header KBMS1 LED connector 6-pin header CN5 LVDS connector 30-pin header LVDS1 Parallel port connector 26-pin header LPT1 PC/104+ connector 120-pin PCI slot CN3 Reset connector 2-pin header RST1 Serial ATA connector 7-pin header S_ATA1 Serial ATA connector 7-pin header S_ATA2 Serial port2 connector 14-pin header COM2 Serial port3 connector 10-pin header COM3 Serial port4 connector 10-pin header COM4 USB 2.0 internal USB connector 8-pin header USB3 Table 3-1: Peripheral Interface Connectors Table 3-2 lists the rear panel connectors on the MOTHERBOARD board. Detailed descriptions of these connectors can be found in Section 3.3on page 66. APC-3580 User Manual 16 Connector Type Label Ethernet connector RJ-45 connector J1 Keyboard/Mouse connector PS/2 connector KB/PS1 Serial port1 connector 9-pin serial port connectors COM1 Two USB 2.0 ports USB port connectors USB1 Two USB 2.0 ports USB port connectors USB2 VGA Connector 15-pin VGA connector VGA1 Table 3-2: Peripheral Interface Connectors 3.1.3 Onboard Jumpers Table 3-3 lists the onboard jumpers. Detailed descriptions of these jumpers can be found in Section 3.4 on page 70. Connector Type Label CF card setup 2-pin header JP1 Clear CMOS 3-pin header JP4 COM2 RS232/RS422/RS485 selector 6-pin header JP2 LCD voltage selector 3-pin header JP6 PC104+ SERIRQ net to CN3 pin B1 selector 3-pin header JP5 Table 3-3: Onboard Jumpers 3.2 Internal Peripheral Connectors Internal peripheral connectors are found on the board and are only accessible when the board is outside of the chassis. This section has complete descriptions of all the internal, peripheral connectors on the MOTHERBOARD board. APC-3580 User Manual 17 3.2.1-bit GPIO Connector CN Label: DIO1 CN Type: 2x5 pin headers CN Location: See Figure 3-3 CN Pinouts: See Table 3-4 The General Purpose Input/Output (GPIO) connector connects external devices. The GPIO connector provides a set of configurable IO ports for either input or output. PIN PIN DESCRIPTION DESCRIPTION NO. NO. 1 GND 2 VCC 3 OUT0 4 OUT1 5 OUT2 6 OUT3 7 IN0 8 IN1 9 IN2 10 IN3 Table 3-4: 4-bit GPIO Connector Pinouts 3.2.2 ATX Power Button Connector CN Label: PWRON CN Type: 1x2 pin headers CN Location: See Figure 3-4 CN Pinouts: See Table 3-5 The ATX power button connector supports ATX power switch and enables power on/off from the chassis. PIN NO. DESCRIPTION 1 Button 1 2 Button 2 Table 3-5: Power Button Connector Pinouts APC-3580 User Manual 18 3.2.3 ATX Power Connector CN Label: J2 CN Type: 1x3 pin header CN Location: See Figure 3-5 CN Pinouts: See Table 3-6 This connector supports the ATX power supply. PIN NO. DESCRIPTION 1 5VSBY 2 GND 3 PSON Table 3-6: Power Connector Pinouts 3.2.4 Audio Connector CN Label: AUDIO1 CN Type: 2x5 pin headers CN Location: See Figure 3-6 CN Pinouts: See Table 3-7 The MOTHERBOARD has a built-in AC ’97 AUDIO CODEC connector directly connected to the MIC-IN, LINE-IN and LINE-OUT. MOTHERBOARD Motherboard PIN PIN DESCRIPTION DESCRIPTION NO. NO. 1 LINE_OUT-R 2 LINE_IN-R 3 GND 4 GND 5 LINE_OUT-L 6 LINE_IN-L 7 GND 8 GND 9 MIC-IN 10 NC Table 3-7: Audio Connector Pinouts APC-3580 User Manual 19 3.2.5 Battery Connector CN Label: BT1 CN Type: 1x2 pin header CN Location: See Figure 3-7 The battery connector is connected to a preinstalled VARTA CR2032 3V battery 3.2.6 12V Power Connector CN Label: CN4 CN Type: 1x4 pin header CN Location: See Figure 3-8 CN Pinouts: See Table 3-8 Connects a power source from a power supply unit (PSU) to the MOTHERBOARD. PIN NO. DESCRIPTION 1 GND 2 GND 3 VCC12 4 VCC12 Table 3-8: 12V Power Connector Pinouts 3.2.6 Compact Flash Type 2 Socket CN Label: CN6 CN Type: 50-pin CN Location: See Figure 3-9 CN Pinouts: See Table 3-9 A CFII (compact flash type II connector) is located on the solder side of the MOTHERBOARD. The CFII connector is for applications without external storage. The Compact Flash socket provides an alternative to hard disk drives in applications where hard disk drives may consume too much space and storage capacity is not a requirement. The CF card behaves like a secondary IDE master APC-3580 User Manual 20 disk drive. PIN NO. DESCRIPTION PIN NO. DESCRIPTION 1 GROUND 26 VCC-IN CHECK1 2 DATA 3 27 DATA 11 3 DATA 4 28 DATA 12 4 DATA 5 29 DATA 13 5 DATA 6 30 DATA 14 6 DATA 7 31 DATA 15 7 HDC_CS0# 32 HDC_CS1 8 N/C 33 N/C 9 GROUND 34 IOR# 10 N/C 35 IOW# 11 N/C 36 N/C 12 N/C 37 INTERRUPT 13 VCC_COM 38 VCC_COM 14 N/C 39 CSEL 15 N/C 40 N/C 16 N/C 41 HDD_RESET 17 N/C 42 IORDY 18 SA2 43 N/C 19 SA1 44 VCC_COM 20 SA0 45 HDD_ACTIVE# 21 DATA 0 46 N/C 22 DATA 1 47 DATA 8 23 DATA 2 48 DATA 9 49 DATA 10 50 GROUND 24 25 N/C VCC-IN CHECK2 3.2.7 DDR SODIMM Socket CN Label: J3 CN Type: 200 Pin DDR-SDRAM SODIMM Socket CN Location: See Figure 3-10 A 200 pin DDR-SDRAM SODIMM socket is located on the rear side of the MOTHERBOARD board. APC-3580 User Manual 21 The SODIMM socket can support 266MHz DDR SODIMM SDRAM of up to 1GB. 3.2.8 Fan Connector CN Label: FAN1 CN Type: 1x3 pin header CN Location: See Figure 3-11 CN Pinouts: See Table 3-10 The cooling fan connector provides a 12V, 500mA current to a system cooling fan. The connector has a "rotation" pin to get rotation signals from fans and notify the system so the system BIOS can recognize the fan speed. Please note that only specified fans can issue the rotation signals. PIN NO. DESCRIPTION 1 Fan Speed Detect 2 +12V 3 GND Table 3-10: Fan Connector Pinouts 3.2.9 IDE Interface Connector CN Label: IDE1 CN Type: 2x22 pin header CN Location: See Figure 3-12 CN Pinouts: See Table 3-11 One IDE connector provides connectivity to two IDE devices. APC-3580 User Manual 22 PIN NO. DESCRIPTION PIN NO. DESCRIPTION 1 RESET# 2 GROUND 3 DATA 7 4 DATA 8 5 DATA 6 6 DATA 9 7 DATA 5 8 DATA 10 9 DATA 4 10 DATA 11 11 DATA 3 12 DATA 12 13 DATA 2 14 DATA 13 15 DATA 1 16 DATA 14 17 DATA 0 18 DATA 15 19 GROUND 20 N/C 21 IDE DRQ 22 GROUND 23 IOW# 24 GROUND 25 IOR# 26 GROUND 27 IDE CHRDY 28 GROUND 29 IDE DACK 30 GROUND–DEFAULT 31 INTERRUPT 32 N/C 33 SA1 34 N/C 35 SA0 36 SA2 37 HDC CS0# 38 HDC CS1# 40 GROUND 39 HDD ACTIVE# 41 VCC 42 VCC 43 GROUND 44 N/C Table 3-11: IDE Connector Pinouts 3.2.10 Inverter Connector CN Label: CN1 CN Type: 1x5 pin headers CN Location: See Figure 3-13 CN Pinouts: See Table 3-12 The inverter connector connects to the LCD backlight inverter. APC-3580 User Manual 23 PIN NO. DESCRIPTION 1 BKLTCTL 2 GND 3 +12V 4 GND 5 BKLEN Table 3-12: Inverter Connector Pinouts 3.2.11 IR Interface Connector CN Label: IR1 CN Type: 1x5 pin headers CN Location: See Figure 3-14 CN Pinouts: See Table 3-13 The integrated infrared (IrDA) connector supports both Serial Infrared (SIR) and Amplitude Shift Key Infrared (ASKIR) interfaces. PIN NO. DESCRIPTION 1 VCC 2 N/C 3 RXD 4 GND 5 TXD Table 3-13: IR Interface Connector Pinouts 3.2.12 Keyboard/Mouse Connector CN Label: KBMS1 CN Type: 1x6 pin header CN Location: See Figure 3-15 CN Pinouts: See Table 3-14 APC-3580 User Manual 24 The Keyboard/PS2 mouse cable shipped with the MOTHERBOARD board is connected to the keyoard/mouse connector. PIN NO. 1 DESCRIPTION VCC5 2 MOUSE DATA 3 MOUSE CLOCK 4 KEYBOARD DATA 5 KEYBOARD CLOCK 6 GND Table 3-14: Keyboard/Mouse Connector Pinouts 3.2.13 LED Connector CN Label: CN5 CN Type: 1x6 pin header CN Location: See Figure 3-16 CN Pinouts: See Table 3-15 This connector connects to the LED lights indicating the hard drive activity and the power status. PIN NO. DESCRIPTION 1 +5V 2 GND 3 VCC5 LED+ 4 GND 5 HDD LED+ 6 HDD LED- Table 3-15: LED Connector Pinouts APC-3580 User Manual 25 3.2.14 LVDS Connector CN Label: LVDS1 CN Type: DF 13 CN Location: See Figure 3-17 CN Pinouts: See Table 3-16 LVDS (Low Voltage Differential Signaling) is a low noise, low power, and low amplitude method for high-speed data transmission over a copper wire. The LVDS connector is typically connected to an LCD screen. PIN NO. Description PIN NO. Description 2 GND 1 NC 4 AY0 3 AY0+ 6 AY1 5 AY1+ 8 AY2 7 AY2+ 10 AYCLK- 9 AYCLK+ 12 AY3 11 AY3+ 14 GND 13 GND 16 BY0- 15 BY0+ 18 BY1- 17 BY1+ 20 BY2- 19 BY2+ 22 BYCLK- 21 BYCLK+ 24 BY3- 23 BY3+ 26 GND 25 GND 28 LCDVCC 27 LCDVCC 30 LCDVCC 29 LCDVCC Table 3-16: LVDS Connector Pinouts 3.2.15 Parallel Port Connector CN Label: LPT1 CN Type: 2x13 pin header CN Location: See Figure 3-18 CN Pinouts: See Table 3-17 APC-3580 User Manual 26 The parallel port connector is usually connected to a printer. A 26-pin flat-cable connector is used to connect the parallel port with a printer or other parallel communication devices. PIN DESCRIPTION PIN DESCRIPTION 1 STROBE# 14 AUTO FORM FEED # 2 DATA0 15 ERROR# 3 DATA1 16 INITIALIZE# 4 DATA2 17 PRINTER SELECT LN# 5 DATA3 18 GND 6 DATA4 19 GND 7 DATA5 20 GND 8 DATA6 21 GND 9 DATA7 22 GND 10 ACKNOWLEDGE # 23 11 BUSY 24 12 PAPER EMPTY 25 13 GND N/C GND PRINTER SELECT Table 3-17: Parallel Port Connector Pinouts 3.2.16 PC/104+ Connector CN Label: CN3 CN Type: 4x30 pin PCI slot CN Location: See Figure 3-19 CN Pinouts: See Table 3-18 APC-3580 User Manual 27 This connector supports the PC/104+ module. PIN Description PIN Description PIN Description PIN Description A1 GROUND B1 NC/SERIRQ C1 +5V D1 AD0 A2 VIO B2 AD2 C2 AD1 D2 +5V A3 AD5 B3 GND C3 AD4 D3 AD3 A4 CBE0- B4 AD7 C4 GND D4 AD6 A5 GND B5 AD9 C5 AD8 D5 GND A6 AD11 B6 VIO C6 AD10 D6 N66EV A7 AD14 B7 AD13 C7 GND D7 AD12 A8 +3.3V B8 CBE1- C8 AD15 D8 +3.3V A9 SERR B9 GND C9 SBO D9 PAR A10 GND B10 PERR C10 +3.3V D10 SDONE A11 STOP B11 +3.3V C11 LOCK- D11 GND A12 +3.3V B12 TRDY- C12 GND D12 DEVSEL- A13 FRAME- B13 GND C13 IRDY- D13 +3.3V A14 GND B14 AD16 C14 +3.3V D14 CBE2- A15 AD18 B15 +3.3V C15 AD17 D15 GND A16 AD21 B16 AD20 C16 GND D16 AD19 A17 +3.3V B17 AD23 C17 AD22 D17 +3.3V A18 IDSEL0 B18 GND C18 IDSEL1 D18 IDSEL2 A19 AD24 B19 CBE3 C19 VIO D19 IDSEL3 A20 GND B20 AD26 C20 AD25 D20 GND A21 AD29 B21 +5V C21 AD28 D21 AD27 A22 +5V B22 AD30 C22 GND D22 AD31 A23 REQ0 B23 GND C23 REQ1- D23 VIO A24 GND B24 REQ2- C24 +5V D24 GNT0- A25 GNT1- B25 VIO C25 GNT2- D25 GND A26 +5V B26 PCICLK0 C26 GND D26 PCICLK1 A27 PCICLK2 B27 +5V C27 PCICLK3 D27 GND A28 GND B28 INTD C28 +5V D28 PCIRST A29 +12V B29 INTA- C29 INTB- D29 INTC- A30 -12v B30 REQ3- C30 GNT3- D30 GND/3.3V Table 3-18: PC/104+ Connector Pinouts APC-3580 User Manual 28 3.2.17 Reset Connector CN Label: RST1 CN Type: 1x2 pin header CN Location: See Figure 3-20 CN Pinouts: See Table 3-19 PIN NO. DESCRIPTION 1 Reset 1 2 Reset 2 Table 3-19: Reset Connector Pinouts 3.2.18 SATA Connectors CN Label: S_ATA1, S_ATA2 CN Type: 1x7 pin header CN Location: See Figure 3-21 CN Pinouts: See Table 3-20 The MOTHERBOARD provides two first-generation SATA ports to connect with SATA drives. The SATA drives transmit data at speeds up to 150MB/s. PIN NO. DESCRIPTION 1 GND 2 TX0+ 3 TX0 4 GND 5 RX0 6 RX0+ 7 GND Table 3-20: SATA Connector Pinouts APC-3580 User Manual 29 3.2.19 Serial Port2 Connector CN Label: COM2 CN Type: 2x7 pin header CN Location: See Figure 3-22 CN Pinouts: See Table 3-21 PIN PIN DESCRIPTION DESCRIPTION NO. NO. 1 DCD# 2 DSR# 3 RxD 4 RTS# 5 TxD 6 CTS# 7 DTR# 8 RI# 9 GND 10 GND 11 TxD485+ 12 TxD485 13 RxD485+ 14 RxD485 Table 3-21: COM2 Connector Pinouts 3.2.20 Serial Port3 Connector 3.2.22 Serial Port4 Connector CN Label: COM3 CN Type: 2x5 pin header CN Location: See Figure 3-23 CN Pinouts: See Table 3-22 PIN PIN DESCRIPTION DESCRIPTION NO. NO. 1 DCD# 2 DSR# 3 RX 4 RTS# 5 TX 6 CTS# 7 DTR# 8 RI# 9 GND 10 GND Table 3-22: COM3 Connector Pinouts APC-3580 User Manual 30 CN Label: COM4 CN Type: 2x5 pin header CN Location: See Figure 3-24 CN Pinouts: See Table 3-23 PIN PIN DESCRIPTION DESCRIPTION NO. NO. 1 DCD# 2 DSR# 3 RX 4 RTS# 5 TX 6 CTS# 7 DTR# 8 RI# 9 GND 10 GND Table 3-23: COM4 Connector Pinouts 3.2.21 USB Connector CN Label: USB3 CN Type: 2x4 pin header CN Location: See Figure 3-25 CN Pinouts: See Table 3-24 Two USB devices can be connected directly to the onboard USB connector. The onboard USB connector is USB 2.0 compliant. PIN PIN DESCRIPTION DESCRIPTION NO. NO. 1 USBVCC4 2 GND 3 D4F 4 D5F+ 5 D4F+ 6 D5F 7 GND 8 USBVCC4 Table 3-24: USB Connector Pinouts APC-3580 User Manual 31 3.3 External (Rear Panel) Connectors Figure 3-26 shows the MOTHERBOARD board rear panel. The peripheral connectors on the back panel can be connected to devices externally when the MOTHERBOARD is installed in a chassis. The peripheral connectors on the rear panel are: .1 x RJ-45 Ethernet connector .1 x PS/2 keyboard/mouse connector .1 x Serial port connector .4 x USB2.0 connectors .1 x VGA connector 3.3.1 Ethernet Connector CN Label: J1 CN Type: RJ-45 CN Location: See Figure 3-26 (labeled number 3) CN Pinouts: See Table 3-25 The MOTHERBOARD is equipped with LAN 10/100/1000-TX Ethernet controller. The Ethernet connector can be directly connected to a Local Area Network (LAN) through a network hub. An RJ-45 Ethernet connector is shown in Figure 3-27. APC-3580 User Manual 32 PIN DESCRIPTION 1 TX0+ 7 TX3+ 2 TX0- 8 TX3- 3 TX1+ 9 Active + 4 TX2+ 10 Active - 5 TX2- 11 LINK + 6 TX1- 12 LINK - PIN DESCRIPTION Table 3-25: RJ-45 Ethernet Connector Pinouts The RJ-45 Ethernet connector has two status LEDs, one green and one yellow. The green LED indicates activity on the port and the yellow LED indicates the port is linked. See Table 3-26. STATUS DESCRIPTION STATUS DESCRIPTION GREEN Activity YELLOW Linked Table 3-26: RJ-45 Ethernet Connector LEDs 3.3.2 Keyboard/Mouse Connector CN Label: KB/PS1 CN Type: PS/2 connector CN Location: See Figure 3-26 (labeled number 6) 3.3.3 Serial Port Connectors CN Label: COM1 CN Type: DB-9 CN Location: See Figure 3-26 (labeled number 1) CN Pinouts: See Table 3-27 The serial ports (COM1) can be connected to a serial communications device directly. APC-3580 User Manual 33 PIN DESCRIPTION NO. PIN NO. DESCRIPTIO N 1 DCD 2 RX 3 TX 4 DTR 5 GND 6 DSR 7 RTS 8 CTS 9 RI Table 3-27: Serial Port Pinouts 3.3.4 USB Connectors CN Label: USB1, USB2 CN Type: USB port CN Location: See Figure 3-26 (labeled number 4 & 5) CN Pinouts: See Table 3-28, Table 3-29 USB devices can be connected directly to the USB connectors on the rear panel. PIN DESCRIPTION PIN DESCRIPTION 1 USBVCC0 5 USBVCC0 2 D0F 6 D1F 3 D0F+ 7 D1F+ 4 GND 8 GND Table 3-28: USB1 Connector Pinouts PIN DESCRIPTION PIN DESCRIPTION 1 USBVCC2 5 USBVCC2 2 D2F 6 D3F 3 D2F+ 7 D3F+ 4 GND 8 GND Table 3-29: USB2 Connector Pinouts APC-3580 User Manual 34 3.3.5 VGA Connector CN Label: VGA1 CN Type: 15-pin CN Location: See Figure 3-26 (labeled number 2) N Pinouts: See Table 3-30 The standard 15-pin VGA connector connects to a CRT or LCD display monitor. PIN DESCRIPTION PIN DESCRIPTION 1 Red 9 No Connect 2 Green 10 Ground 3 Blue 11 No Connect 4 No Connect 12 DDC DAT 5 Ground 13 Horizontal Synchronization 6 Ground 14 Vertical Synchronization 7 Ground 15 DDC Clock 8 Ground Table 3-30: VGA Connector Pinouts APC-3580 User Manual 35 3.4 Onboard Jumpers NOTE: A jumper is a metal bridge that is used to close an electrical circuit. It consists of two metal pins and a small metal clip (often protected by a plastic cover) that slides over the pins to connect them. To CLOSE/SHORT a jumper means connecting the pins of the jumper with the plastic clip and to OPEN a jumper means removing the plastic clip from a jumper. The MOTHERBOARD board has the following four onboard jumpers: .CF card setup (JP1) Clear CMOS (JP4) COM2 RS232/RS422/RS485 selector (JP2) LCD Voltage selector (JP6) PC104+ SERIRQ net to CN3 pin B1 selector (JP5) APC-3580 User Manual 36 3.4.1 CF Card Setup Jumper Label: JP1 Jumper Type: 2-pin header Jumper Settings: See Table 3-31 Jumper Location: See Figure 3-29 Use this jumper (JP1) to set a compact flash card as either the slave device or the master device. JP1 DESCRIPTION Open Slave(Default) Close Master Table 3-31: JP1 Jumper Settings 3.4.2 Clear CMOS Jumper Jumper Label: JP4 Jumper Type: 3-pin header Jumper Settings: See Table 3-32 Jumper Location: See Figure 3-29 APC-3580 User Manual 37 If the MOTHERBOARD fails to boot due to improper BIOS setting, use this jumper to clear the CMOS data and reset the system BIOS information. To do this, use the jumper cap to close pins 2 and 3 for a few seconds then reinstall the jumper clip back to pins 1 and 2. If the “CMOS Settings Wrong” message displays during the boot up process, try to correct the fault by pressing the F1 to enter the CMOS Setup menu. Do one of the following: Enter the correct CMOS setting Load Optimal Defaults Load Failsafe Defaults. After done one of the above, save changes and exit the CMOS Setup menu. JP4 CLEAR CMOS 1-2 closed Normal (default) 2-3 closed Clear CMOS Table 3-32: JP4 Jumper Settings 3.4.3 COM2 Selector Jumper Label: JP2 Jumper Type: Jumper Settings: Jumper Location: 6-pin header See Table 3-33 See Figure 3-29 JP2 DESCRIPTION 1-2 closed RS232 (default) 3-4 closed RS422 5-6 closed RS485 Table 3-33: JP2 Jumper Settings 3.4.3 LCD Voltage Selector APC-3580 User Manual 38 Jumper Label: JP6 Jumper Type: 3-pin header Jumper Settings: See Table 3-34 Jumper Location: See Figure 3-29 This jumper allows the user to set the voltage for the LCD panel. Before setting this jumper please refer to the LCD panel user guide to determine the required voltage. After the required voltage is known, make the necessary jumper setting in accordance with the settings shown in Table 3-34 (LCDVCC signal indicates pin 27-30 defined in Table 3-16: LVDS Connector Pinouts). JP6 DESCRIPTION 1-2 closed LCDVCC = +3.3V (default) 2-3 closed LCDVCC = +5V Table 3-34: JP6 Jumper Settings 3.4.4 PC/104+ Selector Jumper Label: JP5 Jumper Type: 2-pin header Jumper Settings: See Table 3-35 Jumper Location: See Figure 3-29 JP5 DESCRIPTION Open Disconnect (default) Close Connect Table 3-35: JP5 Jumper Settings APC-3580 User Manual 39 Chapter 4_____________________________ AMI BIOS Setup 4.1 Introduction A licensed copy of AMI BIOS is preprogrammed into the ROM BIOS. The BIOS setup program allows users to modify the basic system configuration. This chapter describes how to access the BIOS setup program and the configuration options that may be changed. 4.1.1 Starting Setup The AMI BIOS is activated when the computer is turned on. The setup program can be activated in one of two ways. 1 2 Press the DELETE key as soon as the system is turned on or Press the DELETE key when the “Press Del to enter SETUP” message appears on the screen. If the message disappears before the DELETE key is pressed, restart the computer and try again. 4.1.2 Using Setup Use the arrow keys to highlight items, press ENTER to select, use the PageUp and PageDown keys to change entries, press F1 for help and press ESC to quit. Navigation keys are shown in. Key Function Up arrow Move to previous item Down arrow Move to next item Left arrow Move to the item on the left hand side Right arrow Move to the item on the right hand side Esc key Main Menu – Quit and not save changes into CMOS Status Page Setup Menu and Option Page Setup Menu -- Exit current page and return to Main Menu “+” key Increase the numeric value or make changes “-“ key Decrease the numeric value or make changes OTHERBOARD Motherboard APC-3580 User Manual 40 F1 key General help, only for Status Page Setup Menu and Option Page Setup Menu F2 /F3 key Change color from total 16 colors. F2 to select color forward. F10 key Save all the CMOS changes, only for Main Menu Table 5-1: BIOS Navigation Keys 4.1.3 Getting Help When F1 is pressed a small help window describing the appropriate keys to use and the possible selections for the highlighted item appears. To exit the Help Window press ESC or the F1 key again. 4.1.4 Unable to Reboot After Configuration Changes If the computer cannot boot after changes to the system configuration is made, CMOS defaults. Use the jumper described in Chapter Chapter 3, Section 3.4.2. 4.1.5 BIOS Menu Bar The menu bar on top of the BIOS screen has the following main items: ٛ ٛ ٛ ٛ ٛ ٛ ٛ ٛ Main Changes the basic system configuration. Advanced Changes the advanced system settings. PCIPnP Changes the advanced PCI/PnP Settings Boot Changes the system boot configuration. Security Sets User and Supervisor Passwords. Chipset Changes the chipset settings. Power Changes power management settings. Exit Selects exit options and loads default settings The following sections completely describe the configuration options found in the menu items at the top of the BIOS screen and listed above. 4.2 Main The Main BIOS menu (BIOS Menu 1) appears when the BIOS Setup program is entered. The Main menu gives an overview of the basic system information. APC-3580 User Manual 41 BIOS Menu 1: Main System Overview The System Overview lists a brief summary of different system components. The fields in System Overview cannot be changed. The items shown in the system overview include: ٛ ٛ ٛ ٛ ٛ ٛ ٛ AMI BIOS: Displays auto-detected BIOS information o Version: Current BIOS version o Build Date: Date the current BIOS version was made o ID: Installed BIOS ID o Processor: Displays auto-detected CPU specifications o Type: Names the currently installed processor o Speed: Lists the processor speed o Count: The number of CPUs on the motherboard System Memory: Displays the auto-detected system memory. o Size: Lists memory size The System Overview field also has two user configurable fields: System Time [xx:xx:xx] APC-3580 User Manual 42 Use the System Time option to set the system time. Manually enter the hours, minutes and seconds. System Date [xx/xx/xx] Use the System Date option to set the system date. Manually enter the day, month and year. 4.3 Advanced Use the Advanced menu (BIOS Menu 2) to configure the CPU and peripheral devices through the following sub-menus: WARNING: Setting the wrong values in the sections below may cause the system to malfunction. Make sure that the settings made are compatible with the hardware. ٛ ٛ ٛ ٛ ٛ ٛ ٛ ٛ ٛ CPU Configuration (see Section 5.3.1) IDE Configuration (see Section 5.3.2) Floppy Configuration (see Section 5.3.3) SuperIO Configuration (see Section 5.3.4) Hardware Health Configuration (see Section 5.3.5) ACPI Configuration (see Section 5.3.6) MPS Configuration (see Section 5.3.7) Smbios Configuration (see Section 5.3.8) USB Configuration (see Section 5.3.9) APC-3580 User Manual 43 BIOS Menu 2: Advanced 4.3.1 CPU Configuration Use the CPU Configuration menu (BIOS Menu 3) to view detailed CPU specifications and configure the CPU. APC-3580 User Manual 44 BIOS Menu 3: CPU Configuration The CPU Configuration menu (BIOS Menu 3) lists the following CPU details: ٛ ٛ ٛ ٛ ٛ ٛ ٛ Manufacturer: Lists the name of the CPU manufacturer Brand String: Lists the brand name of the CPU being used Frequency: Lists the CPU processing speed FSB Speed: Lists the FSB speed Cache L1: Lists the CPU L1 cache size Cache L2: Lists the CPU L2 cache size Hyper Threading Technology The following CPU Configuration menu item can be configured. Hyper Threading Technology [Enabled] Disabled Disables the use of hyper threading technology Enabled DEFAULT Enables the use of hyper threading technology 4.3.2 IDE Configuration Use the IDE Configuration menu (BIOS Menu 4) to change and/or set the configuration of the IDE devices installed in the system. APC-3580 User Manual 45 BIOS Menu 4: IDE Configuration OnBoard PCI IDE Controller [Both] Use the OnBoard PCI IDE Controller BIOS option to specify the IDE channels used by the onboard PCI IDE controller. The following configuration options are available. Disabled Prevents the system from using the onboard IDE controller Only allows the system to detect the Primary IDE Primary channel, including both the Primary Master and the Primary Slave Only allows the system to detect the Secondary IDE Secondary channel, including the both Secondary and Master Secondary Slave Both DEFAUL Allows the system to detect both the Primary and T Secondary IDE channels including the Primary Master, Primary Slave, Secondary Master and Secondary Slave. Onboard PCI IDE Mode [Legacy Mode] Use the Onboard PCI IDE Mode BIOS option to set the running mode for the PCI IDE. Legacy Mode DEFAULT The PCI IDE mode is the same as the IDE mode Native Mode The PCI IDE mode is the native mode Hard Disk Write Protect [Disabled] The Hard Disk Write Protect BIOS option protects the hard disks from being overwritten. This menu item is only effective if the device is accessed through the BIOS. Disabled DEFAULT Allows hard disks to be overwritten Enabled Prevents hard disks from being overwritten IDE Detect Time Out (Sec) [35] The IDE Detect Time Out (Sec) BIOS option specifies the maximum time (in seconds) the AMI BIOS APC-3580 User Manual 46 will search for IDE devices. This allows fine-tunes the settings to allow for faster boot times. The following configuration options are available. ٛ ٛ ٛ ٛ ٛ ٛ ٛ ٛ 0 seconds 5 seconds 10 seconds 15 seconds 20 seconds 25 seconds 30 seconds 35 seconds (Default) The best setting to use if the onboard IDE controllers are set to a specific IDE disk drive in the AMI BIOS is “0 seconds” and a large majority of ultra ATA hard disk drives can be detected well within “35 seconds” (the default setting). ATA (PI) 80Pin Cable Detection [Host & Device] When an Ultra ATA/66, an Ultra ATA/100 or an Ultra ATA/133 IDE hard disk drive is used, an 80-conductor ATA cable must be used. The 80-conductor ATA cable is plug compatible with the standard 40-conductor ATA cable. The system must detect the presence of correct cable so that the AMIBIOS can instruct the drive to run at the correct speed for the cable type detected. The ATA (PI) 80Pin Cable Detection BIOS option determines how the IDE cable will be detected. Host & Device Both the motherboard onboard IDE DEFAULT controller and IDE disk drive are used to detect the type of IDE cable used. Host The motherboard onboard IDE controller detects the type of IDE cable used. Device The IDE disk drive to detects the type of IDE cable used. IDE Master and IDE Slave When entering setup, BIOS auto detects the presence of IDE devices. BIOS displays the status of the auto detected IDE devices. The following IDE devices are detected and are shown in the IDE APC-3580 User Manual 47 Configuration menu: ٛ ٛ ٛ ٛ Primary IDE Master Primary IDE Slave Secondary IDE Master Secondary IDE Slave The IDE Configuration menu (BIOS Menu 4) allows changes to the configurations for the IDE devices installed in the system. If an IDE device is detected, and one of the above listed four BIOS configuration options are selected, the IDE configuration options shown in Section 5.3.2.1 appear. 4.3.2.1 IDE Master, IDE Slave Use the IDE Master and IDE Slave configuration menu to view both primary and secondary IDE device details and configure the IDE devices connected to the system. BIOS Menu 5: IDE Master and IDE Slave Configuration Auto-Detected Drive Parameters The “grayed-out” items in the left frame are IDE disk drive parameters automatically detected from the APC-3580 User Manual 48 firmware of the selected IDE disk drive. The drive parameters are listed as follows: Type: Lists the device type (e.g. hard disk, CD-ROM etc.) ٛ LBA Mode: Indicates whether the LBA (Logical Block Addressing) is a method of addressing data on a disk drive is supported or not. ٛ lock Mode: Block mode boosts IDE drive performance by increasing the amount of data B transferred. Only 512 bytes of data can be transferred per interrupt if block mode is not used. Block mode allows transfers of up to 64 KB per interrupt. PIO Mode: Indicates the PIO mode of the installed device. ٛ DMA Mode: Indicates the highest Asynchronous DMA Mode that is supported. ٛ S.M.A.R.T.: Indicates whether or not the Self-Monitoring Analysis and Reporting Technology protocol is supported. ٛ Type [Auto] Use the Type BIOS option select the type of device the AMIBIOS attempts to boot from after the Power-On Self-Test (POST) is complete. BIOS is prevented from searching for an IDE disk drive Not Installed on the specified channel. Auto The the auto detects type IDE disk drive DEFAULT BIOS attached to the specified channel. This setting should be used if an IDE hard disk drive is attached to the specified channel. CD/DVD ARMD The CD/DVD option specifies that an IDE CD-ROM drive is attached to the specified IDE channel. The BIOS does not attempt to search for other types of IDE disk drives on the specified channel. This option specifies an ATAPI Removable Media Device. These include, but are not limited to: ZIP APC-3580 User Manual 49 LS-120 LBA/Large Mode [Auto] Use the LBA/Large Mode option to disable or enable BIOS to auto detects LBA (Logical Block Addressing). LBA is a method of addressing data on a disk drive. In LBA mode, the maximum drive capacity is 137 GB. BIOS is prevented from using the LBA mode control on the Disabled specified channel. Auto BIOS auto detects the LBA mode control on DEFAULT the specified channel. Block (Multi Sector Transfer) [Auto] Use the Block (Multi Sector Transfer) to disable or enable BIOS to auto detect if the device supports multi-sector transfers. Disabled BIOS is prevented from using Multi-Sector Transfer on the specified channel. The data to and from the device occurs one sector at a time. Auto DEFAULT BIOS auto detects Multi-Sector Transfer support on the drive on the specified channel. If supported the data transfer to and from the device occurs multiple sectors at a time. PIO Mode [Auto] Use the PIO Mode option to select the IDE PIO (Programmable I/O) mode program timing cycles between the IDE drive and the programmable IDE controller. As the PIO mode increases, the cycle time decreases. Auto DEFAULT BIOS auto detects the PIO mode. Use this value if the IDE disk drive support cannot be determined. 0 PIO mode 0 selected with a maximum transfer rate of 3.3MBps 1 PIO mode 1 selected with a maximum transfer rate of 5.2MBps 2 PIO mode 2 selected with a maximum transfer rate of 8.3MBps 3 PIO mode 3 selected with a maximum transfer rate of 11.1MBps 4 PIO mode 4 selected with a maximum transfer rate of 16.6MBps APC-3580 User Manual 50 (This setting generally works with all hard disk drives manufactured after 1999. For other disk drives, such as IDE CD-ROM drives, check the specifications of the drive.) DMA Mode [Auto] Use the DMA Mode BIOS selection to adjust the DMA mode options. Auto DEFAULT BIOS auto detects the DMA mode. Use this value if the IDE disk drive support cannot be determined. S.M.A.R.T [Auto] Use the S.M.A.R.T option to auto-detect, disable or enable Self-Monitoring Analysis and Reporting Technology (SMART) on the drive on the specified channel. S.M.A.R.T predicts impending drive failures. The S.M.A.R.T BIOS option enables or disables this function. Auto DEFAULT BIOS auto detects HDD SMART support. Disabled Prevents BIOS from using the HDD SMART feature. Enabled Allows BIOS to use the HDD SMART feature 32Bit Data Transfer [Disabled] Use the 32Bit Data Transfer BIOS option to enables or disable 32-bit data transfers. Disabled DEFAULT Prevents the BIOS from using 32-bit data transfers. Enabled Allows BIOS to use 32-bit data transfers on supported hard disk drives. 4.3.3 Floppy Configuration Use the Floppy Configuration menu (BIOS Menu 6) to set or change the configurations for floppy disk drives. APC-3580 User Manual 51 BIOS Menu 6: Floppy Configuration Floppy A [Disabled] The Floppy A configuration option determines the types of the floppy drive installed in the system. The following configuration options are available. ٛ Disabled (default) 360 KB 5¼” 1.2 MB 5¼” 720 KB 3 ½” 1.44 MB 3½” ٛ 2.88 MB 3½” ٛ ٛ ٛ ٛ Floppy B [Disabled] The Floppy B configuration option determines the types of the floppy drive installed in the system. The following configuration options are available. ٛ ٛ ٛ Disabled (default) 360 KB 5¼” 1.2 MB 5¼” APC-3580 User Manual 52 ٛ ٛ ٛ 720 KB 3 ½” 1.44 MB 3½” 2.88 MB 3½” 4.3.4 Super IO Configuration Use the Super IO Configuration menu (BIOS Menu 7) to set or change the configurations for the FDD controllers, parallel ports and serial ports. BIOS Menu 7: Super IO Configuration On Board Floppy Controller [Enabled] Disabled Allows BIOS to disable the floppy controller Enabled DEFAULT Allows BIOS to enable the floppy controller Serial Port1 Address [3F8/IRQ4] Use the Serial Port1 Address option to select the Serial Port 1 base address. No base address is assigned to Serial Port 1 Serial Port 1 I/O port address is 3F8 and F8/IRQ4 3 DEFAULT the interrupt Disabled address is IRQ4 APC-3580 User Manual 53 3E8/IRQ4 Serial Port 1 I/O port address is 3E8 and the interrupt address is IRQ4 2E8/IRQ3 Serial Port 1 I/O port address is 2E8 and the interrupt address is IRQ3 Serial Port2 Address [2F8/IRQ3] Use the Serial Port2 Address option to select the Serial Port 2 base address. No base address is assigned to Serial Port 2 Serial Port 2 I/O port address is 3F8 and F8/IRQ3 2 DEFAULT the interrupt Disabled address is IRQ3 3E8/IRQ4 Serial Port 2 I/O port address is 3E8 and the interrupt address is IRQ4 2E8/IRQ3 Serial Port 2 I/O port address is 2E8 and the interrupt address is IRQ3 Serial Port2 Mode [Normal] Use the Serial Port2 Mode option to select the Serial Port2 operational mode. Normal DEFAULT Serial Port 2 mode is normal IrDA Serial Port 2 mode is IrDA ASK IR Serial Port 2 mode is ASK IR Parallel Port Address [378] Use the Parallel Port Address option to select the parallel port base address. Disabled No base address is assigned to the Parallel Port 378 DEFAULT Parallel Port I/O port address is 378 278 Parallel Port I/O port address is 278 3BC Parallel Port I/O port address is 3BC MOTHERBOARD Motherboard Parallel Port Mode [Normal] APC-3580 User Manual 54 Use the Parallel Port Mode option to select the mode the parallel port operates in. Normal The normal parallel port mode is the DEFAULT standard mode for parallel port operation. Bi-directional Parallel port outputs are 8-bits long. Inputs are accomplished by reading 4 of the 8 bits on the status register. ECP The parallel port operates in the extended capabilities port (ECP) mode. The ECP mode supports bi-directional communication between the system and the parallel port device and the transmission rates between the two are much faster than the SPP mode. EPP The parallel port operates in the enhanced parallel port mode (EPP). The EPP mode supports bi-directional communication between the system and the parallel port device and the transmission rates between the two are much faster than the Normal mode. ECP & EPP APC-3580 User Manual The parallel port operates in the extended capabilities port (ECP) mode. The ECP mode supports bi-directional communication between the 55 system and the parallel port device and the transmission rates between the two are much faster than the Normal mode The parallel port is also be compatible with EPP devices described above Parallel Port IRQ [IRQ7] Use the Parallel Port IRQ selection to set the parallel port interrupt address. IRQ5 IRQ5 is assigned as the parallel port interrupt address IRQ7 DEFAULT IRQ7 is assigned as the parallel port interrupt address Serial Port3 Address [3E8] Use the Serial Port3 Address option to select the base addresses for serial port 3 Disabled No base address is assigned to serial port 3 3E8 DEFAULT Serial port 3 I/O port address is 3E8 2F8 Serial port 3 I/O port address is 2F8 3E8 Serial port 3 I/O port address is 3E8 2E8 Serial port 3 I/O port address is 2E8 2F0 Serial port 3 I/O port address is 2F0 2E0 Serial port 3 I/O port address is 2E0 Serial Port3 IRQ [11] Use the Serial Port3 IRQ option to select the interrupt address for serial port 3. 4 Serial port 3 IRQ address is 4 9 Serial port 3 IRQ address is 9 10 Serial port 3 IRQ address is 10 11 DEFAULT Serial port 3 IRQ address is 11 Serial Port4 Address [2E8] Use the Serial Port4 IRQ option to select the interrupt address for serial port 4. Disabled No base address is assigned to serial port 3 3F8 Serial port 4 I/O port address is 3F8 2F8 Serial port 4 I/O port address is 2F8 3E8 Serial port 4 I/O port address is 3E8 APC-3580 User Manual 56 2E8 DEFAULT Serial port 4 I/O port address is 2E8 2F0 Serial port 4 I/O port address is 2F0 2E0 Serial port 4 I/O port address is 2E0 Serial Port4 IRQ [10] Use the Serial Port4 IRQ option to select the interrupt address for serial port 4. 3 Serial port 4 IRQ address is 3 9 Serial port 4 IRQ address is 9 10 DEFAULT Serial port 4 IRQ address is 10 11 Serial port 4 IRQ address is 11 4.3.5 Hardware Health Configuration The Hardware Health Configuration menu (BIOS Menu 8) shows the operating temperature, fan speeds and system voltages. BIOS Menu 8: Hardware Health Configuration The following system parameters and values are shown. The system parameters that are APC-3580 User Manual 57 monitored are: ٛ ٛ ٛ ٛ ٛ ٛ ٛ ٛ ٛ ٛ System Temperatures: The following system temperatures are monitored o System Temperature o CPU Temperature Voltages: The following system voltages are monitored o Vcore o AVCC o 3VCC o +12V o VTT o GMCH o +3.3V o +2.5V o VSB o VBAT 4.3.6 ACPI Configuration The ACPI Configuration menu (BIOS Menu 9) configures the Advanced Configuration and Power Interface (ACPI) and Power Management (APM) options. BIOS Menu 9: ACPI Configuration APC-3580 User Manual 58 4.3.6.1 General ACPI Configuration Use the General ACPI Configuration menu (BIOS Menu 10) to select the ACPI state when the system is suspended. BIOS Menu 10: General ACPI Configuration Suspend Mode [Auto] Use the Suspend Mode option to specify the sleep state the system enters when it is not being used. The system enters S1(POS) sleep S1 (POS) state. The system appears off. The CPU is stopped; RAM is refreshed; the system is running in a low power mode. The system enters a S3(STR) sleep state. The CPU has no S3 (STR) power; RAM is in slow refresh; the power supply is in a reduced power mode. Auto DEFAULT The BIOS automatically selects system. APC-3580 User Manual 59 Repost Video on S3 Resume [No] Use the Repost Video on S3 Resume to determine whether the VGA BIOS post will be invoked after the system is roused from an S3 (STR) suspend state. No DEFAULT The VGA BIOS post is not invoked Yes The VGA BIOS post is invoked 4.3.6.2 Advanced ACPI Configuration Use the Advanced ACPI Configuration menu (BIOS Menu 11) to select the ACPI state when the system is suspended. BIOS Menu 11: Advanced ACPI Configuration APC-3580 User Manual 60 ACPI 2.0 Features [No] Use the ACPI 2.0 Features option to enable the ACPI (Advanced Configuration and Power Interface) features. By enabling this feature the system RSDP (Root System Description Pointer) is able to obtain physical addresses for other 64-bit fixed system description tables. No Yes DEFAULT RSDP pointers to 64-bit fixed systems are not provided to the system RSDP pointers to 64-bit fixed systems are provided to the system ACPI APIC Support [Enabled] Use the ACPI APIC Support option to add a pointer to an ACPI APIC table in the RSDT (Root System Description Table). The RSDT is an array of pointers that direct the system to the physical addresses of other description tables. The RSDT is the main ACPI table. The RSDP is located in low memory space of the system and provides the physical address of the RSDT. The RSDT itself is identified in memory because it starts with the signature "RSDT." Disabled Enabled DEFAULT Pointers to the APIC APIC table are not be provided in the RSDT Pointers to the APIC APIC table are provided in the RSDT AMI OEMB table [Enabled] Use the AMI OEMB table option to add a pointer to an OEMB table in the RSDT table and the Extended System Description Table (XSDT), which accommodates physical addresses of description headers that are larger than 32-bits. Notice that both the XSDT and the RSDT can be pointed to by the RSDP structure. . Pointers to the AMI OEMB table are not provided in the RSDT and the XSDT Disabled Enabled DEFAULT Pointers to the AMI OEMB table are provided in the RSDT and the XSDT Headless Mode [Disabled] Use the Headless Mode option to update the ACPI FACP (Fixed ACPI Description Table) to indicate headless operations, i.e. a computer without a monitor, keyboard and mouse. Disabled DEFAULT Enabled APC-3580 User Manual The FACP is not updated to indicate headless mode The FACP is updated to indicate headless mode 61 4.3.6.3 Chipset ACPI Configuration Use the Advanced ACPI Configuration menu (BIOS Menu 12) to select the ACPI state when the system is suspended. BIOS Menu 12: Chipset ACPI Configuration APIC ACPI SCI IRQ [Disabled] Use APIC ACPI SCI IRQ option to enable the system to send a flag report to the ACPI OS if a SCI IRQ interrupt event is made via the APIC. Disabled DEFAULT No flag report is sent to the ACPI OS when there is a "SCI IRQ" interrupt event. Enabled Flag report is sent to the ACPI OS when there is a "SCI IRQ" interrupt event is made via the APIC. USB Device Wakeup From S3/S4 [Disabled] The USB Device Wakeup From S3/S4 BIOS function enables activity on the specified USB device to rouse the system from a sleep state. APC-3580 User Manual 62 Disabled DEFAULT Activity on the USB cannot rouse the system Enabled Activity on the USB can rouse the system 4.3.7 MPS Configuration Use the MPS Configuration menu (BIOS Menu 13) to select `he multi-processor table. BIOS Menu 13: MPS Configuration MPS Revision [1.4] Use the Multiprocessor Specification (MPS) for OS option to specify the MPS version to be used. 1.1 MPS version 1.1 is used 1.4 DEFAULT MPS version 1.4 is used 4.3.8 Smbios Configuration Use the Smbios Configuration menu (BIOS Menu 14) to configure SMBIOS parameters. APC-3580 User Manual 63 BIOS Menu 14: Smbios Configuration Smbios Smi Support [Enabled] Use the Smbios Smi Support to enable the system to support the SMBIOS SMI wrapper for the PnP function 50h – 54h. Disabled SMBIOS SMI wrapper for the PnP function 50h – 54h not supported Enabled DEFAULT SMBIOS SMI wrapper for the PnP function 50h – 54h supported 4.3.9 USB Configuration Use the USB Configuration menu (BIOS Menu 15) to read USB configuration information and configure the USB settings. APC-3580 User Manual 64 BIOS Menu 15: USB Configuration USB Configuration The USB Configuration field shows the system USB configuration. The items listed are: Module Version: 2.24.0-11.4 USB Devices Enabled The USB Devices Enabled field lists the USB devices that are enabled on the system USB Function [6 USB Ports] Use the USB Function BIOS option to enable USB host controllers. Disabled USB function support disabled 2 USB Ports The USB controller activates 2 USB ports 4 USB Ports The USB controller activates 4 USB ports 6 USB Ports DEFAULT The USB controller activates 6 USB ports Legacy USB Support [Enabled] APC-3580 User Manual 65 Use the Legacy USB Support BIOS option to enable USB mouse and USB keyboard support. Normally if this option is not enabled, any attached USB mouse or USB keyboard does not become available until a USB compatible operating system is fully booted with all USB drivers loaded. When this option is enabled, any attached USB mouse or USB keyboard can control the system even when there is no USB driver loaded onto the system. Disabled Enabled Legacy USB support disabled DEFAULT Legacy USB support enabled The Legacy USB support is automatically detected and enabled. Auto USB 2.0 Controller [Enabled] Use the USB 2.0 Controller BIOS option to enable or disable the USB 2.0 controller Enabled DEFAULT USB 2.0 controller enabled Disabled USB 2.0 controller disabled USB2.0 Controller Mode [HiSpeed] Use the USB2.0 Controller Mode option to set the speed of the USB2.0 controller. FullSpeed The controller is capable of operating at 12Mb/s HiSpeed DEFAULT The controller is capable of operating at 480Mb/s BIOS EHCI Handoff [Enable] Use the BIOS EHCI Handoff option for systems running OSes that do not have EHCI hand-off support. The EHCI ownership change is managed by the EHCI driver. Disabled Systems with OSes that do not support EHCI can use the EHCI handoff functionality. Enabled DEFAULT Systems with OSes that do not support EHCI cannot use the EHCI handoff functionality. USB Mass Storage Device Configuration The USB Mass Storage Device Configuration field appears if a USB drive is connected to one of the USB ports or connectors. If this option is selected a menu appears. APC-3580 User Manual 66 4.4 PCI/PnP Use the PCI/PnP menu (BIOS Menu 16) to configure advanced PCI and PnP settings. WARNING! Setting wrong values for the BIOS selections in the PCIPnP BIOS menu may cause the system to malfunction. BIOS Menu 16: PCI/PnP Configuration Clear NVRAM [No] Use the Clear NVRAM option to specify if the NVRAM (Non-Volatile RAM) is cleared when the power is turned off. No DEFAULT System does not clear NVRAM during system boot Yes System clears NVRAM during system boot Plug & Play O/S [No] Use the Plug & Play O/S BIOS option to APC-3580 User Manual 67 specify whether system plug and play devices are configured by the operating system or the BIOS. No DEFAULT If the operating system does not meet the Plug and Play specifications, this option allows the BIOS to configure all the devices in the system. Yes This setting allows the operating system to change the interrupt, I/O, and DMA settings. Set this option if the system is running Plug and Play aware operating systems. PCI Latency Timer [64] Use the PCI Latency Timer option to specify the PCI latency time. The latency time is measured in units of PCI clock cycles for the PCI device latency timer register. Configuration options are: ٛ ٛ ٛ ٛ ٛ ٛ ٛ ٛ 32 64 (Default) 96 128 160 192 224 248 Allocate IRQ to PCI VGA [Yes] Use the Allocate IRQ to PCI VGA option to restrict the system from giving the VGA adapter card an interrupt address. Yes DEFAULT No Assigns an IRQ to a PCI VGA card if card requests IRQ Does not assign IRQ to a PCI VGA card even if the card requests an IRQ Palette Snooping [Disabled] Use the Palette Snooping option to enable or disable the palette snooping function. Disabled DEFAULT Unless the VGA card manufacturer requires palette snooping to be enabled, this option should be disabled. APC-3580 User Manual 68 Enabled PCI devices are informed that an ISA based Graphics device is installed in the system so the ISA based Graphics card functions correctly. This does not necessarily indicate a physical ISA adapter card. The graphics chipset can be mounted on a PCI card. Always check with the adapter card manual first, before modifying the default settings in the BIOS. PCI IDE BusMaster [Disabled] Use the PCI IDE BusMaster BIOS option to enable or prevent PCI IDE busmastering. Disabled DEFAULT Busmastering is prevented Enabled controller on the PCI local bus capabilities IDE has mastering OffBoard PCI/ISA IDE Card [Auto] Use the OffBoard PCI/ISA IDE Card BIOS option to select the OffBoard PCI/ISA IDE Card. Auto DEFAULT The location of the Off Board PCI IDE adapter card is automatically detected by the AMIBIOS. PCI Slot 1 PCI Slot 1 is selected as the location of the OffBoard PCI IDE adapter card. Only select this slot if the adapter card is installed in PCI Slot 1. PCI Slot 2 PCI Slot 2 is selected as the location of the OffBoard PCI IDE adapter card. Only select this slot if the adapter card is installed in PCI Slot 2. PCI Slot 3 PCI Slot 3 is selected as the location of the OffBoard PCI IDE adapter card. Only select this slot if the adapter card is installed in PCI Slot 3. PCI Slot 4 PCI Slot 4 is selected as the location of the OffBoard PCI IDE adapter card. Only select this slot if the adapter card is installed in PCI Slot 4. PCI Slot 5 PCI Slot 5 is selected as the location of the OffBoard PCI IDE adapter card. Only select this slot if the adapter card is installed in PCI Slot 5. PCI Slot 6 PCI Slot 6 is selected as the location of the OffBoard PCI IDE adapter card. Only select this slot if the adapter card is installed in PCI Slot 6. IRQ# [Available] APC-3580 User Manual 69 Use the IRQ# address to specify what IRQs can be assigned to a particular peripheral device. The specified IRQ is available to be used by PCI/PnP Available DEFAULT devices The specified IRQ is reserved for use by Legacy ISA devices Reserved Available IRQ addresses are: ٛ ٛ ٛ ٛ ٛ ٛ ٛ ٛ ٛ IRQ3 IRQ4 IRQ5 IRQ7 IRQ9 IRQ10 IRQ 11 IRQ 14 IRQ 15 DMA Channel# [Available] Use the DMA Channel# option to assign a specific DMA channel to a particular PCI/PnP device. Available DEFAULT The specified DMA is available to be used by PCI/PnP devices Reserved The specified DMA is reserved for use by Legacy ISA devices Available DMA Channels are: ٛ ٛ ٛ ٛ ٛ ٛ DM Channel 0 DM Channel 1 DM Channel 3 DM Channel 5 DM Channel 6 DM Channel 7 Reserved Memory Size [Disabled] Use the Reserved Memory Size BIOS option to specify the amount of memory that should be reserved for legacy ISA devices. APC-3580 User Manual 70 Disabled DEFAULT No memory block reserved for legacy ISA devices 16K 16KB reserved for legacy ISA devices 32K 32KB reserved for legacy ISA devices 64K 54KB reserved for legacy ISA devices 4.5 Boot Use the Boot menu (BIOS Menu 17) to configure system boot options. BIOS Menu 17: Boot 4.5.1 Boot Settings Configuration Use the Boot Settings Configuration menu (BIOS Menu 18) to configure advanced system boot options. APC-3580 User Manual 71 BIOS Menu 18: Boot Settings Configuration Quick Boot [Enabled] Use the Quick Boot BIOS option to make the computer speed up the boot process. Disabled No POST procedures are skipped Enabled DEFAULT Some POST procedures are skipped to decrease the system boot time Quiet Boot [Disabled] Use the Quiet Boot BIOS option to select the screen display when the system boots. Disabled DEFAULT Normal POST messages displayed Enabled OEM Logo displayed instead of POST messages OTHERBOARD Motherboard AddOn ROM Display Mode [Force BIOS] Use the AddOn ROM Display Mode option to allow add-on ROM (read-only memory) messages to be displayed. Force BIOS APC-3580 User Manual DEFAULT The system forces third party BIOS to display 72 during system boot. The system displays normal information during system boot. Keep Current Bootup Num-Lock [On] Use the Bootup Num-Lock BIOS option to specify if the number lock setting must be modified during boot up. Off Does not enable the keyboard Number Lock automatically. To use the 10-keys on the keyboard, press the Number Lock key located on the upper left-hand corner of the 10-key pad. The Number Lock LED on the keyboard lights up when the Number Lock is engaged. On DEFAULT Allows the Number Lock on the keyboard to be enabled automatically when the computer system boots up. This allows the immediate use of the 10-key numeric keypad located on the right side of the keyboard. To confirm this, the Number Lock LED light on the keyboard is lit. PS/2 Mouse Support [Auto] Use the PS/2 Mouse Support option adjusts PS/2 mouse support capabilities. Disabled PS/2 mouse support is disabled and prevented from using system resources. Enabled . Auto DEFAULT Allows the system to use a PS/2 mouse. Allows the system to automatically detect if a PS/2 mouse is being used. Wait For ‘F1’ If Error [Enabled] Use the Wait For ‘F1’ if Error option to specify how the system responds when the system detects an error on boot up. Disabled If there is an error when booting up, the system does not wait for user intervention but continues to boot up in the operating system. Only use this setting if there is a known reason for a BIOS error to appear. An example would be a system administrator must remote boot the system. The computer system does not have a keyboard currently APC-3580 User Manual 73 attached. Enabled DEFAULT If there is an error during boot up, the system waits for a user to press “F1” and enter the BIOS to rectify the problem. The BIOS can then be adjusted to the correct settings. Hit ‘DEL’ Message Display [Enable] Use the Hit “DEL” Message Display option to specify whether the instruction to hit the delete button to enter BIOS during POST appears or not. Disabled No message displayed during POST Enabled DEFAULT Displays “Press DEL to run Setup” message in POST Interrupt 19 Capture [Disabled] Use the Interrupt 19 Capture option to allow optional ROMs such as network controllers to trap BIOS interrupt 19. . Disabled DEFAULT Does not allow optional ROM to trap interrupt 19 Enabled Allows optional ROM to trap interrupt 19 4.6 Security Use the Security menu (BIOS Menu 19) to set system and user passwords. APC-3580 User Manual 74 BIOS Menu 19: Security Change Supervisor Password Use the Change Supervisor Password to set or change a supervisor password. The default for this option is Not Installed. If a supervisor password must be installed, select this field and enter the password. After the password has been added, Install appears next to Change Supervisor Password. Change User Password Use the Change User Password to set or change a user password. The default for this option is Not Installed. If a user password must be installed, select this field and enter the password. After the password has been added, Install appears next to Change User Password. Clear User Password Use the Clear User Password to clear a user password. Boot Sector Virus Protection [Disabled] Disabled DEFAULT Disables the boot sector virus protection APC-3580 User Manual 75 Enabled Enables the boot sector virus protection 4.7 Chipset Use the Chipset menu (BIOS Menu 20) to access the NorthBridge and SouthBridge configuration menus WARNING! Setting the wrong values for the Chipset BIOS selections in the Chipset BIOS menu may cause the system to malfunction. BIOS Menu 20: Chipset 4.7.1 NorthBridge Configuration Use the NorthBridge Configuration menu (BIOS Menu 21) to configure the northbridge APC-3580 User Manual 76 chipset. BIOS Menu 21:NorthBridge Chipset Configuration DRAM Frequency [Auto] Use the DRAM Frequency option to specify the DRAM frequency or allow the system to automatically detect the DRAM frequency. 200MHz Sets the DRAM frequency to 200MHz 266MHz Sets the DRAM frequency to 266MHz 333MHz Sets the DRAM frequency to 333MHz Auto DEFAULT Automatically selects the DRAM frequency MOTHERBOARD Motherboard APC-3580 User Manual 77 Configure DRAM Timing by SPD [Enabled] Use the Configure DRAM Timing by SPD option to determine if the system uses the SPD (Serial Presence Detect) EEPROM to configure the DRAM timing. The SPD EEPROM contains all necessary DIMM specifications including the speed of the individual components such as CAS and bank cycle time as well as valid settings for the module and the manufacturer's code. The SPD enables the BIOS to read the spec sheet of the DIMMs on boot-up and then adjust the memory timing parameters accordingly. Disabled DRAM timing parameters are manually set using the DRAM sub-items Enabled DEFAULT DRAM timing parameter are set according to the DRAM Serial Presence Detect (SPD) If the Configure DRAM Timing by SPD option is disabled, the following configuration options appear. ٛ ٛ ٛ ٛ DRAM CAS# Latency [3] DRAM RAS# to CAS# Delay [5 DRAM Clocks] DRAM RAS# Precharge [5 DRAM Clocks] DRAM RAS# Activate to Precha [15 DRAM Clocks] Memory Hole [Disabled] Use the Memory Hole option to reserve memory space between 15MB and 16MB for ISA expansion cards that require a specified area of memory to work properly. If an older ISA expansion card is used, please refer to the documentation that came with the card to see if it is necessary to reserve the space. Disabled DEFAULT 15MB – 16MB Memory is not reserved for ISA expansion cards Between 15MB and 16MB of memory is reserved for ISA expansion cards APC-3580 User Manual 78 Init. Graphic Adapter Priority [Internal VGA] The Init. Graphic Adapter Priority option selects the graphics controller the system uses as a primary boot device. The options are: ٛ ٛ Internal VGA PCI/Int-VGA Internal Graphics Mode Select [Enable, 8MB] Use the Internal Graphic Mode Select option to specify the amount of system memory that can be used by the Internal graphics device. Disable Enable, 1MB Enable, 4MB Enable, 8MB DEFAULT Enable, 16MB Enable, 32MB 1MB of memory used by internal graphics device 4MB of memory used by internal graphics device 8MB of memory used by internal graphics device 16MB of memory used by internal graphics device 32MB of memory used by internal graphics device Graphics Aperture Size [64MB] The Graphics Aperture Size option selects the size of the AGP aperture. The aperture is a portion of the PCI memory address range dedicated as graphics memory address space. 64MB DEFAULT Graphics aperture size set as 64MB 128MB Graphics aperture size set as 128MB 256MB Graphics aperture size set as 256MB Boot Display Device [Auto] The Boot Display Device BIOS option selects the display device the system uses when it boots. The available options are listed below: ٛ Auto (Default) APC-3580 User Manual 79 ٛ ٛ ٛ ٛ ٛ ٛ ٛ ٛ ٛ ٛ ٛ ٛ ٛ ٛ CRT on Port 0 LFP on Port 2 LFP on Port 3 DFP on Port 2 DFP on Port 3 TV on Port 2 TV on Port 3 CRT-Port 0 & CRT-Port 2 CRT-Port 0 & CRT-Port 3 CRT-Port 0 & LFP-Port 2 CRT-Port 0 & LFP-Port 3 CRT-Port 0 & DFP-Port 2 CRT-Port 0 & DFP-Port 3 DFP-Port 2 & DFP-Port 3 Flat Panel Type [640x480 18bit LVDS] The Flat Panel Type BIOS option specifies the flat panel PC type being used. NOTE: Please refer to the technical documents that came with the flat panel PC to ensure the correct settings are selected. The following options are available: ٛ ٛ ٛ ٛ ٛ ٛ ٛ ٛ ٛ ٛ ٛ ٛ 640x480 LVDS (Default) 800x600 LVDS 1024x768 24bit LVDS 1280x1024 LVDS 1024x768 18 bit LVDS 1600x1200 LVDS 800x600 24bit LVDS 800x600 18bit LVDS 1024x768 36bit LVDS Type 12 Type 13 Type 14 APC-3580 User Manual 80 ٛ ٛ Type 15 Type 16 Local Flat Panel Scaling [Auto] The Local Flat Panel Scaling option selects the mode of the local flat panel scaling. Auto DEFAULT Forced Scaling Disabled Automatically scale the connected panel. The connected local flat panel is forceDisable the local flat panel scaling. local flat d to scale. 5.7.2 SouthBridge Configuration The SouthBridge Intel ICH4 Configuration menu (BIOS Menu 22) the southbridge chipset to be configured. BIOS Menu 22:SouthBridge Chipset Configuration OnBoard AC97 Audio DEVICE APC-3580 User Manual 81 The OnBoard AC97 Audio DEVICE option enables or disables the AC’97 CODEC. Auto DEFAULT The onboard AC’97 automatically detected and enabled Disabled The onboard AC’97 is disabled Restore on AC Power Loss [Last State] The Restore on AC Power Loss BIOS option specifies what state the system returns to if there is a sudden loss of power to the system. Power Off The system remains turned off Power On The system turns on Last State DEFAULT The system returns to its previous state. If it was on, it turns itself on. If it was off, it remains off. 4.8 Power Key The Power menu (BIOS Menu 23) allows the advanced power management options to be configured. APC-3580 User Manual 82 BIOS Menu 23:Power Power Management/APM [Enabled] The Power Management/APM BIOS option allows access to the advanced power management features. If this option is disabled, the only other option on the screen is the “Resume On RTC Alarm.” Disabled Disables the Advanced Power Management (APM) feature Enables the APM nabled DEFAULT feature E Video Power Down Mode [Suspend] The Video Power Down Mode BIOS option specifies in what system mode the video device can be turned off. Disabled The Video cannot be turned off in the Suspend or Standby mode The video can be turned off in the Standby mode The video can be turned off in the uspend S DEFAULT Suspend mode Standby Hard Disk Power Down Mode [Suspend] The Hard Disk Power Down Mode BIOS specifies in what system mode the hard disk device can be turned off. Disabled Standby Suspend DEFAULT APC-3580 User Manual The hard disk cannot be turned off in the Suspend or Standby mode The hard disk can be turned off in the Standby mode The hard disk can be turned off in the Suspend mode 83 Standby Time Out [Disabled] The Power Management/APM option must be enabled in order to change this configuration option. The Standby Time Out option specifies what length of time without activity on certain components will place those components in a standby state. The options are: ٛ ٛ ٛ ٛ ٛ ٛ ٛ ٛ ٛ ٛ ٛ Disabled (Default) 1 Min 2 Min 4 Min 8 Min 10 Min 20 Min 30 Min 40 Min 50 Min 60 Min Suspend Time Out [Disabled] The Power Management/APM option must be enabled in order to change this configuration option. The Suspend Time Out option specifies what length of time without activity on certain components will place those components in a suspended state. The options are: ٛ ٛ ٛ ٛ ٛ ٛ ٛ ٛ ٛ ٛ ٛ Disabled (Default) 1 Min 2 Min 4 Min 8 Min 10 Min 20 Min 30 Min 40 Min 50 Min 60 Min Throttle Slow Clock Ratio [50%] APC-3580 User Manual 84 The Power Management/APM option must be enabled in order to change this configuration option. The Throttle Slow Clock Ratio option allows the BIOS to throttle the CPU clock to reduce power consumption. For example, a throttle ratio of 50% means the BIOS throttles back the CPU clock to operate at 50% of its normal operational time. Throttle slow clock ratio options are: ٛ ٛ ٛ ٛ ٛ ٛ ٛ 87.5% 75% 62.5% 50% (default) 37.5% 25% 12.5% Keyboard & PS/2 Mouse [MONITOR] The Power Management/APM option must be enabled in order to change this configuration option. The keyboard & PS/2 mouse option enables monitoring of activity on the keyboard and PS/2 mouse ports and rouses the system from a sleep or suspend state. The system does not monitor the keyboard and PS/2 mouse ports and does not rouse the system from a sleep Ignore or suspend state when an IRQ is detected. Monitor The system monitors the keyboard mouse DEFAULT and PS/2 ports and rouses the system from a sleep or suspend state when an IRQ is detected. FDC/LPT/COM Ports [MONITOR] The Power Management/APM option must be enabled in order to change this configuration option. The FDC/LPT/COM Ports option enables monitoring of activity on the FDC/LPT/COM ports and rouses the system from a sleep or suspend state. Ignore The system does not monitor the FDC/LPT/COM ports and does not rouse the system from a sleep or suspend state when an IRQ is detected. APC-3580 User Manual 85 Monitor DEFAULT The system monitors the FDC/LPT/COM ports and rouses the system from a sleep or suspend state when an IRQ is detected. Primary master IDE [MONITOR] The Power Management/APM option must be enabled in order to change this configuration option. The Primary Master IDE option enables monitoring of activity of the primary master IDE device and rouses the system from a sleep or suspend state. The system does not monitor the primary master IDE device and does not rouse the system from a sleep or Ignore suspend state when an IRQ is detected. Monitor The system monitors the primary master DEFAULT IDE device and rouses the system from a sleep or suspend state when an IRQ is detected. Primary slave IDE [MONITOR] The Power Management/APM option must be enabled in order to change this configuration option. The Primary Slave IDE option enables monitoring of activity of the primary slave IDE device and rouses the system from a sleep or suspend state. Ignore The system does not monitor the primary slave IDE device and does not rouse the system from a sleep or suspend state when an IRQ is detected. Monitor DEFAULT The system monitors the primary slave IDE device and rouses the system from a sleep or suspend state when an IRQ is detected. Secondary master IDE [MONITOR] The Power Management/APM option must be enabled in order to change this configuration option. The Secondary Master IDE option enables monitoring of activity of the secondary master IDE device and rouses the system from a sleep or suspend state. Ignore The system does not monitor the secondary master IDE device and does not rouse the system from a sleep or suspend state when an IRQ is detected. APC-3580 User Manual 86 Monitor DEFAULT The system monitors the secondary master IDE device and rouses the system from a sleep or suspend state when an IRQ is detected. Secondary slave IDE [MONITOR] The Power Management/APM option must be enabled in order to change this configuration option. The Secondary Slave IDE option enables monitoring of activity of the secondary slave IDE device and rouses the system from a sleep or suspend state. Ignore DEFAULT The system does not monitor the secondary slave IDE device and does not rouse the system from a sleep or suspend state when an IRQ is detected. The system monitors the secondary slave IDE device and rouses the Monitor system from a sleep or suspend state when an IRQ is detected. System Thermal [Disabled] The System Thermal BIOS option enables the manual setting of the Thermal Active Temperature and the THRM throttle Ratio BIOS options. Disabled DEFAULT Thermal Active Temperature and the THRM throttle Ratio BIOS options cannot be set manually. Thermal Active Temperature and the THRM throttle Ratio BIOS Enabled options can be set manually. Power Button Mode [On/Off] The Power Button Mode BIOS specifies how the power button functions. On/Off DEFAULT When the power button is pressed the system is either turned on or off Suspend APC-3580 User Manual When the power button is pressed the system goes into suspend mode 87 Resume on Ring [Disabled] The Resume on Ring BIOS option specifies if the system will be roused from a suspended or standby state when there is activity on the RI (ring in) modem line. That is, the system will be roused by an incoming call on a modem. Disabled DEFAULT Wake event not generated by an incoming call Enabled Wake event generated by an incoming call Resume on Lan [Disabled] The Resume on Lan BIOS option specifies if the system is roused from a suspended or standby state when there is activity on the LAN. Disabled DEFAULT Wake event not generated by LAN activity Enabled Wake event generated by LAN activity Resume on PME# [Disabled] The Resume on PME# BIOS option specifies if the system will be roused from a suspended or standby state when there is activity on the PCI PME (power management event) controller. Disabled DEFAULT Wake event not generated by PCI PME controller activity Enabled Wake event generated by PCI PME controller activity Resume On RTC Alarm [Disabled] The Resume On RTC Alarm determines when the computer is roused from a suspended state. Disabled DEFAULT Enabled The real time clock (RTC) cannot generate a wake event If selected, the following appears with values that can be selected: RTC Alarm Date (Days) System Time After setting the alarm, the computer turns itself on from a suspend state when the alarm goes off. APC-3580 User Manual 88 4.9 Exit The Exit menu (BIOS Menu 24) loads default BIOS values, optimal failsafe values and to save configuration changes. BIOS Menu 24:Exit Save Changes and Exit If configuration changes are complete, select this option to save them and exit the BIOS menus. Discard Changes and Exit If configuration changes are complete but do need to be saved, select this option to exit the BIOS menus. Discard Changes If configuration changes are complete but do need to be saved but BIOS still needs to be run , select this option. Load Optimal Defaults APC-3580 User Manual 89 This option loads optimal default values for each of the parameters on the Setup menus. F9 key can be used for this operation. Load Failsafe Defaults This option loads failsafe default values for each of the parameters on the Setup menus. APC-3580 User Manual 90 Chapter 5_____________________________ Software Drivers 5.1 Available Software Drivers NOTE: The contents of the CD may vary throughout the life cycle of the product and is subject to change without prior notice. Visit the IEI website or contact technical support for the latest updates. The MOTHERBOARD board has five software drivers: ٛ ٛ ٛ ٛ ٛ Chipset Audio LAN VGA SATA All five drivers can be found on the CD that came with the MOTHERBOARD. To install the drivers please follow the instructions in the sections below 5.2 Chipset Driver Installation To install the chipset driver, please follow the steps below: Step 1: Insert the APLEX Product CD into the system setup Autorun “in figure5-2-1 Click APC-3580 User Manual “intel ® chipset Software installation utility” 91 Figure 5-2-1 Step 2: The “InstallShield Wizard Preparation Screen” in Figure 6-1 appears. Figure 6-1 APC-3580 User Manual 92 Step 3: The “setup chipset software installation Utility” in Figure 6-2 appears Click “ Next” Figure 6-2: Welcome Screen Step 4: Click “Next” and the license agreement shown in Figure 6-3 appears. APC-3580 User Manual 93 Step 5: Agree to the license terms by clicking “Yes”. The “Readme” in Figure 6-4 appears. Step 6: Click “Yes”. The driver is installed on the computer. After the installation is complete, the installation complete screen shown in Figure 6-5 appears. Select the preferred option and click “Finish” to complete the installation process. APC-3580 User Manual 94 5.3 RealTek Audio Driver Installation To install the RealTek AC’97 Audio driver, please follow the steps below: Step 1: Insert the APLEX Product CD into the system setup Autorun “in figure Click “Realtek AC’97 Sound System” Step 2: Once double clicking the Setup icon, the install shield wizard for the audio driver starts. See Figure 6-6. APC-3580 User Manual 95 Step 3: The RealTek Audio Setup prepares the install shield to guide through the rest of the setup process. See Figure 6-7. Step 4: After install shield is prepared, the welcome screen shown in Figure 6-8 appears. To continue the installation process, click the “Next” button. The install shield starts to configure the new software as shown in Figure 6-9. APC-3580 User Manual 96 Step 5 To continue the installation process, click the “Yes” button. The installation notice shown below appears. APC-3580 User Manual 97 Step 6: At this stage the clicking the “Yes” button in Figure 6-10 appears, the installation of the driver begins. See Figure 6-11. APC-3580 User Manual 98 Step 7: After the driver installation process is complete, a confirmation screen shown in Figure 6-12 appears Step 8: The confirmation screen shown in Figure 6-12 allows user to restart the computer immediately after the installation is complete or to restart the computer later. For the settings to take effect the computer must be restarted. Once decided when to restart the computer, click the “Finish” button. APC-3580 User Manual 99 5.4 Intel Graphics Media Accelerator Driver To install the GMA driver, please follow the steps below: Step 1: Insert the APLEX Product CD into the system setup Autorun “in figure Click APC-3580 User Manual “Intel® VGA Chipset driver” 100 Step 2: Once double clicking the Setup icon, a Welcome screen shown in Figure 6-13 appears. APC-3580 User Manual 101 Step 3: To continue installing click “Next” and a license agreement shown in Figure 6-14 appears. Read through the license agreement. Step 4: Accept the terms and conditions stipulated in the license agreement by clicking the “Yes” button (Figure 6-14). The installation notice shown in Figure 6-15 appears. APC-3580 User Manual 102 Step 5: After the driver installation process is complete, a confirmation screen shown in Figure 6-16 appears. MOTHERBOARD Motherboard Step 6: The confirmation screen shown in Figure 6-16 allows user to restart the computer immediately after the installation is complete or to restart the computer later. For the settings to take effect the computer must be restarted. Once decided when to restart the computer, click the “Finish” button. APC-3580 User Manual 103 5.5 LAN Driver Installation To install the LAN driver, please follow the steps below: Step 1: Insert the APLEX Product CD into the system setup Autorun “in figure Click APC-3580 User Manual “intel® 8255IER Ethernet Controller Drivers” 104 Step 2: Once double clicked the Setup icon, a LAN License Agreement screen shown in Figure 6-17 appears. Step 3: Accept the License Agreement by clicking “Next.” The follow-up window prompts for the directory the driver is stored in. (See Figure 6-18) APC-3580 User Manual 105 MOTHERBOARD Motherboard Step 4: After selecting the directory the driver is installed in, click “Next.” The screen in Figure 6-19 appears. APC-3580 User Manual 106 Step 5: In Figure 6-19, there are three options. ٛ ٛ ٛ Install Base Driver Installs the base driver Make Driver Disk Copies the driver to disk View Release Notes Opens word document of the release notes 5.6 SATA - ALi RAID Driver Installation CAUTION! Because of the inherent limitations by Intel’s ICH4 chipset, the ALi M5283 SATA and RAID controller is implemented as a device that requires device driver during the Windows installation process. To successfully install the device driver, please carefully read the following instructions. The ALi driver is especially required if SATA drives are the only hard disk drives in the MOTHERBOARD system. Otherwise, the Windows installation program may fail to locate the hard drives whether configuring the SATA disk drives into RAID volumes or using them as individual disk drives. The system BIOS can identify SATA disk drives, but cannot control their operation. The separately installed driver therefore is necessary. 5.6.1 Installation Steps During Windows XP Installation Step 1: Enable SATA ROM using the BIOS configuration utility. The process has been detailed in Appendix E. Step 2: Locate the ALi installation driver folder within the Utility CD that came with the motherboard. Step 3: Copy files under a sub-directory named “SATA50XX” (taking Windows XP installation as the example) to the root directory of floppy diskette (labeled driver diskette). The file names are listed below: APC-3580 User Manual 107 ٛ ٛ ٛ disk1 5283096D.bin txtsetup.oem Also copy the OS option directory “win98_me”, “win_nt”, or “win_xp”, and related driver files in each directory. Step 4: Step 5: MOTHERBOARD Motherboard Boot from Windows installation CD-ROM (set CD-ROM as the 1st Boot Device), when the Windows XP Setup blue screen appears and prompts users to Press F6. Please press the F6 key, if third-party SCSI or RAID driver installation is needed. The setup program continues, later when the setup program prompts users to specify additional adapters, please press the S key. Step 6: The setup program prompts user to insert the driver diskette. Please insert the driver diskette, and press ENTER to continue. Step 7: The follow-up window lists out the installation choices, please select ALi SATA/RAID Controller for Windows XP and press ENTER to continue. Step 8: The follow-up window lists out the devices to be installed, in which selected ALi controller(s) should be included. Step 9: Repeat step 5, but select ALi ATA/RAID Controller at step 7. If both controllers are installed, go to next step. Step 10: If users want to install other devices, please operate at this time. If all devices have been successfully installed, please go to next step. Step 11: Press ENTER to continue Windows XP setup. 5.6.2 Installation Steps under Existing Windows XP After Windows XP is started, Windows system automatically finds the newly installed adapter and prompts user to install its driver. Please follow these steps to install the driver: Step 1: When the Found New Hardware Wizard windows appear (Mass Storage Controller), select Install from a list or specify location (Advanced) and click Next to continue. Step 2: In the follow-up window, please select "Don't search, I will choose the driver to install", APC-3580 User Manual 108 then click Next to continue. Step 3: In the follow-up window, please select SCSI and RAID controllers, and then click Next to continue. Step In the follow-up window, click Have Disk, then insert the driver diskette and type in the driver location: e.g., a CD-ROM, then 4: click OK to continue. Step In the follow-up window, select ALi SATA/RAID Controller, 5: then click Next to continue. Step Confirm the follow-up windows and click the Finish button to continue. 6: Step Please "confirm" the Digital Signature Not Found window when 7: it appears, when finished, please restart the computer. Step Repeat step 1, but select ALi ATA/RAID Controller at step 4. 8: Introduction The MOTHERBOARD board comes with an onboard Realtek ALC655 CODEC. Realtek ALC655 is a 16-bit, full duplex AC’97 Rev. 2.3 compatible audio CODECwith a sampling rate of 48KHz. D.1.1 Accessing the AC ’97 CODEC The CODEC is accessed through one 16-pin header including: 1 2 3 4 A LINE input shared with surround output A MIC input shared with Center and LFE output A LINE output A MIC input line. D.1.2 Driver Installation The driver installation has been described in Chapter 6, Section 6.3. After rebooting the sound effect configuration utility appears in the Windows Control Panel (see APC-3580 User Manual 109 Figure 6-20). If the peripheral speakers are properly connected, sound effects should be heard. Figure 6-20: Sound Effect Manager con D.2 Sound Effect Configuration D.2.1 Accessing the Sound Effects Manager To access the Sound Effects Manager, please do the following: Step 9: Install the audio CODEC driver. Step 10: Click either: he Sound Effect Manager icon in the Notification Area of the system task bar (see Figure T 6-21), or ٛ The Sound Effect Manager icon in the Control Panel (Figure 6-22). ٛ APC-3580 User Manual 110 Figure 6-23: Sound Effects Manager (ALC655) APC-3580 User Manual 111 NOTE: The Sound Effect Manager shown in Figure 6-23 is for the RealTek ALC655 audio CODEC. Different CODECs may have different sound manager appearances. The following section describes the different configuration options in the Sound Effect Manager. D.2.2 Sound Effect Manager Configuration Options The Sound Effects Manager enables configuration of the items listed below. To configure these items click the corresponding menu tab in the Sound Effects Manager in Figure 6-23. NOTE: The Karaoke Mode is configured in the Sound Effect menu. To access Karaoke configuration settings, click on the Sound Effect menu tab. ٛ ٛ ٛ ٛ ٛ ٛ ٛ ٛ ٛ ٛ ٛ Sound Effect Karaoke Mode Equalizer Speaker Configuration Speaker Test S/PDIF-In S/PDIF-Out Connector Sensing HRTF Demo Microphone Effect General NOTE: APC-3580 User Manual 112 Not all RealTek Sound Effect Managers have all the above listed options. The Sound Effect Manager loaded onto the system may only have some of the options listed above. Below is a brief description of the available configuration options in the Sound Effects Manager. ound Effect:- Select a sound effect from the 23 listed options in the drop down menu. Selected S sound effect properties can be edited. To edit ٛ the sound effect click “EDIT.” ٛ Karaoke Mode:- The Karaoke Mode is accessed in the Sound Effect ٛ window. The Voice Cancellation disables the vocal part of the music being played. The Key adjustment up or down arrow icons enables users to define a key that fits a certain vocal range. ٛ Equalizer Selection:- Preset equalizer settings enable easy audio range settings. Ten frequency bands can be configured. ٛ peaker Configuration:- Multi-channel speaker settings are configured in this menu. S Configurable options include: ٛ o Headphone ٛ o Channel mode for stereo speaker output ٛ o Channel mode for 4 speaker output ٛ o Channel mode for 5.1 speaker output ٛ o Synchronize the phonejack switch with speakers settings ٛ peaker Test:-Each speaker connected to the system is tested individually to see if the S 4-channel or 6-channel audio operates properly. ٛ S/PDIF-In & S/PDIF-Out:- These functions are currently not supported. ٛ Connector Sensing:- Realtek ALC655 detects if an audio device is ٛ plugged into the wrong connector. If an incorrect device is plugged in a warning message appears. ٛ RTF Demo:- Adjust HRTF (Head Related Transfer Functions) 3D positional audio here before H running 3D applications. ٛ ٛ ٛ Microphone Effect:- Microphone noise suppression is enabled in this menu. General:- General information about the installed AC’97 audio configuration utility is listed here. APC-3580 User Manual 113 Chapter 6_____________________________ 6.1 Windows 2000/XP Driver Installation for Touch Screen Before installing the Windows 2000/XP driver software, you must have the Windows 2000/XP system installed and running on your computer. You must also have the 9036 PenMount Serial Interface controller board installed. Contents of the PenMount Windows 2000/XP driver folder are listed below: DMC9000.inf DMC9000.sys DMC9000.cat SETUP.EXE If you have an older version of the PenMount Windows 2000/XP driver installed in your system, please remove it first. Follow the steps below to install the PenMount Windows 2000/XP driver. 1. When the system first detects the controller board, a screen appears that shows “Unknown Device”. Do not use this hardware wizard. Press Cancel. APC-3580 User Manual 114 2. Insert the PenMount Driver CD-ROM. Go to the Windows 2000-XP Driver folder. Click setup.exe. 3. The screen displays the installation wizard for the PenMount software. Click “Next”. APC-3580 User Manual 115 3. A License Agreement appears. Click “I accept…” and “Next”. 4. The “Ready to Install the Program” screen appears. Select “Install”. APC-3580 User Manual 116 5. The next screen is “Hardware Installation”. Select “Continue Anyway”. 6. The “InstallShield Wizard Completed” appears. Click “Finish”. APC-3580 User Manual 117 6.2 Configuring the PenMount Windows 2000/XP Driver Upon rebooting, the computer automatically finds the new 9036 controller board. The touch screen is connected but not calibrated. Follow the procedures below to carry out calibration. 1. After installation, click the PenMount Monitor icon “PM” in the menu bar. 2. When the PenMount Control Panel appears, click “Calibrate”. PenMount Control Panel The functions of the PenMount Control Panel are Calibrate, Draw, Multiple Monitors, Option, and About, which are explained in the following sections. Calibrate This function offers two ways to calibrate your touch screen. “Standard Calibration” adjusts most touch screens. “Advanced Calibration” adjusts aging touch screens. Standard Calibration Click this button and arrows appear pointing to red squares. Use your finger or stylus to touch the red squares in sequence. After the fifth red point calibration is complete. To skip, press ‘ESC’. Advanced Calibration Advanced Calibration uses 4, 9, 16 or 25 points to effectively calibrate touch panel linearity of aged touch screens. Click this button and touch the red squares in sequence with a stylus. To skip, press ‘ESC’. APC-3580 User Manual 118 NOTE: The older the touch screen is, the more Advanced Mode calibration points you need for an accurate calibration. Use a stylus during Advanced Calibration for greater accuracy. APC-3580 User Manual 119 Plot Calibration Data APC-3580 User Manual Check this function and a touch panel linearity comparison graph appears when you have finished Advanced Calibration. The blue lines show linearity before calibration and black lines show linearity after calibration. 120 Draw Tests or demonstrates the PenMount touch screen operation. The display shows touch location. Click Draw to start. Touch the screen with your finger or a stylus and the drawing screen will register touch activity such as left, right, up, down, pen up, and pen down. Touch the screen with your finger or a stylus and the drawing screen will register touch activity such as left, right, up, down, pen up, and pen down. APC-3580 User Manual 121 Click Clear Screen to clear the drawing. About This panel displays information about the PenMount controller and this driver version. PenMount Monitor Menu Icon The PenMount monitor icon (PM) appears in the menu bar of Windows 2000/XP system when you turn on the PenMount Monitor in the PenMount Utilities. APC-3580 User Manual 122 The PenMount Monitor has the following functions: APC-3580 User Manual 123 Beep Turns beep on or off. Right Button When you select this function, a mouse icon appears in the right-bottom of the screen. Click this icon to switch between Right and Left Button functions. Pen Stabilizer Check this function to reduce cursor vibration for relatively unstable touch screens, or where there may be excess vibration. Normally this function is not checked. Exit Exits the PenMount Monitor function. PenMount Rotation Functions The PenMount driver for Windows 2000/XP supports several display rotating software packages. The PenMount drivers for Windows 95, Windows 98/ME, Windows 2000/XP, as well as Windows 98 USB and Windows Me/2000/XP support display rotating software packages such as: • Portrait’s Pivot Screen Rotation Software • ATI Display Driver Rotating Function • nVidia Display Driver Rotating Function • SMI Display Driver Rotating Function • Intel 845G/GE Display Driver Rotating Function Configuring the Rotation Function 1. Install the rotation software package. 2. Choose the rotating function (0°, 90°, 180°, 270°) in the 3rd party software. The calibration screen appears automatically. Touch this point and rotation is mapped. APC-3580 User Manual 124 NOTE: The rotating function is disabled if you use Monitor Mapping 6.3 Uninstall the PenMount Windows 2000/XP Driver 1. Exit the PenMount monitor (PM) in the menu bar. 2. Go to Settings, then Control Panel, and then click Add/Remove program. Select PenMount DMC9000 and click the Add/Remove button. 3. Select PenMount DMC9000 and DMC9100. Click the Remove button. APC-3580 User Manual 125 4. Select “Yes” and “Close” to remove the PenMount Windows 2000/XP driver, and reboot the system. APC-3580 User Manual 126 Appendix A: Watchdog Timer The Watchdog Timer is provided to ensure that standalone systems can always recover from catastrophic conditions that cause the CPU to crash. This condition may have occurred by software bug. When the CPU stops working correctly, hardware on the board will either perform a hardware reset (cold boot) to bring the system back to a known state. A BIOS function call (INT 15H) is used to control the Watchdog Timer: z INT 15H: AH – 6FH Sub-function: AL – 2 : Set the Watchdog Timer’s period BL : Time-out value(Its unit--second or minute, is dependent on the item “Watchdog Timer unit select” in CMOS setup). You have to call sub-function 2 to set the time-out period of Watchdog Timer first. If the time-out value is not zero, the Watchdog Timer will start counting down. While the timer value reaches zero, the system will reset. To ensure that this reset condition does not occur, the Watchdog Timer must be periodically refreshed by calling sub-function 2. However the Watchdog timer will be disabled if you set the time-out value to be zero. A tolerance of at least 10% must be maintained to avoid unknown routines within the operating system (DOS), such as disk I/O that can be very time-consuming. Notes: This function is applied by Winbond W83627HF chipset, if partners have further questions about it, please refer to the original datasheets or contact with our customer service department. Note: When exiting a program it is necessary to disable the Watchdog Timer, otherwise the system will reset. Example Program: ; INITIAL TIMER PERIOD COUNTER ; W_LOOP: MOV AX, 6F02H APC-3580 User Manual ;setting the time-out value 127 MOV INT BL, 30 ;time-out value is 48 seconds 15H ; ; ADD YOUR APPLICATION PROGRAM HERE ; CMP EXIT_AP, 1 JNE W_LOOP MOV AX, 6F02H MOV BL, 0 INT ;is your application over? ;No, restart your application ;disable Watchdog Timer ; 15H ; ; EXIT APC-3580 User Manual 128 Appendix B: Digital I/O One characteristic of digital circuit is its fast response to high or low signal. This kind of response is highly needed for harsh and critical industrial operating environment. That’s why we design 4-bit digital inputs and 4-bit digital outputs on the MOTHERBOARD. Digital Input and Output, generally, are control signals. You can use these signals to control external devices that needs On/Off circuit or TTL devices. You can read or write data to the selected address to enable the function of digital IO. Notes: This function is applied by Winbond W83627HF chipset, if partners have further questions about it, please refer to the original datasheets or contact with our customer service department. W83627HF pin DIO pin W83627HF pin DIO pin GP10 IN0 GP14 OUT0 GP11 IN1 GP15 OUT1 GP12 IN2 GP16 OUT2 GP13 IN3 GP17 OUT3 A BIOS function call (INT 15H) is used to control Watchdog Timer: INT 15H: AH – 6FH Sub-function: AL – 8: Set the Digital port is INPUT AL : Digital I/O input value Example program: MOV INT AX, 6F08H 15H ;setting the Digital port is input ; AL low byte = value AH – 6FH Sub-function: AL – 9: Set the Digital port is OUTPUT BL APC-3580 User Manual : Digital I/O output value 129 Example program: MOV MOV INT AX, 6F09H BL, 09H 15H ;setting the Digital port is output ;Digital value is 09H ; Digital Output is 1001bAppendix C: I/O Address Map z I/O ADDRESS MAP I/O ADDRESS MAP DESCRIPTION 000-01F DMA Controller #1 020-021 Interrupt Controller # 1, Master 040-05F System Timer 060-06F Standard 101/102 keyboard Controller 070-07F Real time Clock, NMI Controller 080-0BF DMA Page Register 0A0-0BF Interrupt Controller # 2 0C0-0DF DMA Controller # 2 0F0-0F0 Clear Math Coprocessor Busy 0F1-0F1 Reset Math Coprocessor 0F8-OFF Math Coprocessor 170-1F7 BUS Master PCI IDE Controller 201 DIO 278-27F Parallel Printer Port 2 2E8-2EF Serial Port 4 2F8-2FF Serial Port 2 376-376 BUS Master PCI IDE Controller 378-37F Parallel Printer Port 1 3B0-3DF Intel 82852GM/GME Graphic Controller 3E8-3EF Serial Port 3 3F0-3F7 Floppy Disk Controller 3F8-3FF Serial Port 1 480-48F PCI BUS z 1st MB Memory Address Map MEMORY ADDRESS DESCRIPTION 00000-9FFFF SYSTEM MEMORY A0000-BFFFF VGA BUFFER C0000-CFFFF VGA BIOS E0000-FFFFF SYSTEM BIOS APC-3580 User Manual 130 100000 EXTEND MEMORY z IRQ Mapping Chart IRQ0 System Timer IRQ8 RTC clock IRQ1 Keyboard IRQ9 AC97 AUDIO IRQ2 IRQ Controller IRQ11 COM4 IRQ3 COM2 IRQ10 COM3 IRQ4 COM1 IRQ12 PS/2 mouse IRQ5 PCI DEVICES IRQ13 FPU IRQ6 Available IRQ14 Primary IDE IRQ7 Printer IRQ15 Secondary IDE z DMA Channel Assignment CHANNEL FUNCTION 0 Available 1 Available 2 Available 3 Available 4 Cascade for DMA controller 1 5 Available 6 Available 7 Available APC-3580 User Manual 131 Appendix C___________________________ VESA Mounting The APC-3580 display monitor is mounted by means of VESA. Just carefully mount the arm onto the rear of the unit by fastening the given four screws as shown in Figure B. Figure A: VESA Mounting of the APC-3580 APC-3580 User Manual 132