1
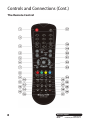
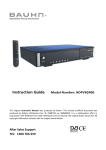
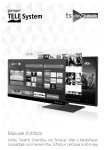
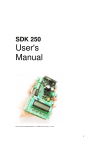
1TB HDD PVR with Twin Tuners
Model Number AS-PVR1000R
INSTRUCTION MANUAL
After Sales Support
Telephone: 1300 886 649
Email: [email protected]
N13275
Contents
Warranty
3
Welcome
4
General Safety Instructions
5
Controls and Connections
7
Basic Operations
14
Electronic Program Guide (EPG)
18
Recording Functions
20
Media Browser/File Manager
23
Menus
25
FAQs
30
Technical Specifications
31
2
After Sales Support
Telephone: 1300 886 649
Email: [email protected]
1TB HDD PVR with Twin Tuners
Warranty Details
The product is guaranteed to be free from defects in workmanship and parts
for a period of 24 months from the date of purchase. Defects that occur within
this warranty period, under normal use and care, will be repaired, replaced or
refunded at our discretion, solely at our option with no charge for parts and
labour. The benefits conferred by this warranty are in addition to all rights
and remedies in respect of the product that the consumer has under the
Competition and Consumer Act 2010 and similar state and territory laws.
Our goods come with guarantees that cannot be excluded under the
Australian Consumer Law. You are entitled to a replacement or refund for
a major failure and for compensation for any other reasonably foreseeable
loss or damage. You are also entitled to have the goods repaired or
replaced if the goods fail to be of acceptable quality and the failure does
not amount to a major failure.
After Sales Support
Telephone: 1300 886 649
Email: [email protected]
Welcome
Congratulations on choosing to buy a BAUHN® product. By doing so you now have
the assurance and peace of mind that comes with purchasing a product made
by one of the leading manufacturers. All products brought to you by BAUHN®
are manufactured to the highest standards of performance and safety and, as
part of our philosophy of customer service and satisfaction, are backed by our
comprehensive 2 Year Warranty. We hope you will enjoy using your purchase for
many years to come.
4
After Sales Support
Telephone: 1300 886 649
Email: [email protected]
General Safety Instructions
Read this manual thoroughly before first use and keep it in a safe place for future
reference, along with the warranty card, purchase receipt and carton. The safety
precautions enclosed herein reduce the risk of fire, electric shock and injury when
correctly adhered to. Follow all instructions and take notice of all warnings to
reduce the risk of fire or electric shock.
Important Warnings and Cautions!
• T o prevent contact with high voltage components
inside, do not attempt to open the cover or the back
of this product. There are no user-serviceable parts
inside this product.
• Do not repair the unit yourself. Only have it serviced
by qualified personnel.
• Do not expose this product to water, rain, moisture
or dust. Do not use it anywhere near water or where
water splashes or drips; do not touch the power plug
with wet hands.
Electrical Safety and Cord Handling
• Before installing this appliance, make sure your outlet voltage corresponds to the
voltage stated on the appliance rating label.
• Only use this appliance with the cord and plug supplied, and do not overload the
power outlet.
• When the power cord is damaged, it must be replaced by the manufacturer or
similarly qualified personnel in order to avoid a hazard. Contact our after sales
support line in order to avoid a hazard.
• Do not let the cord hang over the edge of a table or counter, or touch any hot
surface. Do not allow anything to rest on or roll over the power cord, and run any
cords so that no one steps on or trips over them. Do not run the cord near heatproducing appliances such as radiators, stoves or irons. The excessive heat could
melt the insulation and expose live wires.
• Unplug the unit from the power outlet after use to avoid possible damage during
electrical storms, or when the equipment will be unattended or unused for a long
period of time.
• Always grasp the plug, not the cord, when disconnecting the unit. Pulling the
cord can damage the internal wires and may cause a fire.
• This appliance can only be disconnected from the power supply by unplugging it
from the mains socket. Make sure the mains socket is readily accessible.
After Sales Support
Telephone: 1300 886 649
Email: [email protected]
5
General Safety Instructions (Cont.)
Installation
• The product must be installed in accordance with local laws.
• Place the product on a straight, rigid and stable place. Do not place it on carpet.
Do not place it on top of another appliance that may cause overheating (for
example, a receiver or amplifier).
• When installing the unit, make sure to place it:
• Away from heat sources, radiators or other products that produce heat.
• Away from areas with high temperatures, high humidity or direct sunlight.
• Away from excess dirt and dust.
• Away from any items that may damage it, such as naked flame sources ( lit
candles) or objects containing water.
• Away from open windows and any place where water may get into the unit and
damage it.
• Place the product in a sufficiently aerated place. Allow at least 10cm spacing at
the back and top of the product, and 5cm on both sides, to prevent overheating.
Usage Conditions and Restrictions
• Follow the instructions in this manual when installing and adjusting this
appliance. Only adjust those controls that are covered in this instruction manual,
as improper adjustment of other controls may result in damage. If this happens,
unplug the appliance and have it serviced by appropriately qualified personnel.
• Supervise young children to ensure they do not play with the product. Close
supervision is always necessary when an appliance is used by or near children.
• Do not place anything underneath the product (for example, CDs or magazines).
• Take care not to block any ventilating openings with items such as newspapers,
tablecloths or curtains. Dispose of spent or damaged batteries in accordance with
local regulations.
• This appliance is not intended for use by persons (including children) with
reduced physical, sensory or mental capabilities, or lack of experience and
knowledge, unless they have been given supervision or instructions concerning
use of the appliance by a person responsible for their safety.
• Improper installation or use can result in electrical shock and/or material damage.
We accept no liability for any damage resulting from inappropriate use or
installation.
6
After Sales Support
Telephone: 1300 886 649
Email: [email protected]
Controls and Connections
Front Panel
1
2
3
4
5
6
1 Standby: Press this button to switch the unit on or to standby.
2 CH-: Press this button to change the channel downwards.
3 CH+: Press this button to change the channel upwards.
4 VOL-: Press this button to decrease the volume.
5 VOL+: Press this button to increase the volume.
6 USB2: Connect your USB storage device for copying files or recording.
Rear Panel
1
LOOP IN
2
9
10
11
ANTI N
100-240V~
50/60Hz
CVBS
L
R
CAUTION
RISK OF ELECTRIC SHOCK
DO NOT OPE N
ANTO UT
TUNER-S
3
LOOP OUT
TUNER-M
4
CAUTION: TO REDUCE THE RISK OF ELECTRIC SHOCK.
DO NOT REMOVE COVER. NO USER, SERVICEABLE PARTS INSIDE.
REFER SERVICING TO QUALIFIED SERVICE PERSONNEL.
SPDIF
USB
5 6
HDM I
7
YP
bP
r
8
1 LOOP IN: Connect this to LOOP OUT with the supplied loop cable.
2 ANT IN: Connect your antenna.
3 ANT OUT: Pass RF/antenna signal to other home entertainment units.
4 LOOP OUT: Connect this to LOOP IN with the supplied loop cable.
5 SPDIF: Output digital audio signal to amplifier.
6 USB1: Connect USB device for software updates or use with recording and playback.
7 HDMI: Output High Definition digital video and audio (supports up to 1080i).
8 Y/Pb/Pr: Output Y/Pb/Pr (Component) video signal to TV (supports up to 1080i).
9 Coaxial: Output digital audio signal to amplifier.
10 AV OUT: Output CVBS (Composite) video signal to TV.
11 Audio (L/R):Output left/right audio signals to TV or amplifier.
After Sales Support
Telephone: 1300 886 649
Email: [email protected]
7
Controls and Connections (Cont.)
The Remote Control
8
After Sales Support
Telephone: 1300 886 649
Email: [email protected]
Controls and Connections (Cont.)
Remote Control Functions
1
2
3
4
5
6
7
8
9
10 11 12 13 14 15 16 17 18 19 20 21 22 23 24 25 26 27 28 29 30 31 POWER: Switch the product on or to standby.
Numeric buttons (0-9): Select a channel by channel number.
INFO: Show current program information.
VOL+/-: I ncrease or decrease the volume. Navigate through the menus.
ASPECT: Change the aspect ratio (16:9, 4:3, Letter Box, Pan Scan).
/ : Navigate up or down in menu mode / Change the program.
Menu: View the main menu.
/ / / : Assist with basic operations, as explained in the instructions.
RECALL: Return to the last selected channel.
AUDIO: Display the audio information of the selected program.
TIMER: Enter record timer menu.
T-SHIFT: Enable/disable the time-shift function.
: Skip back to previous file (in media mode).
: Rewind in time-shift or playback mode.
: Start playback or resume playback in time-shift mode.
: Pause playback or start time-shifting.
: Mute the sound or restore it when it is muted.
EPG: Display the EPG list.
FORMAT: Change video output resolution format.
CH+/-: Change the channel upwards/downwards.
OK: Confirm the function.
/ : Navigate to the left or right in menu mode / Control the volume level.
EXIT: Return to the previous step or main menu.
: To page up.
SUB: Switch subtitles on or off.
: To page down.
PVR: Enter the media browser menu.
: Skip to the next file (in media mode).
: Fast Forward in time-shift or playback mode.
: Start instant recording on the current channel.
: Stop recording or time-shifting.
After Sales Support
Telephone: 1300 886 649
Email: [email protected]
9
Controls and Connections (Cont.)
Using the Remote Control
1. To use the remote control, point it towards the front of the HDD PVR.
2. The remote control has a range of up to 7 metres from the HDD PVR at an angle
of up to 60 degrees.
3. The remote control will not operate if its path is blocked.
NOTE:
• If the HDD PVR does not operate when operating the remote control from a
close range, you need to replace the batteries.
• Do not drop the remote control unit; do not subject it to physical shocks.
• Keep the remote control unit dry; wetting it may cause the unit to malfunction.
• Bright sunlight or lightning may cause the remote control to operate erratically.
• Depleted batteries will decrease the remote control sensitivity.
• Replace the batteries with new ones when operation of the unit deteriorates.
Installing Batteries
Remove the battery cover from the remote control unit and put two 1.5V,
AAA size batteries inside the compartment, following the +/- marking in the
battery compartment.
Precautions when using batteries
• Do not use old and new batteries together.
• Do not use different types of battery (for example, Manganese and Alkaline
batteries) together.
• Note that there are chargeable and nonchargeable batteries. Do not attempt to
charge nonchargeable batteries.
• Always remove the batteries from the remote control unit and store the unit in a
dry place if you do not intend to use the remote control for more than a month.
• CAUTION: Danger of explosion! Make sure to insert the batteries correctly and
use only suitable batteries of the same type.
10
After Sales Support
Telephone: 1300 886 649
Email: [email protected]
Controls and Connections (Cont.)
Antenna Requirements
• You may not need to change or replace your existing TV antenna to receive digital
reception. However, if your antenna is not in a good condition, it is recommended
that you consider replacing it to ensure uninterrupted digital television viewing.
• Viewers in areas of poor analog reception may need specialist advice about
antenna requirements for digital reception in their area.
• We recommend using quad shielded cable connecting the antenna to the TV.
Connections to a TV
There are several ways of connecting the HDD PVR to your TV and Hi-Fi System. For
High Definition viewing, your TV must support 720p, 1080i or 1080p resolution.
Your connections between the HDD PVR and TV must be either HDMI or YPbPr
(Component). Other connections will only provide Standard Definition viewing.
WARNING:
Before connecting your equipment, make sure all units are
switched off and unplugged from the mains power supply.
For Standard Definition Viewing:
Connect the HDD PVR receiver via CVBS (composite) and Audio
1. Connect the loop cable to LOOP IN and to LOOP OUT.
2. Connect the antenna to the ANT IN socket of the unit.
3. Connect the unit via CVBS (AV) & Audio L/R, as illustrated below.
TV Interface
Antenna
VIDEO INPUT
AUDIO INPUT
LR
LOOP IN
ANTI N
100-240V~
50/60Hz
CVBS
L
R
CAUTION
RISK OF ELECTRIC SHOCK
DO NOT OPE N
ANTO UT
TUNER-S
LOOP OUT
TUNER-M
CAUTION: TO REDUCE THE RISK OF ELECTRIC SHOCK.
DO NOT REMOVE COVER. NO USER, SERVICEABLE PARTS INSIDE.
REFER SERVICING TO QUALIFIED SERVICE PERSONNEL.
SPDIF
USB
After Sales Support
Telephone: 1300 886 649
Email: [email protected]
HDM I
YP
bP
r
11
Controls and Connections (Cont.)
For High Definition Viewing:
Connect the HDD PVR receiver via HDMI output
1. Connect the loop cable to LOOP IN and to LOOP OUT.
2. Connect the antenna to ANT IN of the unit.
3. Connect the unit to the TV via HDMI cable, as illustrated below.
HDMI Interface
Antenna
AUDIO INPUT
VIDEO INPUT
HDMI INPUT
LR
LOOP IN
ANTI N
100-240V~
50/60Hz
CVBS
L
R
CAUTION
RISK OF ELECTRIC SHOCK
DO NOT OPE N
ANTO UT
TUNER-S
CAUTION: TO REDUCE THE RISK OF ELECTRIC SHOCK.
DO NOT REMOVE COVER. NO USER, SERVICEABLE PARTS INSIDE.
REFER SERVICING TO QUALIFIED SERVICE PERSONNEL.
LOOP OUT
TUNER-M
SPDIF
USB
HDM I
YP
bP
r
Connect the HDD PVR receiver via YPbPr output
1. Connect the loop cable to LOOP IN and to LOOP OUT.
2. Connect the antenna with ANT IN of the unit.
3. Connect the unit to the TV via YPbPr cable, as illustrated below.
4. Connect the unit to the TV via L&R audio cable, as illustrated below.
HDTV Interface
Antenna
COMPONENT VIDEO INPUT
AUDIO INPUT
LR
LOOP IN
ANTI N
100-240V~
50/60Hz
CVBS
L
R
CAUTION
RISK OF ELECTRIC SHOCK
DO NOT OPE N
ANTO UT
TUNER-S
12
LOOP OUT
TUNER-M
CAUTION: TO REDUCE THE RISK OF ELECTRIC SHOCK.
DO NOT REMOVE COVER. NO USER, SERVICEABLE PARTS INSIDE.
REFER SERVICING TO QUALIFIED SERVICE PERSONNEL.
SPDIF
USB
HDM I
YP
bP
r
After Sales Support
Telephone: 1300 886 649
Email: [email protected]
Controls and Conections (Cont.)
For Audio Connection:
Connect via SPDIF (Optical/Coaxial), Mixed Audio L/R output
1. Connect the loop cable to LOOP IN and to LOOP OUT.
2. Connect the antenna with ANT IN of the unit.
3. Connect the unit to the amplifier via audio cable, as illustrated below.
Audio Decoder Interface
Antenna
DIGITAL INPUT
OPTICALL
LOOP IN
AUDIO INPUT
R
ANTI N
100-240V~
50/60Hz
CVBS
L
R
CAUTION
RISK OF ELECTRIC SHOCK
DO NOT OPE N
ANTO UT
TUNER-S
LOOP OUT
TUNER-M
CAUTION: TO REDUCE THE RISK OF ELECTRIC SHOCK.
DO NOT REMOVE COVER. NO USER, SERVICEABLE PARTS INSIDE.
REFER SERVICING TO QUALIFIED SERVICE PERSONNEL.
SPDIF
USB
After Sales Support
Telephone: 1300 886 649
Email: [email protected]
HDM I
YP
bP
r
13
Basic Operations
Power On/Off
Press the button on the remote control (or at the front of the AS-PVR1000R) to
turn on the power to the unit. The blue standby light will extinguish and the LCD
will display the current mode.
To turn the unit off, press the button. The unit will switch to standby mode after
10 seconds and the button at the front of the unit will illuminate in blue.
•
•
If you press the button while recording a program, the following choices will
be displayed.
Yes: Recording will be stopped and the unit will enter standby mode after
10 seconds.
No: The unit will switch to semi-standby mode: recording will continue, but
video and audio output will stop. The LCD will display REC. Press the button
again to wake the unit.
Cancel : The unit will remain on and continue recording.
When in standby mode, and a timer recording is scheduled, the unit will turn
on automatically and enter semi-standby mode. After recording is completed,
the unit will enter standby mode.
Tuning Channels
You have two options for adding new channels, automatically or manually.
Auto Search
1. Press MENU to open the Main Menu.
2. Press the / arrow keys to select Installation, then press to select Auto
Search.
3. Press OK to start the auto search.
The unit will now automatically search for and add DTV channels.
When finished, the first channel will be displayed.
14
After Sales Support
Telephone: 1300 886 649
Email: [email protected]
Basic Operations (Cont.)
DTV Manual Search
1. Press MENU to open the
Main Menu.
2. Press the / arrow keys to
select Installation, then press
to enter the menu on the
right.
3. Press the / arrow keys
to select DTV Manual Search,
then press OK.
4. Press the / arrow keys
to select a frequency. After a
few moments the Strength &
Quality bars will indicate if there is any signal on the selected frequency.
5. Press OK to add the selected frequency to the list you wish to scan.
A ‘+’ symbol will appear in the column Selected.
6. Press to start the scan.
The unit will now search the selected frequencies for and add DTV channels.
When finished, the first channel will be displayed.
NOTE: A
ny timer recordings or reminders you have set will be cleared when a
channel search is performed.
Changing Channels
There are five options for selecting a channel to view:
• Press CH+ / CH- on the remote control or front of the AS-PVR1000R.
• Press the / arrow keys on the remote control.
• Press OK to display channel list, then use the / arrow keys to choose a
channel and press OK to view it.
• Use the numbered buttons to directly enter the
channel number you wish to view.
• Press the EPG button to open the Program Guide and
select a channel from the list.
NOTE: I f recording two programs, you will only be
able to select and view channels from the
same broadcaster as the two programs you are
recording.
After Sales Support
Telephone: 1300 886 649
Email: [email protected]
15
Basic Operations (Cont.)
Changing Volume
There are three options for changing the volume level:
• Press VOL+ / VOL- on the remote control or front of the AS-PVR1000R.
• Press the / arrow keys on the remote control.
• Press on the remote control to mute the volume.
Press again, or VOL+ / VOL-, to restore sound.
Info Box
Display information about the channel you are currently viewing, including channel
number, channel name, current program, next program, signal strength/quality,
current time.
1. Press INFO while in Live TV
mode to display the Info Box.
When recording a program,
the current recording status
will display in the top right
corner of the screen.
2. Press EXIT to hide the Info Box.
The Info Box will auto hide
after the preset time (see page
29, ‘Info box display time’).
Aspect Ratio
You can change the aspect ratio output by the unit to 16:9 Full, 16:9 Letter Box, 16:9
Pan Scan, 4:3 Full, 4:3 Letter Box or 4:3 Pan Scan.
1. Press ASPECT to change to the next aspect ratio option.
The top left of the screen will display the current choice.
16
After Sales Support
Telephone: 1300 886 649
Email: [email protected]
Basic Operations (Cont.)
Format
You can select the video output resolution (1080p, 1080i, 720p, 576i).
Audio
You can select which audio language, sound track and digital audio format you
wish to use from the broadcast of the current program you are watching.
1. Press AUDIO to display the Audio Window.
2. Press the / arrow keys on the remote control to select a menu item.
3. Press the / arrow keys on the remote control to change the setting.
4. Press EXIT to close the Audio Window.
Subtitles (Closed Captions)
This service allows you to activate subtitles while watching normal television
programs that provide it.
1. Press SUB while in Live TV
mode to display the Subtitle
selection window.
2. Press the / arrow keys on
the remote control to select a
subtitle language.
3. Press OK to turn on the
selected subtitle language.
To disable subtitles, select
‘Subtitle Off’.
NOTE: Not all channels or
programs broadcast subtitles.
After Sales Support
Telephone: 1300 886 649
Email: [email protected]
17
Electronic Program Guide (EPG)
EPG stands for Electronic Program Guide. It is supplied by the program providers
and offers information about the programs to be broadcast. Before you can view
any EPG information, you have to ‘activate’ every channel for which you want to
view program information. To do this, select and view for a few seconds each
channel you require EPG information for.
There are two ways to open the EPG:
• While in Live TV mode press EPG.
• Open from Main Menu.
1. Press MENU
2. Use the / arrow keys to select an EPG, then press OK.
3. Use the / keys to select the EPG style you wish to open, then press OK.
EPG Basic Controls
•
•
•
•
•
•
Press EPG to switch between horizontal and vertical display mode.
Press / to scroll up and down the channel list, one page at a time.
Press to Timer Record the selected program (see page 21).
Press again to choose advanced options (advanced start, delay end).
Press three times to cancel the preset recording
Press to set a Reminder for the selected program (see page 21).
Press OK to change to the selected channel and update EPG data for it.
Press EXIT to close the EPG.
Vertical EPG mode
•
•
18
Use the / or CH+ / CH- keys to select a channel.
Press to access the selected channel’s program list on the left side.
• Press to view the
previous day's program
list for the selected
channel.
• Press to view the next
day's program list for the
selected channel.
• Press the / arrow
keys to select a program
for Timer Record or
Reminder option.
After Sales Support
Telephone: 1300 886 649
Email: [email protected]
Electronic Program Guide (Cont.)
Horizontal EPG Mode
•
•
Press the / arrow or CH+ / CH- keys to select a channel.
Press the / arrow keys to cycle through the programs on the right side for
the selected channel.
• Press to view the previous day's program list for the selected channel.
• Press to view the next day's program list for the selected channel.
NOTE: Program information is only displayed in horizontal mode. Only the first five
lines of the program synopsis (in the top left box) will be displayed.
After Sales Support
Telephone: 1300 886 649
Email: [email protected]
19
Recording Functions
Before using any recording functions, you must set the default recording options
(see page 26 'PVR Settings' for instructions).
Instant Recording
This mode allows you to start recording the current channel immediately without
having to set up a start and finish time.
The AS-PVR1000R has the ability to record two channels at the same time. Follow
the instructions below to start recording the first channel, then change to the
second channel you wish to record and perform the same action to start recording.
Start Recording
1. Press
to start instant recording for
the current channel.
Stop Recording
1. Press to stop recording.
2. Use the / arrow keys to select the
channel you want to stop recording.
3. Press OK and the recording will be
stopped.
Recording Duration
1. Press
while viewing the channel
you are recording.
2. Use the / arrow keys to select a
recording duration.
Duration: Displays the current
time left until recording will stop
automatically.
Till Current Program Finished:
Select to stop recording after current
program finishes.
Till Next Program: Select to stop
recording after the next program finishes.
3. Press OK to set the new recording duration.
20
After Sales Support
Telephone: 1300 886 649
Email: [email protected]
Recording Functions (Cont.)
Time-shift Recording
While in Live TV mode and if enabled, the unit will automatically start time-shift
recording the channel currently being viewed.
• To enable/disable time-shift, simply press T.SHIFT on the remote control.
• Time-shift recording will only start 30 seconds after changing to a channel.
• The current time-shift recording will be stopped when the channel is changed
or the unit is turned off.
• Time-shift recordings cannot be saved.
NOTE: When recording two different channels and you want to enable time-shift on
one recording, the storage device speed may cause the particular time-shift
channel to freeze the picture and sound. We therefore recommend you only
enable time-shift mode when recording one channel.
Time-shift Controls
Pause playback.
(PLAY) Resume playback from the current point.
Stop playback and return to the current broadcast signal.
Fast forward (x2, x4, x8, x16, x32, x64).
Rewind (x2, x4, x8, x16, x32, x64).
Timer / Reminder List
Timer List screen shows currently scheduled timer recordings and reminders. From
this window you can edit existing entries
and create new entries.
While in Live TV mode, press TIMER to
enter the Timer List.
• Press to create a new entry.
• Press to remove the selected
entry.
• Press to remove all entries on the
current page.
• Press to sort the list by ‘Run Time’ or ‘Create time’ .
• Press OK to edit the selected entry.
• Press the / arrow keys to select an entry.
• Press / to scroll up/down, one page at a time.
• Press MENU to exit the menu or return to the previous window.
After Sales Support
Telephone: 1300 886 649
Email: [email protected]
21
Recording Functions (Cont.)
Timer Edit Window
• Press the / arrow keys to select an option
• Press / to change an option.
• Use the number buttons to enter date, start time and duration options directly.
• Press OK to save options and close the Edit window.
Switch: Enable or disable the timer (On, Off ).
Type: Choose to record a program or
display a reminder (Record, Remind).
Channel Name: Select the channel you
wish to record.
Date: Enter the start date for the timer
(yyyy/mm/dd).
Start Time: Enter a start time for the timer
in hours and minutes (hh:mm).
Duration: Enter a duration for each
recording instance in minutes. Maximum
duration is 24 hours (1440 minutes).
Mode: Choose how often to perform the
timer (Once, Daily, Weekly, Weekday, Weekend).
Type and Channel Name options cannot be edited after a timer is created.
NOTE:
While recording a program, pressing the button will give you three choices:
• Stop recording after 10 seconds (Yes).
• Continue recording but stop video and audio output (No).
• Continue recording and video/audio output (cancel).
Storage capacity required for recording
Approximate storage capacity required when recording digital signals
Time
Standard Definition Signal
High Definition Signal
30 minutes
1.25 GB
2.6 GB
60 minutes
2.5 GB
4.9 GB
90 minutes
3.75 GB
7.5 GB
120 minutes
5.0 GB
10.0 GB
150 minutes
6.25 GB
12.6 GB
180 minutes
7.5 GB
15.0 GB
22
After Sales Support
Telephone: 1300 886 649
Email: [email protected]
Media Browser/File Manager
The Media Browser allows you to explore and play your recorded programs or
media files from the internal HDD or attached USB device.
The right side will display information about the currently selected file such as
recorded time, recording duration, file size, censorship (program rating) and the
storage location (inner HDD or USB1/2).
While in Media Browser, the last channel you were watching will continue to play in
the top right corner until a media file is previewed.
NOTE: Only connect and disconnect USB devices when the unit is in standby mode.
Press the PVR button to open the Media Browser window.
• Press to display the file options.
• Press to select a series of files (for use with Copy, Delete, etc. options).
• Press to delete the selected file.
• Press to reorganise the list by ‘Record Date’, ‘File Name’ or ‘File Size’.
• Press the / arrow keys to select a file.
• Press / to scroll up/down, one page at a time.
• Press / to change the file list view.
Recording: Lists programs on inner HDD & USB recorded with the ASPVR1000R.
Media: Lists supported media file types on the inner HDD & USB.
All: Lists both ‘Content’ and ‘Media’ types.
• Press OK to start playback of the file in the preview window on the right side.
• Press (PLAY) to start full screen playback of the selected file.
• Press to stop playback of the selected file.
After Sales Support
Telephone: 1300 886 649
Email: [email protected]
23
Media Browser/File Manager (Cont.)
Operation / File Options
Press to display the file options menu.
• Copy: Copies the selected file to the inner HDD or USB device selected in the
PVR menu.
• Select All: Fast option for selecting all files.
• Unselect All: Fast option for cancelling selection of all files.
• Reverse Select: Currently selected files will be un-selected and currently
un-selected files will be selected.
• Rename: Displays the keyboard for renaming the currently highlighted file.
24
After Sales Support
Telephone: 1300 886 649
Email: [email protected]
Menus
Main menu
Menu Selection and Adjustment
1.
2.
3.
4.
5.
6.
Press MENU to display the Main Menu.
Press the / arrow keys to select a menu.
Press OK or to enter the menu.
Press the / arrow keys to select a menu item.
Press OK or / to adjust the menu option/value.
Press MENU to return to the previous menu screen, or press EXIT to exit the
menu completely.
Live TV menu
•
Channel List - Display the list of tuned channels.
EPG menu
• Vertical EPG: Opens the EPG in Vertical mode (see page 18 for details).
• Horizontal EPG: Opens the EPG in Horizontal mode (see page 19 for details).
After Sales Support
Telephone: 1300 886 649
Email: [email protected]
25
Menus (Cont.)
PVR menu
•
•
•
•
26
Media Browser - Opens the Media Browser window (file can support MPG, TS,
TRP, WMV, MP4, MKV, FLV, AVI, MOV, VOB, MP3, WAV format).
Timer List - Opens the Timer List window.
Storage - Displays information about the internal HDD and attached USB
devices (allows you to format the internal HDD or attached USB).
PVR Setting - Set default options for recording modes.
Time Shift Function: Enable/Disable auto time-shift recording mode.
Time Shift Duration: Set default time limit for time-shift function (30-120mins).
Recording Storage: Default storage destination for recording functions (Inner
HDD, USB1, USB2).
Playback Start Position: Select to resume playback of file from start point
(Beginning) or from the point where it was last stopped (Continuing).
Auto Play Next Program: Enable/Disable playback of the next recorded
program after current recording playback finishes.
After Sales Support
Telephone: 1300 886 649
Email: [email protected]
Menus (Cont.)
Installation menu
• Auto Search (see page 14 for
details).
• DTV Manual Search (see page
15 for details).
Settings Menu
•
Audio & Video Output Settings
Video resolution - select video output resolutions: 1080p, 1080i, 720p, 576i.
TV aspect ratio - select the suitable aspect ratio for your TV: 16:9, 4:3.
Aspect ratio conversions - available options: Auto, Letter Box, Pan Scan (use
depending on your TV resolution; see page 16 for details).
Digital audio output format - available options PCM, Bit Stream when
connecting to a audio amplifier.
After Sales Support
Telephone: 1300 886 649
Email: [email protected]
27
Menus (Cont.)
•
Time
Mode - Auto.
Display Existing Date - Automatically set from broadcast signal.
Display Existing Time - Automatically set from broadcast signal.
Daylight Saving Time - Enable/Disable summer time (+1hr).
Region - Select your time zone.
•
Parental control
Censorship - Set your desired program block level from All Block, P, C, G, PG, M,
MA, AV, R, No Block.
Installation Menu Control - Set it to Lock to require password to access the
menu area.
Settings Menu - Set it to Lock to require password to access the menu area.
PVR Menu - Set it to Lock to require password to access the menu area.
New Password - Create a new password
Confirm Password - Re-enter your new password to confirm it.
NOTE: I f Lock is selected, you will need to enter the password to enter the menu.
The factory default password is "0000".
28
After Sales Support
Telephone: 1300 886 649
Email: [email protected]
Menus (Cont.)
•
OSD settings
OSD Transparency - Set the transparency level for On-Screen Display.
Info Box Display Time - Set auto hide time for Info box (see page 16).
•
System information
View system information of the unit.
•
Firmware upgrade
Select to upgrade the software of the unit (upgrade USB must be connected to
rear USB port).
WARNING: Upgrading the firmware will delete all recorded programs on the
internal HDD.
Factory default
Restore to factory default settings.
CAUTION: Restoring to factory defaults will clear all channels and settings you
may have made. All recorded data will be lost.
•
After Sales Support
Telephone: 1300 886 649
Email: [email protected]
29
FAQs
If you experience problems with this HDD PVR or its installation, in the first instance
please read carefully the relevant sections of this instruction manual. If none of the
solutions help you solve your problem, contact the after sales support line.
Problem
Possible cause
Solution
The display on the
front panel is not lit.
Cord is unplugged.
Check the mains lead.
Main fuse is blown.
Check the fuse.
Aerial is disconnected.
Check the aerial lead.
No signal found.
Aerial is damaged/misaligned. Check the aerial.
No picture or sound.
The channel is not
broadcasting now.
Select another channel.
Mosaic blocks in
picture or picture
freezes.
Aerial may not be suitable.
Check the aerial.
Scrambled channel
message.
Channel is scrambled.
Select an alternative
channel.
Locked out of the
channel.
Parental control enabled.
Enter your password.
Receiver is not plugged in.
Plug in and turn on the
receiver.
Remote control is not aimed
correctly.
Aim the remote control at
the front panel.
Front panel is obstructed.
Remove obstructions.
Remote control batteries are
inserted incorrectly.
Make sure the batteries
are inserted correctly.
Batteries are exhausted.
Replace the remote
control batteries.
After moving the
receiver to another
room, the HDD PVR
cannot receive the
digital signal.
The aerial feed may now be
reduced due to signal path.
Try a direct feed from the
antenna.
The picture and
sound freezes when
in time-shift mode.
This may happen if you are
recording two different
channels, due to the storage
device speed.
Only enable time-shift
mode when recording
one channel.
No response to the
remote control.
30
After Sales Support
Telephone: 1300 886 649
Email: [email protected]
Technical Specifications
Tuner
Channel
decoding
Video
decoding
Audio
decoding
AV output
Demultiplexer
Input frequency
174~230MHz UHF
474~858Mhz VHF
Bandwidth
7MHz
Input impedance
75 Ohms
Input level
-80 ~ -20 dBm
Waveform
COFDM
Demodulation
QPSK, 16QAM, 64QAM
FEC
1/2, 2/3, 3/4, 5/6, 7/8
Guard
1/4, 1/8, 1/16, 1/32
Mode
2K, 8K
Standard
MPEG-2: MP@ML, MP@HL
MPEG-4: ASP@L5
H.264/AVC: [email protected], [email protected]
VC-1: AP@L3, L2
Aspect ratio
4:3, 16:9
Video format
PAL/NTSC Video
Video resolution
576i/720p/1080i/1080p
Standard
MPEG-1 and -2, layer 1 and 2 MPEG-4
HE-AAC
Output mode
left, right, stereo
Sampling frequency
32, 44.1, 48 KHz
Video de-emphasis
CCIR REC, 405-1, 625 lines
Video bandwidth
5MHz
Video output impedance
75 Ohms
Video output level
1.0 Vp-p
Audio output frequency
20Hz ~ 20KHz
Audio output impedance
Low
Standard
ISO/IEC 13818-1
Input Max. Bit Stream Rate 60Mbps (Serial)/ 7.5Mbps (Parallel)
After Sales Support
Telephone: 1300 886 649
Email: [email protected]
31
Technical Specifications (Cont.)
Rear panel
Front panel/
RCU
Power/
ambient
Accessories
included
HDTV output
HDMI 1.3
ANT input
IEC-type, female
Loop output
IEC-type, male
Video
CVBS YPbPr
Audio
L/R
Digital audio output
coaxial and optical
USB
USB 2.0
IR Receiver
38KHz
Category
IR (Carrier 38KHz)
Battery
2 x 1.5V
Input voltage
AC 100-240V ~ 50/60Hz
Power consumption
25W
Operation temperature
0~40˚C
Antenna loop cable, AV cable, YPbPr cable,
Remote control, 2 x AAA batteries
Responsible disposal
At the end of its working life, do not throw this device out with your household
rubbish. Electrical and electronic products contain substances that can have
a detrimental effect on the environment and human health if disposed of
inappropriately. Observe any local regulations regarding the disposal of electrical
consumer goods and dispose of it appropriately for recycling. Contact your local
authorities for advice on recycling facilities in your area
32
After Sales Support
Telephone: 1300 886 649
Email: [email protected]