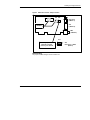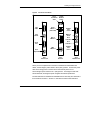
1
174 CEV 200 30
Modicon TSX Momentum
Modbus Plus to Ethernet Bridge
User Guide
890 USE 151 00
31000301 00
03/98
Breite: 185 mm
Höhe: 230 mm
Breite: 178 mm
Höhe: 216 mm
Data, Illustrations, Alterations
Data and illustrations are not binding. We reserve the right to alter products in line with
our policy of continuous product development. If you have any suggestions for
improvements or amendments or have found errors in this publication, please notify us
using the form on one of the last pages of this publication.
Training
Schneider Automation offers suitable further training on the system.
Hotline
See addresses for the Technical Support Centers at the end of this publication.
Trademarks
All terms used in this publication to denote Schneider Automation products are
trademarks of Schneider Automation Incorporated.
All other terms used in this publication to denote products may be registered trademarks
and/or trademarks of the corresponding corporations.
Microsoft and MS-DOS are registered trademarks of Microsoft Corporation, Windows
is a brandname of Microsoft Corporation in the USA and other countries.
IBM is a registered trademark of International Business Machines Corporation.
Intel is a registered trademark of Intel Corporation.
Copyright
All rights are reserved. No part of this document may be reproduced or transmitted in
any form or by any means, electronic or mechanical, including copying, processing or
by online file transfer, without permission in writing by Schneider Automation
Incorporated. You are not authorized to translate this document into any other
language.
ã 1998 Schneider Automation Incorporated. All rights reserved.
Contents
Contents
1.1
1.2
1.3
2.1
2.2
2.3
2.4
2.5
2.6
2.7
2.7.1
2.7.2
2.8
2.8.1
2.8.2
2.9
3.1
3.1.1
3.1.2
3.1.3
3.1.4
3.2
3.2.1
3.2.2
3.3
3.4
3.4.1
3.4.2
3.4.3
3.4.4
3.4.5
890--USE--151--00
Breite: 178 mm
Modbus Plus to Ethernet Bridge
174 CEV 200 30 . . . . . . . . . . . . . . . . . . . . . . . . . . . . . . . . . . . . . . . .
1
Introducing the Ethernet to Modbus Plus Bridge . . . . . . . . . . . . . . . . . . . . . . . .
Bridge Message Transactions and Paths . . . . . . . . . . . . . . . . . . . . . . . . . . . . . .
Specifications . . . . . . . . . . . . . . . . . . . . . . . . . . . . . . . . . . . . . . . . . . . . . . . . . . . . . .
2
4
6
Installing the Bridge Hardware . . . . . . . . . . . . . . . . . . . . . . . . .
9
Overview: Hardware Installation . . . . . . . . . . . . . . . . . . . . . . . . . . . . . . . . . . . . .
Setting the Modbus Plus Node Address . . . . . . . . . . . . . . . . . . . . . . . . . . . . . . .
Setting the Ethernet Connector Jumper . . . . . . . . . . . . . . . . . . . . . . . . . . . . . . . .
Mounting the Bridge Hardware . . . . . . . . . . . . . . . . . . . . . . . . . . . . . . . . . . . . . . .
Connecting the Network and Power Cables . . . . . . . . . . . . . . . . . . . . . . . . . . . .
CE Installation Requirements . . . . . . . . . . . . . . . . . . . . . . . . . . . . . . . . . . . . . . . .
Verifying the Network Communication . . . . . . . . . . . . . . . . . . . . . . . . . . . . . . . . .
Ethernet Card Indicators . . . . . . . . . . . . . . . . . . . . . . . . . . . . . . . . . . . . . . . . . . . . .
Modbus Plus Card Indicators . . . . . . . . . . . . . . . . . . . . . . . . . . . . . . . . . . . . . . . . .
Factory Default Settings . . . . . . . . . . . . . . . . . . . . . . . . . . . . . . . . . . . . . . . . . . . . .
Ethernet Card Defaults . . . . . . . . . . . . . . . . . . . . . . . . . . . . . . . . . . . . . . . . . . . . . .
Modbus Plus Card Defaults . . . . . . . . . . . . . . . . . . . . . . . . . . . . . . . . . . . . . . . . . .
Periodic Maintenance . . . . . . . . . . . . . . . . . . . . . . . . . . . . . . . . . . . . . . . . . . . . . . .
10
12
14
16
18
20
21
21
21
22
22
23
24
Configuring the Bridge . . . . . . . . . . . . . . . . . . . . . . . . . . . . . . . . .
25
Files Supplied With the Bridge . . . . . . . . . . . . . . . . . . . . . . . . . . . . . . . . . . . . . . .
Files Resident in the Bridge . . . . . . . . . . . . . . . . . . . . . . . . . . . . . . . . . . . . . . . . . .
Host Software Disk (31000017) . . . . . . . . . . . . . . . . . . . . . . . . . . . . . . . . . . . . . .
Files Generated or Modified by the Bridge . . . . . . . . . . . . . . . . . . . . . . . . . . . . .
The Software Startup Sequence . . . . . . . . . . . . . . . . . . . . . . . . . . . . . . . . . . . . . .
Overview: Software Configuration . . . . . . . . . . . . . . . . . . . . . . . . . . . . . . . . . . . .
Setting the Ethernet Configuration . . . . . . . . . . . . . . . . . . . . . . . . . . . . . . . . . . . .
Setting the Modbus Plus and TCP/IP Address Mapping . . . . . . . . . . . . . . . . .
Configuration With a BOOTP Server . . . . . . . . . . . . . . . . . . . . . . . . . . . . . . . . . .
Configuration With the CFGUTIL Utility . . . . . . . . . . . . . . . . . . . . . . . . . . . . . . . .
Starting CFGUTIL . . . . . . . . . . . . . . . . . . . . . . . . . . . . . . . . . . . . . . . . . . . . . . . . . .
Navigating the CFGUTIL Menu . . . . . . . . . . . . . . . . . . . . . . . . . . . . . . . . . . . . . . .
Required Configuration Fields . . . . . . . . . . . . . . . . . . . . . . . . . . . . . . . . . . . . . . . .
Additional Configuration Fields . . . . . . . . . . . . . . . . . . . . . . . . . . . . . . . . . . . . . . .
Address Mapping Table Fields . . . . . . . . . . . . . . . . . . . . . . . . . . . . . . . . . . . . . . .
26
26
26
27
27
28
28
28
29
30
30
30
31
31
31
i
Contents
3.4.6
3.5
3.5.1
3.5.2
3.5.3
3.5.4
3.6
3.6.1
3.6.2
3.6.3
3.7
3.8
3.8.1
3.8.2
3.8.3
3.9
3.9.1
3.9.2
3.10
4.1
4.1.1
4.1.2
4.2
4.2.1
4.2.2
5.1
5.1.1
5.2
5.2.1
5.2.2
5.2.3
5.3
5.3.1
5.3.2
5.3.3
ii
Saving the Configuration . . . . . . . . . . . . . . . . . . . . . . . . . . . . . . . . . . . . . . . . . . . .
How Mapping Works: TCP/IP to Modbus Plus . . . . . . . . . . . . . . . . . . . . . . . . .
Destination Indexes 1 ... 249: Mapped Routing . . . . . . . . . . . . . . . . . . . . . . . .
Destination Indexes 0 and 254: Dynamic Message Routing . . . . . . . . . . . . .
Destination Index 255: Bridge Internal Command . . . . . . . . . . . . . . . . . . . . . .
Reserved Destination Indexes . . . . . . . . . . . . . . . . . . . . . . . . . . . . . . . . . . . . . . . .
Setting the Mapping: TCP/IP to Modbus Plus . . . . . . . . . . . . . . . . . . . . . . . . . .
MB+ Mapping Table Layout and Default Entries . . . . . . . . . . . . . . . . . . . . . . . .
Entry Example: MB+ Mapping Table . . . . . . . . . . . . . . . . . . . . . . . . . . . . . . . . . .
Saving the Mapping . . . . . . . . . . . . . . . . . . . . . . . . . . . . . . . . . . . . . . . . . . . . . . . . .
How Mapping Works: Modbus Plus to TCP/IP . . . . . . . . . . . . . . . . . . . . . . . . .
Setting the Mapping: Modbus Plus to TCP/IP . . . . . . . . . . . . . . . . . . . . . . . . . .
TCP Mapping Table Layout and Default Entries . . . . . . . . . . . . . . . . . . . . . . . .
Entry Example: TCP Mapping Table . . . . . . . . . . . . . . . . . . . . . . . . . . . . . . . . . .
Saving the Mapping . . . . . . . . . . . . . . . . . . . . . . . . . . . . . . . . . . . . . . . . . . . . . . . . .
Dynamic Routing of Messages . . . . . . . . . . . . . . . . . . . . . . . . . . . . . . . . . . . . . . .
Setting Up the Bridge for Dynamic Routing . . . . . . . . . . . . . . . . . . . . . . . . . . . .
Using Dynamic Routing . . . . . . . . . . . . . . . . . . . . . . . . . . . . . . . . . . . . . . . . . . . . .
Clearing the Bridge’s Configuration . . . . . . . . . . . . . . . . . . . . . . . . . . . . . . . . . . .
31
32
32
33
33
33
34
34
35
35
36
38
38
39
39
40
40
41
42
Using the Bridge Software . . . . . . . . . . . . . . . . . . . . . . . . . . . . .
43
Bridge Software Contents: SW--MBPE--000 . . . . . . . . . . . . . . . . . . . . . . . . . . .
Bridge Software Disk (31000020) . . . . . . . . . . . . . . . . . . . . . . . . . . . . . . . . . . . . .
Host Software Disk (31000017) . . . . . . . . . . . . . . . . . . . . . . . . . . . . . . . . . . . . . .
Using the Software in Custom Configurations . . . . . . . . . . . . . . . . . . . . . . . . . .
Minimum Requirements for Custom Bridge Configurations . . . . . . . . . . . . . . .
Setting Up a Custom Bridge Configuration . . . . . . . . . . . . . . . . . . . . . . . . . . . . .
44
44
44
45
45
45
Uploading and Downloading Files
.....................
47
Configuring an HTTP Server . . . . . . . . . . . . . . . . . . . . . . . . . . . . . . . . . . . . . . . . .
Configuration Example . . . . . . . . . . . . . . . . . . . . . . . . . . . . . . . . . . . . . . . . . . . . . .
Uploading Files to a Host . . . . . . . . . . . . . . . . . . . . . . . . . . . . . . . . . . . . . . . . . . . .
Upload Overview . . . . . . . . . . . . . . . . . . . . . . . . . . . . . . . . . . . . . . . . . . . . . . . . . . .
Initiating an Upload . . . . . . . . . . . . . . . . . . . . . . . . . . . . . . . . . . . . . . . . . . . . . . . . .
Upload Example . . . . . . . . . . . . . . . . . . . . . . . . . . . . . . . . . . . . . . . . . . . . . . . . . . . .
Downloading Files to the Bridge . . . . . . . . . . . . . . . . . . . . . . . . . . . . . . . . . . . . . .
Download Overview . . . . . . . . . . . . . . . . . . . . . . . . . . . . . . . . . . . . . . . . . . . . . . . . .
Initiating a Download . . . . . . . . . . . . . . . . . . . . . . . . . . . . . . . . . . . . . . . . . . . . . . . .
Download Example . . . . . . . . . . . . . . . . . . . . . . . . . . . . . . . . . . . . . . . . . . . . . . . . .
48
48
50
50
50
51
52
52
52
53
890--USE--151--00
Contents
6.1
6.1.1
6.1.2
6.1.3
6.2
6.2.1
6.3
6.4
6.5
6.5.1
6.5.2
6.6
6.6.1
6.6.2
6.6.3
6.7
6.8
6.9
6.10
6.11
6.12
6.13
6.14
6.15
6.16
6.17
7.1
7.2
8.1
890--USE--151--00
Breite: 178 mm
Diagnostic Tools . . . . . . . . . . . . . . . . . . . . . . . . . . . . . . . . . . . . . . .
55
Diagnostics Overview . . . . . . . . . . . . . . . . . . . . . . . . . . . . . . . . . . . . . . . . . . . . . . .
Logging the Bridge’s Activity . . . . . . . . . . . . . . . . . . . . . . . . . . . . . . . . . . . . . . . . .
Ethernet Diagnostics . . . . . . . . . . . . . . . . . . . . . . . . . . . . . . . . . . . . . . . . . . . . . . . .
Modbus Plus Diagnostics . . . . . . . . . . . . . . . . . . . . . . . . . . . . . . . . . . . . . . . . . . . .
Logging the Bridge’s Activity . . . . . . . . . . . . . . . . . . . . . . . . . . . . . . . . . . . . . . . . .
Notes for Logging . . . . . . . . . . . . . . . . . . . . . . . . . . . . . . . . . . . . . . . . . . . . . . . . . .
TCPINFO . . . . . . . . . . . . . . . . . . . . . . . . . . . . . . . . . . . . . . . . . . . . . . . . . . . . . . . . . .
BDRESET . . . . . . . . . . . . . . . . . . . . . . . . . . . . . . . . . . . . . . . . . . . . . . . . . . . . . . . . .
PING . . . . . . . . . . . . . . . . . . . . . . . . . . . . . . . . . . . . . . . . . . . . . . . . . . . . . . . . . . . . . .
Starting PING at the Bridge . . . . . . . . . . . . . . . . . . . . . . . . . . . . . . . . . . . . . . . . . .
Starting PING at the Host . . . . . . . . . . . . . . . . . . . . . . . . . . . . . . . . . . . . . . . . . . . .
MBPSTAT . . . . . . . . . . . . . . . . . . . . . . . . . . . . . . . . . . . . . . . . . . . . . . . . . . . . . . . . .
Starting MBPSTAT . . . . . . . . . . . . . . . . . . . . . . . . . . . . . . . . . . . . . . . . . . . . . . . . . .
Selecting the Network to be Analyzed . . . . . . . . . . . . . . . . . . . . . . . . . . . . . . . . .
Network Selection Examples . . . . . . . . . . . . . . . . . . . . . . . . . . . . . . . . . . . . . . . . .
Your MBPSTAT Menu . . . . . . . . . . . . . . . . . . . . . . . . . . . . . . . . . . . . . . . . . . . . . . .
Option 1: Set Routing Parameters . . . . . . . . . . . . . . . . . . . . . . . . . . . . . . . . . . . .
Option 2: Monitor Network Activity . . . . . . . . . . . . . . . . . . . . . . . . . . . . . . . . . . .
Option 3: Read Global Data . . . . . . . . . . . . . . . . . . . . . . . . . . . . . . . . . . . . . . . . .
Option 4: Global Data Present Table . . . . . . . . . . . . . . . . . . . . . . . . . . . . . . . . .
Option 5: Node Active Station Table . . . . . . . . . . . . . . . . . . . . . . . . . . . . . . . . . .
Option 6: Node Error Statistics . . . . . . . . . . . . . . . . . . . . . . . . . . . . . . . . . . . . . .
Option 7: Token Station Table . . . . . . . . . . . . . . . . . . . . . . . . . . . . . . . . . . . . . . .
Option 8: Token Owner Work Table . . . . . . . . . . . . . . . . . . . . . . . . . . . . . . . . . .
Option 9: Current Internal Path Transactions . . . . . . . . . . . . . . . . . . . . . . . . . .
Option 10: Node Personality . . . . . . . . . . . . . . . . . . . . . . . . . . . . . . . . . . . . . . . . .
56
56
56
57
58
59
60
60
61
61
61
62
62
62
62
64
65
66
67
68
69
70
71
72
73
74
Message Examples . . . . . . . . . . . . . . . . . . . . . . . . . . . . . . . . . . . .
75
MSTR Example: TCP/IP Node . . . . . . . . . . . . . . . . . . . . . . . . . . . . . . . . . . . . . . .
MSTR Example: Modbus Plus Node . . . . . . . . . . . . . . . . . . . . . . . . . . . . . . . . . .
76
77
NCB Return Codes . . . . . . . . . . . . . . . . . . . . . . . . . . . . . . . . . . . .
79
Network Control Block (NCB) Return Codes . . . . . . . . . . . . . . . . . . . . . . . . . . .
80
Glossary . . . . . . . . . . . . . . . . . . . . . . . . . . . . . . . . . . . . . . . . . . . . . .
81
iii
Modbus Plus to Ethernet Bridge
174 CEV 200 30
H
Introducing the Ethernet to Modbus Plus Bridge
H
Bridge Message Transactions and Paths
H
Specifications
1
1
Modbus Plus to Ethernet Bridge
1.1
Introducing the Ethernet to Modbus Plus Bridge
The Modicon Ethernet to Modbus Plus Bridge provides a transparent multipath
connection between Ethernet host applications and the Modbus Plus industrial
network. The bridge functions as an addressable node on each network,
managing the Ethernet and Modbus Plus protocols and translating messages
between the network applications in both directions.
Ethernet hosts can establish connections to the bridge and send messages
intended for Modbus Plus nodes. The bridge accepts the messages, creates
internal paths for the Modbus Plus transactions, waits for the Modbus Plus token
frame, and forwards the messages to the destination nodes. It receives the data
responses from the Modbus Plus nodes, returns them to the Ethernet hosts, and
closes the paths.
Messages sent to the bridge on either Ethernet or Modbus Plus contain an
embedded Modbus message, consisting of a function code and additional
information such as register addresses and data. The bridge uses the Modbus
function code to determine the type of internal path required for the transaction,
and opens a path if one is available. If a path is not available, a Modbus error
code (exception code) is returned by the bridge to the requesting node.
The bridge provides Modbus Data Master, Data Slave, Program Master, and
Program Slave paths as defined by the Modbus function codes in the messages.
It supports up to eight concurrent Data paths and eight concurrent Program paths.
The bridge supports full five--byte Modbus Plus routing, enabling transactions
through Modicon BP85 Modbus Plus bridges to Modbus Plus nodes on up to three
networks beyond the Ethernet bridge.
Note that Modbus Plus Global Data or Peer Cop messages are not supported
because those types of messages are passed as part of the Modbus Plus token
frame. The token frame is passed among nodes on the local Modbus Plus
network, but is not passed through any bridge devices to other networks.
Figure 1 illustrates a typical bridge connection.
2
Modbus Plus to Ethernet Bridge
Figure 1 Bridge Overview
Ethernet
TCP/IP
Interface
BRIDGE
8 Data Paths
8 Program Paths
Modbus Plus
Interface
Modbus Plus
BP85
Additional
Modbus Plus
Networks
Modbus Plus
Bridge
The bridge maintains two internal mapping tables that provide address mapping
between IP addresses (255.255.255.255) and Modbus Plus path addresses
(64.64.64.64.64). The user can define the mapping at a local keyboard and
monitor connection, using a configuration utility that is stored in the bridge.
Mapping tables can also be downloaded by HTTP from the Ethernet host to the
bridge. If neither method is used, the bridge provides default mapping tables.
The user can assign the bridge’s IP address through a BOOTP server using the
bridge’s MAC address, or locally by means of the bridge’s configuration utility.
The bridge’s Modbus Plus address is assigned in hardware switches on the
bridge’s Modbus Plus card.
The bridge is supplied with brackets for mounting on a vertical panel or horizontal
shelf. Its rear panel has connectors for the networks and for operating power, and
LED indicators for the power, Ethernet and Modbus Plus communication status.
3
Modbus Plus to Ethernet Bridge
1.2
Bridge Message Transactions and Paths
Two types of messages can be initiated to Modbus Plus nodes using Modbus
commands. Programming messages are used for logging into a node and
controlling it, as in load/record/verify operations. Data access messages are used
to read or write data at the node, or to get statistics from the node.
When a message transaction is initiated, a logical path is established between the
originating node and destination node. The path is maintained until the transaction
is completed. The type of path that is set in each device is determined by the
Modbus command embedded in the message.
Table 1 summarizes the four possible types of Modbus Plus paths. The bridge
supports up to eight paths of each type.
Table 1
Modbus Plus Path Types
Path Type
Data Master (DM)
Data Slave (DS)
Program Master (PM)
Program Slave (PS)
Opened in Node
Originator
Destination
Originator
Destination
Opened for Modbus Command
Data access
Data access
Programming
Programming
The maximum amount of concurrent TCP/IP connections available in the bridge is
between 8 and 16, depending on the usage of paths in host applications.
For example, up to 16 data connections can be active between TCP/IP hosts and
Modbus Plus nodes (a maximum of 8 active DM paths and 8 active DS paths). Up
to 16 programming paths can be active (8 PM and 8 PS).
If Modsoft software is being used, it sets both a PM and a DM path in the bridge
for each active connection it maintains to a Modbus Plus destination node.
Modsoft could be running on a single host, or simultaneously on multiple hosts.
Thus up to eight TCP/IP connections can be maintained with Modsoft running on
one to eight hosts.
Table 2 summarizes the Modbus function codes which open DM and DS paths in
the respective nodes. For complete information about Modbus commands, see
the Modbus Protocol Reference Guide, publication PI--MBUS--300.
4
Modbus Plus to Ethernet Bridge
Table 2
Summary of Modbus Data Access Commands
Function Code (Decimal)
1
2
3
4
5
6
7
8 Subfunction 21
15
16
17
Command Name
Read Discrete Output Status (0xxxx)
Read Discrete Input Status (1xxxx)
Read Output Register (4xxxx)
Read Input Register (3xxxx)
Force Single Coil (0xxxx)
Preset Single Register (4xxxx)
Read Exception Status
Get/Clear Network Statistics
Force Multiple Coils (0xxxx)
Preset Multiple Registers (4xxxx)
Report Slave ID
Devices which use the Modbus protocol accept incoming requests for data or
statistics. They reply by returning either a normal or an exception response.
The Modbus function code in the request from an originating node always contains
a most significant bit value of 0 (zero). In a normal Modbus response, the function
code of the originating request is echoed, followed by any requested data or
statistics. In an exception response, the most significant bit is set to 1 (one) to
indicate an error, and the next byte contains an exception code showing the
reason for the error.
Table 3 summarizes the Modbus exception codes which may be returned by the
bridge to the originating node. For further information see the Modbus Protocol
Reference Guide, publication PI--MBUS--300.
Table 3
Summary of Modbus Exception Codes
Exception Code (Hexadecimal)
01
02
03
04
05
06
07
08
09
0A
Meaning
Illegal function
Illegal data address
Illegal data value
Unexpected failure during command execution
ACK ---- Requested operation is in progress
BUSY ---- Not ready to perform requested operation
NAK ---- Requested operation rejected
Could not open Modbus Plus path
Error during Modbus Plus send
Error during Modbus Plus reply
5
Modbus Plus to Ethernet Bridge
1.3
Specifications
Table 4
Power
Input
110 V ac (--15% +10%) 47--63 Hz
Tolerance
94--121 V ac
220 V ac (--15% +10%) 47--63 Hz
187--242 V ac
Current
Inrush 15 A at 115 V ac
Operating 1 A nominal
30 A at 230 V ac
Operating 1 A nominal
The bridge automatically senses the power voltage. There is no user--configured
setup other than ensuring the input voltage is within the specified range.
Table 5
Immunity
Parameter
Radiated Interference
Conducted Interference
Radiated RF Immunity
Radiated RF Impulse
Immunity
Electrostatic Discharge
Reference
EN 55011
EN 55011
EN 50140
IEC 1000--4--3
EN 50140
Component
Enclosure
Enclosure
Enclosure
Limits
Class A
Class A
80...1000 MHz, 10 V/m
Enclosure
900 MHz, 10 V/m
IEC 1000--4--2
Enclosure
Conducted RF Immunity
(Note 1)
Fast Transient Burst
EN 50141
IEC 1000--4--6
IEC 1000--4--4
Surge Transient
EN 50142
IEC 1000--4--5
Voltage Dips / Sag
EN 61000--4--11
Protective Earth
Continuity
IEC 1131,
par. 4.7.2
8 kV air
4 kV contact
Network Lines, 0.15...80 MHz, 10 V rms
Power Lines
Network Lines 1 kV Capacitive Clamp
Power Lines
2 kV Direct
Shield to Gnd 2 kV Common Mode
Power Lines
0.5 kV Common Mode,
1 kV Differential Mode
Power Lines
--30%, 10 ms
--60%, 100 ms
Enclosure to
30 A < 0.1 W
Earth
Hipot
Hipot (0...2 km
altitude)
Network Lines
Power Lines
500 v dc
1780 v dc
Notes
1.
For Network Lines longer than 3 m and permanently connected to the
device.
6
Modbus Plus to Ethernet Bridge
Table 6
Environmental
Parameter
Temperature, Storage
Reference
IEC 68--2--1
IEC 68--2--2
Limits
--25_ C for 96 hrs
+70_ C for 96 hrs
Temperature, Operating
Humidity, Non--operating
IEC 68--2--14
IEC 68--2--3
0...50_ C ambient
95% RH at 50_ C for 24 hrs
non--condensing
Humidity, Operating
IEC 68--2--3
95% RH at 50_ C for 24 hrs
non--condensing
Vibration, Operating
IEC 68--2--6
Shock, Operating
IEC 68--2--27
Free Fall, Packaged
IEC 68--2--32
Free Fall, Unpackaged
IEC 68--2--32
Sinusoidal, 10 sweeps
10...57 Hz: 0.075 mm amplitude
57...150 Hz: 1 g
3 shocks/axis
15 g half sine, 11 ms
1 drop at 1.220 m
5 drops at 0.610 m
2 drops at 0.500 m
Table 7
Packaging
Parameter
Enclosure Material
Weight, Product
Weight, Shipping
Table 8
Agency
UL, CSA
CE
Desription
Steel, baked enamel
9.4 lb (4.3 kg)
10.5 lb (4.8 kg)
Agency Approval
Status
Approved
Meets CE Requirements (see Section 2.6)
7
Installing the Bridge Hardware
H
Overview: Hardware Installation
H
Setting the Modbus Plus Node Address
H
Setting the Ethernet Connector Jumper
H
Mounting the Bridge Hardware
H
Connecting the Network and Power Cables
H
CE Installation Requirements
H
Verifying the Network Communication
H
Factory Default Settings
H
Periodic Maintenance
2
9
Installing the Bridge Hardware
2.1
Overview: Hardware Installation
Here is an overview of the tasks for installing the bridge hardware. The references
are to the sections in this chapter that contain the detailed installation steps.
Setting the Modbus Plus Node Address (Section 2.2)
Before installing the bridge, set its Modbus Plus node address in switches on the
internal Modbus Plus card. The card is accessible by removing the bridge’s cover.
Note that every Modbus Plus node must have a unique address on the network.
The bridge is shipped with the node address set to the default of 1.
Setting the Ethernet Connector Jumper (Section 2.3)
Before installing the bridge, set its internal Ethernet Connector jumper to define
the type of physical cable connection you will be making to the Ethernet. The
bridge has these Ethernet connectors:
H
IEEE 802.3 10Base--T unshielded twisted pair cable (UTP RJ--45)
H
IEEE 802.3 10Base--5 thick cable (AUI DB--15S)
H
IEEE 802.3 10Base--2 thin cable (BNC).
The Ethernet Connector jumper has two positions:
H
Position 1: RJ--45/BNC connection
H
Position 2: AUI connection.
The bridge is shipped with the jumper set to the default RJ--45/BNC position.
Mounting the Bridge Hardware (Section 2.4)
The bridge can be physically installed on a vertical wall panel or horizontal shelf
using mounting brackets supplied with the bridge. Be sure to provide clearance
for ventilation and access to the bridge’s rear panel connectors and indicators.
Connecting the Network and Power Cables (Section 2.5)
Connect the Ethernet and Modbus Plus cables to the bridge’s rear panel. Connect
the power cable and apply power. The bridge has these connectors:
10
H
Ethernet: RJ--45, AUI or BNC (according to your Connector Jumper setting).
H
Modbus Plus: Two DB--9S for dual Modbus Plus drop cables.
H
Power: Three--prong 110/220 V ac connector.
Installing the Bridge Hardware
CE Installation Requirements (Section 2.6)
If the bridge is being installed at a site that must meet CE requirements, and the
10Base--T (RJ--45) connector is being used, a ferrite bead must be installed on the
Ethernet cable at the RJ--45 connector.
Verifying the Network Communication (Section 2.7)
Check the Ethernet and Modbus Plus LEDs to verify operation of the bridge.
11
Installing the Bridge Hardware
2.2
Setting the Modbus Plus Node Address
Do not apply power to the bridge yet. Remove the four screws securing the
enclosure cover, and remove the cover.
Figure 2 Bridge Enclosure Screws
Remove
Screws
Remove
Screws
Locate the Modbus Plus card as outlined in Figure 3. Note that there are two sets
of switches on the card. The Modbus Plus address switches are toward the
bridge’s cable connector panel.
Figure 3 Bridge Top View (Cover Removed)
Switch Detail
Modbus Plus
Address Switches
I/O Base Address
DO NOT CHANGE
Modbus Plus Card
Ethernet Card
CPU Card
Cable Connector Panel
12
Installing the Bridge Hardware
The bridge is shipped with the switches set of a default address of 1 (all switches
in the 0 (zero) position, closest to the card surface).
Set the Modbus Plus address switches 1--6 to the address in your application.
Switches 7 and 8 are not used.
Switch 1 is the least significant bit of the address. Switch 6 is the most significant
bit. The address will be one higher than the binary value you set into the switches.
Table 9 shows the addresses and switch settings.
Table 9
Address
1
2
3
4
5
6
7
8
9
10
11
12
13
14
15
16
17
18
19
20
21
22
Modbus Plus Addresses and Switch Settings
Switches 6--1
000000
000001
000010
000011
000100
000101
000110
000111
001000
001001
001010
001011
001100
001101
001110
001111
010000
010001
010010
010011
010100
010101
Address
23
24
25
26
27
28
29
30
31
32
33
34
35
36
37
38
39
40
41
42
43
44
Switches 6--1
010110
010111
011000
011001
011010
011011
011100
011101
011110
011111
100000
100001
100010
100011
100100
100101
100110
100111
101000
101001
101010
101011
Address
45
46
47
48
49
50
51
52
53
54
55
56
57
58
59
60
61
62
63
64
Switches 6--1
101100
101101
101110
101111
110000
110001
110010
110011
110100
110101
110110
110111
111000
111001
111010
111011
111100
111101
111110
111111
Default Setting
The default setting of the address switches is shown in Section 2.8.
13
Installing the Bridge Hardware
2.3
Setting the Ethernet Connector Jumper
Do not apply power to the bridge yet. The bridge has three types of Ethernet
connectors:
H
IEEE 802.3 10Base--T UTP cable (RJ--45)
H
IEEE 802.3 10Base--5 thick cable (AUI)
H
IEEE 802.3 10Base--2 thin cable (BNC)
A jumper on the Ethernet card defines the connector to be used. The bridge is
shipped with the jumper set to the default RJ--45/BNC position.
If you intend to use either the RJ--45 or BNC connection, you do not need to
change the jumper position. Continue to the next section in this book.
If you intend to use the AUI connection, you must change the jumper from position
1 to position 2. Remove the Ethernet card, change the jumper, and re--install the
card. Figure 4 shows the jumper location.
14
Installing the Bridge Hardware
Figure 4 Ethernet Connector Jumper Location
SW1
JP1 JP2
UTP RJ--45
(10Base--T)
DO NOT
CHANGE
AUI
(10Base--5)
BNC
(10Base--2)
JP2
Set this jumper for the
Ethernet connector
used on your network
2
1
AUI
UTP RJ--45 or BNC
(Default)
Default Setting
The jumper’s default setting is shown in Section 2.8.
15
Installing the Bridge Hardware
2.4
Mounting the Bridge Hardware
Replace the bridge enclosure cover. Do not apply power to the bridge yet.
The bridge is supplied with two mounting brackets. Install them on the bridge’s
side or bottom panel as shown in Figure 5, using the screws provided.
If you use your own hardware, use 6--32 machine screws and do not allow any
screw to protrude more than 1/4 in (6 mm) into the bridge.
Secure the bridge to a vertical panel or horizontal shelf with screws through the
mounting bracket holes.
Mounting Requirements
Provide adequate service access to the rear panel LEDs and cable connectors.
Also note the requirements for venting clearances as shown in Figure 6.
Figure 5 Mounting Dimensions
164 mm
164 mm
Side
Panel
Mounting
Bottom
Panel
Mounting
243
mm
138 mm
Do not allow screws to protrude more than 1/4 in (6 mm) inside Bridge.
16
Installing the Bridge Hardware
Figure 6 Enclosure Dimensions and Clearances
122 mm
Vents
229 mm
Vents
For proper ventilation, maintain minimum clearance of 5.0 in (125 mm)
between all vents and all external equipment.
248 mm
Vents
229 mm
17
Installing the Bridge Hardware
2.5
Connecting the Network and Power Cables
Before connecting the power cable, connect the Ethernet and Modbus Plus
network cables. Refer to the rear panel layout in Figure 7 and the panel detail in
Figure 8 for locations of the connectors.
For information about Modbus Plus network design, including the availability of
drop cables for connection to the bridge, refer to the Modbus Plus Network
Planning and Installation Guide, publication 890 USE 100 00.
See your Ethernet network administrator for information about the Ethernet cables
and connectors applicable to your installation.
Figure 7 Rear Panel Layout
Power LED
Connector Panel
(see detail)
Power Switch
AC Power
Connector
18
Installing the Bridge Hardware
Figure 8 Connector Panel Detail
RJ--45
Connection
Valid
VGA
Video
TCP/IP
Network
Active
RJ--45
10Base--T
(UTP cable)
PS/2
Mouse
Modbus
Plus
Port B
MB Plus
Active
DB--15
10Base--5
Error
Channel B
Error
Channel A
Serial
Port
Modbus
Plus
Port A
BNC
10Base--2
PS/2
Keyboard
Slot 1
Accessories
Slot 2
Ethernet
Slot 3
Modbus Plus
When you have completed the connection of the Ethernet and Modbus Plus
cables, set the bridge’s power switch to the 0 (OFF) position. Connect the power
cable to the bridge power connector and to the external power source.
Set the bridge’s power switch to the 1 (ON) position. The bridge’s Power LED
should illuminate, showing that power is applied and within specification.
The LED indicators for the Ethernet and Modbus Plus cards may also illuminate if
those networks are active. Section 2.7 describes the network LED indicators.
19
Installing the Bridge Hardware
2.6
CE Installation Requirements
If the bridge is being installed at a site that must meet CE requirements, the
following steps must be taken to complete the installation.
Grounding
The bridge must be provided with a direct ground connection of 0.1 ohm or less.
Mounting the bridge on a suitably grounded panel as described in Section 2.4
satisfies this requirement.
In addition the Modbus Plus cable must be grounded to the panel using the ground
wire that is integral to the cable.
Ferrite Bead on RF--45 Cable
If the Ethernet network is being connected to the 10Base--T (RJ--45) connector, an
approved ferrite bead must be installed on the cable at the connector.
The approved bead shown in Figure 9 and in Table 10 is enclosed in a plastic box
which can be clipped over the network cable. It is not necessary to insert the
cable through the bead before you install the RJ--45 connector on the cable.
Figure 9 Ferrite Bead on RJ--45 Cable (CE Requirement)
Cable Tie
prevents bead
from slipping
Ferrite Bead
12 mm
28A2029--0A0
22 mm
Table 10
Approved Ferrite Bead
Manufacturer
(or Equivalent)
Steward
20
32 mm
Location and
Telephone
Livingston, Scotland, UK
0044--1--506--414--200
Part Number
28A2029--0A0
Installing the Bridge Hardware
2.7
Verifying the Network Communication
Refer to Figure 8 for the locations of the bridge’s indicators.
2.7.1
Ethernet Card Indicators
The Ethernet card has an indicator that shows a valid connection between the
card’s RJ--45 (UTP) jack and the network. It has another indicator which flashes
to show’s the bridge’s communication activity on the Ethernet link.
Table 11
Ethernet Card Indicators
Indicator (Green)
RJ--45 Connection Valid
TCP/IP Network Active
2.7.2
Status
Valid connection exists at RJ--45 port.
Bridge is actively communicating TCP/IP.
Modbus Plus Card Indicators
The Modbus Plus card has an indicator that flashes a repetitive pattern to show its
network communication status, plus two indicators which identify communication
errors on the two Modbus Plus cable paths. Note that one error indicator will be lit
normally in single--cable installations, showing that a second cable does not exist.
Table 12
Modbus Plus Active Indicator Patterns
Indicator Pattern (Green)
Six flashes/second
One flash/second
Two flashes, then OFF for 2 seconds
Three flashes, then OFF for 1.7 seconds
Four flashes, then OFF for 1.4 seconds
Table 13
Status
Normal operating state. All nodes on a
healthy network flash this pattern.
The node is off-line. After being in this state
for 5 seconds, the node attempts to go to its
normal operating state.
The node detects the network token being
passed among other nodes, but it never
receives the token.
The node does not detect any token passing
on the network.
The node has detected another node using
the same address.
Modbus Plus Channel Error Indicators
Indicator (Red)
Error Channel A
Error Channel B
Status
Communications error at network port A.
Communications error at network port B.
21
Installing the Bridge Hardware
2.8
Factory Default Settings
This information is provided to allow the installer to restore the factory default
settings, in case one of them is altered inadvertently.
2.8.1
Ethernet Card Defaults
The only user--configurable setting on the card is in jumper JP2 for selecting the
Ethernet connector. This must be set for the connector you are using. Defaults
are shown in Figure 10.
Figure 10 Ethernet Card Defaults
SW1
JP1 JP2
UTP
(10Base--T)
AUI
(10Base--5)
BNC
(10Base--2)
SW1
JP1
JP2
3
2
1
Do Not change
these
switches
Do Not change
this
jumper
2
1
Set this jumper for the
Ethernet connector
used on your network:
2 = AUI
1 = UTP/BNC (Default)
22
Installing the Bridge Hardware
2.8.2
Modbus Plus Card Defaults
This card contains two sets of switches. As you view the card at its top edge, the
I/O Base Address switches are located nearest to the end of the card. These
switch settings should not be changed.
The only user--configurable setting on the card is in the Modbus Plus Address
switches. These must be set to the Modbus Plus node address that will be used
by the bridge in your application (see section 2.2 for details).
Factory default settings are shown in Figure 11.
Figure 11 Modbus Plus Card Defaults
I/O Base
Address Switches
Modbus Plus
Address Switches
Card
Edge
Do Not change
these
switches
Set these switches to the
Modbus Plus address
for the bridge
23
Installing the Bridge Hardware
2.9
Periodic Maintenance
Periodic maintenance consists of cleaning of the bridge’s two internal air filters.
This should be done at least once per year, and more often as required by the
bridge’s environment.
Figure 12 Location of Air Filters
Upper
Air Filter
(behind Vent)
Remove 2 screws,
remove power supply
to clean
Lower Filter
Lower
Air Filter
(behind Vent)
Cleaning the Filters
You will have to remove operating power to the bridge before cleaning the filters.
Contact your network administrator and make sure your application will not be
adversely affected. Then remove power to the bridge.
Remove the filters, clean them with a detergent solution suitable for your site, and
reinstall them. The filter locations are described below.
Upper Filter
Remove the four screws securing the bridge’s enclosure cover, and remove the
cover. The upper filter is accessible behind the bridge’s front panel.
Lower Filter
Remove the two screws securing the bridge’s power supply, and move the supply
away from the rest of the bridge assembly. The lower filter is accessible behind
the power supply’s front panel.
24
Configuring the Bridge
H
Files Supplied With the Bridge
H
Overview: Software Configuration
H
Configuration With a BOOTP Server
H
Configuration With the Internal CFGUTIL Utility
H
How Mapping Works: TCP/IP to Modbus Plus
H
Setting the Mapping: TCP/IP to Modbus Plus
H
How Mapping Works: Modbus Plus to TCP/IP
H
Setting the Mapping: Modbus Plus to TCP/IP
H
Dynamic Routing of Messages
H
Clearing the Bridge’s Configuration
3
25
Configuring the Bridge
3.1
Files Supplied With the Bridge
The bridge is shipped with its application software pre--installed. A Host Software
disk is provided containing files for managing the bridge application at a host PC.
3.1.1
Files Resident in the Bridge
These files are pre--installed and resident in the bridge:
Table 14
Files Resident in the Bridge
File
COMMAND.COM
AUTOEXEC.BAT
CONFIG.SYS
GATELOOP.BAT
SGATE.EXE
BDRESET.EXE
MBPHOST.SYS
CFGUTIL.EXE
CFGUTIL.HLP
MBPSTAT.EXE
PING.EXE
TCPINFO.EXE
WATTCP.CFG
PNPPD.COM
3.1.2
Purpose
DOS command interpreter
Startup at bridge initialization
Startup at bridge initialization
Runs the bridge application
Bridge application program
Initializes the Modbus Plus card
Driver for the Modbus Plus card
Configures the bridge IP setup, MB+ and TCP mapping
Help screen for CFGUTIL.EXE
Diagnostic tool for the Modbus Plus network connection
Diagnostic tool for the Ethernet network connection
Diagnostic tool for BOOTP server communication
Contains the bridge’s IP setup and network parameters
Ethernet packet driver
Host Software Disk (31000017)
The bridge is supplied with one 3.5--inch (1.44 MB) disk, with files for configuring
the bridge at a host PC and downloading the configuration to the bridge. The disk
contains these files:
Table 15
Files on Host Software Disk
File
CFGUTIL.EXE
CFGUTIL.HLP
DWNLD.EXE
README
26
Purpose
Configures the bridge IP setup, MB+ and TCP mapping
Help screen for CFGUTIL.EXE
Download program for host
Text file with current release information and application notes
Configuring the Bridge
3.1.3
Files Generated or Modified by the Bridge
When the bridge is configured using the CFGUTIL program, it writes ASCII text
files that record the bridge’s current configuration and network mapping. The files
are retained in the bridge and referenced for configuration on subsequent startups.
Table 16
Files Generated or Modified by the Bridge
File
RTE.CFG
WATTCP.CFG
RTE.OLD
WATTCP.OLD
Purpose
Contains the bridge’s MB+ and TCP mapping
Contains the bridge’s IP setup and network parameters
Contains the RTE.CFG version prior to the last write
Contains the WATTCP.CFG version prior to the last write
These files can be uploaded and stored in a host. They can be downloaded to
restore a bridge’s configuration. Sections 5.2 and 5.3 describe these procedures.
Note that RTE.CFG must be renamed to RTE.TXT prior to downloading.
Figure 13 Sample File Contents: RTE.CFG (or RTE.TXT) and WATTCP.CFG
Sample: RTE.CFG or RTE.TXT
mbp_1=1.0.0.0.0
mbp_2=2.0.0.0.0
mbp_3=1.0.0.0.0
mbp_4=2.0.0.0.0
...
mbp_249=3.2.57.0.0
tcp_1=205.167.7.1
tcp_2=205.167.7.2
tcp_3=205.167.7.3
tcp_4=205.167.7.4
...
tcp_255=205.167.7.255
3.1.4
Sample: WATTCP.CFG
my_ip=205.167.7.65
ip_address=205.167.7.65
netmask=255.255.255.0
nameserver=205.167.7.2
gateway=205.167.7.2
domainslist=mydomain.com
idle_timeout=300
The Software Startup Sequence
On power--up the bridge software performs the following sequence.
H
CONFIG.SYS loads the Modbus Plus driver MBPHOST.SYS.
H
AUTOEXEC.BAT calls GATELOOP.BAT.
H
GATELOOP.BAT executes BDRESET.EXE, initializing the Modbus Plus card.
H
GATELOOP.BAT executes the Ethernet driver program PNPPD.COM.
H
GATELOOP.BAT executes the bridge application program SGATE.EXE.
27
Configuring the Bridge
3.2
Overview: Software Configuration
Here is an overview of the tasks for configuring the bridge. The references are to
the sections of this guidebook that show the detailed installation steps.
3.2.1
Setting the Ethernet Configuration
Configure the bridge’s IP address and other Ethernet parameters to allow your
host application to recognize the bridge.
Configuration With a BOOTP Server (Section 3.3)
If a BOOTP server exists, configure the server to recognize the bridge. When the
bridge is initially powered up, it will attempt for 30 seconds to connect to a BOOTP
server. If the server is found, the bridge will automatically configure for the
Ethernet connection. Note that you will still have to set up the mappings between
Ethernet and Modbus Plus devices, or you can create a host file for centralized
mapping which you can download.
Configuration With the CFGUTIL Utility (Section 3.4)
If a BOOTP server is not available, you can use the internal CFGUTIL program to
configure the bridge. Connect a keyboard and VGA monitor to the bridge, start the
utility, and use it to setup the bridge’s IP and gateway addresses, and subnetwork
mask.
3.2.2
Setting the Modbus Plus and TCP/IP Address Mapping
Setup your bridge’s mapping tables to control the flow of traffic through the bridge.
Your mappings define the routing destinations for messages received by the
bridge on one network and passed through it to destinations on the other network.
Setting the Mapping: TCP/IP to Modbus Plus (Sections 3.5 and 3.6)
Messages received by the bridge over TCP/IP contain a Destination Index
address byte in the range 1 ... 249 decimal. This byte corresponds to the
dest_idx field in Modbus Application Protocol commands issued in Modicon
panel software such as Concept and Modsoft. The bridge maps this byte to one of
249 possible Modbus Plus node destinations. You define the Modbus Plus node
address to be associated with each Destination Index byte value.
Setting the Mapping: Modbus Plus to TCP/IP (Sections 3.7 and 3.8)
Messages received by the bridge over Modbus Plus contain a routing byte in the
range 1 ... 255 decimal (the dest_idx field). The bridge maps this byte to one of
255 IP destinations. You define the IP address to be associated with each
Modbus Plus routing byte value.
28
Configuring the Bridge
3.3
Configuration With a BOOTP Server
If a BOOTP server is available, you can use it to configure the bridge remotely.
You will need the MAC address of the bridge. The MAC address is marked on a
label on the bridge’s rear panel. Note the address and give it to your server
system administrator.
Use the BOOTP server to associate the bridge’s MAC address with a unique IP
address and assign it to the bridge.
If you want the bridge to use a centralized mapping file for mapping TCP/IP and
Modbus Plus addresses, provide the Uniform Resource Locator (URL) to the file
RTE.TXT in the root path option (option 17) of the BOOTP server.
The URL format is:
//<host_name>/rte.txt
Examples:
//user.modicon.com/rte.txt
//205.167.7.0/rte.txt
29
Configuring the Bridge
3.4
Configuration With the CFGUTIL Utility
If a BOOTP server is not available, you can configure the bridge locally using its
internal CFGUTIL.EXE utility.
Set the bridge power switch to 0 (OFF). Refer to the connector panel detail in
Figure 8 and connect a keyboard and VGA monitor to the bridge. Then set the
bridge power to 1 (ON).
3.4.1
Starting CFGUTIL
Press Ctrl--C to stop the bridge application. This will display the bridge’s
command line prompt. Enter CFGUTIL to start the utility.
Here is an example of the opening menu in CFGUTIL.
Figure 14 CFGUTIL Opening Menu
3.4.2
Navigating the CFGUTIL Menu
Use your Tab key, or Shift and Tab, to select a field for editing. F2 displays Help.
Note the six configuration fields at the left side of the menu. You should configure
these fields first, before setting up the MB+ and TCP mapping fields. Refer to
Sections 3.4.3 and 3.4.4 for details.
30
Configuring the Bridge
3.4.3
Required Configuration Fields
The following two fields require your entries for the bridge to function properly.
Contact your Ethernet network administrator to obtain this information:
3.4.4
H
IP Address
H
Net Mask
Additional Configuration Fields
These four fields may be optional or required, according to your application.
Contact your Ethernet network administrator to obtain this information:
H
Name Server
H
Gateway
H
Domain
H
Idle Timeout
Idle Timeout: The bridge provides a default value of 300 seconds (5 minutes).
This value specifies the amount of time the bridge will maintain Data Master and
Data Slave paths open without active data transfers. If this time elapses, all Data
paths will be closed. You can retain the default value or enter a new one.
3.4.5
Address Mapping Table Fields
Note the MB+ and TCP mapping fields at the center and right side of the menu.
The bridge will use these mappings to forward messages between the networks.
Refer to Sections 3.5 and 3.7 for details on setting the mapping fields.
3.4.6
Saving the Configuration
When you finish configuring the bridge for your application, press Escape. You will
be prompted:
Write files to disk?
Enter Y to save the configuration. Two files will written into the bridge’s root
directory. The TCP/IP configuration will be written to the file C:\WATTCP.CFG.
The MB+ and TCP address mapping tables will both be written to C:\RTE.CFG.
You can now use the bridge in your application.
31
Configuring the Bridge
3.5
How Mapping Works: TCP/IP to Modbus Plus
Each Modbus Plus message destination is defined by a five--byte Modbus Plus
routing path. The use of the path is specific to each type of Modbus Plus device.
Refer to the guidebooks supplied with your Modbus Plus devices for details, or
refer to the Modbus Plus Network Planning and Installation Guide, part number
890 USE 100 00, for a general description of Modbus Plus routing paths.
Messages received by the bridge from Ethernet host nodes contain an embedded
Destination Index byte in the range 1 ... 255 decimal. This byte corresponds to the
dest_idx field in messages constructed by Modicon panel software such as
Modsoft and Concept.
The bridge uses the Destination Index byte to determine the type of routing to be
made.
3.5.1
Destination Indexes 1 ... 249: Mapped Routing
The bridge uses Destination Indexes 1 ... 249 to map messages from a TCP/IP
node to a Modbus Plus destination node.
The bridge maps Destination Indexes in this range to one of 249 possible Modbus
Plus routing paths. Each Destination Index value maps to a location in a Modbus
Plus mapping table, which contains a five--byte Modbus Plus routing path to the
destination node.
Your configuration of the bridge must include entries into the bridge’s mapping
table to correlate the Destination Indexes to your routing paths for Modbus Plus
nodes in your application.
Section 3.6 describes how to set up the TCP/IP to Modbus Plus mapping table.
32
Configuring the Bridge
3.5.2
Destination Indexes 0 and 254: Dynamic Message Routing
The bridge provides a means for dynamic routing of messages at runtime.
Dynamic routing applies only to messages initiated from TCP/IP hosts, and
requires the host to configure the bridge at runtime (to Destination Index 255).
You should be aware of your options for using dynamic routing in your application,
as you setup your mapped routings. Two Destination Indexes are reserved for
routing messages dynamically: 0 and 254 decimal. Your options are:
H
Destination Index 0: Host--based routing A Modbus Plus routing path is
available in the bridge at index location 0 for runtime use by TCP/IP hosts.
When the host configures a path in the bridge, any message from that host
addressed to index 0 will be routed to that Modbus Plus path. The bridge
maintains a cache of up to 10 associations between TCP/IP hosts and
Modbus Plus paths.
This routing option allows the bridge to be configured for simple addressing
to Modbus Plus from TCP/IP nodes which do not support gateway routing.
H
Destination Index 254: Socket--based routing A Modbus Plus routing
path is available in the bridge at index location 254 for the current TCP/IP
host connection only. The bridge maintains one socket connection at that
index location for each of its eight Program and eight Data paths.
This routing option allows the bridge to handle concurrent sessions from one
TCP/IP host, or from multiple hosts, using independent routing assignments.
It provides flexibility for your application to manage routing dynamically, in
addition to the bridge’s fixed mapping table.
Section 3.9 provides examples of dynamic routing.
3.5.3
Destination Index 255: Bridge Internal Command
Messages received by the bridge addressed to Destination Index 255 cause the
bridge to execute an internal operation. This index is used to configure the bridge
for dynamic routing, or to invoke an upload or download operation between the
host and bridge.
Section 3.9 provides examples of dynamic routing. Sections 5.2 and 5.3 provide
examples of uploading and downloading.
3.5.4
Reserved Destination Indexes
Destination Indexes 250 ... 253 are reserved and are not available for use.
33
Configuring the Bridge
3.6
Setting the Mapping: TCP/IP to Modbus Plus
As you design your application you should define a Destination Index value
(1 ... 249) for each Modbus Plus node to which your Ethernet host will originate
messages. Edit the bridge’s mapping table to correlate each Destination Index
value to the five--byte routing path for the intended Modbus Plus node.
3.6.1
MB+ Mapping Table Layout and Default Entries
The MB+ Mapping table contains 249 fields, labeled MBP_1 through MBP_249.
These fields define Modbus Plus routing paths for messages from TCP/IP hosts
which contain Destination Indexes 1 through 249 decimal.
The bridge is shipped with default Modbus Plus routing paths for Destination
Indexes as shown in Table 17.
Table 17
TCP/IP to Modbus Plus Default Mapping
Destination Index (dest_idx)
1 ... 64
65 ... 128
129 ... 192
193 ... 249
Modbus Plus Routing Path
1.0.0.0.0 ... 64.0.0.0.0
2.1.0.0.0 ... 2.64.0.0.0
3.1.0.0.0 ... 3.64.0.0.0
3.2.1.0.0 ... 3.2.57.0.0
For example, the default entry in field MBP_1 specifies that TCP/IP messages
intended for dest_idx value 1 will be routed to Modbus Plus node 1 on the local
Modbus Plus network (the same network that contains the bridge).
Figure 15 shows an example of the bridge’s default mapping, with one custom
entry made by the user.
34
Configuring the Bridge
Figure 15 Example: TCP/IP to Modbus Plus Mapping
Use your Tab key to select the MB+ Mapping table. Use your cursor ‘arrow’ keys,
Page Up, and Page Down to scroll through the table. F2 displays Help.
3.6.2
Entry Example: MB+ Mapping Table
In Figure 15, entry MBP_3 shows an example of custom routing to the Modbus
Plus path 35.10.0.0.0. In this example, incoming TCP.IP messages containing
dest_idx value 3 will cause the bridge to index into table location 3, and to use
these contents for routing the message to Modbus Plus. Messages will be routed
through a Bridge Plus node at address 35 on the local Modbus Plus network, and
forwarded to a destination node at address 10 on a second network.
3.6.3
Saving the Mapping
When you finish setting up the mapping fields for your application, press Escape.
You will be prompted:
Write files to disk?
Enter Y to save the configuration. Two files will written into the bridge’s root
directory. The TCP/IP configuration will be written to the file C:\WATTCP.CFG.
The MB+ and TCP address mapping tables will both be written to C:\RTE.CFG.
You can now use the bridge in your application.
35
Configuring the Bridge
3.7
How Mapping Works: Modbus Plus to TCP/IP
The bridge contains an internal Modbus Plus to TCP mapping table with 255 entry
fields, each containing an IP address. Each message received by the bridge from
a Modbus Plus node contains a five--byte routing path field as shown in Figure 16.
Figure 16 Format of the Modbus Plus Routing Path Field
Byte:
1
2
3
4
5
Bridge
Node
Address
Bridge
Path
First IP
Routing
Byte
MB+ Table
Routing
Byte
Last
Routing
Byte
1 ... 64
1 ... 8
1 ... 255
1 ... 249
(Not Used)
REQUIRED
Defines index into this bridge’s
TCP Mapping table, and routes
message to the IP destination
stored in that table location.
OPTIONAL
If IP destination is another
TCP/IP--MB+ bridge, this byte
routes message to the MB+
node address in that bridge’s
MB+ Mapping table.
Bytes 1 and 2. Bridge Node Address and Path
The first byte in a message initiated from a Modbus Plus node to the bridge
addresses the bridge. The second byte opens a path within the bridge.
Byte 3. First Bridge’s IP Routing
The third byte corresponds to the dest_idx field in Modbus commands. This
byte indexes the bridge’s TCP Mapping table. The bridge extracts the IP address
at that table location and forwards the message to the IP destination.
Byte 4. Second Bridge’s Modbus Plus Routing
Byte 4 allows the Ethernet network to operate as a link between two or more
bridges and their respective Modbus Plus networks. If the IP destination (from the
byte 3 table index) is not another bridge, the fourth byte is not used.
If the IP destination is another bridge, that bridge uses the fourth byte to index into
its MB+ Mapping table. It will extract a Modbus Plus routing path from the table
and forward the message to a destination node on its own Modbus Plus network.
36
Configuring the Bridge
Figure 17 shows an example of the mapping of a message between two
Modbus Plus nodes through a pair of Ethernet bridges.
Figure 17 Example: Linking Modbus Plus Networks Through Ethernet Bridges
Ethernet
IP: 205.167.8.10
Bridge
1
Node 25
B
TCP
Map Entry:
Bridge
2
TCP_17: 205.167.8.10
Modbus
Plus
A
Routiing: 25.8.17.33.0
Originating
Node
C
Modbus Plus
Map Entry:
MBP_33: 12.0.0.0.0
Modbus
Plus
D
Node 12
Destination
Node
A. The Message is Originated
A Modbus Plus node originates a message with the five--byte Modbus Plus path
25.8.17.33.0. The message is addressed to the bridge at node address 25,
specified in the first routing byte.
Bridge 1 (node 25) receives the message and opens its internal path 8. This path
is specified in the second routing byte.
B. Bridge 1 Maps the Message to TCP/IP
Bridge 1 indexes into its TCP Mapping table at location TCP_17, specified by the
third routing byte. Location 17 contains the IP address 205.167.8.10. The bridge
forwards the message to this IP address, a second bridge.
C. Bridge 2 Maps the Message to Modbus Plus
Bridge 2 receives the message and indexes into its Modbus Plus Mapping table at
location MBP_33, specified by the fourth byte of routing in the original message.
Location 33 contains the Modbus Plus routing path 12.0.0.0.0 to a node on the
Modbus Plus network at Bridge 2.
D. The Message is Delivered
The message is delivered to the destination node 12 on the Modbus Plus network.
The node acts upon the Modbus command embedded in the message.
37
Configuring the Bridge
3.8
Setting the Mapping: Modbus Plus to TCP/IP
Each message from a Modbus Plus node contains a five--byte routing path field
(See Section 3.7). The bridge uses the third byte to index into its TCP Mapping
table, extracting an IP address from that entry.
You can edit the table to map the Modbus Plus routing path’s third byte to specific
IP addresses in your application.
3.8.1
TCP Mapping Table Layout and Default Entries
The TCP Mapping table contains 255 fields, labeled TCP_1 through TCP_255.
These fields define IP addresses for messages (from Modbus Plus nodes) which
contain 1 through 255 decimal in byte 3 of the Modbus Plus message routing path.
By default the bridge automatically sets the first three bytes of each IP address to
match the first three bytes of the bridge’s IP address. (See Figure 14 and Section
3.4.3 for an example of configuring the bridge’s IP address.) The bridge sets the
fourth byte of the IP address mapping to the range 1 ... 255.
For example, if you configure the bridge’s IP address as:
205.167.7.65
the TCP Mapping table’s 255 locations will automatically default to:
TCP_1:
TCP_2:
...
TCP_255:
205.167.7.1
205.167.7.2
...
205.167.7.255
Figure 18 shows an example of typical default TCP mapping, with one custom
routing entry made by the user.
38
Configuring the Bridge
Figure 18 Example: Modbus Plus to TCP/IP Mapping
Use your Tab key to select the TCP Mapping table. Use your cursor ‘arrow’ keys,
Page Up, and Page Down to scroll through the table. F2 displays Help.
3.8.2
Entry Example: TCP Mapping Table
In Figure 18, location TCP_10 shows an example of an entry for custom routing.
Note that location TCP_10 is indexed by the bridge when it receives a message
from a Modbus Plus node with contents 10 in the Modbus Plus routing path byte 3.
The bridge extracts the IP address 205.167.99.99 at the table location, and routes
the message to that IP address.
3.8.3
Saving the Mapping
When you finish setting up the mapping fields for your application, press Escape.
You will be prompted:
Write files to disk?
Enter Y to save the configuration. Two files will written into the bridge’s root
directory. The TCP/IP configuration will be written to the file C:\WATTCP.CFG.
The MB+ and TCP address mapping tables will both be written to C:\RTE.CFG.
You can now use the bridge in your application.
39
Configuring the Bridge
3.9
Dynamic Routing of Messages
In addition to the mapped routing of messages from TCP/IP to Modbus Plus,
messages can be dynamically routed in this direction at runtime. Dynamic routing
is available only to connections initiated fromTCP/IP.
The bridge reserves three Destination Indexes for dynamic routing. A TCP/IP host
node uses index 255 to set the bridge for two kinds of dynamic routing from that
host. Then the host uses indexes 0 (zero) or 254 to dynamically route messages.
Index 0 provides Host--based routing for up to 10 TCP/IP hosts concurrently.
Index 254 provides Socket--based routing for the duration of the host connection.
3.9.1
Setting Up the Bridge for Dynamic Routing
You must setup the bridge for dynamic routing before you can use it. Note that
dynamic routing is implemented at runtime and is not part of the bridge’s internal
configuration.
To setup the bridge for dynamic routing, address the bridge using its Destination
Index for an internal bridge command (255). Write the Modbus Plus destination
node’s five--byte routing path as data into one of these registers:
H
Register 1 for Host--based routing
H
Register 255 for Socket--based routing.
The data portion of the write command must contain three words in the form:
<byte_count><5-byte_Modbus_Plus_path>
Example
The following example sets up a Host--based routing to a Modbus Plus node
destination on the routing path 30.18.9.37.2:
Word
1
2
3
Contents (Hex)
05 1E
12 09
25 02
Contents (Decimal)
05 30
18 09
37 02
Note that the five--byte routing path must be preceded with a byte (always
containing 05) to show the length in bytes of the routing path.
40
Configuring the Bridge
3.9.2
Using Dynamic Routing
First setup the bridge for Host--based or Socket--based routing.
The bridge will now associate messages from the host’s IP address with the
Modbus Plus path you established, when you address those messages to the
Destination Index defined for the Host--based or Socket--based routing.
H
Destination Index 0: Host--based routing After you setup the bridge for
Host--based routing from a TCP/IP host to a Modbus Plus path, any
messages from that host addressed to index 0 will be routed to that path.
The bridge maintains a cache of 10 associations between TCP/IP hosts and
Modbus Plus paths using Destination Index 0. Thus up to 10 hosts may set
associations and use them concurrently for transactions with Modbus Plus
nodes. If all 10 cache locations are in use and another host establishes an
association to index 0, the new association will overwrite the oldest one in
the cache.
This routing option allows the bridge to be configured for simple addressing
from TCP/IP nodes which do not support routing through gateways, such as
programming panels.
H
Destination Index 254: Socket--based routing After you setup the bridge
for Socket--based routing from a TCP/IP host to a Modbus Plus path, any
messages from that host addressed to index 254 will be routed to that path.
The TCP/IP host can initiate messages to the Modbus Plus destination for
the duration of the host’s connection to the bridge. When the connection
terminates, the Modbus Plus path no longer exists for that TCP/IP host.
The bridge maintains up to 16 available socket connections, corresponding
to its eight Program and eight Data paths. For example, Modsoft panel
software uses both a Program and a Data path during its connection with the
bridge. The bridge will establish a socket for both paths during dynamic
routing, and will close the sockets when the connection is terminated.
This routing option allows the bridge to handle concurrent sessions from
multiple TCP/IP hosts using independent routing assignments. It provides a
means for your application to manage routing dynamically in addition to the
fixed routings you configure in the bridge’s TCP/IP to Modbus Plus mapping
table.
41
Configuring the Bridge
3.10
Clearing the Bridge’s Configuration
You may want to clear the bridge’s current setup: its IP configuration and mapping
tables. For example, if you intend to reinstall the bridge into a different application
you may wish to assign a new configuration to the bridge for that application.
You will be using the CFGUTIL utility to clear the bridge’s configuration. Here are
the steps.
Setup
If a keyboard and monitor are already connected to the bridge, stop the bridge by
pressing Q and confirming that you want to quit the bridge application.
If a keyboard and monitor are not connected, remove power to the bridge and
connect them to the bridge’s connector panel. Restore power to the bridge. If the
bridge does not display its CFGUTIL menu, stop the bridge application by pressing
Q and confirming that you want to quit the bridge application.
Clearing the Configuration
At the C:\ prompt, enter: CFGUTIL to start the configuration utility.
The CFGUTIL menu should now be displayed. An example is shown in Figure 14.
Your menu should display your current configuration for the bridge.
Edit the CFGUTIL menu fields as follows:
H
IP Address:
Enter
H
Net Mask:
H
Name Server:
H
Gateway:
H
Domain:
bootp
into this field.
Clear this field.
Clear this field.
Clear this field.
Clear this field.
When you finish editing the fields, press Escape. You will be prompted:
Write files to disk?
Enter Y to save the configuration. This will return you to the C:\ prompt.
Delete the file C:\RTE.CFG.
The bridge will now be cleared to its original configuration.
42
Using the Bridge Software
H
Bridge Software Contents: SW--MBPE--000
H
Using the Software in Custom Configurations
4
43
Using the Bridge Software
4.1
Bridge Software Contents: SW--MBPE--000
The bridge software is available as Schneider part number SW--MBPE--000 for
custom bridge hardware configurations. It is on two 3.5--inch (1.44 MB) disks.
4.1.1
Bridge Software Disk (31000020)
The Bridge Software disk provides files to enable a PC with Ethernet and Modbus
Plus network interfaces to function as a bridge.
This software provides the bridge’s application program and diagnostics, and is
also used to configure the bridge locally. The disk contains these files:
Table 18
SW--MBPE--000 Files (Disk 31000020)
File
AUTOEXEC.BAT
CONFIG.SYS
GATELOOP.BAT
SGATE.EXE
BDRESET.EXE
MBPHOST.SYS
CFGUTIL.EXE
CFGUTIL.HLP
MBPSTAT.EXE
PING.EXE
TCPINFO.EXE
WATTCP.CFG
README
4.1.2
Purpose
Startup at bridge initialization
Startup at bridge initialization
Runs the bridge application
Bridge application program
Initializes the Modbus Plus card
Driver for the Modbus Plus card
Configures the bridge IP setup, MB+ and TCP mapping
Help screen for CFGUTIL.EXE
Diagnostic tool for the Modbus Plus network connection
Diagnostic tool for the Ethernet network connection
Diagnostic tool for BOOTP server communication
Contains the bridge’s IP setup and network parameters
Text file with current release information and application notes
Host Software Disk (31000017)
The Host Software disk provides files for configuring the bridge at a host PC and
downloading the configuration to the bridge. The disk contains these files:
Table 19
SW--MBPE--000 Files (Disk 31000017)
File
CFGUTIL.EXE
CFGUTIL.HLP
DWNLD.EXE
README
44
Purpose
Configures the bridge IP setup, MB+ and TCP mapping
Help screen for CFGUTIL.EXE
Download program for host
Text file with current release information and application notes
Using the Bridge Software
4.2
Using the Software in Custom Configurations
The bridge software can be used in custom configurations in which you supply
your own PC and network interface hardware.
4.2.1
Minimum Requirements for Custom Bridge Configurations
Minimum requirements for custom bridge configurations are:
4.2.2
H
386 or faster PC
H
Minimum 1 MB RAM.
H
DOS 5.0 or higher
H
Ethernet card with packet driver and configuration software
H
Modicon SA85 Modbus Plus card.
Setting Up a Custom Bridge Configuration
The general procedure you should follow for installing the bridge software in a
custom configuration is:
H
If your Modbus Plus network application is currently active, ensure that it will
not be disrupted by the addition of the new bridge node.
H
Install your Modicon SA85 Modbus Plus card using the guidebook supplied
with the card. See section 2.2 in this bridge manual for information about
setting up the card’s Modbus Plus node address.
H
Install your Ethernet card using the guidebook for that card.
H
Connect the Ethernet and Modbus Plus network cables to your cards.
H
Install your Ethernet packet driver according to the instructions supplied with
that program.
H
Copy the Bridge Software (31000020) disk files to the root directory of your
bridge PC, except for AUTOEXEC.BAT and CONFIG.SYS. (You will be
using your existing AUTOEXEC.BAT and CONFIG.SYS files.)
H
Note that your root directory now contains a GATELOOP.BAT file. This is
the file which will start the bridge application.
H
Edit the GATELOOP.BAT file to remove the call to the bridge’s Ethernet
driver PNPPD.COM. (You will be using your own driver.)
45
Using the Bridge Software
H
Make sure your Ethernet packet driver program will be called as it was setup
by the driver installation. Refer to your driver guidebook to ensure that it will
be called properly.
The driver may be called from your AUTOEXEC.BAT or CONFIG.SYS file.
Note that you can also call the driver from your new GATELOOP.BAT file.
If necessary, edit GATELOOP.BAT to call the driver. Typical calls to drivers
pass a command line parameter 0x60 (hexadecimal 60) to define the driver
interrupt.
H
Edit your CONFIG.SYS file to call the Modbus Plus driver MBPHOST.SYS.
The entry must be:
DEVICE=MBPHOST.SYS /md000 /s5d /n0 /r2
H
If you intend to start your bridge application at bootup of your PC, edit your
AUTOEXEC.BAT file to call GATELOOP.BAT. There are no parameters.
Reboot your PC to start the bridge application.
If you intend to start your bridge application from your PC’s command line
prompt, reboot your PC to set the changes in AUTOEXEC.BAT and
CONFIG.SYS. Then start GATELOOP.BAT from the command line.
There are no parameters.
H
46
Setup your bridge’s internal configuration as described in section 3.2.
Uploading and Downloading Files
H
Configuring an HTTP server
H
Uploading Files to a Host
H
Downloading Files from a Host
5
47
Uploading and Downloading Files
5.1
Configuring an HTTP Server
To upload and download files between your host computer and the bridge, you will
need an HTTP server application running in the host. The server must have a
cgi--bin directory immediately below the root directory. Here is a path example:
<drive:>\<http.root_directory>\cgi-bin
The cgi--bin directory must be configured for read--execute privileges.
5.1.1
Configuration Example
Here are guidelines for configuring the Microsoft Personal Web Server software in
Windows NT for bridge uploading and downloading. Refer to your server software
guidebook for details.
H
Install the HTTP server application program in your host.
H
Select the Windows Control Panel. Click the HTTP Server icon, and select
Properties. This will open the ‘Personal Web Server Properties’ dialog.
H
Click the Administration tab, and click the ‘Administration’ button.
H
Under ‘Select the PWS Service to View’, select ‘WWW Administrator’.
H
Click the Service tab.
H
Under the box ‘Password Authentication’ check ‘Allow anonymous’ and
‘Basic’. Uncheck ‘Windows NT Challenge/Response’. Click OK.
H
Under ‘Select the PWS Service to View’, select ‘WWW Administrator’ again.
H
Click the Directories tab.
H
Click the Add button. In the ‘Directory’ box, enter:
<drive:>\<http.root_directory>\cgi-bin
where: <drive:> and <http.root_directory> are the drive letter
and root directory for your HTTP server.
48
Uploading and Downloading Files
H
Under the ‘Virtual Directory’ box there is a ‘Directory Alias’ box. Enter:
/cgi-bin
in the ‘Directory Alias’ box.
H
Under the ‘Access’ box check ‘Read’ and ‘Execute’. Click OK.
H
Close the window with File --> Close. Click OK.
H
Copy the program DWNLD.EXE from the host software diskette to the HTTP
cgi--bin directory you have configured on the host machine:
<drive:>\<http_root_directory>\cgi-bin
49
Uploading and Downloading Files
5.2
Uploading Files to a Host
Before initiating your first upload:
H
Install an HTTP server on the host machine and configure it as described in
Section 5.1.
H
Copy the program DWNLD.EXE from the host software diskette to the HTTP
cgi--bin directory you have configured on the host machine:
<drive:>\<http_root_directory>\cgi-bin
5.2.1
Upload Overview
The bridge configuration is stored in two files, WATTCP.CFG and RTE.CFG, each
of which can be uploaded to a host. To upload a file, write the host URL and
filename as data to register 11 in the bridge. After the upload, the status of the
upload will be stored in the file MODICON.LOG in the host cgi--bin directory.
5.2.2
Initiating an Upload
You can initiate the host upload from a TCP/IP node or Modbus Plus node.
H
From a TCP/IP node, address the bridge at its IP address and use a
destination ID (Modbus device address) of 255. The bridge reserves
address 255 to invoke an upload operation between the host and bridge.
H
From a Modbus Plus node, address the bridge at its Modbus Plus address
and use an address of 0 (zero) in the third routing byte. This specifies that
the bridge is to perform an upload to a host machine.
Figure 19 Example: Addressing from Modbus Plus for Host Uploading
50
12
8
Bridge
Modbus Plus
Address
Bridge
Path
0
Specifies
host
upload
operaton
0
0
Not
Used
Not
Used
Uploading and Downloading Files
H
In the Modbus command to the bridge, perform a register write to register 11
in the bridge. Write the host URL as data into that register.
The URL can be in the absolute IP address form:
205.167.7.0/cgi-bin/<filename>
or it can be in the form:
//<host_name/domain/cgi-bin/<filename>
where <filename> is the name of the file to be uploaded (WATTCP.CFG or
RTE.CFG).
H
When the upload is complete, examine the MODICON.LOG file to see the
contents of the uploaded file:
//<host_machine>/<http_root_directory>/cgi-bin/modicon.log
The new contents will be appended to an existing MODICON.LOG file.
Note that the MODICON.LOG file can grow large as new data is appended.
It is the user’s responsibility to delete or edit the file as required.
5.2.3
Upload Example
Here is an example of the contents of a message to upload the file RTE.CFG to
the host path: //username.modicon.com/WebShare/wwwroot//cgi--bin.
The following contents would be written into register 11 in the bridge:
//username.modicon.com/WebShare/wwwroot/cgi-bin/rte.cfg
51
Uploading and Downloading Files
5.3
Downloading Files to the Bridge
Before initiating your first download:
H
Install an HTTP server on the host machine and configure it as described in
Section 5.1.
H
Copy the program DWNLD.EXE from the host software diskette to the HTTP
cgi--bin directory you have configured on the host machine:
<drive:>\<http_root_directory>\cgi-bin
5.3.1
Download Overview
You can download a new version of the bridge’s application SGATE.BIN file or
mapping RTE.TXT file to the bridge. To download a file, write the host URL and
filename as data to register 8 in the bridge. After the download, the status of the
download will be stored in the file MODICON.LOG in the host cgi--bin directory.
SGATE.BIN
When the download is complete and the bridge is restarted, the bridge will copy
SGATE.BIN to its application program SGATE.EXE. It will begin running this as its
new application.
RTE.TXT
The bridge’s mapping tables are stored within the bridge in the file RTE.CFG.
Before downloading new mapping, you must place it in a file named RTE.TXT.
If you have previously uploaded RTE.CFG, the file’s contents are appended into
the MODICON.LOG file in your cgi--bin directory. You can copy those RTE.CFG
contents from MODICON.LOG and paste them into an RTE.TXT file. Then you
can download the RTE.TXT.
The RTE.TXT download will write a new RTE.CFG file in the bridge. When the
download is complete and the bridge is restarted, the bridge will use this file’s
contents as its new mapping tables between TCP and Modbus Plus.
5.3.2
Initiating a Download
To initiate a download:
H
52
Put the file to be downloaded (SGATE.BIN or RTE.TXT) into the
<http_root_directory> of the host machine.
Uploading and Downloading Files
H
In the Modbus command to the bridge, perform a register write to register 8
in the bridge. Write the host URL as data into that register.
The URL can be in the absolute IP address form:
205.167.7.0/<filename>
or it can be in the form:
//<host_name/domain/<filename>
where <filename> is the name of the file to be downloaded (SGATE.BIN
or RTE.CFG). Note that you specify RTE.CFG here, not RTE.TXT.
H
When the download is complete, the download status will be contained in the
MODICON.LOG file:
//<host_machine>/<http_root_directory>/cgi-bin/modicon.log
The new contents will be appended to an existing MODICON.LOG file.
Note that the MODICON.LOG file can grow large as new data is appended.
It is the user’s responsibility to delete or edit the file as required.
H
5.3.3
The bridge will automatically begin using the new downloaded configuration.
Download Example
Here is an example of the contents of a message to download the file RTE.TXT
from the host path: //username.modicon.com/WebShare/wwwroot.
The following contents would be written into register 8 in the bridge:
//username.modicon.com/WebShare/wwwroot/rte.cfg
53
Diagnostic Tools
H
Diagnostics Overview
H
Logging the Bridge’s Activity
H
TCPINFO
H
BDRESET
H
PING
H
MBPSTAT
H
Your MBPSTAT Menu
H
Your MBPSTAT Options
6
55
Diagnostic Tools
6.1
Diagnostics Overview
The bridge contains software tools for diagnosing communication problems on
both the Ethernet and Modbus Plus network. Here is how you can approach a
suspected problem to localize it to one of the network interfaces.
6.1.1
Logging the Bridge’s Activity
Before running diagnostics you can log the communication activity in the bridge.
This can help you to determine the kind of diagnostics you may want to run.
Logging is detailed in Section 6.2.
6.1.2
Ethernet Diagnostics
First determine if the bridge can be recognized by your Ethernet host.
TCPINFO
If you have a BOOTP server and cannot access the bridge from it, run the
diagnostic TCPINFO in the bridge and try to access the bridge again.
You can start PING through a keyboard and monitor connected to the bridge.
After about 30 seconds, TCPINFO should report whether the bridge can be
configured by BOOTP.
TCPINFO is detailed in Section 6.3.
PING
The bridge has the PING utility program which you can use to check Ethernet
connections between the bridge and other IP addresses.
You can start PING from your Ethernet host, or you can start it locally through a
keyboard and monitor connected to the bridge.
PING is detailed in Section 6.5.
56
Diagnostic Tools
6.1.3
Modbus Plus Diagnostics
If you can communicate with the bridge from your Ethernet host, but cannot pass
messages to Modbus Plus nodes, you can test the bridge’s communication on
Modbus Plus.
MBPSTAT
Use the bridge’s MBPSTAT diagnostic to check Modbus Plus communication.
MBPSTAT will show a list of active Modbus Plus nodes that are recognized by the
bridge. It will also monitor network activity and record a node’s error statistics.
MBPSTAT is detailed in Sections 6.6 through 6.17.
BDRESET
You can also initialize the bridge’s Modbus Plus card without having to cycle
power, by using the BDRESET program.. It is detailed in Section 6.4.
57
Diagnostic Tools
6.2
Logging the Bridge’s Activity
Before running diagnostics you can build a log of the communication activity
performed by the bridge. This can help you to determine the kind of diagnostics
you may want to run.
You can set the bridge to log all traffic initiated on either its Ethernet network or
Modbus Plus network. You can also set it to log errors only.
How Logging Works
Logging is turned on and off through a keyboard and monitor connected to the
bridge. The bridge provides five logging modes. It writes the log results with
date/time stamping to a file BRIDGE.LOG, as well as to the monitor.
The BRIDGE.LOG file is self--wrapping and contains enough space for several
hundred lines of logging.
Note that logging will slow the throughput of any application running in the bridge.
Particularly the use of Mode C (TCP/IP Tick Logging) will generate constant
logging messages.
Setup
If a keyboard and monitor are not connected to the bridge, remove power to the
bridge and connect them to the bridge’s panel. Restore power to the bridge.
To invoke logging, the bridge application must be running. If the bridge displays its
CFGUTIL menu on startup, press Escape to close the menu. This should display
the bridge’s C:\ > prompt. Enter GATELOOP to start the bridge.
Starting Logging
With the bridge running, type a letter: A, B, C, D, or E (upper case letter) to select
a logging mode.
The logging modes are:
A
B
C
D
E
Channel Logging.
TCP/IP Error Logging.
TCP/IP Tick Logging.
Routine Logging.
Routine Error Logging.
Stopping Logging
To stop logging type a letter: a, b, c, d, or e (lower case letter) to turn off the
selected logging mode. Type the letter f to turn off all logging.
58
Diagnostic Tools
6.2.1
Notes for Logging
Mode A: Channel Logging Menu
When you invoke the Channel Logging mode A (On) or a (Off), you will be
prompted with the message:
Enter M for MBP initiated sessions
T for TCP initiated sessions
B for both
Session initiator? _
Enter: M to select sessions initiated from Modbus Plus, T for sessions initiated
from TCP/IP, or B to select sessions initiated from either network.
Next you will be prompted:
Please enter the sessions you want to (un)log (a-p)
Enter X when done, T to log all sessions
Session? _
Channels are identified by 16 letters: a...p. The channels are made available to
incoming transactions as they become open within the bridge, with p being the
first available channel. Note that the letters a...p correspond to the sequence in
which the channels are made available. They do not correspond to a specific
Program path or Data path number.
For example, if the bridge is inactive when it receives a transaction, the transaction
will be processed on channel p. If the transaction is initiated from Modsoft and
requires both a Program path and a Data path, then it will be processed on two
channels, p and o.
Channels are freed for new transactions in the order p ----> a as they become
available.
Saving the Logging Status and Log File
The current logging mode is saved to the WATTCP.CFG file in the field:
log_level=<level>
where <level> is the currently selected mode.
defaults are:
log_errors (all TCP/IP and routine errors)
log_channels (all channels)
log_messages (all routine messages)
Both the WATTCP.CFG and the BRIDGE.LOG file can be uploaded to a host.
59
Diagnostic Tools
6.3
TCPINFO
TCPINFO is provided to diagnose BOOTP server problems. If you have a BOOTP
server and cannot access the bridge from it, run TCPINFO in the bridge and try to
access the bridge again. The program is run from the bridge’s command line.
Setup
If a keyboard and monitor are already connected to the bridge, stop the bridge by
pressing Q and confirming that you want to quit the bridge application.
If a keyboard and monitor are not connected, remove power to the bridge and
connect them to the bridge’s connector panel. Restore power to the bridge.
If the bridge displays its CFGUTIL menu, press Escape to close the menu. This
should display the bridge’s C:\ > prompt.
Starting
To start the TCPINFO program, enter: TCPINFO
After a maximum of 30 seconds, TCPINFO should report whether the bridge can
be configured by BOOTP. If it cannot be configured by BOOTP, you will need to
run the CFGUTIL configuration program.
6.4
BDRESET
BDRESET initializes the bridge’s Modbus Plus card, as in power--up of the bridge.
The program is run from the bridge’s command line.
Setup
Setup the bridge with a keyboard and monitor as described for TCPINFO. Note
that removing power to connect the keyboard and monitor will also initialize the
bridge (without the need to run BDRESET). However you might want to have the
keyboard and montior connected to run further diagnostics.
Starting
To start the BDRESET program, enter: BDRESET /s5d
You should see the bridge now attempting to join the Modbus Plus network, as
indicated in its Modbus Plus LEDs. Section 2.7 describes the LED patterns.
60
Diagnostic Tools
6.5
PING
PING is a utility program you can use to check Ethernet connections between the
bridge and other IP addresses.
6.5.1
Starting PING at the Bridge
PING can be run from the bridge’s command line. You can get the command line
prompt by initializing the bridge without a connection to a BOOTP server.
Setup
If a keyboard and monitor are already connected to the bridge, stop the bridge by
pressing Q and confirming that you want to quit the bridge application.
If a keyboard and monitor are not connected, remove power to the bridge and
connect them to the bridge’s connector panel. Restore power to the bridge.
If the bridge displays its CFGUTIL menu, press Escape to close the menu. This
should display the bridge’s C:\ > prompt.
Starting
To start the PING program, enter: PING <NOE_ip_address>
You should see a message indicating that the <NOE_ip_address> is reachable.
6.5.2
Starting PING at the Host
PING can be run from the Ethernet host to determine if the bridge is reachable on
the network.
Setup
The bridge must be running in order for it to respond. If it is not already running,
connect a keyboard and monitor and initialize it as described above. Display the
bridge’s C:\ > prompt.
To start the bridge enter: GATELOOP
Starting
PING the bridge from the host: PING <bridge_ip_address>
You should see a message indicating that the <bridge_ip_address> is reachable.
61
Diagnostic Tools
6.6
MBPSTAT
MBPSTAT is the Modbus Plus network diagnostic utility. You can use it to view a
list of active nodes, monitor network activity, and record a node’s error statistics.
6.6.1
Starting MBPSTAT
MBPSTAT is run from the bridge’s command line. You can get the command line
prompt by initializing the bridge without a connection to a BOOTP server.
Setup
If a keyboard and monitor are already connected to the bridge, stop the bridge by
pressing Q and confirming that you want to quit the bridge application.
If a keyboard and monitor are not connected, remove power to the bridge and
connect them to the bridge’s connector panel. Restore power to the bridge.
If the bridge displays its CFGUTIL menu, press Escape to close the menu. This
should display the bridge’s C:\ > prompt.
Starting
To start the program, enter: MBPSTAT /s5d
6.6.2
Selecting the Network to be Analyzed
The program will next prompt you for a routing path to the Modbus Plus network
you want to analyze. For example, you can examine the local network, or you can
examine a remote network that is accessed through a series of BP85 Bridge Plus
devices.
Note that you are selecting a target network only ---- the address of any specific
node on that network will be entered later as you run the program.
You can enter up to four network routing bytes. The last non--zero entry defines
the target network. The first zero entry terminates the routing. Routing examples
are shown in Figure 20. Your entry screen is shown in Figure 22.
6.6.3
Network Selection Examples
If you enter a routing path of all zeros, you are disabling routing to other networks.
You are instructing the program to analyze the local Modbus Plus network (the one
to which your local host based device is directly connected).
62
Diagnostic Tools
If you enter a routing path of 22.00.00.00, you are instructing the program to
analyze a second network that is connected to the remote side of a Bridge Plus
device, whose address is 22 on the local network.
If you enter 22.24.00.00, you are instructing the program to analyze a third
network that is connected through two Bridge Plus devices ---- through address 22
on the local network, and then through address 24 on the second network.
While running MBPSTAT, you can change the routing path to select another
network through an option on your program menu.
Figure 20 Typical MBPSTAT Routing
Bridge
Running
MBPSTAT
MBPSTAT
Routing
00 00 00 00
Node
Local Network
Node
22
BP85
22 00 00 00
Second Network
24
BP85
22 24 00 00
Third Network
63
Diagnostic Tools
6.7
Your MBPSTAT Menu
When MBPSTAT starts, your Options menu appears. The bridge’s node address
is at the top of the menu, together with the network routing path being analyzed.
Figure 21 MBPSTAT Menu
MODBUS PLUS NETWORK STATUS version 2.10
Node: 30
Adapter: 0
Routing: 22 24 00.00.00
SELECT OPTION
Use
or type first char, then ENTER
1
2
3
4
5
6
7
8
9
10
Q
Set Routing Parameters
Monitor Network Activity
Read Global Data
Global Data Present Table
Node Active Station Table
Node Error Statistics
Token Station Table
Token Owner Work Table
Current Internal Path Transactions
Show Node Personality
Quit
Copyright (c) SCHNEIDER AUTOMATION Inc.
All Rights Reserved.
To select an option, use the cursor keys to move to the option, then press Enter.
You can also type in the option (1--10 or Q) and press Enter. To terminate any test
and return to your options menu, press Escape.
Entering Node Addresses
Some options analyze an overall network, and do not require selection of a node.
Other options analyze the activity of a single node. For those options, the program
will prompt you for a node address. When prompted, enter the address of the node
you wish to examine. Note that any node being analyzed will always be located on
the network you previously specified as the network routing path.
64
Diagnostic Tools
6.8
Option 1: Set Routing Parameters
Figure 22 Set Routing Parameters
MODBUS PLUS NETWORK STATUS version 2.10
Routing Information
MODBUS PLUS Adapter 1 identified as node 30.
Enter ROUTING path first byte
:
This option lets you specify a new routing path without having to restart MBPSTAT.
The program will prompt you for each byte of routing.
65
Diagnostic Tools
6.9
Option 2: Monitor Network Activity
Figure 23 Monitor Network Activity
MODBUS PLUS NETWORK STATUS version 2.10
Global Data Activity, strike any key to exit.
C
1
7
0
0
C
0
2
0
0
C
0
3
0
0
C
0
5
3
2
B
P
2
2
0
0
B
P
2
4
0
0
Node types listed above node numbers:
U=Unknown C=Controller BM=Bridge Mux
H=Host
P=Peer I/O
BP+Bridge Plus
Adapter:
Success:
Failure:
H
3
0
0
0
1
60
0
C
1
6
0
0
B
M
6
4
0
0
This option lists the nodes that exist on the network specified by the routing path.
The program attempts to communicate with every node from address 1 to 64, and
checks whether a response has been received from each node.
The program also attempts to read global data from each active node and displays
the number of words of global data read. The global data word count is displayed
beneath each node’s address. Zeros will be displayed if no global data was read.
If you are accessing a remote network through a Bridge Plus, the program will
inform you that global data is not accessible through the bridge.
The option runs continuously and displays a pass count until you terminate it by
pressing Escape.
66
Diagnostic Tools
6.10
Option 3: Read Global Data
Figure 24 Read Global Data
MODBUS PLUS NETWORK STATUS version 2.10
Global Data
Information from node 5
Adapter: 1
Success: 3319
Failure:
0
(05.00.00.00.00)
1C1B 1E1D 201F 2221 2423 2625 2827 2A29
2C2B 2D2C 2F2E 3130 3332
This option continuously reads and displays global data from the selected node. If
global data is present but is zero words in length, a ‘null data’ message is
displayed.
The option runs continuously and displays a pass count until you terminate it by
pressing Escape.
67
Diagnostic Tools
6.11
Option 4: Global Data Present Table
Figure 25 Global Data Present Table
MODBUS PLUS NETWORK STATUS version 2.10
Global Data Present Bit Map
Information from node 5
Adapter: 1
Success: 16421
Failure:
0
(05.00.00.00.00)
0
2
1
7
1
6
3
0
This option displays a map table of the nodes that have global data present, as
seen by the specified node. Node addresses appearing in the table are those
from which the specified node has received global data since the test was started.
The nodes in the table are not necessarily the only ones active on the network.
The option runs continuously and displays a pass count until you terminate it by
pressing Escape.
68
Diagnostic Tools
6.12
Option 5: Node Active Station Table
Figure 26 Node Active Station Table
MODBUS PLUS NETWORK STATUS version 2.10
Node Activity Bit Map
Information from node 5
0
2
1
7
Adapter: 1
Success: 115
Failure:
0
(05.00.00.00.00)
0
3
1
6
2
2
2
4
3
0
6
4
This option continuously queries the specified node for its list of active nodes and
displays that list. Node addresses shown in normal video are those seen by the
node as remaining active during the test. Node addresses in reverse video are
those which were active at least once during the test, but which have
subsequently gone inactive.
The option runs continuously and displays a pass count until you terminate it by
pressing Escape.
69
Diagnostic Tools
6.13
Option 6: Node Error Statistics
Figure 27 Node Error Statistics
MODBUS PLUS NETWORK STATUS version 2.10
Node Error Counters, Press SPACE to clear.
Information from node 5
0
0
0
0
0
0
0
0
0
0
0
0
244
0
0
0
0
0
(05.00.00.00.00)
Adapter: 1
Success: 182
Failure:
0
Pre-transmit deferral error counter
Receive buffer DMA overrun error counter
Repeated Command received error counter
No Try (nonexistent station) error counter
Cable A framing error
Cable B framing error
Receiver CRC error counter
Bad packet length error counter
Transmit buffer DMA underrun error counter
Bad internal packet-length error counter
Bad MAC-function-code error counter
Communication failed error counter
Good receive packet success counter
No response received error counter
Exception response received error counter
Unexpected path error counter
Unexpected response error counter
Forgotten transaction error counter
This option continuously queries the specified node for a list of its error statistics
and displays the list. As the test runs, the counts in the display can be reset to
zeros by pressing the Space bar.
If you are running the utility on a single-cable network, one of the ‘framing error’
counters will be incrementing continuously due to the open connection on the
monitoring device’s other cable connector. For example, if your single cable is
connected to the Cable A connector, the ‘Cable B framing error’ counter will
increment continuously. In such cases you can disregard the counter.
The option runs continuously and displays a pass count until you terminate it by
pressing Escape.
70
Diagnostic Tools
6.14
Option 7: Token Station Table
Figure 28 Token Station Table
MODBUS PLUS NETWORK STATUS version 2.10
Token Station Table Bit Map
Information from node 5
0
2
1
7
Adapter:
Success:
Failure:
1
165
0
(05.00.00.00.00)
0
3
1
6
2
2
2
4
3
0
6
4
This option displays a map table of the nodes that are passing the network token,
as seen by the specified node.
The option runs continuously and displays a pass count until you terminate it by
pressing Escape.
71
Diagnostic Tools
6.15
Option 8: Token Owner Work Table
Figure 29 Token Owner Work Table
MODBUS PLUS NETWORK STATUS version 2.10
Node Token Owner Bit Map
Information from node 30
Adapter: 1
Success: 208
Failure:
0
(30.00.00.00.00)
1 2 3 4 5 6 7 8
1 2
Data-master token owner
Data-master get-master-response transfer request
Data-slave token owner
Data-slave get-slave-command transfer request
1
Program-master token owner
Program-master get-master-response trans request
Program-slave token owner
Program-slave get-slave-command transfer request
1
Program-master connect-status
Program-slave automatic logout request
This option continuously queries the specified node for its list of internal paths that
are active. The paths listed are the node’s internal data and program paths.
As a path goes active its number is listed in the columns to the left. Paths shown
in normal video are those remaining active during the test. Paths in reverse video
are those which were active at least once during the test, but which have
subsequently gone inactive.
The option runs continuously and displays a pass count until you terminate it by
pressing Escape.
72
Diagnostic Tools
6.16
Option 9: Current Internal Path Transactions
Figure 30 Current Internal Path Transactions
MODBUS PLUS NETWORK STATUS version 2.10
Adapter:
Node Transaction Counters, Press SPACE to clear. Success:
Failure:
Information from node 30
(30.00.00.00.00)
PATH
1
62
0
1
2
3
4
5
6
7
8
DM Actual
DM Total
69
0
0
0
0
0
0
0
0
0
0
0
0
0
0
0
DS Actual
DS Total
6
0
0
0
0
0
3
0
3
0
3
0
0
0
3
0
PM Actual
PM Total
210
76
0
0
0
0
0
0
0
0
0
0
0
0
0
0
PS Actual
PS Total
0
0
0
0
0
0
0
0
0
0
0
0
0
0
0
0
Station Management Input Commands Actual:
Station Management Input Commands Total:
Total Inbound Commands:
Total Outbound Commands:
194
61
0
74
This option displays the count of transactions processed by each of the specified
node’s internal paths. As the test runs, the counts in the display can be reset to
zeros by pressing the Space bar.
The option runs continuously and displays a pass count until you terminate it by
pressing Escape.
73
Diagnostic Tools
6.17
Option 10: Node Personality
Figure 31 Node Personality
MODBUS PLUS NETWORK STATUS version 2.10
Node Personality
Information from node 30
Node Number
Node Type
Software version
Network address
MAC state variable
Peer Status
Token pass counter
Token rotation time
=
=
=
=
=
=
=
=
Adapter: 1
Success: 108
Failure:
0
(30.00.00.00.00)
30
Host
2.00
30
idle
normal link operation
33256
11 milliseconds
This option displays information about the specified node, such as its node type
and software version. It also shows information about the node’s current activity
on the network.
The option runs continuously and displays a pass count until you terminate it by
pressing Escape.
74
Message Examples
H
MSTR Example: TCP/IP Node
H
MSTR Example: Modbus Plus Node
7
75
Message Examples
7.1
MSTR Example: TCP/IP Node
This example shows a Modicon Modsoft screen for an MSTR function in a TCP/IP
node. It writes one register of data to a destination node on Modbus Plus.
H
The MSTR Function Code specifies a Write operation.
H
One register of data is to be transferred.
H
The destination register is 40000 (addressed as register 1).
H
The bridge’s IP address is 205.167.7.66.
H
The destination index is 1. The bridge will forward the message to the
Modbus Plus node whose routing path is in this location in the bridge’s MB+
Mapping table.
Figure 32 MSTR in TCP/IP Node
76
Message Examples
7.2
MSTR Example: Modbus Plus Node
This example shows a Modicon Modsoft screen for an MSTR function in a Modbus
Plus node. It writes one register of data to a destination node on TCP/IP.
H
The MSTR Function Code specifies a Write operation.
H
One register of data is to be transferred.
H
The destination register is 40000 (addressed as register 1).
H
The bridge’s node address is 1. Note that the decimal value 1025 equals
0401 hexadecimal, addressing a Modbus Plus Network Option Module
(NOM) in backplane slot 04 and a node at address 01.
H
The destination index is 28. The bridge will forward the message to the TCP
node whose IP address is in this location in the bridge’s TCP Mapping table.
Figure 33 MSTR in Modbus Plus Node
77
NCB Return Codes
H
8
Network Control Block (NCB) Return Codes
79
NCB Return Codes
8.1
Network Control Block (NCB) Return Codes
The bridge returns the following codes into the NCB_RETCODE field. Note that
some application programs such as Modsoft may not map these codes to the
correct error message.
80
ERR_success 0
/* NCB command completed normally */
ERR_bad_buffer_length 1
/* Bad send or status buffer size */
ERR_invalid 3
/* invalid NetBIOS command */
ERR_timeout 5
/* Command time-out has expired */
ERR_buffer_too_small 6
/* Receive buffer not big enough */
ERR_bad_session_num 8
/* Bad value in NCB_LSN */
ERR_no_RAM 9
/* LAN card doesn’t have enough memory*/
ERR_session_closed 0xa
/* This session is closed */
ERR_cancel 0xb
/* Command has been closed */
ERR_dup_local_name 0xd
/* Name already exists for this PC */
ERR_name_table_full 0xe
/* Local name table is full */
ERR_active_session 0xf
/* Can’t delete name - used in session*/
ERR_sess_table_full 0x11
/* Local session table is full */
ERR_no_listen 0x12
/* Remote PC not listening for call */
ERR_bad_name_num 0x13
/* Bad value in NCB_NUM field */
ERR_no_answer 0x14
/* No answer to CALL or no such remote*/
ERR_no_local_name 0x15
/* No such name in local name table */
ERR_duplicate_name 0x16
/* Name is in use elsewhere on net */
ERR_bad_delete 0x17
/* Name incorrectly deleted */
ERR_abnormal_end 0x18
/* Session aborted abnormally */
ERR_name_error 0x19
/* 2 or more identical names in use! */
ERR_bad_packet 0x1a
/* Bad NetBIOS packet on network */
ERR_card_busy 0x21
/* network card is busy */
ERR_too_many_cmds 0x22
/* Too many NCB commands queued */
ERR_bad_card_num 0x23
/* bad NCB_LANA_NUM - must be 0 */
ERR_cancel_done 0x24
/* command finished while cancelling */
ERR_no_cancel 0x26
/* Command can’t be cancelled */
ERR_busy 0xff
/* Still processing command */
Glossary
9
address
On a network, the identification of a station. In a frame, a grouping of bits that
identifies the frame’s source or destination.
API
Application Program Interface. The specification of functions and data used by one
program module to access another; the programming interface that corresponds to
the boundary between protocol layers.
ARP
Address Resolution Protocol. A network layer protocol used to determine the
physical address which corresponds to the IP address for a host on the network.
ARP is a sub--protocol which operates under TCP/IP.
BOOTP
Bootstrap Protocol. A UDP/IP--based protocol that allows a host to configure itself
dynamically. Provides a means to assign a host its IP address, typically without
user intervention.
bps
Bits per second.
bridge
A device that connects two or more physical networks which use the same
protocol. Bridges read frames and decide whether to transmit or block them based
on their destination address.
client
A computer process requesting service from other computer processes.
dest_idx
The destination field in a Modbus message. Corresponds to the Modbus device
addressed in the message.
81
Glossary
default gateway
The IP address of the network or host to which all packets addressed to an
unknown network or host are sent. The default gateway is typically a router or
other device.
DNS
Domain Name System. A protocol within TCP/IP used to find IP addresses based
on host names.
field
A logical grouping of contiguous bits that convey one kind of information, such as
the start or end of a message, an address, data or an error check.
frame
A group of bits which form a discrete block of information. Frames contain network
control information or data. The size and composition of a frame is determined by
the network technology being used.
framing types
Two common framing types are Ethernet II and IEEE 802.3.
FTP
File Transfer Protocol. A networking protocol used to exchange files between
stations on a network or over the Internet.
gateway
A device which connects networks with dissimilar network architectures and which
operates at the Application Layer. This term may refer to a router.
host
A node on a network.
hostname
A domain name given to a specific computer on a network and used to address
that computer.
HTTP
HyperText Transport Protocol. A protocol used to deliver hypertext documents.
hub
A device which connects a series of flexible and centralized modules to create a
network.
ICMP
Internet Control Message Protocol. A protocol within TCP/IP used to report errors
in datagram transmission.
82
Glossary
Internet
The global interconnection of TCP/IP based computer communication networks.
IP
Internet Protocol. A common network layer protocol. IP is most often used with
TCP.
IP Address
Internet Protocol Address. A 32--bit address assigned to hosts using TCP/IP.
layer
In the OSI model, a portion of the structure of a device which provides defined
services for the transfer of information.
MAC Address
Media Access Control address. The hardware address of a device. A MAC
address is assigned to an Ethernet TCP/IP module in the factory.
network
Interconnected devices sharing a common data path and protocol for
communication.
node
An addressable device on a communications network.
OSI model
Open System Interconnection model. A reference standard describing the
required performance of devices for data communication. Produced by the
International Standards Organization.
packet
The unit of data sent across a network.
PING
Packet Internet Groper. A program used to test whether a destination on a network
can be reached.
port
An access point for data entry or exit within a host using TCP services.
protocol
Describes message formats and a set of rules used by two or more devices to
communicate using those formats.
83
Glossary
repeater
A device that connects two sections of a network and conveys signals between
them without making routing decisions or filtering packets.
router
A device that connects two or more sections of a network and allows information
to flow between them. A router examines every packet it receives and decides
whether to block the packet from the rest of the network or transmit it. The router
will attempt to send the packet through the network by the most efficient path.
server
Provides services to clients. This term may also refer to the computer on which
the service is based.
socket
The association of a port with an IP address, serving as an identification of sender
or recipient.
stack
The software code which implements the protocol being used. In the case of the
NOE modules it is TCP/IP.
STP
Shielded Twisted Pair. A type of cabling consisting of several strands of wire
surrounded by foil shielding, twisted together.
subnet
A physical or logical network within an IP network, which shares a network
address with other portions of the network.
subnet mask
Used to indicate which bits in an IP address identify a subnet.
switch
A network device which connects two or more separate network segments and
allows traffic to be passed between them. A switch determines whether a frame
should be blocked or transmitted based on its destination address.
TCP
Transmission Control Protocol.
TCP/IP
A protocol suite consisting of the Transmission Control Protocol and the Internet
Protocol; the suite of communications protocols on which the Internet is based.
84
Glossary
UDP
User Datagram Protocol. A protocol which transmits data over IP.
URL
Uniform Resource Locator. The network address of a file.
UTP
Unshielded Twisted Pair. A type of cabling consisting of insulated cable strands
which are twisted together in pairs.
Winsock
The Microsoft implementation of the Windows Sockets networking API based on
the Berkeley UNIX Sockets interface for supporting TCP/IP.
WWW
World Wide Web. A hypertext--based, distributed information system in which
clients and servers are freely available.
85