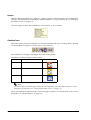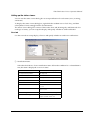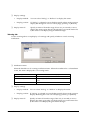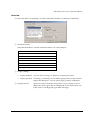
1
EPSON
Advanced Printer Driver
Ver.3.04
TM-C100 Driver Manual
EPSON
Rev.F
410157305
TM-C100 Printer Driver Operation Manual
Cautions
❏
No part of this document may be reproduced, stored in a retrieval system, or transmitted in any form or by any
means, electronic, mechanical, photocopying, recording, or otherwise, without the prior written permission of
Seiko Epson Corporation.
❏
The contents of this document are subject to change without notice. Please contact us for the latest information.
❏
While every precaution has been taken in the preparation of this document, Seiko Epson Corporation assumes no
responsibility for errors or omissions.
❏
Neither is any liability assumed for damages resulting from the use of the information contained herein.
❏
Neither Seiko Epson Corporation nor its affiliates shall be liable to the purchaser of this product or third parties
for damages, losses, costs, or expenses incurred by the purchaser or third parties as a result of: accident, misuse, or
abuse of this product or unauthorized modifications, repairs, or alterations to this product, or (excluding the U.S.)
failure to strictly comply with Seiko Epson Corporation's operating and maintenance instructions.
❏
Seiko Epson Corporation shall not be liable against any damages or problems arising from the use of any options
or any consumable products other than those designated as Original EPSON Products or EPSON Approved
Products by Seiko Epson Corporation.
Trademarks
EPSON is a registered trademark of Seiko Epson Corporation.
Microsoft and Windows are registered trademarks of Microsoft Corporation in the U.S.A. and other countries.
Rev. F
i
Manual Content
This manual consists of the following chapters.
Chapter 1
Outline of the TM-C100 Printer
Driver
Describes the environment of the printer driver.
Chapter 2
Configuring Printer Driver
Settings
Explains how to configure the various printer driver
settings.
Chapter 3
Utilities
Gives details on the use of the various utilities.
Appendix-A
Acquiring printer information
by PRINTER_INFO_2
Explains printer information acquired by
PRINTER_INFO_2.
Conventions
This manual uses the following symbol. Make sure you understand the meaning of this symbol
before handling this product.
Note:
Indicates restrictions necessary to maintain the performance of this product, as well as useful information
on handling this product.
ii
Rev. F
TM-C100 Printer Driver Operation Manual
Table of contents
Manual Content . . . . . . . . . . . . . . . . . . . . . . . . . . . . . . . . . . . . . . . . . . . . . . . . . . . . . . . . . . . . . . . . . . . ii
Conventions . . . . . . . . . . . . . . . . . . . . . . . . . . . . . . . . . . . . . . . . . . . . . . . . . . . . . . . . . . . . . . . . . . . . . . ii
Table of contents . . . . . . . . . . . . . . . . . . . . . . . . . . . . . . . . . . . . . . . . . . . . . . . . . . . . . . . . . . . . . . . . . . iii
Chapter 1 Outline of the TM-C100 Printer Driver
TM-C100 Printer Driver Features . . . . . . . . . . . . . . . . . . . . . . . . . . . . . . . . . . . . . . . . . . . . . . . . . . . . . . 1-2
Operating Environment . . . . . . . . . . . . . . . . . . . . . . . . . . . . . . . . . . . . . . . . . . . . . . . . . . . . . . . . . . . . . 1-3
Operating Environment of the Printer Driver . . . . . . . . . . . . . . . . . . . . . . . . . . . . . . . . . . . . . . . . 1-3
Development tool . . . . . . . . . . . . . . . . . . . . . . . . . . . . . . . . . . . . . . . . . . . . . . . . . . . . . . . . . . . . . 1-3
Application . . . . . . . . . . . . . . . . . . . . . . . . . . . . . . . . . . . . . . . . . . . . . . . . . . . . . . . . . . . . . . . . . . . 1-3
Chapter 2 Configuring Printer Driver Settings
Displaying the printer driver configuration screen . . . . . . . . . . . . . . . . . . . . . . . . . . . . . . . . . . . . . . . 2-1
Option Settings . . . . . . . . . . . . . . . . . . . . . . . . . . . . . . . . . . . . . . . . . . . . . . . . . . . . . . . . . . . . . . . . . . . . 2-3
Paper Source Option . . . . . . . . . . . . . . . . . . . . . . . . . . . . . . . . . . . . . . . . . . . . . . . . . . . . . . . . . . . 2-3
Printer Color Specification . . . . . . . . . . . . . . . . . . . . . . . . . . . . . . . . . . . . . . . . . . . . . . . . . . . . . . . 2-4
Main settings . . . . . . . . . . . . . . . . . . . . . . . . . . . . . . . . . . . . . . . . . . . . . . . . . . . . . . . . . . . . . . . . . . . . . . 2-5
Media Type . . . . . . . . . . . . . . . . . . . . . . . . . . . . . . . . . . . . . . . . . . . . . . . . . . . . . . . . . . . . . . . . . . . 2-5
Color . . . . . . . . . . . . . . . . . . . . . . . . . . . . . . . . . . . . . . . . . . . . . . . . . . . . . . . . . . . . . . . . . . . . . . . . . 2-6
Mode . . . . . . . . . . . . . . . . . . . . . . . . . . . . . . . . . . . . . . . . . . . . . . . . . . . . . . . . . . . . . . . . . . . . . . . . 2-6
Ink Information . . . . . . . . . . . . . . . . . . . . . . . . . . . . . . . . . . . . . . . . . . . . . . . . . . . . . . . . . . . . . . . . 2-6
Print Preview . . . . . . . . . . . . . . . . . . . . . . . . . . . . . . . . . . . . . . . . . . . . . . . . . . . . . . . . . . . . . . . . . . 2-6
Paper Settings . . . . . . . . . . . . . . . . . . . . . . . . . . . . . . . . . . . . . . . . . . . . . . . . . . . . . . . . . . . . . . . . . . . . . 2-7
Paper Source . . . . . . . . . . . . . . . . . . . . . . . . . . . . . . . . . . . . . . . . . . . . . . . . . . . . . . . . . . . . . . . . . . 2-7
Auto Cut . . . . . . . . . . . . . . . . . . . . . . . . . . . . . . . . . . . . . . . . . . . . . . . . . . . . . . . . . . . . . . . . . . . . . 2-8
Paper Size/Page Size . . . . . . . . . . . . . . . . . . . . . . . . . . . . . . . . . . . . . . . . . . . . . . . . . . . . . . . . . . . 2-8
Copies . . . . . . . . . . . . . . . . . . . . . . . . . . . . . . . . . . . . . . . . . . . . . . . . . . . . . . . . . . . . . . . . . . . . . . . 2-10
Orientation . . . . . . . . . . . . . . . . . . . . . . . . . . . . . . . . . . . . . . . . . . . . . . . . . . . . . . . . . . . . . . . . . . . 2-10
Printable Area . . . . . . . . . . . . . . . . . . . . . . . . . . . . . . . . . . . . . . . . . . . . . . . . . . . . . . . . . . . . . . . . . 2-10
Roll Paper Option . . . . . . . . . . . . . . . . . . . . . . . . . . . . . . . . . . . . . . . . . . . . . . . . . . . . . . . . . . . . . . 2-11
Layout Settings . . . . . . . . . . . . . . . . . . . . . . . . . . . . . . . . . . . . . . . . . . . . . . . . . . . . . . . . . . . . . . . . . . . . 2-12
Reduce/Enlarge . . . . . . . . . . . . . . . . . . . . . . . . . . . . . . . . . . . . . . . . . . . . . . . . . . . . . . . . . . . . . . . 2-12
Using the Print Preview Screen . . . . . . . . . . . . . . . . . . . . . . . . . . . . . . . . . . . . . . . . . . . . . . . . . . . . . . . 2-13
Chapter 3 Utilities
EPSON Status Viewer Utility . . . . . . . . . . . . . . . . . . . . . . . . . . . . . . . . . . . . . . . . . . . . . . . . . . . . . . . . . . 3-2
Status display . . . . . . . . . . . . . . . . . . . . . . . . . . . . . . . . . . . . . . . . . . . . . . . . . . . . . . . . . . . . . . . . . . 3-2
Resident icon . . . . . . . . . . . . . . . . . . . . . . . . . . . . . . . . . . . . . . . . . . . . . . . . . . . . . . . . . . . . . . . . . . 3-4
Setting up the status viewer . . . . . . . . . . . . . . . . . . . . . . . . . . . . . . . . . . . . . . . . . . . . . . . . . . . . . 3-5
Starting and stopping the EPSON Status Viewer . . . . . . . . . . . . . . . . . . . . . . . . . . . . . . . . . . . . . 3-8
Nozzle Check Utility . . . . . . . . . . . . . . . . . . . . . . . . . . . . . . . . . . . . . . . . . . . . . . . . . . . . . . . . . . . . . . . . 3-9
Head Cleaning Utility . . . . . . . . . . . . . . . . . . . . . . . . . . . . . . . . . . . . . . . . . . . . . . . . . . . . . . . . . . . . . . . 3-10
Top-Margin Correction Utility . . . . . . . . . . . . . . . . . . . . . . . . . . . . . . . . . . . . . . . . . . . . . . . . . . . . . . . . 3-11
Right-Margin Correction Utility . . . . . . . . . . . . . . . . . . . . . . . . . . . . . . . . . . . . . . . . . . . . . . . . . . . . . . . 3-13
Adjust LR Utility . . . . . . . . . . . . . . . . . . . . . . . . . . . . . . . . . . . . . . . . . . . . . . . . . . . . . . . . . . . . . . . . . . . . 3-15
Appendix-A Acquiring printer information by PRINTER_INFO_2
TM PRINTER_INFO_2.Status Converting Table . . . . . . . . . . . . . . . . . . . . . . . . . . . . . . . . . . . . . . . . . . . A-1
Rev. F
Table of contents iii
iv Table of contents
Rev. F
TM-C100 Printer Driver Operation Manual
Chapter 1
Outline of the TM-C100 Printer Driver
The TM-C100 Printer Driver is the Windows Driver that is included in the Epson Advanced
Printer Driver (hereafter referred to as APD).
This manual describes how to configure the setting of the TM-C100 Printer Driver and how to
use the Utilities.
Refer to the "Epson Advanced Printer Driver Installation Manual" for the Installation and the
test printing of the TM-C100 Printer Driver.
Refer to the "TM-C100 Technical Reference Guide" for the using and setup of the TM-C100
Printer Driver This manual can be downloaded from following URL.
For customers in North America, go to the following web site.
http://www.epsonexpert.com/ and follow the on-screen instructions.
For customers in other countries, go to the following web site.
http://www.epson-pos.com/
Refer to the "Epson Advanced Printer Driver TM Driver Manual" and "Epson Advanced Printer
Driver Printer Driver Specification" about how to use other printer drivers and the specifications
for them.
Note:
The procedures in this manual are described using the Windows XP Professional screens. When using
a different OS, the screens may look different.
Rev. F
Outline of the TM-C100 Printer Driver 1-1
TM-C100 Printer Driver Features
❏ Similarly to normal Windows drivers, allows you to print from commercial text editor or
spreadsheet applications easily, without any programming.
It also allows you to print from applications created using Visual Basic, Visual C++, etc.
❏ Allows you to print using Windows TrueType Fonts. The printer does not have embedded
fonts.
❏ When using roll paper, the roll paper can be cut precisely with the autocutter.(“Auto Cut”
on page 2-8)
❏ Allows you to print in full color using the four colors (CMYK) of the color model. (“Color”
on page 2-6)
❏ Allows you to use various kinds of paper such as ordinary paper, exclusive fine paper, and
exclusive mat paper according to the use for the color model. (“Paper Source Option” on
page 2-3)
❏ Allows you to perform condensed printing. That is, you can print an A4 size ledger sheet in
receipt width. (“Layout Settings” on page 2-12)
❏ Allows you to confirm the error information and the ink information by watching the
condition of the printer with the Status Viewer. You cannot use both the Status Viewer and
the EPSON Status API at the same time. (“EPSON Status Viewer Utility” on page 3-2)
❏ The Nozzle Check utility prints a nozzle check pattern and you can detect clogging of the
nozzles on the print head. And ink clogging can be removed by operating the Head
Cleaning. (“Nozzle Check Utility” on page 3-9)
❏ Allows you to adjust minutely the position to print by Top-Margin Correction, Right-Margin
Correction and Adjust LR. (“Top-Margin Correction Utility” on page 3-11)
❏ Allows you to acquire printer information by using PRINTER_INFO_2. (“Acquiring printer
information by PRINTER_INFO_2” in Appendix-A)
Note:
Coexistence with OPOS is not possible
1-2 Outline of the TM-C100 Printer Driver
Rev. F
TM-C100 Printer Driver Operation Manual
Operating Environment
Operating Environment of the Printer Driver
The minimum requirements in hardware and system to use the printer driver are listed below.
Operating system
Microsoft Windows 2000 Professional SP4 or later
Microsoft Windows XP Professional SP1 or later
Operating system settings
Screen resolution: 800 × 600 or higher
Screen color: 16-bit color or higher (256 colors or
lower not supported)
Interface
USB 1.1 or higher
Others
Microsoft Windows XP Professional system
requirements
• PC with processor of 300 MHz clock speed or
higher recommended
• Intel Pentium/Celeron series, AMD K6/Athlon/
Duron family, or their compatible processors
recommended
• RAM 128 MB or more recommended
Development tool
•
Microsoft Visual Basic
•
Microsoft Visual C++
Application
Allows printing from Windows applications. Printing from commercial text editor or
spreadsheet applications is possible without any programming.
To be able to acquire printer information such as "no paper" or "error" from an application, the
StatusAPI must be used. In such case, the user must develop the application him/herself.
Note:
To print from Microsoft Word, the file must be saved in Word 6.0/95 format.
Rev. F
Outline of the TM-C100 Printer Driver 1-3
1-4 Outline of the TM-C100 Printer Driver
Rev. F
TM-C100 Printer Driver Operation Manual
Chapter 2
Configuring Printer Driver Settings
To print, you need to use the printer driver to configure printer settings.
This chapter describes how to configure printer settings of the printer driver.
Note:
If you replace one TM-C100 with another TM-C100 when you have logged on to your computer as a user
with administrative rights (a user belonging to the Administrators group), the printer may not operate
correctly. In this case, restart your computer.
Displaying the printer driver configuration screen
Start the printer settings with the [Printing Preferences] screen and the [Printing Defaults]
screen. Both screens have the same appearance and settings for each tab.
Note:
It is recommended that both screens of the [Printing Preferences] and the [Printing Defaults] are
configured to the same settings for each tab. Otherwise, this may cause incorrect print results.
❏ [Printing Preferences] screen:
In the [Printers] folder, right-click the TM-C100 icon and
then select [Printing Preferences] from the shortcut menu.
The printing preferences screen appears.
❏ [Printing Defaults] screen:
In the [Printers] folder, right-click the TM-C100 icon and
then select [Printing Preferences] from the shortcut menu.
On the [Advanced] tab, click [Printing Defaults...]. The
printing defaults screen appears.
Configuration tabs
Window pane
Saving or canceling
changes
Rev. F
Configuring Printer Driver Settings 2-1
❏ Configuration tabs:
The following tabs are available on the configuration screen: Main
settings, Paper Settings, Layout Settings, Option Settings, Utility, and
Version. You can select a tab and then modify its settings.
❏ Window pane:
When you change the printer driver settings, the paper information
and printer information in the window pane are also updated. You
can use this pane to check the changes you have made to the settings.
❏ Saving or canceling changes in printer driver settings:
After making changes to settings on the various tabs, you can use the
following three buttons to apply the changes.
•
[OK]:
Apply the changes and then close the configuration screen.
•
[Cancel]:
Cancel the changes and then close the configuration screen.
•
[Apply]:
Apply the changes but do not close the configuration screen.
2-2 Configuring Printer Driver Settings
Rev. F
TM-C100 Printer Driver Operation Manual
Option Settings
Use the [Option] tab to select a Paper Source Option and specify a Printer Color Specification for
the printer. When configuring the printer settings, start from this tab.
Paper Source Option
For the paper source option, select from the following choices: Auto Sheet Feeder, Roll Paper
Holder, or None.
Note:
❏ Always select a paper source option according to the option installed on the printer. If the selected
paper source option does not match the option actually installed on the printer, the printer still works
but the print result is not guaranteed.
❏ When you change the paper source option on this tab, the paper source selection (see “Paper Source”
on page 2-7) on the [Paper] tab is also changed.
❏ If the set paper size/page size (“Paper Size/Page Size” on page 2-8) is larger than the printable area in
the paper source setting, the following message appears. Clicking [OK] displays the paper settings
screen (see “Paper settings screen” on page 2-9).
Rev. F
Configuring Printer Driver Settings 2-3
Printer Color Specification
Select “Color” or “Black,” whichever is appropriate for your printer model.
❏ For color model:
Select “Color.”
❏ For monochrome model:
Select “Black.”
Note:
❏ Always select a color option according to the option specified for the printer. If the selected color
option does not match the option specified for the printer, the printer does not print normally.
❏ When you have changed the printer color specification, the following message appears. Please make
sure that the printer color specification is correct. Clicking [OK] enables the change.
❏ When you change the printer color option on this tab, the following settings on the [Main] tab are also
changed.
•
Medias type (see “Media Type” on page 2-5)
•
Color (see “Color” on page 2-6)
•
Mode (see “Mode” on page 2-6)
2-4 Configuring Printer Driver Settings
Rev. F
TM-C100 Printer Driver Operation Manual
Main settings
Use the [Main] tab to specify the Media Type, Color, Printing Mode, and Print Preview settings.
Media Type
The media type setting differs depending on the printer color specification setting on the
[Option] tab. (See “Printer Color Specification” on page 2-4.)
❏ For color model:
You can select the following media types: Plain Paper, Special
Fine Paper, and Special Matte Paper.
❏ For monochrome model: The media type is set to “Plain Paper” and cannot be changed.
Note:
If the correct media types for the printer color specification of your printer are not displayed, the printer
color specification setting on the [Option settings] tab is incorrect. Set it correctly, referring to “Printer
Color Specification” on page 2-4, and then select the media type.
Rev. F
Configuring Printer Driver Settings 2-5
Color
Specify either “Color” or “Monochrome” for printing.
❏ For color model:
You can select “Color” or “Monochrome.”
❏ For monochrome model: The color is set to “Monochrome” and cannot be changed.
Note:
If the correct color options for the printer color specification of your printer are not displayed, the printer
color specification setting on the [Option settings] tab is incorrect. Set it correctly, referring to “Printer
Color Specification” on page 2-4, and then select the color.
Mode
Specify the printing modes.
❏ Quality or speed:
Select “Quality” or “Speed.” Selecting “Quality”gives better print
results, but it reduces the print speed.
•
For color model:
You can select “Quality” or “Speed.”
•
For monochrome model:The mode is set to “Speed” and cannot be changed.
•
Brightness:
•
For color model:
•
For monochrome model:The mode is set to “Medium (center)” and cannot be changed.
This setting affects mainly the midtones and does not affect the bright
(highlight) and dark (shadow) parts as much.
You can set to the three levels of brightness, “Bright,” “Medium
(center),” or “Dark.”
Ink Information
Gives information about the level of ink remaining in the printer.
Note:
The ink information does not appear in the following cases.
•
When the printer is offline.
•
When the EPSON Status Viewer is not running. (See “Starting and stopping the EPSON Status
Viewer” on page 3-8.)
Print Preview
If you select the “Print Preview” check box, you can use the preview screen to check the print
image before printing actually starts. For information on the print preview screen, see “Using
the Print Preview Screen” on page 2-13.
2-6 Configuring Printer Driver Settings
Rev. F
TM-C100 Printer Driver Operation Manual
Paper Settings
Use the [Paper] tab to specify the Paper Source, Auto Cut, Paper Size/Page Size, Copies,
Orientation, and Printable Area or Roll Paper Option.
Paper Source
The paper source setting differs depending on the paper source option setting on the [Option]
tab. (See “Paper Source Option” on page 2-3.)
❏ If the paper source option is set to “Auto Sheet Feeder”
Specify either “Auto-Sheet Feeder” or “Manual Feed Slot.”
❏ If the paper option is set to “Roll Paper Holder”
The paper source is set to “Roll Paper Holder” and cannot be changed.
❏ If the paper source option is set to “None”
The paper source is set to “Manual Feed Slot” and cannot be changed.
Note:
❏ To set the paper source, it is recommended that you start from the “Printers” folder. If you set the
paper source from an application, for example, this may cause incorrect print results.
❏ If the correct paper sources for the paper source option of your printer are not displayed, the paper
source option setting on the [Option settings] tab is incorrect. Set it correctly, referring to “Paper
Source” on page 2-7, and then select the paper source.
Rev. F
Configuring Printer Driver Settings 2-7
❏ If the set paper size/page size (“Paper Size/Page Size” on page 2-8) is larger than the printable area of
the paper source you have selected, the following message appears. Clicking [OK] displays the paper
settings screen (see “Paper settings screen” on page 2-9).
Auto Cut
The auto sheet cutter setting is available for selection, as shown below, only when the paper
source (see “Paper Source” on page 2-7) is set to “Roll Paper Holder.”
•
Full Cut:
Cut paper from edge to edge after printing is finished.
•
None:
Do not perform auto cut.
Paper Size/Page Size
Select a paper size or a page size to use from the list. Depending on the paper source (see “Paper
Source” on page 2-7), the paper sizes available from the list are different.
❏ If the paper source is “Auto Sheet Feeder,” the following paper sizes are available.
•
Post Card 100 × 148 mm
•
A6 105 × 148 mm
•
Business Card 55 × 90 mm
•
Refill (Bible Size) 95 × 170 mm
•
User Defined Size
❏ If the paper source is “Roll Paper Holder,” the following page sizes are available.
•
Roll Paper 76 × 297 mm
•
Roll Paper 105 × 297 mm
•
User Defined Size
❏ If the paper source is “Manual Feed Slot,” the following paper sizes are available.
•
Post Card 100 × 148 mm
•
A6 105 × 148 mm
•
Refill (Bible Size) 95 × 170 mm
•
User Defined Size
Note:
❏ For information on how to specify a user defined size, see “Specifying a user defined paper size” on
page 2-9.
❏ If you have selected a paper size/page size that is larger than the printable area in the paper source
setting (see “Paper Source” on page 2-7), the paper settings screen (see “Paper settings screen” on
page 2-9) appears.
2-8 Configuring Printer Driver Settings
Rev. F
TM-C100 Printer Driver Operation Manual
Paper settings screen
If the set paper size/page size is larger than the printable area of the paper source setting (see
“Paper Source” on page 2-7), the following screen appears.
Select the output paper size and click [OK] to enable the Fit to Page feature.
(Fit to Page feature: Reduces the print result to fit the output paper size.)
Specifying a user defined paper size
When you select “User Defined Size” as the paper size, the following screen appears.
1. Enter a name for this user defined paper size.
2. Enter the width and length of the paper. If you change the unit, the entered numbers are
adjusted automatically to the new unit. The range of sizes of paper that you can specify for
the each paper source are listed in the following table.
Unit: 0.01 inch
Manual
Auto Sheet Feeder
Roll Paper
Paper width
(Lower: default)
193-850
(394)
193-531
(394)
178-413
(299)
Paper length
(Lower: default)
473-1169
(583)
335-826
(583)
60-3937
(1169)
3. Click [Save]. The user-defined paper size name, width, and length are saved.
Rev. F
Configuring Printer Driver Settings 2-9
Note:
You can define up to 30 user-defined paper sizes. If you try to save more than 30 user-defined paper
sizes, the following message appears and saving is not possible. In this case, you need to use [Delete]
to delete some user-defined sizes before you can add more.
4. Select a paper size and then click [OK]. The selected paper size is enabled.
Copies
You can specify the number of copies to print, whether to collate, and whether to print in the
reverse order.
•
Copies:
Specify the number of copies to print. The number must be in the
range of 1 to 999.
•
Collate:
For a document with multiple pages, the pages are collated when printed.
•
Reverse Order:
The printing order is reversed, starting from the last page first.
Orientation
Specify whether to print in normal or up-sidedown orientation.
•
Rotate by 180º:
Rotate 180º and then print.
Printable Area
This setting appears if the paper source (see “Paper Source” on page 2-7) is set to “Manual Feed
Slot” or “Auto Sheet Feeder.” You can set the printable area to either of the following selections.
•
Standard:
Printing is possible up to a width of 113.3 mm.
•
Maximum:
Printing is possible up to a width of 118.6 mm.
Note:
If the paper type is “Plain Paper” and the mode setting is “Speed,” the printable area is fixed at
“Standard” and therefore cannot be changed.
Centered:
Specify whether to center the print data on the page (vertically and horizontally) for
printing.
2-10 Configuring Printer Driver Settings
Rev. F
TM-C100 Printer Driver Operation Manual
Roll Paper Option
This setting appears if the paper source (see “Paper Source” on page 2-7) is set to “Roll Paper
Holder.” You can select either of the following options.
❏ Banner Mode:
In this mode, no margins are set in the top and bottom
of the page. If the autocutter is enabled, the roll paper is
cut after all printing is finished.
•
Save roll paper:
Select this check box if you want to save roll paper by removing the
extra space at the bottom of a document.
❏ Cut-Sheet Mode:
In this mode, margins are set in the top and bottom of
the page. If the autocutter is enabled, paper is cut after
each page.
•
Rev. F
Print page frame: Select this checkbox if you want to print a dotted line at the end of
each page after data is printed.
Configuring Printer Driver Settings 2-11
Layout Settings
Use the [Layout] tab to Reduce/Enlarge print data on a page.
Reduce/Enlarge
Note:
If the Fit to Page feature (see “Paper settings screen” on page 2-9) is enabled, this check box is selected and
cannot be changed.
When this check box is selected, you can select either of the following options.
❏ Fit to Page:
Select this option to automatically reduce or enlarge print data to fit to
the page of the paper size selected from the combo box.
Note:
In this case, the scale ratio is calculated not from the paper size but the printable area. Therefore, even
if you select the same size as the output paper, the scale ratio is smaller than 100%.
❏ Custom:
Select a paper size from the combo box and specify the scale ratio to a
value from the range of 10 to 400%, in 1% increments. If you specify a
value less than 100%, the print data is reduced. If you specify a value
greater than 100%, the print data is enlarged.
2-12 Configuring Printer Driver Settings
Rev. F
TM-C100 Printer Driver Operation Manual
Using the Print Preview Screen
If you have set up print preview, then the print preview screen appears before data is printed, so
that you can check the print result of the current settings. For information on how to set up the
print preview, see the “Print Preview” on page 2-6.
1 2 3 4 5 6 7
8
9
10
<Magnify dialog>
[View]→[Magnify]
Rev. F
Configuring Printer Driver Settings 2-13
Menu command selection
Description
—
Select object.
1
[File] → [Print Document]
Print the document.
8
[File] → [Cancel Print Job]
Cancel the print job.
9
[View] → [Show Toolbars] → [Standard]
Show or hide the standard toolbar (1 to 7).
—
[View] → [Show Toolbars] → [Print]
Show or hide the print toolbar (8 and 9).
—
[View] → [Printable Area]
Show or hide the printable area.
5
[View] → [Zoom] → [Fit To Screen]
Enlarge or reduce the print preview to match the screen
size.
3
[View] → [Zoom] → [Maximum Zoom]]
Zoom to the maximum.
4
[View] → [Zoom] → [Zoom In]/[Zoom Out]
Enlarge or reduce the print preview by right-clicking or
clicking the print preview.
2
[View] → [Magnify]
Display the magnify dialog box.
—
[View] → [Next Page]
Display the next page if there are multiple pages for
printing.
7
[View] → [Previous Page]
Display the previous page if there are multiple pages for
printing.
6
[View] → [Go To]
Go to a specific page if there are multiple pages for
printing.
10
[Print Options] → [Remove Page]
Do not print the page being displayed.
—
[Print Options] → [Add Page]
Print the page being displayed.
—
2-14 Configuring Printer Driver Settings
Icon
Rev. F
TM-C100 Printer Driver Operation Manual
Chapter 3
Utilities
The TM-C100 printer driver provides a number of utilities, and this chapter describes how to use
them, as listed below.
To access the utilities, use the [Utility] tab of the printer driver.
❏ EPSON Status Viewer Utility:
Use this utility to display error information and the level of
ink remaining.
❏ Nozzle Check Utility:
Use this utility to determine clogged nozzles on the print
head.
❏ Head Cleaning Utility:
Use this utility to clean the nozzles on the print head.
❏ Top-Margin Correction Utility:
Use this utility to adjust any misaligned top margins of
your printouts.
❏ Right-Margin Correction Utility: Use this utility to adjust any misaligned right margins of
your printouts.
❏ Adjust LR Utility:
Rev. F
Use this utility to adjust misaligned vertical lines in your
printouts.
Utilities 3-1
EPSON Status Viewer Utility
The EPSON Status Viewer monitors the state of the printer and then notifies you of error
information or the level of ink remaining.
The status display function (see “Status display” on page 3-2) and the resident icon function (see
“Resident icon” on page 3-4) enable you to know the state of the printer.
To set up notification, use the status viewer setting function (see “Setting up the status viewer”
on page 3-5).
Note:
The EPSON Status Viewer can be used only if during the printer driver installation operation you have
set the startup type to “Automatic” on the startup type setting screen.
Status display
The status display function provides the following viewing methods for you to know the state of
the printer.
❏ Viewer dialog box (see “Viewer dialog box” on page 3-2)
❏ Balloon (see “Balloon” on page 3-4)
Viewer dialog box
From the [Utility] tab, click [EPSON Status Viewer]. The viewer dialog box appears, as shown
below.
Printing
preparation
state
Status information
Display or hide
cartridge information
The viewer dialog box appears in the following cases.
3-2 Utilities
Rev. F
TM-C100 Printer Driver Operation Manual
•
When you click the resident icon on Task Tray
•
When you right-click the resident icon on Task Tray and then select [EPSON TM-C100]
•
When the status set for notification changes (with the display method set to “Dialog”;
see “Setting up the status viewer” on page 3-5)
❏ Printing preparation state
The printing preparation state displays changes according to the state of the printer, as
described in the following table.
State
Icon
No status display
Character display
Printing is ready.
Warning
Error
Printing is not ready.
❏ Status information
•
Displays the state of the status items set for notification. (For information on how to set
up notification, see “Setting up the status viewer” on page 3-5.)
•
Displays different types of status, separated by a line.
❏ Cartridge information/ink information list
•
Cartridge information: Displays graphically the remaining amount of ink.
•
Ink Details:
Displays the type of ink, manufacture date, model, and name of
manufacturer.
The [Cartridge Information] ink information graph and the [Ink Details] button do not
appear if the state of the printer is “Off-line” or “No response from printer.”
Rev. F
Utilities 3-3
Balloon
With the display method set to “Balloon”, a balloon appears when the status set for notification
changes. (For information on the display method and how to set up notification, see “Setting up
the status viewer” on page 3-5.)
A balloon appears above the resident icon on Task Tray, as shown below.
Resident icon
When the printer and your computer are connected and then the power of the printer is turned
on, the resident icon appears on Task Tray as shown below.
The resident icon changes according to the status of the printer.
Resident icon and change in printer status
Priority
Status
1
Error
2
Warning
3
No status display
Icon
Note:
You can set up for each status type whether to send notification. (For information on how to set up
notification of each status, see “Setting up the status viewer” on page 3-5.)
When you click the resident icon, the viewer dialog box appears. (For information on the viewer
dialog box, see “Status display” on page 3-2.)
3-4 Utilities
Rev. F
TM-C100 Printer Driver Operation Manual
Setting up the status viewer
You can use the status viewer dialog box to set up notification for each status (error, warning,
and status).
To display the status viewer dialog box, right-click the resident icon on Task Tray, and then
select [Status Viewer setting] from the shortcut menu.
The status viewer dialog box consists of three tabs: Error tab, Warning tab, and Status tab. For
each type of status, you can set up the display and specify whether to send notification.
Error tab
Use the error tab to set up display of errors and specify whether to send error notifications.
❏ Notification items
Select the check boxes of error notification items. When the condition for a selected item is
met, this item is displayed as an error status.
Error notification item
Rev. F
Condition for display
No response from printer
No response
Off-line
Offline
Printer Cover open
When printer cover is opened
Mechanical error
When mechanical error occurs
Autocutter error
When autocutter error occurs
Critical error
When non-recoverable error
occurs
Auto-recoverable error
When automatically recoverable
error occurs
No Ink Cartridge
When there is no ink cartridge
Replace Ink Cartridge
When the ink cartridge should be
replaced with a new one.
Utilities 3-5
❏ Display settings
•
Display method:
You can select “Dialog” or “Balloon” to display the status.
•
Display position:
If “Dialog” is selected, you can further specify where on the screen to
display the dialog box. You can select [Top], [Center], or [Bottom].
❏ Display interval:
Specify an interval from the range of 0 to 999, in seconds, to use to
display the status again after it is displayed. If you set the interval to
0, the status is not displayed again until it changes.
Warning tab
Use the warning tab to set up display of warnings and specify whether to send a warning
notification.
❏ Notification items
Select the check boxes of warning notification items. When the condition for a selected item
is met, this item is displayed as an warning status.
Warning notification item
Condition for display
No paper
When there is no paper
Release Lever open
When the paper path is opened (release lever pressed
down)
Ink low
When the ink level is low
❏ Display settings
•
Display method:
•
Display position: If “Dialog” is selected, you can further specify where on the screen to
display the dialog box. You can select [Top], [Center], or [Bottom].
❏ Display interval:
3-6 Utilities
You can select “Dialog” or “Balloon” to display the status.
Specify an interval from the range of 0 to 999, in seconds, to use to
display the status again after it is displayed. If you set the interval to
0, the status is not displayed again until it changes.
Rev. F
TM-C100 Printer Driver Operation Manual
Status tab
Use the status tab to set up display of status and specify whether to send status notification.
❏ Notification items
Select the check boxes of status notification items you want to display.
Status notification item
Feeding paper/Paper feed finished
Feed Button pressed/Feed Button not-pressed
Paper at TOF Sensor/No paper at TOF Sensor
Paper at BOF Sensor/No paper ay BOF Sensor
Paper Type: Roll paper/Cut paper
Cut paper: Manual paper feeder/Auto sheet feeder
Cleaning/Cleaning finished
❏ Display settings
•
Display method:
•
Display position: If “Dialog” is selected, you can further specify where on the screen to
display the dialog box. You can select [Top], [Center], or [Bottom].
❏ Display interval:
Rev. F
You can select “Dialog” or “Balloon” to display the status.
Specify an interval from the range of 0 to 999, in seconds, to use to
display the status again after it is displayed. If you set the interval to
0, the status is not displayed again until it changes.
Utilities 3-7
Starting and stopping the EPSON Status Viewer
During the driver installation operation, if the startup type is set to “Automatic” on the startup
type setting screen, the EPSON Status Viewer starts monitoring the printer as soon as the install
operation is completed. If you want to stop or start the EPSON Status Viewer again, use the
following procedure.
Note:
Before using StatusAPI, you need to stop the EPSON Status Viewer. For information on StatusAPI, refer
to the “StatusAPI Reference Manual.”
1. Open the [Control Panel] folder and then the [Administrative Tools] folder. Finally, select
[Services].
2. Select “EPSON Status Viewer Service” as shown below.
3. To stop EPSON Status Viewer:Right-click and then select [Stop] from the shortcut menu.
To start EPSON Status Viewer again:Right-click and then select [Start] from the shortcut
menu.
Note:
While the EPSON Status Viewer is stopped temporarily, if you turn the power of the printer off and
then on again or if you restart the computer, the EPSON Status Viewer starts again automatically.
3-8 Utilities
Rev. F
TM-C100 Printer Driver Operation Manual
Nozzle Check Utility
The Nozzle Check utility prints a nozzle check pattern. By examining the nozzle check pattern,
you can detect whether the nozzles on the print head are clogged.
Use the following procedure to check the nozzles on the print head.
1. Turn on the power of the printer.
2. Load paper. (For information on how to load paper, refer to the “TM-C100 User's Manual”
supplied with the printer. For information on how to set up the paper source, see “Paper
Source” on page 2-7.)
3. From the [Utility] tab, click [Nozzle Check]. The following message appears.
4. Click [Next]. A nozzle check pattern is printed.
5. After the nozzle check pattern is printed, the following message appears.
6. If the nozzle check pattern does not appear incomplete, this indicates the nozzles on the
print head are normal. Click [Finish] to exit this utility.
If the nozzle check pattern appears incomplete, this indicates the nozzles on the print head
are clogged. Click [Clean Head] to perform print head cleaning.
(For information on how to clean the print head, see “Head Cleaning Utility” on page 3-10.)
<Normal printing example>
<Printing example where nozzles are clogged>
Some lines are not printed.
Rev. F
Utilities 3-9
Head Cleaning Utility
The Head Cleaning utility enables you to clean nozzles on the print head of the printer.
To perform print head cleaning, use the following procedure.
1. Turn on the power of the printer.
2. From the [Utility] tab, click [Head Cleaning]. The following message appears.
3. Click [Next]. Print head cleaning starts.
4. When print head cleaning is finished, the following message appears.
To see if the print head has been cleaned successfully, click [Check Nozzle] to print a nozzle
check pattern. (For information on nozzle check, see “Nozzle Check Utility” on page 3-9.)
Note:
The print head cleaning operation removes anything blocking the nozzles and therefore prevents the
nozzles from clogging up. Because this operation also removes some ink, it should not be used unless
necessary.
3-10 Utilities
Rev. F
TM-C100 Printer Driver Operation Manual
Top-Margin Correction Utility
The Top-Margin Correction utility enables you to print a test page and correct any top margin
misalignment problem.
Use the following procedure to correct a top margin misalignment problem.
1. Remove the Roll Paper Holder if it is installed on the printer.
2. Turn on the power of the printer.
3. Manually load paper of A6 or larger size.
Note:
To correct the top margin misalignment problem, be sure to always use paper of A6 or larger size, and
set the paper source to “Manual Feed Slot”; if you use any other combinations, the printer still works
but the print result is not guaranteed. (For information on how to load paper, refer to the “TM-C100
User's Manual” supplied with the printer. For information on how to set up the paper source, see
“Paper Source” on page 2-7.)
4. From the [Utility] tab, click [Top-Margin Correction]. The following message appears.
5. Click [Next]. A test page is printed by using the current top margin position correction
value, and the following message appears.
Rev. F
Utilities 3-11
6. Check the print result. If correction is required, enter a new top margin position and then
click [Retry]. Another test page is printed by using the new top margin position, and the
same message appears. Repeat these steps until the correct top margin is obtained.
<Print result example: where top margin correction is required>
Check the number appearing at the top
of the fan object. Enter this number. In this
example, entering -6 will correct the
problem and the top margin will be
printed in the correct position, as shown
in the figure on the right.
<Print result example: where top margin position is correct>
The number at the top
edge of paper is 0.
Printing
direction
7. After the top margin correction value is determined, click [Save and Exit]. The top margin
correction value is saved and correction is completed.
3-12 Utilities
Rev. F
TM-C100 Printer Driver Operation Manual
Right-Margin Correction Utility
The Right-Margin Correction utility enables you to print a test page and correct a right margin
misalignment problem.
Use the following procedure to correct a right margin misalignment problem.
1. Remove the Roll Paper Holder if it is installed on the printer.
2. Turn on the power of the printer.
3. Manually load paper of A6 or larger size.
Note:
To correct a right margin misalignment problem, be sure to always use paper of A6 or larger size, and
set the paper source to “Manual Feed Slot”; if you use any other combinations, the printer still works
but the print result is not guaranteed. (For information on how to load paper, refer to the “TM-C100
User's Manual” supplied with the printer. For information on how to set up the paper source, see
“Paper Source” on page 2-7.)
4. From the [Utility] tab, click [Right-Margin Correction]. The following message appears.
5. Click [Next]. Two patterns (patterns #1 and #2) are printed by using the current LR position
correction value, and the following message appears.
Rev. F
Utilities 3-13
6. Check patterns #1 and #2 in the print result. If correction is required, enter the new position
correction values and then click [Retry]. The two patterns are printed again, and the same
message appears. Repeat these steps until the correct right margin is obtained.
<Print result example: where right margin
position is correct>
<Print result example: where right margin
correction is required>
Check the number
appearing at the right
side of the fan object.
Enter this number. In this
example, entering -2 will
correct the problem and
the right margin will be
printed in the correct
position, as shown in the
figure on the right.
The number at the right
edge of paper is 0.
Printing
direction
7. After the right margin correction value is determined, click [Save and Exit]. The right margin
correction value is saved and correction is completed.
3-14 Utilities
Rev. F
TM-C100 Printer Driver Operation Manual
Adjust LR Utility
The Adjust LR utility enables you to print a test page and then adjust any printing
misalignment.
Use the following procedure to correct a printing misalignment problem.
1. Turn on the power of the printer.
2. Load paper. (For information on how to load paper, refer to the “TM-C100 User's Manual”
supplied with the printer. For information on how to set up the paper source, see “Paper
Source” on page 2-7.)
3. From the [Utility] tab, click [Adjust LR]. The following message appears.
4. Click [Next]. Two patterns (patterns #1 and #2) are printed by using the current LR
correction value, and the following message appears.
Rev. F
Utilities 3-15
5. Check patterns #1 and #2 in the print result. If correction is required, enter the new LR
correction values and then click [Retry]. The two patterns are printed again, and the same
message appears. Repeat these steps until the correct LR correction value is obtained.
<Print result example: where LR correction is required>
Find the number of the upper
and lower lines that form a
straight line. Enter this number
as the LR correction value. In
this example, entering 2 will
correct the problem and the LR
position will be printed
correctly, as shown in the figure
on the right.
<Print result example: where LR position is correct>
Upper line 0 and lower line 0
become a straight line.
Printing
direction
6. After the LR correction value are determined, click [Save and Exit]. The LR correction values
are saved and correction is completed.
If roll paper is used, after the correction, paper is automatically transported and cut, and the
paper is advanced to the top margin position of the roll paper.
3-16 Utilities
Rev. F
Advanced Printer Driver Printer Driver Specification
Appendix-A
Acquiring printer information by PRINTER_INFO_2
This chapter explains printer information acquired by PRINTER_INFO_2.
APD allows you to acquire printer information by using PRINTER_INFO_2.
TM PRINTER_INFO_2.Status Converting Table
The PRINTER_INFO_2 structure specifies detailed printer information. In this member, you can
acquire the following TM printer statuses.
Rev.F
PRINTER_INFO_2
Status of TM-printer
PRINTER_STATUS_BUSY
not available
PRINTER_STATUS_DOOR_OPEN
1.When the paper roll cover is open.
2.When the carriage cover is open.
PRINTER_STATUS_ERROR
not available
PRINTER_STATUS_INITIALIZING
During the printer initializing.
PRINTER_STATUS_IO_ACTIVE
not available
PRINTER_STATUS_MANUAL_FEED
Feeding paper by the paper feed switch.
PRINTER_STATUS_NO_TONER
Ink cartridge is not installed or replace Ink cartridg.
PRINTER_STATUS_NOT_AVAILABLE
1.Power is not stable.
2.The interface cable is not connected.
PRINTER_STATUS_OFFLINE
1.Between when the power is turned on or the printer is reset and
when the printer becomes ready to receive data.
2.Between when the printer becomes ready to receive data and
when the printer mechanism is finished initializing.
3.During the self-test.
PRINTER_STATUS_OUT_OF_MEMORY
not available
PRINTER_STATUS_OUTPUT_BIN_FULL
not available
PRINTER_STATUS_PAGE_PUNT
not available
PRINTER_STATUS_PAPER_JAM
not available
PRINTER_STATUS_PAPER_OUT
when an empty paper supply is detected by the paper roll end
detector.
PRINTER_STATUS_PAPER_PROBLEM
not available
PRINTER_STATUS_PAUSED
not available
PRINTER_STATUS_PENDING_DELETION
not available
PRINTER_STATUS_POWER_SAVE
not available
PRINTER_STATUS_PRINTING
Between when StartDoc is executed and when the status of
printing completed is returned by the printer.
PRINTER_STATUS_PROCESSING
not available
PRINTER_STATUS_SERVER_UNKNOWN
not available
PRINTER_STATUS_TONER_LOW
The ink low is detected.
Acquiring printer information by PRINTER_INFO_2 A-1
Advanced Printer Driver Printer Driver Specification
PRINTER_INFO_2
Status of TM-printer
PRINTER_STATUS_USER_INTERVENTION
An error has occurred.
1.Printing on the paper roll is not performed correctly due to a
cover-open.
2.Print head temperature error
3.The autocutter does not work correctly.
4.The home position cannot be detected due to a paper jam.
5.The carriage is out of phase.
6.The cut sheet cannot be ejected even if a certain amount of
feeding is tried.
7.The CPU on the printer executes an incorrect address or the I/F
board is not connected.
8.After R/W checking, the printer does not work correctly
9.The power supply voltage is extremely high.
10.The power supply voltage is extremely low.
11.Internal circuit does not work correctly.
12.UIB does not work correctly.
PRINTER_STATUS_WAITING
not available
PRINTER_STATUS_WARMING_UP
not available
A-2 Acquiring printer information by PRINTER_INFO_2
Rev.F
Seiko Epson Corporation