1
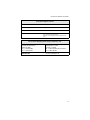
OmniConnect
ISDN
Internet Access Device
Quick Install Guide
PN 613-10791-00 Rev. A
Copyright ”1999 Allied Telesyn International, Corp.
960 Stewart Drive Suite B, Sunnyvale CA 94086 USA
All rights reserved. No part of this publication may be reproduced without prior written permission
from Allied Telesyn International, Corp.
Ethernet is a registered trademark of Xerox Corporation. All other product names, company names,
logos or other designations mentioned herein are trademarks or registered trademarks of their
respective owners.
Allied Telesyn International, Corp. reserves the right to make changes in specifications and other
information contained in this document without prior written notice. The information provided
herein is subject to change without notice. In no event shall Allied Telesyn International, Corp. be
liable for any incidental, special, indirect, or consequential damages whatsoever, including but not
limited to lost profits, arising out of or related to this manual or the information contained herein,
even if Allied Telesyn International, Corp. has been advised of, known, or should have known, the
possibility of such damages.
Regulatory Compliance Information
Agency Approvals
The following agency approvals have been obtained for the LanEdge
OmniConnect ISDN internet access device in the areas of Safety, EMC and PTT
(Public Telephone and Telegraph).
Safety
UL 1950, CSA 22.2 No. 950, EN 60950, EN 41003
EMC
FCC Part 68, FCC Class B, Canada ICES-003 Issue 2 Class B,
EN 55022 Class B (CISPR22 B), EN50082-1, VCCI Class 2
PTT
FCC Part 68, Canadian CS-03, Germany National ISDN-1TR6,
French Delta NET-3, Australian TS-13
CE Marking Directive
The CE mark signifies that the product meets the European Directive 73/23/EEC,
89/336/EEC, and 91/263/EEC.
EMC Information
LanEdge OmniConnect ISDN product conforms to the requirements of
Electro-Magnetic Compatibility (EMC) Directive 89/336/EEC. The installation
and maintenance procedures in the installation and configuration guide must be
followed to ensure compliance with these regulations.
EN55022B Statement
This equipment has been tested and found to comply with the limits for a Class B
equipment pursuant of EN55022. Class B equipment is information technology
equipment which satisfies the Class B interference limits. Such equipment should
not be subject to restrictions on its sale and is generally not subject to restrictions
on its use.
iii
Regulatory Compliance Information
FCC Class B Statement
This device complies with Part 15 of the FCC Rules. Operation is subject to the
following two conditions: (1) This device may not cause harmful interference,
and (2) this device must accept any interference received, including interference
that may cause undesired operation.
This device has been tested and found to comply with the limits for a Class B
digital device, pursuant to Part 15 of the FCC Rules. These limits are designed to
provide reasonable protection against harmful interference in a residential
installation. This equipment generates, uses and can radiate radio frequency
energy and if not installed and used in accordance with the instructions may
cause harmful interference to radio communications. However, there is no
guarantee that interference will not occur in a particular installation. If this
equipment does cause harmful interference to radio or television reception,
which can be determined by turning the equipment off and on, the user is
encouraged to correct the interference by one or more of the following measures:
•
•
•
•
Reorient or relocate the receiving antenna.
Increase the separation between the equipment and the receiver.
Connect the equipment into an outlet on a circuit different from that to
which the receiver is connected.
Consult the dealer or an experienced radio/TV technician for help.
FCC Part 68 Statement
The Federal Communications Commission (FCC) has established rules which
permit htis device to be directly connected to the telephone network,
Standardized jacks are used for these connections. This equipment should not be
used onparty lines or coin phones.
If this device is malfunctioning, it may also be causing harm to the telephone
network; the device should be disconnected until the source of the problem can
be determined and until repair has been made. If this is not done, the telephone
company may temporarily disconnect service.
The telephone company may make changes in its technical operations and
procedures; if such changes affect the compatibility or use of this device, the
telephone company is required to give adequate notice of the changes. You will be
advised of your right to file a complaint with the FCC.
iv
OmniConnect ISDN Quick Install Guide
If the telephone company requests information on what equipment is connected
to their lines, inform them of:
1. The telephone number to which this unit is connected.
2. The ringer equivalence number.
3. The USOC jack required [RJ11C]
4. The FCC Registration Number [xxxUSA-xxxxx-xx-e]
In the event of equipment malfunction, an authorized agent should perform all
repairs. It is the responsibility of users requireing service to report the need for
service to an authorized agent or company.
Operating Conditions for Canada
Canadian Department of Communications Notice
The Canadian Department of Communications label identifies certified
equipment. This certification means that the equipment meets certain
telecommunications network protective operational and safety requirements. The
Department does not guarantee the equipment will operate to the user's
satisfaction. Before installing the equipment, users should ensure that it is
permissible to be connected to the facilities of the local telecommunications
company. The equipment must also be installed using an acceptable method of
connection. In some cases, the company's inside wiring associated with a single
line individual service may be extended by means of a certified connector
assembly (telephone extension cord). The customer should be aware that
compliance with the above conditions may not prevent degradation of service in
some situations.
Repairs to certified equipment should be made by an authorized Canadian
maintenance facility designated by the supplier. Any repairs or alterations made
by the user to this equipment, or equipment malfunctions, may give the
telecommunications company cause to request the user to disconnect the
equipment. Users should ensure for their own protection that the electrical
ground connections of the power utility, telephone lines, and internal metallic
water pipe system, if present, are connected together. This precaution may be
particularly important in rural areas. Users should not attempt to make such
connections themselves, but should contact the appropriate electric inspection
authority, or electrician, as appropriate.
v
Regulatory Compliance Information
The Ringer Equivalence Number (REN) assigned to each terminal device
provides an indication of the maximum number of terminals allowed to be
connected to a telephone interface. The termination on an interface may consist
of any combination of devices subject only to the requirement that the sum of the
Ringer Equivalence Number of all the devices does not exceed 5.
Canadian DOC Compliance Notice
This digital apparatus does not exceed the Class B limits for radio noise emissions
for digital apparatus as set in the Radio Interference Regulations of the Canadian
Department of Communications.
Canadiene DOC Avis de Conformation
Le present appareil numerique n'emet pas de bruits radioelectriques depassant les
limits applicables aux appareils numeriques de class B prescrites dans le
Reglement sur le brouillage radioelectrique edicte par le ministere des
Communications du Canada.
Operating Conditions for the EC
The LanEdge OmniConnect ISDN internet access device conforms to the Low
Voltage Directive 73/23/EEC, the EMC Directive 89/336/EEC, and the TTE
Directive 91/263/EEC.
The European Community specifies the requirements for ISDN cabling for use
with the OmniConnect access device. In countries outside the EC, these
specifications hsould be used to ensure optimal signal quality. ISDN cable
specifications are listed in the table below.
Requirement
TX/RX
Capacitance
TX/RX
Impedance
Crosstalk
Loss at
96 KHz
Connector
Resistance
Ohmic
Resistance
Value
350pF
> 75 ohms
>60 dB
3 ohms
< 0.5 %
Tolerance
0% to 10%
N/A
N/A
+10 % to
-10 %
N/A
vi
OmniConnect ISDN Quick Install Guide
Operating Conditions for the United Kingdom
The following apply to the LanEdge OmniConnect ISDN internet access device
when used in the UK:
1. Interconnection directly, or by way of other apparatus, of ports marked U, S/
T, and Phone with ports marked or not so marked may produce hazardous
conditions on the network, and that advice should be obtained from a
competent engineer before such a connection is made.
2. The BRI connector must be hardwired permanently to the S-reference
connection point by using a connect-one-time-only, non-removable plug
(RJ45 with the latch tab removed).
3. This apparatus must be connected to a main socket outlet with a protective
earth contact.
4. Connection of power supply: LanEdge OmniConnect ISDN internet access
devices are intended for use when supplied with power from a supply
providing 220-240 VAC, 50/60 Hz up to 1.25A.
vii
Table of Contents
Regulatory Compliance Information ïïïïïïïïïïïïïïïïïïïïïïïïïïïïïïïïïïïïïïïïïïïïïïïïïïïïïïïïïïïïïïïïïïïïïïïïïïïïïïLLL
Agency Approvals.................................................................................................................. iii
CE Marking Directive ........................................................................................................... iii
EMC Information ................................................................................................................. iii
EN55022B Statement.................................................................................................... iii
FCC Class B Statement ..................................................................................................iv
FCC Part 68 Statement ..................................................................................................iv
Operating Conditions for Canada..........................................................................................v
Canadian Department of Communications Notice .....................................................v
Canadian DOC Compliance Notice .............................................................................vi
Canadiene DOC Avis de Conformation.......................................................................vi
Operating Conditions for the EC ..........................................................................................vi
Operating Conditions for the United Kingdom..................................................................vii
Chapter 1
Introduction ïïïïïïïïïïïïïïïïïïïïïïïïïïïïïïïïïïïïïïïïïïïïïïïïïïïïïïïïïïïïïïïïïïïïïïïïïïïïïïïïïïïïïïïïïïïïïïïïïïïïïïïïïïïïïïïïïïïïï ì
Overview ..................................................................................................................................1
Work sheet...............................................................................................................................2
Topology..................................................................................................................................3
Chapter 2
Installation ïïïïïïïïïïïïïïïïïïïïïïïïïïïïïïïïïïïïïïïïïïïïïïïïïïïïïïïïïïïïïïïïïïïïïïïïïïïïïïïïïïïïïïïïïïïïïïïïïïïïïïïïïïïïïïïïïïïïïïïï è
Verifying OmniConnect ISDN Package Contents ................................................................5
Placing the OmniConnect ......................................................................................................5
To wall mount a LanEdge product ................................................................................6
To place a single LanEdge product on a desktop ..........................................................6
To interlock a group of LanEdge products on a desktop .............................................7
Connecting the OmniConnect ...............................................................................................8
Verify your PC Configuration ..............................................................................................10
Load OmniStart on the Host PC ..........................................................................................10
Configuration Screens...........................................................................................................10
Enter Password..............................................................................................................11
Internet Service Provider Setup ...................................................................................12
ISDN Parameters Setup................................................................................................13
DNS Configuration.......................................................................................................14
ISDN Parameter Verification.......................................................................................15
Advanced Setup Options (Finish)................................................................................17
LanEdge Publications............................................................................................................18
Where To Find Allied Telesyn and Technical Publications .......................................18
ix
7DEOHýRIý&RQWHQWV
Appendix A
LanEdge OmniConnect ISDN Installation Guide Feedback ïïïïïïïïïïïïïïïïïïïïïïïïïïïïïïïïïïïïïïïïïïëì
Appendix B
Technical Support Fax Order ïïïïïïïïïïïïïïïïïïïïïïïïïïïïïïïïïïïïïïïïïïïïïïïïïïïïïïïïïïïïïïïïïïïïïïïïïïïïïïïïïïïïïïïïïëê
x
Chapter 1
Introduction
Overview
The OmniConnect ISDN Internet Access Device connects users on a local
Ethernet LAN to the Internet over Integrated Services Digital Network (ISDN)
Basic Rate Interface (BRI) lines. The illustrations below show the front and rear
panels of the OmniConnect ISDN.
REAR OF ISDN (S/T)
REAR OF ISDN (U)
FRONT
ý
Power Col
10Base-T LEDs
Ports 1, 2, 3, 4
ISDN Activity LEDs
B1, B2, D Channels
1
Introduction
Work sheet
Before you begin installation, use the following OmniConnect work sheet and
note the listed information for use during configuration.
OmniConnect ISDN Work Sheet
‰ ISDN line is installed and accessible.
‰ Obtain information about your account from your ISDN Provide:
— ISDN Switch Type ______________________________________
— DN #1 (Directory Number) ______________________________
— SPID #1 (if used, North America only) _____________________
— DN #2 (Directory Number, if used) ________________________
— SPID #1 (if used, North America only) ______________________
‰ Obtain information about your account from your Internet Service Provider
(ISP):
— Login name ___________________________________________
— Password _____________________________________________
— Phone number(s) ______________________________________
— Domain Name ________________________________________
— Domain Name Server IP Address
(default 192.168.1.1 )____________________________________
‰ Plan your network topology by identifying the OmniConnect unit
connections.
‰ Verify that you have the hardware and cables necessary to complete the
installation. User supplied items include:
— 10Base-T Cables to connect each client workstation (1 provided)
— ISDN Cable (RJ-45) and External NT-1 for S/T model
— Telephone or telephone equipment for use with POTS connector.
2
OmniConnect ISDN Quick Install Guide
Topology
Plan your topology including the OmniConnect. The sample topology below
shows the ISDN OmniConnect used for a group of PC users in a small office
network. In this example, four 10 Mbps PC NICs and a telephone are connected
to the OmniConnect.
Legend
ISDN Cable (RJ-45)
10Base-T Cable
Telephone Cable (RJ-11)
ISDN Line
(NT-1 for S/T)
OmniConnect*
ISDN (U)
or (S/T)
1
2
3
4
Phone or FAX
10 Mbps Workstations
*Note: Port 1 is either a Workstation or LAN
3
Chapter 2
Installation
Use this section to verify your package contents, position the device, and
configure it.
Verifying OmniConnect ISDN Package Contents
— One OmniConnect ISDN Internet Access Device
— Accessory bag containing rubber feet and bumpers for desktop
placement, and screws for wall mounting the unit
— This Quick Install Guide
— One 10Base-T Ethernet Cable
— One analog telephone cable
— One two-piece AC power adapter
— A CD-ROM labeled OmniStart
— A Warranty Card
Placing the OmniConnect
You can wall mount a single LanEdge product, place it on a desktop, or interlock
two or more to form a single unit that occupies only one footprint on the
desktop.
Air vents are located on both sides of the LanEdge product casing.
Caution
Air vents must not be blocked and must have free access to the room
ambient air for cooling.
5
Installation
To place your LanEdge product, see the steps that follow:
‰ “To wall mount a LanEdge product” on page 6
‰ “To place a single LanEdge product on a desktop” on page 6
‰ “To interlock a group of LanEdge products on a desktop” on page 7
To wall mount a LanEdge product
1. Do not install the rubber feet or bumpers if you are wall mounting the
product. If you previously installed the square rubber bumpers, remove them
using the following step. (The round rubber feet need not be removed.)
‰ To remove the square rubber bumper from the unit:
Place the unit upside down. For each bumper, insert the tip of a small
straight-slot screwdriver between the rubber bumper and the unit casing.
Press down on the screwdriver to pry the bumper off.
2. Prepare the wall by installing two screws (provided) at 9 1/4-inch (23.5 cm)
apart on center.
3. Position the unit onto the screws. Skip to “Connecting the OmniConnect” on
page 8.
To place a single LanEdge product on a desktop
1. Place the unit upside down.
2. Locate the round rubber feet and square rubber bumpers from the accessory
bag. Remove the paper cover from the adhesive and press a rubber foot into
each round receptacle on the bottom of the unit. Remove the paper cover
from the adhesive and press a rubber bumper into each square receptacle on
the bottom of the unit.
3. Put the unit on the desktop. Skip to “Connecting the OmniConnect” on
page 8.
6
OmniConnect ISDN Quick Install Guide
To interlock a group of LanEdge products on a desktop
You can interlock two or more LanEdge products. Interlocking is a physical
placement so that the products occupy only one footprint on the desktop.
Interlocking does not connect the devices in any other way.
If you are installing a FastPrint Server, place it as the base (bottom) unit,
otherwise, place the OmniConnect as the base unit.
1. Select the base unit and place it upside down on a work surface. Locate the
rubber feet and bumpers from the accessory bag. Remove the paper cover
from the adhesive and press a rubber foot into each round receptacle on the
bottom of the unit. Remove the paper cover from the adhesive and press a
rubber bumper into each square receptacle on the bottom of the unit.
2. Place each of the other units upside down on a work surface. Locate the
rubber feet and bumpers from the accessory bag. Do not install the square
rubber bumpers. Remove the paper cover from the adhesive and press a round
rubber foot into each round receptacle on the bottom of the unit.
1RWH
The LanEdge products will not interlock properly if the square rubber
bumpers are installed on the interlocking (upper) unit; install these
bumpers only on the base unit.
7
Installation
3. Place the first LanEdge unit on the desktop as the base. If you are installing a
FastPrint Server, place it as the base (bottom) unit, otherwise, place the
OmniConnect as the base unit.
4. Pry off the interlock cap at each corner of the unit: From the side of the unit,
insert the tip of a small straight-slot screwdriver into the opening of the
interlock cap. Press down on the screwdriver to pry the cap off.
5. Place the next unit over the base (stack) and press down on each corner to
snap the units together.
6. Repeat steps 4 and 5 until all units are in the assemblage.
7. Continue with the installation instructions for each product, and then return
to “Connecting the OmniConnect” on page 8.
Connecting the OmniConnect
1. Connect the ISDN cable to the OmniConnect at the rear panel connector. For
the other end,
— On ISDN (U): connect the cable directly to the ISDN line.
— On the ISDN (S/T): connect the cable to an external NT-1 on the
ISDN line.
2. Connect a telephone (optional) to the POTS connector at the rear panel using
a RJ-11 telephone cable (one provided).
3. Connect the Ethernet LAN devices to the OmniConnect at the rear panel
connectors. Use a straight through RJ-45 cable (one provided) to connect to
the PC through a 10 Mbps or 10/100 Mbps Ethernet Network Interface Card
(NIC).
To connect a LAN to the OmniConnect, use a straight through cable to Port 1
and move the MDI switch to the ON position (use a non-conductive [plastic]
object to move the switch through the case access on the bottom of the
OmniConnect). This eliminates the need for a crossover cable.
1RWH
For your convenience, a flexible cable tie at the right rear of the LanEdge
chassis can be used to secure the Ethernet cables.
4. Apply power to the OmniConnect as follows:
8
OmniConnect ISDN Quick Install Guide
Plug the AC power adapter provided with the unit into the correct AC power
source for this adapter. Next connect the DC cable from the adapter into the
OmniConnect DC input.
Verify that the Power LED lights (see LED table).
5. Verify that the Ethernet LEDs light green (see LED table).
For troubleshooting techniques, refer to your Installation Guide.
You are now ready to configure and setup the OmniConnect. To continue, see
“Verify your PC Configuration” on page 10.
LED
Color
State
Description
Power
Green
On
The unit is receiving power, voltage is within the acceptable
range, and the power supply is working.
Off
No power.
Flashing
The unit is experiencing collisions on the LAN segment. It is
normal for this indicator to flash on occasion
Off
Normal operation.
On
The port is connected to a active 10Base-T repeater or
adapter and the link is active.
Flashing
The port is receiving data packets.
Off
Port is not connected to an active 10Base-T repeater or
adapter.
On
The channel is connected to an active ISDN switch.
Flashing
The channel is receiving and transmitting.
Off
The channel is not active.
Col
Ethernet
Amber
Green
ISDN Activ- Green or
ity:
Amber
B1, B2, D
9
Installation
Verify your PC Configuration
1. Verify that your NIC and network driver are correctly installed; the Ethernet
LED on the OmniConnect and the Link LED on the NIC should be lit. If
necessary, refer to the installation manual for the NIC and the PC.
2. Verify that the TCP/IP protocol is installed and configured on each PC
connected to the OmniConnect. For details concerning this, refer to the
“TCP/IP Network Installation and Configuration” section of your Installation
Guide. See “LanEdge Publications” on page 18 for a list of documents.
Load OmniStart on the Host PC
Use these steps to install OmniStart on the host PC.
1. Insert the CD-ROM and, if necessary, execute the setup.exe file using Run
within the Windows£95/NT Start button or by using Windows£Explorer.
2. Follow the instructions on the screen to install the applications on the PC and
run the configuration applications. The process starts by displaying the
OmniStart Welcome screen, then automatically copies files to the PC, and
begins the configuration. (You will need the work sheet information your
prepared in Chapter 1 during the configuration.) For descriptions of some of
the required configuration screens, refer to “Configuration Screens,”
The simple installation described here is for a configuration that does not have an
established network and uses the OmniConnect as a DHCP server to dynamically
allocate IP address for each client PC. For specific configuration information
when using the OmniConnect with an established network, or to define filters,
DHCP parameters, or other Advanced Setup Options, refer to your Installation
Guide. See “LanEdge Publications” on page 18 for a list of documents.
Configuration Screens
The OmniStart configuration and setup utility has several screens. In most cases
the onscreen setup instructions allow you to quickly and simply install and
configure the OmniConnect. This section presents some of the mandatory
screens where the user must enter information for a simple installation.
10
OmniConnect ISDN Quick Install Guide
Enter Password
Access to the OmniStart configuration utility is protected by a password. The
default password is omni. Enter omni in the dialog box titled Password and press
Enter or Next> to advance to the next screen.
To change the password from the default value, click the check box 'Select this box
to change the password' and then enter the new password in the New Password
and Confirm New Password dialog boxes and press Next>. This will change the
password to the new value. The maximum length of the password string is 15
characters and it may be any alphanumeric character. Pressing Cancel will
terminate the OmniStart installation.
11
Installation
Internet Service Provider Setup
The Internet Service Provider Setup screen is used to enter the Internet Service
Provider (ISP) login and password information. The Internet Service Provider
(ISP) provides you with a login name, password and phone number. Enter the
login information provided in this screen. The OmniConnect will use this
information to establish a connection with the Internet Service Provider.
Remember to enter any numbers required to access an outside area code or city
code.
12
OmniConnect ISDN Quick Install Guide
ISDN Parameters Setup
The ISDN Parameters Screen is used to enter ISDN configuration information.
When an ISDN line is ordered, the ISDN dial-tone provider assigns an ISDN
switch for the ISDN connection, the switch software configuration and the ISDN
phone numbers (Directory Number) and SPID Numbers. Use this screen to enter
all these parameters. Please note that in certain cases, fewer than two SPIDs or
ISDN Phone Numbers may be provided.
First, use the ISDN Switch Type pull-down menu to select the ISDN Switch Type.
If the switch type assigned by the service provider is not listed, please select the
Others option.
Next, select the Switch Software Type. The setup program highlights only valid
Switch Software Types based on the ISDN Switch Type.
Enter the ISDN phone numbers and ISDN SPID numbers (if applicable) into the
edit boxes.
13
Installation
The Enable Data Over Voice (DOV) dialog box should be checked if the ISDN
line is provisioned for Data Over Voice. If the Disable Data Over Voice (Data
Only) dialog box is checked, the OmniConnect will request Data Only bearer
services. The default is Disable Enable Data Over Voice.
Once this information has been entered, pressing the Next > button will advance
the setup process to the next screen. Pressing the Advanced >>> button will allow
the setting of advanced ISDN parameters. If the ISDN link has not been
configured or all the information on this screen is not available, the setup process
may be canceled by pressing the Cancel button. At any time, it is possible to
return to the previous setup screen by pressing the <Back button.
DNS Configuration
Use this screen to enter the domain name and IP address of the DNS Server used
by the ISP. This information is provided by the ISP. This information is required
only if the DHCP server is being utilized. The DHCP server will provide the DNS
information collected from this screen to all the DHCP clients. The DHCP Server
may be disabled by selecting the Disable DHCP Server option. When the Disable
DHCP Server is selected, the DNS Configuration information is not required and
may be left blank.
14
OmniConnect ISDN Quick Install Guide
The default DHCP address is 192.168.1.1.
Once this information is entered, press the Next > button to proceed to the next
screen.
ISDN Parameter Verification
The ISDN Parameter Verification screen verifies the configuration of the ISDN
line, ISDN switch settings, the ISP information and the DNS information. Each
of these parameters are checked for the ISDN line. If there is a failure, an 'x' is
displayed next to the failing item, and if the configuration is correct, a check mark
is displayed.
15
Installation
ISDN Configuration checks to see if the ISDN line is correctly connected to a live
ISDN line and if the ISDN switch parameter settings (switch type, Directory
Number and SPID) are correct. If any of these are not true, ISDN Configuration
returns a failure.
ISP Configuration checks to see if the ISP information (login, password and
phone number) are correct and a login is possible. If any of these are not correct,
this test returns a failure.
Lastly, DNS Configuration checks the DNS server address that is entered in the
DNS screen. If this is incorrect, this test returns a failure.
If there were any failures, press the Next button to go to the Advanced Setup
Options screen, then press the Back button to reenter the configuration and make
corrections.
When the test returns satisfactory results, this concludes the setup process for a
simple installation. Press the Next button to go to the next screen.
16
OmniConnect ISDN Quick Install Guide
Advanced Setup Options (Finish)
Once the user has reached this Advanced Setup Options screen, all the minimum
parameters for a simple installation of the OmniConnect have been configured.
Press the FINISH button on this screen to exit the setup program. The
OmniConnect is ready for use!
The various options located on this screen may be used to setup various advanced
options.
For specific configuration information when using the OmniConnect with an
established network, or to define filters, DHCP parameters, or other Advanced
Setup Options, refer to your Installation Guide. Refer to “LanEdge Publications”
on page 18 for a list of documents.
When needed, to restart the OmniStart setup select the 2PQL6WDUW#
&RQILJXUDWLRQ option icon installed in the 2PQL6WDUW#,6'1 folder.
17
Installation
LanEdge Publications
Visit our technical publications website at: www.alliedtelesyn.com
Web and
CD-ROM
Related Guides
Print
9
OmniConnect ISDN Installation Guide,
613-10787-00
9
OmniConnect ISDN Quick Install Guide,
613-10791-00 (shipped with product)
Where To Find Allied Telesyn and Technical Publications
For Technical Support or Service
Location
Phone
Fax
Americas
United States, Canada, Mexico, Central
America, South America
1 (800) 428-4835
1 (918) 628-3222
Asia
Singapore, Taiwan, Thailand, Malaysia,
Indonesia, Korea, Philippines, China, India
(+65) 3815-613
(+65) 3833-830
Australia
Australia, New Zealand
(61) 2-943-5111
(61) 2-9438-4966
France
France, Belgium, Luxembourg, The Netherlands, Middle East, Africa
(+33) 1-60-92-15-32
(+33) 1-69-28-37-49
Germany
Germany, Switzerland, Austria, Eastern
Europe
(+49) 30-435-900-126
(+49) 30-435-70-650
Hong Kong
(+852) 2-529-4111
(+852) 2 529-7661
Italy
Italy, Spain, Portugal, Greece, Turkey,
Israel
(+39) 02-416047
(+39) 02-419282
Japan
(+81) 3-3443-5640
(+81) 3-3443-2443
United Kingdom
United Kingdom, Denmark, Norway, Sweden, Finland, Iceland
(+44) 1-235-442560
(+44) 1-235-442680
Technical Bulletin Board Service
1 (425) 483-7979
18
OmniConnect ISDN Quick Install Guide
For Technical Support or Service
Location
Phone
Fax
Technical Support Address
[email protected]
CompuServe
Go ALLIED
FTP Server
$GGUHVVã JDWHZD\ïFHQWUHïFRPý>ORZHUFDVHýOHWWHUV@
/RJLQã DQRQ\PRXVý>ORZHUFDVHýOHWWHUV@
3DVVZRUGã \RXUýHðPDLOýDGGUHVVý>UHTXHVWHGýE\ýWKHýVHUYHUýDWý
ORJLQ@
For Information Regarding Allied Telesyn International, Corp.
Allied Telesyn International, Corp.
19015 North Creek Parkway
Bothell, WA 98011
Tel: 1 (425) 487-8880
Fax: 1 (425) 489-9191
Allied Telesyn International, Corp.
960 Stewart Drive, Suite B
Sunnyvale, CA 94086
Tel: 1 (800) 424-4284 (USA and Canada)
Fax: 1 (408) 736-0100
World Wide Web
http://www.alliedtelesyn.com
19
Appendix A
LanEdge OmniConnect ISDN Installation
Guide Feedback
Please tell us what additional information you would like to see discussed in this
guide. If there are topics you would like information on that were not covered in
this guide, please photocopy this page, answer the questions and fax or mail this
form back to Allied Telesyn. The mailing address and fax number are at the
bottom of the page. Your comments are valuable when we plan future revisions of
this guide.
I found the following the most valuable _______________________________
_______________________________________________________________
_______________________________________________________________
_______________________________________________________________
I would like the following more developed _____________________________
_______________________________________________________________
_______________________________________________________________
_______________________________________________________________
I would find this guide more useful if _________________________________
_______________________________________________________________
_______________________________________________________________
_______________________________________________________________
Please fax or mail your feedback. Fax to 1-408-736-0100. Or mail to:
Allied Telesyn International, Corp.
c/o Technical Communications Depart.
960 Stewart Drive, Suite B
Sunnyvale, CA 94086 USA
PN 613-10791-00 Rev A
21
Appendix B
Technical Support Fax Order
Name __________________________________________________________________
Company _______________________________________________________________
Address ________________________________________________________________
City ________________________ State/Province_______________________________
Zip/Postal Code ___________________ Country_______________________________
Phone _______________________________Fax________________________________
Incident Summary
Model number of Allied Telesyn product I am using _____________________________
Firmware release number of Allied Telesyn product_____________________________
Other network software products I am using (e.g., network managers)
______________________________________________________________________
______________________________________________________________________
Brief summary of problem _________________________________________________
______________________________________________________________________
Conditions (List the steps that led up to the problem.) ___________________________
______________________________________________________________________
______________________________________________________________________
______________________________________________________________________
______________________________________________________________________
______________________________________________________________________
______________________________________________________________________
______________________________________________________________________
Detailed description (Please use separate sheet)
Please also fax printouts of relevant files such as batch files and configuration files.
When completed, fax this sheet to the appropriate Allied Telesyn office. Fax numbers can
be found on page 18.
23