1
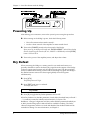
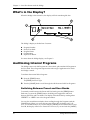
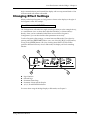
Your First Session with the Wedge – Chapter 1
CHAPTER 1
YOUR FIRST SESSION WITH
THE WEDGE
Unpacking and Inspection
Your Wedge was packed carefully at the factory, and the shipping carton was
designed to protect the unit during shipping. Please retain this container in the
highly unlikely event that you need to return the Wedge for servicing.
The shipping carton should contain the following items:
•
•
•
•
•
J
This instruction manual
Alesis Wedge with the same serial number as shown on shipping carton
Program Chart
AC Power Supply Adapter
Alesis warranty card
It is important to register your purchase; if you have not already filled out your warranty
card and mailed it back to Alesis, please take the time to do so now.
Basic Connections
The Wedge is designed to accommodate a number of applications, whether you are
connecting it with a mixing console or connecting an instrument directly into it.
Briefly described here are the basic connections to get you up and running quickly.
For more information on connections, please refer to Chapter 2.
•
Mono In, Mono or Stereo Out: Connect a 1/4” phone cord to the [LEFT] INPUT
of the Wedge from a mono source The [LEFT] INPUT is normalled to the
[RIGHT] INPUT. This means if you just connect the [LEFT] INPUT, and leave the
the [RIGHT] INPUT unplugged, the same signal will be sent to both Inputs.
Connect another cable from the [LEFT] OUTPUT of the Wedge to an amplifier or
mixer input. Additionally, you could connect a second cable to the [RIGHT]
OUTPUT for use with a stereo amplification system, or two mixer inputs.
•
Stereo: Connect two 1/4” phone cords to the [LEFT] & [RIGHT] INPUTS of the
Wedge from a stereo source , and two 1/4” phone cords from the OUTPUTS of
the Wedge to a stereo amplification system or two mixer inputs.
Wedge Reference Manual
7
Chapter 1 – Your First Session with the Wedge
Powering Up
After making your connections, turn on the system’s power using this procedure:
Ê Before turning on the Wedge’s power, check the following items:
•
•
Have all connections been made correctly?
Are the volume controls of the amplifier or mixer turned down?
Ë Turn on the [POWER] switch on the front panel of the Wedge.
Upon power-up, the display will briefly read “ALESIS WEDGE”, and will then display
the last selected Program Number (00–127, PRESET or USER Bank), and the [PROG]
button’s LED will be lit.
Ì Turn on the power of the amplifier/mixer, and adjust the volume.
Dry Defeat
When connecting the Wedge to a mixing console’s aux sends and returns, it is
generally desirable to remove the direct (dry) signal from the outputs of the Wedge
so that its output signal contains only the effected (wet) signal. The dry signal may
then be combined at the mixing console with the returning wet signal. The Wedge’s
Dry Defeat function removes the direct signal globally from all Programs
simultaneously.
Ê Press [UTIL].
The [UTIL] button will light.
Ë Press [EDIT] until page 1 is selected.
The display will read:
Dry Defeat
Ì Press [D] to toggle the Dry Defeat parameter ON or OFF.
When Dry Defeat is On, the Mix parameter of each effect (described later) will read “- -” to indicate it cannot be edited (it is fixed at 100%). Exceptions: The
RealRoom −>Flange Configuration will have its Reverb Mix parameter disabled (set
at 100%), but the Flange effect’s Mix will still be available for editing. The Lezlie>Room configuration will have its Lezlie Mix disabled, but the Reverb Mix will be
available for editing. For more information, see Chapter 2.
8
Wedge Reference Manual
Your First Session with the Wedge – Chapter 1
Setting Levels
Proper setting of the input and output levels is crucial in order to achieve the
maximum signal-to-noise ratio. As a good rule of thumb, it is usually best to set both
input and output level controls at 90% of full. This will decrease the possibility of
overload distortion and keep the amount of background noise to a minimum.
To manually set the Input and Output levels:
Ê Connect your audio source to the Wedge’s input(s), as described in Chapter 2.
Ë Press the [I/O] button.
Ì Feed signal to the Wedge’s input(s). You can set the Left and Right Input and
Output levels by moving the Value Sliders and Value Wheel. Your input signal
should make the meters go as far to the right as possible without clipping.
Automatic Input Level Settings
The Wedge has the unique ability to automatically select the proper levels for the
inputs based on the signal you are routing to it. In other words, you tell the it to autoadjust levels, and then feed it a signal (play your guitar or keyboard, or play back the
tape); the Wedge does the rest.
To auto-adjust the input levels:
Ê Connect your audio source to the Wedge’s input(s), as described in Chapter 2.
Ë Press and hold the [I/O] button, then press [TAP/AUDITION].
Ì Feed signal to the Wedge’s input(s).
The Auto Input function will “listen” to the signal at its input(s) for about 5 seconds,
and adjust the input levels for both channels. If the Wedge doesn’t detect any signal
level at the input, the Input Level will remain at its previous setting.
Wedge Reference Manual
9
Chapter 1 – Your First Session with the Wedge
What’s in the Display?
When the Wedge is first turned on, the display will look something like this:
The Wedge’s display is divided into 5 sections:
Ê
Ë
Ì
Í
Î
Program Number
Preset/User Bank
Program Name
Configuration
Input Level Meters
For more about the Wedge display, see Chapter 3.
Auditioning Internal Programs
The Wedge comes with 128 Programs in a Preset bank, plus another 128 Programs in
the User bank. These Programs represent the wide range of applications for which
the Wedge is suited.
To audition the internal effect Programs:
Ê Press the [PROG] button.
The [PROG] button will light.
Ë Turn the [VALUE] knob to scroll through the 128 Preset and 128 User Programs.
Switching Between Preset and User Banks
To instantly switch between the Preset and User banks, press the [PROG] button.
Each time you press the [PROG] button, the Wedge will toggle back and forth
between the Preset and User banks. The display will indicate this by reading either
“PRESET” or “USER” next to the Program number.
You can also switch between banks when scrolling through the Programs with the
[VALUE] knob. When you scroll clockwise past Preset 127, the display will “rollover” to User 00. Likewise, if you turn back the [VALUE] knob counterclockwise past
User 00, the display will move to Preset 127. However, if you turn back the [VALUE]
10
Wedge Reference Manual
Your First Session with the Wedge – Chapter 1
knob counterclockwise past Preset 00, the display will not wrap around back to User
127 but instead will remain at Preset 00.
Changing Effect Settings
When you dial up a Program, its Configuration is shown in the display to the right of
the Program’s name. For example:
Vocal Ballad HALL REVERB
The Configuration will either be a single reverb type effect (as in the example above),
or a combination of two or three effects (like Reverb+Delay, or Chorus>Delay>
Reverb). Once you have identified what effects are used in the Program’s
Configuration, you can then find the effect parameters more easily.
To edit a Program’s effect settings, you must first enter Edit mode. This is done by
pressing either the [EDIT/PAGE] button or any one of the [A], [B], [C] or [D] buttons,
as long as the [PROG] button is lit (Note: Pressing these buttons in other modes
performs different functions). Once in Edit mode, the display will look something
like this:
Ê
Ë
Ì
Í
Î
Page Numbers
Selected Page
Parameter Name Strip
Parameter Values and Bar Graphs
A, B, C, D and EDITED Indicators
For more about using the Wedge Display in Edit mode, see Chapter 3.
Wedge Reference Manual
11
Chapter 1 – Your First Session with the Wedge
To edit effect parameters:
Ê Press the [PAGE] button to enter Edit mode.
This selects the first page of effect parameters, if you are editing the Program for the first
time. There are usually two or more pages available in Edit mode, depending on the
Program’s Configuration. The exact number of pages available will be indicated by the
numbers illuminated in the bottom-left corner of the display. Repeatedly pressing
[PAGE] cycles through the available pages. The currently selected page will have a box
around its number. Each page contains up to four parameters, which are labeled with
abbreviated names directly above each.
Ë Move one of the [A-D] sliders.
The parameter will flash indicating it is selected for editing. Once you have modified a
parameter’s value, the word “EDITED” will appear directly beneath it. If you change the
value back to its original setting, the word “EDITED” will disappear.
J
Any changes you make are temporary, until you store those changes into memory. If the
Program you are editing is in the Preset bank, you must save the changes you’ve made to a
location in the User bank. If you recall another Program before storing, your changes will be
lost. For more information , see “Storing Edited Programs”, later in this chapter. For more
about editing effects parameters, see Chapter 4.
Using Online Help
The Wedge has built-in online help to assist you in identifying parameter functions
from the display, without having to look things up in this manual. Once you have
accessed Edit mode (see previous section), you can select any of the parameters
shown in the display by pressing the corresponding button ([A], [B], [C] or [D]).
However, by holding one of these buttons for more than one second, the upper
display will provide a more detailed description of the selected parameter.
For example, if we were still editing Preset 18 (see previous page), holding the [D]
button for more then one second would reveal the name of the “D” parameter:
INPUT LOWPASS FILTER
Once the button is released, the display reverts back to normal.
12
Wedge Reference Manual
Your First Session with the Wedge – Chapter 1
Adjusting Effects Mix Levels
Whether a Program contains a single effect or two or three effects, you can adjust
each effect’s mix to obtain a desirable balance between the original, uneffected signal
and each effect’s output. The Mix parameter (or “wet/dry mix”) for each effect is
found along with the other effect parameters in Edit mode. To make things easier, the
Mix parameter has been consistently placed at the far right of the display page (this
corresponds to the [D] button), on the last page of each effect. Since each effect has a
different number of edit pages, the Mix parameter will not always appear on the
same page for each Program. Keep in mind that if a Program uses more than one
effect, each effect will have its own Mix parameter.
Ê Press the [EDIT/PAGE] button to enter Edit mode.
Look at the far right side of the display for the word MIX (or some variation that identifies
a specific effect’s mix parameter; i.e. CMIX = Chorus Mix, RMIX = Reverb Mix, etc.). If
it doesn’t appear, press the [PAGE] button repeatedly until you find it. To be sure the
Mix parameter in the display is the one you want, use the built-in Online Help function
(see previous section) by holding the [D] button for more than one second.
Ë Press the [EDIT/PAGE] button repeatedly until you reach the highest numbered
page available is selected.
Ì Move the [D] slider to edit the Mix parameter.
The parameter will flash indicating it is selected for editing. The Mix parameter’s range
is 000-100å.
Comparing an Edited Program to its
Original Settings
The left side of the display always indicates the currently selected Program. If the
[PROG] button is pressed once while in Edit mode, the currently selected Program’s
name and the Configuration being used both appear in the upper part of the display.
Once a Program has been edited, the Configuration’s name will appear in lower case
letters. With multi-effect Configurations (where there is more than one effect being
used) and only one effect has been edited, only the edited effect’s name will appear
in lower case letters. Example: If using the Configuration ROOM+DELAY and you
have edited only the Delay’s parameters, the display will read “ROOM+delay” if the
[PROG] button is pressed. This indicates that one or more of the Delay’s parameters
have been altered, but the Reverb’s parameters have not been changed.
By pressing the [COMPARE] button, you can temporarily access the original version
of the Program you are editing — that is, the last Program saved to the currently
selected location number. This allows you to compare the differences created by
changing parameters in the edited Program.
While you are in Compare mode, the display will show the previous values and the
[COMPARE] button will light up. You can use the [EDIT/PAGE] button to scroll to
other pages while in Compare mode. Pressing the button again or pressing [PROG]
Wedge Reference Manual
13
Chapter 1 – Your First Session with the Wedge
exits Compare mode; the display will return to its original state and the edited
version of the Program will be restored.
Restoring an Edited Program to its Original
Settings
If you decide to abort the changes you have made to an edited Program, this can be
done in two easy steps:
Ê Press [PROG].
The display will exit Edit mode.
Ë Turn the [VALUE] knob to select a different Program, then turn it back the
opposite direction to re-select the original Program. (Alternately, you can press
the [PROG] button three times.)
This recalls the stored version of the selected Program number, and the Configuration
name in the display returns to all upper case letters. Consequently, any changes you had
made to the Program before turning the [VALUE] knob would be lost. (That is, unless
you stored the edited Program into memory first.)
Bypassing Effects
At any time you can bypass the effects, allowing you to hear the direct signal without
any processing. This can be done by pressing the [BYPASS] button.
J
14
If the Dry Defeat function is on (see previous section) and the BYPASS button is pressed, no
audio will pass through the unit. Similarly, if the Mix on any program is set to 100% wet and
Bypass is pressed, the unit will not have any audio from its outputs.
Wedge Reference Manual
Your First Session with the Wedge – Chapter 1
Storing and Naming Edited Programs
Once you are satisfied with the changes you have made to an edited Program, or are
creating a new Program from scratch, you will need to store your edited Program
back into memory. The Wedge will store the currently selected Program in nonvolatile memory (which is backed-up when the unit is turned off). If you edit a
Program, the changes you made will still be there the next time you switch on the
unit, even if you hadn’t stored the edited Program into memory yet. However, if you
select another Program from memory before storing the edited Program, your
changes will be lost forever.
J
Although the Wedge has two banks (Preset and User), you can only store Programs in the
User bank.
To store an edited Program:
Ê Press [STORE].
The [STORE] button will flash, and the display will read:
Store XXX (nnnnnnnnnnnn)?
…whereas XXX is a Program location number from 00—127 in the User bank, and
nnnnnnnnnnnn is the Program’s name.
Ë Use the [VALUE] knob to select which location (00—127) you wish to store the
selected Program into.
You can only store Programs into the User bank. If you select a Program from the Preset
bank and store it, you will automatically be taken into the User bank.
Ì If desired, change the Program’s name by pressing [A/NAME].
This moves the cursor from the location number field to the first character in the
Program’s name. Turn the [VALUE] knob to scroll through the list of available
characters. Use the [C/<] and [D/>] buttons to move the cursor’s position left and right,
respectively. If you need to move the cursor back to the Program number field to select a
different location to store to, press [B/ESC].
Note: To abort this operation — and thereby not store the edited Program — simply
press any other button except [STORE].
Í Press [STORE] again.
The [STORE] button’s LED will momentarily flash quickly, while the display reads:
Prog nnnnnnnnnnnn Stored!
…whereby nnnnnnnnnnnn is the Program’s name. The [STORE] button will turn off
and the display will revert to wherever it was before [STORE] was pressed for the first
time.
Wedge Reference Manual
15
Chapter 1 – Your First Session with the Wedge
16
Wedge Reference Manual