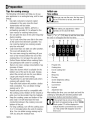
1
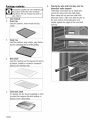
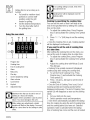
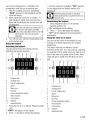
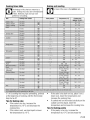
CSM 87300 G
Oven
User Manual
Please read this user manual first!
Dear Customer,
Thank you for purchasing this Beko product. We hope that you get the best results from your product
which has been manufactured with high quality and state-of-the-art technology. Therefore, please read
this entire user manual and all other accompanying documents carefully before using the product and
keep it as a reference for future use. If you handover the product to someone else, give the user manual
as well. Follow all warnings and information in the user manual.
Remember that this user manual is also applicable for several other models. Differences between models
will be identified in the manual.
Explanation of symbols
Throughout this user manual the following symbols are used:
~
I
~:..IIIIl
Important information or useful hints
about usage.
Warning of hazardous situations with
regard to life and property.
lAS
Warning of electric shock.
1Jf\
1&
Warning of risk of fire.
Warning of hot surfaces.
Arcelik A.S.
Karaaga~ caddesi No:2-6
34445 Sutluce/Istanbul/TURKEY
Made in TURKEY
(E:
DImportant instructions and warnings
for safety and environment
4
General safety ............................................... .4
Electrical safety ............................................. .4
Product safety ................................................ 5
Intended use .................................................. 7
Safety for children .......................................... 7
Disposing of the old product ........................... 7
Package information ....................................... 8
mHow to use the hob
18
General information about cooking ............... 18
Using the hobs ............................................ 18
~ How to operate the oven
20
Overview .......................................................9
Package contents ......................................... 10
Technical specifications ................................ 12
General information on baking, roasting and
grilling .................................................. 20
How to operate the electric oven .................. 20
Operating modes ......................................... 21
Using the oven clock ................................... 22
Using the keylock ........................................ 23
Using the clock as an alarm ......................... 23
Cooking times table ..................................... 25
How to operate the grill ................................ 26
Cooking times table for grilling ..................... 26
~m~ln!..!.!s!!!t!!!al!!!la~t!!!io~n_ _ _ _ _ _ _ _1"-""3
~ Maintenance and care
Before installation ........................................ 13
Installation and connection ........................... 14
Future Transportation ................................... 15
General information ..................................... 27
Cleaning the hob ......................................... 27
Cleaning the control panel ........................... 28
Cleaning the oven ....................................... 28
Removing the oven door .............................. 28
Removing the door inner glass ..................... 29
Replacing the oven lamp .............................. 29
~ General information
mPreparation
9
16
Tips for saving energy .................................. 16
Initial use ..................................................... 16
Time setting ................................................. 16
First cleaning of the appliance ....................... 17
Initial heating ............................................... 17
27
~mi-!T~ro!!.!u!:!.!b!.!!le!!!is!!.lh!!!0!:!!ot!:!..!in~g'--_ _ _ _ _--'3=0
3/EN
This section contains safety
instructions that will help protect from
risk of personal injury or property
damage. Failure to follow these
instructions shall void any warranty.
General safety
.. The appliance is not intended for
use by persons (including children)
with reduced physical, sensory or
mental capabilities, or lack of
experience and knowledge,
unless they have been given
supervised or instruction
concerning use of the appliance
by a responsible person for their
safely.
.. Young children should be
supervised to ensure that they do
not play with the appliance.
.. Never place the product on a
carpet-covered floor. Otherwise,
lack of airflow beneath the
product will cause electrical parts
to overheat. This will cause
problems with your product.
.. Installation and repair procedures
must always be performed by
Authorized Service Agents. The
manufacturer shall not be held
responsible for damages arising
from procedures carried out by
unauthorized persons which may
also void the warranty. Before
4/EN
installation, read the instructions
carefully.
.. Do not operate the product if it is
defective or has any visible
damage.
.. Control that the product function
knobs are switched off after every
use.
Electrical safety
.. If the product has a failure, it
should not be operated unless it
is repaired by the Authorized
Service Agent. There is the risk of
electric shock!
.. Only connect the product to a
grounded outleVline with the
voltage and protection as
specified in the "Technical
specifications". Have the
grounding installation made by a
qualified electrician while using
the product with or without a
transformer. Our company shall
not be liable for any problems
arising due to the product not
being earthed in accordance with
the local regulations.
.. Never wash the product by
spreading or pouring water onto it!
There is the risk of electric shock!
.. The product must be unplugged
during installation, maintenance,
cleaning and repairing procedures.
•
•
•
•
•
•
If the power connection cable for
the product is damaged, it must
be replaced by the manufacturer,
its service agent or similary
qualified persons in order to avoid
a hazard.
Only use the connection cable
specified in the "Technical
specifications" .
The appliance must be installed
so that it can be completely
disconnected from the network.
The separation must be provided
either by a mains plug, or a
switch built into the fixed
electrical installation, according to
construction regulations.
If the electrical supply is restricted, means of all-pole disconnection must be accessible
and incorporated in the fixed wiring in accordance with the wiring
rules.
Rear surface of the oven gets hot
when it is in use. Make sure that
the electrical connection does not
contact the rear surface;
otherwise, connections can get
damaged.
Do not trap the mains cable
between the oven door and frame
and do not route it over hot
surfaces. Otherwise, cable
insulation may melt and cause
fire as a result of short circuit.
• Any work on electrical equipment
and systems should only be
carried out by authorized and
qualified persons.
• In case of any damage, switch off
the product and disconnect it
from the mains. To do this, turn
off the fuse at home.
• Make sure that fuse rating is
compatible with the product.
Product safety
• WARNING: In order to prevent
accidental tipping of the
appliance, for example by a child
climbing onto the open oven door,
the stabilizing means must be
installed. Please refer to
instructions for installation.
• Never use the product when your
judgment or coordination is
impaired by the use of alcohol
and/or drugs.
• Be careful when using alcoholic
drinks in your dishes. Alcohol
evaporates at high temperatures
and may cause fire since it can
ignite when it comes into contact
with hot surfaces.
• Do not place any flammable
materials close to the product as
the sides may become hot during
use.
• During use the appliance
becomes hot. Care should be
taken to avoid touching heating
elements inside the oven.
5/EN
•
•
•
•
•
•
•
•
•
•
6/EN
Keep all ventilation slots clear of
obstructions.
Do not heat closed tins and glass
jars in the oven. The pressure
that would build-up in the tin/jar
may cause it to burst.
Do not place baking trays, dishes
or aluminium foil directly onto the
bottom of the oven. The heat
accumulation might damage the
bottom of the oven.
Do not use harsh abrasive
cleaners or sharp metal scrapers
to clean the oven glass door since
they can scratch the surface,
which may result in shattering of
the glass.
Do not use a steam cleaner to
clean this appliance.
Use the shelves as described in
"How to operate the electric
oven".
Do not use the product if the front
door glass removed or cracked.
Oven handle is not towel dryer.
Do not hang up towel, gloves, or
similar textile products when the
grill function is at open door.
Always use heat resistant oven
gloves when putting in or
removing dishes into/from the hot
oven.
WARNING: Ensure the appliance
is switched off before replacing
the lamp to avoid the possibility of
electric shock.
•
Unattended cooking on a hob with
fat or oil can be dangerous and
may result in fire. NEVER try to
extinguish a fire with water, but
switch off the appliance and then
cover flame e.g. with a lid or a
fire blanket.
• Danger of fire: Do not store items
on the cooking surfaces.
• If the surface is cracked, switch
off the appliance to avoid the
possibility of electric shock.
• The appliance is not intended to
be operated by means of an
external timer or separate
remote-control system.
• Vapour pressure that build up due
to the moisture on the hob
surface or at the bottom of the
pot can cause the pot to move.
Therefore, make sure that the
oven surface and bottom of the
pots are always dry.
For the reliability of the fire of the
product;
• Make sure the plug is fitting to
socket as well for not cause to
spark.
• Do not use damaged or cutted or
extension cable except the
original cable.
• Make sure that not whether liquid
or moisture on the socket is
pluged to product.
Intended use
• This product is designed for
domestic use. Commercial use
will void the guarantee.
• This appliance is for cooking
purposes only. It must not be
used for other purposes, for
example room heating.
• This product should not be used
for warming the plates under the
grill, drying towels, dish cloths etc.
by hanging them on the oven
door handles. This product should
also not be used for room heating
purposes.
• The manufacturer shall not be
liable for any damage caused by
improper use or handling errors.
• The oven can be used for
defrosting, baking, roasting and
grilling food.
Safety for children
• WARNING: Accessible parts will
become hot when in use. To
avoid burns and scalds children
should be kept away.
• WARNING: Accessible parts may
become hot when the grill in use.
Children should be kept away.
• The packaging materials will be
dangerous for children. Keep the
packaging materials away from
children. Please dispose of all
parts of the packaging according
to environmental standards.
•
Electrical products are dangerous
to children. Keep children away
from the product when it is
operating and do not allow them
to play with the product.
• Do not place any items above the
appliance that children may reach
for.
• When the door is open, do not
load any heavy object on it and do
not allow children to sit on it. It
may overturn or door hinges may
get damaged.
Disposing of the old product
Compliance with the WEEE
Directive and Disposing of the
Waste Product:
[!]
This product complies with EU WEEE
Directive (2012/19/EU). This product
bears a classification symbol for
waste electrical and electronic
equipment (WEEE).
This product has been manufactured
with high quality parts and materials
which can be reused and are suitable
for recycling. Do not dispose of the
waste product with normal domestic
and other wastes at the end of its
service life. Take it to the collection
center for the recycling of electrical
and electronic equipment. Please
consult your local authorities to learn
about these collection centers.
7/EN
Compliance with RoHS Directive:
The product you have purchased
complies with EU RoHS Directive
(2011/65/EU). It does not contain
harmful and prohibited materials
specified in the Directive.
Package information
• Packaging materials of the
product are manufactured from
recyclable materials in
accordance with our National
Environment Regulations. Do not
dispose of the packaging
materials together with the
domestic or other wastes. Take
them to the packaging material
collection points designated by
the local authorities.
8/EN
Overview
10
7
11
9
5--+-----+
8
4--+----+
2
3
4
5
6
Front door
Handle
Bottorn drawer
Tray
Wire shelf
Control panel
1 2
2
3
4
5
6
7
8
9
3
7
8
9
10
11
4
5
6
Burner plate
Fan rnotor (behind steel plate)
Larnp
Grill heating elernent
Shelf positions
7
8
9
Warning larnp
Therrnostat larnp
Function knob
Single-circuit cooking plate Rear left
Dual-circuit cooking plate Front left
Digital tirner
Single-circuit cooking plate Front right
Single-circuit cooking plate Rear right
Therrnostat knob
glEN
Package contents
ccessories supplied can vary depending on
he product model. Not every accessory
...........lOescribed in the user manual may exist on
your product.
1.
2.
User manual
Oven tray
Used for pastries, frozen foods and big
roasts.
3.
4.
Wire Shelf
Used for roasting and for placing the food to
be baked, roasted or cooked in casserole
dishes to the desired rack.
5.
Small wire shelf
It is placed into the tray (if supplied) in order
to collect the dripping fat while grilling so
that the oven is ke t clean.
~~---'""'!
1OlEN
6.
Placing the wire shelf and tray onto the
telescopic racks properly
Telescopic racks allow you to install and
remove the trays and wire shelf easily .
When using the tray and wire shelf with
telescopic racks, make sure that the pins at
the rear section of the telescopic rack
stands against the edges of the wire shelf
and tray.
7.
Placing the wire shelf and tray onto the
wire racks properly
Products without telescopic pUll-out: With
product without a telescopic pull-out, the
baking tray and grill are pushed in with their
edges between the runners on the side
mounts.
It is important to place the wire shelf and/or
tray onto the rack properly. Slide the wire
shelf or tray between 2 rails and make sure
that it is balanced before placing food on it
see the followin
8.
S lash back assembl
Splashback
Please take splashback and package of
screws, nuts, fillers form warmer drawer
Place splashback according to the drawing,
place nut inside splashback on to the hole,
screw the splashback to the burner's plate
with screw form under burner plate
4~-1
3
1
2
3
4
-ffS'
2/,
Splashback
Screw
Burner plate
Nut
If you don't want to install splashback on to
your cooker, you can place fillers to the
holes.
Do not overtighten the screws as damage to
the hob or splashback could occur.
11/EN
Basics: Information on the energy label of electrical ovens is given in accordance with the EN 50304
standard. Those values are determined under standard load with bottom-top heater or fan assisted heating
(if any) functions.
echnical specifications may be changed
ithout prior notice to improve the quality of
....._.Lhe product.
Figures in this manual are schematic and
may not exactly match your product.
12/EN
alues stated on the product labels or in the
documentation accompanying it are
...._-.,btained in laboratory conditions in
accordance with relevant standards.
Depending on operational and
environmental conditions of the product,
these values may vary.
Product must be installed by a qualified person in
accordance with the regulations in force. The
manufacturer shall not be held responsible for
damages arising from procedures carried out by
unauthorized persons which may also void the
warran .
Preparation of location and electrical
installation for the product is under
....._lClustomer's responsibility.
HHDANGER:
The product must be installed in
fL-lL....l·accordance with all local electrical
regulations.
tHDANGER:
fL-lL....lPrior to installation, visually check if the
product has any defects on it. If so, do
not have it installed.
Damaged products cause risks for your
safety.
Before installation
To ensure that critical air gaps are maintained
under the appliance, we recommend that this
appliance is mounted on a solid base and that
the feet do not sink into any carpet or soft
flooring.
The kitchen floor must be able to carry the
weight of the appliance plus the additional weight
of cookware and bakeware and food.
•
It can be used with cabinets on either side
but in order to have a minimum distance of
400mm above hotplate level allow a side
clearance of 65mm between the appliance
and any wall, partition or tall cupboard.
• It can also be used in a free standing
position. Allow a minimum distance of 750
mm above the hob surface.
•
(*) If a cooker hood is to be installed above
the cooker, refer to cooker hood
manufacturer' instructions regarding
installation height (min 650 mm).
• The appliance corresponds to device class 1,
i.e. it may be placed with the rear and one
side to kitchen walls, kitchen furniture or
equipment of any size. The kitchen furniture
or equipment on the other side may only be
of the same size or smaller.
• Any kitchen furniture next to the appliance
must be heat-resistant (100°C min.).
Safety chain
The appliance must be secured against
overbalancing by using the supplied two safety
chains on your oven.
Fasten hook (1)by using a proper peg to the
kitchen wall (6) and connect safety chain (3) to
the hook via the locking mechanism (2).
13/EN
using the product without a grounding installation
in accordance with the local re ulations.
ttDANGER:
\The product must be connected to the
I'-..L..~
mains supply only by an authorised and
qualified person. The product's
warranty period starts only after correct
installation.
Manufacturer shall not be held responsible
for damages arising from procedures
carried out by unauthorised persons.
Stability hook
Locking mechanism
Safety chain (supplied and mounted to oven)
Firmliy fix chain to cooker rear
Rear of cooker
Kitchen wall
2
3
4
5
6
tability chain to be as short as practicable
o avoid oven tilting forward and diagonal to
void oven side tilting.
Cooker stability chain for cookers not designed
with bracket engagement slot.
Installation and connection
Product can only be installed and connected in
accordance with the statuto installation rules.
•
Do not install the product next to
refrigerators or freezers. The heat emitted
by the product will increase the energy
consumption of cooling appliances.
I
•
•
Carry the product with at least two persons.
Product must be placed directly on the floor.
It must not be placed onto a base or a
edestal.
•
I
Do not use the door and/or handle to carry
r move the product. The door, handle or
hinges get damaged.
Electrical connection
Connect the product to a grounded outleVline
protected by a fuse of suitable capacity as stated
in the "Technical specifications" table. Have the
grounding installation made by a qualified
electrician while using the product with or
without a transformer. Our company shall not be
liable for any damages that will arise due to
14/EN
HHDANGER:
1'-.L.~T,he power cable must not be clamped,
bent or trapped or come into contact
with hot parts of the product.
A damaged power cable must be replaced
by a qualified electrician. Otherwise, there is
risk of electric shock, short circuit or fire!
The mains supply data must correspond to the
data specified on the type label of the product.
The rating plate is either seen when the door or
the lower cover is opened or it is located at the
rear wall of the unit depending on the unit type.
Power cable of your product must comply with
the values in "Technical s ecifications" table.
DANGER:
Before starting any work on the
I'-..L..~electrical installation, disconnect the
product from the mains supply.
There is the risk of electric shock!
Connecting the power cable
1. If a power cable is not supplied together
with your product,a power cable that you
would select from the table (Technical
specifications, page 12) in accordance with
the electrical installation at your home must
be connected to your product by following
the instructions in cable diagram.
If it is not possible to disconnect all poles in the
supply power, a disconnection unit with at least 3
mm contact clearance (fuses, line safety
switches, contactors) must be connected and all
the poles of this disconnection unit must be
adjacent to (not above) the product in
accordance with lEE directives. Failure to obey
this instruction may cause operational problems
and invalidate the product warranty.
2. Open the terminal block cover with a
screwdriver.
3. Insert the power cable through the cable
clamp below the terminal and secure it to the
main body with the integrated screw on cable
clamping component.
4. Connect the cables according to the supplied
qi~g~?'!l:
•
Future Transportation
•
•
SUPPLY CORD
.....................................................................................................................................
5. After completing the wire connections, close
the terminal block cover.
6. Route the power cable so that it will not
contact the product and get squeezed
between the product and the wall.
•
Push the product towards the kitchen wall.
Adjusting the feet of oven
Vibrations during use may cause cooking
vessels to move. This dangerous situation
can be avoided if the product is level and
balanced.
For your own safety please ensure the
product is level by adjusting the four feet at
the bottom by tuming left or right and align
level with the work top.
Final check
1. Reconnect the product to the mains.
2. Check electrical functions.
•
Keep the product's original carton and
transport the product in it. Follow the
instructions on the carton. If you do not
have the original carton, pack the product in
bubble wrap or thick cardboard and tape it
securely.
To prevent the wire grill and tray inside the
oven from damaging the oven door, place a
strip of cardboard onto the inside of the
oven door that lines up with the position of
the trays. Tape the oven door to the side
walls.
Do not use the door or handle to lift or move
the product.
Do not place any objects onto the product
nd move it in upright position.
Check the general appearance of your
product for any damages that might have
ccurred during transportation.
15/EN
Tips for saving energy
Initial use
The following information will help you to use
your appliance in an ecological way, and to save
energy:
• Use dark coloured or enamel coated
cookware in the oven since the heat
transmission will be better.
• While cooking your dishes, perform a
preheating operation if it is advised in the
user manual or cooking instructions.
• Do not open the door of the oven frequently
during cooking.
• Try to cook more than one dish in the oven
at the same time whenever possible. You
can cook by placing two cooking vessels
onto the wire shelf.
• Cook more than one dish one after another.
The oven will already be hot.
• You can save energy by switching off your
oven a few minutes before the end of the
cooking time. Do not open the oven door.
• Defrost frozen dishes before cooking them.
• Use pots/pans with cover for cooking. If
there is no cover, energy consumption may
increase 4 times.
• Select the bumer which is suitable for the
bottom size of the pot to be used. Always
select the correct pot size for your dishes.
Larger pots require more energy.
• Pay attention to use flat bottom pots when
cooking with electric hobs.
Pots with thick bottom will provide a better
heat conduction. You can obtain energy
savings up to 1/3.
• Vessels and pots must be compatible with
the cooking zones. Bottom of the vessels or
pots must not be smaller than the hotplate.
• Keep the cooking zones and bottom of the
pots clean. Dirt will decrease the heat
conduction between the cooking zone and
bottom of the pot.
• For long cookings, turn off the cooking zone
5 or 10 minutes before the end of cooking
time. You can obtain energy savings up to
20% by using the residual heat.
Time setting
16/EN
Before you can use the oven, the time must
be set. If the time is not set, oven will not
perate.
hile making any adjustment, related
ymbols on the clock will flash.
Press ,,_" or ,,+" (5/6) keys to set the time after
the oven in ener ized for the first time.
11
10 9 8
7
6
+
2
3
4
5
6
7
8
9
10
11
Program key
Cooking time
End of cooking time
Alarm
Minus key
Plus key
Screen brightness setting
Alarm volume
Current time
Keylock
Adjustment key
After setting the time, you can start and end the
cooking by selecting the desired position with
tem erature button and function button.
If the current time is not set, time setting
ill start increasing/moving up from 12:00.
Clock symbol '9' will be displayed to
indicate that the current time has not been
set. This symbol will disappear once the
time is set.
Current time settings are cancelled in case
f power failure. It needs to be readjusted.
To change the time of the day you have
previously set:
1. Press (11) key to activate current time
symbol '9'.
2. Press ,,-" or ,,+" (5/6) keys to set the
current time.
Changing screen brightness adjustment
1. Press (11) key to activate screen brightness
symbol '7' for screen brightness adjustment.
2. Press '-' or '+' (5/6) keys to set the desired
brightness.
» Selected brightness level will appear as d-01 ,
d-02 or d-03 on the display.
First cleaning of the appliance
he surface might get damaged by some
etergents or cleaning materials.
Do not use aggressive detergents, cleaning
powders/creams or any sharp objects
during cleaning.
Do not use harsh abrasive cleaners or sharp
metal scrapers to clean the oven door glass
since they can scratch the surface, which
may result in shattering of the glass.
1. Remove all packaging materials.
2. Wipe the surfaces of the appliance with a
damp cloth or sponge and dry with a cloth.
Initial heating
Heat up the product for about 30 minutes and
then switch it off. Thus, any production residues
or layers will be bumt off and removed.
WARNING
Hot surfaces cause bums!
II-.....~.
Product may be hot when it is in use. Never
touch the hot burners, inner sections of the
oven, heaters and etc. Keep children away.
Always use heat resistant oven gloves when
putting in or rernoving dishes into/frorn the
hot oven.
Electric oven
1. Take all baking trays and the wire grill out of
the oven.
2. Close the oven door.
3. Select Static position.
4. Select the highest oven power; See How to
operate the electric oven, page 20.
5. Operate the oven for about 30 minutes.
6. Tum off your oven; See How to operate the
electric oven, page 20
Grill oven
1. Take all baking trays and the wire grill out of
the oven.
2. Close the oven door.
3. Select the highest grill power; see How to
operate the grill, page 26.
4. Operate the grill about 30 minutes.
5. Tum off your grill; see How to operate the
grill, page 26
rnoke and srnell rnay ernit for a couple of
hours during the initial operation. This is
quite norrnal. Ensure that the roorn is well
ventilated to remove the smoke and srnell.
Avoid directly inhaling the srnoke and the
srnell that ernits.
17/EN
General information about cooking
Never fill the pan with oil more than
one third of it. Do not leave the hob
unattended when heating oil.
Overheated oils bring risk of fire. Never
attempt to extinguish a possible fire
with water! When oil catches fire,
cover it with a fire blanket or damp
cloth. Turn off the hob if it is safe to do
so and call the fire de artment.
•
•
•
•
•
•
•
•
Before frying foods, always dry them well
and gently place into the hot oil. Ensure
complete thawing of frozen foods before
frying.
Do not cover the vessel you use when
heating oil.
Place the pans and saucepans in a manner
so that their handles are not over the hob to
prevent heating of the handles. Do not place
unbalanced and easily tilting vessels on the
hob.
Do not place empty vessels and saucepans
on cooking zones that are switched on.
They might get damaged.
Operating a cooking zone without a vessel
or saucepan on it will cause damage to the
product. Turn off the cooking zones after
the cooking is complete.
As the surface of the product can be hot, do
not put plastic and aluminum vessels on it.
Clean any melted such materials on the
surface immediately.
Such vessels should not be used to keep
foods either.
Use flat bottomed saucepans or vessels only.
Put appropriate amount of food in
saucepans and pans. Thus, you will not
have to make any unnecessary cleaning by
preventing the dishes from overflowing.
Do not put covers of saucepans or pans on
cooking zones.
Place the saucepans in a manner so that
they are centered on the cooking zone.
18/EN
When you want to move the saucepan onto
another cooking zone, lift and place it onto
the cooking zone you want instead of sliding
it.
Tips about glass ceramic hobs
• Glass ceramic surface is heatproof and is
not affected by big temperature differences.
• Do not use the glass ceramic surface as a
place of storage or as a cutting board.
• Use only the saucepans and pans with
machined bottoms. Sharp edges create
scratches on the surface.
• Do not use aluminum vessels and
saucepans. Aluminum damages the glass
ceramic surface.
Spills may damage the
glass ceramic surface
and cause fire.
.rvi.
~
:~::
·~.
.
~
·
·
.:
.
Do not use vessels with
concave or convex
bottoms.
Use only the saucepans
and pans with flat
bottoms. They ensure
easier heat transfer.
If the diameter of the
saucepan is too small,
energy will be wasted.
3
Single-circuit cooking plate 14-16 cm
2
3
4
Dual-circuit cooking plate 18-20/12-14 cm
Single-circuit cooking plate 14-16 cm
Single-circuit cooking plate 18-20 cm is list
of advised diameter of pots to be used on
related burners.
JDANGER:
tOo not allow any object to drop on the
IL-.......~'hob. Even small objects such as a
saltshaker may damage the hob.
Do not use cracked hobs. Water may leak
through these cracks and cause short
circuit.
In case of any kind of damage on the
surface (eg., visible cracks), switch off the
product immediately to minimize the risk of
electric shock.
Glass ceramic hob is equipped with an operation
light and a hot zone warning indicator.
Hot zone warning indicator indicates the status of
the active zone and it remains lit after the plate is
turned off. When the temperature of the plate
cools down to a level that it can be touched by
hand, warning indicator turns off. Flickering of
the hot zone warnin indicator is not a failure.
•
I
Turning off the ceramic plates
Turn the plate knob to OFF (upper) position.
Using multi-segmented cooking zones
Multi-segmented cooking zones allows to cook
with different size of saucepans on the same
cooking zone. When these cooking zones are
activated, first the inward cooking zone turns on.
1. To change the active cooking zone diameter,
turn the control knob clockwise.
2. A "click" will be heard as soon as the
hot late radius chan es.
Turning off mUlti-segment cooking zones
1. Turn the knob counter clockwise to OFF
(upper) position to turn off the oven. All
ments of the cooki zone are turned off.
Quick heating glass-ceramic hobs emit a
bright light when they are switched on. Do
not stare at the bright light.
Turning on the ceramic plates
The hob control knobs are used for operating the
plates. To obtain the desired cooking power, turn
the hob control knobs to the corresponding level.
2
3
Position 1
Position 2
Position 3
Position 2 and 3 of the multi-segment
ooking zones do not operate
independently.
19/EN
General information on baking,
roasting and grilling
tHot surfaces cause bums!
Product may be hot when it is in use. Never
touch the hot burners, inner sections of the
oven, heaters and etc. Keep children away.
Always use heat resistant oven gloves when
putting in or removing dishes into/from the
hot oven.
tSe careful when opening the oven door
as steam may escape.
Exiting stearn can scald your hands, face
and/or eyes.
Tips for baking
• Use non-sticky coated appropriate metal
plates or aluminum vessels or heat-resistant
silicone moulds.
• Make best use of the space on the rack.
• Place the baking mould in the middle of the
shelf.
• Select the correct rack position before
tuming the oven or grill on. Do not change
the rack position when the oven is hot.
• Keep the oven door closed.
Tips for roasting
• Treating whole chicken, turkey and large
piece of meat with dressings such as lemon
juice and black pepper before cooking will
increase the cooking performance.
• It takes about 15 to 30 minutes longer to
roast meat with bones when compared to
roasting the same size of meat without
bones.
• Each centimeter of meat thickness requires
approximately 4 to 5 minutes of cooking
time.
• Let meat rest in the oven for about
10 minutes after the cooking time is over.
The juice is better distributed all over the
20/EN
roast and does not run out when the meat is
cut.
•
Fish should be placed on the middle or
lower rack in a heat-resistant plate.
Tips for grilling
When meat, fish and poultry are grilled, they
quickly get brown, have a nice crust and do not
get dry. Flat pieces, meat skewers and sausages
are particularly suited for grilling as are
vegetables with high water content such as
tomatoes and onions.
•
Distribute the pieces to be grilled on the
wire shelf or in the baking tray with wire
shelf in such a way that the space covered
does not exceed the size of the heater.
• Slide the wire shelf or baking tray with grill
into the desired level in the oven. If you are
grilling on the wire shelf, slide the baking
tray to the lower rack to collect fats. Add
some water in the tray for easy cleaning.
Foods that are not suitable for grilling
carry the risk of fire. Only grill food
which is suitable for intensive grilling
heat.
Do not place the food too far in the
back of the grill. This is the hottest area
and fatty food may catch fire.
How to operate the electric oven
2
Function knob
Thermostat knob
1. Set the Temperature knob to the desired
temperature.
2. Set the Function knob to the desired
operating mode.
» Oven heats up to the adjusted temperature and
maintains it. During heating, temperature lamp
stays on.
Switching off the electric oven
Turn the function knob and temperature knob to
off upper position.
r~Trted
bottom/tOp heating
-Top heating, bottom heating plus fan
db
On the rear wall) are in operation. Hot
air is evenly distributed throughout
the oven rapidly by means of the fan.
Cook with one tray only.
--
[MtlnrMfumn
.&.
The oven is not heated. Only the fan
On the rear wall) is in operation.
~
o
Rack positions (For models with wire shein
It is important to place the wire shelf onto the
side rack correctly. Wire shelf must be inserted
between the side racks as illustrated in the figure.
Do not let the wire shelf stand against the rear
wall of the oven. Slide your wire shelf to the front
section of the rack and settle it with the help of
the door in order to obtain a good grill
performance.
Operating modes
The order of operating modes shown here may
be different from the arrangement on your
product.
['p- and(Otlnm
heating
Top and bottom heating are in
--
O
operation. Food is heated
simultaneously from the top and
bottom. For example, it is suitable for
cakes, pastries, or cakes and
casseroles in baking moulds. Cook
with one tray only.
Bottom heating
Only bottom heating is in operation. It
is suitable for pizza and for
-subsequent browning of food from
the bottom.
Suitable for thawing frozen granular
food slowly at room temperature and
cooling down the cooked food.
Fan Heating
~ Warm air heated by the rear heater is
evenly distributed throughout the
oven rapidly by means of the fan. It is
suitable for cooking your meals in
different rack levels and preheating is
not required in most cases. Suitable
for cooking with multi trays.
I
"3D" function
Top heating, bottom heating and fan
~
assisted heating (in the rear wall) are
-in operation. Food is cooked evenly
and quickly all around. Cook with one
tray only.
[ f1D
Large grill at the ceiling of the oven is
in operation. It is suitable for grilling
large amount of meat.
•
•
•
Put big or medium-sized
portions in correct rack
position under the grill
heater for grilling.
Set the temperature to
maximum level.
Turn the food after half of
the grilling time.
21/EN
Grill+Fan
00
If no cooking setting is made, time of the
day cannot be set.
Grilling effect is not as strong as in
Full Grill
•
•
•
Put small or medium-sized
portions in correct shelf
position under the grill
heater for grilling.
Set the desired temperature.
Tum the food after half of
the grilling time.
Using the oven clock
11
10
9
8
7
6
+
2
3
4
5
6
7
8
9
10
11
Program key
Cooking time
End of cooking time
Alarm
Minus key
Plus key
Screen brightness setting
Alarm volume
Current time
Keylock
Adjustment key
Maximum time that can be set for end of
cooking is 5 hours 59 minutes.
Program will be cancelled in case of power
failure. You must reprogram the oven.
hile making any adjustments, related
symbols will flash on the display. You must
-,,_Iwait for a short time for the settings to take
effect.
22/EN
Cooking time will be displayed once the
cooking starts.
Cooking by specifying the cooking time:
You can set the oven so that it will stop at the
end of the specified time by setting the cooking
time on the clock.
1. To adjust the cooking time, Press Program
key (1) and activate the Cooking Time symbol
(2).
2. Press '-' 1 '+' (5/6) keys to set the cooking
time.
» Once the Cooking Time is set, Cooking symbol
will be displayed continuously.
If you want to set the end of cooking time
to a later time:
After setting the cooking time on the clock, you
can set the end of cooking time to a later time.
1. To adjust the cooking time, press Program
key (1) and activate the Cooking Time symbol
(2).
2. Adjust the cooking time with Minus (5) and
Plus (6) keys.
» Cooking Time symbol remains lit (displayed
continuously) after setting the cooking time.
3. To set the End of Cooking Time, Press
Program key (1) and activate the Cooking
Time symbol (3).
4. Press - (5) and + (6) keys to set the end of
cooking time.
» Once the End of Cooking Time is set, End of
Cooking symbol and Cooking symbol will be
displayed continuously. The End of Cooking Time
symbol (3) will disappear as soon as the cooking
starts.
5. Put your dish into the oven.
6. Select operation mode and temperature.
» Oven timer automatically calculates the startup
time for cooking by using the end of cooking time
and the cooking period you have set. Selected
operation mode is activated when the startup
time of cooking has come and the oven is heated
up to the set temperature. It maintains this
temperature until the end of cooking time.
7. After the cooking process is completed,
"End" appears on the displayed and the
alarm will sound.
8. Alarm signal will sound for 2 minutes. To
stop the alarm signal, just press any key.
Alarm will be silenced and current time will
be dis la ed.
•
If you mute the alarm by pressing any
key, the oven will restart operating.
If you press any button at the end of the
alarm period, the oven will restart
operating.
I
9. Tum off the oven with the Temperature knob
and Function knob.
Using the keylock
Activating the keylock
You can prevent oven from being used by
a..c..!iy..a.!iD9...!b.~...~~Yl.o..~.~..!~D~.t.iQD.:.....
1
10
+
» Once the keylock is activated, "On" appears
on the display and the Keylock symbol (10)
remains lit.
•
I
When the Keylock function is activated,
control panel buttons except for the key (11)
cannot be used.
Deactivating the keylock
1. Press Adjustment key (11) to activate
Keylock symbol (10).
» "On" will appear on the display.
2. Press '-' (5) to deactivate the keylock.
» "OFF" will be displayed once the keylock is
deactivated.
Using the clock as an alarm
You can use the clock of the product for any
warning or reminder apart from the cooking
programme.
The alarm clock has no influence on the
functions of the oven. It is only used as a warning.
For example, this is useful when you want to turn
food in the oven at a certain point of time. Alarm
clock will give a signal once the time you set is
over.
+
2
2
3
4
5
6
7
8
9
10
11
3
4
5
Program key
Cooking time
End of cooking time
Alarm
Minus key
Plus key
Screen brightness setting
Alarm volume
Current time
Keylock
Adjustment key
1. Press the key (11) to activate Keylock symbol
(10).
» "OFF" will appear on the display.
2. Press '+' key (6) to activate the keylock.
2
3
4
5
6
7
8
9
10
11
Program key
Cooking time
End of cooking time
Alarm
Minus key
Plus key
Screen brightness setting
Alarm volume
Current time
Keylock
Adjustment key
23/EN
Setting the alarm clock
1. Press Program key (1) to activate the alarm
time s mbol 4.
2. Adjust the alarm time using .. +" /..-" (5/6)
keys.
» Alarm symbol will remain lit and the alarm time
will appear on the display once the alarm time is
set.
3. At the end of the alarm time, Alarm Time
symbol (4) will start flashing and the alarm
signal is heard.
Turning off the alarm
1. To stop the alarm, just press any key.
» Alarm will be silenced and current time will be
displayed.
If you want to cancel the alarm:
1. To reset the alarm time, press Program key
(1) to activate the alarm time symbol (4).
2. Press and hold the '-' (5) key until "00:00"
is displayed.
•
I
larm time will be displayed. If the alarm
ime and cooking time are set concurrently,
shortest time will be displayed.
Changing alarm tone
1. Press Setting key (11) to activate the Alarm
Tone symbol (8).
2. Adjust the desired tone using .. +" /..-" (5/6)
keys.
»Selected alarm tone will appear as "b-01",
"b-02" or "b-03" on the display.
24/EN
Cooking times table
Baking and roasting
1st rack of the oven is the bottom rack.
timings in this chart are meant as a
. Timings may vary due to tem
....._IUI food, thickness, type and your own
preference of cooking.
Rack position
(**) In a cooking that requires preheating, preheat
at the beginning of cooking until the thermostat
lamp turns off.
Tips for baking cake
• If the cake is too dry, increase the
temperature by 1aoc and decrease the
cooking time.
• If the cake is wet, use less liquid or lower
the temperature by 1aoc.
•
If the cake is too dark on top, place it on a
lower rack, lower the temperature and
increase the cooking time.
• If cooked well on the inside but sticky on the
outside use less liquid, lower the
temperature and increase the cooking time.
Tips for baking pastry
• If the pastry is too dry, increase the
temperature by 1aoc and decrease the
25/EN
•
•
cooking time. Dampen the layers of dough
with a sauce composed of milk, oil, egg and
yoghurt.
If the pastry takes too long to bake, pay
care that the thickness of the pastry you
have prepared does not exceed the depth of
the tray.
If the upper side of the pastry gets browned,
but the lower part is not cooked, make sure
that the amount of sauce you have used for
the pastry is not too much at the bottom of
the pastry. Try to scatter the sauce equally
between the dough layers and on the top of
ast for an even brownin .
Cook the pastry in accordance with the
mode and temperature given in the cooking
,...._.L,able. If the bottom part is still not browned
enough, place it on one lower rack next
time.
. WARNING
'IClose oven door during grilling.
Hot surfaces may cause burns!
Switching on the grill
1. Turn the Function knob to the desired grill
symbol.
2. Then, select the desired grilling temperature.
3. If required, perform a preheating of about 5
minutes.
» Temperature light turns on.
Switching off the grill
1. Turn the Function knob to Off (top) position.
Rack positions
Grill performance will decrease if the wire grill
stands against rear part of the oven. Slide your
wire grill to the front section of the rack and
settle it with the help of the door in order to
obtain the best rill performance.
Tips for cooking vegetables
• If the vegetable dish runs out of juice and
gets too dry, cook it in a pan with a lid
instead of a tray. Closed vessels will
preserve the juice of the dish.
• If a vegetable dish does not get cooked, boil
the vegetables beforehand or prepare them
like canned food and put in the oven.
How to operate the grill
A
,.\
I V\
Cooking times table for grilling
26/EN
Foods that are not suitable for grilling
carry the risk of fire. Only grill food
which is suitable for intensive grilling
heat.
Do not place the food too far in the
back of the grill. This is the hottest area
and fatty food may catch fire.
Service life of the product will extend and the
possibility of problems will decrease if the
roduct is cleaned at re ular intervals.
Disconnect the product from mains
supply before starting maintenance and
cleaning works.
There is the risk of electric shock!
HDANGER:
Allow the product to cool down before
you clean it.
Hot surfaces may cause burns!
•
•
•
•
Clean the product thoroughly after each use.
In this way it will be possible to remove
cooking residues more easily, thus avoiding
these from burning the next time the
appliance is used.
No special cleaning agents are required for
cleaning the product. Use warm water with
washing liquid, a soft cloth or sponge to
clean the product and wipe it with a dry
cloth.
Always ensure any excess liquid is
thoroughly wiped off after cleaning and any
spillage is immediately wiped dry.
Do not use cleaning agents that contain
acid or chloride to clean the stainless or
inox surfaces and the handle. Use a soft
cloth with a liquid detergent (not abrasive) to
wipe those parts clean, paying attention to
swee in one direction.
he surface rnight get darn aged by sorne
detergents or cleaning rnaterials.
Do not use aggressive detergents, cleaning
powders/crearns or any sharp objects
during cleaning.
Do not use harsh abrasive cleaners or sharp
rnetal scrapers to clean the oven door glass
since they can scratch the surface, which
rnay result in shattering of the glass.
Do not use stearn cleaners to clean the
appliance as this rnay cause an electric
shock.
Cleaning the hob
Glass ceramic surfaces
Wipe the glass ceramic surface using a piece of
cloth dampened with cold water in a manner as
not to leave any cleaning agent on it. Dry with a
soft and dry cloth. Residues may cause damage
on the glass ceramic surface when using the hob
for the next time.
Dried residues on the glass ceramic surface
should under no circumstances be scraped with
hook blades, steel wool or similar tools.
Remove calcium stains (yellow stains) by a small
amount of lime remover such as vinegar or
lemon juice. You can also use suitable
commercially available products.
If the surface is heavily soiled, apply the cleaning
agent on a sponge and wait until it is absorbed
well. Then, clean the surface of the hob with a
dam cloth.
Sugar-based foods such as thick crearn and
syrup rnust be cleaned prornptly without
waiting the surface to cool down. Otherwise,
glass cerarnic surface rnay be darnaged
perrnanently.
Slight color fading may occur on coatings or
other surfaces in time. This will not affect
operation of the product.
Color fading and stains on the glass ceramic
surface is a normal condition, and not a defect.
Scraper for cleaning the glass ceramic
surface
Clean the spilled residues and stuck dirts with a
commercially available scraper which is specially
designed for glass ceramic surfaces.
To avoid scratches, hold the scraper at a narrow
an Ie.
27/EN
Removing the oven door
Cleaning the control panel
Clean the control panel and knobs with a damp
cloth and wipe them dry.
• Do not remove the control buttons/knobs to
lean the control panel.
Control panel may get damaged!
1. Open the front door (1).
2. Open the clips at the hinge housing (2) on
the right and left hand sides of the front door
by pressing them down as illustrated in the
fi ure.
I
Cleaning the oven
To clean the side wall
1. Remove the front section of the side rack by
pulling it in the opposite direction of the side
wall.
2. Remove the side rack completely by pulling
it towards
2
3
Catalytic walls
Side walls or just back wall of oven interior may
be covered with catalytic enamel.
The catalytic walls of the oven must not be
cleaned. The porous surface of the walls is selfcleaning by absorbing and converting spitting fat
(steam and carbon dioxide).
Clean oven door
Don't use any harsh abrasive cleaners or
harp metal scrapers for cleaning the oven
,...._IOOOr. They could scratch the surface and
destroy the glass.
28/EN
Front door
Hinge
Oven
3. Move the front door to half-way.
4. Remove the front door by pulling it upwards
to release it from the ri ht and left hin es.
teps carried out during removing process
hould be performed in reverse order to
install the door. Do not forget to close the
clips at the hinge housing when reinstalling
the door.
Removing the door inner glass
The inner glass panel of the oven door can be
removed for cleaning.
Use the spade provided with the product to
remove the inner glass for cleaning.
1. Open the oven door.
2. Place the spade (1) to the area indicate on
the glass panel (3) and push in the direction
shown to remove the glass.
3. To reattach the glass panel in its seat, insert
its bottom part into the plastic slot (2).
Pressing it from the upper part towards the
metal frame (6), ensure that the pins (4) are
seated into their slots
5
6
Pin housing
Metal frame
Install the inner glass panel so that the
printed side will face upwards.
Replacing the oven lamp
DANGER:
\Sefore replacing the oven lamp, make
IL-.......~sure that the product is disconnected
from mains and cooled down in order to
avoid the risk of an electrical shock.
Hot surfaces may cause burns!
he oven lamp is a special electric light bulb
that can resist up to 300°C. See Technical
....--specificafions, page 12 for details. Oven
larnps can be obtained from Authorised
Service Agents.
Position of larnp might vary frorn the figure.
2
3
Spade
Plastic slot
Inner glass panel
If your oven is equipped with a round lamp:
1. Disconnect the product frorn mains.
2. Turn the glass cover counter clockwise to
remove it.
3. Remove the oven larnp by turning it counter
clockwise and replace it with the new one.
4. Install the glass cover.
4
Pin
29/EN
Ed •• I.III.I~III$I.
• .. It is normal thatsteam escapes during operation: »> This is not a fault.
Igl!!I •• m.I"!.$.i!II.I"g!gg!I!lg~
• .. When the metal parts are heated, they may expand and cause noise. »> This is not a fault.
Igl!!lggg~g!r@.
•
•
•
The mains fuse is defective or has tripped. »> Check fuses in the fuse box. If necessary,
replace or reset them.
Product is not plugged into the (grounded) socket. »> Check the plug connection.
Buttons/knobs/keys on the control panel do not function. »> Keylock may be enabled. Please
disable it. (See. Using the keylock, page 23 )
.inll• •;II'III~
•
•
Oven lamp is defective. »> Replace oven lamp.
Power is cut. >>> Check if there is power. Check the fuses in the fuse box. If necessary,
replace or reset the fuses.
En lIu ut 011
•
•
•
Function and/or Temperature are not set. »> Set the function and the temperature with the
Function and/or Temperature knob/key.
In models equipped with a timer, the timer is not adjusted. »> Adjust the time.
(In products with microwave oven, timer controls only microwave oven.)
Power is cut. >>> Check if there is power. Check the fuses in the fuse box. If necessary,
replace or reset the fuses .
•In ••I~I.I.r)I.llilll!!lllnl!ll!r!•• !IIIIII!I~
•
A previous power outage has occurred. »> Adjust the time / Switch of the product and switch
it on again.
Consult the Authorised Service Agent or the
dealer where you have purchased the
product if you can not remedy the trouble
although you have implemented the
instructions in this section. Never attempt to
repair a defective product yourself.
3D/EN
Part no: 285.3013.40
Rev: AB/22.02.2013