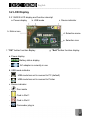
1
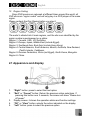
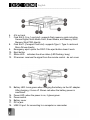
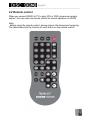
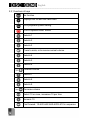
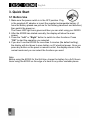
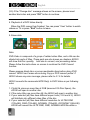
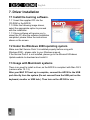
English
--------------------------------------------------------------------------------Notices
1.
2.
3.
4.
5.
6.
2
The copyright on this user manual remains with Apacer Inc. No part of
this user manual may be transmitted, reproduced, or changed.
Other companies’ product names that may be used herein remain the
property of their respective owners.
The product specifications, design and this user’s manuals content are
subject to change without notice.
If you have any questions, please contact your merchant or our
service center for clarification. We are not responsible for any losses
resulting from using this product no matter what the reason.
The guarantee and repair information is on the warranty card.
This product incorporates copyright protection technology that is
protected by method claims of U.S. patents and other intellectual
property rights owned by MacroVision Corporation and other rights
owners. Use of this copyright protection technology must be
authorized by MacroVision Corporation, and is intended for home and
other limited viewing uses only unless otherwise authorized by
MacroVision Corporation. Reverse engineering or disassembly is
prohibited.
English
--------------------------------------------------------------------------------Content
1. Before Use ......................................................................... 4
1.1 Warning ................................................................... 4
1.2 Notice ...................................................................... 4
1.3 Contents of the product packaging ......................... 5
2. Product features and appearances.................................... 6
2.1 Appearance and display.......................................... 7
2.2 Remote control........................................................ 9
3. Quick Start ....................................................................... 12
3.1 Before Use ............................................................ 12
3.2 LCD Display .......................................................... 13
3.3 Menu instruction.................................................... 15
4. Usage............................................................................... 17
4.1 Copy ...................................................................... 17
4.2 Photo View ............................................................ 21
4.3 DVD Playback Mode ............................................. 22
4.4 DVD Convert Mode ............................................... 25
4.5. USB Mode ............................................................ 31
5. Setting .............................................................................. 33
6. Firmware Upgrade ........................................................... 35
7. Driver Installation ............................................................. 36
7.1 Install the burning software. .................................. 36
7.2 Under the Windows 2000 operating system ......... 36
7.3 Usage with Macintosh systems............................. 36
8. General operation ............................................................ 37
8.1 Charging the battery.............................................. 37
8.2 Emergency eject ................................................... 37
8.3 Daily cleaning and maintenance ........................... 37
9. Hardware specifications................................................... 38
10. Frequently asked questions........................................... 39
3
English
---------------------------------------------------------------------------------
1. Before Use
Note: To use this product safely, note the following instructions:
1.1 Warning
Please observe the following to avoid accidents.
1.
2.
3.
4.
5.
In order to prevent electric shocks or other harm, do not take the
AD330 apart or refit this product or attempt to repair it yourself.
To prevent fire, electric shock or breakdown, do not use this product in
humid conditions (like the bathroom).
If there is smoke, a strange sound or smell when using this product,
please immediately switch off the power and/or disconnect the AD330
from your computer.
This product is a precision electronic product, do not drop or subject it
to physical shocks.
Only use the supplied AC power adapter. Any other types of AC power
adapter are prohibited. Apacer is not liable for any damage caused by
using any other type of AC power adapter.
1.2 Notice
To avoid personal loss or injury:
1.
2.
3.
4.
5.
6.
4
When your hands are wet, do not touch this product.
Touch a metal item to discharge any static electricity that may be
present in your body before use.
Do not switch off the power or reboot when this product is in the middle
of data transferring. We are not responsible for any data loss or
damage.
Use only the supplied accessories (like the AC adapter and the
rechargeable battery).
To avoid disc compatibility issues causing data loss, please refer to the
latest disc compatibility list of Apacer web site before use.
To avoid DVD conversion error. Please use AC adapter to convert your
DVD
English
--------------------------------------------------------------------------------1.3 Contents of the product packaging
Item
AD330
Number
1
AC adapter
1
RCA video cable (3-in-1; 1.5 m)
1
USB 2.0 cable: one of mini-A, one of mini-B
2
Remote control (with battery)
1
Quick Start & User manual (English version)
1
Warranty card
1
User manual CD
1
Blank CD-R
1
Blank DVD+R
1
Nero Recording software
1
Bag
1
Optional item listed
Item
Number
Rechargeable Li-ion battery: 7.4 V, 2200 mAh
1
Car Charger
1
5
English
---------------------------------------------------------------------------------
2. Product features and appearances
The DISC
AD330 is designed to incorporate flexibility and high
performance. It has the following features and functions:
‧ Portable photo recorder
‧ Standalone DVD converter through USB connector
‧ Standalone CD/DVD writer
‧ Able to view photos via LCD panel
‧ Support most types of flash memory cards
‧ USB 2.0 external card reader, USB external DVD/CD writer.
‧ Rechargeable Li-ion battery (optional), AC adapter, and car cigarette
charger (optional) for anywhere, anytime data backup
Notices:
1. This product doesn’t support the 5 V Smart Media Card specifications.
2. This product supports Memory Stick/Memory Stick Pro and is compliant
with Memory Stick Duo (works via a transfer card).
3. This product does not support the Memory Stick Magic Gate function.
4. This product doesn’t support the copyright protection function of SD.
5. This product supports mini-SD, RS-MMC and T-FLASH card through an
adapter or holder.
6. This product supports XD-picture card through a CF card adapter.
7. Use of this product does not guarantee that discs recorded can be read by
other brand CD-ROMs or DVD-ROMs.
8. Full erasure of rewritable DVD+/- RW or CD-RW media has to operate via
a computer. AD330 only provides quick-erase function.
9. Remember the copying of digital data such as music, videos, computer
programs and so on is prohibited. We are not responsible for the
consequences of any acts of infringement.
10. AD330 can’t guarantee playback of all kinds of Dolby title.
11. Disc formats supported by this DVD-Drive:
CD-R/CD-RW
8CM: 156MB
12CM: 650MB
6
DVD-R/DVD-RW
8CM: 1.4GB
12CM: 4.7GB
DVD+R/DVD+RW
8CM: 1.4GB
12CM: 4.7GB
English
--------------------------------------------------------------------------------12. Region Coding:
Since DVD movies are released at different times around the world, all
DVD discs are “region coded” and will only play in a DVD player of the same
region.
Please recheck the Disc Region before you play it.
The world is divided into 6 main regions, and the discs are identified by the
region number superimposed on a globe :
Region 1: Canada, USA, US Territories.
Region 2: Europe, Japan, Middle East (include Egypt).
Region 3: Southeast Asia, East Asia (include Hong Kong).
Region 4: Central America, South America, Mexico, Australia, New Zealand,
Pacific Islands, Caribbean.
Region 5: Russian Federation, Africa (not Egypt), North Korea, Mongolia.
Region 6: China.
2.1 Appearance and display
1.
2.
3.
4.
5.
“Right” button: press to select the next option
“Exit” or “Cancel” button: Return the previous action selections. If
pressing this button over 3 seconds, the screen will show “Please turn
off power”.
Display screen: it shows the operation status and function settings
“OK” or “View” button: selects the action indicated on the display
“Left” button: press to select the previous option
7
English
---------------------------------------------------------------------------------
6.
7.
A/V out jack.
Card Slot 2 (5-in-1 card slot): supports flash memory cards including
Secure Digital, Multi-Media Card, Smart Media, and Memory Stick /
Memory Stick PRO directly.
8. Card Slot 1 (Compact Flash slot): supports Type I / Type II cards and
Micro Drives directly.
9. Emergency eject: ejects the DISC if the eject button doesn’t work.
10. Eject button
11. Status LED: indicates the drive status (LED flashing: busy)
12. IR receiver: receives the signal from the remote control - do not cover.
13. Battery LED: turns green when charging the battery via the AC adapter.
After charging, it turns off. Shows red when the battery power is
insufficient.
14. Power LED: when the power is on, it glows green.
15. Power switch
16. Battery cover
17. DC-in jack
18. USB 2.0 port: for connecting to a computer or camcorder
8
English
--------------------------------------------------------------------------------2.2 Remote control
When you connect AD330 to TV to play VCD or DVD, please use remote
control. You may also use remote control for normal operation of AD330.
Note:
Before using the remote control, please remove the transparent wrapping.
The table below lists the function of each button on the remote control.
9
English
--------------------------------------------------------------------------------2.2.1 functions of keys
No function
Displays the file and the video data
DVD playback system setting
“DVD Playback mode” switch
Selects 1
Selects 2
Selects 3
Press to mute, or to resume normal volume
Selects 4
Selects 5
Selects 6
Increase volume
Selects 7
Selects 8
Selects 9
Decrease volume
Select 10 or more, increases 10 per time
Numeric 10
Fast forward: 1X 2X 4X 8X 20X 1X in sequence
10
English
--------------------------------------------------------------------------------Fast backward: 1X 2X 4X 8X 20X 1X in sequence
Switch to previous video
Switch to next video
Play video or Pause
Stop playing
Enable and select language type
Enable and display the subtitle
Eject VCD or DVD disc
Select options in the menu or “Left” button
Confirmation key or “OK” or “View” button
Select options in the menu or “Right” button
Cancel the function or return the previous option or “Exit”
or “Cancel” button
“DVD convert” button / “Long press “OK” button
11
English
---------------------------------------------------------------------------------
3. Quick Start
3.1 Before Use
1. Make sure the power switch is in the OFF position. Plug
in the supplied AC adapter or insert the supplied rechargeable battery (if
have the battery please see picture for the battery placement and direction)
then switch the power on.
The Power LED light turns green and then you can start using your AD330.
2. After the AD330 has started normally, the display will show the main
screen.
3. Press the “Left” or “Right” button to switch to other functions. Press
“OK” to start the operation you selected.
4. If you don’t use the AD330 for more than 3 minutes (the default setting),
the display will shut down to save battery or AC electrical power. Once you
press any button on the panel or remote control, the display returns to the
normal mode and you can select the functions you want.
Note:
Before using the AD330 for the first time, charge the battery for a full 8 hours.
Avoid using the AD330 on the edge of a desk or any other unstable places.
12
English
--------------------------------------------------------------------------------3.2 LCD Display
3.2.1 AD330 LCD display and function descript
a. Power display
b. USB mode
c. Device indicator
h. Notice icon
d. Selection name
e. Selection icon
f. “OK” button function display
g. “Exit” button function display
a. Power display
Battery status display
AC adapter is currently in use
b. USB mode indicator
USB mode has set to connect to PC (default)
USB mode has set to connect to Printer
c. Device indicator
Disc inside
Card in Slot 1
Card in Slot 2
Camcorder plug-in
13
English
--------------------------------------------------------------------------------d. Selection name
Name of selected icon.
e. Selection icon
Copy
Photo view
Setting
DVD playback
DVD convert
f. “OK” button function display
Operation function base on display status operation
g. “Exit” button function display
Operation function base on display status operation
h. Notice icon
Processing, please wait.
Processing, please don’t touch any key
3.2.2 Turning off the device
If you want to exit and power off system,
please move to main menu and press “Exit”
button for 3 sec. The LCD will show “Please turn
off power or press any key back to main menu”.
If you want to exit, please turn off power or else
press any key to return to the main menu.
14
English
--------------------------------------------------------------------------------3.3 Menu instruction
There are five modes in Main menu: Copy、 Photo view 、Setting、 DVD
playback、DVD convert.
a.
Copy
Backup the photos or movies from your memory card or camcorder by default
mode. End of backup, press “OK” button into preview mode, press “Exit”
button return to main menu
b.
Photo View
Display JPEG files from medias, not support USB device. Press “OK” into
sub-function select mode. If put into card & disc at the same time, Please
select the source list (Disc, Slot1 or Slot2) and select target folder, and click
the options to view photos. After confirm AD330 will base on default mode
(Single mode or thumbnail mode) to browse, than if you press “OK” you can
perform the functions below.
Single Mode sub-function:
Thumbnail Mode sub-function:
Single photo slideshow
Thumbnail photos slideshow
Go to thumbnail mode
Go to single mode
Rotate the current photo
Print the current photo
15
English
--------------------------------------------------------------------------------c.
DVD Playback
AD330 will automatically check the disc. If the VCD or DVD can be played,
AD330 will play it automatically.
d.
DVD Convert
Make a DVD Video from Camcorder
OTG Device source:
OTG1: HDD or Micro Drive
OTG2: SD card
Convert Type:
All files / Select file
/ Playlist
Folder contains source files
Files for DVD convert:
Movie File in 4: 3 aspect ratio
16
/ Movie File in 16: 9 aspect ratio
English
---------------------------------------------------------------------------------
4. Usage
4.1 Copy
4.1.1 Copy from memory card
To perform a quick backup function, it is recommended to insert a single card
only.
Insert the memory card that you want to copy into the appropriate slot.
Slot 1: CF Type I/II, Micro Drive
Slot 2: SD, MMC, SM, MS & MS pro Card
4.1.2 Copy from camcorder
Please plug in USB mini-A (short cable) to AD330, Plug in USB mini-B (long
cable) to camcorder.
OTG1: HDD or Micro Drive
OTG2: SD card
Press the eject button on the front panel to open the tray.
Insert a disc and push the disc tray closed.
Note: Make sure the disc is placed securely on the spindle of the disc tray
and has clicked in place. Please prepare blank discs or erase rewritable discs
before doing Copy function. AD330 can’t erase discs during Copy or DVD
conversion period.
17
English
--------------------------------------------------------------------------------There are two modes for copying: go to Setting Mode to change setting
before using.
Copy
In this mode, the AD330 utilizes fast copying to record digital
data from the memory card to the DISC.
S-Copy
In this mode, after completing the copy work, the AD330 checks the
DISC to ensure all digital data has been recorded securely from the
memory card to the DISC.
Press the “Left” or “Right” button to choose Copy
mode. Press “OK” button, AD330 will burn the
Disc directly and show the copy status. If multiple
cards or devices are detected by AD330, it is
necessary to select device before burning.
The following image appears, showing the capacity of the memory card and
the Disc. While copying, you will be able to track the progress of the copy
work from the following image on the display.
Note:
1. Do not press any button or switch off the
power at this time, otherwise the data in the
memory card could be damaged or not copied
properly. We are not responsible for any loss
resulting from this operating error.
2. The Copy (S-Copy) processing can’t cancel
or stop, please make sure the copy function
before starting.
3. The 12cm empty DVD Disc size is 4.7 GB, the 8cm empty DVD Disc
size is 1.4GB, the 12 cm empty CD Disc is 650MB. AD330 will reserve 5%
outside Disc track space to avoid Data loss.
4. The Copy function just shows the total sizes of card for copying,
remaining space size of Disc to burn, but can’t know status of all users’
Discs to determine the total number of Discs for copying.
18
English
--------------------------------------------------------------------------------4.1.3 Copy status and information
1. If the copying is successful, the display will
show the following image. You can press “View”
to check the photo disc directly or eject
both the memory card and the Disc.
2. If the disc capacity is less than the source
data, AD330 will span more than one disc to do
Copy function. The display will show the
following image.
3. Press “burn” to start recording. Once disc is
full, it will show “Change Disc”.
4. Eject the Disc and insert a new one, press
“burn” to record again.
If you don’t want to record more than one Disc,
please press “cancel”
4.1.4 About the finished Disc
The Disc is a Joliet format with “Apacer” disc label.
The folders, file types and file content on the Disc are consistent with the
source data.
The folder names are numbered as 001, 002, 003 …… They will increase
with each “Copy”.
The Disc can record until full.
Previous DVD-ROM or player might not support the multi-border
(multi-session) DVD disc.
4.1.5 Erase data.
>
>
>
19
English
--------------------------------------------------------------------------------4.1.6 Error messages/ Warning messages
The display may show an Error/ Warning Message. The following is the list
of Error message:
No
1
Reason
Solution
Check that the memory card is properly inserted
and check your memory card for any faults.
2
Check the DISC is placed securely on the spindle
of the disc tray, or the card is not inserted in slot.
3
Make sure the DISC in the AD330 is writeable and
not previously recorded by other recorders than
AD330 in “stand alone mode”.
4
The AD330 can’t read the data on the DISC: check
the disc surface for any scratches
5
The Disc can’t be written to: replace with another
DISC.
20
English
--------------------------------------------------------------------------------6
An error found after checking the data. Replace
with a blank, writeable DISC.
7
Please check the Camcorder power, MOD file, and
USB OTG connect status after DVD-video finalized.
8
Please replace with another blank DVD to convert
again after DVD-video finalized.
9
Please insert a blank disc to convert DVD-video
4.2 Photo View
4.2.1 After selecting the “Photo View” function,
the AD330 will detect any JPEG files from the
card or the disc. Please select the source list
(CF slot, 5-in-1 slot, Disc drive) and click the
options to view photos. The default setting is to
show photos in “Single” viewer. You can choose
the initial viewer mode: “Single” or “Thumbnail”
in the settings menu
4.2.2 In Photo View mode, you can use the “Left”, “Right”, “OK” and “Exit”
buttons to function in the same way on the remote control. Click the “Right”
button to view next photo and “Left” button to check previous one.
21
English
--------------------------------------------------------------------------------4.2.3 When viewing the photos, click “OK” button to choose sub functions.
4.2.4 Sub function
1. You can choose “Single
photo display mode.
”, “Thumbnail
” or “Slideshow
” for the
2. Select “Rotate
” to rotate the photo. Press “OK” to rotate the photo
by 90°, 180°, 270° and 360°.
” function to print the photo. If you
3. Select “Print
want to print the photos, please go to “Setting” ((Please
refer to 5.2 USB mode)) first and set the “USB mode” as
“Printer
”. On the upper left side, the display will
show the “Printer icon
” instead of “PC icon
”.
After that, you can plug USB cable (mini-B) into both AD330 and printer to
run printing function. (Printers must support with PictBridge protocol)
4. Click the “Exit” button to cancel and go back to “Photo view” mode
4.2.5
AD330 can’t view photo for camcorder via USB cable. Please directly
use the camcorder LCD to view photos.
4.3 DVD Playback Mode
4.3.1 Before use
Make sure the power switch is in the OFF position when
you want to connect the AC power adapter to the AD330,
and then switch the power ON.
Plug the supplied composite cable to the corresponding colored jacks on the
TV, and the other end to the A/V out jack of the AD330.
Turn on the TV set and select the proper signal source.
4.3.2 Start using
After the AD330 has started normally, the display will show the following. This
is the copy function. Press the “Left” or “Right” button to switch to DVD
playback mode.
Press “OK” to enter DVD playback mode, the display will show “Connect TV”
or press “Exit” to cancel the selection.
22
English
--------------------------------------------------------------------------------When the signal from the AD330 is conveyed to
the TV set, the following image appears on the TV
screen.
In DVD playback mode, please use the included
remote control to operate the AD330.
4.3.3 DVD playback
1. Insert a VCD or DVD disc into the AD330.
2. The AD330 will automatically check the disc. If the VCD or DVD can be
played, AD330 will play it automatically.
3. Press
press
to pause the playback, press again to resume playing, and
to stop the playback.
4.During playback of a DVD-Video disc, press
setting or press
to change the subtitle
to change the language soundtrack.
5. When a VCD or DVD is played, press
fast forward functions, and press
DVD.
6. While playing, press
/
/
to perform fast backward or
to show the file data of the VCD or
to select the previous/next video chapter, or
press any number (
…
,
) to play the corresponding title. After title
selection, AD330 will always play from first chapter of the title.
/
to adjust the volume. If turn off the Power, the Volume
7. Press
will back to default setting of maximum.
to switch to the mute mode and press again to
8. While playing, press
return to the normal volume mode, or press
/
to return to the
normal volume mode and adjust the volume.
23
English
--------------------------------------------------------------------------------4.3.4 DVD playback system setting
Press
anytime to set up the system
1. TV SYSTEM
NTSC / NTSC-J / PAL / PAL-M / PAL 60 /
AUTO
2. OSD LANGUAGE
ENGLISH / CHINESE / JAPANESE /
GERMAN / SPANISH / FRENCH / ITALIAN
/ PORTUGUESE
3. SOURCE (No function of this model)
CF CARD / 5-IN-1 CARD / DISC
4. SCREEN SAVER
ON / OFF
5. DEFAULT
RESTORE
24
English
--------------------------------------------------------------------------------4.4 DVD Convert Mode
4.4.1 Before use
a.
f.
b.
g.
c.
d.
e.
h.
i.
j.
Plug power adapter into AD330 and turn on. “refer to icon a”
1. Plug power adapter into JVC camcorder and turn the switch to “play
mode”, “refer to icon b, c”.
2. Plug the USB cable (mini-A) into AD330.“refer to icon d, e”
3. Plug the USB cable (mini-B) into JVC camcorder. “refer to icon f, g, h”
4. Connect both USB cables (the other end of both mini-A and mini-B).
“refer to icon i, j”
5. Check whether camcorder is showing on the screen or not.
6. You should make a memo to list which movies files or playlist that you
want before using AD330.
25
English
---------------------------------------------------------------------------------
Camcorder connected
26
Disc inserted
English
--------------------------------------------------------------------------------4.4.2 Start using
1. select DVD convert
2. Select source to convert
If camcorder is connecting with AD330, the screen will show “OTG 1” and
“OTG 2” instead of “Slot 1” and “Slot 2”.
OTG 1: Hard Drive / Micro Drive
OTG 2: SD card
3. Select convert type
(1) Convert all movies
>
All files
File information
“Long press OK”
>
>
Copy status
Disc finalizing
>
Change Disc
Burning Finish
(if it’s necessary)
27
English
--------------------------------------------------------------------------------(1.1) Press the “Left” or “Right” button to “All files” and press “OK” button
for 3 seconds (“Long press OK”).
(1.2) AD330 will show some information on the screen. Please refer to the
disc numbers and prepare enough blank DVD discs or rewritable DVD
discs (that should be erased before use). Insert the disc and close the
tray completely.
(1.3) Press “OK” button to start “DVD convert” or press “Exit” to cancel.
(1.4) Please be patient with the “Disc finalizing” process; after that, AD330
will show “Burning finish” on the screen.
(2) Convert the movies you want
>
Select files Mode
>
Select folder
>
Copy status
>
Select multiple files
“Long press OK”
>
Disc finalizing
File information
>
Change Disc
(if it’s necessary)
Burning Finish
(2.1) Press the “Left” or “Right” button to “Select files” and press “OK”
button.
(2.2) Press the “Left” or “Right” button to select PRG folder and press “OK”
button.
(2.3) Press the “Left” or “Right” button to select movie files and press “OK”
button; the selected file will show with a yellow frame instead of green frame,
the file number and capacity will also increase. If pressing “OK” button again,
the selected movie file will be canceled.
(2.4) You can repeat the process of (2.3) to select multiple movies.
(2.5) You can press “Exit” button and repeat the process of (2.2), (2.3) to
select more movie files.
28
English
--------------------------------------------------------------------------------(2.6) After movie file is selected, please press “OK” button for 3 seconds
(“Long press OK”). AD330 will show some information on the screen. Please
refer to the disc numbers and prepare enough blank DVD discs or rewritable
DVD discs (that should be erased before use). Insert the disc and close the
tray completely.
(2.7) Press “OK” button to start “DVD convert” or press “Exit” to cancel.
Please be patient with the “Disc finalizing” process; after that, AD330 will
show “Burning finish” on the screen.
(2.8) If the “Change disc” message shows on the screen, please insert
another blank disc and press “OK” button to continue.
(2.9) It is recommended to use playlist to do DVD convert more efficiently.
(3) Convert movies in playlist
>
Playlist Mode
Select Playlist
“Long press OK"
>
Disc finalizing
>
>
File information
Copy status
>
Change Disc
Burning Finish
(if it’s necessary)
(3.1) Press the “Left” or “Right” button to “Playlist” and press “OK” button.
(3.2) Press the “Left” or “Right” button to select a number of Playlist and
press “OK” button for 3 seconds (“Long press OK”).
(3.3) AD330 will show some information on the screen. Please refer to the
disc numbers and prepare enough blank DVD discs or rewritable DVD discs
(that should be erased before use). Insert the disc and close the tray
completely.
(3.4) Press “OK” button to start “DVD convert” or press “Exit” to cancel.
Please be patient with the “Disc finalizing” process; after that, AD330 will
show “Burning finish” on the screen.
29
English
--------------------------------------------------------------------------------(3.5) If the “Change disc” message shows on the screen, please insert
another blank disc and press “OK” button to continue.
4. Playback of a DVD-Video directly
When the DVD convert has finished. You can press “View” button to watch
videos on TV or press ”Exit” button to leave.
5. Erase data
>
>
>
Note:
DVD-Video is composed of a group of related video titles, and a title can be
divided into parts of titles. These parts are also known as chapters. AD330
will show the Disc quantity, total size to convert, and processing status.
Please follow the instructions on screen to continue the DVD Convert
function.
Please prepare blank discs or erase rewriteable discs before doing DVD
convert. AD330 can’t erase discs during Copy or DVD convert period. If
AD330 shows any error message, please refer to 4.1.5 for details.
AD330 converts the camcorder MOD file(s) to DVD-Video as per following
rules:
1. If total file sizes are more than 4.2GB (reserved 5% Disc Space), the
AD330 will span to another disc.
2. If the video titles are more than 99, the AD330 will span to another disc.
3. If your selected (all) files have different aspect ratio (16:9 and 4:3), AD330
will distribute into different video titles of the disc.
4. If your selected (all) files have different resolution for ULTRA FINE
(720x480), FINE (720x480), NORMAL (720x480), ECONOMY (352x240),
AD330 will convert the ULTR FINE, FINE, NORMAL MOD file within a
30
English
--------------------------------------------------------------------------------same video title, and convert the ECONOMY MOD file to another video
title.
5. If your selected (all) files include some PRG folder, AD330 will distribute to
different video titles for each PRG folder.
6. If you select a Playlist to do DVD convert, AD330 will ignore the rule of
PRG folder. Just follow the Playlist and the rules of Note. 1,2,3,4 to do
DVD convert.
7. When DVD convert is finished, AD330 will finalize the DVD-Video Disc and
can’t rewrite again.
8. AD330 can’t do DVD convert for which files are in the folder “EXT_MOV” of
JVC camcorder.
4.5. USB Mode
The default setting of USB mode is connected to PC. When connected to a
PC, AD330 becomes an external DVD burner and also an external card
reader.
4.5.1 Before use
Make sure the power switch is in the OFF position. Plug in the supplied AC
adapter or insert the supplied rechargeable battery then switch the power on
(if you have the battery please see the picture below).
The Power LED light turns green and the display shows the Welcome
animation.
Plug one end of the supplied USB 2.0 cable (mini-B) into the PC’s USB port,
and the other end into the AD330’s USB port.
4.5.2 Start using
After the AD330 has started normally, the
display will show the following.
This is the USB mode. When you unplug the
USB cable, AD330 will return to the main menu
automatically.
Three new devices will show on the PC: one is
31
English
--------------------------------------------------------------------------------the recording device and the other two are card readers.
Note: Not support Windows 98, ME. If your OS is Windows 2000, you need to
download SP3 or later version from Microsoft before using the AD330
(www.microsoft.com).
4.5.3 Notices when connecting to a PC
The usage under Windows and Macintosh is different. Please refer to the
following notices for the most effective use.
(1) Notices for Windows and Macintosh
The AD330 needs the power from the AC adapter or the supplied battery
when connected to a PC (we suggest using AC adapter).
The AD330 may work improperly when connected to a PC via a USB hub
with other USB products being used at the same time. We suggest
connecting only the AD330 to the PC.
The AD330 is compliant with Windows and Macintosh operating systems –
we can’t guarantee that the AD330 can be operated normally under other
operating systems.
We don’t guarantee that the AD330 can be operated normally in Multi-OS
and imitative conditions.
(2) Special notices for Windows.
Make sure the PC’s USB interface supports USB 2.0 to obtain high
transmission rates. We don’t guarantee the AD330 can be operated normally
via the recording function of Windows XP.
(3) Special notices for Macintosh
The AD330 conforms to Mac OS X (after 10.1.3). There is no need to install a
driver.
To eject the AD330, please drag the AD330 icon on the desktop to the recycle
bin. If this doesn’t work, please press Eject to exit.
Ensure the AD330 icon on the desktop has been dragged to the recycle bin
before removing the memory card.
The AD330 doesn’t conform to the Disc Burner function of the Mac OS.
32
English
---------------------------------------------------------------------------------
5. Setting
All the functions have been set up with factory defaults. You can change
these settings under the “Settings” function.
Please refer to the previous “Setting” descriptions on chapter 3.3 Menu
instruction ->c. setting
After the function has been selected please press “OK” to access.
Set customized options
Entering this menu; you can perform the functions below:
5.1 Photo View: Define the default viewing mode
Browse single photo full-screen. (Default)
Show 9 photos in one page for browsing
5.2 USB Mode: Set the USB connection status
Connect to PC(Default)
Connect to Printer
5.3 Repeat mode: Repeat the photos when viewing
Turn off the repeat function(Default)
Turn on the repeat function
5.4 Time zone: It sets for regional time; push “Left” button and “Right”
button to adjust your time zone.
Setting time zone will display below the ICON (Default: Greenwich
Mean Time)
33
English
--------------------------------------------------------------------------------5.5 Slide timing: Set the timing for each photo display Slide timing.
1 Sec.
3 Sec. (Default)
5 Sec.
10 Sec.
5.6 Power saving: Shut down the screen after no activity
3min. (Default)
5min.
10min.
30 min
0 min. Never turn off the screen till Power Off.
5.7 Skip: Set speed of fast photo browsing.
10 Steps (Default)
50 Steps
100 Steps
500 Steps
34
English
--------------------------------------------------------------------------------5.8 Copy type: Set initial status of Copy
Copy data in memory Card to Disc
Backup data and Check data error after copy. (Default)
5.9 Erase Disc
Erase data on the rewritable CD/DVD Discs. Press “OK” button to
execute.
5.10 Info
Show the firmware version , release date and web site information
6. Firmware Upgrade
When you want to upgrade firmware, please go to Apacer’s web page to
download the latest version and follow the steps as below
:
6.1 Set the USB mode under “PC” selection.
6.2 Plug in USB cable (mini-B) and connect the AD330 to PC.
6.3 The screen will display “Connect USB”
6.4 Click the firmware upgrade tool. The tool will detect AD330 automatically
and update when the device is working properly.
6.5 If the update version is newer than the current version, it will update it.
6.6 After 100% finalized, then inform user to restart the AD330
35
English
---------------------------------------------------------------------------------
7. Driver Installation
7.1 Install the burning software.
7.1.1 Insert the supplied CD into the
CD-ROM or the AD330.
7.1.2 After the following image shows,
select the appropriate option to proceed
with the installation.
7.1.3 Some software will require you to
reboot the PC after the software installation
completed, please follow the instructions
shown on the screen.
7.2 Under the Windows 2000 operating system
Make sure that Service Pack 3 is installed properly before using with
Windows 2000 – please refer to your Windows manual.
If the Service Pack 3 is not installed, please go to the Microsoft Windows
Update website to download and install it.
7.3 Usage with Macintosh systems
There is no need to install a driver, as the AD330 is compliant with Mac OS X
(versions after 10.1.3).
After your MAC PC boot up is complete, connect the AD330 to the USB
port directly from the system (Do not connect from the USB port on the
keyboard, monitor or USB hub.). Then turn on the AD330 for use.
36
English
---------------------------------------------------------------------------------
8. General operation
8.1 Charging the battery
‧
‧
‧
Insert the supplied battery into your AD330. (If you have the battery)
Plug in the supplied AC adapter, the battery LED will turn green, and the
battery starts to charge.
When battery is fully charged, the battery LED turns off. (It may take
three hours to charge the battery.)
8.2 Emergency eject
‧
‧
‧
‧
If the DISC tray does not open after pressing the eject button, then
please follow these steps to open it:
Switch off the power.
Insert a thin metal stick into the emergency hole on the front panel to
eject the DISC tray a little bit.
Pull out the DISC tray carefully.
8.3 Daily cleaning and maintenance
If you use the AD330 properly, then there is no need to clean or maintain it.
All you have to do is keep the inserted memory cards and Discs clean. Use a
professional cleaning cloth or without fiber-free cloth to clean the surface of
the DISC.
37
English
---------------------------------------------------------------------------------
9. Hardware specifications
Card reader
Slot
Micro Drive, CF Type I/II slot
5-in-1 (SD/MMC/MS/SM/MS PRO) slot
DVD dual
Write speed
drive
Up to 24X (CD-R); Up to 24X (high speed CD-RW)
Up to 4X (DVD-R, DVD+R, DVD+RW)
Up to 2X (DVD-RW)
Read speed
Up to 24X (CD-R, CD-RW)
Up to 2.4 x (DVD+R, DVD+RW)
Up to 2X (DVD-R, DVD-RW)
Memory
2 MB
Format
CD-DA, CD-ROM, CD-ROM XA, Photo-CD
support
(multiple session), Video CD, CD Extra, CD Text,
CD-R, CD-RW, High-Speed-RW, DVD-R,
DVD+RW, DVD-R, DVD-RW
Interface
USB 2.0
Power
Battery
Rechargeable Li-ion battery: 7.4 V, 2200 mAh
(optional)
Up to 2 hours of recording time
AC adapter
AC 100 - 240 V, DC 9 V
Dimension
184 (L) x 157 (W) x 33 (H) mm/7.24(L) x 6.18(W) x 5.23(H) inches
Weight (g)
565 (without battery), 665 (with battery)
38
English
---------------------------------------------------------------------------------
10. Frequently asked questions
Q: If I make a mistake while recording data, what should I do?
A: If the display shows an error message, please check the error code list and
follow the instructions shown on the display to solve the problem.
Q: Why can’t I find the recorded data?
A: The data will be saved in the new folders named “001”, “002” and so on in
sequence. So please go to next layer of folders to locate your data.
Q: What’s the recording speed in fast burn mode?
A: It takes approximately 4 minutes to record data on a 256 MB memory card.
Q: What’s the battery usage?
A: The power of the supplied rechargeable battery can record approximately
the data on thirty-six 256 MB memory cards.
Q: If there is no signal from the TV set in Movie mode, what should I do?
A: If the AD330 is currently in Movie mode, please check if the display has
stopped flashing and the RCA cable is connected properly. If there is a signal
conveyed out, the TV screen will show the AD330 display.
Q: Why can’t I see the photos from the memory card via TV?
A: Ensure the AD330 is in Photo View mode and the TV is receiving a signal.
Check if the photo file format is JPEG as the AD330 supports only JPEG
(baseline) formats.
Q: After I followed the instructions to connect the AD330 to a PC, it still
doesn’t work. Then what should I do?
A: Under the Windows 2000 system, there is no need to install a driver but
Service Pack 3 is needed. If you have difficulty in using the AD330, please
visit our website www.apacer.com for more related information.
39
English
--------------------------------------------------------------------------------IMPORTANT SAFETY INSTRUCTIONS
1.
Read these instructions carefully. Save these instructions for future
reference.
Follow all warnings and instructions marked on the product.
Do not use this product near water.
Do not place this product on an unstable cart, stand, or table. The
product may fall, causing serious damage to the product.
This product should be operated from the type of power indicated on the
marking label. If you are not sure of the type of power available, consult
your dealer or local power company.
2.
3.
4.
5.
Lithium Battery Statement
"CAUTION: Risk of explosion if battery is incorrectly replaced. Dispose
of used batteries according to the manufacturer's instruction"
Note: The (following/ abovementioned) term “STENO” means the
trademark
40
applied by Apacer Technology Inc.
English
--------------------------------------------------------------------------------DVD-Dual Safety Warning
DANGER
VISIBLE AND INVISIBLE RADIATION WHEN OPEN.
AVOID EXPOSURE TO BEAM.
VORSICHT
UNSICHTBARE LASERSTRAHLUNG WENN GEÖFFNET.
NICHT IN DEN STRAHL SEHEN.
ATTENTION
RADIATION DU FAISCEAU LASER INVISIBLE AND VISIBLE. EN CAS
D’OUVERTURE. EVITER TOUTE EXPOSITION AUX RAYONS.
VARO
AVATTAESSA OLET ALTTIINA NÄKYMÄTTÖMÄLLE LASERSÄTEILYLLE
ÄLÄ KATSO SÄTEESEEN.
VARNING!
OSYNLING LASERSTRÄLNING NÄR DENNA DEL ÄR ÖPPNAD.
BETRAKTA EJ STRÄLEN.
VARNING
OSYNLING LASERSTRÄLNING NÄR DENNA DEL ÄR ÖPPNAD. STIRRA
EJ IN I STRÄLEN.
ADVARSEL
USYNLIG LASERSTRÄLING VED ÄBNING. SE IKKE IND I STRÄLEN.
CLASS 1 LASER PRODUCT
APPAREIL A LASER DE CLASSE 1
LASER KLASSE 1
LOUKAN 1 LASERLAITE
PRODUIT LASER
CATEGORIE 1
41