1
2
DESCRIPTION
INTRODUCTION
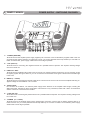
Drivers were attached to it, while the preamplifier is connected to it through copper bars.
The fan is managed by the ASC unit, permitting it to quickly reach the optimal temperature and stabilize it.
The air pulled in by the fan is discharged between the main board and aluminium bottom plate, then it goes out through
the input and power terminal sides of the amplifier.
Since this air isn’t extremely hot, due to small power dissipation, it helps to eliminate the possible stagnated hot air under
the main board mosfets.
The side ducts where both power supply and output power stage transistors are placed, including emitter resistors, are
coupled to it by fixing springs, and were purposefully sized to dissipate heat.
This system allows the air to go out through the amplifier top, thus avoiding the fact that, when the amplifier is embedded
into an into a custom installation, a closed area of hot stagnated air is generated underneath the amplifier which would
prevent the cooling system from pulling cool air in and would make the system inefficient.
Using finned aluminium heatsinks, the ducts also employ a natural convection cooling system.
This way, if the forced cooling system loses efficiency, heat dissipation doesn’t fully fail and allows the amplifier to work
the same under normal listening conditions.
5 • INSTALLATION METHOD AND MAINTENANCE
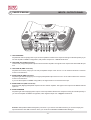
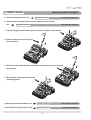
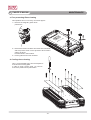
a) Fixing plate and side handles
HV venti is equipped with a removable fixing plate, positioned beneath the bottom, and with two removable side handles
for its displacement.
Before installing the fixing plate, you have to remove it by loosening the four screws, two at each end; on the plate itself
you’ll find pre-drilled holes and slots to mount the amplifier to the installation site.
After this operation, take the amplifier by its handles and attach it on its pre-installed mounting plate. This operation is
easy thanks to the plate runners. Now secure the amplifier by fastening the four screws previously removed into the
mounting plate.
Once you have mounted the amplifier, in order to adjust the controls and connect the cables, you have to remove the two
fixing handles: beneath them you can make all the necessary adjustments and tighten the connecting cables.
Once handles are removed, access to the electronics is not possible in order to avoid any possible installation bits that
could fall inside of it.
When installation is completed, before placing the handles back, you have to mount them to the factory provided grilles,
which protect the displacement slot and cover cables.
The ideal installation of the HV venti is when the amplifier is partially embedded, so that the underneath mounting plate is
hidden and only the cosmetically appealing one are visible; this is the best choice both in terms of aesthetics and thermal
dissipation.
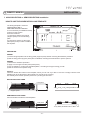
b) Glass panel
The glass panel is removable to enable you to change the setting of the Dual Power system (factory default is Hi Current),
or if you want to change Dual Bias configuration (factory default is Low). You have to remove the glass panel also if you
want to insert the optional crossover. Please be very careful while removing the glass panel. Also make sure no metallic
objects are left inside the amplifier before the glass is re-installed.
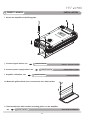
c) Maintenance
Since forced cooling systems draw dust, you have to pay special attention to maintenance.
For this reason the metallic grilles that protect the five fans are attached with a magnetic system and are easily
removable.
Underneath three of these metallic grilles, you will find a foam filter, which stops the dust from the drawn air. Foam
filters have to be periodically cleaned with soap and water; we recommend you clean them once every 6 months or less
depending on environmental conditions.
Once filters are dried, they can be put back to their place. Do not use an external heat source to dry the foam filters. Now
you can remount the grilles. You can fix them in four different ways according to which Audison logo side you want to be
visible.
The cooling ducts can be cleaned as well thanks to the two panels that are accessible beneath the HV venti amplifier. In
order to carry out this operation, you have to remove the amplifier.
This is a time consuming procedure so we recommend you to do it every time the amplifier has to be removed for
whatever reason.
-8-