1
BMPreVIEW
© 2008 Anton Golik, Fototest Ltd.
2
BMPreVIEW
1
Overview
1.1
Introduction
BMPreVIEW is a fast, compact FREEWARE large BMP-image previewer for Windows with an
easy to use interface and a nice features that are zooming, contrast adjustments, and more.
With BMPreVIEW you can quickly preview large BMP image files. Image files are displayed in
miniature (thumbnails). This lets you keep an overview of the images available at the same time as
letting you quickly view and select specific images. BMPreVIEW automatically fit large image to the
window size.
BMPreVIEW can be run without installation. An additional features is that BMPreVIEW is available
on all Windows operating systems.
1.2
LICENSE
BMPreVIEW is FREEWARE without any limitation. PROGRAM IS DISTRIBUTED "AS IS". NO
WARRANTY OF ANY KIND IS EXPRESSED OR IMPLIED.
1.3
Features
Main features of BMPreVIEW:
·
·
·
·
·
·
·
·
·
·
·
1.4
works without installation
memory saving thumbnail-like image previewing algorithm
creates thumbnails of image files with the fastest speed
antialiasing for quality preview
manual and automatic contrast enhancement filters
selected region zooming
save to file and copy to clipboard operations
drag & drop support
simple hotkeys, keyboard shortcuts for all operations
input file name command line parameter
shows information of image files
System Requirements
The Minimum System Requirements are:
·
·
·
·
·
·
Microsoft Windows 95 OSR2 (98, Me, NT, 2000, XP and Vista are Supported)
100 MHz processor
1 MB available hard disk space
8 MB of RAM (for 1024x768 pix display)
SuperVGA HiColor compatible display adapter and monitor
keyboard, mouse or other pointing device
© 2008 Anton Golik, Fototest Ltd.
Overview
1.5
3
Supported File Formats
There is the only one format supported by the current version of BMPreVIEW - uncompressed
Windows Bitmap 1, 8, 24 bits (2, 256, 16M color images), loading of RLE8 or RLE4 compressed
bitmaps is not currently supported.
1.6
Installation
Installation of BMPreVIEW can be done in two different ways. Using the Setup program or ZIP
Archive:
BMPreVIEW installation files
We recommend using the Setup program as this is simple to use and allows for easy installation
and deinstallation.
1.6.1
For the Experienced Computer User
Download BMPreVIEW, and unzip the files into a directory of your choice. Create a shortcut to the
program in the Windows start menu, or place an icon on your Windows desktop that can be double
clicked to start the BMPreVIEW.
You can also add BMPreVIEW to Send-to Menu:
© 2008 Anton Golik, Fototest Ltd.
4
BMPreVIEW
Windows XP Send-to Menu
Unzipped, the archive contains file bmpreview.exe the program that makes BMPreVIEW work:
ZIP Archive contents
© 2008 Anton Golik, Fototest Ltd.
Overview
1.6.2
5
For the Less-experienced Computer User
Download a self-install copy of BMPreVIEW and start the Setup program by double-clicking on
the file:
Setup Welcome Screen
Setup program contains ReadMe file that describes the BMPreVIEW, and gives information
about the author, history of versions of the program and outlines some advanced features:
© 2008 Anton Golik, Fototest Ltd.
6
BMPreVIEW
Setup ReadMe Screen
Follow the on-screen instructions of the Setup program.
1.7
Update
If you already installed a version of BMPreVIEW, and you want to replace this version with a new
one, then you perform an update. Update requires you the uninstall the old version and then install
the new in the same directory.
© 2008 Anton Golik, Fototest Ltd.
Overview
1.8
Uninstall
To uninstall BMPreVIEW after it has been installed using the Setup Program go to Start
Programs Fototest BMPreVIEW and click Uninstall BMPreVIEW:
Link to Uninstall
or see in Start
Settings
© 2008 Anton Golik, Fototest Ltd.
Control Panel
Add/Remove Programs:
7
8
BMPreVIEW
BMPreVIEW in Add/Remove list
All program files, directories and registry entries on your computer will be removed by uninstaller
automatically.
To uninstall BMPreVIEW after it has been installed using the ZIP Archive delete the program
directory and the files contained. Also delete the application properties stored in registry key
HKEY_CURRENT_USER\Software\Fototest\BMPreView.
1.9
Command Line
Command line options allow you to set input file name before the BMPreVIEW is launched, for
example bmpreview.exe "C:\My Documents\My Pictures\Image.bmp".
1.10
Getting Started
Open BMPreVIEW by clicking it’s icon on the Windows Start Menu or double clicking the icon on
your desktop. The following picture shows the main window that is displayed when BMPreVIEW is
started:
© 2008 Anton Golik, Fototest Ltd.
Overview
BMPreVIEW is started
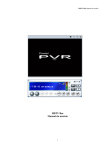
The right mouse button used to show the context popup menu:
© 2008 Anton Golik, Fototest Ltd.
9
10
BMPreVIEW
Context popup menu
Right click on the main window, then select Open Image… option in the menu to get a file for
use in the previewer. A dialog box will allow you to select the file you want:
© 2008 Anton Golik, Fototest Ltd.
Overview
11
Open dialog
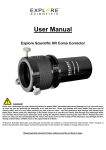
After the opening, you will see small resized version of image or you will get an error message, if
the file type is unsupported by BMPreVIEW. The image will be resized to fit the window. Resizing
the window lets you control the size and quality of the preview. The following image shows the
main window with an open image:
© 2008 Anton Golik, Fototest Ltd.
12
BMPreVIEW
BMPreVIEW with opened image
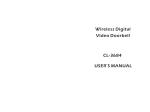
With an image in the viewer, you can manipulate it in some ways. Functions for changing an image
are in the Filters submenu:
© 2008 Anton Golik, Fototest Ltd.
Overview
Filters submenu
When you are finished with the image, bring in another image, or
© 2008 Anton Golik, Fototest Ltd.
Exit BMPreVIEW.
13
14
1.11
BMPreVIEW
Menu
The context popup menu allows quick access to some of the most useful features of BMPreVIEW.
There is an image of the menu here :
Main menu and submenus
© 2008 Anton Golik, Fototest Ltd.
How to...
2
How to...
2.1
Open
15
Right click on the main window, then select Open Image… option in the menu (or use Enter
key.) The Open dialog box will allow you to select the file you want:
Open dialog
Locate the file you want, or type a file name into File Name text field. Files of type lets you limit
your choice, showing only the type of file supported by BMPreVIEW (Windows Bitmap).
Single click on
double click the filename.
button brings the file into the BMPreVIEW window. You can also
To close dialog without opening a file, click
button.
After the opening, you will see an image or you will get an error message, if the file type is
unsupported by BMPreVIEW:
© 2008 Anton Golik, Fototest Ltd.
16
BMPreVIEW
Error message box
User can open pictures using Drag & Drop:
Drag & Drop
2.2
Reopen
Right click on the main window, then select Reload Image option in the menu (or use
Backspace key) to bring in, again, the last file you opened.
2.3
Close
Right click on the main window, then select Close Image option in the menu (or use Del key) to
remove the image from the BMPreVIEW. This does not affect the image stored on your disk drive.
© 2008 Anton Golik, Fototest Ltd.
How to...
2.4
17
Copy
Right click on the main window, then select Copy To Clipboard option in the menu (or use Ctr
+C shortcut). The image in BMPreVIEW window (only resized preview, not entire image) will be
placed on the Windows Clipboard, and may be pasted in elsewhere.
2.5
Save
Right click on the main window, then select Save As… option in the menu (or use S key.) The
Save dialog box will allow you to find the directory where you want the file saved and specify the
file name:
Save dialog
The image in BMPreVIEW window (only resized preview, not entire image) will be saved to file.
Click
button to send the file to your disk drive.
To exit without saving, click
© 2008 Anton Golik, Fototest Ltd.
button.
18
2.6
BMPreVIEW
Exit
There are several ways to exit the program.
On the main window, press the Esc key on your keyboard. The program will close immediately. (If
you're in the menu or dialog box, Esc key will back out of that window. Press it again to exit.)
Right click on the main window, and then select Exit option in the menu to close the
BMPreVIEW. Click the
box in the upper right corner of the program window. This will also close
the program.
Note: BMPreVIEW doesn't ask if you are sure you want to exit - it closes right away. Be sure you've saved any work you
want to keep.
2.7
Enhance Contrast
Right click on the main window, then select Filters submenu, then Increase or Decrease
contrast. You can also automatically adjust contrast by Histogram Equalization method.
This actions can be reversed by the menu's
2.8
Reload Image command.
Zooming
Use the left mouse button to outline the area (selection):
Region selection
This action can be reversed by the menu's
2.9
Reload Image command.
View Files in Directory
With BMPreVIEW you can display all the BMP files in each directory.Use the Space bar or Left
arrow key to move forward and Right arrow key to move backward through the files.
Note: when you reach the first/last of the images in a directory, BMPreVIEW don't notify if end/begin of directory is
© 2008 Anton Golik, Fototest Ltd.
How to...
19
reached.
To specify the directory right click on the main window, then select Browse Folder... option in
the menu (or use F key). The Browse fo Folder dialog box will allow you to select the directory
you want:
Browse for Folder dialog
2.9.1
Next File
Right click on the main window, then select Next Image option in the menu (or use Right
Arrow key). The BMPreVIEW displays the next BMP file in current directory.
2.9.2
Previous File
Right click on the main window, then select Previous Image option in the menu (or use Left
Arrow key). The BMPreVIEW displays the previous BMP file, in reverse sequence.
2.9.3
First File
Press Home key. The BMPreVIEW displays the first BMP file in the current directory.
2.9.4
Last File
Press End key. The BMPreVIEW displays the final BMP file in the current directory.
© 2008 Anton Golik, Fototest Ltd.
20
BMPreVIEW
3
Settings
3.1
Antialiasing
Enable this if you want better (but slower) displaying of the color images.
Right click on the main window, then select Options submenu. Check the
option for turn this mode ON. Turn it OFF by clicking Antialiasing again.
3.2
Antialiasing
Autocontrast
Enable it if you want to automatically change the intensity of each loaded image.
Right click on the main window, then select Options submenu. Check the
option for turn this mode ON. Turn it OFF by clicking Autocontrast again.
3.3
Autocontrast
Always on Top
Right click on the main window, then select Options submenu. Check the Always On Top
option. BMPreVIEW will always be visible on your screen, even when you open other programs.
This can be removed by clicking Always On Top again.
Note: this option will be saved and restored after next BMPreVIEW start.
3.4
Memory optimization
You can improve your efficiency by optimizing memory usage. Optimization increases the amount
of RAM available on your computer by storing temporary files that are not currently in use in the
swap disk space. This artificially increases the amount of memory available on your computer and
improves the ability of BMPreVIEW to handle bitmap images. Recommended for computers that
having 128 MB of RAM or less.
Right click on the main window, then select Options submenu. Check the Optimize RAM
Usage option for turn this mode ON. Turn it OFF by clicking Optimize RAM Usage option
again.
Note: this option works only on Windows NT, 2000, XP and Vista.
3.5
Only 1 Instance
There is not allowed to open BMPreVIEW more than once at the same time. BMPreVIEW will
prevent more than one instance of the program at any time.
3.6
Last window size and position
Each time you open the BMPreVIEW, it will be positioned on your screen where it was when you
last closed it.
© 2008 Anton Golik, Fototest Ltd.
Information
4
Information
4.1
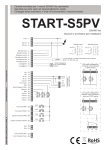
View Image Properties
21
Right click on the main window, then select Image Info… option in the menu (or use F3 key). A
box opens with the following about the image:
·
·
·
·
·
·
·
·
File name
File disk size
Original image dimensions
Current image dimensions
Original color depth and Bits per Pixel
Current image memory
Time to load image
Total RAM usage by program
The following picture shows this dialog box:
Image info box
Click the
4.2
button when you are done viewing the information.
Getting Help
Right click on the main window, then select Help option in the menu (or use F1 key). This help
file (the one you are reading now) will appear.
Note: HTML Help (CHM files) is the standard help format for Windows 98 and later versions, including Windows XP.You
may download:
· BMPreVIEW help for Windows 95 in Windows Help Format (HLP files)
· User Manual for Abobe Reader (PDF files)
here: http://www.graintest.ru/download.html.
4.3
About the program
Right click on the main window, then select About… option in the menu. This gives the current
version number of BMPreVIEW, website and e-mail address for the author, and the copyright
notes.
The following picture shows this dialog box:
© 2008 Anton Golik, Fototest Ltd.
22
BMPreVIEW
About box
When done viewing the information, click on the bar that says "close".
5
Hotkeys
For quick access, all menu items are available using Control and Key combinations (shortcuts)
Available keyboard shortcuts in BMPreVIEW:
Key
Function
+
Increase image contrast
-
Decrease image contrast
Load next image in current folder
Load previous image in current folder
Space
Load next image in current folder
Enter
Open image
S
Save image to file
Ctrl+C
Copy image to Clipboard
Del
Close image
Delete
Backspace
Reload image
F3
Image info
F
Browse folder
E
Apply histogram equalization filter
T
Turn ON/OFF Always On Top mode
© 2008 Anton Golik, Fototest Ltd.
Hotkeys
6
Key
Function
D
Turn ON/OFF Autocontrast mode
A
Turn ON/OFF Antialiasing mode
R
Turn ON/OFF Optimize RAM Usege mode
F1
Help
Ecs
Exit
Home
Load first image in current folder
End
Load last image in current folder
Version History
Legend:
- added feature
- bug fixed/removed
- improved/changed feature
1.1.0.0 (04/2008)
English help file and user manual
optional installer (by Inno Setup)
now displays the next, previous, first and last image in current directory
"Select Folder" dialog allows to select a directory from which the files will be taken
RAM usage optimization for WinNT/2000/XP/Vista
information about memory usage by application in "About..." and "File Info..." dialog boxes
"Always On Top" mode improvements
progress label now shows image loading percentage
1.0.2.0 (04/2008)
improved autocontrast enhancement filter
fixed bug with applying contrast enhancement filter to the newly opened image when
"Autocontrast" mode is on
fixed bug with "Save As" dialog appearance when "Always on Top" mode is on
minor bugs fixes and code optimization for stability improvement
1.0.1.1 (03/2008)
Windows 95/98/Me compatibility improvements
1.0.1.0 (12/2007)
English language interface
new "About..." dialog
some GUI features: icons added in popup menu
improved contrast enhancement filters
"Options -> Always on Top" command added
"Options -> Autocontrast" command added (linereal histogram stretch)
"Copy to Clipboard" command added
© 2008 Anton Golik, Fototest Ltd.
23
24
BMPreVIEW
"Save As..." command added
doesn't use bmpreview.ini any more
application properties store in registry HKEY_CURRENT_USER\Software\Fototest\BMPreView
now application consists of one single file bmpreview.exe [540Кб]
fixed bug in command line support
sometimes popup menu doesn't work after zooming
memory leaks in contrast algorithm
some other minor bugs fixed...
1.0.0.3 (02/2007)
files opening via command line
prevent the simultaneous start of several instances of BMPReVIEW
some other minor bugs
1.0.0.2 (12/2006)
contrast enhancement filters added ("Filters" submenu)
"File Info" dialog (file size, file name, image dimensions...)
1.0.0.1 (08/2006)
some bugs with 1 bit images support fixed
improved stability
saving application properties into bmpreview.ini file (remember last window position and
more...)
many other minor bugs, cosmetical improvements and some language corrections
1.0.0.0 (08/2005)
First semi-public beta release…
7
Contact Information
E-mail: [email protected]
WWW: http://www.graintest.ru
8
Credits
The program BMPreVIEW and documentation by the author Anton Golik are copyright protected.
© 2005-2008 Anton Golik, Fototest Ltd. All rights reserved.
RAM usage optimization code by Tomasz Klekot http://www.techblog.tomksoft.com/download/
Ram-Optimization-Sources and Swiss Delphi Center.
© 2008 Anton Golik, Fototest Ltd.