1
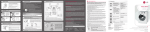
USER’S
MANUAL
DAB/DAB+ Receiver
DG-DAB888R
MUTE
INT.
PRO.
HD
MEMORY
SEARCH
OSD
SETUP
FILE
MOVIE
CVBS
MUSIC
PHOTO
MENU
OK
16:9
P+M
VOL+
VOL-
ZOOM
ROTATE
THE FUTURE OF HOME ENTERTAINMENT
A clever
. product
NEED HELP?
If you are experiencing difficulty operating this product or require
set upassistance please contact the DGTEC Service Centre. The call
is freefrom anywhere in Australia. Our operators will assist you in
plainEnglish without the technical jargon:
Call
1800 189 941
(Australia)
8:00 am - 6:00 Australian EST
*Subject tochange without notice.
-1-
Precautions
Before fore using this product, please carefully read and keep
these Operation Instructions for later reference.
Setting Up
Ensure that the mains supply in your house complies with that indicated on the
identification sticker located at the back of your Receiver. Install your Receiver
horizontally, on a suitable base (furniture), with enough space around it for
ventilation (7~10cm). Do not stack other, or heavy devices on top of the Receiver.
Do not place the Receiver on amplifiers or other equipment which may become hot.
This Receiver is designed for continuous use.
Switching the Receiver to the stand-by mode does not disconnect the electricity
supply In order to separate the Receiver completely from the mains, it has to be
disconnected by unplugging the main plug, especially when left unused for a long
period of time.
For your safety
Never open the Receiver or any of its components. It can be dangerous for you
or certain fragile components. You could receive an electric shock.
Caution
Protect the Receiver from moisture (dripping or splashing and objects filled with liquids)
and excess heat (e.g.fireplace) or equipment creating strong magnetic or electric fields
(i.e.speakers...). Disconnect the power cable from the mains electricity supply if the
Receiver malfunctions. Your Receiver is not intended for industrial use but for domestic
purposes only. Use of this product is for personal use only. If your Receiver has been stored
in a cold atmosphere for example during transportation in the winter, wait for approximately
2 hours until they have reached room temperature, before use.
Maintenance of Cabinet
For safety reasons, be sure to disconnect the AC power cord from the AC outlet when
cleaning the cainet.
- not use benzene, thinner, or other solvents for cleaning.
- Wipe the cabinet with a soft cloth.
- 2-
Precautions
Handling the Power Cord
-
Hold the plug when you unplug the power cord.
Do not put the power cord near any heat source equipment.
Do not place any heavy object on the power cord.
Do not use any other power that is not include the receiver(DG-DAB888R).
Caution
- Take care not to damage LCD.
- Do not insert anything except SD Card into SD Card Slot.
-3-
Before you start
Accessories
Receiver (DG-DAB888R)
Remote Control
FM Radio Antenna
Antenna Conversion Cable
DAB+ Antenna
A/V Cable
AC/DC Adaptor
Manual
Install Battery
In The
Remote
Control
Remote
Controller
Function
Buttons
1. Open the battery cover on the back of the remote control.
2. Insert batteries. Make sure that the polarities (+ and -) are aligned correctly.
3. Replace the battery cover.
Remote
If
remoteController
control does
Function
not operate
Buttons
properly
1. Check the polarity + and - of the batteries.
2. Check if the batteries are drained.
3. Check if remote controller sensor is blocked by obstacles.
4. Check if there is any fluorescent lighting nearby.
- 4-
Table of Contents
Description - Front Panel ............................................................................................................................... 6
Description - Rear Panel ................................................................................................................................ 7
Tour of Remote Control .................................................................................................................................. 8
SETUP
Setup
Connections
Power Cable Connection ............................................................................................................................. 10
Audio/Video Cable Connection ................................................................................................................... 11
DAB+ Antenna Connection ......................................................................................................................... 12
FM Radio Antenna Connection .................................................................................................................. 12
REFERENCE
- 5-
FUNCTIONS
Reference
Q&A(Trouleshooting) ..................................................................................................................................... 23
Specification .................................................................................................................................................... 24
CONNECTIONS
Functions
Power ON/OFF ............................................................................................................................................. 13
- Main Power ON
- Main Power OFF
Using Buttons ................................................................................................................................................. 15
- Basic Function Key
Main Menu ...................................................................................................................................................... 16
DAB Mode ...................................................................................................................................................... 16
- Return Main Menu
- Searching
- Stop
- Recording
- Channel List
- EPG (Extended Program Guide)
FM Radio Mode ............................................................................................................................................. 19
- Searching Frequency
- Frequency Stored
- Frequency Up/Down
REC File Playback Mode ............................................................................................................................ 19
- Recording File Playback
- Browsing
MUSIC Playback Mode ............................................................................................................................... 20
- Music File Playback
- Browsing
Time and Alarm Setting ............................................................................................................................... 21
- Time Setting
- Date Setting
- Alarm Time Setting
Firmware Upgrade ........................................................................................................................................ 22
Description - Front Pannel
Front Panel Controls
1. STANDBY
When the unit is first plugged in, the indicator lights and LCD is turned on. When STANDBY is
pressed on again, the light goes out and the receiver is turned off.
2. UP
Use to move up or select a previous PRESET frequency.
3. LEFT
Use to move left or go to previous menu.
4. DOWN
Use to move down or select a next PRESET frequency.
5. RIGHT
Use to move right or go to next menu.
6. DAB+
Go to DAB+ mode.
7. FM
Go to FM radio mode.
8. MUSIC
Go to MUSIC play mode.
9. DISPLAY
- Display various messages concerning operations such as
MENU, MUSIC play, FM radio, DAB+, ...
- Show menu, message, or information.
10. SD SOCKET
Use to play music file or store DAB+ recording file.
-6-
SETUP
DG-DAB888R
Description - Rear Pannel
Rear Panel Controls
1. DAB+ ANTENNA INPUT JACK
Connect to an external DAB+ antenna.
2. FM ANTENNA INPUT JACK
Connect to an external FM radio antenna.
3. VIDEO OUT JACK
Use a video cable to connect to the Video input jack on your television, amplifier, or a/v system.
4. DIGITAL AUDIO OUTPUT JACK
Use an optical digital cable to connect to a compatible Dolby Digital Receiver.
5. AUDIO LEFT OUTPUT JACK
Connect to the Audio left input jacks of your television, amplifier, or a/v system.
6. AUDIO RIGHT OUTPUT JACK
Connect to the Audio left input jacks of your television, amplifier, or a/v system.
7. AC/DC ADAPTOR JACK
Connect the ac/dc adaptor plug into this jack.
8. MAIN POWER SWITCH
Control the power on/off.
-7-
SETUP
DG-DAB888R
Tour of the Remote Control
VIDEO
-8-
SETUP
DG-DAB888R
Tour of the Remote Control
1. POWER button
16. MOVE DOWN button
2. VIDEO button
17. MOVE RIGHT button
3. SEARCH button
18. SELECT button
4. MENU button
19. FM RADIO button
5. ALARM1 ON/OFF button
20. MOVE UP button
6. DAB button
21. ALARM2 ON/OFF button
7. MOVE LEFT button
22. EPG button
8. REC PLAY button
23. BROWSER button
9. TIME button
24. EXIT button
10. ALARM1 button
25. REC. button
11. ALARM2 button
26. STOP button
12. VOL- button
27. CAPTION button
13. DATE button
28. SPDIF button
14. VOL+ button
29. MUTE button
Power ON or OFF(Standby mode).
Video output ON.
Start channel scan in DAB or FM mode.
Enter the main menu.
Alarm1 function enable or disable.
Enter DAB+ mode.
Navigate left.
Start recording in DAB mode.
Enter time setting mode.
Enter alarm1 time setting mode.
Enter alarm2 time setting mode.
Decrease volume.
Enter date setting mode.
Increase volume.
Navigate down.
Navigate right.
Play/Pause or select file in browse mode.
Enter FM radio mode.
Navigate up.
Alarm2 function enable or disable.
Enter EPG list menu.
Enter browser menu.
Exit main menu or exit browser menu.
Start recording in DAB mode..
Stop channel scan or stop recording.
Caption display ON/OFF.
SPDIF output ON.
Audio mute.
15. MUSIC PLAY button
Enter MUSIC playback mode.
-9-
SETUP
Remote Control
Controller
Function
Function
Buttons
Buttons
Connections
Before
the DG-DAB888R
RemoteConnecting
Controller Function
Buttons
- Always turn off the DG-DAB888R, TV, A/V system, and other components before you connect
or disconnect any cables.
- Refer to the user’s manual of the additional components you are connecting for more
information on those particular components.
Connection
to anFunction
AC/DC adaptor
Remote
Controller
Buttons
CONNECTIONS
Connect the power cable(AC/DC adaptor)
Turn on the power
Turn off the power
- 10 -
Connections
Connection
to anFunction
Audio System
Remote
Controller
Buttons
CONNECTIONS
Connect the audio / video cable
Remote
Connection
Controller
to a DAB+
Function
antenna
Buttons
Connect the DAB+ antenna
- 11 -
Connections
Remote
Connection
Controller
to a FM
Function
radio antenna
Buttons
CONNECTIONS
Connect the FM radio antenna
- 12 -
Power ON/OFF
Power ON
There are two kinds power on. - Main power on and STANDBY mode.
1. Main Power ON
(1) Connect the AC/DC power adaptor into the power jack.
(2) Press the upper side of the main power switch.
(1) Press the power button on either the front panel or remote control.
(2) A blue light will illuminate the circular directional button.
- 13 -
FUNCTIONS
2. STANDBY mode in watch mode
Power ON/OFF
Power OFF
There are two kinds of power off. - Main power off and STANDBY mode.
1. Main Power Off
(1) Please press the low side of the main power switch.
(1) Please press and hold the power button on product front panel or remote control.
(2) Then the blue light will be turned off and the screen will display watch and date.
- 14 -
FUNCTIONS
2. STANDBY mode
Using Buttons
Front Panel
Basic Function Keys
Icon
Key Action
Items
Power ON or Select file in browser mode.
Long press
Power OFF.
(2)
Short press
Navigate up.
(3)
Short press
Navigate left.
(4)
Short press
Navigate down.
(5)
Short press
Navigate right.
(6)
DAB
Short press
Go to Digital DAB+ mode.
(7)
FM
Short press
Go to FM radio mode.
Short press
Go to MUSIC playback mode.
(8) MUSIC
See the page7 and page8 for remote control usage.
- 15 -
FUNCTIONS
Short press
(1) POWER
Mode - Main Menu
Main Menu
Press
button to display main menu. Use the
one of the four selections available.
and
navigation keys to highlight
FUNCTIONS
DAB Menu
Select DAB menu to activate Digital Radio (DAB+) mode.
Press
functions.
button to display sub menu. You can use
- 16 -
and
buttons to select
DAB Mode
Return to Manu
Press
button to exit current mode(DAB mode - left side)
or use the
button on remote control to exit current mode.
Searching Channels
Searching channels with this icon. Press
the channel search screen or use the
control to activate channel search.
button to display
button on remote
Searching Hold / Recording Stop
Press the STOP icon to stop scanning in channel search mode
or to stop recording in recording mode.
Press the
button on the remote control to stop searching in channel search mode or
stop recording in recording mode.
- 17 -
FUNCTIONS
On completion of the scan the system will save the digital
channels scanned in your region.
DAB Mode
Recording
Select REC icon or press
button on remote control to
record the channel you are listening to.
REC symbol will be displayed during recording.
Channel List
Select this icon to display the channel list and press
button to show the list in the format left below.
EPG
Select this icon or press
button on remote control to
display the selected channels EPG (Extended Program Guide)
when available.
Press
or
button to select the list and press
button to display the channel information.
Press
button to return previous menu.
- 18 -
FUNCTIONS
Press
or
button to highlight your selection and press
button to play.
button to return previous menu.
Press
FM Radio Mode
Press
or
button to select the list and press
button to display the program information in detail.
Press
button to return previous menu.
Press
button to return previous menu.
FM Radio Mode
FM rdaio will be displayed as below.
1. Searching Frequency
Press
button to scan all frequencies.
The scanned broadcasting frequencies will be automatically
stored.
Press
or
button to search the stored frequency.
or
button once to navigate up/down, repeat the process to move in up and
Press
down in one step increments. Hold the
or
button down to activate previous/next
channel search function.
3. Return
Press
button to return to main menu.
REC File Playback Mode
This Receiver can playback recorded files stored on an SD card that is inserted
into the SD card slot on the front panel.
When you select Playback mode the recorded file content on the SD card will
be displayed on the screen, see below.
- 19 -
FUNCTIONS
2. Frequency Up / Down
MUSIC Playback Mode
Browser will display DAB recording file only. Press
,
, or
button to highlight the file that you want to
playback.
After highlighting the file, press
,
button to play.
Use the
or
button on remote control to adjust
volume, the volume bar will be displayed on screen.
Press
button on remote control to mute the volume.
MUSIC Playback Mode
Music Playback Screen
1. Level Meter : Color level meter.
2. Folder/file name and file information are displayed which
scrolls automatically.
3. Playing file title, artist and album is displayed.
4. Playing time is displayed.
5. Music playback mode is displayed.
6. Playing status is displayed.
7. Playing file number and total file number is displayed.
- Press
or
FUNCTIONS
1. Listen to Music
button to play previous/next title.
- Press
or
button to adjust volume.
- Press
button to mute the sound.
2. File Browsing
The browser will display Mp3 and MWA file. Press
select the file.
After selecting the file, press
button to play.
,
,
, or
Time, Set and Alarm
The time screen is displayed in standby mode.
- 20 -
button to
Time and Alarm Setting
1. Time Setting
button, the hour segment will flash. Press
or
button to set the hour.
Press
Next press
button to set the minute segment of the time, the minute segment will flash.
Press
or
button to adjust the minute setting then press
button to save
settings.
2. Date Setting
Press
button, then year segment will flash. Press
or
button to adjust the year.
Next press
button the month segment will flash. Press
or
button to adjust the
month setting. Press
button to move to date bar. Use
or
button
the date setting. Press
button to save the changes.
3. Alarm Time Setting
This Receiver has two alarm settings, follow the simple setup procedure below to set alarm.
Press
button, then alarm1 segment will flash. Press
or
button to adjust the
desired alarm setting. Press
button the minute segment will flash. Press
or
button to adjust the minute setting. Press
button to save alarm1 setting.
Follow the sample above to set alarm2.(Use
button.)
4. Mode Change
or
button to change the mode of Alarm1 or Alarm2. The displayed icon
.
icon is alarm ON status, and
icon is alarm OFF status.
- 21 -
FUNCTIONS
Press
or
will changed to
Firmware Upgrade
New firmware, for this Receiver may become available at some point in the future to provide
enhanced features for this product. Check our website from time to time. If/When a new firmware
upgrade becomes available follow this procedure.
1. Download “upgrade file” from our web site (www.dgtec.com.au)
2. Copy “upgrade file” onto SD card.
3. Turn the main power switch on the rear panel to the OFF position. Insert the SD card into the
SD card slot in the front panel then turn the main power switch on the rear panel to the ON
position.
4. The upgrade starts automatically once the “upgrade file” on SD card is detected.
1) Once the upgrade file is detected on the SD card you will see the
following display.
2) If there is any problem with the SD card, you will see the following
message. Check that the fiel has been downloaded correctly to the
SD card.
3) In phase one of the upgrade the current memory is deleted, a
progress bar will be displayed.
5) Once you have successfully completed the new firmware upgrade we suggest you delete the
upgrade file on the SD card before using it with this Receiver to record or playback music files.
- 22 -
FUNCTIONS
4) In phase 2 of the upgrade the new firmware will be loaded, a
progress bar will be displayed.
Q&A (TROUBLESHOOTING)
Before calling the DGTEC National Call Centre on 1800 189 941 trying using
the Trouble Shooting Guide below.
Q. No power.
A. Make sure the AC/DC adaptor is properly inserted into the power socket on the rear panel of
the Receiver. Check that the power switch on the rear panel of the Receiver is in the ON
position.
Q. Cannot get the DAB+ signal
A. Check that the DAB+ antenna is properly connected with DAB+ antenna socket.
Q. No sound / video
A. Make sure that the TV/monitor is set to the correct AV input or in the case of an A/V Receiver
the input settings are properly set.
A. Check to make sure that the receiving device does not have the MUTE setting activated.
Q. Remote control is not responding
A. Check whether there is any obstacle between the remote control and the unit.
A. Make sure that the batteries for the remote control are properly installed.
A. Make sure that the batteries have power.
Q. Cannot record DAB+
A. You will need a SD card inserted in the SD card slot in the front panel to record. Make sure
that the SD card is properly inserted.
A. The SD card my be full.
Q. No music file
A. Please check whether there is SD card in SD socket.
A. Make sure that there are music files on the SD card.
REFERENCE
- 23 -
SPECIFICATION
General
Power Requirements
AC/DC Adaptor [email protected]
Power Consumption
max. 5W
Dimension
410mm(W) x 250mm(D) x 55mm(H)
Operating Temperature Range +5 C to +35 C
Operating Humidity Range
Memory
External Memory
Video
Output
Composite Video
Display
2 channel
Audio
Output
Frequency Response
Music Play
DAB+
Dimension
Antenna
10% to 75%
SD Card Type
QVGA(320 x 240) TFT LCD
1 channel : 1.0 Vp-p (75ohm Load)
Left, Right
48 Khz Sampling : 4Hz to 22KHz
96 Khz sampling : 4Hz to 44KHz
S/N Ratio
over 85dB
THD
under 0.1%
Supported File
Mp3, WMA
DAB+ Antenna
FM Radio Antenna
Australia Standard
50ohm impedance external antenna (SMA)
wire type (150mm)
REFERENCE
- 24 -
A clever
. product
DG-DAB888R