1
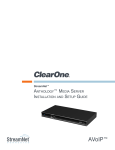
VIEW™
SLX300 SpeakerLinX™ IP Zone
Amplifier Installation and Setup Guide
TM
AVoIP™
ClearOne
5225 Wiley Post Way
Suite 500
Salt Lake City, UT 84116
Telephone 1.800.283.5936
1.801.974.3760
Tech Sales
1.800.705.2103
FAX1.801.974.3669
[email protected]
[email protected]
On the Web
www.clearone.com
www.netstreams.com
www.streamnetpartners.com
View
SLX300 SpeakerLinX IP Zone Amplifier
Installation and Setup Guide
ClearOne Document
800-000-000-08 Rev 1.1 - June 13, 2012
© 2012 ClearOne and NetStreams - All rights reserved. No part of
this document may be reproduced in any form or by any means
without written permission from ClearOne and NetStreams.
Printed in the United States of America. ClearOne and NetStreams
reserves specific privileges.
Information in this document is subject to change without notice.
Table of Contents
Important Safety Notices
Chapter 1: Installing the SLX300...............................................................................................1
Connections and Indicators...............................................................................................................................................1
Ethernet Connection........................................................................................................................................................2
EIM Connection (Expansion Interface Module)..............................................................................................................2
Speaker Connections......................................................................................................................................................2
Balanced Audio Connections..........................................................................................................................................2
LED Indicators.................................................................................................................................................................2
Monitoring Jack...............................................................................................................................................................2
Power Connection...........................................................................................................................................................2
Chapter 2: SLX300 Setup ..........................................................................................................3
SLX300 Screens in the Dealer Setup Program..................................................................................................................3
Adding an SLX300 to a Project.......................................................................................................................................3
Configuring the SLX300 .................................................................................................................................................4
Chapter 3: Mounting Options.....................................................................................................8
Chapter 4: Compliance............................................................................................................10
Chapter 5: Service and Support..............................................................................................11
Important Safety Notices
Read these warnings, heed all warnings, and keep for future reference.
• Clean only with a dry cloth.
• Do not use this apparatus near water.
»» CAUTION: To reduce the risk of electrical shock, do not expose this appliance to
rain or moisture. Equipment must not be exposed to dripping or splashing and no
objects filled with liquids, such as vases, must be placed on the equipment.
• The mains socket outlet must provide a Class 1 Protective Earthing Connection where the outlet
has a protective earth (ground) connection.
• This device uses a polarized, or grounding-type plug. Do not defeat the safety purpose of the
plug. A polarizing plug has two blades with one wider than the other, A grounding-type plug has
two blades and a third grounding prong. The wide blade or third prong is provided for safety.
If the provided plug does not fit into your outlet, consult an electrician for replacement of the
obsolete outlet.
• The mains plug or appliance connector shall be used as the disconnect device, so the mains
plug or appliance connector should always remain readily operable.
• Audio outputs - Use “Class II Wiring” speaker cables.
• Do not block any ventilation openings. Install in accordance to the manufacturers instructions.
• Do not install near any heat sources such as radiators, heat registers, stoves or other apparatuses
(including amplifiers) that produce heat.
• Only use attachments/accessories specified by the manufacturer.
Chapter 1: Installing the SLX300
The SLX300 SpeakerLinX is a high power, networked audio amplifier. This amplifier may be
mounted any distance from the speaker location; however, longer speaker wires may result in
some distortion of the audio waveform. In addition to being a very capable amplifier, the SLX300
can also function as the zone or room controller and has a built-in web server which can provide
a user interface. Each zone of audio must have at least one SpeakerLinX. Combining the amplifier
and room controller, and connecting local audio sources to the SpeakerLinX minimizes the amount
of cabling required to accomplish multiple functions.
»» NOTE: The SLX300 and the SLX300i are identical except for the power input. The
SLX300 is the 120 Volt, US model, and the SLX300i is the 240 Volt, International
model.
CONNECTIONS AND INDICATORS
The SLX300 has connections for the following:
• 10/100Mb Ethernet (RJ45)
• Two +4 dBu Stereo Balanced Audio Inputs (3.5mm, 2 x 3 pin Phoenix-style)
• Two +4 dBu Stereo Balanced Audio Outputs (3.5 mm, 2 x 3 pin Phoenix-style)
• Two Stereo Speaker Outputs (7.5mm, 2 x 2 pin Phoenix-style)
• IEC Power Cord Inlet (according to US or International model ordered)
• StreamNet EIM (RJ45)
• Monitoring Jack (1/4-inch, on front)
Stereo
Speaker
Outputs
Stereo
Balanced
Audio
Outputs
Power/Status
LED
Stereo
Balanced
Audio
Inputs
EIM for
Audio Port,
BluePort,
IRLinX or
KeyLinX
Ethernet
Network
Power
Cord
Input
Fuse
Access
On/Off
Switch
Monitoring
Jack
Chapter 1: Installing the SLX300
1
Ethernet Connection
The 10/100 Ethernet connector allow connection to a TCP/IP network that is setup to run StreamNet.
Using a standard (straight through) Category-5 or Category-6 Ethernet cable, connect the Ethernet
port on the SLX300 to an available port on your network router or switch.
EIM Connection (Expansion Interface Module)
Using a standard (straight through) Category-5 or Category-6 Ethernet cable, connect the EIM
port on the SLX300 to any EIM compatible accessory. This includes BluePort, KeyLinX, IRLinX, any
Audio Port, or EIM enabled external amplifiers.
»» NOTE: The EIM splitter is required to install a KeyLinX or IRLinX. It is shipped in the
same box with the KeyLinX and IRLinX.
Speaker Connections
Connect the left/right speaker audio outputs to the intended speakers. Use the supplied 2-pin,
7.5mm screw cage connectors to adapt your cable to the output plugs. Each speaker connector
has an LED which is normally off, but turns red when the related corresponding channel experiences
a fault.
Balanced Audio Connections
Balanced analog audio input and output allows for the use of longer cables while reducing
susceptibility to external noise. Use the supplied 3-pin, 3.5mm screw cage connectors to adapt
your cable to the input plugs.
The inputs allow external devices to supply audio to the SLX300 which is amplified for output on the
stereo speaker outputs. The audio is also encoded within the SLX300 for access by other devices
in the StreamNet network.
Balanced audio outputs can be used to connect to other amplifiers and audio devices.
LED Indicators
The front panel indicator glows blue as soon as power is applied, but turns red when either channel
amplifier experiences a fault.
The balanced input has two LEDs on the back panel by the connectors, one per channel. The LEDs
are green when there is audio activity. They turn red when the input signal is too high and being
clipped.
Each speaker connector on the back panel has an LED, they are off in normal operation, turning
red if the amplifier is overloaded or otherwise has a fault.
Monitoring Jack
The 1/4” jack on the front of the unit allows direct monitoring of the speaker outputs. This jack
provides a voltage output -21dB below that of the speaker output (open circuit) with an output
impedance of 91 ohms. This jack is suitable for listening with headphones.
Power Connection
»» CAUTION: To reduce the risk of electric shock, grounding of the center pin of this
plug must be maintained.
2
TechSales StreamNet Design Help: 1.800.705.2103
Chapter 2: SLX300 Setup
The SLX300 is setup for use in a commercial or residential network using the StreamNet Dealer
Setup program and the StreamNet Dealer Setup manual. StreamNet Dealer Setup is a PC-based
program that allows you to configure devices so that they can communicate across a StreamNet
network. Phases of the software setup include:
• Adding or creating a new project or opening an existing project
• Finding the new device
• Matching the new Anthology physical hardware device to the hardware setup in the project
• Configuring the device with system-specific information
• Saving the project
• Sending the configuration files to the system
The steps involved in these processes are detailed in the DigiLinX Dealer Setup manual available
for viewing or download at www.netstreams.com.
SLX300 SCREENS IN THE DEALER SETUP PROGRAM
When you start Dealer Setup program, the SLX300 will be automatically detected like any other
DigiLinX device. Verify the configuration information on the tabs for the device as shown in the
following screen examples:
Adding an SLX300 to a Project
1. Enter the following information:
Room Name - Room or Zone name for this device.
Model Number - Select from the drop-down list (using the down arrow key) to select the
correct model number for this device.
Audio Port Name - If you are installing an Audio Port in that room, you can name the source
input connected to that Audio Port (such as MP3 Player).
Enable Audio Port Service - Enable the Audio Port service only if you intend to install
an Audio Port in that room. The Audio Port connects to the RJ45 jack labeled EIM on the
SpeakerLinX.
Chapter 2: SLX300 Setup
3
IR/KeyLinX - This drop-down menu lets you select from two models of KeyLinX (KL10X and
KL20X), one model of IRLinX (IRL1), and two combination models (for chaining an IRLinX off a
KeyLinX) (IRL1 & KL10X, and IRL1 & KL20X). The KL20X offer a microphone and a TALK button
for the IP intercom feature. The KL10X and KL20X provide an IRLinX port on the back panel.
KeyLinX or IRLinX connects to the Expansion Interface Module (EIM) port on a SpeakerLinX.
»» NOTE: The EIM splitter is required to install a KeyLinX or IRLinX. It is shipped in the
same box with the KeyLinX and IRLinX.
Speaker Model - This option is designed for IP-Ready speakers which are specifically labeled
by your speaker manufacturer. Selecting this option loads the filter and crossover arrangements designed by your speaker manufacturer into the signal processor of the SpeakerLinX,
thereby enabling greater performance out of your SpeakerLinX.
2. After completing the information, click Save & Continue.
Configuring the SLX300
Adjust the settings for each SLX300 connected to the system by filling in the appropriate fields on
each of the tabs. (Refer to the Dealer Setup manual for complete descriptions of each tab and
field.)
The following examples show the screens used to configure the SLX300.
SLX300 Dealer Setup - Info Tab
4
TechSales StreamNet Design Help: 1.800.705.2103
SLX300 Dealer Setup - Audio Tab
SLX300 Dealer Setup - Audio Port Tab
Chapter 2: SLX300 Setup
5
SLX300 Dealer Setup - Stream Tab
SLX300 Dealer Setup - IR/KeyLinX Tab
6
TechSales StreamNet Design Help: 1.800.705.2103
SLX300 Dealer Setup - IR/Tab
Chapter 2: SLX300 Setup
7
Chapter 3: Mounting the SLX300
By varying the use of the included mounting brackets, screws and the joiner plate, one or two
SLX300 units can be mounted in different ways:
• Under surface mount
• Wall mount or top surface mount
• Rack mount (dual with joiner plate)
The following illustrations show how each of these is accomplished using the mounting brackets,
screws, filler plate and the joiner plate:
Brackets Attached for
Under Surface Mount
Brackets Attached for
Wall or Top Surface Mount
8
TechSales StreamNet Design Help: 1.800.705.2103
Underside of Two SLX300s Prepared for Front
Attachment Rack Mount with Joiner Plate
Two SLX300s Prepared for Front Attachment
Rack Mount with Joiner Plate
Two SLX300s Prepared for Rear Attachment
Rack Mount with Joiner Plate
Chapter 3: Mounting the SLX300
9
Chapter 4: Compliance
Compliance Overview
UL Compliance
This equipment is compliant with applicable UL (Underwriters Laboratory) safety standards.
RoHS Compliance
All components and processes used to produce the SLX300 complies with the RoHS initiative.
Sustainability
The SLX300 is compliant with the WEEE recycling initiative. It is made from easily recyclable
materials such as aluminum and steel.
Electrical Safety Advisory
This equipment uses AC power which can be subjected to electrical surges, typically lightning
transients which are very destructive to customer terminal equipment. The warranty for this
equipment does not cover damage caused by electrical surge or lightning transients. To reduce
the risk of this equipment becoming damaged it is suggested that the customer consider installing
a surge arrestor.
Any modifications to the device without express authorization from ClearOne is prohibited as per
47CFR15.21 and could void the users authority to operate the device.
European Compliance
Details on European equipment compliance can be found on the ClearOne website at the following
location: www.ClearOne.com/resources/EuroDOC.php.
10
TechSales StreamNet Design Help: 1.800.705.2103
Chapter 5: Service and Support
If you need assistance setting up or operating your product, please contact us. We welcome your
comments so we can continue to improve our products and better meet your needs.
Technical Support
Telephone:1.800.283.5936
E-mail:
[email protected]
Web site:
www.ClearOne.com, www.NetStreams.com
Sales
Telephone:1.800.707.6994
E-mail:
[email protected]
TechSales
Telephone:1.800.705.2103
E-mail:
[email protected]
Product Returns
All product returns require a Return Material Authorization (RMA) number. Contact ClearOne
Technical Support before returning your product. Make sure you return all the items and packing
materials that originally shipped with your product.
The Power of AV over IP™
CLEARONE LOCATIONS
HEADQUARTERS:
Salt Lake City, UT USA
5225 Wiley Post Way
Suite 500
Salt Lake City, UT 84116
Tel: 801.975.7200
Toll Free: 800.945.7730
Fax: 801.977.0087
e-mail: [email protected]
EMEA
Tel: 44 (0) 1189.036.053
e-mail: [email protected]
APAC
Tel: 801.303.3388
e-mail: [email protected]
LATAM
Tel: 801.974.3621
e-mail: [email protected]
TechSales
Tel: 800.705.2103
e-mail: [email protected]
Technical Support
Tel: 800.283.5936
e-mail: [email protected]
Chapter 5: Service and Support
11