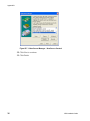
1
VirtualReScan® 3.5
Installation Guide
10300408-000
Revision A
Copyright
Copyright © 2004 Kofax Image Products. All Rights Reserved. Printed in the U.S.A.
The information contained in this document is the property of Kofax Image Products.
Neither receipt nor possession hereof confers or transfers any right to reproduce or
disclose any part of the contents hereof, without the prior written consent of Kofax
Image Products. No patent liability is assumed, however, with respect to the use of
the information contained herein.
Trademarks
VirtualReScan, Kofax, ImageControls, and Adrenaline are registered trademarks of
Kofax Image Products.
ISIS and PixTools are trademarks of Pixel Translations, a division of Captiva Software
Corporation.
TWAIN is a registered trademark of the TWAIN Working Group.
All other product names and logos mentioned herein are the property of their
respective companies.
Disclaimer
The instructions and descriptions contained in this document were accurate at the
time of printing. However, succeeding products and documents are subject to change
without notice. Therefore, Kofax Image Products assumes no liability for damages
incurred directly or indirectly from errors, omissions, or discrepancies between the
product and this document.
An attempt has been made to state all allowable values where applicable throughout
this document. Any values or parameters used beyond those stated might have
unpredictable results.
Contents
How to Use This Guide . . . . . . . . . . . . . . . . . . . . . . . . . . . . . . . . . . . . . . . . . . . . . . . . . . v
Introduction . . . . . . . . . . . . . . . . . . . . . . . . . . . . . . . . . . . . . . . . . . . . . . . . . . . . . . . . . . . . . . v
How this Guide is Organized . . . . . . . . . . . . . . . . . . . . . . . . . . . . . . . . . . . . . . . . . . . . . . . v
Related Documentation . . . . . . . . . . . . . . . . . . . . . . . . . . . . . . . . . . . . . . . . . . . . . . . . . . . vii
Technical Support Information . . . . . . . . . . . . . . . . . . . . . . . . . . . . . . . . . . . . . . . . . . . . viii
1
VRS Overview . . . . . . . . . . . . . . . . . . . . . . . . . . . . . . . . . . . . . . . . . . . . . . . . . . . . . . . . .
Introduction . . . . . . . . . . . . . . . . . . . . . . . . . . . . . . . . . . . . . . . . . . . . . . . . . . . . . . . . . . . . . .
Using VRS with Your Scanner . . . . . . . . . . . . . . . . . . . . . . . . . . . . . . . . . . . . . . . . . . . . . . .
VRS Scanners: Certified vs. Non-Certified . . . . . . . . . . . . . . . . . . . . . . . . . . . . . . . . .
VRS Component Installers . . . . . . . . . . . . . . . . . . . . . . . . . . . . . . . . . . . . . . . . . . .
Using VRS with the Adrenaline Image Processing Engine . . . . . . . . . . . . . . . . . . .
Minimum and Recommended System Requirements . . . . . . . . . . . . . . . . . . . . . . .
Minimum Requirements . . . . . . . . . . . . . . . . . . . . . . . . . . . . . . . . . . . . . . . . . . . .
Recommended Requirements . . . . . . . . . . . . . . . . . . . . . . . . . . . . . . . . . . . . . . . .
TWAIN and ISIS Considerations . . . . . . . . . . . . . . . . . . . . . . . . . . . . . . . . . . . . . . . . .
USB and FireWire Considerations . . . . . . . . . . . . . . . . . . . . . . . . . . . . . . . . . . . . . . . .
Certified Operating Systems . . . . . . . . . . . . . . . . . . . . . . . . . . . . . . . . . . . . . . . . . . . . .
Certified Interfaces . . . . . . . . . . . . . . . . . . . . . . . . . . . . . . . . . . . . . . . . . . . . . . . . . . . . .
Certified SCSI Scanner Controllers . . . . . . . . . . . . . . . . . . . . . . . . . . . . . . . . . . . . . . .
2
Installation . . . . . . . . . . . . . . . . . . . . . . . . . . . . . . . . . . . . . . . . . . . . . . . . . . . . . . . . . . . . 5
Overview . . . . . . . . . . . . . . . . . . . . . . . . . . . . . . . . . . . . . . . . . . . . . . . . . . . . . . . . . . . . . . . . . 5
Installation Sequence for Personal, Professional, and Low-Volume Scanners . . . 5
Installation Sequence For Mid-Volume and High-Volume Scanners . . . . . . . . . . . 6
Install the SCSI Scanner Controller . . . . . . . . . . . . . . . . . . . . . . . . . . . . . . . . . . . . . . . . . . . 6
Attach the Scanner . . . . . . . . . . . . . . . . . . . . . . . . . . . . . . . . . . . . . . . . . . . . . . . . . . . . . . . . 8
TWAIN Installations . . . . . . . . . . . . . . . . . . . . . . . . . . . . . . . . . . . . . . . . . . . . . . . . . . . 8
USB and FireWire Installations . . . . . . . . . . . . . . . . . . . . . . . . . . . . . . . . . . . . . . . . . . 9
Post USB/FireWire Driver Installation Procedure . . . . . . . . . . . . . . . . . . . . . . . 9
Verify the Scanner Connection . . . . . . . . . . . . . . . . . . . . . . . . . . . . . . . . . . . . . . 10
Resolve the Found New Hardware Wizard Event . . . . . . . . . . . . . . . . . . . . . . . . . . . . . 12
Install the Scan Application . . . . . . . . . . . . . . . . . . . . . . . . . . . . . . . . . . . . . . . . . . . . . . . . 13
VRS Installation Guide
1
1
1
2
2
3
3
3
3
4
4
4
4
4
iii
Contents
Install the VRS Software . . . . . . . . . . . . . . . . . . . . . . . . . . . . . . . . . . . . . . . . . . . . . . . . . . . 14
Attach the VRS Hardware Key . . . . . . . . . . . . . . . . . . . . . . . . . . . . . . . . . . . . . . . . . . . . . . 22
3
Testing Your Installation . . . . . . . . . . . . . . . . . . . . . . . . . . . . . . . . . . . . . . . . . . . . . . . .23
Overview . . . . . . . . . . . . . . . . . . . . . . . . . . . . . . . . . . . . . . . . . . . . . . . . . . . . . . . . . . . . . . . . 23
Starting VRS with an ImageControls Application . . . . . . . . . . . . . . . . . . . . . . . . . . . . . . 23
Starting VRS with a TWAIN Application . . . . . . . . . . . . . . . . . . . . . . . . . . . . . . . . . . . . . 25
Starting VRS with an ISIS Application . . . . . . . . . . . . . . . . . . . . . . . . . . . . . . . . . . . . . . . 26
4
VRS Removal Procedures . . . . . . . . . . . . . . . . . . . . . . . . . . . . . . . . . . . . . . . . . . . . . . .27
Overview . . . . . . . . . . . . . . . . . . . . . . . . . . . . . . . . . . . . . . . . . . . . . . . . . . . . . . . . . . . . . . . . 27
Removing VRS . . . . . . . . . . . . . . . . . . . . . . . . . . . . . . . . . . . . . . . . . . . . . . . . . . . . . . . . . . . 27
A
Kofax Product Installation Guideline . . . . . . . . . . . . . . . . . . . . . . . . . . . . . . . . . . . . . .29
Installation Scenarios . . . . . . . . . . . . . . . . . . . . . . . . . . . . . . . . . . . . . . . . . . . . . . . . . . . . . . 29
Ascent Capture . . . . . . . . . . . . . . . . . . . . . . . . . . . . . . . . . . . . . . . . . . . . . . . . . . . . . . . 29
Other Kofax Products . . . . . . . . . . . . . . . . . . . . . . . . . . . . . . . . . . . . . . . . . . . . . . . . . . 29
B
Configuring Non-Certified Scanners . . . . . . . . . . . . . . . . . . . . . . . . . . . . . . . . . . . . . .31
Overview . . . . . . . . . . . . . . . . . . . . . . . . . . . . . . . . . . . . . . . . . . . . . . . . . . . . . . . . . . . . . . . . 31
Creating a Scan Source for a Non-Certified Scanner . . . . . . . . . . . . . . . . . . . . . . . . . . . 31
C
VRS Restore Default Values Utility . . . . . . . . . . . . . . . . . . . . . . . . . . . . . . . . . . . . . . . .37
Overview . . . . . . . . . . . . . . . . . . . . . . . . . . . . . . . . . . . . . . . . . . . . . . . . . . . . . . . . . . . . . . . . 37
Installation Instructions . . . . . . . . . . . . . . . . . . . . . . . . . . . . . . . . . . . . . . . . . . . . . . . . . . . . 37
Restoring VRS Settings . . . . . . . . . . . . . . . . . . . . . . . . . . . . . . . . . . . . . . . . . . . . . . . . . . . . 39
Changing the Default VRS Scanner . . . . . . . . . . . . . . . . . . . . . . . . . . . . . . . . . . . . . . . . . . 40
D
VRS Non-Interactive Mode. . . . . . . . . . . . . . . . . . . . . . . . . . . . . . . . . . . . . . . . . . . . . . .41
Non-Interactive Mode vs. Interactive Mode . . . . . . . . . . . . . . . . . . . . . . . . . . . . . . . . . . 41
E
Installing USB Drivers . . . . . . . . . . . . . . . . . . . . . . . . . . . . . . . . . . . . . . . . . . . . . . . . . .43
Overview . . . . . . . . . . . . . . . . . . . . . . . . . . . . . . . . . . . . . . . . . . . . . . . . . . . . . . . . . . . . . . . . 43
Installing Visioneer 9650 USB Drivers . . . . . . . . . . . . . . . . . . . . . . . . . . . . . . . . . . . . . . . 43
Installing Fujitsu USB Drivers . . . . . . . . . . . . . . . . . . . . . . . . . . . . . . . . . . . . . . . . . . . . . . 44
Index . . . . . . . . . . . . . . . . . . . . . . . . . . . . . . . . . . . . . . . . . . . . . . . . . . . . . . . . . . . . . . . .45
iv
VRS Installation Guide
How to Use This Guide
Introduction
VirtualReScan (VRS) works with a wide range of scanning applications in a variety of
settings—from single-user desktop systems to large-scale enterprise solutions.
Whether you are an expert at image processing or have no special knowledge of
scanning, the VRS Installation Guide provides the information you need to successfully
install and test VRS.
How this Guide is Organized
This guide consists of the following chapters and appendices:
Chapter 1 - VRS Overview gives an overview of the VirtualReScan application
and outlines the requirements for running VRS.
Chapter 2 - Installation includes the VRS installation sequence, along with stepby-step procedures.
Chapter 3 - Testing Your Installation describes how to test your VRS installation
with an ImageControls-based application, a TWAIN application, and an ISIS
application.
Chapter 4 - VRS Removal Procedures explains how to remove the VRS
application and related components.
Appendix A - Kofax Product Installation Guideline discusses installation of VRS
with other Kofax products.
Appendix B - Configuring Non-Certified Scanners explains how to set up a noncertified scanner to work with VRS.
Appendix C - VRS Restore Default Values Utility explains how to restore VRS
default settings and change the default VRS scanner.
VRS Installation Guide
v
How to Use This Guide
Appendix D - VRS Non-Interactive Mode explains how to disable VRS noninteractive mode in connection with Böwe Bell & Howell 8000 B/C series
scanners.
Appendix E - Installing USB Drivers outlines special USB driver installation
procedures required by some scanners.
vi
VRS Installation Guide
How to Use This Guide
Related Documentation
The VRS Installation Guide is just one piece in the VRS documentation set. Your VRS
product package also includes related documentation, as outlined in this section.
VRS User’s Manual
The VRS User’s Manual includes instructions for using VRS and explains the product
features in detail. The manual is intended for all potential scan operators, regardless
of their scanning expertise.
VRS Online Help
VRS online help provides online assistance with your application. You can access the
online help by pressing F1 from any VRS dialog box.
VRS Quick Reference
The VRS Quick Reference contains screen shots, shortcuts, and basic user tips.
VRS Release Notes
Late-breaking product information is available from the release notes. You should
read the release notes carefully, as they contain information that may not be available
in the other VRS documentation.
VRS Installation Guide
vii
How to Use This Guide
Technical Support Information
For additional technical information about Kofax products, visit the Kofax Web site at
www.kofax.com and select an appropriate option from the Support menu. The Kofax
Support pages provide product-specific information, such as current revision levels,
the latest drivers and software patches, online documentation and user manuals,
updates to product release notes (if any), technical tips, and an extensive searchable
knowledgebase. You can find VRS FAQs on the VRS Support pages.
The Kofax Web site also contains information that describes support options for Kofax
products. Please review the site for details about the available support options. If you
need to contact Kofax Technical Support, please have the following information
available:
•
•
•
•
•
•
•
viii
VRS software version
Scanning application
Operating system
Scanner make and model
Scanner engine (board) type
SCSI Scanner controller (if applicable)
Special/custom configuration or integration information
VRS Installation Guide
Chapter 1
VRS Overview
Introduction
This guide gives you instructions for installing VirtualReScan (VRS).
Using VRS with Your Scanner
Since its first release, VRS has grown to accommodate a wide range of certified
scanners. This was accomplished initially with two distinct versions of VRS:
Hardware VRS and Software VRS. Now there is only one version of VRS to
accommodate throughput for a range of scanners, including Personal, Professional,
Low-Volume, Mid-Volume, and High-Volume.
Table 1-1. Scanners Supported by VRS
Scanner
Throughput (Pages Per Minute)
Personal
Less than 10 PPM
Professional
11-40 PPM
Low-Volume
Up to 59 PPM
Mid-Volume
60 - 90 PPM
High-Volume
More than 90 PPM
Personal, Professional, and Low-Volume scanners are designed to support low to
moderate throughput. Mid-Volume and High-Volume production scanners are
specifically designed for large numbers of scans per day. For this reason, production
scanners are equipped with the Kofax SCSI driver, which supports heavy scan
workloads while maintaining rated speed.
VRS Installation Guide
1
Chapter 1
Your VRS package will indicate whether you have VRS for Personal, Professional,
Low-Volume, Mid-Volume, or High-Volume scanners.
VRS Scanners: Certified vs. Non-Certified
When a scanner is certified for VRS, it goes through a rigorous testing process during
which the best default settings are identified and selected. For this reason, we
recommend that you use VRS only with certified scanners. You can use the product
page on the Kofax Web site to view the list of VRS-certified scanners. In addition to
listing the scanner name and manufacturer, the VRS product page includes the
following information:
• Driver used for VRS 3.5 (TWAIN, ISIS, or Kofax SCSI)
• Black or white background (black borders are necessary for automatic
cropping)
• Additional memory required for optimal performance (if applicable)
• Interface certified by VRS (SCSI, USB, or FireWire)
VRS is also capable of working with certain non-certified “compatible” scanners,
provided that they have been configured with the Kofax Source Manager (KSM). It is
important to be aware that you may experience less than optimal image quality when
using a non-certified scanner with VRS. Not every scanner can be used with VRS. To
be configured as compatible with VRS, a non-certified scanner must meet the
following requirements:
• Ability to output a 256-level grayscale image as a single image.
• Provide a TWAIN driver or an ISIS driver. While VRS works best with an ISIS
driver, it also supports some scanners with TWAIN drivers.
Note For more information about using non-certified scanners with VRS, refer to
Configuring Non-Certified Scanners on page 31.
VRS Component Installers
During the standard VRS installation, you will be prompted to select the name of your
scanner from a list of certified scanners. The VRS installer uses the name to identify
the appropriate drivers to install for your scanner. Because the list of VRS-certified
scanners is updated on a regular basis, some certified scanners may not appear on the
list that you see during the installation. In this case, you may need to download a
“VRS Component Installer” update to obtain the drivers required for your VRScertified scanner. To locate the appropriate VRS Component Installer for your
scanner, select the VRS product link from the Kofax Web site Support pages.
2
VRS Installation Guide
VRS Overview
Component Installers are available only for scanners that have been certified for use
with VRS. Non-certified scanners can be used with VRS only if they meet the
requirements outlined in the preceding section.
Using VRS with the Adrenaline Image Processing Engine
The VRS product bundle for Personal, Professional, or Low-Volume Scanners with
the Adrenaline Image Processing Engine (AIPE) offers image processing features such
as standard bar code reading, forms recognition, line removal, and much more. AIPE
also provides Enhanced Bar Code recognition. See the Enhanced Bar Code Engine
appendix in the VRS User’s Manual for more information on how to take full
advantage of this feature.
Note Because the Adrenaline Image Processing Engine (AIPE) only works with
ImageControls-based applications, the AIPE capabilities in the VRS+AIPE bundle will
NOT work with TWAIN and ISIS applications. If you need these capabilities and you
are using a TWAIN application, you can download the Adrenaline TWAIN Data
Source from the Kofax Web site.
Minimum and Recommended System Requirements
So that VRS can be used to its maximum potential, Kofax provides both minimum
and recommended system requirements. Ensure that you meet the minimum
requirements before attempting to install VRS. Using the recommended requirements
will help to assure the fastest and best VRS performance.
Minimum Requirements
• Pentium 4, 1.4 GHz processor, 256 MB RAM
• Hard drive with 300 Mbytes free disk space for installation
• Monitor resolution: 800 x 600
Recommended Requirements
• Pentium 4, 2.0 GHz processor, 512 MB of RAM for Color
• Hard drive with 300 Mbytes free disk space for installation
• Monitor resolution: 1024 x 768
VRS Installation Guide
3
Chapter 1
TWAIN and ISIS Considerations
All VRS scanners are supported by either TWAIN or ISIS drivers. Although some of
these scanners will work with both ISIS and TWAIN drivers, only the driver that
works best with VRS will be certified for use. If your scanner is certified with a
TWAIN driver, refer to TWAIN Installations on page 8 and follow the instructions that
apply to your scanner. It is not necessary to install an ISIS driver, as VRS includes all
the necessary ISIS software to control the certified scanners. For details, select the VRS
Supported Configurations link from the Support area of the Kofax Web site.
USB and FireWire Considerations
Some VRS scanners are supported by a USB or FireWire interface. If your scanner
requires a USB or FireWire interface, there may be specific installation instructions
that apply to your scanner. Refer to USB and FireWire Installations on page 9 for more
information.
Certified Operating Systems
VRS has been certified to work on the following operating systems:
• Windows XP Professional
• Windows 2000 Professional
Certified Interfaces
Only USB, SCSI, and FireWire interfaces are certified with VRS at this time.
Certified SCSI Scanner Controllers
You can consult the Kofax Web site for updates to VRS-supported SCSI scanner
controllers.
4
VRS Installation Guide
Chapter 2
Installation
Overview
This chapter explains the basic VRS installation sequence, which consists of five basic
steps. The sequence of steps may vary slightly, according to the throughput
supported by the scanner that you plan to use with VRS. Personal, Professional, and
Low-Volume scanners require one installation sequence, while Mid-Volume and
High-Volume production scanners require another sequence (both are outlined
below). If you have any question about which installation sequence is appropriate for
your scanner, refer to Table 1-1 on page 1.
Before you start the VRS installation process, gather the required materials:
•
•
•
•
•
VRS installation CD
VRS-certified scanner
SCSI scanner controller and supporting documentation (if applicable)
VRS hardware key (if applicable)
An appropriate (preferably Kofax) scanner cable
Installation Sequence for Personal, Professional, and Low-Volume
Scanners
If your scanner is classified as a Personal, Professional, or Low-Volume scanner, you
should complete the VRS installation sequence in this order:
1
Install the SCSI Scanner Controller (refer to page 6)
2
Attach the Scanner (refer to page 8)
3
Install the Scan Application (refer to page 13)
4
Install the VRS Software (refer to page 14)
5
Attach the VRS Hardware Key (refer to page 22)
VRS Installation Guide
5
Chapter 2
Installation Sequence For Mid-Volume and High-Volume Scanners
If your scanner is classified as a Mid-Volume or High-Volume scanner, you should
complete the VRS installation sequence in this order:
1
Install the VRS Software (refer to page 14)
2
Install the SCSI Scanner Controller (refer to page 6)
3
Attach the Scanner (refer to page 8)
4
Resolve the Found New Hardware Wizard Event (refer to page 12)
5
Install the Scan Application (refer to page 13)
Install the SCSI Scanner Controller
This step describes how to install the SCSI scanner controller.
X To install the SCSI scanner controller
1
Shut down your PC and unplug the PC power cord.
2
Install the SCSI scanner controller on your PC according to the installation
instructions supplied by the controller manufacturer.
Note If you are using a Kofax Adrenaline 450, 650, or 650i SCSI scanner
controller, refer to the installation instructions in the Getting Started Guide that
came with the controller.
3
6
Once the SCSI scanner controller has been installed, plug in the PC power
cord, start your PC, and open Windows Explorer.
VRS Installation Guide
Installation
4
If you have Windows XP, a compatibility message will appear. Click
Continue Anyway to clear the message and proceed to the next step.
Figure 2-1. Windows Logo Compatibility Message
5
Right-click on My Computer and select Properties| Hardware | Device
Manager.
6
Once the list of devices appears, select SCSI and RAID Controllers and
expand the node to verify that the name of your SCSI scanner controller
appears. For Kofax SCSI scanner controllers, the name will probably be listed
as Kofax Adrenaline 450/650/650i.
VRS Installation Guide
7
Chapter 2
Attach the Scanner
Once you have installed your SCSI scanner controller, you can attach your scanner.
X To connect the scanner to your PC
1
Make sure to power off the scanner and PC and unplug the power cord for
both.
2
Attach the scanner cable to the scanner.
3
Attach the scanner cable to the SCSI port on your PC.
Figure 2-2. Attaching the Scanner to Your PC
4
Plug in the power cord for your scanner.
5
Plug in the power cord for your PC and then start it. Windows may launch
the Found New Hardware Wizard. If so, proceed to Resolve the Found New
Hardware Wizard Event on page 12 and follow the instructions. Otherwise,
VRS will be ready to use once your scan application is installed.
TWAIN Installations
If you need to install the TWAIN driver for a VRS-certified scanner, follow the
manufacturer-provided TWAIN driver installation instructions particular to your
scanner. The TWAIN driver can be installed before or after the VRS software
installation.
Note To install a non-certified (compatible) VRS scanner, refer to “Configuring NonCertified Scanners” on page 31.
During the VRS installation process, you may be reminded to install the TWAIN
driver. If you have already installed the required TWAIN driver, click OK to clear the
message and continue. If necessary, install the TWAIN driver after the VRS software
installation is done.
8
VRS Installation Guide
Installation
USB and FireWire Installations
This section covers the general procedure for installing and configuring USB or
FireWire scanners with VRS. You should also refer to the manufacturer-provided
installation instructions because some scanners have unique requirements.
Note For some scanners with unique requirements, the USB driver installation
process differs from the standard procedure outlined here. For more information,
refer to Installing USB Drivers on page 43.
X To install and configure USB or FireWire scanners
1
Do one of the following, as applicable:
• Plug in the USB cable from your scanner to the USB port.
• Plug in the FireWire cable from your scanner to the FireWire port.
Windows will detect the new device and launch the New Hardware Found
wizard.
2
Follow the on-screen instructions to locate the necessary driver on the
installation CD supplied with your scanner.
3
Verify that the scanner is installed correctly. Refer to Verify the Scanner
Connection on page 10.
4
Review the Post USB/FireWire Driver Installation Procedure below.
5
Install your scanning application. Refer to Install the Scan Application on
page 13.
6
Install VRS. For details, refer to Install the VRS Software on page 14.
7
Attach the VRS hardware key to the USB port of your PC.
Post USB/FireWire Driver Installation Procedure
Some scanners are designed to perform particular actions when triggered. For
example, some scanners are set to automatically launch the Microsoft imaging
application when paper is inserted into the automatic document feeder. For best
results, we recommend that you disable all such device events before installing/using
VRS.
X To disable device events
1
From the Windows Start menu, select Settings | Control Panel.
2
Open Scanners and Cameras.
VRS Installation Guide
9
Chapter 2
3
On the Devices tab of the Scanners and Cameras Properties dialog box, select
your scanner from the list of installed devices, and then click the Properties
button.
4
Select the Events tab.
5
Select a device event from the list of scanner events.
6
The application associated with the event will appear in the Send to This
Application list box.
7
At the bottom of the screen, select the Disable Device Events check box.
8
Repeat steps 5-7 until all unnecessary device events are disabled.
Note Clear the Disable Device Events check box to restore a device event.
9
Click Apply, and then select OK to exit the Events tab.
10 Click OK to close the Scanners and Cameras dialog box.
Verify the Scanner Connection
Use this procedure to verify that your scanner is properly connected.
X To check the scanner connection status
10
1
Right-click on My Computer.
2
Select Manage.
3
At the Computer Management dialog box, double-click on the Device
Manager icon. The devices on your system will appear in the right pane.
4
Double-click on the Imaging devices icon.
VRS Installation Guide
Installation
Figure 2-3. Computer Management - Select Imaging Devices
5
If your scanner appears under Imaging devices, as in Figure 2-3, it has been
properly connected to your system. If your scanner is not listed as an imaging
device, check the USB/FireWire cable connection or try rebooting, and then
check again to see if the device is listed. If your scanner still is not connected,
you may need to contact Technical Support.
6
Close the Computer Management dialog box.
VRS Installation Guide
11
Chapter 2
Resolve the Found New Hardware Wizard Event
Use the procedure in this section to resolve the Found New Hardware Wizard Event
that may appear after you have attached the scanner to your PC.
1
If you have not done so already, insert the VRS installation CD in the
appropriate drive (if necessary, click Cancel to exit the VRS setup). As in
Figure 2-4, select to install the software automatically and then click Next.
Figure 2-4. Windows Found New Hardware Wizard
2
At the next screen, select the option labeled “Don’t Prompt Me Again to
Install This Software” and click Finish.
3
Select the option to restart your computer. Once all files have been installed,
remove the VRS installation CD and store it in a safe place.
Alternatively, Windows 2000 users may use the following procedure:
12
1
At the screen similar to Figure 2-4, insert the VRS installation CD in the
appropriate drive (if necessary, click Cancel to exit the VRS setup). Select to
install the software automatically and then click Next to search for a driver.
2
Select the option to search CD-ROM drives.
3
Select the option to Disable the device, click Finish to end, and then select the
option to restart your computer. Once all files have been installed, remove the
VRS installation CD and store it in a safe place.
VRS Installation Guide
Installation
Install the Scan Application
If you are using VRS with a Personal, Professional, or Low-Volume scanner, the
scanning application installation should be completed before the VRS installation. If
you are using VRS with a Mid-Volume or High-Volume production scanner, the
scanning application installation is completed after the VRS installation. To verify the
recommended installation sequence, refer to Overview on page 5.
X To install the scan application
1
Install your ImageControls-based, TWAIN, or ISIS your scanning application
according to the manufacturer’s instructions.
2
Scan some sample documents to ensure that the application is working
properly.
Note If you are installing an ImageControls-based application in conjunction with
other Kofax products, refer to Kofax Product Installation Guideline on page 29.
VRS Installation Guide
13
Chapter 2
Install the VRS Software
This section explains how to install the VRS software. If you are installing VRS in
conjunction with other Kofax products, refer to Appendix A, Kofax Product Installation
Guideline before you proceed.
Note If VRS uses a TWAIN driver for your scanner, refer to TWAIN Installations on
page 8. If VRS uses a USB or FireWire interface, refer to USB and FireWire Installations
on page 9.
X To install the VRS software
1
Close all applications on the computer where you want to install VRS and
make sure that you are logged in as a user with Administrative privileges.
Note Although Administrative permissions are required for the user who
performs the VRS installation, no special permissions are required to use the
VRS application.
2
Insert the VRS installation CD in the appropriate drive. The CD supports
AutoPlay, so the installation will automatically start (if it does not start, run
Setup.exe from the root folder of the installation CD).
If you do not have AutoPlay enabled, select Start| Run and do one of the
following:
• Type in D:\SETUP.EXE, where D: is the CD-ROM drive as shown in
Figure 2-5. Click OK.
• Click Browse, navigate to the CD-ROM drive, select the Setup.exe file, and
click Open. At the Run dialog box, click OK.
Figure 2-5. Windows Run Dialog Box
The VirtualReScan (VRS) installation will begin.
14
VRS Installation Guide
Installation
Note If an existing version of an ISIS toolkit is installed on your PC, a
notification message will display if the toolkit version differs from the VRS
ISIS toolkit version. Once the VRS installation is complete, you should verify
that any applications relying on ISIS runtime files still function properly. If
not, you may need to reinstall the earlier version of the ISIS toolkit.
3
If the Windows System Update message appears, click Yes. Then select the
option to restart your PC from the Please Reboot the Workstation dialog box.
4
Review the initial VRS Setup screen as shown in Figure 2-6 and click Next.
Figure 2-6. VirtualReScan Setup
VRS Installation Guide
15
Chapter 2
If the installer detects an existing version of VRS on your computer, a
notification will appear, similar to Figure 2-7.
Figure 2-7. VRS Installation Detected
To ensure a successful installation, use the Add/Remove Programs option on
the Windows Control Panel to remove the existing instance of VRS. Then
return to the VRS Installation Detected screen and click Next.
Note If you are currently running VRS 2.0 or later, you can successfully
upgrade to VRS 3.5 without removing the existing instance of VRS. If you are
currently running VRS 1.02, you must upgrade to VRS 2.0 before upgrading
to VRS 3.5. If you are currently running Hardware VRS 1.03, 1.04, or 1.05, you
are required to remove all instances of Hardware VRS prior to installing
VRS 3.5. Additionally, you are required to use the VRS upgrade kit to update
your Hardware VRS installation to VRS 3.5. For more information about
removing VRS, refer to VRS Removal Procedures on page 27.
5
The VRS installation analyzes your system for the amount of space available
on the default drive and lists the Space Required and Space Available values
below the destination folder information.
Accept the default installation folder, C:\PROGRAM FILES\KOFAX\IMGCTLS, or
click Browse to select another destination. The default destination may vary if
16
VRS Installation Guide
Installation
you previously installed VRS or another Kofax application to another
location.
Figure 2-8. VirtualReScan Setup – Confirm Destination Folder Screen
6
If there is not enough disk space to continue the installation, you will be
notified via a message box:
There is not enough space to install the option(s). Please free up some
disk space or modify your selections.
In this situation, click OK to clear the message. Then click Cancel and Exit
Setup from the subsequent screens to quit the VRS installation. Once you
have created more disk space, restart the VRS installation.
–or–
When installing to a drive other than C:, you can verify disk space on the
other drive before proceeding. To check the disk space on an alternate drive:
a Click the Disk Space button.
b At the screen similar to Figure 2-9, select a drive from the list and click OK.
The values for available and required space will be updated on this screen
and on the VirtualReScan setup page.
c Click OK to return to the installation.
VRS Installation Guide
17
Chapter 2
Figure 2-9. Disk Space Settings
7
Click Next to confirm the installation folder. A list of scanners will display.
Figure 2-10. VirtualReScan Setup – Select Scanner
8
Do one of the following:
• Select your scanner from the list and click Next.
• Select the option to configure the scanner later if you plan to download a
VRS Component Installer for a VRS-certified scanner that does not appear
on the list, and then click Next. For more information, refer to VRS
Component Installers on page 2.
• Select the option to configure the scanner later if you have a non-certified
VRS scanner that does not appear on the list. Then click Next. When using
a non-certified scanner, you will need to use the Kofax Source Manager
from the Windows Control Panel to configure the scanner to work with
18
VRS Installation Guide
Installation
VRS. For more information, refer to Configuring Non-Certified Scanners on
page 31.
Note If you are using a Böwe Bell & Howell 8000 B/C scanner, two versions
of the scanner will appear on the scanner pick list. “Böwe Bell & Howell 8000
B/C” corresponds to the standard interactive version. “Böwe Bell & Howell
8000 B/C (non-interactive mode)” is the appropriate selection if you want to
run VRS in the background. When non-interactive mode is in effect, you
cannot see or use VRS dialog boxes while documents are being scanned. See
Appendix D, VRS Non-Interactive Mode on page 41 for more information.
9
You will be notified when the installation process is ready to begin, as shown
in Figure 2-11. If you want to revise any setup preferences before proceeding
with the installation, click Back to return to the previous screens. Otherwise,
click Next to proceed with the installation process.
Figure 2-11. Ready to Install Dialog Box
VRS Installation Guide
19
Chapter 2
A series of update messages will appear while the installation is in progress.
Figure 2-12. Installation in Progress
10 You will be notified when the VRS installation process is finished, similar to
Figure 2-13.
Figure 2-13. Setup Complete
20
VRS Installation Guide
Installation
11 Click Finish. You will be prompted to restart your computer.
Figure 2-14. Post-Installation Restart Message
12 Select the option to restart your computer now, and then click Finish. Do not
remove the VRS installation CD until the computer has been restarted,
because it is possible that scanner drivers may be installed after you reboot.
13 Once the computer has been restarted and all drivers have been installed
from the CD, remove the installation CD and store it in a safe place.
14 If applicable to your situation, proceed with the download process for a VRS
Component Installer. A VRS Component Installer is required if both of the
following apply:
• You plan to use a VRS-certified scanner that did not appear on the scanner
list presented during the standard VRS installation.
• You selected the “I will configure my scanner using KSM at a later
time” checkbox during the standard VRS installation.
Note To locate a VRS Component Installer for your scanner, select the VRS
product link from the Kofax Web site Support pages. For more information,
refer to VRS Component Installers on page 2.
VRS Installation Guide
21
Chapter 2
Attach the VRS Hardware Key
When you use VRS with Personal, Professional, or Low-Volume scanners, a hardware
key (dongle) is included in your product package. The hardware key must be
installed to ensure proper licensing for your application. If you download VRS from
the Kofax Web site, you can use the application in Demo mode until the hardware key
is shipped to you.
X To attach the VRS hardware key (dongle)
1
Attach the VRS hardware key to the appropriate port:
• If you are using a USB hardware key, insert it into your USB port.
• If you are using a parallel hardware key, attach it to your parallel port.
2
22
You are now ready to use VRS.
VRS Installation Guide
Chapter 3
Testing Your Installation
Overview
Once VRS is installed, it is a good idea to activate and test your installation. You may
use any application that is based on ImageControls, ISIS, or TWAIN. This section
explains how to start VRS with three sample applications: Scan Demo
(ImageControls-based), Microsoft Imaging (TWAIN-based), and QuickScan Pro (an
ISIS-based application).
Note During the VRS installation process, the VRS Source is automatically created
and set as the default-scanning source. If you switch scanners, the settings associated
with the VRS Source must be updated. You can use the Restore Default Values (RDV)
utility to update the settings for the VRS Source without having to reinstall VRS. For
details, refer to VRS Restore Default Values Utility on page 37.
Starting VRS with an ImageControls Application
Scan Demo is an ImageControls-based application that ships with VRS. Scan Demo is
designed specifically to demonstrate VRS. Follow the instructions in this section to
test your VRS installation with Scan Demo.
X To start VRS using Scan Demo
1
Power on your scanner.
2
Switch on your PC.
3
Start Kofax Scan Demo (click twice on the Scan Demo icon on your desktop).
4
Select the following scan source:
• <Your Scanner Model> with VRS
VRS Installation Guide
23
Chapter 3
Figure 3-1. Select Scan Source Dialog Box – Scan Demo
Note The choice of sources created at the time of installation will vary,
according to the scanner you are using with VRS.
5
Click OK.
6
The VRS icon will appear in your Windows taskbar.
Figure 3-2. VRS Icon in Windows Taskbar
7
Click the Scan Single Page button on the Kofax Scan Demo scanner bar
(located at the bottom left corner of Kofax Scan Demo). If the scan completes
successfully, you are ready to use VRS.
Figure 3-3. Kofax Scan Demo – Scan Single Page Button
24
VRS Installation Guide
Testing Your Installation
Starting VRS with a TWAIN Application
Use this procedure to test VRS with Imaging for Windows, which is a TWAIN
application.
Note If you have Windows 2000, you can test VRS with Microsoft Imaging for
Windows, which is a TWAIN application. If you have Windows XP, Microsoft Office
Document Imaging and Microsoft Office Document Scanning are available for testing
with VRS, if you included them as part of your Microsoft Office installation. Both are
TWAIN applications.
X To start VRS with Imaging for Windows
1
Turn on your scanner.
2
Switch on your PC.
3
Go to Start | Programs | Accessories | Imaging. The Imaging for Windows
application will launch.
4
From Imaging for Windows, select File | Select Device. The Select Scanner
dialog box will display.
5
Select the Kofax VRS TWAIN scan source and click OK.
6
From the Imaging for Windows File menu, select Acquire Image. The Kofax
VRS TWAIN interface will launch and the VRS icon will appear in the
Windows taskbar.
7
Follow the on-screen instructions to test the application with VRS. As pages
are scanned, they will appear within the Imaging for Windows application.
VRS Installation Guide
25
Chapter 3
Starting VRS with an ISIS Application
Use this procedure to test VRS with QuickScan Pro.
X To start VRS using QuickScan Pro
1
Turn on your scanner.
2
Switch on your PC.
3
Start QuickScan Pro.
4
Click the Scan Setup button.
5
At the Scanner Selection dialog box, select the scanner you will be using.
Figure 3-4. Selecting the Scan Source from QuickScan Pro
26
6
Click OK.
7
Go to File | Scan Page.
8
Once the VRS icon appears on the Windows taskbar, you are ready to use
VRS.
VRS Installation Guide
Chapter 4
VRS Removal Procedures
Overview
This chapter explains how to remove VRS and related components from your
computer.
If you are currently running VRS 2.0 or later, you can successfully upgrade to VRS 3.5
without removing your existing application. If you are currently running VRS 1.02,
you must upgrade to VRS 2.0 before upgrading to VRS 3.5.
If you are currently running Hardware VRS 1.03, 1.04, or 1.05, you are required to
remove all instances of Hardware VRS prior to installing VRS 3.5. Additionally, you
are required to use the VRS upgrade kit to update your installation to VRS 3.5.
Once you complete the procedure for removing VRS, any existing VRS profiles are
left intact. If desired, you can reinstall VRS and continue to use the profiles.
Removing VRS
Use this procedure to remove VRS and related components from your computer.
X To remove the VRS application
1
Go to Start | Settings | Control Panel.
2
Click twice on Add/Remove Programs.
3
Select VirtualReScan.
4
Click the Change/Remove button.
5
Click Yes to confirm the file deletion.
6
Click Yes to confirm removal of shared files.
7
A screen will indicate a successful removal. Click OK.
VRS Installation Guide
27
Chapter 4
Figure 4-1. Successful Removal
8
In the same manner, use the Add/Remove Programs option to remove the
following related items, as applicable:
3 Kofax Scan Demo
3 Kofax SCSI Scanner FW Utility (applies only to VRS installations with MidVolume or High-Volume production scanners)
3 Kofax TWAIN Data Source
3 VRS Component Installer (denoted by a CI prefix, such as CI-DR-6080)
Note These items may be removed in any order.
9
When VirtualReScan and the applicable related items have been removed
successfully, click the Close button on the Add/Remove Programs dialog
box.
In addition, we also suggest that you remove all previous versions of
ImageControls. Refer to your ImageControls documentation for removal
procedures.
28
VRS Installation Guide
Appendix A
Kofax Product Installation Guideline
Installation Scenarios
You may install VRS 3.5 in conjunction with other Kofax products, except as follows:
VRS 3.5 should not be installed on a system with Hardware VRS versions 1.02, 1.03,
1.04, and 1.05. To ensure optimal VRS performance, refer to the documentation that
accompanied your other Kofax product(s) for specific recommendations.
If you are currently running VRS 2.0 or later, you can successfully upgrade to VRS 3.5
without removing your existing application. If you are currently running VRS 1.02,
you must upgrade to VRS 2.0 before upgrading to VRS 3.5.
If you are currently running Hardware VRS 1.03, 1.04, or 1.05, you are required to
remove all instances of Hardware VRS prior to installing VRS 3.5. Additionally, you
are required to use the VRS upgrade kit to update your installation to VRS 3.5.
For more information about removing VRS, refer to VRS Removal Procedures on
page 27.
Ascent Capture
If you are installing Ascent Capture, refer to the installation documentation that
shipped with Ascent Capture.
Other Kofax Products
A good resource for the installation of Kofax products is the Scanner Configurator on
the Kofax Web site. The Scanner Configurator can be used to determine if a particular
combination of Kofax products is recommended. The Scanner Configurator does not
list installation order, however. Again, refer to the documentation that accompanied
your other Kofax product(s) for installation instructions. See Technical Support
Information on page viii for information on how to contact Kofax if you need
assistance in determining installation order.
VRS Installation Guide
29
Appendix A
30
VRS Installation Guide
Appendix B
Configuring Non-Certified Scanners
Overview
When a scanner is certified for VRS, it goes through a rigorous testing process in
which the best default settings are selected. For this reason, we recommend that you
only use VRS with certified scanners. However, VRS is capable of working with
certain non-certified, “compatible” scanners, provided that they have been configured
with the Kofax Source Manager (KSM). It is important to be aware that you may
experience less than optimal image quality when using VRS with a non-certified
scanner.
Not every scanner can be used with VRS. To be configured as “compatible” with VRS,
a non-certified scanner must meet the following requirements:
• Ability to output a 256-level grayscale image as a single image.
• Provide a TWAIN driver or an ISIS driver. While VRS works best with an ISIS
driver, it also supports some scanners with TWAIN drivers.
To use a non-certified scanner with VRS, you should install the VRS software
according to the instructions in Chapter 2. When prompted to select a scanner during
the VRS installation, select the checkbox labeled “I will configure my scanner using
KSM at a later time.”
After completing the VRS installation, use the procedure in the next section to install
the proper scanner drivers and create a scan source.
Creating a Scan Source for a Non-Certified Scanner
In order for a non-certified scanner and VRS to work properly together, you will need
to install the scanner driver on your own, and then use the Kofax Source Manager in
your Windows Control Panel to identify the new scanner and make that source
available to VRS. These instructions explain how to use KSM to create the scan source
you need to use a non-certified scanner with VRS.
VRS Installation Guide
31
Appendix B
X To create a source device using the Kofax Source Manager (KSM)
1
Once you have installed the scanner driver according to the scanner
manufacturer instructions, select Start| Control Panel.
2
Click twice to open the KSM icon, shown in Figure B-1.
Kofax Source
Manager
Figure B-1. Windows Control Panel with KSM Icon
3
32
When the Kofax Source Manager (KSM) dialog box displays, select Next.
VRS Installation Guide
Configuring Non-Certified Scanners
Figure B-2. Kofax Source Manager
4
At the screen similar to Figure B-3, click Create.
Figure B-3. Kofax Source Manager (KSM) Dialog Box
5
The Source Properties dialog box will display, as in Figure B-4.
VRS Installation Guide
33
Appendix B
Figure B-4. Source Properties Dialog Box
6
Enter a Source Name. The source name is used to refer to this source when
you select it from your scan application. The Source Name can be any name
you desire. For example, a source name might include the scanner name with
an indication of the source type, as in “Scanner XYZ – VRS ISIS scanning.”
7
Select a Source Type. The selections for Source Type depend on the hardware
and software engines configured on your system. The following source types
are displayed in the Source Type drop-down list:
•
•
•
•
•
•
•
•
•
•
•
•
•
•
•
•
Kofax Adrenaline Hardware - Import with image processing
Kofax Adrenaline Hardware - Scanning with image processing
Kofax Hardware - Import from disk with image processing
Kofax Hardware - Scanning with image processing
Software VRS - ISIS scanning with image processing (AIPE)
Software VRS - ISIS scanning
ISIS scanning
ISIS Scanning with Image Processing (AIPE)
Software VRS - TWAIN scanning with Image Processing (AIPE)
Software VRS - TWAIN scanning
TWAIN scanning
TWAIN Scanning with Image Processing (AIPE)
Hardware VRS - SCSI scanning with image processing (AIPE)
Hardware VRS - SCSI scanning
Kofax Software - Import from disk with image processing
Kofax Software - Import from disk without image processing
The completed Source Properties dialog box should appear similar to
Figure B-5.
34
VRS Installation Guide
Configuring Non-Certified Scanners
Figure B-5. Completed Source Properties Dialog Box
8
Select OK. For ISIS and TWAIN scanner source types, a Select Scanner dialog
box displays, similar to Figure B-6.
Figure B-6. Select Scanner Dialog Box
9
Select the Compatible device option.
10 Select your scanner from the drop-down list. If your scanner does not appear
on the list, however, click the Refresh button on the Select Scanner dialog box,
and then click OK. If your scanner still does not appear, make sure you
installed the scanner driver correctly.
11 Click OK. The Kofax Source Manager dialog box, as shown in Figure B-7,
redisplays with the new source added to the list of Configured Sources.
VRS Installation Guide
35
Appendix B
Figure B-7. Kofax Source Manager – New Source Created
12 Click Next to continue.
13 Click Finish.
36
VRS Installation Guide
Appendix C
VRS Restore Default Values Utility
Overview
The VRS default settings have been carefully chosen to allow VRS to excel at a wide
range of documents without adjustments. In the day-to-day use of VRS, however,
these default settings may inadvertently be altered. The VRS Restore Default Values
(RDV) Utility performs two valuable functions: it restores VRS settings to their
original values and sets the default VRS scanner without requiring a VRS reinstall.
The Restore Default Values Utility allows you to reset these values to their original
state while carefully preserving any custom profiles that may have been created in the
meantime. You can also use the utility to change the default VRS scanner. When you
install VRS, the Restore Default Values Utility is included as part of your installation.
Installation Instructions
This section describes how to install and use the RDV utility.
Note The imgctls folder location depends on the destination folder set during the
installation process.
X How to install the VRS Restore Default Values Utility
1
Go to C:\Program Files\Kofax\imgctls\install\RDV and double-click on
Setup.exe. The RDV installation will begin, as indicated by the RDV Setup
Welcome screen.
VRS Installation Guide
37
Appendix C
Figure C-1. RDV Setup Welcome Screen
2
Click Next. The RDV setup will begin. When the progress indicator
disappears, the RDV installation is complete.
3
A shortcut to the RDV program is added to the Kofax VRS program folder.
X How to create a shortcut for the RDV utility on your desktop
38
1
Go to C:\Program Files\Kofax\imgctls\RDV and right-click on RDV.exe.
2
Select Create Shortcut from the right-click menu.
3
Click, drag, and drop Shortcut to RDV.exe onto your desktop.
VRS Installation Guide
VRS Restore Default Values Utility
Restoring VRS Settings
This procedure gives a quick overview of how to use the RDV utility.
X To restore VRS settings to the factory defaults
1
Click twice on the RDV desktop icon to launch the utility.
2
Select the Restore factory default settings option, which will update your
settings from the Restore Default Settings Utility.
-orIf you want the most current VRS settings and have Internet access, select the
Download latest defaults from the Kofax Web site option. This will
automatically launch your Web browser and begin the download process for
factory default settings.
3
Click Apply.
4
Select OK. The settings will be restored.
Note There is no need to restore VRS settings to the factory defaults when
you choose to select another scanner as the default VRS scanner. Default
settings are automatically updated when you change the VRS scanner using
this utility.
VRS Installation Guide
39
Appendix C
Changing the Default VRS Scanner
If you have used VRS with one scanner, but have switched to another scanner (or
scanners) at some point by reinstalling VRS, you may use the VRS Restore Default
Values Utility to change the default VRS scanner without reinstalling VRS.
X To select another scanner as the default VRS scanner
1
Click twice on the RDV desktop icon to launch the utility.
2
On the Select scanner drop-down list in the VRS Scanner group, select the
scanner.
3
Click Apply. As a result, when Kofax VRS is listed as a source in your scan
application, this scanner will be used.
4
Click OK to close the utility.
If you are switching to a Canon DR-2080C, a Canon DR-3060, a Canon DR-3080C, a
Kodak i50, or a Kodak i60 scanner, you may receive an error message similar to the
following when attempting to use the default scanner:
Missing or Corrupt ISIS.pxw scanner driver file.
This file is only installed by VRS when the scanner is selected during the setup
process.
X To install the ISIS.pxw (ISIS driver), do one of the following:
• Install the ISIS driver from the scanner manufacturer CD.
• Reinstall VRS and select the scanner during VRS setup.
If you are switching to a Canon CanoScan N 650U/N 656U, a Canon CanoScan
N 1220U, a Fujitsu fi-4110CU, an HP ScanJet 7400C series, or a Visioneer 9650 USB
scanner, refer to the TWAIN and/or USB installation instructions in Chapter 2. Once
you have installed the scanner using these instructions, you will be able to use the
VRS RDV utility to switch between another scanner to this one and vice versa.
40
VRS Installation Guide
Appendix D
VRS Non-Interactive Mode
Non-Interactive Mode vs. Interactive Mode
Users of the Böwe Bell & Howell 8000 B/C scanner have the choice of selecting VRS in
a non-interactive mode at the time of installation. This mode is specifically designed
for Böwe Bell & Howell users who do not wish to see any VRS dialog boxes while
scanning, yet would like VRS to run conveniently in the background.
While this feature is automatically set during installation of the Böwe Bell & Howell
8000 B/C scanner, VRS non-interactive mode can be switched back to interactive
mode.
X To switch the Böwe Bell & Howell 8000 B/C scanner from non-interactive
mode to interactive mode
1
Right-click on the VRS Tray icon.
2
Go to QC Modes. Select Hardware Warnings.
3
Select On Errors. Non-interactive mode will effectively be turned off.
4
In addition, you may go to the VRS Administration Utility and customize
how you want VRS to respond to hardware problems. Refer to Chapter 2 of
the VRS User’s Manual, Configuring VRS Before You Scan, for more
information.
VRS Installation Guide
41
Appendix D
42
VRS Installation Guide
Appendix E
Installing USB Drivers
Overview
The general procedure for USB driver installation in Chapter 2 may not apply to some
VRS-certified scanners that have unique requirements. This appendix explains the
special USB driver installation procedures that apply if you are using VRS with one of
the following scanners:
•
•
•
•
Visioneer 9650
Fujitsu fi-4110CU
Fujitsu fi-4120C
Fujitsu fi-4220C
Installing Visioneer 9650 USB Drivers
This section explains the USB driver installation procedure for Visioneer 9650
scanners in a Windows XP environment.
X To install the Visioneer 9650 USB driver
Note Do not connect your scanner until you are prompted to do so.
1
Place the installation CD included with your scanner in your CD-ROM drive.
2
Right-click on the Windows Start button and select Explore.
3
Locate the CD-ROM drive and click twice on the Visioneer icon to open it.
4
Find the 9650.exe file in the Drivers folder under ScanSoft.
5
Click twice on the 9650.exe file to launch the driver installation.
6
When the progress indicator clears, click Yes if you receive a Digital Signature
Not Found screen.
VRS Installation Guide
43
Appendix E
7
Follow the on-screen instructions to connect your scanner and complete the
installation.
8
Refer to the Post USB/FireWire Driver Installation Procedure on page 9.
Installing Fujitsu USB Drivers
This section explains the USB driver installation procedure for certain Fujitsu
scanners in a Windows 2000/XP environment. The procedure describes the
installation of the required USB driver as well as instructions for additional
configuration recommended for using the scanners with VRS. The Fujitsu fi-4110CU is
supported on Windows 2000. The Fujitsu fi-4120C and Fujitsu fi-4220 are supported
on Windows 2000 and XP. The Fujitsu fi-4110CU installation is explained here.
X To install the USB driver for the Fujitsu fi-4110CU
1
Install the scan application you plan to use with VRS according to the
instructions provided by the manufacturer.
2
Plug in the scanner.
3
At the Found New Hardware Wizard initial screen, select Next.
4
When the Install Hardware Device Drivers screen displays, select the option
to “Search for a suitable driver for my device” and then click Next.
5
Insert the Fujitsu ScanPartner installation CD in the appropriate drive. If
AutoPlay is enabled, you may need to exit the Fujitsu installation program to
continue with the USB driver installation.
6
When the Locate Driver Files screen displays, select the checkbox labeled
“Specify a location” and then click Next.
7
At the next screen, type the following path into the text box:
G:\ISIS\WIN2K
where G: corresponds to the appropriate drive
8
Click OK. The next screen will confirm that the correct driver has been found
and list the path.
9
Click Next. A Digital Signature Not Found screen will appear. Click Yes to
bypass the screen.
10 Click Finish when the successful installation of the USB driver is confirmed.
11 Review the Post USB/FireWire Driver Installation Procedure on page 9.
44
VRS Installation Guide
Index
A
F
Adrenaline Image Processing Engine (AIPE), 3
Ascent Capture, 29
Attaching
hardware key, 22
scanner, 8
FireWire
considerations, 4
driver installation, 9
installations, 9
interface, 4
Found New Hardware wizard, 12
Fujitsu fi-4110CU USB driver, 44
Fujitsu fi-4220C USB driver, 44
B
Böwe Bell & Howell 8000 B/C scanner, 19, 41
C
Certified interfaces, 4
Certified scanner controllers, 4
Certified scanners, 2, 29
Compatible devices, 35
Compatible scanners, 2, 31
Component installers, 2, 18, 21
removing, 28
Configurator, scanner, 2, 29
Connection
scanner, 10
Controllers
scanner, 4, 6
D
Default VRS scanner, 40
changing, 40
Device events
disabling, 9
Documentation, vi
Dongle, 22
VRS Installation Guide
H
Hardware
New Hardware wizard, 12
Hardware keys, 22
Hardware VRS, 1, 16, 27, 29
Help, vi
High-Volume scanners, 1, 6
I
ImageControls applications
using with VRS, 23
Installing
FireWire drivers, 9
scan application, 13
SCSI scanner controllers, 6
TWAIN drivers, 8
USB drivers, 9
VRS hardware key, 22
VRS software, 14
Interactive mode, 41
Interfaces, 4
ISIS applications
using with VRS, 23
ISIS considerations, 4
45
Index
K
Keys, hardware, 22
Kofax applications
using with VRS, 29
Kofax scanner configurator, 2, 29
Kofax Source Manager, 18, 32
KSM, 18, 32
L
Low-Volume scanners, 1, 5
M
Mid-Volume scanners, 1, 6
Minimum system requirements, 3
N
New Hardware wizard, 12
Non-certified scanners, 2, 31
Non-interactive mode, 41
O
Online help, vi
Operating systems, 4
P
Personal scanners, 1, 5
Professional scanners, 1, 5
Q
Quick reference, vi
R
RDV, 37
RDV utility, 23, 37
Recommended system requirements, 3
Release notes, vi
Removing
ScanDemo, 28
TWAIN data source, 28
VRS, 27
46
VRS component installers, 28
Requirements, system, 3
Restore Default Values utility, 23, 37
S
Scan application
installing, 13
Scan Demo
removing, 28
Scanner configurator, 2, 29
Scanner connection
verifying, 10
Scanner controllers, 4, 6
Scanner throughput, 1
Scanners
certified, 2, 29
compatible, 2, 31
high-volume, 1
low-volume, 1
mid-volume, 1
non-certified, 2, 31
personal, 1
professional, 1
Scanning source
for non-certified scanners, 31
types, 34
VirtualReScan, 23
SCSI interface, 4
SCSI scanner controllers, 4, 6
Source name, 34
Source types, 34
Support options, vii
System requirements, 3
T
Technical support, vii
Testing the VRS installation, 23
Throughput
scanner, 1
TWAIN
considerations, 4
installations, 8, 25
TWAIN applications
using with VRS, 25
VRS Installation Guide
Index
TWAIN data source
removing, 28
U
Uninstalling VRS, 27
Upgrading VRS, 16
USB considerations, 4
USB drivers
Fujitsu fi-4110CU, 43
Fujitsu fi-4120C, 43
Fujitsu fi-4220C, 43
installing, 9, 43
Visioneer 9650, 43
USB installations, 9
USB interface, 4
User manual, vi
V
Visioneer 9650 USB driver, 43
VRS
component installers, 2, 18, 21
documentation set, vi
hardware keys, 22
installation sequence, 5, 6
removing, 27
starting, 23
testing, 23
upgrading, 16
using with ImageControls applications, 23
using with Imaging for Windows, 25
using with ISIS applications, 23
using with Kofax applications, 29
using with Scan Demo, 23
using with TWAIN applications, 25
VRS component installers
removing, 28
VRS Restore Default Values utility, 37
W
Windows 2000, 4
Windows XP, 4
VRS Installation Guide
47
Index
48
VRS Installation Guide