1
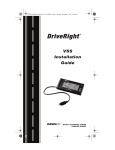
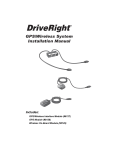
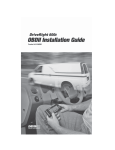
DriveRight
®
SmartCard System
User’s Guide
© Davis Instruments Corp. 2004. All rights reserved.
DriveRight SmartCard System User’s Guide
Rev. A, April 2004
Product #8104 SmartCard On-Board Reader
Products # 8104, 8108, 8112, 8116, and 8119
Product #8108 SmartCard Desktop Reader
Document part number: 07395.191
Product #8112 SmartCards, Pack of 10
Information in this document subject to change without notice.
Product #8116 Starter Interrupter Kit
DriveRight® is a registered trademark of Davis Instruments Corporation.
Velcro® is a trademark of Velcro Industries, Manchester, NH.
14
Product #8119 Adapter Kit for DriveRight Trip 500AL
Technical Support
If you are experiencing problems with your SmartCard equipment, first check the
cable connections and verify the settings. If you are unable to solve the problem,
please call Davis Technical Support. We’ll be glad to help. Most questions can be
answered on the phone. You can also e-mail us for support, or visit our website.
Sorry, we are unable to accept collect calls.
❏ (510) 732-7814 — Monday through Friday, 7:00 am to 5:30 pm, Pacific Time.
❏ (510) 670-9589 — Fax to Technical Support.
❏ [email protected] — E-mail to Technical Support.
❏ [email protected] — E-mail to Davis Instruments.
Regulatory Compliance
E Mark
This product complies with the essential protection requirements of the EC EMC
Vehicle Directive 95/54/EC.
FCC Part 15 Class B Registration
This equipment has been tested and found to comply with the limits for a Class B digital device, pursuant to Part 15 of the FCC Rules. These limits are designed to provide
reasonable protection against harmful interference in a residential installation. This
equipment generates, uses, and can radiate radio frequency energy and, if not installed
and used in accordance with the instructions, may cause harmful interference to radio
communications. There is, however, no guarantee that interference will not occur in a
particular installation.
Remedies for Possible Interference
If this equipment does cause harmful interference to radio or television reception,
which can be determined by turning the equipment on and off, the user is encouraged
to try to correct the interference by one or more of the following measures:
• Reorient or relocate the receiving antenna.
• Increase the separation between the equipment and receiver.
• Connect the equipment into an outlet on a circuit different from that to which the
receiver is connected.
❏ www.davisnet.com — Product documentation and specifications are available in
the Automotive Support section of our website. Watch for FAQs and other
updates.
Warranty & Repair Information
One Year Limited Warranty
We warrant our products to be free of defects in material and workmanship for the
period of one year from the date of original purchase. While we make every effort to
carefully manufacture our products to the highest standards of quality, occasionally
parts may be found to be missing, defective, or damaged.
If you have a defective part, return the product to us, shipping charges pre-paid.
Include proof of purchase and a written explanation of the trouble. During the warranty period, we will, at our option, either repair or replace the product free of
charge. Please do not return items for repair without prior authorization.
This warranty does not cover damage due to improper installation or use, negligence, accident, or unauthorized service, or to incidental or consequential damages
beyond the Davis products themselves. Implied warranties are limited in duration to
the life of this limited warranty.
Some states do not allow limitations on how long an implied warranty lasts, or the
exclusion or limitation of incidental and consequential damages, so the above may
not apply to you. This warranty gives you specific legal rights. You may have other
rights, which vary from state to state.
• Consult the dealer or an experienced radio/TV technician for help.
Changes or modification not expressly approved in writing by Davis Instruments may
void the warranty and void the user’s authority to operate this equipment.
3465 Diablo Avenue, Hayward, CA 94545-2778 U.S.A.
510-732-9229 • Fax: 510-732-9188
E-mail: [email protected] • www.davisnet.com
13
Contents
Starter
60 Amp
Solenoid
Starter Power
Key Switch
Introduction
12V
Ignition Switch Wire
In-Line
Splice
Butt
Splice
Green Wire
SmartCards . . . . . . . . . . . . . . . . . . . 4
Correct Insertion
Configuring SmartCards
Additional Cards
Green Wire
On-Board Reader . . . . . . . . . . . . . . 5
Components
Installation & Wiring
Operation . . . . . . . . . . . . . . . . . . 7
Login
Auto Logout
Sleep Mode
Download
Upload
Clock Adjustment
Logout
STARTER
INTERRUPTER
RELAY
#8116
Yellow Wire
SmartCard
On-Board
Reader
#8104
.........2
Butt
Splice
Switched 12V
Red Wire
..................1
The SmartCard System
Butt
Splice
Gray Wire
Desktop Reader . . . . . . . . . . . . . . . . 9
Adapter Kit for
DriveRight Trip 500AL . . . . . . . . . 10
Components
Installation &Wiring
Starter Interrupter Kit . . . . . . . . . 11
Components
Installation & Wiring
Operation
Technical Support . . . . . . . . . . . . . 13
Warranty & Repair Information . . 13
Introduction
8116 Starter Interrupter Kit wiring diagram
Remove the fuse for the 12V line from the fusebox before beginning installation. Use
an in-line splice and butt splices as shown in above diagram. Replace the fuse when
installation is complete.
Crimp Tool,
22-18AWG Position
(red dot)
In-Line Splice
The SmartCard group of products is designed to be part of a complete DriveRight onboard vehicle monitoring system. SmartCard allows quick collection and transfer of
vehicle operation data to a PC. Extra security to prevent unauthorized operation is also
provided. DriveRight Fleet Management Software, product #8186, is necessary to
review reports and analyze data. It is also required to configure the SmartCards. All
DriveRight 600 models work with the SmartCard system. To use SmartCards with
DriveRight Trip 500AL, the Adapter Kit #8119 is needed.
Do It Yourself?
Stripped wire,
trimmed off flush
3/16 - 1/4"
(5 - 6 mm)
Butt
Splice
Switched 12V
Wire
Red Wire from
Interrupter Relay
In-Line Splice
3/16 - 1/4"
(5 - 6 mm)
Butt Splice
Starter Interrupter Operation. Insert a configured SmartCard into the On-Board
Reader. If a valid code is read, the relay allows the driver to start the engine. The green
indicator light is on during the time the car can be started; after about one minute the
light goes out (the unit enters sleep mode) and the card will have to be reinserted to
start.
12
Since the specific installation of SmartCard hardware can vary considerably from one
vehicle to another, these instructions are intended to be a general guide for the professional installer or knowledgeable and experienced mechanic. We strongly recommend
that you read the entire manual before beginning the installation. Be sure you understand each procedure thoroughly before starting that procedure.
CAUTION
Installing SmartCard hardware or any of the DriveRight components in a vehicle can
be hazardous to both the installer and the vehicle’s electrical system. This manual
assumes you are aware of the inherent dangers of working in and around a vehicle and
have a working understanding of electricity. If you are uneasy about any part of the
installation, please have an ASE-certified technician (Automotive Service Excellence)
or professional automotive mechanic do the installation. Davis Instruments specifically
disclaims any liability for injury or loss resulting from the installation or use of
DriveRight products.
1
The SmartCard System
This manual gives installation and operating instructions for five products in the
SmartCard system:
To disconnect the old 4-pin connector, pull back the housing on the male connector to
release the lock. When you push the connectors together, the housing on the male connector slides back when you make the connection and the cables lock together.
Starter Interrupter Kit
This security option prevents the vehicle from being started until a valid SmartCard is
inserted into the On-Board Reader. If there is an invalid login from the SmartCard, the
starter interrupter is disabled and the car will not start.
Components. Your Starter Interrupter Kit, product #8116, should come with all the
SmartCards. The size of a credit card, a SmartCard contains a memory chip. One
SmartCard is provided with the On-Board Reader; additional cards may be purchased
in packs of 10 (order #8112). The cards can be configured for use as either a driver or
an administrative SmartCard.
components shown below. Make sure you have all necessary components before proceeding with the installation.
Relay with Harness
The driver SmartCard travels with the driver. It can be worn on a lanyard, clipped
to a belt, or carried in a wallet. The card carries driver I.D. and receives downloaded
information. A single driver can store up to 600 trips from a vehicle on one card.
An administrative SmartCard is the possession of a fleet manager. It can be configured to apply limits, thresholds, and authorizations to the DriveRight consoles. An
administrative or driver SmartCard will store all the data in the car’s DriveRight. To
download data from multiple vehicles, use the Palm Download Kit, product #8181.
Butt Splices
(18-22AWG)
In-Line Splices
#8 Flat Washer
#8 x 3/4"
Sheet Metal Screw
8116 Starter Interrupter Kit components
Installation and Wiring. The Starter Interrupter Kit (switched 12V wire) is spliced
into the 12V ignition switch wire. DO NOT splice into the 60 amp starter motor power
wire.
CAUTION: Connecting the wires incorrectly can be hazardous to the installer and the
vehicle’s electrical system. This manual assumes you are aware of the inherent dangers
of working in and around a vehicle and have a working understanding of electricity.
On-Board Reader. Connects to the DriveRight console in a passenger vehicle or
truck. The Reader contains a printed circuit board and a microprocessor. SmartCard is
inserted into the Reader’s slot before starting the vehicle; driver’s I.D. will automatically be relayed to the DriveRight console for authentication. If the optional Starter
Interrupter (#8116) is installed, the driver can start the vehicle if authenticated; otherwise the vehicle will not start. At the end of the trip, the driver presses a button on the
Reader to automatically download data onto the SmartCard.
2
Study the diagram on the next page.
11
Adapter Kit for DriveRight Trip 500AL
This optional equipment is needed to use a DriveRight Trip 500AL model with the
SmartCard system.
Components. Your DriveRight Trip 500AL Adapter Kit, product #8119, should
come with the components shown below:
Digital Input
Cable
Serial Data Cable
(download cable)
Desktop Reader. Connects to a PC at the office via USB port. Works in conjunction with the DriveRight Fleet Management Software, which reads and writes to the
SmartCard. Supervisors insert SmartCards into the Desktop Reader to quickly download data. They also use the unit to configure driver and administrative SmartCards, or
write information to be uploaded to the DriveRight console in the vehicle.
Adapter Cable
for SmartCard Reader
8119 Adapter Kit for DriveRight Trip 500AL components
Installation and Wiring. The Adapter Cable converts the 4-pin connector on the
DriveRight Trip 500AL to the 8-pin required by the SmartCard On-Board Reader. The
Serial Data Cable connects to the rear jack on the On-Board Reader to complete the
communications link. The Digital Input Cable allows the 4-pin VSS cable to connect
to the 8-pin input on the On-Board Reader.
Digital
Inputs
(not used)
Vehicle
Speed
Sensor
(VSS)
Cable
the On-Board Reader to be used with the DriveRight model Trip 500AL (not required
with DriveRight 600). Provides data download capability to the Trip 500AL, but not
driver I.D. capability.
DIGITAL INPUT
CABLE
4-pin
4-pin
8-pin
SmartCard Adapter Kit for DriveRight Trip 500AL. Special cabling allows
8-pin
To Starter Interrupter
Relay Harness
(optional)
SERIAL DATA
CABLE
(Download Cable)
Display
SmartCard
On-Board Reader
8-pin
8-pin
4-pin
ADAPTER CABLE
for SmartCard Reader
4-pin
Starter Interrupter Kit. This option ensures that the vehicle can only be started by
a designated driver. The kit is a 12V starter interrupter relay in the car’s starter circuit.
If a valid code is read on the SmartCard, the relay allows the driver to start the car. A
green light is on during the time the car can be started.
8119 Wiring Diagram
10
3
SmartCards
Clock Adjustment. If you notice that the DriveRight console has incorrect time or
Correct Insertion. When sliding SmartCard into the On-Board Reader or Desktop
Reader, be sure the memory chip on the card is facing up as shown:
date, its clock can be adjusted using the SmartCard. The administrator configures the
card to add or subtract minutes (see the Fleet Management software manual). When the
card is next used, the console’s clock will be adjusted according to the minutes stored
on the SmartCard. If the minutes added or subtracted result in a different date or
month, the software takes this into account. Leap year is also considered. With an
administrative card, the clock is adjusted every time the card is inserted. With a driver
card, the clock is adjusted only once, when the card is inserted and the status is overwritten.
Logout. If auto logout is on (the SmartCard was removed within 5 seconds after
login), logout action is triggered automatically if there is no speed for the timeout period set on the card. Otherwise, initiate logout by removing the card with the vehicle
stopped, reinsert the card, then remove it again within 5 seconds.
If the logout is successful, the indicator light goes off. The vehicle’s starter is disabled. Once the starter is disabled, a re-login is required to enable it again.
If the logout is not successful, the red indicator light is on (but there is no beep).
The On-Board Reader goes into power-saving mode unless a card is inserted or the
download button is pushed. Average power consumption should be less than 5 ma
when the vehicle is off.
SmartCard and On-Board Reader
Desktop Reader
SmartCard and Desktop Reader
Configuring SmartCards. The Fleet Management Software must be installed on
the PC before configuring SmartCards. Once the software is loaded, connect the
DeskTop reader to the USB port. Insert the SmartCard and follow instructions in your
Fleet Management Software Manual for configuring the card as either a driver or
administrative SmartCard. Fleet Management Software versions 3.3 and above support
SmartCards.
Additional Cards. Order #8112 provides a pack of 10 SmartCards ready to
configure.
4
The Desktop Reader, product
#8108, has a USB connector which
fits a USB port 1.1 or higher.
DriveRight Fleet Management
Software, version 3.3 or higher, drives the Reader. You’ll probably
want to install the software before
connecting the Reader to your PC.
The Fleet Management Software
8108 Desktop Reader
reads and writes to the SmartCard.
See the software manual for instructions on configuring a SmartCard (assigning a driver code and card type, whether driver or administrative), initiating a download (card type is detected, then data is parsed
and stored appropriately), or initiating an upload (settings are written to the card to be
transferred to the DriveRight console in the vehicle).
9
Sleep Mode. To conserve power, the On-Board Reader goes into sleep mode automatically. During sleep the unit is idle, not powered down; the starter circuit is still
enabled. The Reader draws only about 15% as much power during sleep as opposed to
regular operation with the indicator light on.
On the DriveRight 600, with auto logout OFF and the vehicle stationary, the unit
goes to sleep in about 10 minutes. Download is triggered before going to sleep if a card
is inserted. If download is successful, the green indicator light temporarily comes on
before going to sleep. If download is not successful, the light turns red temporarily and
then goes to sleep. This also applies to the DriveRight Trip 500AL.
On-Board Reader
Components. Your On-Board Reader, product #8104, should come with all the components shown below. Make sure you have all necessary components before proceeding with the installation.
#8 Flat Washers
(3)
Sleep mode ends and the Reader wakes up if a card is inserted or the vehicle begins
to move. If a card was in before sleep mode began, the unit wakes up when the card is
removed.
When the unit is in sleep mode, all lights are off.
Mounting Brackets
(2)
SmartCard
On-Board Reader
Double-Sided Foam Tape (6 strips)
SmartCard
5-1/2" Cable Ties
(4)
A blinking yellow light indicates download is in progress.
If download is interrupted, the Reader sends a command to the DriveRight 600 console to stop sending data. With a DriveRight Trip 500AL console, the Reader has to
wait for the console to finish sending data even if download is interrupted.
Download takes about 35 seconds for both DriveRight 600 and Trip 500AL.
Download or data transfer are not permitted when the vehicle is in motion. If
attempted, a red light and two short beeps will indicate user error.
Data Transfer. The SmartCard can be configured and used to upload settings to the
#8 x 3/4" Self-Tapping
Machine Screws
(3)
8104 On-Board Reader Components
If the download is successful, the green indicator light comes on and there is one
long beep.
If the download is not successful, the red indicator light comes on and there are
two short beeps.
#8-32 x 5/16"
Machine Screws
(2)
Velcro ® Tape (4 pair)
Download. At the end of the trip, with the vehicle not moving, speed shows zero on
the DriveRight screen. Pressing the download button on the front of the Reader automatically downloads the driving data onto the SmartCard, which will be presented to
the fleet manager.
#8 Split Lock
Washers
(2)
Note: Not all pieces are required for installation.
Installation and Wiring. A DriveRight Trip 500AL or 600 should be installed and
working properly before adding the On-Board Reader. See the instructions that came
with your DriveRight model.
Connecting the On-Board Reader. The On-Board Reader is installed in series
between the DriveRight display console and the adapter cable of the DriveRight unit or
the GPS module (if present). Study the following diagram:
GPS or Digital Input
Adapter Cable
To Starter Interrupter
Relay Harness
(optional)
DriveRight console. If the status on the console is set for data transfer, data transfer is
triggered when the card is inserted and there is no speed. A driver card can upload to
only one DriveRight. An administrative card can upload to multiple DriveRights.
A blinking yellow light indicates the upload is in progress.
If the upload is successful, the green light comes on (no beep).
If the upload is unsuccessful, the red light comes on (no beep).
It is necessary to reinsert the card to login after the upload is completed.
8
Display
SmartCard
On-Board Reader
8104 On-Board Reader Wiring Diagram
5
To remove the connectors, hold both
cables by their connector housings and
pull apart. The housing of the male connector slides to release the lock and allow
the cables to be separated.
To connect cables, hold the female connector and push the male connector from
behind, allowing its housing to slide back.
When you make connection, the cables
lock together.
To connect cables,
hold as shown here:
To disconnect cables,
hold as shown here:
Sliding
Connector Housing
On-Board Reader Operation:
Login. Before starting the car, insert a configured SmartCard into the Reader. The driver’s I.D. will be automatically relayed to the DriveRight console for authentication.
No driver code need be entered into the DriveRight console. A “driver list” is stored in
the DriveRight console, naming which persons may drive that vehicle. A “vehicle list”
is stored on a driver’s SmartCard, containing the identities of vehicles which that driver
is allowed to use.
For DriveRight 600, if the vehicle list on the SmartCard is not empty, both the vehicle I.D. and driver I.D. will be checked for login. If the vehicle list is empty, only the
driver I.D. will be used.
Mounting the On-Board Reader to the Dashboard. With the cabling connected,
position the On-Board Reader in an easy-to-reach location above or below the dashboard, with the slot facing the driver and the indicator light and download button clearly visible. Then attach the unit in one of three ways:
1. Mounting Brackets. Attach the two mounting brackets to the On-Board Reader
with the hardware shown below. Drill pilot holes and secure brackets to the dash with
#8 x 3/4"
self-tapping sheet metal screws provided.
Self-Tapping
Machine Screws
(2)
For DriveRight Trip 500AL, since it does not support driver I.D., only the vehicle
I.D. will be used for login. If the vehicle list is empty, then no login action is performed.
If the I.D. is read correctly, one low-pitch beep will sound and the green indicator
will light. The vehicle’s starter is enabled. If the vehicle does not move (no pulses
detected on the VSS, vehicle speed sensor) and no other user activities are performed
(login, download), the green light will go out after 10 minutes to save power.
If the I.D. is not authorized, two high-pitch beeps will sound and the red indicator
comes on. The starter is disabled.
If the card is inserted the wrong way or there is an error reading the SmartCard, the
yellow indicator comes on and there is no beep.
Whenever the vehicle is moving, the user cannot use the SmartCard to login, download, or upload. If attempted, a red light and two short beeps will indicate user error.
Mounting
Bracket
#8 Flat Washer
#8 Split Lock Washer
#8-32 x 5/16" Machine Screw
2. Using Velcro ®. Apply the four adhesive-backed Velcro loop tapes to the back of the
On-Board Reader, then attach the four hook tapes to the loop tapes. Now press the
adhesive backing of the hook tapes onto your selected mounting surface.
3. Double-sided foam tape. Peel and adhere the six foam tape strips to the unit and the
surface.
6
If the light is red, it will go off to save power after about 5 seconds. Green or yellow
lights will stay on for 10 minutes past the trip end. Whether login is successful or not,
the DriveRight console continues to display the CURRENT screen.
Auto Logout. If login is successful and the card is removed within 5 seconds, auto
logout is turned on. This is an advantage to the user since the card need not remain
inserted while driving and logout will occur automatically after a prescribed timeout
period. A timeout period, such as 10 minutes, is set by the administrator and remembered on the SmartCard. Logout will occur if the timeout period elapses and there is no
movement of the vehicle or activity on the DriveRight system.
The auto logout timer is reset every time there is a new login or speed is detected.
The DriveRight 600 console also has an “auto logout” function. This should be disabled before using the auto logout feature on the SmartCard.
7