1
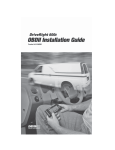
DriveRight
®
Vehicle
Management
Software
Getting Started Guide
Product #8180, 8185
Product Number: 8180, 8185
Davis Instruments Part Number: 7395.063
DriveRight Software Getting Started Guide
®
Rev. C Manual (December 3, 1999)
© Davis Instruments Corp. 1999. All rights reserved.
This product complies with the essential protection requirements of the EC
EMC Directive 89/336/EC.
DriveRight is a registered trademark of Davis Instruments Corp. Windows is a
trademark of Microsoft Corporation.
TABLE OF CONTENTS
INTRODUCTION . . . . . . . . . . . . . . . . . . . . . . . . . . . . . . . . . . 2
Components . . . . . . . . . . . . . . . . . . . . . . . . . . . . . . . . . . . . . . . . . . . . . . . .2
System Requirements . . . . . . . . . . . . . . . . . . . . . . . . . . . . . . . . . . . . . . . . .3
CONNECTING THE DRIVERIGHT TO YOUR PC. . . . . . . . . . . . . . 3
INSTALLING THE SOFTWARE . . . . . . . . . . . . . . . . . . . . . . . . . . 4
ISoftware Shortcut Option . . . . . . . . . . . . . . . . . . . . . . . . . . . . . . . . . . . . .4
Network Installation . . . . . . . . . . . . . . . . . . . . . . . . . . . . . . . . . . . . . . . . . .4
GETTING STARTED . . . . . . . . . . . . . . . . . . . . . . . . . . . . . . . . 5
Planning for Initial Software Use . . . . . . . . . . . . . . . . . . . . . . . . . . . . . . . .5
Starting VMS . . . . . . . . . . . . . . . . . . . . . . . . . . . . . . . . . . . . . . . . . . . . . . . .6
Configuring VMS . . . . . . . . . . . . . . . . . . . . . . . . . . . . . . . . . . . . . . . . . . . .6
Select a Language . . . . . . . . . . . . . . . . . . . . . . . . . . . . . . . . . . . . . . . . . . . . 6
Enter Your 8-digit Registration ID Code . . . . . . . . . . . . . . . . . . . . . . . . . .6
Test the DriveRight Link . . . . . . . . . . . . . . . . . . . . . . . . . . . . . . . . . . . . . . .6
Set Time and Date . . . . . . . . . . . . . . . . . . . . . . . . . . . . . . . . . . . . . . . . . . . .7
Set DriveRight ID Codes for Individual Vehicles . . . . . . . . . . . . . . . . . . . .7
Set Preferences . . . . . . . . . . . . . . . . . . . . . . . . . . . . . . . . . . . . . . . . . . . . . .7
Set Download Options . . . . . . . . . . . . . . . . . . . . . . . . . . . . . . . . . . . . . . . .8
Set Automation Options . . . . . . . . . . . . . . . . . . . . . . . . . . . . . . . . . . . . . . .8
Set Driver Profiles . . . . . . . . . . . . . . . . . . . . . . . . . . . . . . . . . . . . . . . . . . . .9
Set Vehicle Profiles . . . . . . . . . . . . . . . . . . . . . . . . . . . . . . . . . . . . . . . . . . .9
ADVANCED OPTIONS . . . . . . . . . . . . . . . . . . . . . . . . . . . . . 10
Set a Corporate Structure . . . . . . . . . . . . . . . . . . . . . . . . . . . . . . . . . . . . .10
Set Driver Groups . . . . . . . . . . . . . . . . . . . . . . . . . . . . . . . . . . . . . . . . . . .10
Set Driver Schedules by Day . . . . . . . . . . . . . . . . . . . . . . . . . . . . . . . . . . .10
Set Driver Schedules by Week . . . . . . . . . . . . . . . . . . . . . . . . . . . . . . . . .11
Set Service Schedules (Trip 500AL only) . . . . . . . . . . . . . . . . . . . . . . . . . .11
Set Expense Categories . . . . . . . . . . . . . . . . . . . . . . . . . . . . . . . . . . . . . . .11
Set Frequent Destination Addresses . . . . . . . . . . . . . . . . . . . . . . . . . . . . .11
Set Routes . . . . . . . . . . . . . . . . . . . . . . . . . . . . . . . . . . . . . . . . . . . . . . . . .12
DOWNLOADING DATA . . . . . . . . . . . . . . . . . . . . . . . . . . . . 12
ADDITIONAL SOFTWARE TOPICS . . . . . . . . . . . . . . . . . . . . . . 12
Using Filters and the Active Range . . . . . . . . . . . . . . . . . . . . . . . . . . . . . .12
Reporting . . . . . . . . . . . . . . . . . . . . . . . . . . . . . . . . . . . . . . . . . . . . . . . . .13
Passwords . . . . . . . . . . . . . . . . . . . . . . . . . . . . . . . . . . . . . . . . . . . . . . . . .13
Symbols . . . . . . . . . . . . . . . . . . . . . . . . . . . . . . . . . . . . . . . . . . . . . . . . . . .13
Importing Data From a Prior Version . . . . . . . . . . . . . . . . . . . . . . . . . . . .14
Trip Records . . . . . . . . . . . . . . . . . . . . . . . . . . . . . . . . . . . . . . . . . . . . . . .14
Page 1
INTRODUCTION
The DriveRight Vehicle Management Software (VMS) package
allows you to store, view and manipulate DriveRight data on
your PC. More specifically, VMS provides tools for sorting,
tracking, scheduling, analyzing, printing, and graphing data
for a number of individual DriveRight units.
This guide is intended to get you up and running with VMS in
the shortest time possible. For a more comprehensive introduction to VMS, please refer to the documentation files
accompanying this install (see the DriveRight Software|DOC
folder on your PC once you complete this install).
NOTE: This guide presumes familiarity with standard Windows® operating system conventions (e.g. double click). Consult your Windows™ 95 documentation for help with unfamiliar Windows
terminology.
Components
Before installing the software on your PC, make sure your
package includes the following components:
❏ DriveRight hardware module
A black interface box to connect the DriveRight to your PC.
❏ DriveRight connector cable
A cable with stereo plugs at both ends to connect the DriveRight to the hardware module.
❏ Serial port connector cable
A cable with telephone plugs at both ends to
connect the hardware module to one of the PC
connectors listed below.
❏ DB25 connector and DB9 connector
A 25-pin and a 9-pin connector with telephone
plugs to connect the serial port cable directly
to a serial port in your PC.
❏ Four DriveRight software diskettes
Page 2
System Requirements
The software requires the following:
❏ 486/25 (Pentium recommended) computer
running Windows 95; at least 10 MB free hard
disk space; one free serial port (COM1, 2, 3, or
4); mouse recommended.
❏ 8 MB of Memory (16 MB recommended)
❏ VGA/SVGA Monitor (800 x 600 display recommended)
CONNECTING THE DRIVERIGHT TO YOUR PC
To communicate with the DriveRight, connect the DriveRight
to a serial port on your PC using the hardware and cables as
shown below.
IBM Compatible
COM
Ports
DB9
(9-Pin)
Connection
Options
DB25
(25-Pin)
Serial Port
Connector
Cable
DriveRight
DriveRight
Connector
Cable
DriveRight
Hardware
Module
You can connect either the DB9 or DB25 connector to any
free serial port. The hardware module may remain connected
to the PC permanently. To download data from the DriveRight, connect the free end of the connector cable to the
DriveRight device at the time of the download.
Page 3
INSTALLING THE SOFTWARE
Follow the instructions below to install VMS.
1. Insert the Install disk in the disk drive.
2. Run setup.exe from the Install disk.
You can run the setup in one of two ways.
Either click the Start button to open the Start menu and
select Run.... In the Run dialog box, type a:/setup.exe
(where a is your floppy disk drive) and click OK.
Or, alternatively, double click the My Computer icon. In
the My Computer Explorer window that appears, double
click your floppy disk drive (most likely a:/). Then, to run
the setup, double click the setup.exe file.
3. Follow the instructions on the installation window to complete the install process.
Software Shortcut Option
To display the DriveRight icon directly on your desktop, drag
the newly-created icon to the desktop. Or, alternatively, you
can create this shortcut at any time by right-clicking on the
desktop, selecting New and then Shortcut from the right
mouse button pop-up menu, clicking the Browse button to
seek out the software's installed location, and then double
clicking the DriveRight icon.
Network Installation
To install the software on a network, follow the normal installation instructions and specify a folder on the server as location for the software.
In a network scenario, the network administrator grants access
to the software; configures the database engine to enable the
software to locate necessary files; and specifies a folder to
maintain the locking file that assigns individual user rights.
ADMIN NOTE:Include the location of this folder in the path command
or repeat the installation procedure for each client PC. If you specify the
same folder for the locking file as selected in the software install abave,
only the database engine will be installed and multiple users may share
the software.
Page 4
GETTING STARTED
This guide introduces the most commonly used VMS features.
All software features (including some not covered here) are
covered in the help file and printable user’s manual (found in
the DOC folder of the DriveRight Software folder).
Planning for Initial Software Use
This software package has many features for tracking vehicle
information, use and associated costs. The software also
allows for several layers of classification, and for different
degrees of detail in accounting for driver and vehicle information. We recommend thinking about the following questions
so that you can tailor VMS to your needs.
❏ Fleet Structure
Are there several branches to my organization? What does my corporate tree look like?
Within a certain location, are there separate
groups of drivers and/or vehicles I want to
track? (These are implemented using a Corporate Structure Definition, Group Name Definitions
for drivers, and specifying Fleet Numbers for
vehicles.)
❏ Tracking Schedules (Trip 500AL only)
Do I want to set up a filter to check that drivers enter the proper trip type? (This capability
is found under Day and Week Schedules.)
❏ Cost Tracking
Will I use the software to enter vehicle costs,
such as gasoline and maintenance? (Costs
areas are defined as various Expense Categories.)
❏ Trip Details (Trip 500AL only)
Are routes and destinations to be entered for
each trip? (Setting up known addresses and
routes is enabled under the Setup Trip options.)
❏ Password Protection
Do I want to protect all or parts of the data
from unauthorized viewing and alteration?
(Multiple users can be specified in the Passwords section.)
Page 5
Starting VMS
To start the program, double click the shortcut icon on the
desktop or select DriveRight Software from the Start menu.
Across the top of the main program screen is the menu bar
which contains all of the program commands.
This manual uses the notation “Select File|Import|Dos
Data…” for menu commands. The first part of the notation
(“File”) represents the menu name, the second part (“Import”)
the sub-menu name (where applicable), and the final part
(“Dos Data”) the command name.
Configuring VMS
Follow the steps below to configure the software and connect
to the DriveRight console.
1. Select a Language
A dialog box appears when the program first starts up to
allow you to select which language you want to use for
operations and reports. Select from English, French, German, Dutch, Spanish, and Swedish, then click OK.
2. Enter Your 8-digit Registration ID Code
A dialog box will prompt you for your 8-digit code. You can
find this code on the registration card accompanying the
software.
3. Test the DriveRight Link
Select Setup|Serial Port...
Select the serial port that the DriveRight hardware is using.
Make sure that the DriveRight is connected and activated
and the console displays the word “CURRENT.” (Press
MODE if the display is blank.) If you do not know which
port you are using, click Auto Detect. The software will
automatically search for the serial port.
NOTE: If you are working on a network, ask the network administrator
to assist you in selecting the correct serial port.
If the auto detect fails, you can try to manually detect the
correct serial port by checking your system configuration in
the Windows 95 control panel.
Page 6
4. Set Time and Date
Select DriveRight|Set Time & Date...
Make sure that the DriveRight console is activated and the
console displays “CURRENT.” When you set the time and
date in VMS and click the OK button, the time and date
you specified should appear on the DriveRight console.
5. Set DriveRight ID Codes for Individual Vehicles
Select DriveRight|Set DriveRight...
Each DriveRight console is calibrated for a specific vehicle,
and the ID code is what links the console to the vehicle
data in VMS.
Read any calibration set during vehicle testing, change settings for the DriveRight console, and give it a unique DriveRight ID code. Later, when you add vehicles to the
software configuration, you will complete this console-VMS
data link.
6. Set Preferences
Select File|Preferences|Units...
The dialog box that appears contains the following
options:
❏ Unit Mode
Specify the distance and speed units you want
VMS to use (i.e. English or Metric).
❏ Date Mode
Specify the date format you want VMS to use,
including separators and leading zeros. Every
date you enter in VMS will need to follow the
format you choose.
❏ Time Mode
Specify the time format used in the software
(e.g., AM-PM or 24 hour clock). Every time
you enter in VMS will need to follow the format you choose.
❏ Currency
Specify the preferred currency.
Page 7
7. Set Download Options
Select File|Preferences|Download Options...
The dialog box tha appears contains the following options:
❏ Synchronize time and date after every download
This option resets the DriveRight to the system
time and date after each download. If you
select this option, check the system time and
date regularly to ensure accuracy.
❏ Log accident data after every download
Include accident log data in the records (only
available on DriveRight models with accident
logging facilities).
❏ Use DriveRight ID Code as Location ID or
Driver ID (Trip 500AL only)
With the DriveRight Trip 500AL you may specify a Driver ID using the code on the DriveRight.
If only one driver uses a vehicle, the code may
be used as a Location ID. To specify a Location
ID for each address, select Setup|Trips|
Addresses... (explained below). Then, at the
beginning of a trip, specify the Location ID in
the DriveRight console. When downloading
the DriveRight, VMS interprets each ID as the
destination of each trip.
8. Set Automation Options
Select File|Preferences|Automation Options...
❏ Automatically use last trip destination as next
trip origin
Automatically assign the destination address of
a given trip as the originating address of the
next trip.
Page 8
❏ Automatically update changed records
Each VMS data entry display includes an
Update button. If you choose to automate
this function, updates will be made automatically whether or not you click the Update button.
❏ Automatically update odometers
When downloading or adjusting data, the
stored odometer values of the vehicles concerned will be recalculated automatically.
9. Set Driver Profiles
Select Setup|Drivers|Add/Remove/Update Drivers...
Click the Add button to name and define each driver's
specifications. Enter a unique Driver ID for each driver (e.g.
1234). If you later define some of the advanced options on
page 10 (e.g., Corporate Structure, Driver Groups and
Schedules), specify those here as well. Repeat this step to
add driver profiles as needed.
10.Set Vehicle Profiles
Select Setup|Vehicles|Add/Remove/Update Vehicles...
Click the Add button to specify the name of a vehicle’s
usual driver. Depending on the DriveRight model the specified name may be linked to the collected information.
NOTE: When a DriveRight without Driver ID is used for several drivers, simply assign the new information in a DriveRight console to any driver by changing the vehicle’s default driver
before downloading.
In the Vehicles window, beneath the default driver section,
specify vehicle data (e.g. Model/Type and License). (If you
later define Service Schedules, see page 11, you can specify
one here.)
After you download data from the DriveRight console, you
can specify the starting odometer as well. Possible deviations from the actual odometer reading may be adjusted by
increasing the starting odometer.
Page 9
The DriveRight settings are shown in the bottom portion of
the screen. Click the Read button to read the current DriveRight console settings (including the DriveRight calibration
number) from the connected DriveRight. Check these settings and change them if necessary. Then press the Set button to upload the settings (including the DriveRight ID)
back to the DriveRight console.
NOTE: This window contains critical information. Double check that
the calibration data is accurate to ensure the correct calculation of distances and speed. Also check the DriveRight ID to
make sure that data is correctly linked with specific vehicles.
ADVANCED OPTIONS
1. Set a Corporate Structure
Select Setup|Corporate Structure…
The Corporate Structure allows for up to three levels of a
company to be categorized for more detailed reporting.
Name the levels you plan to use at the top (eg. Division,
Region, and Branch) then name the participating units
(Division--Drilling, Testing; Region--USA, EU, Gulf; Branch-Houston, Aberdeen).
If you plan to use less than three levels, start at the third
level, and name any unused levels “N/A” or “Unused”,
since VMS needs to hold a place for all three levels. Once
the levels are established, you will be able to assign drivers
and vehicles to each of these levels.
2. Set Driver Groups
Select Setup|Drivers|Group Name Definition...
Click the Add button to define a driver group (e.g. Sales,
Engineering, etc.) Repeat this step for each group.
3. Set Driver Schedules by Day
Select Setup|Drivers|Day Schedules...
Click the Add button to name and define the schedule(s)
used by drivers to perform their duties. You may specify different trip types (private, business, commute, etc.) for each
period. Repeat this step as needed.
Page 10
4. Set Driver Schedules by Week
Select Setup|Drivers|Week Schedules...
Click the Add button to name and define week schedules
(e.g. working week, holiday, external duties). You can specify the Day Schedule for each day of the week by using the
drop-down menu. Repeat this step as needed.
5. Set Service Schedules (Trip 500AL only)
Select Setup|Vehicles|Service Schedules...
Click the Add button to name and define Service Schedules
(e.g. Mazda, Ford). Once you define a service schedule, you
can assign it to a vehicle and upload it into the DriveRight
Trip 500ALs to notify drivers when it is time to bring the
vehicle in for service. (To assign a schedule to a vehicle, see
“Set Vehicle Profiles” on page 9.) Enter each event separately (e.g. one entry for 30,000 mi., one for 60,000 mi.),
but unite them under the same service schedule name (e.g.
Mazda).
6. Set Expense Categories
Select Setup|Vehicles|Expense Categories...
Click the Add button to specify expense categories here if
you want VMS to assist with calculating expenses (e.g. fuel,
depreciation, insurance, etc.) Repeat as needed. Once you
define the expense categories you can enter vehicle
expenses into the VMS system.
7. Set Frequent Destination Addresses
Select Setup|Trips|Addresses...
Click the Add button to enter the addresses of frequently
visited clients, delivery points, or other routine destinations. To easily link a client to specific trip data at a later
stage, specify a client search name and a unique 4-digit
Location ID for that client now. For more information on
this function see “Set Automation Options” on page 8. To
specify many addresses quickly, you can import them using
the File|Import|Addresses... menu option.
Page 11
8. Set Routes
Select Setup|Trips|Routes...
Click the Add button to name and define a route, including
each of its legs. Repeat as needed. When completed, individual trips may be assigned to one of the established
routes.
DOWNLOADING DATA
Once the data connection is established and the software is
configured, you are ready to collect data and transfer it into
the various database files.
Select DriveRight|Download DriveRight to download the
data collected by the DriveRight console onto your PC. If the
DriveRight is properly calibrated and assigned, the data will be
automatically linked to the correct vehicle. If you desire, you
may add information to this data using the Database|Trips...
menu option.
ADDITIONAL SOFTWARE TOPICS
Once you begin collecting data, you can use VMS to report, filter, import and record the DriveRight data. The following section provides a brief overview of these and other functions.
More information on all of these, and other, features is available in the online help file and in the printable manual and
“readme” files found in the DOC folder of the DriveRight Software folder.
Using Filters and the Active Range
Since the software database holds all relevant information for
an unlimited number of vehicles, drivers, and trips, the information may quickly grow to a size too unmanageable for
timely analysis. Several features are built in to help manage
the data.
Filters are routinely available to help isolate data by date,
driver, or any other parameter found in the database. The filter
dialog will appear any time a report or operation could benefit
from limiting the amount of data presented. See the online
help file for details about how to input the range sought by
each filter option.
Page 12
The Active Range is another powerful tool to isolate data. By
enabling the Active Range, a group of dates or vehicles may be
globally isolated from the overall database. All operations will
then take the isolated portion as its starting point before any
additional filters are added.
Reporting
The reporting tools are perhaps the most valuable aspect of
VMS for vehicle managers and other administrators. The
Reports… menu offers tools for determining use and safety
information.
In most cases, the amount of information needed for routine
operations is only a small portion of what is available. We
recommend that, once data is available, managers and adminstraters run initial samples of all desired reports. Those which
the manager/administrator finds most valuable could then be
made part of a routine weekly and/or monthly reporting
schedule.
For summaries of driver and fleet data, we recommend checking out the following reports: Driver Performance Score, Corporate Reports (if you have set a corporate structure), Trips
(Graphical), and Aggregated Trip Information.
Passwords
By default, VMS sets no passwords. This default mode permits
anyone running it to perform any and all of the available
functions. The password feature allows access rights to be
granted to particular software users in various degrees. The
first user has full access and can then create other users with
specific rights to view, print and modify data.
Symbols
The creation and use of symbols may save time when a certain group or time frame is often isolated in a filter. By creating a symbol, the set of characters “01/01/1998…31/01/1998”
may be called “January 1998" when using a date filter. The
software comes pre-loaded with numerous defined symbols each of which can be added by pressing the Add Standard
Symbols button in the Setup|Symbols dialog box.
Page 13
Importing Data From a Prior Version
If you are upgrading from a prior version of DriveRight software, use the File|Import|Dos Data… menu item to convert
existing Dos data to this new Windows version.
The dialog will prompt you to indicate the location of the
existing data and ask you if you would like to add each vehicle
it identifies. If a vehicle already exists, you will have the
option of adding more data to it. For each new vehicle added,
a new driver is also added. Information you entered in the
Setup/Vehicles of the old software is automatically transferred
to the new software. Software preferences (units, time format, etc.)
are not transferred.
Trip Records
With the DriveRight Trip Computer, simply download trip
data to the PC and then specify the address you visited.
With the DriveRight Trip 500AL, you may specify the address
you are planning to visit at the start of your trip using the 4digit Location ID. Activate the Use DriveRight ID Code as:
option (in File|Preferences|Automation Options) to have VMS
automatically add addresses when trips are downloaded.
Make sure you give each address a unique 4-digit location ID.
If you print the Reports|Database Reports|Addresses (Short
List)... and take it with you on your trip, you can enter the
Location ID into the DriveRight display. You may also set the
500AL to warn you when no code is entered.
You may print the trip records using the Reports|Trip Tax
Report... option. As the software has already combined the
addresses with the trips, just print the data and send it as part
of your report to the appropriate tax agency. For more help,
see the online help guide.
NOTE: In order to make a reasonable tax case for the trip records, we
advise saving fuel tickets, tickets from service stations, etc. You
could be asked to send these in as well.
3465 Diablo Avenue, Hayward, CA 94545-2778
510-732-9229 • Fax: 510-732-9118
E-mail: [email protected] • www.davisnet.com/driveright