1
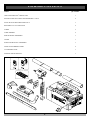
TUBE/PIPE ASSEMBLY
IMPORTANT SAFETY INSTRUCTIONS FOR
INSTALLATION
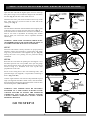
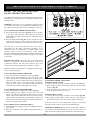
FIG. 1
Warning: Incorrect installation can lead to severe injury.
Follow ALL installation instructions.
CHECK OPERATION OF DOOR
BEFORE BEGINNING THE INSTALLATION OF THE
SECURALIFT® AUTOMATIC OPENER CHECK THE
OPERATION OF THE DOOR.
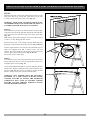
The door must be well balanced and be in a reasonable
operating condition. You should be able to lift the door
smoothly and with little resistance. It should stay open around
900mm to 1200mm above the floor. The door should not stick
or bind in the guide tracks. The ideal operational effort in
raising or lowering the door should not exceed a force of 10kg
(22 lbs.). Make sure that all door locks are either removed or
disabled and remove unnecessary accessories.
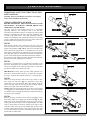
FIG. 2
STEP 1
Slide shuttle assembly onto index tube (one piece only) and
insert screwdriver or clevis pin to hold it in place and slide into
support tube assembly. (Fig. 1 & 2). The arrow on shuttle must
point towards the garage Door. To assemble the rest of the
tubes, always slide short insert tube half way into the long tube,
then slide other tube into remaining insert tubes. Continue this
process with remaining tube until desired length is reached.
Insert pipe into pipe support assembly and drive unit and leave
the drive unit in the packaging for protection.
STEP 2
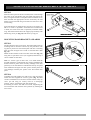
The opener is supplied with a 10 tooth Drive Sprocket on the
drive unit. If the opener is to be fitted to a one piece door without track, exchange the 10 tooth sprocket with a 7 tooth drive
sprocket available as an option from ATA.
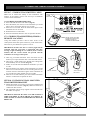
FIG. 3
IMPORTANT: If using track type door (often referred to as
panel lift or track tilt door) only use a 10 tooth drive sprocket.
If using a one piece door without track use a 7 tooth sprocket.
STEP 3
Attach one end of chain to chain index screw, nearer to drive
unit, using one joint link. (Fig. 3). Proceed to wrap chain
around drive unit sprocket/idler wheel then follow along the
pipe to the idler wheel on the support pipe assembly. Finally,
attach to the other end of the chain index screw.
NOTE: Make certain that the teeth of the drive unit sprocket
are engaged in the chain and that the chain is not twisted. Make
sure that the chain is engaged in the plastic chain idle wheel on
the support pipe assembly.
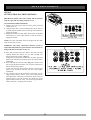
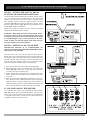
FIG. 4
STEP 4
Remove locating screwdriver from trolley. Disengage trolley
from chain index by swinging lever downward (Fig. 4), then
slide trolley away from chain index along pipe track. Loosen
locking nuts on chain index screws. To tighten chain, turn chain
index in anti-clockwise direction, looking from support pipe
assembly to drive unit. Do not over-tighten chain as it has to sag
6-12mm. Check before locking screw with lock nuts that chain
is not twisted. When the tension is finalised, tighten lock nuts
at both ends of chain index.
7