1
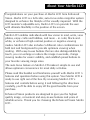
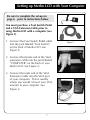
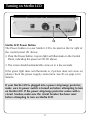
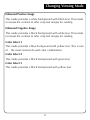
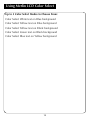
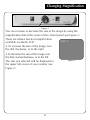
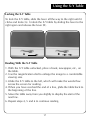
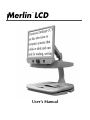
Merlin LCD
TM
User’s Manual
In order to maintain the consistency with the printed version of this manual,
this page is intentionally left without manual content.
Table of Contents
About Your Merlin LCD
...........................
1
Merlin LCD at a Glance . . . . . . . . . . . . . . . . . . . . . . . . . . . .
2-3
Safety and Care . . . . . . . . . . . . . . . . . . . . . . . . . . . . . . . . . .
4-5
Setting Up Merlin LCD . . . . . . . . . . . . . . . . . . . . . . . . . . . .
6
Setting Up Merlin LCD with Your Computer . . . . . . . . . . . . .
7
Turning on Merlin LCD . . . . . . . . . . . . . . . . . . . . . . . . . . . .
8
Using Your Computer with Merlin LCD . . . . . . . . . . . . . . . .
9
Changing Viewing Mode . . . . . . . . . . . . . . . . . . . . . . . . . . . 10-11
Using Merlin LCD Color Select . . . . . . . . . . . . . . . . . . . . . . 12-14
Changing Magnification
...........................
15
Changing Brightness . . . . . . . . . . . . . . . . . . . . . . . . . . . . . .
16
Using the X-Y Table . . . . . . . . . . . . . . . . . . . . . . . . . . . . . . .
17
Tips for Reading and Writing . . . . . . . . . . . . . . . . . . . . . . . .
18
Programming Set-up Options
19
.......................
Troubleshooting . . . . . . . . . . . . . . . . . . . . . . . . . . . . . . . . . . 20-21
Other Products from Enhanced Vision . . . . . . . . . . . . . . . . . 22-24
Contact Information . . . . . . . . . . . . . . . . . . . . . . . . . . . . . . .
24
Warranty Statement . . . . . . . . . . . . . . . . . . . . . . . . . . . . . . . 25-26
In order to maintain the consistency with the printed version of this manual,
this page is intentionally left without manual content.
About Your Merlin LCD
Congratulations on your purchase of Merlin LCD from Enhanced
Vision. Merlin LCD is a full-color, auto-focus video magnifier system
designed to enhance the lifestyle of the visually impaired. With the
LCD monitor’s adjustable arm, Merlin LCD can provide the user
with ultimate flexibility in the position of the screen.
Merlin LCD enables individuals with low vision to read, write, view
photos, enjoy crafts and hobbies, and more – in color, black-andwhite, or enhanced high-contrast positive or negative viewing
modes. Merlin LCD also includes 5 different color combinations for
both text and background to provide optimum viewing when
reading. With easy-to-use buttons that are also distinguishable by
touch, you can enlarge or reduce the image in seconds, change
viewing modes for easier visibility, and establish preset buttons to
your favorite viewing image sizes.
The auto focus feature on Merlin LCD makes it simple to use and
allows optimum convenience for most daily activities.
Please read this booklet and familiarize yourself with Merlin LCD ’s
features and operation before using this system. Your Merlin LCD is
ready to use right out of the box. By reviewing Merlin LCD ’s
features and controls before using it and following the directions
carefully, you’ll be able to enjoy all the great benefits from your
purchase.
Enhanced Vision products are designed to give you the highest
quality image, convenient and easy-to-use features and years of
reliable service. Thank you for choosing the Enhanced Vision Merlin
LCD .
1
Merlin LCD at a Glance
Take a few moments to familiarize yourself with the components of
your Merlin LCD:
1. LCD monitor
2. LCD monitor arm
3. Merlin
4. Merlin power button
5. Viewing Mode button
6. Magnification dial
7. X-Y table
8. X-Y table locking lever
9. Recessed handles for carrying Merlin
10. Merlin LCD 12V power supply and power cord
11. Light ON/OFF Switch
12. LCD monitor cord
Optional Accessories (not included)
13. Foot Switch Pedal
14. Extension VGA Cable
2
Merlin LCD at a Glance
2
1
3
10
5
6
4
12V
7
8
9
11
Optional Accessories (not included)
13
12
3
14
Safety and Care
To obtain the most benefit and life from your Merlin LCD, please
read these safety precautions very carefully.
Merlin LCD is designed to enlarge and enhance images in order to
offer improvement in the quality of life for people with visual
impairment. The extent to which Merlin LCD can improve the
ability to see images depends on a person’s individual condition
and level of visual impairment.
Merlin LCD is not designed to restore vision, correct eye conditions
or halt degenerative vision loss. An eyecare professional can
determine the usefulness and suitability of Merlin LCD for a
patient’s individual condition.
Precautions
• Merlin LCD is designed to be used on a stable, level surface such
as a solid desk or table.
• Do not place Merlin LCD on an unstable table, cart or stand. It may
fall, causing serious damage to the unit or bodily injury to a user.
• Merlin LCD should be used indoors, and should not be exposed
to extreme or rapid changes in temperature or humidity. Do not
place Merlin LCD near a radiator or heater, or where it will be
exposed to long hours of direct sunlight. These conditions may cause
damage to the unit’s electronics or optics.
• Always place the power cords away from traffic areas to avoid
the danger of someone tripping over the cord or damaging it.
• To prevent the risk of electrical shock, do not use Merlin LCD
near water and do not attempt to disassemble the unit.
• Use only the power supplies provided with your Merlin LCD.
Using unauthorized power supplies may cause serious damage to
Merlin LCD’s electronic components.
4
Safety and Care
To Move Merlin LCD to Another Location
• If you are repositioning Merlin LCD a short distance across a desk
or table, make sure you do not pull on any power cords or
connector cables.
• Disconnect and secure all power and video cables and lock the
X-Y table before moving the unit.
• Carry Merlin LCD only by the two recessed handles located on either
side of its base. Do not carry it by the LCD monitor arm.
• Situate Merlin LCD securely in its new location before replacing
the monitor on the upper platform.
Caring for Merlin LCD
• Always turn the power OFF for the Merlin LCD and the monitor
when the system is not in use.
• Always turn the power OFF before cleaning Merlin LCD.
• The plastic surfaces of Merlin LCD can be cleaned with a soft dry
cloth or an electrostatic dusting wipe. DO NOT use liquid cleaners.
• The protective glass covering the camera can be cleaned as
needed with the lens cloth provided within your Merlin LCD’s
packaging.
5
Setting Up Merlin LCD
1. Find a steady and level location,
such as a table or desk, where you
will be comfortable using Merlin
LCD.
Figure 1
Figure 2
2. Carry Merlin LCD only by the two
recessed handles on the sides of the
base for a secure grip. Do not lift
the unit by its LCD monitor arm.
Place it on the table or desk (see
Figure 1).
3. Plug the Merlin LCD 12V power
supply cord into an outlet and the
other end into the DC IN 12V jack
on the back of Merlin LCD’s base.
Make sure the connection is tight
(see Figure 2 and item #10 on
Page 3).
4. Plug the LCD cord into an outlet.
This cord is attached to the LCD
monitor arm (see Figure 3 and item
#12 on Page 3).
Figure 3
6
Setting up Merlin LCD with Your Computer
Be sure to complete the set-up on
page 6 prior to instructions below.
You must purchase a Foot Switch Pedal
and a VGA Extension Cable prior to
using Merlin LCD with a computer (see
Figure 1).
1. Connect the Foot Switch Pedal cable
into the jack labeled “Foot Switch”
on the back of Merlin LCD (see
Figure 2).
Figure 1
2. Connect the female end of the VGA
extension cable into the port labeled
“COMPUTER” on the back of your
Merlin LCD (see Figure 2).
3. Connect the male end of the VGA
Extension Cable into the VGA port
of your computer. This is usually
where you would connect your VGA
monitor to your computer (see
Figure 3).
Figure 2
Figure 3
7
Turning on Merlin LCD
#2
#1
Merlin LCD Power Button
The Power button on your Merlin LCD is located on the far right of
the control panel (#1 above).
• Press the Power button. A green light will illuminate on the Control
Panel, indicating the power is ON (#2 above).
• The screen should automatically come on in a few seconds.
If the green light does not illuminate or if picture does not come on,
please check the power supply connections (see #3 on page 6 for
details).
If your Merlin LCD is plugged into a power strip/surge protector,
make sure its power switch is turned on before attempting to turn
on Merlin LCD. If the power strip/surge protector comes with a
circuit breaker, make sure the circuit breaker has been reset
before attempting to turn on Merlin LCD.
8
Using Your Computer with Merlin LCD
Using a Computer with Merlin LCD OFF
At times, you may want to use your computer without Merlin LCD.
Just make sure you turn Merlin LCD OFF by pressing the POWER
button. The computer’s display signal will automatically flow
through the Merlin LCD even with it turned OFF. There is no need
to disconnect any cables.
Switching between Merlin LCD and a Computer
Once you have completed the set-up on page 6 and turned on both
the Merlin LCD and your computer, press down on the foot switch
to toggle between computer viewing and Merlin LCD.
9
Changing Viewing Mode
You can choose a viewing option by pressing the MODE button on
the control panel. Each push will change your viewing option. If you
keep pressing the button you will cycle through all 7 options. These
options are:
The default options can be used regardless of the control box
settings. They are as follows:
• Full Color Image
Crisp, Clear
Text Images!
• Black and White Image
• Enhanced Positive Image
Enhanced Positive
• Enhanced Negative Image
• Color Select 1
Crisp, Clear
Text Images!
• Color Select 2
• Color Select 3
Enhanced Negative
Full Color Image
This mode is used most often because it gives you a true color
representation of the image that is being magnified. When Merlin
LCD is first turned on, it displays the image in full color.
Black and White Image
Based on your preference, you can choose the black-and-white
mode.
10
Changing Viewing Mode
Enhanced Positive Image
This mode provides a white background with black text. This mode
increases the contrast to offer crisp text images for reading.
Enhanced Negative Image
This mode provides a black background with white text. This mode
increases the contrast to offer crisp text images for reading.
Color Select 1
This mode provides a blue background with yellow text. This is one
of the most commonly used color combination.
Color Select 2
This mode provides a black background with green text.
Color Select 3
This mode provides a black background with yellow text.
11
Using Merlin LCD Color Select
Merlin LCD was designed to provide optimum viewing for
people with certain visual conditions by offering an expanded
range of choices in both text and background colors.
Merlin LCD provides up to 5 color combinations to best fit your
eye condition. See page 14 for a list of color combinations. Three
modes have been pre-programmed for ease of use. Up to five color
select viewing modes can be programmed per your personal
preferences.
How to Program a Color Select Option
With Merlin LCD turned ON, place a piece of reading material on
the X-Y table so that it appears on your monitor at a magnification
size that is comfortable for viewing. Follow these steps to program
the color select options:
Step 1: Press and hold the MODE button
until the words “ENTERING SETUP”
appear on your monitor.
ENTERING SETUP
Step 1
12
Using Merlin LCD Color Select
Step 2:
Turn the MAGNIFICATION dial
Clockwise to scroll through the menu
options. Choose a COLOR SELECT
prompt (1-5) and press the MODE
COLOR SET
button.
Step 3:
Turn the MAGNIFICATION dial to
choose your preferred color
combination and select one of the
following:
Step 2
EXIT
• Press the MODE button to save the
settings.
Step 4
• OR, If you want to turn OFF the
current COLOR SELECT (1-5) option,
select OFF by turning the
MAGNIFICATION button clockwise.
• OR, if no change is desired select
EXIT by turning the MAGNIFICATION
button clockwise.
Step 4:
To program another color select viewing mode, repeat
steps 2-4. If you are finished, turn the magnification dial
counterclockwise to EXIT and press MODE to return to
normal use.
13
Using Merlin LCD Color Select
Up to 5 Color Select Modes to Choose From:
Color Select White text on Blue background
Color Select Yellow text on Blue background
Color Select Yellow text on Black background
Color Select Green text on Black background
Color Select Blue text on Yellow background
14
Changing Magnification
Figure 1
You can increase or decrease the size of the image by using the
magnification dial at the center of the control panel (see Figure 1).
There are sixteen levels of magnification
available on Merlin LCD.
SIZE-7
• To increase the size of the image, turn
the dial clockwise, or to the right.
• To decrease the size of the image, turn
the dial counterclockwise, or to the left.
The size you selected will be displayed in
the upper left corner of your monitor (see
Figure 2).
15
Figure 2
Changing Brightness
Figure 1
You can increase or decrease the brightness of the image by using
the brightness dial at the right bottom of the control panel (see
Figure 1).
There are 12 levels of brightness available on the Merlin LCD.
• To increase the brightness, turn dial to the right.
• To decrease the brightness, turn dial to the left.
16
Using the X-Y Table
Locking the X-Y Table
To lock the X-Y table, slide the lever all the way to the right until it
clicks and locks (A). Unlock the X-Y table by sliding the lever to the
right again and release the lever (B).
A
B
Reading With the X-Y Table
1. With the X-Y table unlocked, place a book, newspaper, etc., on
the table.
2. Use the magnification dial to enlarge the image to a comfortable
viewing size.
3. Glide the X-Y table to the left, which will make the words flow
across the screen for reading.
4. When you have reached the end of a line, glide the table back to
the beginning of the line.
5. Move the table away from you slightly to display the start of the
next line.
6. Repeat steps 4, 5 and 6 to continue reading.
17
Tips for Reading and Writing
Reading with Merlin LCD
• New users of video magnifier systems have a tendency to overmagnify their reading material. Make the type large enough to see it
comfortably, but not so large that it becomes tedious to scan across
a page.
• Use the X-Y table to move reading materials under the camera,
rather than moving the material manually, except small items such
as a checkbook or a business card.
• New users should use two hands when moving the X-Y table for
reading, until they become comfortable using one hand.
Writing with Merlin LCD
• Beginners should start at smaller magnification sizes, and then
increase magnification as they become more comfortable using
Merlin LCD for writing.
• The smaller the magnification size the bigger you tend to write;
the higher the magnification size the smaller you’ll write.
• Use a pen that makes a bold line, such as a heavy point pen, a
felt-tip marker or a fine point marker, for easier visibility.
• It might be helpful to use lined paper to more easily find and keep
your place.
• It might be easier to keep your place if you write a few words at a
time, then move the X-Y table and write again, rather than moving
continually as you write.
• Write in either color, black-and-white or positive viewing modes.
18
Programming Setup Options
#1
#2
The Merlin LCD can be programmed in its set-up mode. There are 2
options you can select in set-up mode:
Screen Messages and Color Select.
Entering Set-up
1. Turn the MAGNIFICATION dial (#1 above) all the way
counterclockwise, to the lowest size. This will start you at the
beginning of the menu when you enter set-up.
2. Press and hold the MODE button (#2). Merlin LCD will display
“ENTERING SET-UP.” Then the screen will fade to black and the word
“EXIT“ will appear.
3. Turn the MAGNIFICATION dial to the right to select the different set-up
options.
4. Press the MODE button (#2) to activate or deactivate each option.
Set-up Options
In clockwise order starting at Exit, the options you can program are:
Exit: When programming is complete, select this option and press MODE
to exit.
Screen Messages: If Screen Messages are turned OFF, Merlin LCD will not
display magnification sizes or viewing modes.
Color Select: There are 5 different color combinations available for
programming. Please refer to page 12 on “How to
program a color select option”.
Exiting Set-up
EXIT
1. Turn the MAGNIFICATION dial all the way
counterclockwise, or to the left, until the word
“EXIT” appears.
2. Press MODE to exit set-up.
19
Troubleshooting
1. No Power to Merlin LCD
• Push the Power button on Merlin LCD’s control panel. A light next
to the Power button should turn on, indicating the power is on.
• Make sure the 12V power supply cord is completely plugged into
the outlet.
• Make sure the two parts of the power supply cord are securely
connected.
• Make sure the power supply cord is completely plugged into the
DC 12V IN jack on the back of the viewing stand base.
• Check the power strip/surge protector’s on/off switch and circuit
breaker if Merlin LCD is plugged into one.
2. Blurred or Out-of-Focus Image
• Clean the protective glass covering the camera with the nonabrasive lens cleaning cloth provided with your Merlin LCD.
• Clean the monitor screen with a non-abrasive cloth sprayed with a
glass cleaning solution.
3. Merlin LCD Lights are Not ON
• Check that Merlin LCD is ON. If not, check FAQ 1.
• Check that the light switch (item 11 on page 3) under Merlin
LCD’s control panel is ON.
20
Troubleshooting
X-Y Table Does Not Move Smoothly
• Make sure the locking lever is positioned completely to the left.
X-Y Table Does Not Stay in Locked Position
• Make sure the locking lever is all the way to the right and that the
handle pops up into the locking slot.
Light Bulb Burns Out
Your Merlin LCD comes equipped with two 10,000-hour fluorescent
light bulbs designed to provide years of trouble-free service.
However, if one burns out, contact your place of purchase or
Enhanced Vision at (800)440-9476 for instructions or assistance on
replacing the bulb.
If you have any questions or require technical assistance please
call (800)440-9476, Monday – Friday from 8 a.m. to 5 p.m. PST.
21
Other Enhanced Vision Products
Jordy – Two Low Vision Systems in One
For distance, intermediate and near viewing.
Magnification: 1X – 30X
Four viewing modes for optimum visibility:
Color, Black/White, Enhanced Positive,
Enhanced Negative
Jordy Docking Stand (optional)
Magnification: 4X – 40X
Amigo
Amigo is a truly portable desktop magnifier.
Optimal viewing is achieved with a tilting
6.5 inch viewing screen. Amigo provides 3.5
to 14x digital magnification and the lightest
weight in its class. Amigo is battery
operated and can be taken anywhere.
22
Other Enhanced Vision Products
Acrobat
The Acrobat's innovative rotating camera
design enables people with low vision to
perform daily tasks more effectively. By
rotating the camera, the user can read, write,
self-view, and magnify images at any
distance. This Full Color, Auto-Focus Acrobat
has the most versatile and flexible arm
available.
Flipper – The Ultimate in Flexibility
Read, write, get more out of life! Our
innovative camera design lets you magnify in
almost any position with images in full color.
Magnification: 1X – 44X*
*With optional stand
Available with Color and Black &
White Display Modes
Max – Powerful Magnifier
A powerful magnifier for reading. Connects
to any TV in seconds.
Magnification: 17X – 25X on a 20"
Television
Available in Color or Black & White
23
Other Enhanced Vision Products
Nemo
Travel with ease! The pocket-sized Nemo is
lightwieght and affordable. Look-up phone
numbers in seconds and perform simple
household tasks with ease. Incorporateing 4”
viewing screen with digital magnification this ultra portable device can go anywhere.
Accessories
Smart Video
Connects Enhanced Vision’s low vision devices to a computer
monitor.
Carrying Cases
Convenient cases for storage and transport of all Enhanced Vision
products.
MaxTrak
An essential accessory to keep your Max straight while rolling across
a page.
Battery
Rechargeable batteries for Enhanced Vision’s low vision devices.
Contact information:
Toll Free: (800)440-9476
Phone: (714)465-3400
Fax: (714)374-1821
www.enhancedvision.com
[email protected]
[email protected]
[email protected]
24
Warranty
Enhanced Vision
Merlin LCD Video Magnifier Warranty Policy
Enhanced Vision products are designed to give you the highest quality image, convenient features, ease of use
and reliable service. Merlin LCD has been inspected and tested prior to shipping. Our company stands
behind the quality materials, components and workmanship of the Merlin LCD video magnifier.
For these reasons we are pleased to offer two warranty options. These options are available when the purchaser
completes the warranty registration form.
Three-year warranty for the Merlin LCD base and the monitor.
This option can be selected on the warranty registration form by the agencies, states, groups,
multi-users, product demonstration sites and the individual purchasers. Enhanced Vision warrants
Merlin LCD against defects in materials and workmanship under normal use for three years from the
date of original purchase. Enhanced Vision, at its option, will at no charge either repair the product or
replace it during the warranty period.
Lifetime warranty for the Merlin LCD base at a one-time cost of $299.00.
LCD Monitor is not covered under this option. (Individual purchaser only)
This option can be selected on the warranty registration form and it is only available to the
individual purchaser. Enhanced Vision warrants Merlin LCD base against defects in materials and
workmanship under normal use for the lifetime of the individual purchaser. Enhanced Vision, at its
option, will at no charge either repair the product or replace it during the warranty period.
The LCD Monitor is not covered by the lifetime warranty and it is covered for 3 years only.
The lifetime warranty is non-transferable and only valid for an individual purchaser. This
warranty is not available for International Customers.
On the warranty card the purchaser will be asked to select between the three-year (no-cost) or lifetime
warranty for a one-time fee of $299.00. If lifetime coverage is elected, a $299.00 check made payable
to “Enhanced Vision” will need to be included with the warranty form. The lifetime product
warranty is only valid if the product is registered within 30 days of purchase and a $299.00 check
made payable to “Enhanced Vision” is included with the warranty registration form. If this form
has not been provided, please request one from the local Enhanced Vision representative or call us at
(800) 440-9476.
Restrictions
All product purchases need to be registered with Enhanced Vision. Registering Merlin LCD confirms the right
to maximum protection and service of the product warranty. If no selection is made on the warranty form or
payment is missing, the individual purchaser will default to the three-year warranty.
The lifetime warranty is non-transferable and does not apply to groups, multi-users, companies or agencies. It
has been designed for end-consumer / individual purchaser. Agencies, states, group homes, classrooms and
demo site units will receive Enhanced Vision standard 3-year product warranty detailed above. Enhanced
Vision also reserves the right to repair or replace any purchasers Merlin LCD with a similar or better product.
25
Warranty
In the case that the end-consumer / original individual resells the Merlin LCD within a 3 year time period from
original purchase date and the product is resold by a recognized manufacturer representative, the Merlin LCD
warranty will default to the balance of what remains of the standard 3 year warranty (from original purchase
date). The lifetime warranty would be void.
Consider the example below:
After one year Mary Smith’s vision deteriorates past using the Merlin LCD to assist her. She resells the
Merlin LCD to a recognized Enhanced Vision manufacturer representative, and he/she then sells the
Merlin LCD to Anne Clark. Anne Clark receives a two-year warranty with the Merlin LCD (the
amount left on a standard two year warranty).
Anne will need to complete and submit a warranty registration form, marking the box that she is a
“converted original owner” and provide the serial number for the product.
The 3-year and optional Lifetime product warranty does not cover the following:
1. Defects or damage from misuse, use in other than suggested manner, accident or neglect.
2. Defects or damage from improper operation, maintenance, installation, adjustment, alterations or
modification.
3. Defects from spills of food or liquid.
4. All plastic surfaces and all other externally exposed parts that are scratched or damaged due to
normal use.
5. Damage due to operating Merlin LCD with equipment not supplied by Enhanced Vision.
6. Light bulbs that are not covered under warranty.
7. The Merlin LCD monitor is not included in the lifetime warranty and it is covered for three years.
THERE ARE NO OTHER EXPRESSED OR IMPLIED WARRANTIES ACCOMPANYING THIS
PRODUCT.
Service Process
We don’t expect that you will need to have repairs on the Merlin LCD but if you do, you will need to send the
unit to our warranty service center.
If warranty service is required, please call Enhanced Vision between 8 a.m. – 5 p.m. PST for a return
authorization number. Warranty repairs are not accepted without a return authorization number.
You may wish to keep your original packaging in case warranty service is required
Proof of purchase must be provided, bearing date of purchase, in order to receive warranty service
Purchaser is responsible and shall pay for shipment of products to Enhanced Vision for repair. Enhanced
Vision is responsible and shall pay for return shipment of repaired products back to purchaser. Enhanced
Vision reserves the right to use reconditioned and/or serviceable used parts for warranty repairs.
Anyone using this product knowingly assumes certain risks, due to the need to utilize vision enhancement
devices.
Thank you for making Enhanced Vision and Merlin LCD your choice for better vision.
26
Notes
27
The Merlin LCD video magnifier is designed to enlarge and
enhance images to improve the lives of people who have low
vision. The extent to which Merlin LCD can improve the
ability to see images and text depends on a person’s
individual condition and level of visual impairment. Merlin
LCD is not designed to restore vision, correct eye conditions
or halt degenerative vision loss. An eyecare professional can
best determine the suitability of Merlin LCD for a patient’s
specific condition. For more information, please visit
www.enhancedvision.com.
www.enhancedvision.com
(800)440-9476
(714)465-3400
Jan, 2007
Part #???????
Copyright © 2005 by Enhanced Vision. All rights reserved.
Product specifications subject to change without prior notice.