1
PT2000™ & Top Gun
Portable Data Terminals
User’s Guide
PSC Inc
959 Terry Street
Eugene, Oregon 97402
Telephone: (541) 683-5700
Fax: (541) 345-7140
Copyright ©2002 PSC Inc. An Unpublished Work - All rights reserved. No part of the contents of this documentation or the procedures described therein may be reproduced or transmitted in any form or by any means without
prior written permission of PSC Inc. or its wholly owned subsidiaries ("PSC"). Owners of PSC products are hereby
granted a non-exclusive, revocable license to reproduce and transmit this documentation for the purchaser's own
internal business purposes. Purchaser shall not remove or alter any proprietary notices, including copyright
notices, contained in this documentation and shall ensure that all notices appear on any reproductions of the documentation.
Should future revisions of this manual be published, you can acquire printed versions by contacting PSC Customer
Administration. Electronic versions will either be downloadable from the PSC web site (www.pscnet.com) or provided on appropriate media. If you visit our web site and would like to make comments or suggestions about this or
other PSC publications, please let us know via the “Contact PSC” page.
Disclaimer
Reasonable measures have been taken to ensure that the information included in this manual is complete and
accurate. However, PSC reserves the right to change any specification at any time without prior notice.
PSC is a registered trademark of PSC Inc. The PSC logo is a trademark of PSC. All other trademarks and trade
names referred to herein are property of their respective owners.
This product may be covered by one or more of the following patents: 4603262 • 4639606 • 4652750 • 4672215 • 4699447 • 4709195 • 4709369
• 4749879 • 4792666 • 4794240 • 4798943 • 4799164 • 4820911 • 4845349 • 4861972 • 4861973 • 4866257 • 4868836 • 4879456 • 4939355 •
4939356 • 4943127 • 4963719 • 4971176 • 4971177 • 4991692 • 5001406 • 5015831 • 5019697 • 5019698 • 5086879 • 5115120 • 5144118 •
5146463 • 5179270 • 5198649 • 5200597 • 5202784 • 5208449 • 5210397 • 5212371 • 5212372 • 5214270 • 5229590 • 5231293 • 5232185 •
5233169 • 5235168 • 5237161 • 5237162 • 5239165 • 5247161 • 5256864 • 5258604 • 5258699 • 5260554 • 5274219 • 5296689 • 5298728 •
5311000 • 5327451 • 5329103 • 5330370 • 5347113 • 5347121 • 5371361 • 5382783 • 5386105 • 5389917 • 5410108 • 5420410 • 5422472 •
5426507 • 5438187 • 5440110 • 5440111 • 5446271 • 5446749 • 5448050 • 5463211 • 5475206 • 5475207 • 5479011 • 5481098 • 5491328 •
5493108 • 5504350 • 5508505 • 5512740 • 5541397 • 5552593 • 5557095 • 5563402 • 5565668 • 5576531 • 5581707 • 5594231 • 5594441 •
5598070 • 5602376 • 5608201 • 5608399 • 5612529 • 5629510 • 5635699 • 5641958 • 5646391 • 5661435 • 5664231 • 5666045 • 5671374 •
5675138 • 5682028 • 5686716 • 5696370 • 5703347 • 5705802 • 5714750 • 5717194 • 5723852 • 5750976 • 5767502 • 5770847 • 5786581 •
5786585 • 5787103 • 5789732 • 5796222 • 5804809 • 5814803 • 5814804 • 5821721 • 5822343 • 5825009 • 5834708 • 5834750 • 5837983 •
5837988 • 5852286 • 5864129 • 5869827 • 5874722 • 5883370 • 5905249 • 5907147 • 5923023 • 5925868 • 5929421 • 5945670 • 5959284 •
5962838 • 5979769 • 6000619 • 6006991 • 6012639 • 6016135 • 6024284 • 6041374 • 6042012 • 6045044 • 6047889 • 6047894 • 6056198 •
6065676 • 6069696 • 6073849 • 6073851 • 6094288 • 6112993 • 6129279 • 6129282 • 6134039 • 6142376 • 6152368 • 6152372 • 6155488 •
6166375 • 6169614 • 6173894 • 6176429 • 6188500 • 6189784 • 6213397 • 6223986 • 6230975 • 6230976 • 6237852 • 6244510 • 6259545 •
6260763 • 6266175 • 6273336 • 6276605 • 6279829 • 6290134 • 6290135 • 6293467 • 6303927 • 6311895 • 6318634 • 6328216 • 6332576 •
6332577 • 6343741 • AU703547 • D312631 • D313590 • D320011 • D320012 • D323492 • D330707 • D330708 • D349109 • D350127 •
D350735 • D351149 • D351150 • D352936 • D352937 • D352938 • D352939 • D358588 • D361565 • D372234 • D374630 • D374869 • D375493
• D376357 • D377345 • D377346 • D377347 • D377348 • D388075 • D446524 • EP0256296 • EP0260155 • EP0260156 • EP0295936 •
EP0325469 • EP0349770 • EP0368254 • EP0442215 • EP0498366 • EP0531645 • EP0663643 • EP0698251 • GB2252333 • GB2284086 •
GB2301691 • GB2304954 • GB2307093 • GB2308267 • GB2308678 • GB2319103 • GB2333163 • GB2343079 • GB2344486 • GB2345568 •
GB2354340 • ISR107546 • ISR118507 • ISR118508 • JP1962823 • JP1971216 • JP2513442 • JP2732459 • JP2829331 • JP2953593 •
JP2964278 • MEX185552 • MEX187245 • RE37166 • Other Patents Pending
CONTENTS
Preface: About this Guide ....................................................................................v
Style Conventions.......................................................................................... vi
Document Conventions ......................................................................... vi
Keys and Keystroke Conventions ........................................................... vi
Radio Frequency Interference ....................................................................... vii
Technical Support ....................................................................................... viii
Chapter 1: Introduction & Quick Start Guide ................................................... 1
Overview ........................................................................................................ 2
Getting Started Quickly ................................................................................. 4
Chapter 2: About the PT2000 and Top Gun..................................................... 7
The PT2000................................................................................................... 8
Top Gun ........................................................................................................ 9
The Keypad .................................................................................................. 10
Data Keys.............................................................................................. 11
Function Keys ....................................................................................... 12
Action Keys ........................................................................................... 12
The Display Screen....................................................................................... 13
The Virtual Display............................................................................... 13
Displaying Information about the Portable ........................................... 15
The Beeper ................................................................................................... 15
The Auto-Off Feature................................................................................... 16
The PT Dock ............................................................................................... 16
User’s Guide
i
Contents
Chapter 3: Using the PT2000 and Top Gun with PALPRO .......................17
Getting Started .............................................................................................18
Attaching an Input Device to the PT2000 .............................................18
Turning On the Portable .......................................................................19
Setting the Time and Date ....................................................................19
Setting a Password .................................................................................20
Collecting Data.............................................................................................21
Using the Portable as a Keyboard Wedge...............................................21
Using PALPRO .....................................................................................23
DESCRIPT ...........................................................................................35
INVMODEM.......................................................................................42
TIMESTMP..........................................................................................44
Reviewing the Collected Data .......................................................................47
Uploading Data to the Host PC ...................................................................49
Serial Configuration ..............................................................................49
Keyboard Wedge Configuration ............................................................51
Removing Collected Data from Memory ......................................................52
Turning Off the Portable ..............................................................................53
Resetting the Portable ...................................................................................54
Care and Cleaning ........................................................................................55
Chapter 4: Programming the PT2000 and Top Gun ..................................57
Overview ......................................................................................................58
Using Programming Utilities ........................................................................59
PERCPROG .........................................................................................59
PDPROG..............................................................................................62
Using Predefined Defaults ............................................................................63
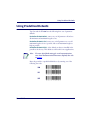
Using Bar Codes ...........................................................................................64
Guidelines for Creating Programming Bar Codes ..................................64
Using Multiple Bar Codes .....................................................................65
General Programming Parameters.................................................................66
Setting the Hour Format, Time, and Date.............................................67
Serial Parameters...........................................................................................68
Xmodem Protocol .................................................................................68
Code 39 and ASCII Equivalents for Serial Characters............................70
ii
PT2000 & Top Gun
Contents
Chapter 5: Transferring Data With PSC Utilities...........................................71
Overview ...................................................................................................... 72
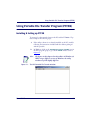
Using Portable File Transfer Program (PTFER) ........................................... 73
Installing & Setting up PTFER ............................................................. 73
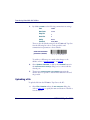
Uploading a File.................................................................................... 74
Downloading a File ............................................................................... 76
Changing Settings ................................................................................. 76
Setting Command Line Options ........................................................... 78
Using PDTFER............................................................................................ 80
Using MACTFER ........................................................................................ 81
Using UPDTFER......................................................................................... 83
Appendix A: Programming Parameters .............................................................85
Overview ...................................................................................................... 86
Appendix B: Full Keyboard Support .....................................................................93
Overview ...................................................................................................... 94
Appendix C: The Top Gun Module ........................................................................99
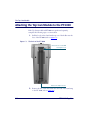
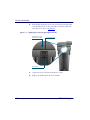
Attaching the Top Gun Module to the PT2000 ......................................... 100
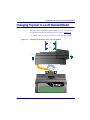
Changing Top Gun to a Left-Handed Model............................................. 103
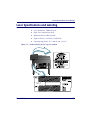
Laser Specifications and Labeling................................................................ 105
Appendix D: The PT Dock ...................................................................................... 107
About the PT Dock .................................................................................... 108
Setting Up the Dock .................................................................................. 108
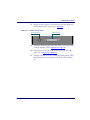
Attaching the Dock Adapter to the Portable........................................ 108
Attaching the PT Dock to a Computer ............................................... 110
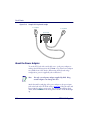
About the Power Adapter .................................................................... 112
Using the PT Dock .................................................................................... 113
Recharging the Portable’s Batteries ..................................................... 113
Maintenance ....................................................................................... 113
User’s Guide
iii
Contents
Appendix E: Batteries ..............................................................................................115
Alkaline Batteries ........................................................................................116
NiCd Battery Pack......................................................................................117
Recharging the NiCd Battery Pack ......................................................119
Storing the NiCd Battery Pack ............................................................120
Lithium Backup Battery..............................................................................120
Low Battery Indication ...............................................................................121
NiCd Battery Pack or Alkaline Batteries ..............................................121
Backup Battery ....................................................................................121
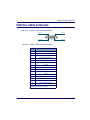
Appendix F: Connector Configurations ............................................................123
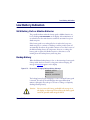
Bar Code & Magnetic Stripe Reader Connector .........................................124
Interface Cable Connector ..........................................................................125
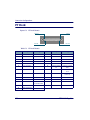
PT Dock.....................................................................................................126
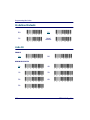
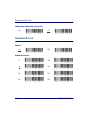
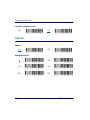
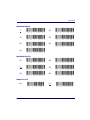
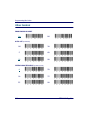
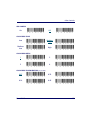
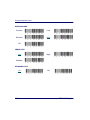
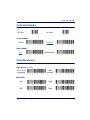
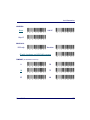
Appendix G: Programming Bar Codes ..............................................................127
Predefined Defaults....................................................................................128
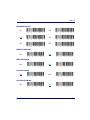
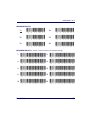
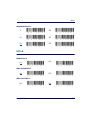
Code 39.....................................................................................................128
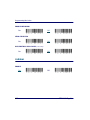
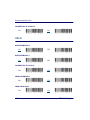
Interleaved 2 of 5 .......................................................................................130
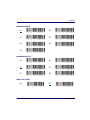
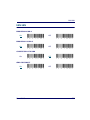
Codabar.....................................................................................................132
Code 93.....................................................................................................134
UPC-A ......................................................................................................135
UPC-E.......................................................................................................136
EAN/JAN ..................................................................................................137
UPC/EAN/JAN Extensions .......................................................................138
Code 128...................................................................................................138
Other Controls ..........................................................................................140
Clock and Calendar ...................................................................................143
Serial Parameters........................................................................................143
iv
PT2000 & Top Gun
Preface:
About this Guide
PREFACE CONTENTS
S tyle Conve ntions ............................................... viii
Document Conventions ....................................... viii
Keys and Keystroke Conventions.......................... viii
Ra dio Fre que ncy Inte rfe re nce ..............................ix
Te chnica l S upport................................................. x
About this Guide
Style Conventions
Document Conventions
Formatting conventions are used throughout this guide as a method of
providing consistency for notes, cautions, and warnings.
Notes Notes appear throughout the manual to provide additional information
on a topic, including technical details, exceptions to instructions and
other pertinent information. These notes are identified by the notepad
symbol and bold italics text.
Cautions Cautions appear when there is information for the user that is strongly
recommended. They are identified by the exclamation mark in a triangle
and bold italics text. This text appears in gold bold italics text if the
user is viewing the manual in electronic PDF form on their computer.
Warnings Warnings appear when there is something of extreme importance for
the user to know prior to proceeding. They are identified by the
exclamation mark in a triangle and bold italics text. This text appears in
red bold italics text if the user is viewing the manual in electronic PDF
form on their computer.
Keys and Keystroke Conventions
Portable keys and keystroke conventions are used throughout this
manual to identify the difference between a key on the portable and
keystrokes input by the user. Brackets such as: <Scan> indicate a key on
a portable data terminal. Data or keystrokes entered by the user, and
filenames or directories are presented in a monospaced typeface.
vi
PT2000TM & Top GunTM
Radio Frequency Interference
Radio Frequency Interference
This device complies with Part 15 of the FCC Rules. Operation is
subject to the following two conditions:
1.
This device may not cause harmful interference, and
2.
This device must accept any interference received, including
interference that may cause undesired operation.
This Class A digital apparatus complies with Canadian ICES-003.
Cet appareil numérique de la Classe A est confirme à la norme
NMB-003 du Canada.
This equipment has been tested and found to comply with the limits for
a Class A digital device, pursuant to Part 15 of the FCC Rules. These
limits are designed to provide reasonable protection against harmful
interference in a residential installation. This equipment generates, uses
and can radiate radio frequency energy and, if not installed and used in
accordance with these instructions, may cause harmful interference to
radio communications. However, there is no guarantee that interference
will not occur in a particular installation. If this equipment does cause
interference to radio or television reception, which can be determined by
turning the equipment off and on, the user is encouraged to try to
correct the interference by one or more of the following measures:
z Reorient or relocate the receiving antenna.
z Increase the separation between the equipment and receiver.
z Connect the equipment into an outlet on a circuit different from
which the receiver is connected.
z Consult the dealer or an experienced radio/TV technician for
help.
User’s Guide
vii
About this Guide
Technical Support
PSC Website Technical Support
The most comprehensive source for technical support and information
for PSC products is the PSC website: www.pscnet.com. The site offers
product support, product registration, warranty information, answers to
frequently asked questions (product FAQs), product manuals, product
tech notes, software updates, patches, demos, and instructions for
returning products for repair.
Reseller Technical Support
Another excellent source for technical assistance and information is an
authorized PSC reseller. A reseller is directly acquainted with specific
types of businesses, application software, and computer systems and,
therefore, is in the best position to provide individualized assistance.
E-Mail Technical Support
If the solution to a technical support question is not available through
the PSC website or a local reseller, contact PSC technical support
directly via E-mail at [email protected].
Telephone Technical Support
For those without E-mail access, call toll-free in the USA 1 (800) 5472507 or (541) 683-5700 from outside the United States of America.
PSC Solutions Group
For advanced, cost-effective services, contact the PSC Solutions Group
(PSG) at (888) 583-3008 or (541) 683-5700 from outside the United
States of America, or [email protected]. You can also visit PSG’s webpage,
accessible at www.pscnet.com.
viii
PT2000TM & Top GunTM
1
Introduction &
Quick Start Guide
CHAPTER CONTENTS
Ove rvie w ............................................................... 2
Ge tting S ta rte d Quickly ......................................... 4
Introduction & Quick Start Guide
Overview
This manual contains complete information about using and
programming the PT2000 portable and Top Gun module.
The manual contains the following sections:
z Chapter 2, About the PT2000 and Top Gun, provides a complete
overview of the portables, including descriptions of the keypad,
the display screen, and optional accessories. Read this chapter
before using the portable.
z Chapter 3, Using the PT2000 and Top Gun with PALPRO, contains
complete information about operating the portable, connecting it
to a host computer or terminal, and uploading data to the host.
Read this chapter before using the portable.
z Chapter 4, Programming the PT2000 and Top Gun, explains how to
customize the portable’s settings. Read this chapter to change the
default settings.
z Chapter 5, Transferring Data With PSC Utilities, provides
information about software programs to transfer data between the
portable and a DOS PC, an IBM 3151 terminal, a UNIX
workstation, or a Macintosh computer. Read this chapter to
upload collected data.
z Appendix A, Programming Parameters, contains ID numbers,
acceptable settings, and defaults for all programming parameters
for Top Gun and the PT 2000. Refer to this chapter to change
settings in the portable.
z Appendix B, Full Keyboard Support, includes tables listing Code 39,
ASCII, and mnemonic values to use in programming the
portables. Refer to this chapter when creating bar codes for
programming the portable.
2
PT2000 & Top Gun
Overview
z
z
z
z
z
z
z
User’s Guide
Appendix C, The Top Gun Module,
provides information about the
Top Gun module. Refer to this chapter if the Top Gun module is
separate from the PT2000 or to change the direction of the laser.
Appendix D, The PT Dock, explains how to set up and use the
optional dock for the PT2000 or Top Gun. Refer to this chapter
before using the dock for the first time or when connecting it to a
PC.
Appendix E, Batteries, provides information about using alkaline
or nickel-cadmium batteries and about the lithium backup
battery installed in the portable. Refer to this chapter to replace
one type of battery with another in the portable.
Appendix F, Connector Configurations, identifies pin assignments
for the connectors on the PT2000. Refer to this chapter to order
cables or make custom ones.
Appendix G, Programming Bar Codes, contains bar codes for
scanning to set selected programming parameters. Use this
chapter to change settings in the portable.
Refer to the Index to find specific topics in this user’s guide.
About this Guide contains a section on Technical Support, which
provides information on technical assistance. Refer to this section
for help or technical assistance.
3
Introduction & Quick Start Guide
Getting Started Quickly
The PSC portable comes with an application named PALPRO loaded in
memory. PALPRO includes three useful data-collection programs for
using the PT2000 or Top Gun without additional programming.
Follow the steps below to begin using the portable with PALPRO
immediately. Page references show where to find more information.
They are live links in the PDF (on-line portable document format)
version of this manual.
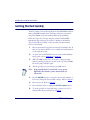
1.
Fill out and return the registration card enclosed with the unit. If
there is a Top Gun module, be sure to include both serial numbers
on the registration card.
2.
To replace the installed alkaline batteries with a nickel-cadmium
battery pack, refer to Appendix E on page 115.
3.
With a PT2000, attach a bar code scanner or magnetic stripe
reader by pushing its plug into the jack at the top of the PT2000.
Be sure the plug is firmly in place.
4.
Turn the portable on by pressing the green I/O button.
Note:
4
If the portable has been customized, it may operate
differently. Check with a systems administrator for
instructions.
5.
Press the ENTER key twice to accept the current date and time, or
if necessary, change the date and time settings. (Refer to page 19.)
6.
Enter a password. (Refer to page 20.)
7.
Press any function key to display the PALPRO Options menu.
8.
To use the portable as a keyboard wedge, connect it to a PC or
terminal following the instructions on page 21.
PT2000 & Top Gun
Getting Started Quickly
9.
Then select <F3> from the PALPRO Options menu. (Refer to
page 23.)
z
When not using the portable as a keyboard wedge, press the
<F2> key to display the list of available applications, and
select the application to use. (Refer to page 26–page 29.)
The PT2000 or Top Gun is now ready to begin collecting data. Enter
data with the Top Gun module or another bar code scanner, a magnetic
stripe reader, or the keypad.
For information about uploading collected data from the portable to a
PC, refer to “Uploading Data to the Host PC,” starting on page 49.
User’s Guide
5
2
About the PT2000 and
Top Gun
CHAPTER CONTENTS
The PT2000 .......................................................... 8
Top Gun ................................................................ 9
The Ke ypa d......................................................... 10
Data Keys.............................................................. 11
Function Keys ....................................................... 12
Action Keys ........................................................... 12
The Dis play S cre e n ............................................ 13
The Virtual Display............................................... 13
Displaying Information about the Portable............ 15
The Be e pe r......................................................... 15
The Auto-Off Fe a ture .......................................... 16
The PT Dock....................................................... 16
About the PT2000 and Top Gun
The PT2000
The PSC PT2000 is a rugged, handheld, portable data-collection
terminal that allows bar code scanning technology anywhere.
The PT2000 accepts input from any of the following devices:
z The Top Gun module (refer to page 9)
z Wands (visible light and infrared)
z Handheld charge-coupled device (CCD) scanners
z 5-volt handheld laser scanners
z ID badge readers
z Magnetic stripe readers (one track)
The PT2000 automatically recognizes and discriminates among the
following bar code symbologies:
z
z
z
z
Codabar
Code 93
Interleaved 2 of 5
UPC-A
z
z
z
z
Code 128
EAN-8
JAN-8
UPC-E
z
z
z
z
Code 39
EAN-13
JAN-13
UPC/EAN/JAN extensions
The PT2000 verifies acceptance of input by sounding a beep. Change
the beeper’s volume, pitch, and duration to suit the work environment
or personal preferences.
The PT2000’s liquid crystal display (LCD) provides easy readability. Its
keypad provides full alphanumeric input capabilities and includes four
programmable function keys. The PT2000 features a built-in PC
interface, for use as a keyboard “wedge” for those applications requiring
fixed-station scanning.
The PT2000 comes with the PALPRO application installed. PALPRO
is made up of three useful programs coexisting in memory:
z ASSETPRO, for tracking assets at various locations.
z INVPRO, for inventory control. Customize it to collect itemand-quantity information or item-only data.
8
PT2000 & Top Gun PDTs
Top Gun
z
TRACKPRO, for tracking check-in and check-out of articles at
one or more locations. An optional date-and-time stamp records
when each item is checked in or out.
PALPRO is part of the PSC Portable Applications Library (PAL). With
PAL, the PT2000 can be customized for specific purposes without using
a programming application. Or use the PSC Program Generator™
(PPG™) to create additional custom programs for the PT2000.
Note:
Please contact a PSC dealer for more information about
PAL or PPG.
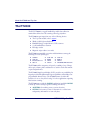
Top Gun
Top Gun is an integrated unit consisting of a laser module mounted on
a PT2000. The Top Gun module is also available separately as an addon for the PT2000 (refer to Figure 2-1 on page 10). The module attaches
to the 9-pin connector at the top of the PT2000 and can be adapted for
right- or left-handed use. The module has two triggers, allowing
scanning with either the index finger or thumb.
Use Top Gun to scan bar code labels on flat, curved, or irregular surfaces
at distances ranging from one inch to two feet. The Top Gun laser
module operates like other handheld lasers—just aim and press the
trigger. Light-emitting diodes (LEDs) on the module indicate laser
activation and good reads. An audible tone also indicates good reads.
Collected data is stored in the PT2000.
User’s Guide
9
About the PT2000 and Top Gun
For complete information about the Top Gun module, refer to
Appendix C on page 99.
Figure 2-1: The Top Gun Module
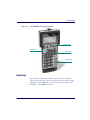
The Keypad
The keypads on the PT2000 and Top Gun have three types of keys: data
keys, function keys, and action keys (refer to Figure 2-2 on page 11).
Each key produces a beep when pressed.
10
PT2000 & Top Gun PDTs
The Keypad
Figure 2-2: The PT2000 and Top Gun keypads
Function keys
Action key
Data keys
Action keys
Data Keys
Use data keys to enter letters, numbers, and several other characters.
There are 26 of these keys. Each key can be used in two modes: normal
and alpha. Use the <Alpha> key to switch between the modes (see the
description of the <Alpha> key below).
User’s Guide
11
About the PT2000 and Top Gun
Function Keys
There are four function keys, <F1> through <F4>, at the top of the
keypad. Alpha mode changes these keys to <F5> through <F8>. Actions
assigned to the function keys are determined by the active program.
Action Keys
There are four action keys: <I/O>, <Alpha>, <BKSP>, and <ENTER>.
Note:
If the portable does not power on when the <I/O> key is
pressed, replace the alkaline batteries or recharge the
battery pack (refer to Appendix E).
<I/O>: Press this key to turn the portable on and off. When turned on,
the portable beeps and returns to its previous location when it last shut
off. The portable does not beep when the <I/O> key is pressed to turn the
unit off. The <Alpha> key has no effect on the <I/O> key.
<Alpha>: Press the <Alpha> key to toggle between normal and alpha
modes. In normal mode, a press of a key either inserts the nonletter
character printed on or above the key or performs an action (for
example, clearing the entry or scrolling through the display). In alpha
mode, a press of a key inserts the letter printed on it.
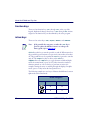
The following example uses two keys to illustrate the difference between
alpha mode and normal mode:
Result of Keypress
Key
12
Normal Mode
Alpha Mode
%
H
8
P
PT2000 & Top Gun PDTs
The Display Screen
Press the <Alpha> key to enter alpha mode. A caret (^) appears at the
cursor position in the display screen. The portable remains in alpha
mode until a function key is pressed, or until the <Alpha> key is pressed
again.
<BKSP>: This is the backspace key. Press it to move the cursor one
place to the left and delete the character there.
<ENTER>: Press this key to enter the current data string and move to
the next programming command.
The Display Screen
The portable’s display screen can show 4 lines of text with up to 16
characters on each line. However, the unit can actually hold up to 24
lines of data with up to 80 characters on a line. Scroll the display to view
data that doesn’t currently appear.
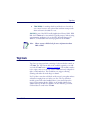
The Virtual Display
The portable’s display screen is like a window to a larger display area,
called the virtual display (refer to Figure 2-3 on page 14). Data longer
than 16 characters is placed in the virtual display while entering or
reading information. Information automatically carries over (or “wraps”)
to the next line if there are more than 80 characters in a line.
User’s Guide
13
About the PT2000 and Top Gun
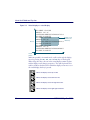
Figure 2-3: Virtual display vs. actual display
24 lines
Virtual
display
F1=NEXT F2=PRE
REC#11 OF 16
120850A30NME5274J400967629
F3=REV F4=EXIT
F1=NEXT F2=PRE
REC#12 OF 16
120850A30NME5274J400984019
F3=REV F4=EXIT
F1=NEXT F2=PRE
REC#13 OF 16
120850A30NME5274J400942885
F3=REV F4=EXIT
Display screen
(4 lines by 16
characters)
80 characters
When the portable is in normal mode, scroll text through the display
screen by pressing the <A>, <B>, <C>, and <D> keys on the keypad.
When using these keys, the text in the virtual display remains in place
and the display screen changes perspective. The symbol printed above
each key indicates the direction in which the display screen moves over
the virtual display that key is pressed.
Moves the display screen up one line
Moves the display screen down one line
Moves the display screen left eight characters
Moves the display screen right eight characters
14
PT2000 & Top Gun PDTs
The Beeper
The virtual display continues to maintain the latest 24 lines of data once
all lines of the virtual display are full. The oldest data is “pushed off the
top” as new data is added at the bottom.
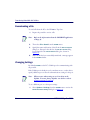
Displaying Information about the Portable
Display information about the portable by scrolling the display screen
past the last character on a current line. Press the <D> key until the
version number is displayed. The display screen lists the system version
number and the amount of random-access memory installed (refer to
Figure 2-4).
Figure 2-4: Display screen showing version number
PT2000
Vers. 4.0
128k
The Beeper
The portable provides audible feedback to indicate when a bar code has
been scanned successfully and to acknowledge when a key is pressed.
The default setting provides one beep to indicate a good scan or key
entry. Another beep sequence warns of possible problems. The pitch,
number, volume, and length of beeps are all programmable.
User’s Guide
15
About the PT2000 and Top Gun
The Auto-Off Feature
The Auto-Off feature lets the PT2000 or Top Gun conserve power by
partially shutting down when not in use. Pressing the <I/O> key returns
the portable to full power. Set the time between the last activity in the
portable and Auto-Off from 1 through 99 minutes. The default is 10
minutes. A setting of 00 disables Auto-Off.
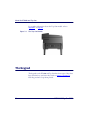
The PT Dock
The PSC PT Dock™ (refer to Figure D-1 on page 109) is specially
designed for use with the PT2000 and Top Gun. The dock provides a
connection between the PT2000 or Top Gun and the PC without
sacrificing the convenience of portability. To transmit data to or from
the portable, place the unit in the dock. To use the PT2000 or Top Gun
for data collection again, remove it from the dock. Or, use the PT Dock
to recharge the portable’s rechargeable NiCd battery pack and backup
lithium battery.
For more information about the PT Dock, refer to Appendix D, The PT
Dock.
16
PT2000 & Top Gun PDTs
3
Using the PT2000 and Top
Gun with PALPRO
Use the PT2000 or Top Gun as a keyboard wedge to enter data directly into an application
one item at a time. When away from the PC, it is possible to collect all the data records and
upload them to the host PC later. The number of data records that can be collected before
uploading them depends on how much random-access memory (RAM) the portable has.
CHAPTER CONTENTS
Ge tting S ta rte d ................................................... 18
Attaching an Input Device to the PT2000............. 18
Turning On the Portable ....................................... 19
Setting the Time and Date .................................... 19
Setting a Password ................................................. 20
Colle cting Da ta ................................................... 21
Using the Portable as a Keyboard Wedge ............... 21
Using PALPRO ..................................................... 23
DESCRIPT........................................................... 35
INVMODEM....................................................... 42
TIMESTMP ......................................................... 44
Re vie wing the Colle cte d Da ta ............................. 47
Uploa ding Da ta to the Hos t PC........................... 49
Serial Configuration .............................................. 49
Keyboard Wedge Configuration ............................ 51
Re moving Colle cte d Da ta from Me mory............. 52
Turning Off the Porta ble ...................................... 53
Using the PT2000 and Top Gun with PALPRO
Getting Started
Unless it has been customized, the PT2000 or Top Gun has three
alkaline batteries installed and is programmed for simple data collection.
To begin using the portable, attach the input device (PT2000 only; refer
to Attaching an Input Device to the PT2000, below) and turn it on.
Note:
This chapter describes how to use the portable with its
original PSC programming (PALPRO). If the portable has
been customized, it may operate differently. Check with a
systems administrator for revised operating instructions.
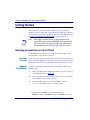
Attaching an Input Device to the PT2000
The PT2000 can be used with most industry-standard input devices
equipped with a 9-pin squeeze connector.
Bar Code Attach a bar code scanner by pushing its connector into the connector at
Scanner the top of the PT2000. Be sure the scanner connector is firmly in place.
Refer to the input device’s operating manual for instructions on its use.
Magnetic To attach a compatible1 magnetic stripe reader (MSR) complete the
Stripe Reader following steps:
1.
Remove the black plastic welp clip from the connector on the top
of the PT2000 (refer to Figure 3-1).
2.
Using a flat-blade screwdriver, remove the two screws securing the
clip, and pull the clip off the connector.
3.
Push the MSR’s connector into the PT2000’s connector.
z
Be sure the MSR connector is firmly in place.
1.Only the following MSRs can be used for this purpose:
00-000-2A (Track 1), 00-000-2B (Track 2) or 00-000-23 (Track 3).
18
PT2000 & Top Gun PDTs
Getting Started
Figure 3-1: The input connector on the PT2000
Welp clip
Turning On the Portable
Turn the PT2000 or Top Gun on by pressing the green <I/O> button.
The display screen returns to the view displayed when it was turned off.
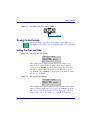
Setting the Time and Date
Figure 3-2: The Time and Date Display
Current Date:
02/01/02
Enter New Date:
¤
When turning the portable on for the first time, the display screen
shows the date currently loaded in memory. If the displayed date is
correct, press the <ENTER> key. If the date is wrong, enter the correct
date. Use two digits each for the month, for the day, and for the year
(e.g., 020101). Press <ENTER> for the program to automatically format
the entry (e.g., 2/01/01).
Figure 3-3: The Current Time Display
Current Time:
09:17:32
Enter New Time:
¤
The next display screen shows the time currently loaded in the portable’s
memory. If the displayed time is correct, press the <ENTER> key. If the
time is wrong, enter the correct time. Use two digits each for the hour,
for the minute, and for the seconds (e.g., 133000). If the portable’s
User’s Guide
19
Using the PT2000 and Top Gun with PALPRO
system clock is set for 12-hour format, type A for A.M. or P for P.M. after
the number (e.g., 013000P). Press <ENTER> when finished.
Note:
It is possible to return to the date and time prompts from
other display screens and menus (such as the password
prompt screen shown below). Or, change the date and time
formats (refer to page 69).
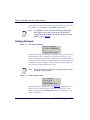
Setting a Password
Figure 3-4: The Password Display
ENTER CURRENT
OR NEW PASSWORD
¤
F-KEY=SET TIME
Password security allows a manager or supervisor to customize a portable
and then hand it off to a worker. A password can contain up to 128
characters and can use any characters available on the portable. Without
the password, the worker cannot switch applications or make changes to
an application’s title or prompts. The password prompt screen appears
after entering the date and time from a reset.
Note:
If a password is lost or forgotten, reset the portable and start
over with a new password.
Figure 3-5: PALPRO Options Menu
PSC PALPRO
08:18:04 ¤
03/01/98
F-KEY=CONTINUE
After the password is entered, the text in Figure 3-5 is displayed. Press a
function key (any of the blue keys at the top of the keypad), for the
display to change to the PALPRO Options menu. The portable is now
ready to collect data.
20
PT2000 & Top Gun PDTs
Collecting Data
Collecting Data
When finished setting up the PT2000 or Top Gun (refer to the previous
section), the PALPRO Options menu appears on the display screen. Use
the menu to choose a PALPRO application or use the portable as a
keyboard wedge.
Using the Portable as a Keyboard Wedge
With the PT2000 or Top Gun attached to the PC or IBM 3151
terminal as a keyboard wedge, use a bar code label or magnetic stripe to
enter data directly into the application. Data can also be entered by
using the keypad on the portable.
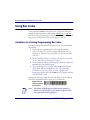
Installing the Two PSC cables1 are required to install the portable as a keyboard
Keyboard wedge.
Wedge To connect the PT2000 or Top Gun as a keyboard wedge, complete the
following steps:
1.
Plug the 15-pin connector into the cable connector on the
bottom of the portable.
Figure 3-6: Keyboard wedge installation for PCs
1.For a listing of PT2000 cable numbers, consult the PSC Price Book at:
http: www.pscnet.com.
User’s Guide
21
Using the PT2000 and Top Gun with PALPRO
2.
Attach the other end to the 25-pin connector of the keyboard
wedge cable (refer to Figure 3-6 on page 21).
3.
PC: Attach the small male plug of the PSC cable to the keyboard
jack on the PC (refer to Figure 3-6).
Terminal: Insert the keyboard cable plug into the modular jack
on the PSC cable connector.
4.
PC: Attach the keyboard cable to the small female jack on the
PSC cable (refer to Figure 3-6).
Terminal: Insert the modular plug of the PSC cable into the
keyboard input jack on the terminal.
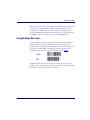
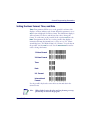
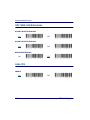
5.
Scan the appropriate bar code below:
AT or PS/2 models
30-286, 50, 50Z, 60,
70, 80, 90, 95 (U.S.
keyboard)
*$+$-D2C011EE*
IBM 3151 terminal
*$+$-D2C015EE*
Using the To use the PT2000 or Top Gun as a keyboard wedge, complete the
Keyboard setup and installation procedures described earlier in this chapter. Then
Wedge complete the following steps:
1.
From the PALPRO Options menu, select <F3>.
Figure 3-7: The PALPRO Options Menu
PALPRO OPTIONS
F2=SELECT PROG
F3=WEDGE
F4=PASSWORD ¤
2.
22
Open the application and place the cursor at the location where
the data is to be entered.
PT2000 & Top Gun PDTs
Collecting Data
3.
Use a bar code scanner (the Top Gun module or another device
attached to the PT2000), a magnetic stripe reader, or the keypad
to enter data.
z
When scanning a bar code or running a magnetic stripe card
through the reader, the data is entered at the cursor position
in the application.
z
When using the keypad to enter the data, the data is
displayed in the second line of the PT2000 display screen.
z
Press the <ENTER> key, to send the data to the PC.
4.
When finished collecting data, press the <F5> key
(<Alpha>+<F1>) to exit.
Figure 3-8: The PT2000 Wedge Menu
* PT2000 WEDGE *
¤
F5=EXIT
Using PALPRO
PALPRO combines three Portable Applications Library applications into
a single, convenient program (refer to page 8). With PALPRO installed
on the PSC portable, it is possible to switch from one application to
another without having to install each application.
Selecting a Complete the following steps to select a PALPRO application:
PALPRO
1. With the PALPRO Options menu displayed, press the <F2> key.
Application
Figure 3-9: The PALPRO Options Menu
PALPRO OPTIONS
F2=SELECT PROG
F3=WEDGE
F4=PASSWORD ¤
User’s Guide
23
Using the PT2000 and Top Gun with PALPRO
2.
Press <F1> to use ASSETPRO, <F2> to use INVPRO, or <F3> to use
TRACKPRO.
Figure 3-10: Selecting a PALPRO application
F1=ASSET MGMT
F2=INV MGMT
F3=ITEM TRACKING
F4=EXIT ¤
Note:
3.
If INVPRO is selected, the next screen asks the user to select
one or two prompts (refer to page 29 for information). Make
a selection before going on to the next step.
To change the application’s title or prompts, select <F3>.
Otherwise, select <F4>.
Figure 3-11: Changing Prompts Menu
CHANGE PROMPTS?
F3=YES
F4=NO ¤
z
z
Note:
When finished changing prompts (or if <F4> was selected in
step 3), the selected application’s menu appears on the
portable’s display screen.
For information about using the individual applications, refer
to page 27–page 29.
For information about changing titles and prompts, refer to
below.
Changing Program Titles and Prompts,
Note:
24
If TRACKPRO was selected, the user is given the option of
adding a date/time stamp before getting to the application
menu. (Refer to page 33.)
PT2000 & Top Gun PDTs
Collecting Data
Changing PALPRO allows the user to change the title that appears on the menu for
Program each application, or change the prompts for each application. Change
Titles and titles or prompts after selecting an application. To use the application’s
Prompts current title and prompts, select <F4> at the prompt shown at the left.
To change the title or prompts, complete the following steps:
1.
Press the <F3> key at the prompt.
Figure 3-12: Changing Prompts Menu
CHANGE PROMPTS?
F3=YES
F4=NO ¤
2.
Enter a name for the application (for example, FIXED ASSETS)
followed by the <ENTER> key. The entered name appears at the
top of the application menu for the current application.
Figure 3-13: Changing the Title
ENTER APPL TITLE
FIXED ASSETS ¤
3.
Enter the text for the first prompt (for example, BUILDING ID)
followed by the <ENTER> key.
Figure 3-14: Entering the First Prompt
ENTER PROMPT 1
BUILDING ID ¤
4.
User’s Guide
Enter the text for the second prompt (for example, ASSET NO.)
followed by the <ENTER> key.
25
Using the PT2000 and Top Gun with PALPRO
Figure 3-15: Entering the Second Prompt
ENTER PROMPT 2
ASSET NO.¤
Switching to To switch from one PALPRO application to another, complete the
Another following steps:
PALPRO 1. Select <F5> from the current application’s menu to exit the
Application
application.
Note:
Enter <F5> on the keypad by pressing the <Alpha> key and
then the <F1> key.
Figure 3-16: Application Menu
ASSET MGMT ¤
F2=COLLECT
F3=FILE OPTIONS
F5=EXIT
2.
At the prompt, enter the current password, or press any function
key (the blue keys at the top of the keypad) to return to the menu
for the current application.
Figure 3-17: Password Prompt
ENTER PASSWORD
¤
F-KEY=EXIT
26
3.
When the correct password is entered, the original PALPRO
screen appears.
4.
Press any function key to display the PALPRO Options menu.
5.
Follow the steps under Selecting a PALPRO Application on page 23.
PT2000 & Top Gun PDTs
Collecting Data
Using Use ASSETPRO to track assets (furniture, phones, computers, electronic
ASSETPRO equipment, etc.) at various locations (example: departments, rooms,
floors, buildings, etc.). With ASSETPRO, enter an identification code
for a location, collect all the asset IDs at the location, and then enter an
identification code for a different location.
To use ASSETPRO, complete the following steps:
1.
From the ASSETPRO application menu, select <F2>.
Figure 3-18: ASSETPRO Application Menu
ASSET MGMT ¤
F2=COLLECT
F3=FILE OPTIONS
F4=EXIT
2.
The first prompt appears on the screen. Enter the identification
code for the location (example, WH3E).
z
Scan a bar code for the location or use the keypad to enter the
location ID.
z
When using a scanner, the code is entered automatically;
when using a keypad, press the <ENTER> key.
Figure 3-19: The Location ID Prompt
LOCATION ID
¤
F3=REV F4=EXIT
3.
User’s Guide
The second prompt now appears on the first line of the screen,
and the location ID appears on the third line.
z
Scan the bar code identifying an asset, or use the keypad to
enter the asset’s ID number or description (for example,
004322).
27
Using the PT2000 and Top Gun with PALPRO
Figure 3-20: The Item ID Prompt
ITEM ID
¤
WH3E
F3=REV F4=EXIT
4.
The location ID and item ID appear together on the third line of
the screen, separated by a comma, and the second prompt remains
on the screen.
z
The portable is ready to accept another ID for an asset at the
current location.
Figure 3-21: The Next Item ID Prompt
ITEM ID
¤
WH3E,004322
F3=REV F4=EXIT
5.
When finished collecting asset IDs for the location, press the <F4>
key to return to the first prompt.
6.
Repeat steps 2-5 until IDs for each asset at every location is
collected.
7.
Press the <F4> key to return to the first prompt.
8.
Press the <F4> key to return to the application menu.
The portable stores the collected data in a single ASCII text file. When
uploading the file to the PC, the data appears as a list. Each line in the
list contains two fields separated by a comma. The first field is the
location, and the second field is the equipment identification number.
The example in Figure 3-22 is part of a data file uploaded from a
portable that used ASSETPRO to collect data.
28
PT2000 & Top Gun PDTs
Collecting Data
Figure 3-22: Collected Data in ASCII text file
BLDG1,000295
BLDG1,001862
BLDG1,000945
BLDG1,001008
BLDG1,000036
BLDG1,000490
BLDG2,000288
BLDG2,002596
Using Use this application to track inventory. INVPRO provides a choice of one
INVPRO prompt or two. Use one prompt to scan or enter an ID number or
description for each item. Use two prompts to scan or enter an item ID
and the quantity of that item.
To use INVPRO, complete the following steps:
1.
At the first screen that appears, press the <F4> key to use the
application with only one prompt.
z
Use the <F3> key for two prompts.
Figure 3-23: Selecting the Number of Prompts
USE 2 PROMPTS?
F3=YES
F4=NO ¤
2.
Press the <F3> key to change the title or prompts that appear on
the application’s display screens. (Refer to page 25 for instructions
on changing the prompts.)
Figure 3-24: Changing Prompts
CHANGE PROMPTS?
F3=YES
F4=NO ¤
z
User’s Guide
To use the current title and prompts, press the <F4> key.
29
Using the PT2000 and Top Gun with PALPRO
3.
The application menu appears next on the display screen.
4.
Continue with the instructions for Using One Prompt, below, or
Using Two Prompts on page 31, depending on the selection made
in step 1.
Using One Prompt
1.
Select <F2> from the application menu.
z
A prompt appears on the screen.
2.
Scan the bar code for an inventory item, or use the keypad to
enter the item’s ID number or description.
z
Using a scanner, the code is entered automatically; with a
keypad, press the <ENTER> key.
3.
The item ID number appears on the third line of the screen. The
portable is ready to accept another item ID.
Figure 3-25: The Item ID Display
ITEM ID
¤
40-000-00
F3=REV F4=EXIT
4.
Repeat step 1 until all IDs for all items are collected.
5.
Press the <F2> key to return to the application menu.
The portable stores the collected data in a single ASCII text file. When
uploading the file to the PC, the data appears as a list. Each line in the
list contains the ID for a single item. The example in Figure 3-26 is part
of a data file uploaded from a portable that used INVPRO with one
prompt to collect data.
30
PT2000 & Top Gun PDTs
Collecting Data
Figure 3-26: Collected Data in ASCII text file
40-000-00
40-002-00
40-006-00
40-010-00
00-000-17
00-000-19
00-000-02
00-000-11
Using Two Prompts
1.
Select <F2> from the application menu. The first prompt appears
on the screen.
Figure 3-27: The Item ID Display
ITEM ID
¤
F3=REV F4=EXIT
2.
Scan the bar code for an inventory item, or use the keypad to
enter the item’s ID number or description.
z
Using a scanner, the code is entered automatically; with a
keypad, press the <ENTER> key.
Figure 3-28: Enter the Number of Units of Item in Inventory
QUANTITY
¤
40-000-00
F3=REV F4=EXIT
User’s Guide
3.
The second prompt now appears on the first line of the screen,
and the item ID appears on the third line.
4.
Enter the number of individual units of the item in inventory.
5.
The item number and quantity appear together on the third line
of the screen, separated by a comma, and the first prompt
31
Using the PT2000 and Top Gun with PALPRO
reappears on the screen. The portable is ready to accept another
item ID
Figure 3-29: Input Another Item ID
ITEM ID
¤
40-000-00,25
F3=REV F4=EXIT
6.
When finished collecting inventory data, press the <F4> key to
return to the application menu.
The portable stores the collected data in a single ASCII text file. When
uploading the file to the PC, the data appears as a list. Each line in the
list contains two fields separated by a comma. The first field is the item
ID, and the second field is the number of units of that item. Figure 3-30
shows part of a data file uploaded from a portable that used INVPRO
with two prompts to collect data.
Figure 3-30: Collected Data in ASCII text file
40-000-00,25
40-006-00,12
00-000-19,56
00-000-02,30
40-002-00,47
00-000-17,16
40-010-00,4
00-000-11,85
Using Use this application to record check-in and check-out of articles
TRACKPRO (supplies, books, files, tools, equipment, etc.) at one or more locations.
TRACKPRO uses
two prompts, one for location and one for item,
looping at the second prompt until the user exits to record a new
location ID An optional date/time stamp records exactly when each item
is taken or returned.
To use TRACKPRO, complete the following steps:
32
PT2000 & Top Gun PDTs
Collecting Data
1.
At the first screen, press the <F3> key to change the title or
prompts that appears on the application’s display screens. (Refer
to page 25 for information on changing the prompts.)
Figure 3-31: The Change Prompts Display
CHANGE PROMPTS?
F3=YES
F4=NO ¤
z
2.
To use the current title and prompts, press the <F4> key.
At the next prompt, select <F3> to use the date/time stamp.
Figure 3-32: The Add Date/Time Stamp Display
ADD DATE/TIME
STAMP?
F3=YES
F4=NO ¤
z
Otherwise, select <F4>.
Figure 3-33: The Item Tracking Display
ITEM TRACKING ¤
F2=COLLECT
F3=FILE OPTIONS
F5=EXIT
3.
From the application menu, select <F2>.
Figure 3-34: The QUANTITY Display
F1=CHECK IN
F2=CHECK OUT
F4=EXIT ¤
User’s Guide
4.
Press the <F1> key to record an item being checked in.
z
Press <F2> to record an item being checked out.
5.
Enter the identification code for the location (for example,
MAIN).
33
Using the PT2000 and Top Gun with PALPRO
6.
Scan a bar code for the location or use the keypad to enter the ID
code.
Figure 3-35: The Location ID Code Display
LOCATION ID
¤
IN :
F3=REV F4=EXIT
z
With a scanner, the code is entered automatically; with a
keypad, press the <ENTER> key.
7.
The ITEM ID prompt appears on the first line of the screen, and
the location ID appears on the third line.
8.
Scan the bar code for the item, or use the keypad to enter the
item’s ID number or description (for example, P203).
Figure 3-36: The ITEM IDDisplay
ITEM ID
¤
IN :MAIN
F3=REV F4=EXIT
9.
The location ID and item ID appear on the third line of the
screen, separated by a comma. The ITEM ID prompt remains on
the screen, and the portable is ready to accept another ID for an
item at the current location.
Figure 3-37: The Next ITEM ID Display
ITEM ID
¤
IN :MAIN,P203
F3=REV F4=EXIT
Note:
34
If the application is set up to add a date/time stamp, the
date and time that the item was checked out will follow the
item ID on the third line. (Scroll the display to see the entire
line.)
PT2000 & Top Gun PDTs
Collecting Data
10.
When finished collecting asset IDs for the location, press the <F4>
key to return to the LOCATION ID prompt.
11.
Repeat steps 5 through 10 until all the IDs for the assets at every
location are collected.
12.
Press the <F4> key again to return to the menu shown at step 4.
13.
To change from check-in to check-out (or vice versa), repeat
step 4.
z
Otherwise, press the <F4> key to return to the application
menu.
The portable stores check-in data in one ASCII text file and check-out
data in another file. When uploading one of the files to the PC, the data
appears as a list. Each line in the list contains two fields separated by a
comma. The first field is the LOCATION ID, and the second field is the
ITEM ID When using the date/time stamp, each line also includes the
check-in or check-out date and time. The list shown in Figure 3-38 is
part of a check-out file uploaded from a portable that used TRACKPRO
with the date/time stamp.
Figure 3-38: Collected Data in ASCII text file
MAIN,P203,03/01/98,10:27:18
MAIN,814223-001,03/01/98,10:27:45
MAIN,00-929-00,03/01/98,11:04:51
MAIN,P0009222,03/01/98,11:22:02
WHS,00-680-00,03/01/98,11:40:53
WHS,004322,03/01/98,11:40:57
WHS,16-000-00,03/01/98,11:41:11
WHS,A0039242,03/01/98,11:41:15
DESCRIPT
DESCRIPT (The Description Application) is
another useful program for
tracking inventory. You can use the application with item and
description files that you create and load in advance. You can also add
User’s Guide
35
Using the PT2000 and Top Gun with PALPRO
to files or create them from scratch in the portable as you collect
inventory data.
When you enter an item ID into the portable, the application checks the
loaded item file for that entry. If the ID matches one in the file, the
portable displays a description of the item (which it gets from the loaded
description file) and prompts you for the number of individual units of
the item. If the ID does not match one in the item file, the application
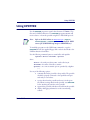
allows you to add the ID and a description to the database.
The item and description files are simple ASCII text files consisting of
singles lines of data. The lines in the two files correspond to each other;
that is, the first line in the description file is the description of the item
in the first line of the item file, the second line in the description file is
the description of the item in the second line of the item file, and so on.
Examples of the two types of files are shown below. The item file is on
the left, and the description file is on the right.
00-629-02
00-667-00
00-670-00
00-675-00
00-680-00
00-690-00
00-693-00
1-697-0
Note:
36
PT DOCK MANUAL
PT2000 MANUAL
S10+ MANUAL
S20+ MANUAL
EASYWAND MANUAL
BC BASICS MANUAL
TOPGUN MANUAL
EASYKEY+ MANUAL
The two files must have exactly the same number of lines,
even if some of the lines are blank.
PT2000 & Top Gun PDTs
Collecting Data
Loading Item and Description Files into the Portable
Note:
1.
For information about connecting a portable to your
computer, see the user's guide for the portable. For
information about PTFER and PDTFER file-transfer
programs, see pages 73-80.
At the screen displaying the program name, press any function
key.
Figure 3-39: DESCRIPT Prompt
DESCRIPT
08:17:32
05/01/02
F-KEY=CONTINUE
2.
At the next screen, press the <F1> key to display the application
menu.
Figure 3-40: Selecting DESCRIPT
F1=DESCRIPT
F2=WEDGE
F4=EXIT
Note:
3.
For information about using the portable as a wedge, see
“Using the Portable as a Keyboard Wedge” on page 21.
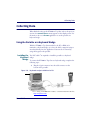
From the application menu, select <F2>.
Figure 3-41: DESCRIPT Application Menu
F1=COLLECT
F2=RECEIVE LISTS
F3=FILE OPTIONS
F4=EXIT
4.
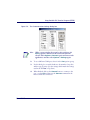
User’s Guide
If item and description lists are already loaded in the portable, the
screen shown at the right will be displayed. To replace a list, select
37
Using the PT2000 and Top Gun with PALPRO
<F2> and go to step 5.
<F3> and go to step 8.
To add new items to an existing list, select
Figure 3-42: FILE NOT EMPTY Prompt
FILE NOT EMPTY
F2=ERASE
F3=APPEND
F4=EXIT
5.
To erase the item and description lists that are currently loaded in
the portable, select <F2>. The second line of the display screen
will become blank, and the lists will be removed from the
portable's memory.
Figure 3-43: ERASE Option
ERASE
F2=PICKLIST
F3=COLLECT
F4=EXIT
6.
Press the <F4> key to return to the application menu, and select
<F2>.
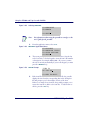
7.
From the Receive Lists menu, select <F2> to download the item
list or <F3> to download the description list.
Figure 3-44: RECEIVE LISTS Menu
RECEIVE LISTS
F2=RECEIVE ITEM
F3=RECEIVE DESC
F4=EXIT
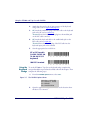
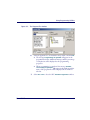
8.
38
The next screen will prompt you to connect the portable to the
computer. When you are sure the portable is connected properly,
run the appropriate transfer program to download the list. (Use
PTFER in Windows or PDTFER in DOS). Then select <F3> on
the portable to transfer the file.
PT2000 & Top Gun PDTs
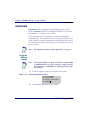
Collecting Data
Figure 3-45: CONNECT TO PORTABLE Prompt
CONNECT FOR REC
ITEM LIST
F3=CONTINUE
F4=EXIT
9.
When the transfer is completed, the portable's screen will report
on the number of records in the list in memory. Press the <F4>
key to return to the Receive Lists menu.
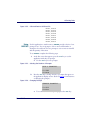
Figure 3-46: Results Report
RESULTS
RECORDS=16
F4=CONTINUE
10.
To load another file, repeat steps 7 through 9. When both files
are loaded, press the <F4> key to return to the application menu.
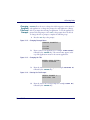
Using
DESCRIPT
Note:
1.
To set a new date or time, see page 19.
At the screen displaying the program name, press any function
key.
Figure 3-47: DESCRIPT Prompt
DESCRIPT
08:17:32
05/01/02
F-KEY=CONTINUE
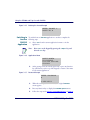
2.
User’s Guide
At the next screen, press the <F1> key to display the application
menu.
39
Using the PT2000 and Top Gun with PALPRO
Figure 3-48: Selecting DESCRIPT
F1=DESCRIPT
F2=WEDGE
F4=EXIT
Note:
3.
For information about using the portable as a wedge, see the
user's guide for the portable.
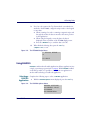
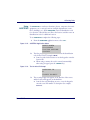
From the application menu, select <F1>.
Figure 3-49: DESCRIPT Application Menu
F1=COLLECT
F2=RECEIVE LISTS
F3=FILE OPTIONS
F4=EXIT
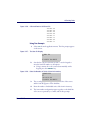
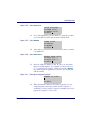
4.
The screen prompts you for an item identification. Scan the bar
code for an item, or use the keypad to enter the item's ID number
or description (for example, 00-693-00). (If you use a scanner,
the code is entered automatically; if you use the keypad, you must
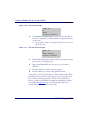
press the <ENTER> key).
Figure 3-50: ITEM ID Prompt
ITEM ID
00-693-00
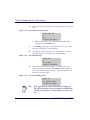
F3=REV F4=EXIT
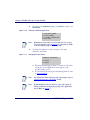
5.
40
If the item ID matches an ID in the next item file, the portable
displays the text from the corresponding line in the description
file and prompts you for the number of units of the item.
If there is no match for an item ID, the portable prompts you to
reenter the item ID or add it to the item list. To add an item to
the list, press the <F3> key.
PT2000 & Top Gun PDTs
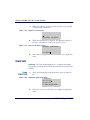
Collecting Data
Figure 3-51: ITEM ID Match
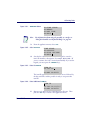
QUANTITY
BCBASICS MANUAL
F3=REV F4=EXIT
The application adds the item ID to the item list and prompts
you for a description of the item. Use the keypad to enter a
description (for example, POCKET READER MANUAL). The
application will add the description to the description file and
prompt you for the number of units of the item.
Figure 3-52: Entering Item Description
ENTER DESCRIPT
6.
When you enter a number (for example, 50), the portable returns
to the first prompt, ready to accept another item ID
7.
When you are done collecting inventory data, press the <F4> key
to return to the application menu.
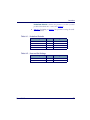
The portable stores the collected data in a single ASCII text file.
When you upload the file to your computer, the data will appear
as a list. Each line in the list will contain two fields separated by a
comma. The first field is the item ID, and the second field is the
number of units of that item. (The item descriptions are not
included in the file). The list below is part of a data file uploaded
from a portable that used DESCRIPT to collect data.
00-680-00, 46
00-667-00, 244
00-697-00, 90
00-693-00, 135
00-675-00, 19
00-629-02, 72
00-670-00, 159
User’s Guide
41
Using the PT2000 and Top Gun with PALPRO
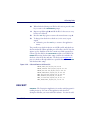
INVMODEM
INVMODEM (Inventory Application with Modem Option ) works
exactly like INVPRO. However, an additional feature lets you send the
collected data to a computer over a modem.
To use this application, you should have experience with modem
communications. You should know how to set up the modem for your
system and how to use the communications software that runs it. If you
are connecting to a bulletin board system, you should know how to log
into the system.
Note:
For information about using the application, see page 29.
Note:
The modem should be set up for transmission at either 2400
or 9600 baud with no parity, 8 data bits, 1 stop bit, and no
date compression. INVMODEM uses Xmodem protocol for file
transmissions.
Using the
Modem
Feature
1.
From the application menu, select <F3> for file options.
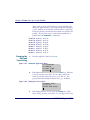
Figure 3-53: INVMODEM Application Menu
INV W/MODEM
F2=COLLECT
F3=FILE OPTIONS
F4=EXIT
2.
42
From the File Options menu, select <F2>.
PT2000 & Top Gun PDTs
Collecting Data
Figure 3-54: Select SEND FILE
*FILE OPTIONS*
F2=SEND FILE
F3=ERASE FILE
F4=EXIT
3.
Use a cable supplied by your PSC dealer to connect the portable
to your modem, and select <F3> from the send file menu.
Figure 3-55: Select MODEM
*SEND FILE*
F2=SERIAL
F3=MODEM
F4=EXIT
4.
Select <F2> to transmit the file at 2400 baud or <F3> to transmit
it at 9600 baud.
Figure 3-56: Select BAUD RATE
SELECT BAUD RATE
F2=2400,N,8,1
F3=9600,N,8,1
F4=EXIT
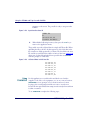
5.
Enter the telephone number to dial. Be sure to use the format
that your modem requires. (For example, you may need to use
"9," as a prefix for the number). When you press the <ENTER>
key on the keypad, the application connects to the modem and
calls the number.
Figure 3-57: Entering the telephone number
NUMBER TO DIAL
F4=EXIT
6.
User’s Guide
When the modem connects to the remote computer, two-way
communications between the portable and the computer is
established. Use the portable to enter the commands you need to
prepare the computer to receive a file.
43
Using the PT2000 and Top Gun with PALPRO
7.
When the computer is ready, press the <F3> key on the portable
to begin the file transmission.
Figure 3-58: Begin File Transmission
F3=UPLD F4=EXIT
8.
When the transmission is completed, the application displays a
message. Select <F4> to return to the previous screen.
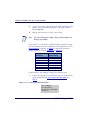
Figure 3-59: Return to Previous Screen
UPLOAD COMPLETE
F4=EXIT
9.
Select <F4> to hang up the modem and return to the application
menu.
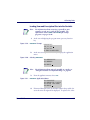
TIMESTMP
(The Time-Stamp Application) is a simple item-tracking
program that records the date and time that each item is entered into the
portable.
TIMESTMP
Using
TIMESTMP
1.
At the screen displaying the program name, press any function
key.
Figure 3-60: TIMESTMP Application Menu
TIMESTMP
08:17:32
05/01/02
F-KEY=CONTINUE
2.
44
At the next screen, press the <F1> key to display the application
menu.
PT2000 & Top Gun PDTs
Collecting Data
Figure 3-61: TIMESTMP Menu
F1=TIME STAMP
F2=WEDGE
F3=SET TIME
F4=EXIT
Note:
3.
For information about using the portable as a wedge, see
“Using the Portable as a Keyboard Wedge” on page 21.
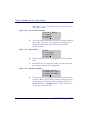
From the application menu, select <F2>.
Figure 3-62: Select COLLECT
TIME STAMP
F2=COLLECT
F3=FILE OPTIONS
F4=EXIT
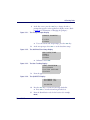
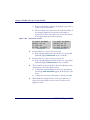
4.
Scan the bar code for an item, or use the keypad to enter the
item's ID number or description (for example, 00-693-00). (If
you use a scanner, the code is entered automatically; if you use the
keypad, you must press the <ENTER> key).
Figure 3-63: Enter the ITEM ID
ITEM ID
00-693-00
F3=REV F4=EXIT
The item ID appears on the third line of the screen, followed by
the date and time, and the portable is ready to accept another
item ID
Figure 3-64: Enter Additional ITEM IDs
ITEM ID
00-693-00,05/01/
F3=REV F4=EXIT
5.
User’s Guide
Repeat step 4 until you have collected IDs for all items. Then
press the <F4> key to return to the application menu.
45
Using the PT2000 and Top Gun with PALPRO
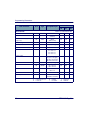
The portable stores the collected data in a single ASCII text file.
When you upload the file to your computer, the data will appear
as a list. Each line in the list will contain the ID for a single item,
followed by the date and time that the item ID was entered in the
portable. The list below is part of a data file uploaded from a
portable that used TIMESTMP to collect data.
40-000-00, 05/01/95, 10:27:18
40-002-00, 05/01/95, 10:27:45
40-006-00, 05/01/95, 11:04:51
40-010-00, 05/01/95, 11:22:02
00-000-17, 05/01/95, 11:40:53
00-000-19, 05/01/95, 11:40:57
00-000-02, 05/01/95, 11:41:11
00-000-11, 05/01/95, 11:41:15
Changing the
Date and
Time Setting
1.
From the application menu, select <F3>.
Figure 3-65: TIMESTMP Application Menu
F1=TIMESTMP
F2=WEDGE
F3=SET TIME
F4=EXIT
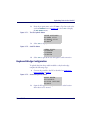
2.
If the displayed date is correct, press the <ENTER> key. If the date
is wrong, enter the correct date. Use two digits each for the
month, for the day, and for the year (e.g., 11, 04, 95). The
program will automatically format the entry (e.g., 11/04/95).
Figure 3-66: Entering the Correct Date
CURRENT DATE
05/01/02
ENTER NEW DATE:
3.
46
If the displayed time is correct, press the <ENTER> key. If the
time is wrong, enter the correct time. Use two digits each for the
PT2000 & Top Gun PDTs
Reviewing the Collected Data
hour, for the minute, and for the seconds (e.g., 133000). If the
portable's system clock is set for 12-hour format, type A for A.M.
or P for P.M. after the number (e.g., 013000P).
Figure 3-67: Entering the Correct Time
CURRENT TIME
8:17:32
ENTER NEW TIME:
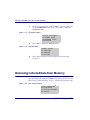
Reviewing the Collected Data
Before uploading collected data, review it on the portable and delete
incorrect or unnecessary records.
Note:
1.
When used as a keyboard wedge, the portable does not store
any data.
From any screen that offers REV as an option, select <F3> to
display the data-review screen (refer to Figure 3-69).
Figure 3-68: Sample Screen Showing the REV Option
ITEM ID
¤
F3=REV F4=EXIT
z
User’s Guide
The last data that was input is displayed on the third line of
the screen.
47
Using the PT2000 and Top Gun with PALPRO
z
z
If the record includes a quantity, the quantity is given after a
comma at the end of the line.
The second line of the data-review screen tells the number of
the currently displayed record and the total number of
records. The top line of the data-review screen offers options
for moving through the records in memory.
Figure 3-69: Data-review screens
F1=PREV F2=NEXT
REC#65 OF 65
27-000-00
F3=DEL F4=EXIT
Item-only data
48
F1=PREV F2=NEXT
REC#65 OF 65
27-000-00,15
F3=DEL F4=EXIT
Item-and-quantity data
2.
Press the <F2> key to move to the next record.
z
If the currently displayed record is the last one, the portable
will briefly display END OF FILE on the second line.
3.
Press the <F1> key to move to the previous record.
z
If the currently displayed record is the first one, the portable
will briefly display START OF FILE on the second line.
4.
The bottom line of the screen offers options for deleting records
and returning to the data-collection screen.
z
To delete the currently displayed record, press the <F3> key.
The message ARE YOU SURE? appears on the first line of the
screen.
z
To delete the record, press <F3> again; to cancel, press <F4>.
5.
When finished reviewing the data records, press <F4> once to
return to the data-collection screen or twice to return to the
application menu.
PT2000 & Top Gun PDTs
Uploading Data to the Host PC
Uploading Data to the Host PC
The PT2000 and Top Gun store data records in files in random-access
memory (RAM). When finished collecting data in a file, transmit
(upload) that file from the portable to the host PC. The number of
records that can collected before uploading depends upon the amount of
RAM the portable has.
Note:
Refer to Appendix D on page 107 for instructions to connect
the PT Dock to a PC.
The portable can be connected to the host PC in either a serial
configuration or a keyboard wedge configuration. The serial
configuration requires a communications program to transfer data to
and from the portable. With this configuration, use an external 9-volt
power adapter (available from a PSC dealer). With the keyboard wedge
configuration, power is drawn from the host PC.
Serial Configuration
Use a PSC 25-pin cable or a PSC 9-pin cable for serial configuration.
Note:
Only use cables approved for this application. For a listing
of PT2000 cable numbers, consult the PSC Price Book at:
http: www.pscnet.com.
Complete the following steps to attach the cable:
User’s Guide
1.
One of the connectors on the cable has the cable number on it.
Plug that connector into the cable input jack on the bottom of the
portable.
2.
Attach the other end of the cable (with the connector labeled
computer) to an available serial port on the PC.
49
Using the PT2000 and Top Gun with PALPRO
3.
To use a 9-volt power adapter, attach the small, round plug of the
adapter to the round power input jack on the cable connector
labeled computer.
4.
Plug the other end into an outlet or power strip.
Note:
Use only a PSC power adapter. Using another adapter can
damage the portable.
The portable is set at the factory with the following parameter settings
for serial communications. For explanations of these parameters, refer to
Serial Parameters, beginning on page 70. To change the parameter
settings, use the bar codes in Appendix G on page 128.
Parameter
Baud rate
Data bits
Parity
Stop bits
Enable Xon/Xoff
Linefeed
Protocol
Timeout
Default Setting
9600
8
None
1
Off
None
ACK/NAK
1 second
To upload data to the computer, complete the following steps:
1.
Prepare the computer to receive data by using one of the software
programs described in Transferring Data With PSC Utilities on
page 71.
Figure 3-70: Inventory Management Menu
INV MGMT ¤
F2=COLLECT
F3=FILE OPTIONS
F5=EXIT
50
PT2000 & Top Gun PDTs
Uploading Data to the Host PC
2.
From the program menu on the PT2000 or Top Gun (such as the
one from INVPRO shown in Figure 3-70), select <F3> to display
the File Options menu.
Figure 3-71: The File Options Menu
*FILE OPTIONS*
F2=SEND FILE
F3=ERASE FILE
F4=EXIT ¤
3.
Select <F2> to display the Send File menu.
Figure 3-72: Send File Menu
*SEND FILE*
F2=SERIAL
F3=WEDGE
F4=EXIT ¤
4.
Select <F2> to upload the data through the serial connection.
Keyboard Wedge Configuration
To upload data from the portable installed as a keyboard wedge,
complete the following steps:
1.
Connect the portable to the PC as described on Installing the
Keyboard Wedge on page 21.
Figure 3-73: Asset Management Menu
ASSET MGMT ¤
F2=COLLECT
F3=FILE OPTIONS
F5=EXIT
2.
User’s Guide
Open the PC application and place the cursor at the location
where data is to be entered.
51
Using the PT2000 and Top Gun with PALPRO
3.
From the program menu on the PT2000 or Top Gun (such as the
one from ASSETPRO shown above), select <F3> to display the
File Options menu.
Figure 3-74: File Options Menu
*FILE OPTIONS*
F2=SEND FILE
F3=ERASE FILE
F4=EXIT ¤
4.
Select <F2> to display the Send File menu.
Figure 3-75: Send File Menu
*SEND FILE*
F2=SERIAL
F3=WEDGE
F4=EXIT ¤
5.
Select <F3> to upload the data through the keyboard wedge
connection.
Removing Collected Data from Memory
After uploading a file from the PT2000 or Top Gun to the PC, erase the
file from the portable’s memory. To do so, complete the following steps:
Figure 3-76: Item Tracking Menu
ITEM TRACKING ¤
F2=COLLECT
F3=FILE OPTIONS
F5=EXIT
52
PT2000 & Top Gun PDTs
Turning Off the Portable
1.
From the program menu on the PT2000 or Top Gun (such as the
one from TRACKPRO above), select <F3> to display the File
Options menu.
Figure 3-77: File Options Menu
*FILE OPTIONS*
F2=SEND FILE
F3=ERASE FILE
F4=EXIT ¤
2.
Select <F3>to display the Erase File menu.
Figure 3-78: Erase File Option
*ERASE FILE*
F3=ERASE
F4=EXIT ¤
3.
Press the <F3> key to erase the file.
Turning Off the Portable
Turn the PT2000 or Top Gun off by pressing the green <I/O> button
displayed at left. This will turn off the screen display, but it will not clear
any information in the portable’s random-access memory (RAM).
The portable is programmed to shut itself off automatically if it is not
used for ten minutes. Change the auto-off time by scanning the
appropriate bar code on page 140.
User’s Guide
53
Using the PT2000 and Top Gun with PALPRO
Resetting the Portable
To reset the PT2000 or Top Gun, remove the battery pack, alkaline
batteries, or external power supply. Then press and hold down the
<Alpha> and <ENTER> keys while reinserting the batteries or
reconnecting the power supply. The portable will prompt to enter the
current date and time.
Caution: Resetting the PT2000 or Top Gun is similar to pressing
<Ctrl>+<Alt>+<Delete> on a PC. All data stored in the
portable’s memory will be cleared.
Or, reset the PT2000 by scanning the following bar code:
Reset
54
*+.*
PT2000 & Top Gun PDTs
Care and Cleaning
Care and Cleaning
With normal use, the PT2000 or Top Gun should require no
maintenance. If it gets dirty, wipe it with a damp cloth.
User’s Guide
Caution:
Do not immerse the portable in liquid.
Caution:
Do not use any abrasive cleaners on the display screen.
55
4
Programming the
PT2000 and Top Gun
Top Gun and the PT2000 are configured with certain default parameter settings before they
are shipped from the factory. These settings will work for many applications. Change the
settings by scanning the bar codes provided in this chapter and in Appendix G, Programming
Bar Codes, on page 127 or by creating bar codes for specific settings. Or, download new
programs to the portable from DOS or Windows.
CHAPTER CONTENTS
Ove rvie w ............................................................. 46
Us ing Progra mming Utilitie s ............................... 47
PERCPROG ......................................................... 47
PDPROG.............................................................. 50
Us ing Pre de fine d De fa ults .................................. 51
Us ing Ba r Code s ................................................. 52
Guidelines for Creating Programming Bar Codes .. 52
Using Multiple Bar Codes ..................................... 53
Ge ne ra l Progra mming Pa ra me te rs ..................... 54
Setting the Hour Format, Time, and Date............. 55
S e ria l Pa ra me te rs ............................................... 56
Xmodem Protocol ................................................. 56
Code 39 and ASCII Equivalents for Serial Characters
58
Programming the PT2000 and Top Gun
Overview
PT2000 and Top Gun recognize the following commands at all times:
*/+*
*/-*
*--*
*-+*
*/.*
*.-*
*.+*
*+.*
*$$*
Sets the portable to alpha mode
Sets the portable to normal mode
Has the same effect as the <Clear> key
Has the same effect as the <BKSP> (backspace) key
Prepares the portable to accept a program
Sounds a low beep on the portable
Sounds a high beep on the portable
Clears all memory and resets the portable
Retrieves data if the application program stops execution
and gives the PROGRAM FAILED message. Connect the
portable to the PC and start the communications program,
then scan this bar code. The data will transmit, one file at a
time.
Enter these commands with bar codes or through the PC’s serial port.
With PSC Program Generator (PPG), it is possible to embed these
codes in a PPG program. For information about using PPG to program
the portable, refer to the PSC Program Generator User Manual.
58
PT2000 & Top Gun PDTs
Using Programming Utilities
Using Programming Utilities
The PSC portable comes with a collection of applications and utilities
on a disk. This collection is called the Portable Applications Library, or
PAL. Two of the utilities, PDPROG and PERCPROG, enable
programming of the portable from DOS or Windows.
Note:
For complete information about PAL, including installation
instructions, refer to the Fa lcon Porta ble Applica tions
Libra ry (PAL) Us e r’s Guide .
Both programming utilities check the version number of the portable's
operating system. If it is different from the PAL version, it installs the
operating system along with the application.
PERCPROG
PERCPROG
is the utility used to program a PSC portable through
Windows.
To customize the installation of an application, complete the following
steps:
1.
Connect the portable to the PC (refer to page 18 for information
on getting started.).
2.
Double-click on the Portable Programmer icon in the PSC PAL
program group. The PSC Portable Programmer window will
open (refer to Figure 4-1).
Note:
User’s Guide
The figures in this chapter show the utilities in Windows 95.
When using a different version of Windows, the utility
windows may look slightly different.
59
Programming the PT2000 and Top Gun
Figure 4-1: The PSC Portable Programmer (PERCPROG) Main Window
3.
From the menu, select Options > Settings. The Communications
Settings window will open (refer to Figure 4-2).
Figure 4-2: The Communications Settings window
4.
Note:
5.
60
Select the desired serial port. Then select OK.
After changing the serial port setting, PERCPROG will keep
the new setting until it is changed again. Use the icons in the
PSC PAL program group (Windows 3.1) or the Start Menu
(Windows 9x) to install an application.
From the PSC Portable Programmer menu, select File > Open.
The Program File window will open (refer to Figure 4-3).
PT2000 & Top Gun PDTs
Using Programming Utilities
Figure 4-3: The Program File window
User’s Guide
6.
Select the application to be installed in the portable, and click OK.
z
The message Programming the portable will appear in the
programmer window. Additional messages and the percentage
of completion will be displayed as the programming
progresses.
z
When programming is completed, the message Portable
successfully programmed will appear in the window, and the
name of the program file will be displayed in the window’s
title bar.
7.
Select File > Exit to close the PSC Portable Programmer window.
61
Programming the PT2000 and Top Gun
PDPROG
PDPROG is the utility used to program a PSC portable through DOS.
Using PDPROG involves entering commands on the DOS command
line. The command line syntax is as follows:
pdprog filename[.hex] [-¦/][port]
where
filename = the name of the file for the application to install in
the portable (The file has a .hex extension. Do not include the
extension in the command line.)
port = 1¦2¦3¦4 to specify the serial port (default=COM2)
The port setting is optional and can be entered either before or after the
file name. If used, precede it with a hyphen (-) or a slash (/).
For example, use the command pdprog descript -1 to transfer the
description program to a portable over the COM1 serial port.
62
PT2000 & Top Gun PDTs
Using Predefined Defaults
Using Predefined Defaults
Top Gun and the PT2000 have the following three sets of parameter
defaults:
Predefined Default 0 (D0) : turns every on/off parameter off and sets
all minimum and maximum lengths to zero.
Predefined Default 1 (D1): turns every on/off parameter on, sets all
minimum lengths as low as possible, and sets all maximum lengths as
high as possible.
Predefined Default 2 (D2) : is the default set that was installed in the
portable at the factory. This default set will work for most applications.
Note:
To restore the default settings for serial communications,
scan Serial Communications Parameter (default) bar code
on page 81.
Reset the portable to a predefined default set by scanning one of the
following bar codes:
D0
D1
D2
User’s Guide
*$+$-D0EE*
*$+$-D1EE*
*$+$-D2EE*
63
Programming the PT2000 and Top Gun
Using Bar Codes
To program the PT2000 and Top Gun, scan Code 39 bar codes that
contain the desired parameters and settings. Appendix G on page 127
provides several programming bar codes. Custom bar codes can be made
using any bar code printing software that supports Code 39.
Guidelines for Creating Programming Bar Codes
Keep the following in mind when creating bar codes for programming
the portable:
z Create custom programming bar codes using the standard
Code 39 character set, not the extended (full ASCII) Code 39
character set. (However, bar codes must be read using extended
Code 39.)
z The first and last character of each bar code must be an asterisk
(*), the start and stop character for Code 39.
z The first asterisk of the programming bar code must be followed
immediately by the characters $+$-.
z The programming bar code must end with EE and an asterisk.
The portable will treat multiple bar codes of programming
information as one entry as long as *$+$- appears at the
beginning of the first bar code and EE* does not appear until the
end of the last bar code.
Scanning the following sample bar code will enable Code 39 scanning
and set the maximum length for Code 39 to 35 characters:
Enable Code 39;
set max length to
35 characters
Note:
64
*$+$-0010235EE*
The human readable portion of the barcode symbol, as
shown here and elsewhere in this manual is optional and
not required for scanning purposes.
PT2000 & Top Gun PDTs
Using Bar Codes
Like all Code 39 bar codes, this sample starts and ends with an asterisk
(*). $+$- starts programming mode. 00 is the ID number for the
parameter that enables Code 39, and 1 turns it on. 02 specifies the
Code 39 maximum-length parameter, and 35 sets it to 35 characters per
label. EE saves the new settings and exits programming mode.
Using Multiple Bar Codes
Create multiple bar codes to program the portable. After making the
settings in the first bar code (which must begin with *$+$-), the
portable waits for additional programming bar code entry if the first bar
code does not include EE*. Scanning the following two bar codes
provides the same result as scanning the single one on page 64:
*$+$-
*$+$-001*
EE*
*0235EE*
Commands cannot be split between two or more bar codes. It is not
possible to have a parameter ID number at the end of one bar code and
its setting or string at the beginning of the next.
User’s Guide
65
Programming the PT2000 and Top Gun
General Programming Parameters
Table 4-1 describes
some of the general parameters for programming the
PT2000 or Top Gun. For descriptions of serial parameters, refer to
Table 4-2. For a complete list of parameters and defaults, refer to
Appendix A.
Table 4-1: Selected Programming Parameters
66
ID #
Parameter
Description
05
Code 39 full
ASCII
Supports the Code 39 extended ASCII character
set (refer to Appendix B on page 93). For example,
a character string encoded in Code 39 as +A is
transmitted as a lowercase a. This allows every key
of the keyboard to be encoded in a Code 39 bar
code.
06
Code 39
accumulate
Treats multiple bar codes as a single bar code,
provided that all bar codes except the last begin
with a space. The last code must not begin with a
space. Up to 128 characters (not including
preamble, postamble, and symbology identifiers)
can be accumulated before transmission.
0B
I 2 of 5
enable
checksum
Enables use of checksums in Interleaved 2 of 5 bar
codes. This parameter should be set to On to read
Interleaved 2 of 5 bar codes.
33, 36
UPC
conversion
Converts UPC-A bar codes to EAN-13 (ID #33),
and converts UPC-E bar codes to UPC-A (ID #36).
3B–3E UPC/EAN/
JAN
extensions
Reads two-digit (ID #3C) and five-digit (ID #3D)
extensions if the portable is programmed to allow
them (ID #3B). Doesn’t read UPC, EAN, or JAN bar
codes if the portable is programmed to require
extensions (ID #3E) and no extensions are present.
PT2000 & Top Gun PDTs
General Programming Parameters
Setting the Hour Format, Time, and Date
Time: Turn parameter ID D8 on to set the portable's real-time clock
display to 24-hour (military-style) format. When this parameter is set to
the time is displayed in 12-hour format. The default time display is
24-hour format. Use the 12- and 24-hour bar codes to change the
format. To set the time on the portable’s clock, scan the Time bar code.
Off,
Date: Turn parameter ID D9 on to set the portable’s date display to
international format (day/month/year) or off to set it to U.S. format
(month/day/year). The default format is U.S. Format. To set the date in
the portable, scan the Date bar code. Use the International Format bar
codes to change the format.
12-Hour Format
24-Hour Format
Time
Date
U.S. Format
International
Format
*$+$-D80EE*
*$+$-D81EE*
*%-*
*%.*
*$+$-D90EE*
*$+$-D91EE*
Use the portable’s keyboard to enter the hour, time and date in the
current format.
Note:
User’s Guide
When finished setting the date and time formats, press any
function key to return to the program.
67
Programming the PT2000 and Top Gun
Serial Parameters
Use bar codes to set parameters for using the PT2000 or Top Gun as a
serial device. Table 4-2 describes the serial parameters; bar codes for
setting them begin on Serial Parameters on page 143. (For a complete
listing of parameters and defaults, refer to Appendix A.)
This section also includes a table of Code 39 and ASCII equivalents for
serial characters (refer to Table 4-3 on page 70). Use the Code 39
equivalents when creating bar codes for programming.
Table 4-2: Serial Parameters
ID #
Parameter
Description
C1
Baud rate
Determines the communication speed. The
setting for the portable must match the setting
that the host computer uses.
C2
Data bits
Specifies the number of data bits in each
character.
C3
Parity
Specifies the parity of the data characters.
C4
Stop bits
Selects the minimum space between data
characters.
C5
Xon/Xoff
handshaking
Used for software data-flow control. With this
option enabled, the portable transmits an Xoff
character when its serial input buffer has
fewer than ten characters of free space. Once
all the data in the serial buffer is processed,
the portable transmits an Xon character.
Xmodem Protocol
The PT2000 and Top Gun support the Xmodem (checksum) filetransfer protocol for serial communication, which is available in many
commercially marketed products.
68
PT2000 & Top Gun PDTs
Serial Parameters
Xmodem is a simple send-and-wait-for-response protocol using a fixedlength data field. The data field is embedded in an Xmodem packet,
which also contains a packet number and a single-byte arithmetic
checksum. The protocol link is established by the receiver transmitting a
NAK character until the sender responds. The sender responds by
transmitting an Xmodem packet. The sender then waits for either an
ACK signal, in which case it transmits the next packet, or a NAK signal,
in which case it retransmits the packet. Once all packets are transmitted,
the sender transmits an EOT signal, indicating the end of transmission.
Scan the following bar code to set a portable to use the Xmodem
protocol:
XModem
protocol
User’s Guide
*$+$-CA02EE*
69
Programming the PT2000 and Top Gun
Code 39 and ASCII Equivalents for Serial Characters
Table 4-3 provides
Code 39 and ASCII equivalents for serial characters.
For Code 39, ASCII, and mnemonic equivalents of keyboard keys, refer
to Appendix B.
Table 4-3: Code 39 and ASCII Equivalents for Serial Characters
Character
Code 39
ASCII
Value
Character
Code 39
ASCII
Value
NUL
%U
80
DLE
$P
10
SOH
$A
01
DC1
$Q
11
STX
$B
02
DC2
$R
12
ETX
$C
03
DC3
$S
13
EOT
$D
04
DC4
$T
14
ENQ
$E
05
NAK
$U
15
ACK
$F
06
SYN
$V
16
BEL
$G
07
ETB
$W
17
BS
$H
08
CAN
$X
18
HT
$I
09
EM
$Y
19
LF
$J
0A
SUB
$Z
1A
VT
$K
0B
ESC
%A
1B
FF
$L
0C
FS
%B
1C
CR
$M
0D
GS
%C
1D
SO
$N
0E
RS
%D
1E
SI
$O
0F
US
%E
1F
Terminate string: //
70
PT2000 & Top Gun PDTs
5
Transferring Data
With PSC Utilities
CHAPTER CONTENTS
Ove rvie w ............................................................. 60
Us ing Porta ble File Tra ns fe r Progra m (PTFER).. 61
Installing & Setting up PTFER ............................. 61
Uploading a File .................................................... 62
Downloading a File ............................................... 64
Changing Settings ................................................. 64
Setting Command Line Options ........................... 66
Us ing PDTFER ................................................... 68
Us ing MACTFER ................................................ 69
Us ing UPDTFER................................................. 71
Transferring Data With PSC Utilities
Overview
After scanning a series of bar codes or inputting other data into the
PT2000 or Top Gun, use a data-transfer utility to upload the
information to the host computer.
Note:
To launch Windows applications, select menu options, use
dialog boxes, or refer to Microsoft Windows documentation.
Both the PT2000 and Top Gun come with PSC’s Portable
Applications Library (PAL) on a disk. PAL includes two programs to
transfer data between the portable and a PC:
PTFER Windows application. (Refer to page 73.)
PDTFER DOS program that runs by issuing commands on the DOS command
line. (Refer to page 80.)
Note:
PSC also provides two utilities MACTFER and UPDTFER
for transferring data to and from Macintosh or UNIX
workstations. These utilities are free from PSC for your
convenience, however their use is at your own risk, and not
supported by PSC Technical support. Go to the PSC website
at www.pscnet.com > Support > Software Updates > PT2000/
Top Gun to download the most current transfer program.
Refer to Technical Support on page viii for more information.
MACTFER Macintosh program used to communicate via 8-pin DIN ADB (not
USB) with a Macintosh. (Refer to page 81.)
UPDTFER UNIX program used to communicate with a UNIX workstation. (Refer
to page 83.)
After collecting data with the portable, use one of these programs to
transfer the data to an ASCII file on the PC.
72
PT2000 & Top Gun PDTs
Using Portable File Transfer Program (PTFER)
Using Portable File Transfer Program (PTFER)
Installing & Setting up PTFER
To prepare for a data transfer between the PC and the PT2000 or Top
Gun, complete the following steps:
1.
If the utility software is not already installed on the PC, install it
following the instructions included with the diskette packaged
with the portable.
2.
In Windows, click on the Portable File Transfer (PTFER) icon in
the PSC program group to get a blank PTFER window (refer to
Figure 5-1).
Note:
The figures in this chapter show the utilities in Windows 95.
When using a different version of Windows, the utility
windows may look slightly different.
Figure 5-1: The PSC Portable File Transfer window
User’s Guide
73
Transferring Data With PSC Utilities
3.
By default, PTFER uses the following communications settings:
Port
COM2
Baud rate
9600
Stop bits
1
Data bits
8
Parity
None
Protocol
ACK/NAK
These are also the default settings for the PT2000 and Top Gun.
Scan the following bar code to set the portable’s serial
communications parameters to these defaults:
Serial Communication
parameters (defaults)
*$+$-C8EE*
* $ + $ - C 8 E E *
To switch to a different port or make other changes to the
defaults, refer to “Changing Settings,” on page 76.
4.
Select Options >Connect (or click on the Connect button in
the Communications Settings dialog box) to connect with the
selected port.
5.
The message Communications port opened appears in the
window. It is now possible to transfer files between the PC and
the portable.
Uploading a File
To upload a file from the PT2000 or Top Gun to the PC:
1.
74
Select File > Receive and use the File to Receive dialog box
(refer to Figure 5-2) to specify the name and location of the file to
store the data in.
PT2000 & Top Gun PDTs
Using Portable File Transfer Program (PTFER)
Figure 5-2: The File to Receive dialog box
2.
PTFER displays a message saying that it is expecting the file (refer
to Figure 5-3).
3.
Make the appropriate selections on the portable to upload the
data into the specified file on the PC (refer to page 49).
Figure 5-3: The PTFER window during an upload
Note:
4.
User’s Guide
If no success message appears, select a different port.
When the file has been successfully transferred, a message appears
in the PTFER window.
75
Transferring Data With PSC Utilities
Downloading a File
To send a file from the PC to the PT2000 or Top Gun:
1.
Prepare the portable to receive a file.
Note:
Refer to the information about the DESCRIPT application
on Page 35.
2.
Then select File > Send from the PTFER menu.
3.
Specify the name and location of the file in the File to Transmit
dialog box. (Except for the title bar, the File to Transmit dialog
box is identical to the File to Receive dialog box, shown in
Figure 5-4.)
4.
When the file has been successfully transferred, a message appears
in the PTFER window.
Changing Settings
By default, PTFER uses the PC's COM2 port for communicating with
the portable.
If the COM2 port is already in use by a modem, mouse, or other device,
specify a different port or alter the communications settings for the port.
Note:
When not sure what settings to use, leave them at the
defaults. To restore factory defaults, scan the bar codes in
Predefined Defaults on page 128
To use a different port or to alter port settings:
1.
76
Select Options > Settings from the PTFER menu to receive the
Communications Settings dialog box (Figure 5-4).
PT2000 & Top Gun PDTs
Using Portable File Transfer Program (PTFER)
Figure 5-4: The Communications Settings dialog box
Note:
User’s Guide
When a connection has been made to the serial port, the
Settings option is dimmed on the menu and cannot be
selected. Select Options > Connect again to disconnect the
application, and then select Options > Settings again.
2.
To use a different COM port, select it in the Port options group.
3.
Use this dialog box to switch baud rate, the number of stop bits,
and the type of parity. (Use the settings which match the settings
used in the PT2000 or Top Gun.)
4.
When finished, click on the Connect button to connect to the
port, or select OK and then use the Connect command in the
menu to make the connection.
77
Transferring Data With PSC Utilities
Setting Command Line Options
Note:
In Windows 3.x, the command is in the Command Line
input box in the application’s Program Item Properties
window in the Program Manager.
In Windows 95, create a shortcut to the application. (The
Desktop is a good place to put the shortcut.) Find the
command in the Target input box on the Properties tab of the
shortcut’s Properties window.
Change settings for the Portable File Transfer program before starting
the program by entering options for the command that starts it. Type
the options using the following syntax:
ptfer filename [-¦/][Pn][Bn][Dn][action]
where
filename = the name of the file to transfer (include the extension)
Pn = the number of the COM port to be used (1, 2, 3, or 4; the
default setting is P2)
Bn = the baud rate to use (the default setting is B9600)
Dn = the timeout period, in seconds (the default is 30 seconds on
receive and 1 second on transmit)
action = A to receive data and append it to the existing file
C to connect automatically when transmitting or receiving
E to echo the display to the screen
H to display on screen help
M to maximize the PTFER window
N to minimize the PTFER window
0n n n to set the size and position of the PTFER window
R to receive data from the portable and replace the existing
file contents
S to display the line count in the title bar
T to transfer data to the portable (the default)
X to exit automatically after data is transmitted or received
78
PT2000 & Top Gun PDTs
Using Portable File Transfer Program (PTFER)
The port, baud rate, timeout, and action parameters are optional. If
using one or more parameters, precede them with a hyphen (-) or a slash
(/). Enter parameters either before or after the file name.
For example: the command ptfer link.txt /P1 would send the
file named link.txt over COM1 to the portable (the default action,
T, is assumed). The command ptfer -3r data.txt would upload
data from the portable over COM3 into a file named data.txt.
The port, baud rate, and position and size settings are saved to and
restored from the initialization file.
User’s Guide
79
Transferring Data With PSC Utilities
Using PDTFER
Instead of using the PTFER application in Windows, transfer files to and
from the PT2000 or Top Gun using commands on the DOS command
line.
The command line syntax for transferring files with PTFER is as follows:
pdtfer filename [-¦/][port][Bn][Dn][action]
where
filename = the name of the file to transfer (include the extension)
port = the number of the COM port to use (1, 2, 3, or 4; the default
setting is 2)
Bn = the baud rate to use (the default setting is B9600)
Dn = the timeout period, in seconds (the default is 30 seconds on
receive and 1 second on transmit)
action = A to receive data and append it to the existing file
E to echo the display to the screen
H to display on screen help
R to receive data from the portable and replace the existing
file contents
T to transfer data to the portable (the default)
The port, baud rate, timeout, and action parameters are optional. When
using one or more parameters, precede them with a hyphen (-) or a
slash (/). Enter parameters either before or after the file name.
For example, the command pdtfer link.txt /1 sends the file
named link.txt over COM1 to the portable (the default action, T, is
assumed). The command pdtfer -3r data.txt would upload data
from the portable over COM3 into a file named data.txt.
Note:
80
Files must be transferred to or from the current DOS
directory.
PT2000 & Top Gun PDTs
Using MACTFER
Using MACTFER
Use the MACTFER program to transfer data between a PT2000 or Top
Gun and a Macintosh. Only one cable is required to connect the
portable to a Macintosh. (Contact a PSC dealer to order.)
To transfer data using the MACTFER program, complete the following
steps:
1.
Copy the mactfer.exe file from the supplied floppy disk to the
Macintosh hard drive.
2.
Scan the following bar code to make sure the portable’s serial
communications parameters are set to the defaults:
Serial Communication
parameters (defaults)
*$+$-C8EE*
* $ + $ - C 8 E E *
3.
Connect the Macintosh cable to the PT Dock.
4.
Connect the other end of the serial cable to the cable input jack
on the bottom of the portable.
5.
Plug the mini-DIN end of the Macintosh cable into the
Macintosh modem port. The modem port is marked:
6.
Start the MACTFER program on the Macintosh. An untitled
window appears for displaying received or transferred data.
7.
To upload a file from the portable to the Macintosh, select File >
Receive and use the Receive File dialog box to specify the name
and location of the file to store the data in. Then select options on
the portable to upload the data into the specified Macintosh file.
Note:
Copy received data to other applications using the Edit >
Copy command.
User’s Guide
81
Transferring Data With PSC Utilities
8.
82
To send a file to the portable, select File > Send and specify the
name and location of the file in the Send File dialog box. To
accept the transferred file, the portable must be programmed to
accept serial input and store it in a file or register. Depending on
the program, it may be necessary to select some options on the
portable first.
PT2000 & Top Gun PDTs
Using UPDTFER
Using UPDTFER
Use the UPDTFER program to transfer data between a PT2000 or Top
Gun and a UNIX workstation. The UPDTFER program transmits and
receives data to or from the portable using PSC's ACK/NAK protocol.
Note:
Refer to the PSC website at www.pscnet.com > Support >
Software Updates > PT2000/Top Gun to download the UNIX
transer file (UNIXUPLD.zip unzips to UPDTFER.exe).
To install the program, use the UNIX tar command to copy the
UPDTFER file from the supplied floppy disk or website download to the
UNIX workstation’s hard drive.
Use the following command syntax to transfer files with updtfer:
updtfer device filename -options
where
device = the serial port device name, such as /dev/tty1a
filename = the name of the file to transfer
options = one or more transfer options, preceded by a hyphen
(-)
Use any of the following options:
t transmits data in the given file to the portable. The portable
should be properly connected to the specified serial port
and ready to receive data.
r receives data from the portable and stores it in the given
file. When receiving data from the portable, start UPDTFER
before invoking the transfer on the portable.
a appends the given file with data received from the portable.
d displays debugging information on the screen during
transfer.
User’s Guide
83
Transferring Data With PSC Utilities
s
h
performs the transfer “silently” (without displaying received
data on the screen).
displays help on program usage and options.
For example: updtfer /dev/tty2a readin.dat -r would receive
data from a portable connected to a serial port named /dev/tty2a and
place data in a file named readin.dat.
The UPDTFER program has the following settings. The portable's
communications settings must match.
z
Baud rate: 9600
z
Stop bits: 1
z
Data bits: 8
z
Parity: None
z
Flow control: ACK/NAK;
no XON/XOFF
The UPDTFER program returns an exit status of 0 if the transfer is
successful. If the transfer is unsuccessful, it returns a nonzero status, such
as 1.
84
PT2000 & Top Gun PDTs
A
Programming
Parameters
APPENDIX CONTENTS
Ove rvie w ........................................................... 104
Pre de fine d De fa ults ........................................... 105
S ave -a nd-Exit S e ttings ...................................... 105
Ge ne ra l Progra mming Pa ra me te rs ................... 106
Code 39 ...............................................................106
Interleaved 2 of 5 .................................................106
Codabar ...............................................................106
Code 93 ...............................................................106
Universal Product Code-A (UPC-A) ....................107
Universal Product Code-E (UPC-E) ....................107
European Article Numbering (EAN)/
Japan Article Numbering (JAN) ...................107
UPC, EAN, JAN Extensions................................107
Code 128 .............................................................107
Other Controls ....................................................108
S e ria l Progra mming Pa ra me te rs ....................... 109
Programming Parameters
Overview
Note:
For information about programming, refer to Chapter 4.
This appendix provides information about all programmable settings for
the PT2000 and Top Gun.
z
Table A-1: lists programming ID
(refer to page 87).
z
Table A-2:
lists save-and-exit settings (refer to page 87).
z
Table A-3:
provides the following information (refer to page 88):
Note:
numbers for predefined defaults
For explanations of some general programming parameters,
refer to page 66. For explanations of serial parameters, refer
to page 68.
Code Parameter : is the “human” name for programming options.
ID # : is the “portable” name for programming options. For example, to
set a Code 39 minimum label length, enter 01 when programming the
portable. Programming ID numbers given in this appendix can be used
with all programming methods.
Type : tells what kind of setting to use for each code parameter:
On/Off : is a toggle. 1 turns the parameter on, and 0 turns it off.
Value : requires a two-character entry (e.g., 02 for two beeps after each
good read, or 05 for a length of five).
String : uses one or more ASCII characters, followed by // to indicate
the end of the string.
Immediate : takes effect as soon as the ID number is entered.
Acceptable Input : gives the settings or range of settings that you can
use for each code parameter.
86
PT2000 & Top Gun
Overview
Predefined Defaults : tells how the parameter is set when you select
predefined default D0, D1, or D2 (refer to page 87).
z
Table A-4:, beginning on page 91, lists parameter settings for serial
communications.
Table A-1: Predefined Defaults
Setting
ID #
Type
Predefined default set 0
D0
Immediate
Predefined default set 1
D1
Immediate
Predefined default set 2
D2
Immediate
Predefined serial defaults
C8
Immediate
ID #
Type
Save and exit
EE
Immediate
Exit only, no save
EF
Immediate
Table A-2: Save-and-Exit Settings
Setting
User’s Guide
87
Programming Parameters
Table A-3: General Programming Parameters
Code Parameter
ID #
Type
Acceptable Input
Code 39
Predefined Defaults
D0
D1
D2
Enter 1 for On and 0 for Off.
Enable
00
On/Off
On or Off
Off
On
On
Minimum length
01
Value
00–60
00
00
00
Maximum length
02
Value
00–60
00
60
20
Enable checksum
03
On/Off
On or Off
Off
Off
Off
Send checksum
04
On/Off
On or Off
Off
Off
Off
Full ASCII mode
05
On/Off
On or Off
Off
On
On
Accumulate mode
06
On/Off
On or Off
Off
On
Off
Enable AIAG alternate
check digit
07
On/Off
On or Off
Off
Off
Off
08
On/Off
On or Off
Off
On
On
Minimum length
09
Value
02–60
02
02
06
Maximum length
0A
Value
02–60
02
60
10
Enable checksum
0B
On/Off
On or Off
Off
Off
Off
Send checksum
0C
On/Off
On or Off
Off
Off
Off
Use lengths 6 and 14 only
(case code)
0D
On/Off
On or Off
Off
Off
Off
Enable
20
On/Off
On or Off
Off
On
On
Minimum length
21
Value
00–60
00
02
04
Maximum length
22
Value
00–60
00
60
20
Send start/stop
23
On/Off
On or Off
Off
Off
Off
Convert Codabar to CLSI
24
On/Off
On or Off
Off
Off
Off
Interleaved 2 of 5
Enable
Enter 1 for On and 0 for Off.
Codabar
Enter 1 for On and 0 for Off.
Code 93
Enter 1 for On and 0 for Off.
Enable
2C
On/Off
On or Off
Off
On
On
Minimum length
2D
Value
00–50
00
01
02
Maximum length
2E
Value
01–50
00
50
20
88
PT2000 & Top Gun
Overview
Code Parameter
ID #
Type
Acceptable Input
Universal Product Code-A (UPC-A)
Predefined Defaults
D0
D1
D2
Enter 1 for On and 0 for Off.
Enable
30
On/Off
On or Off
Off
On
On
Send system digit
31
On/Off
On or Off
Off
On
On
Send check digit
32
On/Off
On or Off
Off
On
Off
Convert UPC-A to EAN-13
33
On/Off
On or Off
Off
On
Off
Universal Product Code-E (UPC-E)
Enter 1 for On and 0 for Off.
Use system digit 0
34
On/Off
On or Off
Off
On
On
Use system digit 1
35
On/Off
On or Off
Off
On
On
Convert UPC-E to UPC-A
36
On/Off
On or Off
Off
On
Off
Send system digit
37
On/Off
On or Off
Off
On
Off
Send check digit
38
On/Off
On or Off
Off
On
Off
European Article Numbering (EAN)/
Japan Article Numbering (JAN)
Enter 1 for On and 0 for Off.
Enable EAN-8/JAN-8
39
On/Off
On or Off
Off
On
On
Enable EAN-13/JAN-13
3A
On/Off
On or Off
Off
On
On
Convert EAN-13 to ISBN
3B
On/Off
On or Off
Off
Off
Off
Send check digit
3F
On/Off
On or Off
Off
Off
On
UPC, EAN, JAN Extensions
Enter 1 for On and 0 for Off.
Allow 2-digit extensions
3C
On/Off
On or Off
Off
On
On
Allow 5-digit extensions
3D
On/Off
On or Off
Off
On
On
Require extensions
3E
On/Off
On or Off
Off
Off
Off
Code 128
Enter 1 for On and 0 for Off.
Enable
40
On/Off
On or Off
Off
On
On
Minimum length
41
Value
00–60
00
02
02
Maximum length
42
Value
00–60
00
60
20
Enable UCC128
43
On/Off
On or Off
Off
Off
Off
User’s Guide
89
Programming Parameters
Code Parameter
ID #
Type
Acceptable Input
Other Controls
Predefined Defaults
D0
D1
D2
Enter 1 for On and 0 for Off.
Enable manual reset
B0
On/Off
On or Off
On
On
On
Auto-Off
B2
Value
00–99
(minutes)
00
60
10
Intercharacter delay (keyboard
wedge only)
B3
Value
00–99
(milliseconds)
00
06
00
Add symbology identifiers*
B5
On/Off
On or Off
Off
On
Off
Good-read tone
B8
Value
00 (low) – 07 (high)
05
05
05
Good-read number of beeps
B9
Value
01–04
01
01
01
Good-read tone duration
BA
Value
00 = 0.14 sec.
01 = 0.07 sec.
02 = 0.45 sec.
03 = 0.22 sec.
01
01
01
Beeper volume
BC
Value
00 = Off
01 (low) – 07 (high)
08 = One level higher
09 = One level lower
07
07
07
Error tone
BD
Value
00 (low) – 07 (high)
03
03
03
Time format
D8
On/Off
On = 24-hour
Off = 12-hour
On
On
On
Date format
D9
On/Off
On = International
Off = U.S.
Off
Off
Off
Keyboard click
DD
On/Off
On or Off
On
On
On
Laser delay
DE
Value
00–99
(10-millisecond units)
01
01
01
K
L
M
= Code 128
= Code 93
= EAN-13
*
A
B
C
= UPC-A
= Interleaved 2 of 5
= Code 39
E
G
I
= UPC-E
= EAN-8
= Codabar
*.
90
PT2000 & Top Gun
Overview
Table A-4: Serial Programming Parameters
Code Parameter
Predefined Default
(C8)
ID #
Type
Acceptable Input
Host select
C0
Value
11 = ATs, PS/2s, and
compatibles
15 = IBM terminals
None
Baud rate
C1
Value
00 = 300
01 = 600
02 = 1200
03 = 2400
04 = 4800
05 = 9600
06 = 19,200
07 = 38,400
08 = 76,800
05
Data bits
C2
Value
07 = 7 bits
08 = 8 bits
08
Parity
C3
Value
00 = None
03 = Odd
04 = Even
00
Stop bits
C4
Value
01 = 1 bit
02 = 2 bits
01
Enable Xon/Xoff
C5
On/Off
On or Off
Off
Linefeed (LF)
(Valid for CA = 00 only)
C6
Value
00 = None
01 = Strip LF
02 = Add LF
00
Predefined serial defaults
C8
End-of-file character
C9
Value
Any single ASCII
character
1A
Protocol
CA
Value
00 = EOR only
01 = CR with checksum
and ACK/NAK response
02 = Xmodem
01
End-of-record (EOR) character
CC
Value
Any single
ASCII character
(CR)
Timeout
CD
Value
00–99
(100-millisecond units)
10
Enter 1 for On and 0 for Off.
User’s Guide
91
B
Full Keyboard Support
APPENDIX CONTENTS
Ove rvie w ........................................................... 112
Common Ke yboa rd Ke ys .................................. 113
IBM (or Compa tible ) PC Ke yboa rd Ke ys ........... 115
Full Keyboard Support
Overview
Almost every key on the keyboard, including non-printing keys, can be
programmed into the PT2000 or Top Gun. The tables in this appendix
list Code 39 equivalents for programming all keyboard keys.
Use the Code 39 values to create bar codes to include lowercase or nonalphanumeric characters in a bar code. For example, to include an
exclamation mark (!) in a bar code, encode it as /A (slash capital a).
Note:
Full ASCII mode for Code 39 must be enabled in the
portable.
Some keys act immediately when read into the portable. For example,
the portable transmits the page-down command to the computer as
soon as it reads a bar code containing the characters %U$Z.
Other keys are not quite so simple. For example, the <Ctrl> key has to
be “turned on and off.” When typing <Ctrl>+<C>, for instance, hold
the <Ctrl> key down while pressing <C>, then release the <Ctrl> key.
Three signals are sent to the host device:
<Ctrl> key on (down)<C>
<Ctrl> key off (up)
To include the <Ctrl>+<C> keystroke combination in a bar code,
encode $SC$R. Think this way when encoding <Ctrl>, <Alt>, <Shift>,
and other keys requiring a key to be held down while another is pressed.
Including a function key in a bar code can present a problem if the
portable is programmed to follow every bar code transmission with an
autoterminator character. Eliminate the autoterminator in a bar code by
including the “zap” character, $Z, in any bar code not followed by the
autoterminator. For example, encode %U$A$Z to send function key
<F1> with no autoterminator.
Table B-1 on page 95 lists the Code 39 and ASCII equivalents for keys
that are common to many keyboards. Table B-2 on page 97 lists
equivalents for additional keys found on IBM PC and compatible
keyboards.
94
PT2000 & Top Gun
Overview
Table B-1: Common Keyboard Keys
Key
Code 39
ASCII
Value
Key
Code 39
ASCII
Value
SP
space
20
:
/Z
3A
!
/A
21
;
%F
3B
"
/B
22
<
%G
3C
#
/C
23
=
%H
3D
$
/D
24
>
%I
3E
%
/E
25
?
%J
3F
&
/F
26
A
A
41
'
/G
27
B
B
42
(
/H
28
C
C
43
)
/I
29
D
D
44
*
/J
2A
E
E
45
+
/K
2B
F
F
46
,
/L
2C
G
G
47
-
- or /M
2D
H
H
48
.
. or /N
2E
I
I
49
/
/O
2F
J
J
4A
0
0 or /P
30
K
K
4B
1
1 or /Q
31
L
L
4C
2
2 or /R
32
M
M
4D
3
3 or /S
33
N
N
4E
4
4 or /T
34
O
O
4F
5
5 or /U
35
P
P
50
6
6 or /V
36
Q
Q
51
4
4 or /T
34
R
R
52
5
5 or /U
35
S
S
53
6
6 or /V
36
T
T
54
7
7 or /W
37
U
U
55
8
8 or /X
38
V
V
56
9
9 or /Y
39
W
W
57
table continues
User’s Guide
95
Full Keyboard Support
Key
Code 39
ASCII
Value
Key
Code 39
ASCII
Value
X
X
58
o
+O
6F
Y
Y
59
p
+P
70
Z
Z
5A
q
+Q
71
@
%V
40
r
+R
72
[
%K
5B
s
+S
73
\
%L
5C
t
+T
74
]
%M
5D
u
+U
75
^
%N
5E
v
+V
76
_
%O
5F
w
+W
77
a
+A
61
u
+U
75
b
+B
62
v
+V
76
c
+C
63
w
+W
77
d
+D
64
x
+X
78
e
+E
65
y
+Y
79
f
+F
66
z
+Z
7A
g
+G
67
`
%W
60
h
+H
68
{
%P
61
i
+I
69
|
%Q
7C
j
+J
6A
}
%R
7D
k
+K
6B
~
%S
7E
l
+L
6C
Del
%T
7F
m
+M
6D
Zap
$Z
1A
n
+N
6E
*Not an actual key; see information about the “zap” character on page 94\
96
PT2000 & Top Gun
Overview
Table B-2: IBM (or Compatible) PC Keyboard Keys
Key
Code 39
ASCII Value
Key
Code 39
ASCII Value
F1
%U$A
8001
¦
%U%A
801B
F2
%U$B
8002
Ø
%U%B
801C
F3
%U$C
8003
¨
%U%C
801D
F4
%U$D
8004
Æ
%U%D
801E
F5
%U$E
8005
Caps Lock
$C
03
F6
%U$F
8006
Num Lock
$D
04
F7
%U$G
8007
Scroll Lock
$E
05
F8
%U$H
8008
Backspace
$H
08
F9
%U$I
8009
Horizontal Tab
$I
09
F10
%U$J
800A
Vertical Tab
$K
0B
F11
%U$K
800B
Enter
$M
0D
F12
%U$L
800C
Alt Off
$N
0E
Insert
%U$U
8015
Alt On
$O
0F
Home
%U$V
8016
Ctrl Off
$R
12
Page Up
%U$W
8017
Ctrl On
$S
13
Delete
%U$X
8018
Shift Off
$V
16
End
%U$Y
8019
Shift On
$W
17
Page Down
%U$Z
801A
Esc
%A
1B
Numeric Keypad
Enter
%U%E
801F
3
%U3
8033
*
%U/J
802A
4
%U4
8034
+
%U/K
802B
5
%U5
8035
-
%U-
802D
6
%U6
8036
/
%U/O
802F
7
%U7
8037
0
%U0
8030
8
%U8
8038
1
%U1
8031
9
%U9
8039
2
%U2
8032
User’s Guide
97
C
The Top Gun Module
CHAPTER CONTENTS
Atta ching the Top Gun Module to the PT2000 .. 118
Cha nging Top Gun to a Le ft-Ha nde d Mode l ..... 121
La s e r S pe cifica tions a nd La be ling .................... 123
The Top Gun Module
Attaching the Top Gun Module to the PT2000
If the Top Gun module and PT2000 were purchased separately,
complete the following steps to connect them:
1.
Pull the hook on the elastic hand strap out of the holder near the
base of the PT2000 (refer to Figure C-1).
Figure C-1: The back of the PT 2000
Remove these screws after
releasing the hook
Release the strap hook here
2.
100
Remove the two screws that attach the other end of the hand strap
to the PT 2000 (refer to Figure C-1).
PT2000 & Top Gun
Attaching the Top Gun Module to the PT2000
Note:
Contact a PSC dealer to order a replacement hand strap
and screws. Request the PT2000 strap kit.
Figure C-2: Attaching the Top Gun module
3.
User’s Guide
Place the Top Gun module on the top of the PT2000 and gently
press it onto the 9-pin connector (refer to Figure C-2).
101
The Top Gun Module
4.
Place the flat metal plate at the top end of the elastic hand strap
over the indentation on the back of the Top Gun module and
insert the screws (refer to Figure C-3).
Figure C-3: Replacing the hand strap (magnified view)
Indentation on back
of Top Gun module
Flat metal plate
Hand strap
102
5.
Tighten the screws until the metal plate is secure.
6.
Replace the hand-strap hook into its holder.
PT2000 & Top Gun
Changing Top Gun to a Left-Handed Model
Changing Top Gun to a Left-Handed Model
Top Gun comes assembled for right-handed use. To use the unit with
the left hand, complete the following steps as shown in Figure C-4:
1.
Remove the two screws from the top of the Top Gun module.
Figure C-4: Switching the Direction of the Top Gun Module
Step 1
Step 5
Step 4
Step 2
Step 3
User’s Guide
103
The Top Gun Module
104
2.
Gently lift the top to separate it from the rest of the module. (Be
careful not to break the ribbon cable inside the module.)
3.
Turn the top around so that the laser is pointing in the opposite
direction.
4.
Replace the top of the module.
5.
Insert and tighten the two screws. (Do not over tighten them.)
PT2000 & Top Gun
Laser Specifications and Labeling
Laser Specifications and Labeling
z
Laser classification: CDRH Class II
z
Light source: 680-nm laser diode
z
Minimum element width: 6.0 mils
z
Depth of field: 2 to 24 inches (55-mil labels)
z
Operating temperature: -4° to 109°F (-20° to 43°C)
Figure C-5: Product labeling for the Top Gun module
Eugene, OR
March 1998
User’s Guide
105
D
The PT Dock
CHAPTER CONTENTS
About the PT Dock............................................ 126
S e tting Up the Dock.......................................... 126
Attaching the Dock Adapter to the Portable ........ 126
Attaching the PT Dock to a Computer ............... 128
About the Power Adapter .................................... 130
Us ing the PT Dock............................................ 131
Recharging the Portable’s Batteries ...................... 131
Maintenance........................................................ 131
The PT Dock
About the PT Dock
The PSC PT Dock is specially designed for use with the PT2000 or Top
Gun. Use the dock for data transmission between the portable and a PC.
Remove the portable from the dock to use it for data collection.
The PT Dock comes with the following accessories:
z
An adapter for the base of the PT2000 or Top Gun, and two
screws
z
Rubber pads and Velcro™ strips for the bottom of the dock
A Power adapter and cables for the PT Dock are available separately
from a PSC dealer.
Setting Up the Dock
Attaching the Dock Adapter to the Portable
Before using the PT Dock for the first time, connect the adapter to the
base of the PT2000 or Top Gun. Complete the steps in Figure D-1:
Caution: Be careful not to overtighten the screws.
1.
108
Align the pins on the PT Dock adapter with the holes in the
connector on the base of the PT2000 or Top Gun. Be sure the
orientation of the adapter matches the orientation of the base, as
shown in Figure D-2 on page 109.
PT2000 & Top Gun
Setting Up the Dock
2.
Gently press the PT Dock adapter into the base of the PT2000 or
Top Gun.
Figure D-1: The PT2000, PT Dock, and adapter
3.
Use the two provided screws to secure the adapter to the portable.
Figure D-2: Attaching the adapter
Adapter, with longest edge up
User’s Guide
Base of PT2000, or Top Gun with
keypad side up
109
The PT Dock
Attaching the PT Dock to a Computer
Set up the Dock as either a serial device or a keyboard wedge. The cable
part number will depend upon your computer type and desired
configuration (serial or keyboard wedge).
Note:
Refer to PSC’s website at www.pscnet.com at the Service
quick link, contact a PSC dealer, or contact PSC customer
service at (541) 683-5700 to determine the appropriate PSC
cable to use with the PT Dock.
Caution: Do not attempt to connect a PT Dock to a PC using an
off-the-shelf RS-232 cable. Use a PSC cable
manufactured specifically for the PT Dock.
Serial
Configuration
1.
Be sure the power to the workstation is turned off.
2.
One plug on the serial cable is labeled with the cable part number.
Attach that plug to the cable input jack on the back of the
PT Dock (refer to Figure D-3).
Note:
A power adapter is not required to run the PT Dock. The
power adapter is used only to recharge the NiCd batteries in
the portable. However, without an adaptor, the LED
indicators on the PT Dock will not light up.
3.
Attach the other end of the cable to an available serial port on the
PC.
4.
If there is an optional power adapter, attach it to the power input
jack on the back of the PT Dock. (Refer to page 112 for more
information about the power adapter.)
5.
Turn the workstation on.
Keyboard To configure the keyboard wedge, complete the following steps:
Wedge
1. Turn off the power to the workstation.
Configuration
110
PT2000 & Top Gun
Setting Up the Dock
2.
Plug the 25-pin connector of the cable into the cable input jack
on the back of the PT Dock (refer to Figure D-3).
Figure D-3: Back of the PT Dock
Power input jack
User’s Guide
Cable input jack
3.
Attach the small male plug of the PSC cable to the keyboard jack
on the workstation (refer to Figure D-4 on page 112).
4.
Attach the keyboard cable to the small female jack on the PSC
cable (refer to Figure D-4 on page 112).
5.
Turn the workstation on. The green light-emitting diode (LED)
labeled POWER on the front panel of the PT Dock should light
up.
111
The PT Dock
Figure D-4: Sample PSC Keyboard wedge
To computer
To keyboard
×
To PT Dock
OU
T
About the Power Adapter
To use the PT Dock with a serial cable, use a 9-volt power adapter to
recharge the NiCd batteries in the PT2000 or Top Gun. Power adapters
are available from a PSC dealer. (When using the keyboard wedge
configuration, power is supplied by the workstation.)
Note:
Use only a 9-volt power adapter supplied by PSC. Using
another adapter can damage the unit.
Attach the small, round plug of the power adapter to the power input
jack on the back of the PT Dock (refer to Figure D-3). Plug the other end
into a 110-volt outlet or power strip. The green light-emitting diode
(LED) labeled POWER on the front panel of the PT Dock should light
up.
112
PT2000 & Top Gun
Using the PT Dock
Using the PT Dock
Set up the PT Dock as described in the preceding section. Place the
PT2000 or Top Gun into the dock, with the keypad facing out. To use a
power adapter or the keyboard wedge configuration, the green LED
labeled READY on the front panel of the PT Dock should light up. (If
the READY light does not come on, make sure the POWER light is on
and the portable is fully inserted into the dock. If it still doesn’t work,
make sure the PT Dock adapter is securely attached to the portable and
that the contacts in the dock are clean.)
When the portable is in the Dock, the user may download programs or
data to it, or upload data from it, just as if it were connected directly to a
workstation. The user can also leave the unit in the dock while using an
attached bar code reader.
Recharging the Portable’s Batteries
Note:
Use the keyboard wedge connection or the power adapter to
recharge the batteries.
When using a nickel-cadmium (NiCd) battery pack in the portable, use
the PT Dock to recharge it. Leave the battery pack in the portable while
it is in the dock. The battery pack and the backup battery will be
recharged while the READY light is on. (Refer to page page 116 to make
sure Switch 2 in the portable’s battery compartment is correctly
positioned.)
Maintenance
With normal use, the PT Dock should require no maintenance. To
clean the contacts in the Dock or on the adapter, wipe them with a
damp cloth after removing the power supply (adapter or keyboard
wedge cable) from the unit. Wait for the contacts to dry before using the
PT Dock again.
User’s Guide
113
E
Batteries
The PT2000 and Top Gun run on two types of batteries. The main batteries supply operating
power for the PT2000 unit and for the Top Gun module or another input device. The
internal lithium battery provides backup power to maintain the random-access memory and
real-time clock when the main batteries are removed.
The portable can use two different types of main batteries: individual alkaline cells or a
rechargeable nickel-cadmium (NiCd) battery pack.
APPENDIX CONTENTS
Alka line Ba tte rie s .............................................. 134
NiCd Ba tte ry Pa ck............................................. 135
Recharging the NiCd Battery Pack.......................137
Storing the NiCd Battery Pack.............................138
Lithium Ba ckup Ba tte ry ..................................... 138
Low Ba tte ry Indica tion....................................... 139
NiCd Battery Pack or Alkaline Batteries...............139
Backup Battery ....................................................139
Batteries
Alkaline Batteries
The PSC PT2000 or Top Gun comes with three alkaline batteries
installed. To replace the alkaline batteries, complete the following steps:
1.
Detach the elastic hand strap on the back of the portable by
pulling its hook out of its holder near the base (refer to Figure C-1
on page 100).
2.
Press on the arrow symbol on the battery-compartment cover and
push the cover in the direction indicated by the arrow.
3.
Pull the end of the plastic ribbon sticking out of the battery
compartment toward the batteries until they pop out.
4.
Set the two switches inside of the battery compartment for the
type of batteries being used.
ALK NI-Cd
Figure E-1: Base of the battery compartment
ON K40
Close-up shows
switch 1 in ALK
position and
switch 2 in NI-Cd
position
z
z
116
1 2
Refer to the diagram inside the battery compartment which
indicates the positions for alkaline (ALK) and nickelcadmium (NiCd) batteries (refer to Figure E-1).
Make sure Switch 2 is in the ALK position. If necessary, use a
pen or a small screwdriver to slide the switch to that position.
PT2000 & Top Gun
NiCd Battery Pack
Caution: Switch 2 must be in the ALK position to prevent the unit
from attempting to charge the alkaline batteries. This
could cause them to leak, damage the unit, and void the
product warranty.
z
Switch 1 may
be in either position.
5.
Lay the plastic ribbon along the bottom of the battery
compartment with the end sticking out of the compartment.
6.
Insert the batteries in the positions indicated by the diagram
inside the compartment.
7.
Replace the battery-compartment cover by sliding it into place.
z
Make sure the plastic ribbon is tucked underneath the cover.
8.
Replace the hand-strap hook into its holder.
NiCd Battery Pack
The battery pack for the PT2000 and Top Gun (PSC part #00-862-00)
contains three rechargeable AA NiCd batteries. To install the NiCd
battery pack, complete the following steps:
User’s Guide
1.
Detach the elastic hand strap on the back of the portable by
pulling its hook out of its holder near the base (refer to Figure C-1
on page 100).
2.
Press on the arrow symbol on the battery-compartment cover and
push the cover in the direction indicated by the arrow.
117
Batteries
3.
Pull the end of the plastic ribbon sticking out of the battery
compartment toward the batteries until they pop out.
4.
Set the two switches inside of the battery compartment for the
type of batteries being used.
z
Refer to the diagram inside the battery compartment which
indicates the positions for alkaline (ALK) and nickelcadmium (NiCd) batteries (refer to Figure E-1).
z
Make sure Switch 2 is in the NiCd position. If necessary, use a
pen or a small screwdriver to slide the switch to that position.
z
Switch 1 may be in either position.
5.
Lay the plastic ribbon along the bottom of the battery
compartment with the end hanging out of the compartment.
6.
Find the positive (+) and negative (-) symbols on the battery pack’s
label (refer to Figure E-2). With the label facing up, tilt the
negative end of the pack into the upper end of the battery
compartment, and then gently press the positive end until it is
fully inserted into the battery compartment.
Figure E-2: Battery pack label
PSC
118
-
7.
00-862-00
NiCd BATTERIES
+
Replace the battery-compartment cover by sliding it into place.
z
Make sure the plastic ribbon is tucked underneath the cover.
PT2000 & Top Gun
NiCd Battery Pack
8.
Replace the hand-strap hook into its holder.
Caution: Do not short-circuit a battery—damage to the battery
can result. Do not incinerate, crush, or puncture
batteries. The electrolyte contained in NiCd batteries is
composed of caustic materials that are harmful to the
eyes and skin. Dispose of batteries in compliance with all
applicable regulations.
Recharging the NiCd Battery Pack
If the portable will not turn on or if the message LOW BATTERY appears
on the display, the battery pack needs recharging. To recharge the NiCd
battery pack, use a cable and an external 9-volt power adapter (refer to
Figure D-1 on page 109). A full charge takes about eight hours.
To recharge the NiCd battery pack, complete the following steps:
1.
If the portable is on, turn it off.
2.
One of the connectors on the cable has the cable number on it.
Plug that connector into the cable input jack on the bottom of the
portable.
Caution: Use only a power adapter supplied by a PSC dealer.
Using another adapter can damage the unit.
3.
Attach the small, round plug of the 9-volt power adapter to the
round power input jack on the cable connector labeled
COMPUTER. Plug the other end into an outlet or power strip.
Use the PT Dock to recharge the NiCd batteries. Leave the batteries in
the unit while it is in the Dock. The batteries recharge while the READY
light is on. (Make sure Switch 2 in the portable’s battery compartment is
in the NiCd position; refer to Figure E-1.)
User’s Guide
119
Batteries
It is best to charge the battery pack at or slightly below room
temperature. Always charge the battery within the temperature range of
50°–85°F (10°–30°C).
Storing the NiCd Battery Pack
The battery pack can be stored indefinitely, regardless of its charge state.
Store it between -22° and 122°F (-30° to 50°C). Stored batteries lose
about ten percent of their charge per month when they are kept at room
temperature. Batteries stored at higher temperatures discharge at a faster
rate.
Lithium Backup Battery
The portable contains a lithium battery as a backup to save application
program codes, collected data and system information, including the
clock setting. Under most circumstances, a fully charged backup battery
will keep information for at least 10 days if the main batteries are
completely discharged or removed. This should provide sufficient time
to recharge the battery pack without risk of losing data.
The backup battery is recharged whenever a charged battery pack is
installed as well as when the power supply is connected.
If the lithium battery is allowed to discharge, any application program
code that is resident in the random-access memory will be lost,
Consequently, when a charged battery pack is installed and the unit is
turned ON, it is likely that the operating system will detect the
corrupted application code and will display a PROGRAM FAILED
message.
120
PT2000 & Top Gun
Low Battery Indication
Low Battery Indication
NiCd Battery Pack or Alkaline Batteries
The portable indicates when the battery pack or alkaline batteries are
low by flashing LOW BATTERY on the display. About 20 minutes of
use remain before the main batteries reach their automatic low-power
shutdown point.
If the battery pack is not recharged before it reaches the low-power
shutdown point, it continues to discharge, and the portable turns off
automatically. Even then, the portable continues to save data, because of
the lithium backup battery. It is important, however, to recharge the
battery pack or replace the alkaline batteries at this time to avoid
running down the backup battery and losing data.
Backup Battery
When the lithium backup battery is low. or after inserting a battery pack
if the portable has been stored for a long time without charging, the
message in Figure E-3 appears on the display
Figure E-3: Please Wait Charging Backup Battery Message
PLEASE WAIT
CHARGING
BACKUP BATTERY
¤
The backup battery begins recharging as soon as a charged battery pack
is inserted. The message should disappear after approximately 10
minutes, although it may take up to an hour to recharge a completely
discharged backup battery.
Caution: Do not remove the battery pack while the message is on
the display, or data may be lost. Charge the battery pack
inside the portable while using the Dock.
User’s Guide
121
Batteries
If the message does not disappear or occurs other than at initial use after
prolonged storage, then the backup battery may no longer be accepting
a charge from the battery pack or adapter. Contact a PSC dealer.
Use the PT Dock to recharge the lithium backup battery in the portable.
The battery will be recharged while the READY light is on. (Make sure
the switch in the portable’s battery compartment is in the correct
position for the type of batteries being used.)
122
PT2000 & Top Gun
F
Connector Configurations
APPENDIX CONTENTS
Ba r Code & Ma gne tic S tripe Re a de r Conne ctor142
Inte rfa ce Ca ble Conne ctor ................................ 143
PT Dock ............................................................ 144
Connector Configurations
Bar Code & Magnetic Stripe Reader Connector
Figure F-1: Bar Code & Magnetic Stripe Reader Pinouts
Pin #1
Pin #5
Pin #6
Pin #9
Table F-1: Bar Code & Magnetic Stripe Reader Pinouts
124
Pin #
Description
1
Laser sync in
2
Bar code data in
3
Good-read out
4
Mag stripe information in
5
Laser trigger in
6
Laser-scan enable out
7
Ground
8
Ground
9
+5V
PT2000 & Top Gun
Interface Cable Connector
Interface Cable Connector
Figure F-2: Interface Cable Connector Pinouts
Pin #8
Pin #1
Pin #15
Pin #9
Table F-2: Interface Cable Connector Pinouts
Pin #
Description
1
Shield
2
Transmit data out
3
Receive data in
4
Hardware handshake out*
5
Hardware handshake in
6
Not used
7
Ground
8
Cable detect
9
+5V in
10
+9V in
11
485+
12
485-
13
Wedge clock
14
Wedge data
15
Wedge keyboard enable
* Must be connected to CTS or hardware
handshake out on the computer.
User’s Guide
125
Connector Configurations
PT Dock
Figure F-3: PT Dock Pinouts
Pin #13
Pin #1
Pin #25
Pin #14
Table F-3: PT Dock Pinouts
Pin #
Description
Usage
1
No connection
2
No connection
3
No connection
Reserved
16
No connection
4
485-
Reserved
17
No connection
5
485+
Reserved
18
No connection
6
No connection
19
Serial handshake
out
Controls received
data
7
Keyboard interface
20
Serial data in
Received data to
dock
8
Keyboard interface
21
Serial data out
Transmitted data
from dock
Reserved
Pin #
Description
14
Ground
15
No connection
9
No connection
22
No connection
10
No connection
23
+5V
11
Serial handshake in
24
No connection
12
Keyboard interface
25
Ground
13
Keyboard interface
126
Controls
transmitted data
Usage
+5 volts in to dock
PT2000 & Top Gun
G
Programming Bar Codes
This chapter provides bar codes for common setup parameters that can be used for
programming the PSC PT2000 and Top Gun. Factory default settings are underlined.
APPENDIX CONTENTS
Pre de fine d De fa ults ............................................. 146
Code 39............................................................... 146
Inte rle ave d 2 of 5................................................. 148
Coda ba r .............................................................. 150
Code 93............................................................... 152
UPC-A ................................................................. 153
UPC-E ................................................................. 154
EAN/JAN ............................................................. 155
UPC/EAN/JAN Exte ns ions .................................. 156
Code 128............................................................. 156
Othe r Controls ..................................................... 158
Clock a nd Ca le nda r............................................. 161
S e ria l Pa ra me te rs ................................................ 161
Programming Bar Codes
Predefined Defaults
DO
*$+$-D0EE*
D2
*$+$-D2EE*
D1
*$+$-D1EE*
Serial
defaults
*$+$-C8EE*
*$+$-001EE*
Off
*$+$-000EE*
Code 39
ENABLE
On
MINIMUM LENGTH
128
00
*$+$-0100EE*
40
*$+$-0140EE*
10
*$+$-0110EE*
50
*$+$-0150EE*
20
*$+$-0120EE*
60
*$+$-0160EE*
30
*$+$-0130EE*
PT2000 & Top Gun
Code 39
MAXIMUM LENGTH
10
*$+$-0210EE*
40
*$+$-0240EE*
20
*$+$-0220EE*
50
*$+$-0250EE*
30
*$+$-0230EE*
60
*$+$-0260EE*
Off
*$+$-030EE*
Off
*$+$-040EE*
Off
*$+$-050EE*
Off
*$+$-060EE*
ENABLE CHECKSUM
On
*$+$-031EE*
SEND CHECKSUM
On
*$+$-041EE*
FULL ASCII MODE
On
*$+$-051EE*
ACCUMULATE MODE
On
User’s Guide
*$+$-061EE*
129
Programming Bar Codes
ENABLE AIAG ALTERNATE CHECK DIGIT
On
*$+$-071EE*
Off
*$+$-070EE*
Off
*$+$-080EE*
Interleaved 2 of 5
ENABLE
On
*$+$-081EE*
MINIMUM LENGTH
130
2
*$+$-0902EE*
30
*$+$-0930EE*
6
*$+$-0906EE*
40
*$+$-0940EE*
10
*$+$-0910EE*
50
*$+$-0950EE*
20
*$+$-0920EE*
60
*$+$-0960EE*
PT2000 & Top Gun
Interleaved 2 of 5
MAXIMUM LENGTH
10
*$+$-0A10EE*
40
*$+$-0A40EE*
20
*$+$-0A20EE*
50
*$+$-0A50EE*
30
*$+$-0A30EE*
60
*$+$-0A60EE*
REQUIRED LENGTH (no default; overrides minimum and maximum settings)
2
*$+$-09020A02EE* 12 *$+$-09120A12EE*
4
*$+$-09040A04EE* 14 *$+$-09140A14EE*
6
*$+$-09060A06EE* 16 *$+$-09160A16EE*
8
*$+$-09080A08EE* 18 *$+$-09180A18EE*
10
*$+$-09100A10EE* 20 *$+$-09200A20EE*
User’s Guide
131
Programming Bar Codes
ENABLE CHECKSUM
On
*$+$-0B1EE*
Off
*$+$-0B0EE*
Off
*$+$-0C0EE*
*$+$-0D1EE*
Off
*$+$-0D0EE*
*$+$-201EE*
Off
*$+$-200EE*
SEND CHECKSUM
On
*$+$-0C1EE*
USE LENGTHS 6 AND 14 ONLY (case code)
On
Codabar
ENABLE
On
132
PT2000 & Top Gun
Codabar
MINIMUM LENGTH
04
*$+$-2104EE*
40
*$+$-2140EE*
10
*$+$-2110EE*
50
*$+$-2150EE*
20
*$+$-2120EE*
60
*$+$-2160EE*
30
*$+$-2130EE*
MAXIMUM LENGTH
10
*$+$-2210EE*
40
*$+$-2240EE*
20
*$+$-2220EE*
50
*$+$-2250EE*
30
*$+$-2230EE*
60
*$+$-2260EE*
Off
*$+$-230EE*
SEND STOP/START
On
User’s Guide
*$+$-231EE*
133
Programming Bar Codes
CONVERT CODABAR TO CLSI
On
*$+$-241EE*
Off
*$+$-240EE*
*$+$-2C1EE*
Off
*$+$-2C0EE*
Code 93
ENABLE
On
MINIMUM LENGTH
134
2
*$+$-2D02EE*
30
*$+$-2D30EE*
10
*$+$-2D10EE*
40
*$+$-2D40EE*
20
*$+$-2D20EE*
50
*$+$-2D50EE*
PT2000 & Top Gun
UPC-A
MAXIMUM LENGTH
2
*$+$-2E02EE*
30
*$+$-2E30EE*
10
*$+$-2E10EE*
40
*$+$-2E40EE*
20
*$+$-2E20EE*
50
*$+$-2E50EE*
UPC-A
ENABLE UPC-A
On
*$+$-301EE*
Off
*$+$-300EE*
SEND SYSTEM DIGIT
On
*$+$-311EE*
Off
*$+$-310EE*
Off
*$+$-320EE*
SEND CHECK DIGIT
On
User’s Guide
*$+$-321EE*
135
Programming Bar Codes
CONVERT UPC-A TO EAN-13
On
*$+$-331EE*
Off
*$+$-330EE*
Off
*$+$-340EE*
Off
*$+$-350EE*
Off
*$+$-360EE*
Off
*$+$-370EE*
Off
*$+$-380EE*
UPC-E
USE SYSTEM DIGIT 0
On
*$+$-341EE*
USE SYSTEM DIGIT 1
On
*$+$-351EE*
CONVERT UPC-E TO UPC-A
On
*$+$-361EE*
SEND SYSTEM DIGIT
On
*$+$-371EE*
SEND CHECK DIGIT
On
136
*$+$-381EE*
PT2000 & Top Gun
EAN/JAN
EAN/JAN
ENABLE EAN-8/JAN-8
On
*$+$-391EE*
Off
*$+$-390EE*
Off
*$+$-3A0EE*
Off
*$+$-3B0EE*
Off
*$+$-3F0EE*
ENABLE EAN-13/JAN-13
On
*$+$-3A1EE*
CONVERT EAN-13 TO ISBN
On
*$+$-3B1EE*
SEND CHECK DIGIT
On
User’s Guide
*$+$-3F1EE*
137
Programming Bar Codes
UPC/EAN/JAN Extensions
ALLOW 2-DIGIT EXTENSIONS
On
*$+$-3C1EE*
Off
*$+$-3C0EE*
Off
*$+$-3D0EE*
*$+$-3E1EE*
Off
*$+$-3E0EE*
*$+$-401EE*
Off
*$+$-400EE*
ALLOW 5-DIGIT EXTENSIONS
On
*$+$-3D1EE*
REQUIRE EXTENSIONS
On
Code 128
ENABLE
On
138
PT2000 & Top Gun
Code 128
MINIMUM LENGTH
2
*$+$-4102EE*
40
*$+$-4140EE*
10
*$+$-4110EE*
50
*$+$-4150EE*
20
*$+$-4120EE*
60
*$+$-4160EE*
30
*$+$-4130EE*
MAXIMUM LENGTH
10
*$+$-4210EE*
40
*$+$-4240EE*
20
*$+$-4220EE*
50
*$+$-4250EE*
30
*$+$-4230EE*
60
*$+$-4260EE*
Off
*$+$-430EE*
ENABLE UCC128
On
User’s Guide
*$+$-431EE*
139
Programming Bar Codes
Other Controls
ENABLE MANUAL RESET
On
*$+$-B01EE*
Off
*$+$-B00EE*
AUTO-OFF (in minutes)
Off
*$+$-B200EE*
30
*$+$-B230EE*
5
*$+$-B205EE*
60
*$+$-B260EE*
10
*$+$-B210EE*
90
*$+$-B290EE*
INTERCHARACTER DELAY (in milliseconds)
140
0
*$+$-B300EE*
50
*$+$-B350EE*
10
*$+$-B310EE*
75
*$+$-B375EE*
25
*$+$-B325EE*
99
*$+$-B399EE*
PT2000 & Top Gun
Other Controls
ADD CODE ID
On
*$+$-B51EE*
Off
*$+$-B50EE*
*$+$-B805EE*
GOOD-READ TONE
Low
*$+$-B800EE*
Medium
High
Medium
Low
*$+$-B802EE*
High
*$+$-B807EE*
GOOD-READ BEEPS
1
*$+$-B901EE*
3
*$+$-B903EE*
2
*$+$-B902EE*
4
*$+$-B904EE*
GOOD-READ TONE DURATION (in seconds)
0.07
*$+$-BA01EE*
0.22
*$+$-BA03EE*
0.14
*$+$-BA00EE*
0.45
*$+$-BA02EE*
User’s Guide
141
Programming Bar Codes
BEEPER VOLUME
Increase
*$+$-BC08EE*
Low
*$+$-BC01EE*
Decrease
*$+$-BC09EE*
High
*$+$-BC07EE*
Off
*$+$-BC00EE*
High
*$+$-BD07EE*
Off
*$+$-DD0EE*
ERROR TONE
Low
*$+$-BD01EE*
Medium
*$+$-BD04EE*
KEYBOARD CLICK
On
142
*$+$-DD1EE*
PT2000 & Top Gun
Clock and Calendar
Clock and Calendar
*%-*
Set Date
*%.*
*$+$-D80EE*
24-Hour
*$+$-D81EE*
International
*$+$-D91EE*
Set Time
CLOCK FORMAT
12-Hour
DATE FORMAT
U.S.
*$+$-D90EE*
Serial Parameters
HOST SELECT (no default)
*$+$-C011EE*
IBM
terminal
*$+$-C015EE*
300
*$+$-C100EE*
1200
*$+$-C102EE*
600
*$+$-C101EE*
2400
*$+$-C103EE*
AT, PS/2, or
compatible
BAUD RATE
User’s Guide
143
Programming Bar Codes
4800
*$+$-C104EE*
38,400
*$+$-C107EE*
9600
*$+$-C105EE*
76,800
*$+$-C108EE*
19,200
*$+$-C106EE*
*$+$-C207EE*
8
*$+$-C208EE*
None
*$+$-C300EE*
Even
*$+$-C304EE*
Odd
*$+$-C303EE*
2
*$+$-C402EE*
Off
*$+$-C50EE*
DATA BITS
7
PARITY
STOP BITS
1
*$+$-C401EE*
ENABLE XON/OFF
On
144
*$+$-C51EE*
PT2000 & Top Gun
Serial Parameters
LINEFEED
None
*$+$-C600EE*
Strip LF
*$+$-C601EE*
Add LF
*$+$-C602EE*
PROTOCOL
EOR only
*$+$-CA00EE* Xmodem *$+$-CA02EE*
CR with checksum and ACK/NAK response
*$+$-CA01EE*
TIMEOUT (in 100-millisecond units)
0
*$+$-CD00EE*
50
*$+$-CD50EE*
10
*$+$-CD10EE*
75
*$+$-CD75EE*
25
*$+$-CD25EE*
99
*$+$-CD99EE*
User’s Guide
145
INDEX
$+$- in ba r code s 4-64
* (a s te ris k) in ba r code s 4-64
^ (ca re t) in dis pla y s cre e n 2-13
I/O ke y 2-12, 3-19, 3-53
A
a ccumula te option for Code 39 4-66
bar codes for G-129
programming parameters for A-88
a da pte r, powe r 3-50
AIAG che ck digit
bar codes for G-130
programming parameters for A-88
Alpha ke y 2-12
a lpha mode 2-12
bar code for 4-58
a pplica tions s e e PALPRO
ARE YOU S URE? me s s a ge 3-48
AS CII
equivalents for serial characters 4-70
full (extended) 4-64, 4-66
bar codes for G-129
programming parameters for A-88
values for keyboard keys B-95 to B-96
AS S ETPRO 3-27 to 3-28
User’s Guide
starting 3-23
a s te ris k (*) in ba r code s 4-64
a tta ching porta ble to compute r
keyboard wedge configuration 3-21
serial configuration 3-49
a tta ching TopGun module to PT 2000
C-
100 to C-102
Auto-Off
bar codes for G-140
programming parameters for
A-90
B
ba cks pa ce ke y 2-13
ba r code s ymbologie s 2-8
displaying 2-15
ba r code s for progra mming 4-58, G-127 to
G-145
creating 4-64 to 4-65
for date format 4-67
multiple 4-65
for predefined defaults G-128
for serial parameters G-143 to G-145
for setting date 4-67
for setting time 4-67
for time format 4-67
147
Index
ba tte rie s E-115 to E-122
ba ud ra te 4-68
bar codes for G-143 to G-144
default 5-74
programming parameters for A-91
setting
in PDTFER 5-80
in PTFER 5-77, 5-78, 5-79
be e pe r 2-15
bar codes for 4-58, G-141 to G-142
programming parameters for A-90
bits , da ta a nd s top 4-68
bar codes for G-144
default 5-74
programming parameters for A-91
setting in PTFER 5-77
BKS P ke y 2-13
buttons s e e ke ypa d
C
ca ble s
keyboard wedge 3-21
serial 3-49
ca le nda r s e e da te a nd time
ca re t (^) in dis pla y s cre e n 2-13
cha nging communica tions s e ttings
5-76
to 5-77
cha ra cte r s e t, full (e xte nde d) AS CII
4-64,
4-66
bar codes for G-129
programming parameters for A-88
cha rging ba ckup ba tte ry me s s a ge E-121
che ck-in a nd che ck-out s e e TRACKPRO
che cks um
Interleaved 2 of 5 4-66
protocol 4-68
cle a ning the porta ble 3-55
148
clock s e e time a nd da te
Coda ba r
bar codes for G-132 to G-134
programming parameters for A-88
Code 128
bar codes for G-138 to G-139
programming parameters for A-89
Code 39
accumulate option 4-66
programming parameters for A-88
bar codes for G-128 to G-130
equivalents for keyboard keys B-95 to B-96
full (extended) ASCII mode 4-64, 4-66
bar codes for G-129
programming parameters for A-88
programming parameters for A-88
Code 93
bar codes for G-134 to G-135
programming parameters for A-88
colle cting da ta 3-21 to 3-35
COM port s e e port
comma nd line options
for PDTFER 5-80
for PTFER 5-78 to 5-79
communica tions port s e e port
communica tions s e ttings
changing 5-76 to 5-77
Port options for 5-77
for PTFER 5-74
for updtfer 5-84
Communica tions S e ttings dia log box
(PTFER) 5-77
conne ctor ca ble s
keyboard wedge 3-21
serial 3-49
conne ctor configura tions F-123 to F-126
conve rs ion options 4-66, A-89
PT2000 & Top Gun
Index
D
D0, D1, D2 (pre de fine d de fa ults )
4-63, A-
87
bar codes for 4-63, G-128
da ta
collecting 3-21 to 3-35
deleting 3-48, 3-52 to 3-53
reviewing 3-47 to 3-48
transferring 5-71 to 5-84
from DOS 5-80
from a Macintosh 5-81 to 5-82
from a UNIX workstation 5-83 to 5-84
from Windows 5-73 to 5-79
uploading 3-49 to 3-52
da ta bits 4-68
bar codes for G-144
default 5-74
programming parameters for A-91
da ta ke ys 2-11
da te a nd time
bar codes for G-143
programming parameters for A-90
setting date 3-19 to 3-20, 4-67
setting time 3-19 to 3-20, 4-67
setting time format 4-67
de fa ult communica tions s e ttings
for PTFER 5-74
for updtfer 5-84
de fa ults , pre de fine d 4-63, A-87
bar codes for G-128
resetting 4-63
de le ting da ta 3-48, 3-52 to 3-53
dia log boxe s (PTFER)
Communications Settings 5-77
File to Receive 5-75
File to Transmit 5-76
dis pla y s cre e n 2-13 to 2-15
caret (^) in 2-13
User’s Guide
scrolling 2-14
dock (PT Dock) D-107 to D-113
connector configuration F-126
dock (PT Dock) 2-16
dolla r s ign ($) in ba r code s 4-64
DOS , tra ns fe rring da ta from 5-80
downloa ding da ta from the porta ble
5-76
E
EAN-13
converting from UPC-A 4-66, A-89
converting to ISBN A-89
see also European Article Numbering
ENTER ke y 2-13
Europe a n Article Numbe ring (EAN)
bar codes for G-137 to G-138
extensions 4-66, A-89, G-138
programming parameters for A-89
see also EAN-13
e xte nde d AS CII cha ra cte r s e t 4-64, 4-66
bar codes for G-129
programming parameters for A-88
e xte nde d ke yboa rd s upport B-95 to B-96
e xte ns ions (UPC, EAN, a nd J AN) 4-66
bar codes for G-138
programming parameters for A-89
F
FCC informa tion 1-vii
file na me , s pe cifying for file tra ns fe r
in MACTFER 5-81, 5-82
in PDTFER 5-80
in PTFER 5-74, 5-76, 5-78
in updtfer 5-83
File to Re ce ive dia log box (PTFER)
5-75
149
Index
File to Tra ns mit dia log box (PTFER) 5-76
file tra ns fe r, utilitie s for
MACTFER 5-72, 5-81 to 5-82
PDTFER 5-72, 5-80
PTFER 5-72, 5-73 to 5-79
updtfer 5-72, 5-83 to 5-84
full (e xte nde d) AS CII mode 4-64, 4-66
bar codes for G-129
programming parameters for A-88
full ke yboa rd s upport B-95 to B-96
function ke ys 2-12
G
ge tting s ta rte d quickly
1-4 to 1-5
4-68
I
input de vice , a tta ching to PT 2000
inte rcha ra cte r de la y
bar codes for G-140
programming parameters for A-90
inte rfa ce ca ble s
keyboard wedge 3-21
serial 3-49
Inte rle a ve d 2 of 5
bar codes for G-130 to G-132
checksum 4-66
programming parameters for A-88
introduction 1-2 to 1-3
inve ntory tra cking s e e INVPRO
INVPRO 3-29 to 3-32
150
A-89
J
J a pa n Article Numbe ring (J AN)
bar codes for G-137 to G-138
extensions 4-66, A-89, G-138
programming parameters for A-89
K
H
ha nds ha king, Xon/Xoff
starting 3-23
IS BN, conve rting from EAN-13
bar codes for G-137
3-18
ke yboa rd ke ys , progra mming B-95 to B-96
ke yboa rd we dge 3-21 to 3-23
cables for 3-21
installing 3-21 to 3-22
uploading data 3-51
ke ypa d 2-10 to 2-13
function keys 2-12
I/O (on/off) key 2-12, 3-19, 3-53
modes 2-12
on/off (I/O) key 2-12, 3-19, 3-53
scrolling keys 2-14
L
la s e r s e e TopGun module
M
Ma cintos h compute rs , tra ns fe rring da ta
from 5-81 to 5-82
MACTFER 5-72, 5-81 to 5-82
me s s a ge
PT2000 & Top Gun
Index
ARE YOU SURE? 3-48
charging backup battery E-121
PROGRAM FAILED 4-58, E-120
Micros oft Windows , tra ns fe rring da ta
from 5-73 to 5-79
module (TopGun) 2-10, C-99 to C-105
attaching to PT 2000 C-100 to C-102
changing orientation of C-103
product labeling C-105
specifications C-105
multiple ba r code s
accumulate option for 4-66
programming parameters A-88, G-129
creating 4-65
N
norma l mode
bar code for
58
2-12
4-58
O
on/off (I/O) ke y 2-12, 3-19, 3-53
options s e e progra mming pa ra me te rs
orie nta tion of TopGun module ,
cha nging C-103
P
PAL (Porta ble Applica tions Libra ry)
4-59
PALPRO 3-23 to 3-53
ASSETPRO 3-27 to 3-28
changing program titles 3-25
changing prompts 3-25
INVPRO 3-29 to 3-32
User’s Guide
Options menu 3-20, 3-22, 3-23, 3-26
selecting an application 3-23
switching applications 3-26
TRACKPRO 3-32 to 3-53
pa ra me te rs s e e progra mming
pa ra me te rs
pa rity 4-68
bar codes for G-144
default 5-74
programming parameters for A-91
setting in PTFER 5-77
pa s s word 3-20, 3-26
PDPROG 4-62
PDTFER 5-72, 5-80
Pe rcon Porta ble Progra mme r 4-59 to 4-61
Pe rcon Progra m Ge ne ra tor (PPG) 2-9, 4-
2-9,
PERCPROG 4-59 to 4-61
pin a s s ignme nts F-123 to F-126
port
default 5-74
setting
in PDTFER 5-80
in PTFER 5-77, 5-78
Port options in Communica tions S e ttings
dia log box 5-77
Porta ble Applica tions Libra ry (PAL) 2-9,
4-59
powe r a da pte r 3-50
PPG 2-9, 4-58
pre de fine d de fa ults 4-63, A-87
bar codes for G-128
product la be ling for TopGun module
C-
105
PROGRAM FAILED me s s a ge
4-58, E-
120
progra m title s , cha nging 3-25
progra mming
bar codes for 4-58, G-127 to G-145
151
Index
predefined defaults A-87
bar codes for G-128
see also programming parameters
progra mming pa ra me te rs A-85 to A-91
general 4-66 to 4-67, A-88 to A-90
predefined defaults 4-63, A-87
bar codes for G-128
serial 3-50, 4-68 to 4-70, A-91
progra mming utilitie s 4-59 to 4-62
progra ms s e e PALPRO
prompts , cha nging 3-25
protocol
default 5-74
programming parameters for A-91
Xmodem 4-68
PT 2000
about 2-7 to 2-16
attaching input device to 3-18
attaching to computer
keyboard wedge configuration 3-21
serial configuration 3-49
attaching TopGun module to C-100 to C-
symbologies read by 2-8
displaying 2-15
turning on 3-19
turning on off 3-53
uploading data from
using PTFER 5-74 to 5-75
see also file transfer, utilities for
PT Dock 2-16, D-107 to D-113
connector configuration F-126
PTFER 5-72, 5-73 to 5-79
command line options 5-78 to 5-79
communications settings 5-74
changing 5-76 to 5-77
dialog boxes
Communications Settings 5-77
File to Receive 5-75
File to Transmit 5-76
Q
quick-s ta rt guide
1-4 to 1-5
102
bar codes for programming
4-58, G-127 to
G-145
creating 4-64 to 4-65
multiple 4-65
batteries E-115 to E-122
cleaning 3-55
connector configurations F-123 to F-126
default communications settings 5-74
downloading data from
using PTFER 5-76
see also file transfer, utilities for
predefined defaults 4-63
bar codes for G-128
resetting 3-54
bar code for 4-58
serial parameters 3-50
152
R
ra ndom-a cce s s me mory (RAM)
displaying 2-15
re gis tra tion ca rd 1-4
re s e tting the porta ble 3-54
bar code for 4-58
re vie wing da ta 3-47 to 3-48
3-17
S
s cre e n (dis pla y) 2-13 to 2-15
scrolling 2-14
s e le cting a PALPRO a pplica tion
3-23
PT2000 & Top Gun
Index
s e ria l ca ble
attaching 3-49
uploading data 3-49
s e ria l cha ra cte rs , Code 39 a nd AS CII
e quiva le nts 4-70
s e ria l communica tions
bar codes for G-143 to G-145
parameters for A-91
s e ria l port s e e port
s e ria l progra mming pa ra me te rs 3-50, 468 to 4-70, A-91
bar codes for G-143 to G-145
s e tting a pa s s word 3-20
s e tting time a nd da te 3-19 to 3-20, 4-67
s top bits 4-68
default 5-74
programming parameters for A-91
setting in PTFER 5-77
s witching PALPRO a pplica tions 3-26
s ymbologie s 2-8
displaying 2-15
T
time a nd da te
bar codes for G-143
programming parameters for A-90
setting date 3-19 to 3-20, 4-67
setting time 3-19 to 3-20, 4-67
setting time format 4-67
time out
programming parameters for A-91
setting in PDTFER 5-80
setting in PTFER 5-78
title s of PALPRO progra ms , cha nging
25
TopGun
about 2-9
User’s Guide
3-
attaching to computer
keyboard wedge configuration 3-21
serial configuration 3-49
bar codes for programming 4-58, G-127 to
G-145
creating 4-64 to 4-65
multiple 4-65
batteries E-115 to E-122
cleaning 3-55
connector configurations F-123 to F-126
default communications settings 5-74
downloading data from
using PTFER 5-76
see also file transfer, utilities for
module see TopGun module
predefined defaults 4-63
bar codes for G-128
resetting 3-54
bar code for 4-58
serial parameters 3-50
symbologies read by 2-8
displaying 2-15
turning off 3-53
turning on 3-19
uploading data from
using PTFER 5-74 to 5-75
see also file transfer, utilities for
TopGun module 2-10, C-99 to C-105
attaching to PT 2000 C-100 to C-102
changing orientation of C-103
product labeling C-105
specifications C-105
tra cking a s s e ts s e e AS S ETPRO
tra cking inve ntory s e e INVPRO
TRACKPRO 3-32 to 3-53
starting 3-23
tra ns fe rring da ta 5-71 to 5-84
from a Macintosh 5-81 to 5-82
from a UNIX workstation 5-83 to 5-84
153
Index
from the DOS command line 5-80
from Windows 5-73 to 5-79
turning the porta ble on a nd off 3-19, 3-53
MACTFER 5-72, 5-81 to 5-82
PDTFER 5-72, 5-80
PTFER 5-72, 5-73 to 5-79
updtfer 5-72, 5-83 to 5-84
utilitie s for progra mming 4-59 to 4-62
U
Unive rs a l Product Code (UPC)
conversion options 4-66, A-89
extensions 4-66
bar codes for G-138
programming parameters for A-89
see also UPC-A and UPC-E
UNIX works ta tions , tra ns fe rring da ta
from 5-83 to 5-84
UPC-A
bar codes for G-135 to G-136
converting from UPC-E 4-66, A-89
converting to EAN-13 4-66, A-89
programming parameters for A-89
UPC-E
bar codes for G-136
converting to UPC-A 4-66, A-89
programming parameters for A-89
updtfe r 5-72, 5-83 to 5-84
uploa ding da ta 3-49 to 3-52, 5-74 to 5-75
utilitie s
154
V
ve rs ion numbe r, dis pla ying
virtua l dis pla y 2-13 to 2-15
2-15
W
Windows , tra ns fe rring da ta from
5-73 to 5-
79
X
Xmode m protocol 4-68
Xon/Xoff 4-68
programming parameters for
A-91
PT2000 & Top Gun
Index
Z
“za p” cha ra cte r
User’s Guide
B-94
155
DECLARATION OF CONFORMITY
PSC Inc. hereby declares that the equipment specified below
has been tested and found compliant to the following directives and standards –
Directives:
EMC 89/336/EEC
Low Voltage 73/23/EEC
R&TTE 1999/5/EC
Standards
Equipment: EN 55022-A&B:1994/1998, EN 50082-1:1992/1998
EN 55024:1998, EN 60825-1:1996, EN 60950:1998
Power Supplies:
EN 55014-1/2:1993/1997, EN 61558-1:1997
EN 61558-2-6:1997
Radios: ETS 300 328:1995/1996, EN 300 826:1997
EN 301.489.1/17:2000, EN 60950:1992+A4
Equipment Type:
Product:
Portable Data Terminal Equipment
Falcon Family Models 31X, 32X, 33X, 34X, 51X, Single
Dock Station, 4-Slot Dock Station, and PT2000
Al Eckerdt
Director, Corporate Quality
PSC, Inc.
959 Terry Street
Eugene, OR 97402
U.S.A.
Peter Lomax
Vice President
Europe, Middle East & Africa
PSC Bar Code Ltd.
Axis 3, Rhodes Way
Watford
Hertfordshire WD24 4TR
UK
Asia Pacific
PSC Hong Kong
Hong Kong
Telephone: [852]-2-584-6210
Telefax: [852]-2-521-0291
Italy
PSC S.r.l.
Vimercate (MI), Italy
Telephone: [39] (0) 39/62903.1
Telefax: [39] (0) 39/6859496
Australia
PSC Asia Pacific Pty Ltd.
North Ryde, Australia
Telephone: [61]0(2)9878 8999
Telefax: [61]0(2)9878 8688
Japan
PSC Japan K.K.
Shinagawa, Tokyo, Japan 141-0031
Telephone: [81] (0)3 3491 6761
Telefax: [81] (0)3 3491 6656
France
PSC Sarl
LES ULIS Cedex, France
Telephone: [33] .01.64.86.71.00
Telefax: [33] .01.64.46.72.43
Latin America
PSC S.A., INC.
Miami, Florida, USA
Telephone: (305) 539-0111
Telefax: (305) 539-0206
Germany
PSC GmbH
Darmstadt, Germany
Telephone: [49] (0) 61 51/93 58 0
Telefax: [49] (0) 61 51/93 58 58
United Kingdom
PSC Bar Code Ltd.
Watford, England
Telephone: [44] (0) 1923 809500
Telefax: [44] (0) 1923 809 505
www.pscnet.com
Corporate Headquarters
Portland, OR, USA
Telephone: (503) 534-3553
Telefax: (503) 534-3555
©2002 PSC INC.
PSC Inc.
959 Terry Street
Eugene, OR 97402-9150
Telephone: (541) 683-5700
Telefax: (541) 686-1702
R44-2249 (Rev B)
7/02