1
HARDWARE HOOKUP
OPERATION
Connections for power, Cresnet, and shades or drapes must be made prior to installation.
Power Hookup
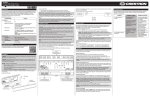
AC power is connected to the three pigtail leads as shown in the following illustration.
AC Hookup Connections for the C2N-SDC
The C2N-SDC front panel can be used for local control and Net ID setup. Refer to the
following illustration for details.
C2N-SDC Operation
Grommet
Holes for
Motor Control
Cables
The 3-wire ac pigtail
exits from the back of
the C2N-SDC.
Motor
Controls 1
Motor
Controls 2
Cable secures the
pigtail to the rear of the
C2N-SSDC.
Cresnet
Connectors
3-Wire AC Pigtail Wire Colors
Ground - Green with Yellow Stripe
Hot - Black
Neutral - White
SETUP LED and Push
Button to Set Net ID
Using Crestron Toolbox
Power Indicator LED
(Indicates power received
from Cresnet)
NET Indicator LED
(Indicates unit identified
in program)
TROUBLESHOOTING
AC Wiring to Breaker
NOTE: All wiring must be installed in accordance with all local and national electrical
codes.
Shade or Drape Motor Hookup
Pass the shade or drape motor cable through the nylon cable clamp (supplied, refer to
“Installation”) and through the hole in the front of the C2N-SDC. Connect the shade or
drape motor cable as shown in the following illustration.
C2N-SDC Connections
Common (Neutral)
The following table provides corrective action for possible trouble situations. If further
assistance is required, please contact a Crestron customer service representative.
C2N-SDC Troubleshooting
TROUBLE
The green PWR LED
does not illuminate.
The yellow NET LED
does not illuminate.
Up
Ground
The shade or drape
does not respond.
Down
POSSIBLE CAUSE(S)
CORRECTIVE ACTION
An incorrect power
supply is being used.
Use a Crestron power
supply.
The device is not
receiving power.
Verify that the cables
plugged into the NET ports
are secure.
There is an improper
Net ID on the device or
program.
Verify that the C2N-SDC’s
Net ID matches the Net ID in
the control system program.
There is a loose
network connection.
Verify that the cable plugged
into the NET port is secure.
A fault exists in the ac
wiring.
Check the wiring.
A fault exists with the
shade or drape.
Verify that the shade or drape
upper and lower limits are set
properly. Refer to the shade
or drape manufacturer's
instructions.
Motor Cable
Product warranty can be found at www.crestron.com/warranty.
The specific patents that cover Crestron products are listed at patents.crestron.com.
NOTE: The power wires are not shown in this illustration for clarity.
Crestron, the Crestron logo, Cresnet, and Crestron Toolbox are either trademarks or registered
trademarks of Crestron Electronics, Inc. in the United States and/or other countries. Other trademarks,
registered trademarks, and trade names may be used in this document to refer to either the entities
claiming the marks and names or their products. Crestron disclaims any proprietary interest in the
marks and names of others. Crestron is not responsible for errors in typography or photography.
This document was written by the Technical Publications department at Crestron.
©2014 Crestron Electronics, Inc.