1
%&)"-CTCQMG"5[UVGO
www.radioshack.com™
YKVJ"$WKNV/KP"9Q"/QPKVQT
OWNER’S MANUAL —
Please read before using this equipment.
Cat. No. 32-1174 A
%106'065
Important Safety Instructions ........ 2
Features ........................................ 5
A Quick Look at Your System ....... 7
Connections .................................. 9
Connecting Microphones ........... 9
Connecting an Optional
Audio Component ...................... 9
Connecting an Optional
Video Component ...................... 9
Connecting to Power .................. 10
Connecting an
External Speaker ..................... 10
Connecting a Stereo VCR ....... 10
Singing Along .............................. 10
With a CDG/CD
or Cassette Tape ..................... 11
With an Optional
Audio Component .................... 12
CDG or CD Operation ................. 12
Playing a CDG or CD .............. 12
Program Play ........................... 14
Cassette Deck Operation ............ 15
Recording Your
Voice with Music ...................... 15
Troubleshooting .......................... 16
Care ............................................ 17
Cleaning the
Tape-Handling Parts ................ 17
Specifications .............................. 18
Optional Accessories ............... 18
#"+/2146#06"#
If an icon appears at the end of a paragraph, go to the box on that page
with the corresponding icon for pertinent information.
— Warning
R
. ý— Caution
# — Important
° — Hint
± — Note
© 2002 RadioShack Corporation.
All Rights Reserved.
RadioShack and RadioShack.com
are trademarks used by
RadioShack Corporation.
Important Safety Instructions
WARNING: To reduce the risk of fire or shock hazard, do not expose
this product to rain or moisture.
R
"9#40+0)"
•
•
R
CAUTION
"
This system employs a laser
light beam. Only a qualified
service person should remove
the cover or attempt to service
this device, due to possible eye
injury.
RISK OF ELECTRIC SHOCK. DO NOT
OPEN.
CAUTION: TO REDUCE THE RISK OF ELECTRIC SHOCK, DO
NOT REMOVE COVER OR BACK. NO USER-SERVICEABLE
PARTS INSIDE. REFER SERVICING TO QUALIFIED PERSONNEL.
This symbol is intended to alert you to the
presence of uninsulated dangerous voltage
within the product’s enclosure that might be of
sufficient magnitude to constitute a risk of
electric shock. Do not open the product’s
case.
The use of controls,
adjustments, or procedures
other than those specified
herein might result in
hazardous radiation exposure.
!
."%#76+10".
•
•
This compact disc player is
classified as a CLASS 1 LASER
product, and the CLASS 1
LASER PRODUCT label is
located on the rear panel.
Invisible laser radiation when
open and inter locks defeated.
Avoid exposure to beam.
±"016'"±"
Most material on compact discs
and prerecorded tapes is
copyrighted. Unauthorized
duplication of copyrighted material
is a violation of the copyright laws
of most countries and such
duplication may result in fines and/
or imprisonment. Note, however,
that in the United States, it is not a
violation of U.S. copyright laws for
a consumer to use an audio
recording device to duplicate
personally-owned musical
recordings for noncommercial
(personal) use.
2
!
This symbol is intended to inform you that
important operating and maintenance
instructions are included in the literature
accompanying this product.
The graphical symbols with supplemental markings are located
on the back of the product.
This CD player is made and tested to meet exacting safety
standards. It meets FCC requirements and complies with
safety performance standards of the U.S. Department of
Health and Human Services.
.#±
Rý
THE FCC WANTS YOU TO KNOW
This device complies with Part 15 of the FCC Rules.
Operation is subject to the following two conditions: (1) this
device may not cause harmful interference, and (2) this
device must accept any interference received, including
interference that may cause undesired operation.
+/2146#06"5#('6;"
+05647%6+105
1. Read Instructions — All the safety and operating
instructions should be read before the product is
operated.
2. Retain Instructions — The safety and operating
instructions should be retained for future reference.
3. Heed Warnings — All warnings on the product and in
the operating instructions should be adhered to.
4. Follow Instructions — All operating and use
instructions should be followed.
5. Water and Moisture — Do not use this product near
water (for example, near a bath tub, wash bowl, kitchen
sink, or laundry tub; in a wet basement; or near a
swimming pool; and the like).
6. Ventilation — Slots and openings in the cabinet are
provided for ventilation and to ensure reliable operation
of the product and to protect it from overheating, and
these openings must not be blocked or covered. The
openings should never be blocked by placing the
product on a bed, sofa, rug, or other similar surface.
This product should not be placed in a built-in
installation such as a bookcase or rack unless proper
ventilation is provided or the manufacturer’s
instructions have been adhered to.
7. Heat — The product should be situated away from heat
sources such as radiators, heat registers, stoves, or
other products (including amplifiers) that produce heat.
8. Power-Cord Protection — Power-supply cords should
be routed so that they are not likely to be walked on or
pinched by items placed upon or against them, paying
particular attention to cords at plugs, convenience
receptacles, and the point where they exit from the
product.
9. Attachments — Do not use attachments not
recommended by the product manufacturer as they
may cause hazards.
10. Accessories — Do not place this product on an
unstable cart, stand, tripod, bracket, or table. The
product may fall, causing serious injury to a child or
adult, and serious damage to the product. Use only with
a cart, stand, tripod, bracket, or table recommended by
the manufacturer, or sold with the product. Any
mounting of the product should follow the
manufacturer’s instructions, and should use a mounting
accessory recommended by the manufacturer.
A product and cart combination should be
moved with care. Quick stops, excessive
force, and uneven surfaces may cause
the product and cart combination to
overturn.
3
11. Lightning — For added protection for this product
during a lightning storm, or when it is left unattended
and unused for long periods of time, unplug it from the
wall outlet and disconnect the antenna or cable system.
This will prevent damage to the product due to lightning
and power-line surges.
12. Power Lines — An outside antenna system should not
be located in the vicinity of overhead power lines or
other electric light or power circuits, or where it can fall
into such power lines or circuits. When installing an
outside antenna system, extreme care should be taken
to keep from touching such power lines or circuits as
contact with them might be fatal.
13. Servicing — Do not attempt to service this product
yourself as opening or removing covers may expose
you to dangerous voltage or other hazards. Refer all
servicing to qualified service personnel.
14. Damage Requiring Service — Unplug this product
from the wall outlet and refer servicing to qualified
service personnel under the following conditions: a)
When the power-supply cord or plug is damaged, b) If
liquid has been spilled, or objects have fallen into the
product, c) If the product has been exposed to rain or
water, d) If the product does not operate normally by
following the operating instructions. Adjust only those
controls that are covered by the operating instructions
as an improper adjustment of other controls may result
in damage and will often require extensive work by a
qualified technician to restore the product to its normal
operation, e) If the product has been dropped or
damaged in any way, and f) When the product exhibits
a distinct change in performance — this indicates a
need for service.
15. Overloading — Do not overload wall outlets, extension
cords, or integral convenience receptacles as this can
result in a risk of fire or electric shock.
16. Object and Liquid Entry — Never push objects of any
kind into this product through openings as they may
touch dangerous voltage points or short-out parts that
could result in a fire or electric shock. Never spill liquid
of any kind on the product.
17. Replacement Parts — When replacement parts are
required, be sure the service technician has used
replacement parts specified by the manufacturer or
have the same characteristics as the original part.
4
Unauthorized substitutions may result in fire, electric
shock, or other hazards.
Features
18. Safety Check — Upon completion of any service or
repairs to this product, ask the service technician to
perform safety checks to determine that the product is
in proper operating condition.
19. Wall or Ceiling Mounting — The product should be
mounted to a wall or ceiling only as recommended by
the manufacturer.
20. Power Sources — This product should be operated
only from the type of power source indicated on the
marking label. If you are not sure of the type of power
supply to your home, consult your product dealer or
local power company. For products intended to operate
from battery power, or other sources, refer to the
operating instructions.
21. Cleaning — Unplug this product from the wall outlet
before cleaning. Do not use liquid cleaners or aerosol
cleaners. Use a damp cloth for cleaning.
22. Grounding or Polarization — This plug will fit into the
power outlet only one way. This is a safety feature. If
you are unable to insert the plug fully into the outlet, try
reversing the plug. If the plug should still fail to fit,
contact your electrician to replace your obsolete outlet.
Do not defeat the safety purpose of the polarized plug.
23. Outdoor Antenna Grounding — If an outside antenna
or cable system is connected to the product, be sure
the antenna or cable system is grounded so as to
provide some protection against voltage surges and
built-up static charges. Article 810 of the National
Electrical Code, ANSI/NFPA 70, provides information
with regard to proper grounding of the mast and
supporting structure, grounding of the lead-in wire to an
antenna discharge unit, size of grounding conductors,
location of antenna-discharge unit, connection to
grounding electrodes, and requirements for the
grounding electrode.
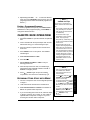
('#674'5
This unit is designed to play CD’s bearing the Sýlogo. If
CD’s do not conform to the CD standard, they may not play
properly.
5
Your RadioShack CDG Karaoke System is one of the most
versatile karaoke systems available. It lets you be the “star”
as you sing along with your favorite recordings on a CD,
CDG (a compact disc with a graphic track), or cassette tape,
and hear your voice with the music through the powerful
built-in speaker.
The karaoke system’s CDG capability is the latest
advancement in karaoke technology. Its built-in 7-inch
monitor lets you read the lyrics.
You can sing along without video graphics using special
karaoke audio cassette tapes (not supplied) and the CD
disks (such as the supplied CDG demo disk) that let you
balance the volume of the original singer’s voice and the
music tracks. Or, you can sing along with a regular prerecorded cassette tape or CD (not supplied).
±"016'"±"
Additional karaoke CDs, audio
cassettes, and video cassettes are
available at your local RadioShack
store or online at
www.radioshack.com.
Plus, your karaoke system can be
used as a PA system for speaking
at parties or other small gatherings.
You can also connect another audio source to the karaoke
system, such as a stereo VCR, and play a karaoke video
cassette (not supplied). ±
CDG/CD Player — play regular or karaoke CDs, or special
CDGs, so you can experience digital images. Plus, the
player’s 1-bit D/A converter and 8 times oversampling
produce high quality sound.
8-Watt Output Power — sing along and listen through one
of the biggest amps offered in a karaoke system, including a
5” full range speaker and a 2” tweeter.
Cassette Deck — plays cassette tapes.
Auto-Stop — automatically stops a tape when it finishes
playing or recording to protect the tape and tape-handling
parts.
Automatic Search — quickly locate and play any track on
the loaded CDG/CD.
Audible Search — quickly locate a particular section of
track while playing a CD.
Supplied CDG Disc — lets you sing along with the music
and adjust the volume of the pre-recorded voice and music.
Recording — record your voice as you sing along with a
CDG/CD or an external audio source connected to the
system.
Built-In Speaker — share the music with your family or
friends.
6
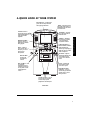
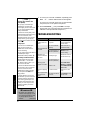
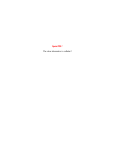
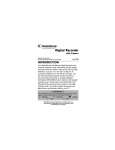
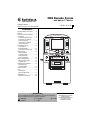
#"37+%-".11-"#6";174"5;56'/
Built-In Monitor — Displays the
lyrics with the tempo of music
when playing CDG discs.
CDG/CD Controls —
Use to play, pause, skip
forward or backward, or
stop CD and CDG
playback.
INTRO — Plays the first 10
seconds of each track on a
CDG/CD to help you locate
a certain track.
REPEAT — Repeats a
single track, all tracks,
or a programmed
sequence of tracks.
MASTER VOLUME —
Controls volume of
CDG/CD and cassette
being played.
FUNCTION SELECT —
Slide to CDG/CD, TAPE, or
AUX, depending on
whether you are playing a
CDG, CD, tape, or another
audio component.
ECHO — Adds an
echo (concert hall
effect) to your voice
when using a
microphone.
BALANCE — Adjusts
the balance between the
prerecorded original
singer’s voice and the
music.
MIC VOLUME —
Controls the
microphone’s
volume.
MIC 1 and MIC 2 — Use
the supplied
microphone and an
optional microphone
to sing duets or lead
and background
vocals.
PITCH — Adjusts the
tape speed to match
your voice’s pitch.
AUTOMATIC VOICE
CONTROL— Lets you
replace the pre-recorded
original singer’s voice
with your voice.
Cassette Controls — Use to
record, play, fast-forward,
rewind, stop or pause
playback of cassette tapes.
Front View
RadioShack Corporation
Fort Worth, Texas 76102
Cat. No. 32-1174 A
08A02
Printed in China7
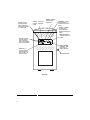
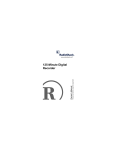
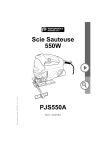
A Quick Look at Your System
PROGRAM — Program
up to 19 CD tracks in a
selected order.
AUX IN L and R —
Connects another
audio input source,
such as a stereo VCR
or a radio tuner.
VIDEO IN — Connects
to another video input
source.
BRIGHT — Adjusts
monitor picture
brightness.
CONTRAST — Adjust
when the picture
contrast is too weak or
strong.
V-HOLD — Adjusts
monitor picture
appearance to be
steady (no rolling up or
down).
MONITOR ON/OFF —
Turns the monitor on
and off.
AUX OUT L and R —
Connects another
audio component,
such as an equalizer/
amp or a PA system.
RIGHT CHANNEL
OUTPUT 8Ω 15W —
Connect to an
external speaker.
VIDEO OUT —
Connects another
video component,
such as a TV or an
external monitor.
Microphone Holder
Rear View
RadioShack Corporation
Fort
8 Worth, Texas 76102
Cat. No. 32-1174 A
08A02
Printed in China
%100'%6+105
R
%100'%6+0)"/+%412*10'5
The system has two microphone jacks, MIC 1 and MIC 2.
Use the supplied microphone to sing along with your
favorite recordings, and connect an optional microphone
(not supplied) for duets or lead and background vocals. For
the best performance, the additional microphone should be
a unidirectional 600-ohm dynamic microphone with a
1/4-inch (6.35-mm) plug and an ON/OFF switch. Your local
RadioShack store has a wide selection of microphones.
"9#40+0)"
R
"
To avoid electrical shock, do not
connect the system to AC power
until all other connections are
complete.
Rý
1. Set MASTER VOLUME to MIN.
2. If you are connecting only one microphone, plug it into
MIC 1.
If you are connecting a second microphone, plug it into
MIC 2.
3. To store the microphone, pull down the built-in
microphone holder and place the microphone in the
holder’s grip.
Connections
When a microphone is plugged into MIC 1 or MIC 2, the
system mixes the microphone output with recorded music
from cassette tapes, CDs, or CDGs.
%100'%6+0)"#0"126+10#."
#7&+1"%1/210'06
To sing along with music from an optional component (such
as a tuner, A/V receiver, or VCR), connect the component’s
audio output jacks to the system’s AUX IN R and L jacks.
To hear your voice and music from the system through an
optional component (such as equalizer/booster or PA
system), connect the component’s audio input jacks to the
system’s AUX OUT R and L jacks.
%100'%6+0)"#0"126+10#."
8+&'1"%1/210'06
To see images on the karaoke screen from an optional
video component (such as a VCR or DVD player), plug one
end of the supplied cable into VIDEO IN and the other end
into the video component’s video output jack.
9
±"016'"±"
•
If your television or optional
monitor does not have the
required video input/output jack,
you might need a radio
frequency modulator (not
supplied).
•
You must change your TV or
optional monitor’s source
selection to AUX IN or VIDEO
IN when connecting your
karaoke system to an AUX IN or
VIDEO IN. Refer to your TV or
optional monitor’s instructions
manual for details.
To see the words from a CDG on a TV or optional monitor,
plug one end of the supplied yellow RCA cable into VIDEO
OUT and the other end into your TV or monitor’s video input
jack. You can only view video from the karaoke system on
the connected TV; you cannot view video from another
optional video component. ±
%100'%6+0)"61"219'4
When you have made all other connections, plug your
system’s power cord into a standard AC outlet.
%100'%6+0)"#0"':6'40#."52'#-'4
If you want to connect an external speaker (not supplied),
connect a speaker to the RIGHT CHANNEL OUTPUT 8Ω 15W
jack on the back of the system. The external speaker should
have an impedance no less than 8 ohms and be able to
handle 15 watts.
%100'%6+0)"#"56'4'1"8%4
Connect a stereo VCR’s left and right audio output (AUX
OUT) to the system’s AUX IN L and R jacks.
Connect a VCR’s video out to the Karaoke’s VIDEO IN jack.
Connecting to Power
5+0)+0)"#.10)
1. Press POWER to turn on the system. The POWER
indicator lights.
2. If you play a CDG or CD, slide FUNCTION SELECT to
CDG/CD.
If you play a cassette tape, slide FUNCTION SELECT to
TAPE.
If you connect an optional audio component, slide
FUNCTION SELECT to AUX.
10
9+6*"#"%&)1%&"14"%#55'66'"6#2'
1. Plug a microphone into MIC 1 or MIC 2.
2. Press POWER to turn on the system. The POWER
indicator lights.
3. Load a CDG/CD in the CD compartment or a cassette
tape in the cassette compartment. If you play a CDG,
turn on the monitor by sliding MONITOR on the back of
the system to ON. The monitor automatically displays
words.
4. Turn BRIGHT, CONTRAST, and V-HOLD on the back of
the system to adjust the picture as necessary.
5. Slide FUNCTION SELECT to CDG/CD or TAPE.
6. Press PLAY/PAUSE « or .PLAY.
7. Adjust MASTER VOLUME to the desired level.
8. Slide the microphone’s ON/OFF switch to ON and rotate
MIC VOLUME to adjust its volume.
9. Speak or sing into the microphone, while adjusting
ECHO for the desired voice effects.
10. Adjust TONE for the desired effects.
11. If you are playing a tape, rotate PITCH so the pitch of
music matches your voice.
If you are using a karaoke cassette tape or CDG/CD,
rotate AUTO VOICE CONTROL so that the prerecorded
voice is replaced with your voice.
Also rotate BALANCE to adjust the levels between the
prerecorded singer’s voice and the music. Rotate
BALANCE toward MUSIC to hear the music, or toward
VOICE to hear the prerecorded singer’s voice. ±
12. Press STOP * to stop playing the CDG/CD. Then press
¬ýOPEN/CLOSE to open the compartment door and
remove the CDG/CD.
±"016'"±"
AUTO VOICE CONTROL and
BALANCE have no effect on a
regular (non-karaoke) pre-recorded
cassette tape.
Press ªýSTOP/EJ. to stop playing a tape. Press ªý
STOP/EJ. again to open the compartment door and
remove the cassette tape.
13. Slide the microphone’s ON/OFF switch to OFF, and slide
MONITOR ON/OFF on the back of the system to OFF.
14. Press POWER to turn off the system.
11
9+6*"#0"126+10#."#7&+1"
%1/210'06
1. If you are connecting only one microphone, plug it into
MIC 1.
If you are connecting a second microphone, plug it into
MIC 2.
2. Press POWER to turn on the system. The POWER
indicator lights.
3. Slide MONITOR ON/OFF on the back of the system to
ON.
4. Turn BRIGHT, CONTRAST, and V-HOLD on the back of
the system to adjust the picture as necessary.
5. Slide FUNCTION SELECT to AUX.
6. Turn on the audio component. If you are using a VCR,
load and play a video cassette.
7. Rotate MASTER VOLUME to the desired level.
8. To hear your voice with the music, slide the
microphone’s ON/OFF to ON and rotate MIC VOLUME to
adjust its volume.
9. Speak or sing into the microphone. If needed, rotate
ECHO to get desired voice effects.
10. Rotate TONE to the desired setting.
11. When you finish singing, slide ON/OFF on the
microphone to OFF.
12. Slide MONITOR ON/OFF on the back of the system to
OFF.
CDG or CD Operation
13. Press POWER to turn off the system, then turn off the
audio component.
%&)"14"%&"12'4#6+10
2.#;+0)"#"%&)"14"%&"
1. Press POWER to turn on the system. The power
indicator lights.
2. Slide FUNCTION SELECT to CDG/CD.
12
3. If you are playing a CDG, slide MONITOR on the back of
the system to ON.
4. Press ¬ýOPEN/CLOSE to open the CDG/CD door.
5. Place a CDG/CD in the compartment tray over the
center hub, label side up.
6. Press ¬ýOPEN/CLOSE again to close the CDG/CD
compartment. &ý&ýthen the CDG/CD’s total number of
tracks appear on the CDG/CD DISPLAY.
7. Press PLAY/PAUSE «. The PLAY/PAUSE indicator
lights and the CDG/CD begins to play track 1. The CDG
indicator lights when a CDG is playing, and the words
to the song appear on the monitor.
8. Adjust MASTER VOLUME and TONE to the desired level.
9. To temporarily stop play, press PLAY/PAUSEý«. The
PLAY/PAUSE indicator flashes. To resume play, press
PLAY/PAUSE «again.
10. The system automatically stops play at the end of the
CDG/CD’s last track. To stop it sooner, press STOP. ±
5MKRRKPI"6TCEMU
±"016'"±"
Do not apply excessive force to the
CDG/CD door, or press the door
while a CDG/CD is playing.
You can skip up or down to the desired track by pressing
SKIP % or &. To play the selected track, press PLAY/
PAUSEý«.
5GCTEJ"2NC["*(QT"%&"1PN[+
Hold down SKIP % or & to search rapidly forward or
backward during play. The CD plays rapidly and you hear
the sound at a high speed.
4GRGCV"2NC[
To repeat the current track while a CD is playing, press
REPEAT once, the REPEAT indicator flashes. To cancel
repeat, press REPEAT twice. The REPEAT indicator turns
off.
To repeat all the tracks while a CD is playing, press REPEAT
twice, the REPEAT indicator turns on.
To cancel repeat, press REPEAT again, the REPEAT
indicator turns off.
+PVTQ"5ECP
You can set the system to play the first 10 seconds of each
track so you can quickly find the one you want.
13
To start intro scan from the first track, press PLAY/PAUSE
«. Then press INTRO when the disk is stopped.
±"016'"±"
Intro Scan
•
•
To exit intro scan, you must
press INTRO again, open the
CD compartment, or turn off the
karaoke system.
You can use repeat play during
intro scan.
Program Play
•
•
You can program up to 19
tracks. When the 19th track is
programmed, ¶ý¶ýflashes and
you cannot program more
tracks.
You can use intro scan and
repeat play during program
play.
To start intro scan while a CD is playing, press INTRO during
the first 10 seconds of play to start intro scan from the
current track. Press INTRO after the first 10 seconds of play
to start intro scan at the beginning of the next track.
The system stops after the last track is scanned. Press
INTRO to exit intro scan. To stop scanning while a CD is
playing, press INTRO and the system resumes normal play
with the current track. ±
241)4#/"2.#;
You can program the CDG/CD player to play up to 19 tracks
in any order you choose. You can program the same track
to play more than once.
1. Press STOP *. The PLAY/PAUSE indicator turns off.
2. Press PROGRAM. The PROGRAM indicator and &
flash.
3. Press SKIP % or & to select the desired track. The
selected track number and the PROGRAM indicator
flash.
4. Press PROGRAM to store the selected track, the
PROGRAM indicator and 0 continue flashing.
5. Repeat Steps 3 and 4 to program up to 19 tracks. ±
6. Press PLAY/PAUSE «ýto play the programmed tracks.
The first track number you selected appears on the
display and the PROGRAM indicator continues to flash.
7. Program play automatically stops at the end of the last
programmed track. To stop program play sooner, press
STOP *. If you press STOP * during programming, you
exit the programming mode, and all programmed tracks
are lost.
4GXKGYKPI14GRNCEKPI"C"
2TQITCOOGF"5GSWGPEG
1. While play is stopped, repeatedly press PROGRAM to
review the programmed track numbers.
2. To replace a programmed track, repeatedly press
PROGRAM until the desired programmed track number
flashes. The PROGRAM indicator continues to flash.
14
3. Repeatedly press SKIP % or & to select the desired
track, then press PROGRAM to store the track. The next
programmed track number automatically appears and
flashes. °
'TCUKPI"C"2TQITCOOGF"5GSWGPEG
°"*+06"°"
%&)1%&"%CTG"6KRU
Even though a compact disc is
durable, treat the CD surface with
care.
To erase a programmed sequence, press OPEN/CLOSE or
STOP before or after programmed play, press POWER, or
change the selected function.
•
Do not write on either side of the
CD, particularly the non-label
side (signals are read from the
non-label side).
%#55'66'"&'%-"12'4#6+10
•
1. Press ªýSTOP/EJ. to open the cassette compartment
door.
Do not store CDs in high
temperature or high humidity
areas. They might warp.
•
2. Insert a cassette with the exposed tape down and the
desired side facing you. Avoid touching the tape.
Keep CDs dry. A water drop can
act as a lens and affect the laser
beam's focus.
•
Always handle a CD by the
edges to avoid fingerprints and
always keep it in its protective
case or sleeve when it is not in
use. Fingerprints and scratches
on the CD's surface can prevent
the laser beam from correctly
reading the digital information. If
the CD gets scratched, use
RadioShack Scratch 'n Fix to
repair the disc.
•
Use only normal bias tapes in
the cassette deck. Metal or
high-bias type tapes are not
recommended.
•
To temporarily stop play, press
PAUSE f. Press PAUSE fý
again to resume play.
•
To rapidly wind the tape forward
or backward, press + FFWD
or "ýREW. Press ªýSTOP/
EJ. when you reach the desired
section.
•
To record, press ç REC. When
ç REC is pressed, .PLAY
automatically is pressed. Press
ªýSTOP/EJ. to stop
recording.
3. Push the cassette compartment door closed until it
clicks shut.
4. Press POWER to turn on the system. The POWER
indicator lights.
5. Slide FUNCTION SELECT to TAPE.
6. Press PLAY ..
7. Rotate MASTER VOLUME and TONE to suit your
listening preferences.
9. Press ªýSTOP/EJ. again to open the cassette
compartment, then remove the cassette tape. ±
±"016'"±"
4'%14&+0)";174"81+%'"9+6*"/75+%
1. Connect a microphone. See “Connecting Microphones”
on Page 9.
2. Load a blank audio cassette in the cassette deck.
3. Slide FUNCTION SELECT to CDG/CD for a CDG/CD or
AUX for an optional audio component.
4. If you are recording with a CDG or CD, follow the steps
in “Playing a CDG or CD” on Page 12 . See “With an
Optional Audio Component” on Page 12 if you are
recording from another audio component.
15
Cassette Deck Operation
8. When the tape reaches its end, the cassette deck
automatically stops and PLAY releases. Press ªý
STOP/EJ. to stop play sooner.
°"*+06"°"
4GUVQTKPI"6CRG"6GPUKQP"CPF"
5QWPF"3WCNKV[
After you play a cassette tape
several times, the tape might
become tightly wound on the reels.
This can cause playback sound
quality to deteriorate.
To restore the sound quality, fastforward the tape from the beginning
to the end of one side, then
completely rewind it. Then loosen
the tape reels by gently tapping
each edge of the cassette on a flat
surface. .
'TCUKPI"6CRGU
To record over a cassette tape,
simply record as usual. The
cassette deck records over the
previous recording.
You can quickly erase both sides of
a cassette tape using a
RadioShack bulk tape eraser. ±
2TGXGPVKPI"#EEKFGPVCN"'TCUWTG
Cassette tapes have two eraseprotection tabs — one for each
side. When a tab is in place, you
can record on that side.
To prevent accidental erasure of a
tape recording, use a screwdriver
to remove one or both of the
cassette tape’s erase-protection
tabs. This prevents çREC from
being pressed.
Troubleshooting
If you later decide to record on a
tape side after you have removed
the erase-protection tab, place a
piece of strong plastic tape over
that side’s erase-protection hole.
Be sure you cover only the hole
originally covered by the eraseprotection tab
."%#76+10".
•
16
Be careful not to damage the
cassette when tapping it. Do not
touch the exposed tape or allow
any sharp objects near the
cassette.
(Continued)
5. To record your voice with a CDG/CD, repeatedly press
SKIP %ýor & until the desired track number appears.
To record your voice with music from an optional audio
component, turn on the optional component.
6. Press PLAY/PAUSE «, then press çREC. The tape
deck records your voice along with the sound from the
CDG/CD or the optional audio component. °
6417$.'5*116+0)
2TQDNGO
The karaoke
system does not
work.
2QUUKDNG"%CWUG
No power.
Disc is not inserted
correctly.
Make sure disc is
inserted correctly.
CD PLAYER does
not work.
Incorrect function is
selected (CDG/CD).
Moisture has
formed inside the
CD deck.
5QNWVKQP
Make sure the power
plug is inserted into
the AC outlet.
Humidity is high.
Slide FUNCTION
SELECT to the
correct setting.
Wait about 20 to 30
minutes to let it dry.
Incorrect function is
selected (CDG/CD).
No song lyrics
appear on screen.
Picture is jumping
up.
Monitor is off.
Slide FUNCTION
SELECT to CDG/CD.
Slide MONITOR ON/
OFF to ON.
V. hold not tuned.
Adjust the V. hold
knob.
CD only plays first
Intro scan function is
10 seconds of
turned on.
track.
Press INTRO to turn
off intro scan.
%#4'
."%#76+10".
(Continued)
Removing the erase-protection
tabs does not prevent a bulk eraser
from erasing a cassette tape.
Modifying or tampering with the system’s internal
components can cause a malfunction and might invalidate
its warranty and void your FCC authorization to operate it. If
your system is not performing as it should, take it to your
local RadioShack store for assistance.
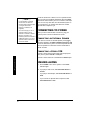
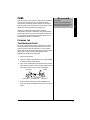
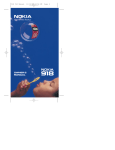
%.'#0+0)"6*'"
6#2'/*#0&.+0)"2#465
Dirt, dust or particles of the tape's coating can accumulate
on the tape heads and other parts that the tape touches.
This can greatly reduce the performance of the cassette
player. After every 20 hours of tape player operation, follow
these steps to clean the tape-handling parts or use a
RadioShack cassette deck cleaning kit.
1. Disconnect AC power.
2. Open the cassette compartment door and press PLAY
to expose the tape-handling parts.
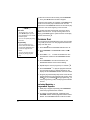
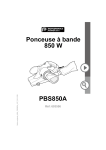
3. Use a cotton swab dipped in denatured alcohol or tape
head cleaning solution to clean the tape guides, record/
play head, erase head, pinch roller, and capstan.
Tape Guides
Erase Head
Record/Play Head
Capstan
Pinch Roller
4. When you finish cleaning, press ª STOP/EJ. and
close the cassette compartment door. Then reconnect
power.
17
Care
Keep the system dry; if it gets wet, wipe it dry immediately.
Use and store the system only in normal temperature
environments. Handle the system carefully; do not drop it.
Keep the system away from dust and dirt, and wipe it with a
damp cloth occasionally to keep it looking new.
52'%+(+%#6+105
Audio Section:
Output Power (Maximum) ................................................... 8 Watts
Output Impedance ..................................................................... 8 Ω
CD Player Section:
Frequency Response .............................. 20 Hz to 20 KHz (± 3 dB)
Signal–to–Noise Ratio ........................................................... 65 dB
Wow and Flutter ....................................................... Immeasurable
D-A Conversion ............................................................... 1-Bit DAC
Number of Programs ....... 20 Steps Random Access programming
Sampling System ........................................ 8 Times Oversampling
Cassette Deck Section:
Wow and Flutter ..................................................... 0.35% (WRMS)
Frequency Response ........................... 125 Hz to 6.3 KHz (± 5 dB)
Tape Speed ................................................................ 4.75 cm/sec.
AC Input Power ...................................................... AC 120V/60 Hz
Dimensions (H×W×D) ............................. 22.5 × 11.8 × 10.5 Inches
(571.5 × 299.7 × 266.7 mm)
Weight ................................................................................ 24.8 lbs
(11.3 kg)
Accessories: Pre-recorded Karaoke CD+G disc, AV Cable,
Dynamic Microphone
Specifications are typical; individual units might vary. Specifications
are subject to change and improvement without notice.
126+10#."#%%'5514+'5
Optional accessories, available at your local RadioShack
store or at www.radioshack.com, include microphones,
CD&G sets of musical hits, Karaoke cassettes, and extra
speakers.
18
Notes
016'5
19
Limited Ninety-Day Warranty
This product is warranted by RadioShack against manufacturing defects in material and workmanship under normal use for ninety (90) days from the date of purchase from RadioShack companyowned stores and authorized RadioShack franchisees and dealers. EXCEPT AS PROVIDED
HEREIN, RadioShack MAKES NO EXPRESS WARRANTIES AND ANY IMPLIED WARRANTIES,
INCLUDING THOSE OF MERCHANTABILITY AND FITNESS FOR A PARTICULAR PURPOSE,
ARE LIMITED IN DURATION TO THE DURATION OF THE WRITTEN LIMITED WARRANTIES
CONTAINED HEREIN. EXCEPT AS PROVIDED HEREIN, RadioShack SHALL HAVE NO LIABILITY OR RESPONSIBILITY TO CUSTOMER OR ANY OTHER PERSON OR ENTITY WITH RESPECT TO ANY LIABILITY, LOSS OR DAMAGE CAUSED DIRECTLY OR INDIRECTLY BY USE
OR PERFORMANCE OF THE PRODUCT OR ARISING OUT OF ANY BREACH OF THIS WARRANTY, INCLUDING, BUT NOT LIMITED TO, ANY DAMAGES RESULTING FROM INCONVENIENCE, LOSS OF TIME, DATA, PROPERTY, REVENUE, OR PROFIT OR ANY INDIRECT,
SPECIAL, INCIDENTAL, OR CONSEQUENTIAL DAMAGES, EVEN IF RadioShack HAS BEEN ADVISED OF THE POSSIBILITY OF SUCH DAMAGES.
Some states do not allow limitations on how long an implied warranty lasts or the exclusion or limitation of incidental or consequential damages, so the above limitations or exclusions may not apply to
you.
In the event of a product defect during the warranty period, take the product and the RadioShack
sales receipt as proof of purchase date to any RadioShack store. RadioShack will, at its option, unless otherwise provided by law: (a) correct the defect by product repair without charge for parts and
labor; (b) replace the product with one of the same or similar design; or (c) refund the purchase
price. All replaced parts and products, and products on which a refund is made, become the property of RadioShack. New or reconditioned parts and products may be used in the performance of
warranty service. Repaired or replaced parts and products are warranted for the remainder of the
original warranty period. You will be charged for repair or replacement of the product made after the
expiration of the warranty period.
This warranty does not cover: (a) damage or failure caused by or attributable to acts of God, abuse,
accident, misuse, improper or abnormal usage, failure to follow instructions, improper installation or
maintenance, alteration, lightning or other incidence of excess voltage or current; (b) any repairs
other than those provided by a RadioShack Authorized Service Facility; (c) consumables such as
fuses or batteries; (d) cosmetic damage; (e) transportation, shipping or insurance costs; or (f) costs
of product removal, installation, set-up service adjustment or reinstallation.
This warranty gives you specific legal rights, and you may also have other rights which vary from
state to state.
RadioShack Customer Relations, 200 Taylor Street, 6th Floor, Fort Worth, TX 76102
12/99
RadioShack Corporation
Fort Worth, Texas 76102
Cat. No. 32-1174 A
08A02
Printed in China