1
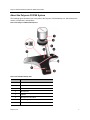
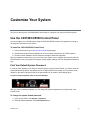
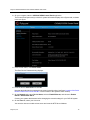
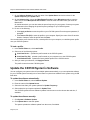
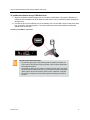
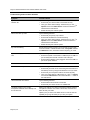
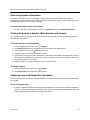
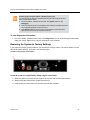
User Guide 1.0 | June 2014 | 3725-65974-001/E Polycom CX5100 Unified Conference Station Trademark Information POLYCOM® and the names and marks associated with Polycom's products are trademarks and/or service marks of Polycom, Inc., and are registered and/or common law marks in the United States and various other countries. All other trademarks are the property of their respective owners. Patent Information The accompanying product may be protected by one or more U.S. and foreign patents and/or pending patent applications held by Polycom, Inc. © 2014 Polycom, Inc. All rights reserved. Polycom, Inc. 6001 America Center Drive San Jose CA 95002 USA No part of this document may be reproduced or transmitted in any form or by any means, electronic or mechanical, for any purpose, without the express written permission of Polycom, Inc. Under the law, reproducing includes translating into another language or format. As between the parties, Polycom, Inc., retains title to and ownership of all proprietary rights with respect to the software contained within its products. The software is protected by United States copyright laws and international treaty provision. Therefore, you must treat the software like any other copyrighted material (e.g., a book or sound recording). Every effort has been made to ensure that the information in this manual is accurate. Polycom, Inc., is not responsible for printing or clerical errors. Information in this document is subject to change without notice. 2 Table of Contents About This Guide . . . . . . . . . . . . . . . . . . . . . . . . . . . . . . . . . . . . . . . . . . . . . . . . . . . 3 About Conventions Used in this Guide . . . . . . . . . . . . . . . . . . . . . . . . . . . . . . . . . . . . . . . . . . . 3 Understand Information Icons . . . . . . . . . . . . . . . . . . . . . . . . . . . . . . . . . . . . . . . . . . . . . . . 3 Understand Terms Used in this Guide . . . . . . . . . . . . . . . . . . . . . . . . . . . . . . . . . . . . . . . . 4 Understand Typographic Conventions . . . . . . . . . . . . . . . . . . . . . . . . . . . . . . . . . . . . . . . . 4 Get More Information . . . . . . . . . . . . . . . . . . . . . . . . . . . . . . . . . . . . . . . . . . . . . . . . . . . . . . . . . 4 Find Product Documentation . . . . . . . . . . . . . . . . . . . . . . . . . . . . . . . . . . . . . . . . . . . . . . . . 4 Use the Knowledge Base . . . . . . . . . . . . . . . . . . . . . . . . . . . . . . . . . . . . . . . . . . . . . . . . . . 5 Contact Technical and Solution Support . . . . . . . . . . . . . . . . . . . . . . . . . . . . . . . . . . . . . . . 5 Get Started . . . . . . . . . . . . . . . . . . . . . . . . . . . . . . . . . . . . . . . . . . . . . . . . . . . . . . . . . 6 Introduce the Polycom CX5100 System . . . . . . . . . . . . . . . . . . . . . . . . . . . . . . . . . . . . . . . . . . 6 About the Polycom CX5100 System . . . . . . . . . . . . . . . . . . . . . . . . . . . . . . . . . . . . . . . . . . 7 Set Up Your System Hardware . . . . . . . . . . . . . . . . . . . . . . . . . . . . . . . . . . . . . . . . . . . . . . . . . 8 Connect a Computer to the System . . . . . . . . . . . . . . . . . . . . . . . . . . . . . . . . . . . . . . . . . . 8 Power On and Off . . . . . . . . . . . . . . . . . . . . . . . . . . . . . . . . . . . . . . . . . . . . . . . . . . . . . . . . 9 Understanding the Indicator Lights . . . . . . . . . . . . . . . . . . . . . . . . . . . . . . . . . . . . . . . . . . . 9 First-time Startup . . . . . . . . . . . . . . . . . . . . . . . . . . . . . . . . . . . . . . . . . . . . . . . . . . . . . . . . . . . 10 Best Practices for Effective Camera Tracking . . . . . . . . . . . . . . . . . . . . . . . . . . . . . . . . . . . . . 10 Tips for Setting Up the Room . . . . . . . . . . . . . . . . . . . . . . . . . . . . . . . . . . . . . . . . . . . . . . 10 Tips for Meeting Participants . . . . . . . . . . . . . . . . . . . . . . . . . . . . . . . . . . . . . . . . . . . . . . . 10 Place and Answer Calls . . . . . . . . . . . . . . . . . . . . . . . . . . . . . . . . . . . . . . . . . . . . . 11 Place a Video Call . . . . . . . . . . . . . . . . . . . . . . . . . . . . . . . . . . . . . . . . . . . . . . . . . . . . . . . . . . 11 Answer a Call . . . . . . . . . . . . . . . . . . . . . . . . . . . . . . . . . . . . . . . . . . . . . . . . . . . . . . . . . . . . . 11 End Calls . . . . . . . . . . . . . . . . . . . . . . . . . . . . . . . . . . . . . . . . . . . . . . . . . . . . . . . . . . . . . . . . . 12 Control What You Hear . . . . . . . . . . . . . . . . . . . . . . . . . . . . . . . . . . . . . . . . . . . . . . . . . . . . . . 12 Control What the Far End Hears and Sees . . . . . . . . . . . . . . . . . . . . . . . . . . . . . . . . . . . . . . . 12 Customize Your System . . . . . . . . . . . . . . . . . . . . . . . . . . . . . . . . . . . . . . . . . . . . . 13 Use the CX5100/CX5500 Control Panel . . . . . . . . . . . . . . . . . . . . . . . . . . . . . . . . . . . . . . . . . 13 Find Your Default System Password . . . . . . . . . . . . . . . . . . . . . . . . . . . . . . . . . . . . . . . . 13 Polycom, Inc. 1 Polycom CX5100 Unified Conference Station User Guide Create or Load a System Profile . . . . . . . . . . . . . . . . . . . . . . . . . . . . . . . . . . . . . . . . . . . . 14 Update the CX5100 System’s Software . . . . . . . . . . . . . . . . . . . . . . . . . . . . . . . . . . . . . . . . . 16 Troubleshoot Issues . . . . . . . . . . . . . . . . . . . . . . . . . . . . . . . . . . . . . . . . . . . . . . . . 18 Solve Audio and Video Problems . . . . . . . . . . . . . . . . . . . . . . . . . . . . . . . . . . . . . . . . . . . . . . 18 Accessing System Information . . . . . . . . . . . . . . . . . . . . . . . . . . . . . . . . . . . . . . . . . . . . . 20 Testing the System’s Speaker, Microphones, and Camera . . . . . . . . . . . . . . . . . . . . . . . 20 Capturing Logs and Diagnostic Information . . . . . . . . . . . . . . . . . . . . . . . . . . . . . . . . . . . 20 Restoring the System to Factory Settings . . . . . . . . . . . . . . . . . . . . . . . . . . . . . . . . . . . . . 21 Regulatory Information . . . . . . . . . . . . . . . . . . . . . . . . . . . . . . . . . . . . . . . . . . . . . 22 Polycom, Inc. 2 About This Guide The Polycom CX5100 Unified Conference Station User Guide is intended for anyone who needs to use, customize, and troubleshoot the Polycom CX5100 system. This guide includes overview information that you may find helpful when you’re just starting to learn about video conferencing or if you need a quick refresher. It also includes step-by-step instructions for everyday video conferencing tasks. About Conventions Used in this Guide To help you find what you want quickly, this guide uses the same information icons, terms, and writing conventions throughout the book. This section describes these conventions. Understand Information Icons These icons help you quickly identify information of special interest. Information Icons Used in this Guide Type of Icon Icon Type of Information Note A Note highlights information you need to know to successfully accomplish a procedure or understand a concept. Caution A Caution highlights a risk of damage to equipment, loss of data, or impact to security. Warning A Warning highlights a risk of injury to a person. Polycom, Inc. 3 Polycom CX5100 Unified Conference Station User Guide Understand Terms Used in this Guide Understanding these terms helps you understand the information in this guide more easily. Terms Used in this Guide Category Term Description General active call Any call (including a conference call) in which you are participating. You can see and hear the other sites in the active call, and they can see and hear you, unless you mute your video or audio. held call Any call (including a conference call) that is on hold. When a call is on hold, you can’t see or hear other participants in the call, and they can’t see or hear you. privacy cap Physical camera cover for the Polycom CX5100 system cameras. system Refers to the CX5100 Unified Conference Station. Understand Typographic Conventions The following table lists the typographic conventions are used in this guide to distinguish different types of information. . Typographic Conventions Used in this Guide Blue Used for cross-references to other information in this document and links to external web pages or documents. Italics Used to emphasize text, to show example values, and to show titles of reference documents. Bold Indicates interface items such as menus, soft keys, file names, directories, and text you need to enter. Menu > Submenu Indicates a series of menu choices. For example, Administration > System Information indicates that you should select the Administration menu and then select System Information. Get More Information You can find a wide variety of useful information about your system on the Polycom Support site at support.polycom.com. Find Product Documentation You can find Polycom product documentation on the Polycom CX5100 support page on Polycom Support. The following documents are available on the support page: ● Setting up the Polycom CX5100 and CX5500 Systems Polycom, Inc. 4 Polycom CX5100 Unified Conference Station User Guide ● Polycom CX5100 Release Notes Use the Knowledge Base For more troubleshooting information, search the Knowledge Base at Polycom Support. Contact Technical and Solution Support For support or service, please contact your Polycom distributor or go to Polycom Support. Polycom, Inc. 5 Get Started This following sections introduce you to the Polycom CX5100 system: how it works, what it looks like, and how to get started using it to participate in video conferences. Introduce the Polycom CX5100 System The Polycom CX5100 unified conference station lets you use the collaboration capabilities of Microsoft Lync voice, video, and content while automatically tracking the flow of conversation to enable richer, more interactive communication. The CX5100 system provides the camera and microphones. You place, answer, and control Microsoft Lync calls using the computer connected to the system. During a call, the integrated cameras capture the entire panoramic view of your conference room, and the integrated microphones capture the voices coming from any location around the table. During calls, the system automatically shows the person who is speaking, along with a 360-degree view of the other participants in the room. The site with the active speaker sees the last speaker. See the figure below for an example of how the CX5100 system works. How the CX5100 system works Polycom, Inc. 6 Polycom CX5100 Unified Conference Station User Guide About the Polycom CX5100 System The following figure introduces you to the parts of the Polycom CX5100 tabletop unit, which houses the camera, microphones, and speakers. Parts of the Polycom CX5100 Tabletop Unit Parts of the CX5100 Tabletop Unit Feature Description 1 Camera cover 2 Cameras 3 Active video indicator 4 Microphones 5 Speaker 6 Microphone mute buttons 7 USB 3.0 Type B connection to computer 8 USB 2.0 connector for memory stick Polycom, Inc. 7 Polycom CX5100 Unified Conference Station User Guide Set Up Your System Hardware When setting up your CX5100 system, place the system in the center of the conference room table and connect the cables according to the configuration shown in the document Setting up the Polycom CX5100 or CX5500 System, which was shipped in the box with your system. You can also find this guide on the Polycom CX5100 support page on Polycom Support. For larger conference rooms, you can connect two optional satellite microphones. The following diagram shows how to place the microphones. Placing the satellite microphones Connect a Computer to the System System performance may vary based on the connected computer, your network connection, and your Lync client version. The computer connected to the system should meet the minimum hardware and software requirements shown in the following table. Minimum Hardware and Software Requirements for the Connected Computer Category Requirements Windows Windows 8.1 (32-bit and 64-bit) Windows 8 (32-bit and 64-bit) Windows 7 (32-bit and 64-bit) Desktop Client Microsoft Lync 2013 (recommended) Microsoft Lync 2010 Processor Basic Video Transmit • 2.0 GHz or higher HD Transmit • Quad cores, 2.0 GHz or higher For the Lync 2013 client, find detailed system requirements at Lync Client Software Support on Microsoft Lync TechCenter. For the Lync 2010 client, find detailed system requirements at Client and Device Software and Infrastructure Support on Microsoft Lync TechCenter. RAM 2 GB Hard drive space 1.5 GB Video card Minimum 128 MB RAM with support for full hardware acceleration Polycom, Inc. 8 Polycom CX5100 Unified Conference Station User Guide Minimum Hardware and Software Requirements for the Connected Computer Category Requirements Monitor Minimum 1024 x 768 USB connector USB 3.0 is required for 1080p calling. Connecting the system to a USB 2.0 or USB 1.0 port may result in reduced performance. If you see a message that your system could run faster when you connect the CX5100, the system is connected by USB 2.0. Using Third-party USB Extension Cable If you use a third-party USB extension cable to increase the distance between the tabletop unit and the PC, be aware that most extension cables limit the data rate or provide only USB 2.0 performance, even when plugged into a USB 3.0 port. When you connect the CX5100 to the PC by USB 2.0, you will see a warning that your system could run faster. Power On and Off Connect the power to the Polycom CX5100 system. While the system starts up, the green indicators flash. When the indicator lights stop flashing and the indicators are off, the system is ready to use. You do not need to power the system on or off. Understanding the Indicator Lights The Polycom CX5100 system indicator lights let you know whether the system is sending audio or video in video calls. The three microphone indicator lights are located on the tabletop unit base. The active video indicator light is located on the underside of the camera head. See Parts of the Polycom CX5100 Tabletop Unit for the location of the microphone and active video indicators. About Microphone Indicator Lights Microphone Indicator System State Off Not in a call Green In call Green flashing Ringing Green slow flashing System is starting up Red In call with microphones muted Red flashing Ringing with microphones muted On hold Green/red flashing Software update is in progress Polycom, Inc. 9 Polycom CX5100 Unified Conference Station User Guide About Active Video Indicator Lights Active Video Indicator System State Off Not in a call No video in a call Green In call with active video Flashing Privacy cap is closed First-time Startup After you connect your system and power it on, the indicator lights flash. When the flashing ends, you can make Lync calls using the computer connected to the system. Best Practices for Effective Camera Tracking To ensure that the Polycom CX5100 system can track the active speaker most effectively, follow the guidelines in this section. Tips for Setting Up the Room Follow these best practices listed below when setting up your CX5100 system in a conference room. ● Place the device in a large conference room, rather than a small room. ● If the room has hard walls or large windows, consider installing sound-absorbing panels and window blinds or drapes. ● Place the device in the center of the table, and place the table in the center of the room. ● If wall displays are part of the room’s setup, move the device closer to the displays. ● Place the device so that participants are speaking toward the device. Avoid placing the device so that participants speak away from the system, especially if they are nearby. Tips for Meeting Participants Follow these best practices listed below to ensure that your Polycom CX5500 system effectively tracks active speakers and participants during conference calls. ● Make sure there are no items placed between your mouth and the microphones. For example, move your laptop so that it does not block you when you speak. ● Face the CX5100 system, not the whiteboard or the wall, when you stand at the front of a small conference room to speak. Facing the wall can cause echoes that interfere with the active speaker tracking. ● Avoid standing close to the conference table when speaking. Instead, sit at the table or move away from the table so the camera can clearly track your movements. Polycom, Inc. 10 Place and Answer Calls Calling and answering with the Polycom CX5100 system uses the familiar Lync interface. This section describes the steps using Lync 2013, but the steps are similar if you use Lync 2010. Place a Video Call You can place calls to people and systems in your organization that are registered to the Directory Service. To place a video call: 1 In Microsoft Lync, do one of the following: Click and scroll to the contact you want to call. Start typing a name in the search box and click names. Click . As you type, the system finds matching and choose a name from your Recent Calls. 2 Click a name to select it. 3 Click to start a video call. To invite others to join a conference: » From a conversation window in Microsoft Lync, do one of the following: Click and then click Invite More People. Find the person you want and click OK. Drag a contact from your contacts list into the conversation window. Answer a Call When you receive a call, you see a call notification that tells you who is calling. To answer a call: » In the incoming call notification, do one of the following: Click Accept to join the call. Click Redirect > Reply with an Instant Message to send a message to the caller. Polycom, Inc. 11 Polycom CX5100 Unified Communication Station User Guide To refuse a call: » In the incoming call notification, do one of the following: Click Decline. Click Ignore to refuse the call. End Calls Hanging up a call with another person automatically disconnects the other person. When you hang up from a conversation that includes multiple participants, the other participants remain connected. To end a call: » In Microsoft Lync, click . Control What You Hear During a call, you can control what you hear at the local site. To adjust the volume: » Click in your Windows tray and use the slider control Control What the Far End Hears and Sees During a call, you can control what the far sites can hear and see. To mute the microphone: » On the base of the system, touch red when the system is muted: . The microphone indicators on the base of the tabletop unit are . You can also mute the system’s audio using the Mute button in the Lync client. However, muting the system in this way does not update the indicator lights on the tabletop unit. To mute the video: » Lower the privacy cap on the tabletop unit. The active video indicator flashes green to indicate that the system is not sending video to the far end. Polycom, Inc. 12 Customize Your System You can use the Polycom CX5100/CX5500 Control Panel to customize your Polycom CX5100 system. Use the CX5100/CX5500 Control Panel You can configure your CX5100 system using the CX5100/CX5500 Control Panel application running on the computer connected to your system. To install the CX5100/CX5500 Control Panel: 1 Using a web browser, go to the Polycom CX5100 support page. 2 Download the Control Panel installation file to the computer connected to the CX5100 system. 3 Double-click the installation file and follow the prompts to install the application. After you install the Control Panel, you can connect your system to your computer and create a profile for CX5100 system, view your system’s information, change system settings, and view diagnostics and retrieve logs. Find Your Default System Password In order to make changes to you Polycom CX5100 system using the Control Panel, you need to enter the system password. By default, the password is the 14-digit system serial number. You can find the serial number on the label on the back panel of the power data box, as shown in the following figure. Location of the Serial Number Label on the Power Data Box After you enter the default password, you can change the system’s password in the System tab in the Control Panel. To change the system default password: 1 In the Control Panel, click System > Password. 2 Enter the default password in the Old Password field. Polycom, Inc. 13 Polycom CX5100 Unified Communication Station User Guide 3 Enter a new password for the system in the New Password field and retype the new password in the Confirm New Password field. 4 Click Change Password. Your new password is saved for the system and you can enter your new password when you need to make changes to your CX5100 system. Create or Load a System Profile The Profile Editor in the Control Panel enables you to change device settings and update software. You can also save profiles onto your computer and load a profile to your CX5100 system. The table Network Configuration Settings shows the network settings you can configure in the Profile Editor and save onto your CX5100 system. Network Configuration Settings Setting Description Device Name Displays the Device Name on the Diagnostics page. Naming your CX5100 helps you manage multiple devices. Enable Ethernet Enables the system to connect to the network by Ethernet. You must enable Ethernet before you can configure the system for automatic software updates. Enable DHCP Enables the system to use Dynamic Host Configuration Protocol (DHCP) to obtain the IP Address, Default Gateway, Subnet Mask, and Preferred and Alternate DNS Server settings automatically. Enable EAP/802.1x Enables the System to use 802.1X authentication. You must Enter the Host Name, Domain Name, EAP Identity, and the EAP passwords manually. To create a profile: 1 Power on the Polycom CX5100 system and connect the Polycom CX5100 system to the computer using the USB cable. Polycom, Inc. 14 Polycom CX5100 Unified Communication Station User Guide 2 On your computer, start the CX5100/CX5500 Control Panel application. The Control Panel opens and your device’s system information displays in the System tab, as shown in the next figure. 3 In the Control Panel, click Profile Editor. The Enter Device Password dialog displays. 4 Enter the Device Password and click OK. Note that the default device password is the system’s serial number (see figure Location of the Serial Number Label on the Power Data Box for the location of the system’s serial number). 5 On the Network tab, enter a Device Name, select to Enable Ethernet, and choose to Enable DHCP or Enable EAP 802.1x. Contact your system administrator before changing the network settings for your CX5100 system. 6 On the Time tab, select your time zone. You can also choose to enable a time server and enter the NTP Server Address. Polycom, Inc. 15 Polycom CX5100 Unified Communication Station User Guide 7 On the Software Update tab, enter the name of the Update Server and select values for the Update Frequency and Update Time. 8 On the Advanced tab, choose the Mute Button Function. Select Microphone only to mute the audio only or select Microphone and Camera to mute the audio and video when you touch the Mute button. On the Advanced tab, you can also select the power frequency for your system. Contact your system administrator before changing the power frequency settings for your CX5100 system. 9 Do one of the following: Click Apply to Device to save the profile on your CX5100 system. Enter the system password, if prompted. Click Save to File (PC) to save the profile to your computer. Specify the name of the file and the location of where to save the profile and click Save. You can also load a profile from the device, a saved profile from your computer, or a default system profile onto your CX5100 systems. To load a profile: 1 In the Profile Editor tab, click Load Profile. 2 Select one of the following options: Load from Device uploads the profile saved on the CX5100 system. Load from File (PC) uploads a profile saved on your computer on to the CX5100 system. Load Default Profile uploads the factory default profile for the CX5100 device. 3 After you make your selection, click Apply to Device. The profile is saved onto the CX5100 system. Update the CX5100 System’s Software You can configure your system to check for available updates automatically, or you can update the software for your CX5100 system manually in the Control Panel or upload new software to the system using a USB flash drive. To update the software automatically: 1 In the Profile Editor tab, select Software Update. 2 Enter the name of the Update Server. 3 Select the how often your system updates for Update Frequency. 4 Select what time your system updates for Update Time. Your CX5100 system retrieves software updates from the server on the chosen date and time, if available. To update the software manually: 1 Click System > Software Update. 2 Click Update Now to start the update. The system uploads the software update from the server, if available. Polycom, Inc. 16 Polycom CX5100 Unified Communication Station User Guide To update the software using a USB flash drive: 1 Obtain the software update package from your network administrator, and copy the software to a USB flash drive formatted as FAT32. Make sure that there is only one software update package on the flash drive. 2 Connect the drive to the USB 2.0 port on the tabletop unit or to the USB 3.0 port on the power data box, as shown in the following figure. The system detects the drive automatically and starts the update within 30 seconds. Location of the USB 2.0 connectors Important Notes About Installation • The indicator lights begin to flash indicating that the update has started. The system reboots several times during the update, and the indicator lights flash in several different patterns. • The update can take up to 40 minutes to complete. During this time, the system reboots several times.Make sure that you do not power the system off during an update. Wait for at least 40 minutes to make sure the update has completed. • The update is complete when the indicator lights stop flashing for at least 30 seconds. Polycom, Inc. 17 Troubleshoot Issues If you experience problems using the Polycom CX5100 system, try the following suggestions. Solve Audio and Video Problems Use the following table to find possible corrective actions if you experience problems. Troubleshooting Audio and Video Problems Symptom Corrective Action General The system won’t power on. Ensure that your power cable is connected securely to a working power outlet. The CX5100 Control Panel does not connect to the CX5100 system. Try the following solutions: • Disconnect the USB cable from the computer and reconnect it. • Restart the Control Panel application. Softupdate fails because the system is unable to locate the update software. Try the following solutions: • Ensure that your Ethernet cable is connected securely. • Ensure that your Ethernet connection is enabled and configured correctly. • Ensure that the URL of the update server is configured correctly. Click Apply to Device to transfer the settings to the device. • If you continue to have problems, copy the update software to a USB thumb drive, and attach it to the tabletop unit or the power data box. Ensure that there is only one software update package on the USB drive. My computer is connected to a USB 3.0 port, but I see a warning that my computer is connected to a USB 2.0 port. Try the following solutions: • Ensure the system is connected to a USB 3.0 port. A USB 3.0 port is usually blue and has a SS icon next to the port. • Disconnect the USB cable from the computer and reconnect it. • Update the USB 3.0 driver on the computer to ensure that the date of the driver is 2013 or later. Visit your computer’s manufacturer’s website for the latest driver available for your computer. • Connect the computer directly to the blue USB 3.0 port on the power data box instead of the tabletop unit. Video Polycom, Inc. 18 Polycom CX5100 Unified Communication Station User Guide Troubleshooting Audio and Video Problems Symptom Corrective Action My camera is not listed in the device selection list. Try the following solutions: • Ensure that your camera cable is connected securely. • Verify your video device settings. In Microsoft Lync, click Options and choose Video Device. Ensure that CX5100 is selected as the video device. • Restart the Polycom CX5100 system. Others don't see my video. Try the following solutions: • Ensure that your privacy cap is raised. • Ensure that all cables are connected securely. • Verify your video device settings. In Microsoft Lync, click Options and choose Video Device. Ensure that CX5100 is selected as the video device. • Restart the Polycom CX5100 system. My video is flickering. Ensure that the Power Frequency is set correctly for your locale. From the CX5100 - CX5500 Control Panel, click System and then click Advanced. Then, choose the Power Frequency you need. My video is displayed at a very low frame rate. Try the following solutions: • Ensure the system is connected to a USB 3.0 port. A USB 3.0 port is usually blue and has a SS icon next to the port. • Ensure that the tabletop unit is plugged in to the blue USB 3.0 port on the power data box. Audio Others don't hear my audio. Try the following solutions: • Ensure that your audio is not muted using the mute buttons on the tabletop unit or by using the mute button in the Lync client. • Ensure that your microphone cable is connected securely. • Verify your audio settings. In Microsoft Lync, click Options and choose Audio Device. Ensure that CX5100 is selected as the audio device. I don't hear audio from others. Try the following solutions: • Ensure that the far-site audio is not muted. • Ensure that your volume is set to an audible level. I muted my audio in Lync, but the microphone indicators on the tabletop unit do not show red. Muting your audio in Lync does not control the CX5100 system’s microphone indicators. Your audio is still muted, and the far end does not hear your audio. Update your Lync client to the latest version in order to have the capability of syncing call activity in Lync with your system. Polycom, Inc. 19 Polycom CX5100 Unified Communication Station User Guide Accessing System Information The System Info page lets you view a listing of system settings and status that may be helpful in troubleshooting. The information is refreshed each time you access the page. To refresh the page, go to another page and return to the System Info page. To access information about your system: » From the CX5100 - CX5500 Control Panel, click System and then click System Information. Testing the System’s Speaker, Microphones, and Camera You can ensure that your Polycom CX5100 is configured and operating correctly by testing the speaker, microphones, and camera. To test the speaker and microphones: 1 From the Microsoft Lync client, click Options. 2 Click Audio Device and then choose the CX 5100 device as the Audio Device. 3 In the Speaker section, click Play to play a tone. 4 Adjust the slider to make the tone louder or softer. 5 Gently brush your finger over the microphone on the base of the tabletop unit and check to be sure the indicator in the Microphone section turns green in response. If there is no response, check to be sure the microphone is not muted. 6 Adjust the slider to make the microphone more or less sensitive. To test the camera: 1 From the Microsoft Lync client, click Options. 2 Click Video Device and check the video preview. Capturing Logs and Diagnostic Information If you contact Polycom for help with a system problem, you might be requested to supply information about your system. To retrieve system logs: » Connect a USB thumb drive to the USB port on the tabletop unit or on the power data box. Make sure there is no softupdate package on the thumb drive. The logs are transferred automatically. Note that it takes approximately one minute to complete the transfer. Polycom, Inc. 20 Polycom CX5100 Unified Communication Station User Guide Retrieving logs using the CX5100 - CX5500 Control Panel You can also use the CX5100 - CX5500 Control Panel retrieve logs to a thumb drive connected to the device. 1 From the CX5100 - CX5500 Control Panel, click System and then click Debugging. 2 Connect a USB thumb drive to the USB port on the tabletop unit. Make sure there is no softupdate package on the thumb drive. 3 Click Retrieve Logs to copy the logs to the thumb drive. Note that it takes approximately one minute to complete the transfer. To view diagnostics information: » From the CX5100 - CX5500 Control Panel, click Diagnostics. You can scroll through this information using your mouse. Right-click to copy this information to the clipboard. Restoring the System to Factory Settings If you experience severe system problems, you can perform a factory restore. The restore button is on the back of the power data box, as shown in the following figure: Location of the system restore button To reset the system to its original factory settings using the restore button: 1 While the system is powered off, use a paper clip to press and hold the restore button. 2 While holding the restore button, power the system on. 3 Keep holding the restore button for 20 more seconds; then release it. Polycom, Inc. 21 Regulatory Information Important Safeguards Read and understand the following instructions before using the system: • Always disconnect the system from power before cleaning and servicing and when not in use. • Keep ventilation openings free of any obstructions. • The power cord acts as the disconnect device. Disconnect power cord to electrically isolate the system, and before removing any covers. • No user serviceable parts are contained within the device, a qualified technician must perform service or repair work. Special Safety Instructions Plug Acts as Disconnect Device: The socket outlet to which this apparatus is connected must be installed near the equipment and must always be readily accessible. Follow existing safety instructions and observe all safeguards as directed. Polycom, Inc. 22 Polycom CX5100 Unified Communication Station User Guide Regulatory Notices Class B Digital Device or Peripheral This equipment has been tested and found to comply with the limits for a Class B digital device, pursuant to part 15 of the FCC Rules. These limits are designed to provide reasonable protection against harmful interference in a residential installation. This equipment generates, uses and can radiate radio frequency energy and, if not installed and used in accordance with the instructions, may cause harmful interference to radio communications. However, there is no guarantee that interference will not occur in a particular installation. If this equipment does cause harmful interference to radio or television reception, which can be determined by turning the equipment off and on, the user is encouraged to try to correct the interference by one or more of the following measures: • Reorient or relocate the receiving antenna. • Increase the separation between the equipment and receiver. • Connect the equipment into an outlet on a circuit different from that to which the receiver is connected. • Consult the dealer or an experienced radio/TV technician for help. Part 15 FCC Rules This device complies with part 15 of the FCC rules. Operation is subject to the following two conditions: 1) This device may not cause harmful interference, and 2) this device must accept any interference received, including interference that may cause undesired operation. Industry Canada (IC) This Class [B] digital apparatus complies with Canadian ICES-003. Cet appareil numerique de la Classe [B] est conforme à la norme NMB-003 du Canada. Polycom, Inc. 23 Polycom CX5100 Unified Communication Station User Guide Regulatory Notices Europe This Polycom CX5100 has been marked with the CE mark. This mark indicates compliance with EEC directories 2006/95/EC and 2004/108/EC. A full copy of the Declaration of Conformity can be obtained from Polycom Ltd., 270 Bath Road, Slough, Berkshire, SL1 4DX, UK. Singapore Complies with IDA Standards DA101619 Class B Statements Japan Korea Polycom, Inc. 24