1
The Telephone.
Functionel and Easy to Use.
Deutsche
Telekom
Introduction
By opting for telephone, you have selected an individually adaptable cordless telephone with a
wide choice of practical user facilities.
This User Guide is designed to help you make the most of your telephone.
Whether you use your telephon for private or business use, it offers
• excellent quality of speech thanks to digital technology,
• even greater mobility and a greater range/availability:
– greater mobility by simply expanding with additional handsets, with no major installation
effort involved.
You can operate up to 6 handsets on one base station, with the possibility of making a
free internal call between two handsets and, at the same time, an external call from
another handset.
– a greater range by expanding with an additional telephone radio relay involved a minimum
of installation work.
– greater availability
A handset can be operated on up to 4 base stations.
• the wide range of other user facilities you would expect from a cordless telephone.
To enable you to phone from your telephone, you should first read at least the sections listed below and follow the operating instructions given there:
•
•
•
•
•
Key to controls
Setting up and putting into service
Incoming calls
Outgoing calls
During a call.
You can use two different four-digit PINs to protect your telephone against
• unauthorised modification of the system-specific settings (system PIN)
and
• unauthorised modification of the handset-specific settings (device PIN).
These PINs are factory set to "0000". The protection functions become effective as soon as you
replace the corresponding "0000" setting with your personal digit sequence "XXXX".
Take a moment to try out all the different functions on your telephone; this will enable you to get
to know and benefit from its wide range of user facilities.
Additional handsets, charging stations, battery cells and radio relays are available from Deutsche
Telekom.
A2
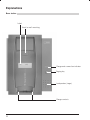
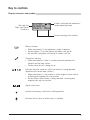
Explanations
Base station
Label
Hook for wall mounting
Charge and connection indicator
Paging key
Loudspeaker (ringer)
Charge contacts
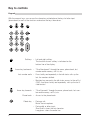
B1
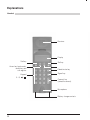
Explanations
Handset
Receiver
Display
Softkey
Arrow key backwards,
redial key and
call register
Keypad
0 – 9, ,
Softkey
Delete/mute key
Signal key
Connect key
(seize/disconnect)
Microphone
Battery charge contacts
B2
Handgerät
Relais
Abmelden
Handgerät
An Feststat.
An Fremdsys.
Fremdgerät
Relais
Anmelden
Tonruf
Amt:
Nr.1:
…
Faktor
Einstellen
Keine
Entgelt
Dauer
Anzeige
Automatisch
Station A
…
Letzt:
Total:
System
Uml. Sofort
Uml. nach 15s
Uml. Besetzt
Abfragen
Umleiten
Anklopfen
CLIR
Entparken
Stationswahl
An-/Abmelden
Entgelt
Intern Menü
Tastenschutz
Ausschalten
Dienste
Laut:
Takt:
Mel. I
Mel. 1
Mel. 2
Mel. 3
Amt
Nr. 1:
…
MSN A
…
MSN A
…
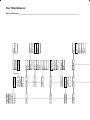
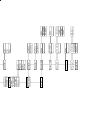
Der Menübaum
Im Ein-Zustand
System
Geräte-PIN
Zurücksetzen
Hörer-Laut
Tastenton
RW-Warnton
Direktruf
Dir.-Annahme
Auto DTMF
Sprache
1: Amtsperre
…
MSN A
…
Amtskennzif.
Auto Keypad
Auto ECT
Wahlsperre
Rufverteiler
TK-Anlage
System-PIN
MSN A
…
Nr.1 MSN A
…
Auswahl MSN
Nummer:
1: Amtsperre
1: Inland
1: Ausland
1: Keine
MSN A
Name MSN A
Mel. MSN A
MSN A
…
Lieferzust.
Systemeinst.
Feststation
Name/Nr. MSN
Lieferzust.
Namenverz.
Laut:
Takt:
Mel.:
Handgerät
English
Français
Italiano
Deutsch
Feststation
Herausgeber:
Deutsche Telekom AG
Änderungen vorbehalten
MNr 40 152 637EA
Stand Mai 1998
ABSC 20266977
3K.028
Inhaltsverzeichnis
Notes
Safety notes ........................................................................................................................................................ 4
Important notes on the use of battery cells ....................................................................................................... 4
Key to controls
Display: characters ans symbols ........................................................................................................................ 5
Keypad ................................................................................................................................................................. 6
Setting up and putting into service
What's included in the delivery package ........................................................................................................... 9
Default settings ................................................................................................................................................... 9
Installation location/Range ............................................................................................................................... 10
Desktop or wall-mounted, as you wish ........................................................................................................... 11
Connecting the base station ............................................................................................................................ 13
Inserting and charging the battery cells in the handset .................................................................................. 14
Fitting the clip to the handset ........................................................................................................................... 15
Basic settings
Handset: ON, OFF, Lock state ......................................................................................................................... 16
Handset: Switching between states ................................................................................................................ 17
Programming the subscriber number (MSN = Multiple suscriber Number) ................................................... 18
Programming the name for MSN ..................................................................................................................... 19
Programming digit for MSN-specific melody ................................................................................................... 20
Personal Identification Number (PIN) ............................................................................................................... 21
Entering a new system PIN .............................................................................................................................. 22
Entering a new handset PIN ............................................................................................................................. 23
Setting the handset volume .............................................................................................................................. 24
Activating/deactivating call waiting .................................................................................................................. 25
Setting the language for the menu prompting ................................................................................................. 26
Incoming calls
Answering a call ................................................................................................................................................ 27
Answering a call ................................................................................................................................................ 28
Ending a call ...................................................................................................................................................... 28
Rejecting a call .................................................................................................................................................. 28
Call register ....................................................................................................................................................... 29
Offbook answering ............................................................................................................................................ 30
Outgoing calls
Selecting the multiple subscriber number ....................................................................................................... 31
Selecting a temporary multiple ......................................................................................................................... 32
Calling Line Identification Restriction ............................................................................................................... 33
Dialling from the numeric keypad ..................................................................................................................... 34
Ending a call ...................................................................................................................................................... 34
Off-line call preparation ..................................................................................................................................... 34
Last number radial ............................................................................................................................................ 35
Enhanced-convenience dialling
About the phone book ...................................................................................................................................... 36
Storing an entry in the phone book ................................................................................................................. 37
Storing an entry in the phone book from off-line call preparation .................................................................. 38
Dialling from the phone book ........................................................................................................................... 39
1
Changing/deleting a phone-book entry ........................................................................................................... 40
Deleting all the entries in the phone book ....................................................................................................... 41
During a call
Mute switch ....................................................................................................................................................... 42
Adjusting the handset volume .......................................................................................................................... 43
Send DTMF function ......................................................................................................................................... 44
Automatic completion of call to busy subscriber ............................................................................................ 45
Activating the automatic CCBS ........................................................................................................................ 45
Display for automatic CCBS ............................................................................................................................. 45
Parking ............................................................................................................................................................... 46
Parking a call ..................................................................................................................................................... 46
Retriering a parked, external call (unparking) .................................................................................................. 46
Answering call-waiting calls .............................................................................................................................. 47
Call diversion
Activating call diversion always ........................................................................................................................ 48
Deactivating call diversion always .................................................................................................................... 49
Activating call diversion o busy ........................................................................................................................ 50
Deactivating call diversion on busy .................................................................................................................. 51
Activating call diversion no reply ...................................................................................................................... 52
Deactivating call diversion no reply .................................................................................................................. 53
Charge/talk-time display
Introduction ....................................................................................................................................................... 54
Activating/deactivating the charge/talk-time display ...................................................................................... 55
Checking the amounts ...................................................................................................................................... 56
Changing the charge factor .............................................................................................................................. 57
Checking and deleting the amounts of all handsets and MSN ...................................................................... 58
Direct call
Activating direct call .......................................................................................................................................... 59
Dialling a direct call number ............................................................................................................................. 60
Deactivating direct call ...................................................................................................................................... 60
Call barring
Activating call barring ....................................................................................................................................... 61
Paging
From base station to handset(s) ....................................................................................................................... 62
Ringing tone
Setting the ringing tone on the handset .......................................................................................................... 63
Setting the ringing tone on the base station ................................................................................................... 65
Operation with several handsets
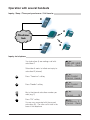
Explanations ...................................................................................................................................................... 66
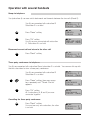
Subscribing a handset to the base station ...................................................................................................... 66
Desubscribing a handset from the base station .............................................................................................. 68
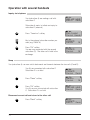
Marking internal calls ........................................................................................................................................ 69
Checking the internal subscriber number ........................................................................................................ 70
Rejecting a call .................................................................................................................................................. 70
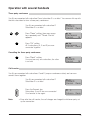
Inquiry / Swap / Three party conference / Call transfer .................................................................................. 71
Inquiry via telephone ......................................................................................................................................... 71
Swap via telephone ........................................................................................................................................... 72
Three-party conference via telephone ............................................................................................................. 72
2
Call transfer via telephone ................................................................................................................................ 73
Inquiry via telephone ......................................................................................................................................... 74
Swap .................................................................................................................................................................. 74
Three-party conference .................................................................................................................................... 75
call transfer ........................................................................................................................................................ 75
Setting the ringing allocation for the handsets (exchange ring) ..................................................................... 76
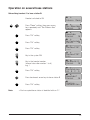
Operation on several base stations
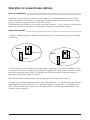
General explanations ........................................................................................................................................ 77
Application example .......................................................................................................................................... 77
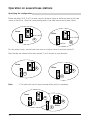
Specifying the configuration ............................................................................................................................. 78
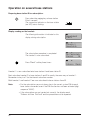
Subscribing handsets to base stations ............................................................................................................ 79
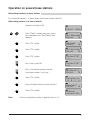
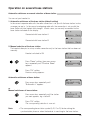
Automatic switchover or manual selection of base station ............................................................................ 83
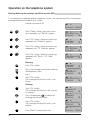
Operation on the telephone system
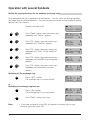
Entering/deleting the exchange indentification code (EIC) ............................................................................. 84
Sending an automatic keypad .......................................................................................................................... 85
Transfer with Disconnect .................................................................................................................................. 86
Operation on the telephone system
Subscribing a telephone handset to a foreign system .................................................................................... 87
Subscribing a foreign telephone handset ........................................................................................................ 88
Initialising
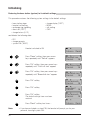
Restoring the handset to its default settings ................................................................................................... 89
Restoring the basw station (system) to its default settings ............................................................................ 90
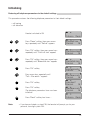
Restoring all telephone parameters to the default settings ............................................................................ 91
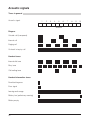
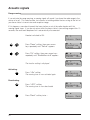
Acoustic signals
Tones in general ................................................................................................................................................ 92
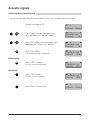
Activating/deactivating keyclick ....................................................................................................................... 93
Range warning .................................................................................................................................................. 94
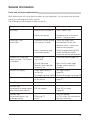
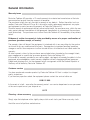
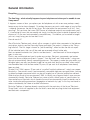
General information
Faults and self-help trouble shooding .............................................................................................................. 95
Warranty terms .................................................................................................................................................. 96
Customer service .............................................................................................................................................. 96
Cleaning - when necessary .............................................................................................................................. 96
Recycling ........................................................................................................................................................... 97
Approvals
CE-labelling ....................................................................................................................................................... 98
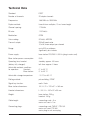
Technical Data
99
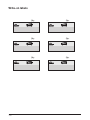
Write-on labels
100
Notes
101
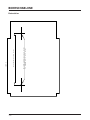
Bohrschablone
102
Stichwortverzeichnis
105
3
Notes
Safety notes
• Warning
Only use approved nickel-cadmium (NiCd) batteries.
The handset battery compartment contains the corresponding warning notes.
The telephone is supplied complete with two rechargeable NiCd batteries, type AA (mignon
cells). Only NiCd batteries of the following types are approved for use as replacement or spare batteries:
– RC 6/600 from Saft
– P/60 AA from Panasonic
– R6 NC-P from Philips
– AA 600 F from Furukawa
Replacement or spare battery cells as well as charging stations are supplied by Deutsche
Telekom.
• Using other battery cell types or non-rechargeable batteries/primary cells can be dangerous
and also lead to malfunctions and/or damage to the set.
• Understandably, Deutsche Telekom AG cannot assume any liability in such cases.
• Make sure the battery cells are fitted correctly.
• Do not dip the battery cells in water; do not throw into the fire.
• Battery cells become warm when being charged; this is a normal and harmless process.
• Do not use third-party charging stations as they may damage the battery cells.
• Only use the enclosed SNG 2 power supply unit for the base station.
Important notes on the use of battery cells
To ensure your battery cells have a long service life, please follow the following principles:
• The battery cells must be charged without interruption for at least 10 hours
prior to the initial commissioning.
• It takes several days for the battery cells to reach their full capacity and
therefore their full "stand-by and talk time".
• Make sure the charging contacts do not come into contact with metallic or
greasy parts.
If the telephone is not used over a longer period of time with the power switched off (e.g. during
holiday periods), the handset (i.e. the battery cells) must be charged before switching the telephone back on.
Please dispose of any defective battery cells in the proper manner (not in domestic waste).
4
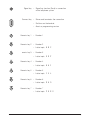
Key to controls
Display: characters and symbols
Message line
Digits and special
characters
012401313
Intern Menü
Symbols indicating the telephone’s
current operating mode
Current meaning of the softkeys
Battery indicator
• When permanently lit, the telephone is ready to operate
• Flashes approx. 10 minutes before the battery cells go flat
• No indication: telephone switched off or battery cells flat
Connection indicator
• When permanently lit, there is a radio connection between the
handset and the base station
• Flashes while the call is being set up
Indicates the base station on which the handset is being operated
(operation with several base stations)
• When permanently lit, the handset is within range of a base station.
Incoming and outgoing calls are possible.
• Flashes when a base station is being searched. Incoming and
outgoing calls are not possible.
Signals letter input
ndicates a temporary switchover in dialling method
Indicates that a choice of other menus is available
5
Key to controls
Keypad
With the numeric keys you can use the characters printed above the keys for letter input
(phone book) as well as the functions marked on the keys themselves.
1
2
3
4
5
6
7
8
9
0
Softkeys – Left and right softkey.
The function of each softkey is indicated on the
bottom line of the display.
Arrow key backwards – "Scroll backwards" through the menu, phone book, last
number redial memory, call list, etc.
Last number redia – Press briefly and repeatedly in the idle state: calls up the
last five numbers dialled.
– Maintain key pressed in the idle state: access to the call list
(CLIP); then press briefly and repeatedly: calls up the last 5
caller entries.
Arrow key forwards – "Scroll forwards" through the menu, phone book, last number redial memory, call list, etc.
Phone book – Access to the phone book
C
Delete key – During a call:
Mutes the microphone
– During digit or letter input:
Short press: clears the last character
Long press: clears the entire line
6
Signal key – Signal key function (Flash) in connection
with a telephone system
Connect key – Seizes and terminates the connection
– Switches on the handset
– Aborts a programming session
1
Numeric key 1 – Number 1
2
Numeric key 2 – Number 2
– Letter input: A B C
3
umeric key 3 – Number 3
– Letter input: D E F
4
Numeric key 4 – Number 4
– Letter input: G H I
5
Numeric key 5 – Number 5
– Letter input: J K L
6
Numeric key 6 – Number 6
– Letter input: M N O
7
Numeric key 7 – Number 7
– Letter input: P Q R S
7
8
Numeric key 8 – Number 8
– Letter input: T U V
9
Numeric key 9 – Number 9
– Letter input: W X Y Z
0
Numeric key 0 – Number 0
– Character input: \ . , Star key – Can be used for various special functions
Hash key – Can be used for various special functions
8
Setting up and putting into service
What’s included in the delivery package
Included in telephone package you will find the following:
• Base station
• Handset
• 2 battery cells
• Plug-in mains unit
• Connecting cord
• User Guide incl. Quick Reference User Guide
• Clip
• Drilling template
• Bag with two screws and two plugs for mounting the base station to the wall
Default settings
The Configuration section will tell you how to customise telephone.
The most commonly used functions on your telephone have been preset by the manufacturers
(Default Settings) so that you can start using the telephone as soon as the batteries have been
charged:
•
•
•
•
•
•
•
•
Offhook answering:
off
Talk time display:
off
Units/amount display:
on
Calling Line Identification Restriction (CLIR): off
Call waiting:
on
Language:
English
Handset/system PIN:
0000
Handset:
• Handset has subscribed with the base station
(intern 1)
• No barring, no direct call (emergency call) activated
• Exchange line activated
• Handset volume: normal (off)
• Key-click activated
• Range warning tone deactivated
• Station selection automatic
• Ringer volume level "4"
• Ringer tone sequence level "4"
• All MSN to digit 1
Digit 1: melody 1
Digit 2: melody 2
Digit 3: melody 3
Intern: melody 5
• Base station:
• Ringer volume level "3"
• Ringer tone sequence level "4"
• Ringer melody level "1"
You are free to reprogram any of these default settings to suit your personal requirements and
local supply conditions.
9
Setting up and putting into service
Installation location/Range
Installation location
Do not position the base station in the immediate vicinity of other electronic appliances such as
hifi equipment, office equipment or microwave ovens; this will prevent any mutual interference.
Also avoid installing the base station in the vicinity of heat sources, such as radiators or in direct
sunlight. For the best possible range we recommend a central installation location at the centre
of your radius of action. Avoid installation in niches, small rooms and behind steel doors. To
prevent radio feedback in other telephones, we recommend the largest possible distance
(min. 1 m) between the base station or handset and the other telephone.
Setting up your telephone
Your telephone is designed to be used under normal operating conditions. Modern furniture is
treated with an endless variety of lacquer and plastic coatings, and looked after with a wide
range of polishes and finish preservatives. Therefore, it cannot be excluded that some of these
substances may contain agents which will attack or deform the plastic feet of the base station.
If the equipment feet are chemically altered in this way, they may leave unsightly marks on the
surface of furniture. Deutsche Telekom AG cannot accept any liability for damage of this kind.
We recommend that you use a non-slip underlay for your telephone, especially on new furniture
or furniture treated with lacquer-based preservatives.
Range
The radio range is approx. 300 m in the open. Ambient conditions can affect the range, as can
room and building-related factors. The effective range is lower inside buildings than outdoors.
Silent zones can occur due to the digital transmission in the frequency range used - and also
within the range, depending on the structural environment. In such cases the transmission
quality can be affected by repeated, short call interruptions. Normal call quality can be restored
simply by moving slightly out of the silent zone.
Listening protection
telephone transmits the voice data between base station and handset in cryptologically enciphered form (scrambling). As a result the tapping of your calls by other cordless telephones, radio
receivers, scanners, etc., is excluded.
Note for hearing-aid users
Before using the telephone, hearing-aid users should be aware that radio signals interfere with
hearing aids and can cause an unpleasant humming noise if sufficiently loud.
Important information
Whenever you make a telephone call, the handset and base station are connected with each
other via an enciphered radio channel. This means that no other cordless telephone can either
make calls at your expense or listen in to your telephone calls.
10
Setting up and putting into service
Desktop or wall-mounted, as you wish
Desktop version
The simplest option is to use telephone as a desktop unit. Simply set up the telephone where
you want it and connect.
Wall-mounted version
Turn the wall-mounting hook through 180° so that the handset can be suspended on the base
station (see Figure below). Swap the foot props around with the rubber feet on the back of the
base station so that the Telephonecan be secured vertically to the wall (see Figure on page 12).
The drilling templates supplied will help you to mount your telephone correctly.
Turn through 180°
Slide upwards
Push back in
Hook for
wall mounting
11
9,0 VDC / 400 mA
9,0 VAC / 170 mA
Setting up and putting into service
Desktop
12
Wall
Setting up and putting into service
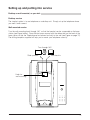
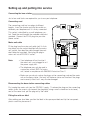
Connecting the base station
Just a few small tasks are required for you to use your telephone.
Connecting cord
The connecting cord has two plugs of different
lengths. Insert the shorter one into the socket underneath your telephone until it is firmly connected.
This socket is identified by a small telephone symbol. Feed the cord through the moulded cable duct
provided. Connect the RJ-45 plug into your telephone socket.
Fit the plug from the mains unit cable (until it clicks
into place) into the socket identified with the mains
unit symbol, then feed the cable through the moulded cable duct provided. Next plug the plug-in
mains unit into a 220/230 V socket.
Note:
9,0 VDC / 400 mA
9,0 VAC / 170 mA
Mains unit cable
• Your telephone will not function if
the mains unit is not plugged in or if
the power supply fails.
• The telephone may only be used in
conjunction with an SNG 2 af mains
unit, tested in compliance with EN60950 Protection Class 2.
• Make sure you do not confuse the plugs on the connecting cord and the mains
unit on the base station. Not only will the base station not function if the plugs
are incorrectly fitted, but it may also be damaged.
Disconnecting the base station connecting cables
First unplug the mains unit from the 220/230 V supply. To release the plugs on the connecting
cables, press the snap-in clip towards the plug body (using a small screwdriver for instance)
and, at the same time, pull the plug out by the cable.
Fitting the write-on label
After adding your local data, position the label in the space provided and clip the transparent
plastic cover into place over it.
13
Setting up and putting into service
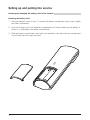
Inserting and charging the battery cells in the handset
Inserting the battery cells
1. Place the handset in front of you. To remove the battery compartment cover, press it lightly
and slide it downwards.
2. Insert the 2 battery cells into the battery compartment (as shown): Make sure the polarity is
correct; it is indicated on the battery compartment.
3. Slide the battery compartment cover back over the battery cells and close the compartment.
You will hear the cover snap into place.
51
°
10.195°
14
Setting up and putting into service
Charging the battery cells
IThe battery cells are not charged when supplied. To charge the batteries, you need to place
the handset on to the charging bracket of the base station. If the luminous display (green LED)
on the base station
• is flashing =
batteries are being charged
• is steadily lit =
batteries are charged
A single battery charge is sufficient for approx. 40 hours in "stand-by" mode or approx.
5 hours in "talk" mode.
The charging time takes approx.
5 hours.
Note:
• Do not use batteries/primary cells, only NiCd battery cells. Observe the
"Important Notes" on Page 4.
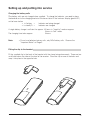
Fitting the clip to the handset
Fit the supplied clip to the back of the handset with the clamp facing downwards. There are two
small holes down the sides at the level of the receiver. Place the clip on one of the holes and
snap it into place in the opposite hole.
10.195°
15
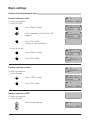
Basic settings
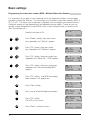
Handset: ON, OFF, Lock state
You can switch your handset to one of three states:
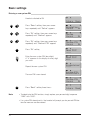
1. On state
The handset automatically switches itself to the ON state when
you insert its battery cells. It signals incoming calls, which you
can answer by pressing the Connect key. Outgoing calls are
also enabled.
Intern
Menü
2. OFF state
In this state, your handset is switched off. Incoming calls are
not signalled. Outgoing calls are not enabled.
3. Lock state
(to protect against accidentally pressing the keys when carrying
the handset) Incoming calls are signalled and can be answered
by pressing the Connect key. Your handset remains active in
the ON state for the duration of the call.
Outgoing calls are not enabled, i.e. to make a call you need to
switch the handset from Lock to ON.
---SCHUTZ--¢Aus
Switching back to the ON state
If you are in the menu, the handset automatically switches back to the ON state if you do not
press any of its keys for 20 seconds (key input).
16
Basic settings
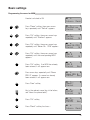
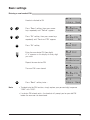
Handset: Switching between states
Handset switched to ON:
Intern
To switch the handset
– to the OFF state
Menü
Press "Menu" softkey
Tastenschutz
Zurück
Ok
Press repeatedly until "Switch off"
appears
Ausschalten
Zurück
Ok
Press "Ok" softkey
Handset is now switched off
– to the Lock state
Press "Menu" softkey
Tastenschutz
Zurück
Ok
Press "Ok" softkey
---SCHUTZ--¢Aus
Handset switched to Lock:
---SCHUTZ--¢Aus
To switch the handset
– to the ON state
Press "¢Off" softkey
Schutz Aus?
Zurück
Ok
Press "Ok" softkey
Intern
Menü
Intern
Menü
Handset switched to OFF:
To switch the handset
– to the ON state
Press the Connect key
17
Basic settings
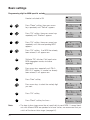
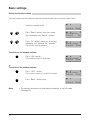
Programming the subscriber number (MSN = Multiple Subscriber Number)
It is important that you enter in your telephone one of the telephone numbers you have been
allocated by Deutsche Telekom. You can assign up to 5 different subscriber numbers (MSN, A,
B, C, D or E). This allows you for example to separate calls according to private and business.
A different melody will ring depending on the telephone number dialled. Further on you can
allocate a freely definable text to each MSN, which is then displayed when you receive a call.
(See "Answering a call".)
Handset switched to ON
Intern
Press "Menu" softkey, then press arrow
keys repeatedly until "Setup" appears
Press "Ok" softkey, then press arrow
keys repeatedly until "System" appears
Press "Ok" softkey, then press arrow keys
repeatedly until "Name/Nr. MSN" appears
1
2
3
4
5
6
7
8
9
Einstellen
Zurück
Ok
System
Zurück
Ok
Name/Nr. MSN
Zurück
Ok
Press "Ok" softkey, then press arrow keys
repeatedly until the corresponding MSN
appears
MSN A
Zurück
Ok
Press "Ok" softkey. If an MSN has already
been entered, it will appear now
MSN A
Zurück
Neu
Press "New" softkey
Tel.Nr.:?
Zurück
Key in one of allocated telephone numbers
6217680
Zurück
Ok
Press "Ok" softkey.
The MSN is now stored
6217680
Zurück
Neu
Press "Back" softkey five times…
Intern
Menü
0
18
Menü
Basic settings
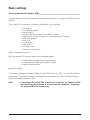
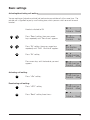
Programming the name for MSN
Handset switched to ON
Intern
1
2
3
4
5
6
7
8
9
0
Menü
Press "Menu" softkey, then press arrow
keys repeatedly until "Setup" appears
Einstellen
Zurück
Ok
Press "Ok" softkey, then press arrow keys
repeatedly until "System" appears
System
Zurück
Press "Ok" softkey, then press arrow keys
repeatedly until "Name/Nr. MSN" appears
Name/Nr.MSN
Zurück
Ok
Press "Ok" softkey, then press arrow keys
repeatedly until the corresponding MSN
appears
MSN A
Zurück
Ok
Press "Ok" softkey. If an MSN has already
been entered, it will appear now
MSN A
Zurück
Neu
Press arrow keys repeatedly until "Name
MSN A" appears. If a name has already
been entered, it will appear now
Name MSN A
Zurück
Neu
Press "New" softkey
Name:?
Zurück
Key in the relevant name (key in the letters,
see "About the phone book")
PRIVAT
Zurück
Ok
Press "Ok" softkey
PRIVAT
Zurück
Neu
Intern
Menü
Ok
Press "Back" softkey five times…
19
Basic settings
Programming digit for MSN-specific melody
Handset switched to ON
Intern
Press "Menu" softkey, then press arrow
keys repeatedly until "Setup" appears
Einstellen
Zurück
Ok
Press "Ok" softkey, then press arrow keys
repeatedly until "System" appears
System
Zurück
Press "Ok" softkey, then press arrow keys
repeatedly until the corresponding MSN
appears
Name/Nr.MSN
Zurück
Ok
Press "Ok" softkey. If an MSN has already
been entered, it will appear now
20
Ok
MSN A
Zurück
Ok
Softtaste "Ok" drücken. Falls bereits eine
MSN eingegeben wurde, wird diese
angezeigt
MSN A
Zurück
Neu
Press arrow keys repeatedly until "Mel.
MSN A:1" appears. If a name has already
been entered, it will appear now
Mel.MSN A:1
Zurück
Neu
Press "New" softkey
Melodie 1
Zurück
Press arrow keys to select the melody digit
you want
Melodie 3
Zurück
Ok
Press "Ok" softkey
Mel.MSN A:3
Zurück
Neu
Press "Back" softkey five times…
Note:
Menü
Intern
Menü
• The base station ringer cannot be set specifically for each MSN. If several handsets with different MSN are operated on a base station, we recommend that you
switch off the base station ringer (see page 64).
Basic settings
Personal Identification Number (PIN)
Your personal settings on the telephone can be protected in part by using two different, four-digit PINs.
The system PIN is required if you want to protect the system settings
•
•
•
•
•
•
•
•
•
•
•
Call barring
Units/amount display
Log on/log off
Resetting the base station to the default settings
Resetting the system settings (call distribution and call barring)
MSN configuration
Direct call
Call diversion
Select MSN
Call distribution
System secret number
against unauthorised access.
With the handset PIN you can protect your telephone against
• unauthorised resetting of the name directory
• unauthorised resetting to the default settings
• handset secret number
geschützt werden.
In the default settings the handset PIN and system PIN are set to "0000", i.e. the PIN function is
deactivated. The protect function is activated when you replace the "0000" number with your
own personal digit sequence "XXXX".
Note:
• If you forget the system PIN, you will have to call out the Telekom Customer Service at your expense to intervene on the telephone. Forgetting
the system PIN is like losing a key.
21
Basic settings
Entering a new system PIN
Handset switched to ON
Intern
Press "Menu" softkey, then press arrow
keys repeatedly until "Setup" appears
Press "Ok" softkey, then press arrow keys
repeatedly until "System" appears
Press "Ok" softkey, then press arrow keys
repeatedly until "System-PIN" appears
Press "Ok" softkey
1
2
3
4
5
6
7
8
9
0
Menü
Einstellen
Zurück
Ok
System
Zurück
Ok
System-PIN
Zurück
Ok
Neue PIN?
____
Enter the new system PIN (four digits)
A " *" appears on the display for every digit
you enter.
Neue PIN?
***_
Repeat the new system PIN
Wiederholen!
____
The new PIN is now stored
System-PIN
gespeichert
System-PIN
Zurück
Ok
Press "Back" softkey three times…
Note:
Intern
Menü
• To deactivate the PIN function, simply replace your personal digit sequence
"XXXX" with "0000".
• If a system PIN already exists, the handset will prompt you for your old PIN before the new one can be entered.
22
Basic settings
Entering a new handset PIN
Handset switched to ON
1
2
3
4
5
6
7
8
9
0
Intern
Menü
Press "Menu" softkey, then press arrow
keys repeatedly until "Setup" appears
Einstellen
Zurück
Ok
Press "Ok" softkey, then press arrow keys
repeatedly until "Device-PIN" appears
Geräte-PIN
Zurück
Ok
Press "Ok" softkey
Neue PIN?
____
Enter the new device PIN (four digits)
A " *" appears on the display for every digit
you enter.
Neue PIN?
***_
Repeat the new device PIN
Wiederholen!
____
The new PIN is now stored
Geräte-PIN
gespeichert
Geräte-PIN
Zurück
Ok
Press "Back" softkey twice…
Note:
Intern
Menü
• To deactivate the PIN function, simply replace your personal digit sequence
"XXXX" with "0000".
• If a device PIN already exists, the handset will prompt you for your old PIN
before the new one can be entered.
23
Basic settings
Setting the handset volume
You can increase the call volume inside the handset to hear your call partner more clearly.
Handset switched to ON
Intern
Press "Menu" softkey, then press arrow
keys repeatedly until "Setup" appears
Press “Ok” softkey, then press arrow keys
repeatedly until “Handset Vol.” appears.
The inactive setting appears.
Menü
Einstellen
Zurück
Ok
Hörer-Laut
Zurück ¢Ein
To switch on the handset volume:
Press "¢On" softkey.
The handset volume is increased.
Hörer-Laut
Zurück ¢Aus
or
To switch off the handset volume:
Press "¢Off" softkey
The handset volume is set back to normal.
Hörer-Laut
Zurück ¢Ein
Press "Back" softkey twice…
Intern
Note:
24
• The handset volume can also be altered temporarily in the talk mode
(see page 35).
Menü
Basic settings
Activating/deactivating call waiting
You are making an (internal or outside) call and receive an outside call at the same time. The
outside call is signalled to you by a call waiting tone, which you can switch on or off for each
handset.
Handset switched to ON
Intern
Menü
Press "Menu" softkey, then press arrow
keys repeatedly until "Services" appears
Dienste
Zurück
Press "Ok" softkey, then press arrow keys
repeatedly until "Call Waiting" appears.
Anklopfen
Zurück
Ok
Press "Ok" softkey
1:Anklopfen
Zurück ¢Ein
Press arrow keys until the handset you want
appears
Ok
2.Anklopfen
Zurück ¢Ein
Activating call waiting:
Press "¢On" softkey.
1:Anklopfen
Zurück ¢Aus
Deactivating call waiting:
Press "¢Off" softkey
Press "Back" softkey three times…
1:Anklopfen
Zurück ¢Aus
Intern
Menü
25
Basic settings
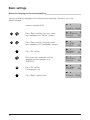
Setting the language for the menu prompting
You can set different languages for the display menu prompting. German is set as the
default language.
Handset switched to ON.
Intern
26
Menü
Press "Menu" softkey, then press arrow
keys repeatedly until "Setup" appears.
Einstellen
Zurück
Ok
Press "Menu" softkey, then press arrow
keys repeatedly until "Language" appears.
Sprache
Zurück
Ok
Press "Ok" softkey.
Deutsch
Zurück
Ok
Press arrow keys repeatedly until the
language you want appears, e.g.
"English".
Englisch
Zurück
Ok
Press "Ok" softkey.
The language is set.
Sprache
Zurück
Ok
Press "Back" softkey twice…
Intern
Menü
Incoming calls
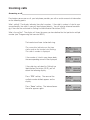
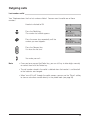
Answering a call
Even before you answer a call, your telephone provides you with a certain amount of information
on the following points:
Who’s calling? The display indicates the caller’s number. If the caller's number is listed in your
name directory, the caller’s name will be displayed directly. You will also be informed accordingly if the caller has activated his Calling Line Identification Restriction (CLIR).
Who is the call for? The display will show the name you have defined for that particular multiple
number (see "Programming the name for MSN").
The handset and base station both ring.
The connection indicators on the base
station and on the handset start flashing.
The caller’s number is displayed.
If the number is listed in your phone book,
the corresponding name will be displayed.
0326217681
MSN
abweis
MUSTER HANS
MSN
abweis
If the caller has activated his Calling Line
Identification Restriction (CLIR), you will
obtain the following display.
Anruf anonym
MSN
abweis
Press "MSN" softkey. The name of the
multiple number dialled appears on the
display.
PRIVAT
Name abweis
Press "Name" softkey. The information on
the caller appears again.
Anruf anonym
MSN
abweis
27
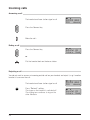
Incoming calls
Answering a call
The handset and base station signal a call
MUSTER HANS
MSN
abweis
Press the Connect key
Make the call...
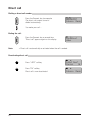
Ending a call
Press the Connect key
Anrufe: 08
Intern Menü
or
Put the handset back on the base station.
Rejecting a call
You do not want to answer an incoming outside call on your handset and reject it, e.g. if another
handset is to answer the call.
28
The handset and base station signal a call
MUSTER HANS
MSN
abweis
Press "Reject" softkey.
The ringer on the handset is switched off.
The ringing tone continues to ring on the
other handsets.
Anrufe: 09
Intern Menü
Incoming calls
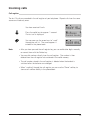
Call register
The last 10 calls are recorded in the call register of your telephone. Repeat calls from the same
source are listed only once.
You have received 5 calls.
Press the redial key for approx. 1 second.
The last call is displayed.
You can now use the arrow keys to "scroll"
through the call list. The name appears if
entered in the phone book.
Note:
Anrufe: 05
Intern Menü
065284068
Zurück Spchr
MUSTER HANS
Zurück Spchr
• After you have pressed the call register key you can redial other digits manually
or correct them with the Delete key.
• You can dial numbers directly from the call register. The number is then
deleted from the call register but contained in the redial memory.
• The call number stored in the call register is deleted when the handset is
switched off or the batteries are changed.
• When "scrolling" through the call register you can use the "Save" softkey to
store a call number directly in the phone book.
29
Incoming calls
Offhook answering
The offhook answering facility enables you to take incoming calls directly, simply by lifting the
handset from the base station (without having to press the Connect key).
Handset switched to ON.
Intern
Press "Menu" softkey, then press arrow
keys repeatedly until "Setup" appears.
Press "Ok" softkey, then press arrow keys
repeatedly until "Offhook Ans." appears.
The inactive setting is displayed.
Menü
Einstellen
Zurück
Ok
Dir.-Annahme
Zurück ¢Ein
Activating offhook answering:
Press "¢On" softkey.
Offhook answering is now activated.
Dir.-Annahme
Zurück ¢Aus
or
Deactivating offhook answering:
Press "¢Off" softkey.
Offhook answering is deactivated again.
Dir.-Annahme
Zurück ¢Ein
Press "Back" softkey twice…
Intern
30
Menü
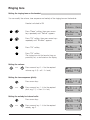
Outgoing calls
Selecting the multiple subscriber number
Your Telephoneallows you to define the multiple subscriber number via which an outgoing call
is to be made. This gives you the following opportunities:
Charges incurred are allocated to the corresponding multiple subscriber numbers.
This provides you for example with a separate list of private and business calls.
The call partner you call can determine the identity of the caller unequivocally.
The MSN can be selected specifically for each handset.
Handset switched to ON.
Press "Menu" softkey, then press arrow
keys repeatedly until "Setup" appears
Press "Ok" softkey, then press arrow keys
repeatedly until "System" appears
System
Zurück
Ok
Press "Ok" softkey, then press arrow keys
repeatedly until "Select MSN" appears
Auswahl MSN
Zurück
Ok
Press "Ok" softkey, then press arrow keys
repeatedly until the handset of your choice
appears
Nr.1: GESCH.
Zurück
Neu
Press "New" softkey, the press arrow keys
repeatedly until the MSN of your choice
appears.
PRIVAT
Zurück
Press "Ok" softkey
The new MSN is now set
Nr.1: PRIVAT
Zurück
Neu
Press "Back" softkey four times…
Note:
Einstellen
Zurück
Ok
Intern
Ok
Menü
• f you do not program a name for the MSN, the number will be displayed instead.
31
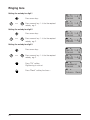
Outgoing calls
Selecting a temporary multiple subscriber number
IYour telephone also allows you to select a multiple subscriber number only temporarily, i.e. for
the subsequent outgoing call.
Handset switched to ON
Intern
1
2
3
4
5
6
7
8
9
0
1
2
3
4
5
6
7
8
9
0
Note:
Press “Intern” softkey
Nummer: ?
Intern 1
Enter the corresponding number
80 for MSN A
81 for MSN B£
82 for MSN C
83 for MSN D
84 for MSN E
81
Dial the subscriber number you want
Menü
816426102
Menü
• The subscriber number can also be dialled from the phone book.
• A number dialled in this way is not stored in the redial.
• For temporary MSN selection from the phone book, see page 37/39.
32
Menü
Outgoing calls
Calling Line Identification Restriction
Your Telephoneallows you to suppress the display of your own multiple subscriber number on
the called party’s set when making an outgoing call. As a result your multiple subscriber number
is not displayed to the called party. CLIR can be activated and deactivated specifically for each
handset.
Handset switched to ON
Intern
Press "Menu" softkey, then press arrow
keys repeatedly until "Services" appears.
Press "Ok" softkey, then press arrow keys
repeatedly until "CLIR" appears.
Press "Ok" softkey.
Press arrow keys until the handset you want
appears.
Menü
Dienste
Zurück
Ok
CLIR
Zurück
Ok
1: CLIR
Zurück ¢Ein
2: CLIR
Zurück ¢Ein
Activating CLIR:
Press "¢On" softkey.
2: CLIR
Zurück ¢Aus
Press "¢Off" softkey
2: CLIR
Zurück ¢Ein
Deactivating CLIR:
Press "Back" softkey three times…
Intern
Menü
33
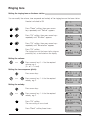
Outgoing calls
Dialling from the numeric keypad
Handset switched to ON
Press the Connect key.
You will hear the dial tone.
1
2
3
4
5
6
7
8
9
Key in the subscriber number you want
The number is dialled.
You will hear the ringing tone.
The called party answers.
0
Intern
Menü
Intern
Menü
012401313
Menü
You make your call...
Ending a call
Press the Connect key
or
Replace the handset on the base station.
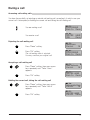
Off-line call preparation
You can also key in the subscriber number (max. 22 characters), check it and correct if necessary with the Delete key C , and only then dial the number.
Handset switched to ON.
1
2
3
4
5
6
7
8
9
0
Intern
Menü
Key in the subscriber number.
012401313
Spchr
Press the Connect key within 20 seconds.
The number is dialled.
012401313
Menü
You make your call...
Note:
34
• Off-line call preparation is also possible with last number redial, the call list
and the phone book.
Outgoing calls
Last number redial
Your Telephonestores the five last numbers dialled. You now want to redial one of those
numbers.
Handset switched to ON
Intern
Press the Redial key.
The number last dialled appears.
Press the arrow keys repeatedly until the
number you want appears.
Press the Connect key.
You hear the dial tone.
Menü
2401313
Zurück Spchr
2401314
Zurück Spchr
2401314
Menü
You make your call...
Note:
• Once you have pressed the Redial key, you can still key in other digits manually
or correct them with the Delete key.
• The call number stored in the redial is deleted when the handset is switched off
or the batteries are changed.
• When "scrolling" through the redial memory you can use the "Save" softkey
to store a subscriber number directly in the phone book (see page 38)
35
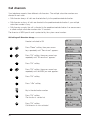
Enhanced-convenience dialling
About the phone book
You can save 40 telephone numbers (max. 22 digit positions) with name (max. 12 character
positions) in your phone book. The handset automatically sorts your inputs alphabetically.
The numeric keys are automatically switched over to alpha characters for entering and calling
up the names.
Text is entered as described in the following example.
To write out the name Meier:
6
Press numeric key 6 (MNO) once.
The next input position flashes.
3
Press numeric key 3 (DEF) twice in quick
succession. The letter "D" was displayed
after you pressed the key the first time.
The next input position flashes.
4
Press numeric key 4 (GHI) three times in quick
succession. The letters "G/H" were displayed
in succession after you pressed the key the
first time. The next input position flashes.
3
Press numeric key 3 (DEF) twice in quick
succession. The letter "D" was displayed
after you had pressed the key once.
The next input position flashes.
7
Press numeric key 7 (PQRS) three times in
quick succession. The letters "P/Q" were
displayed in succession after you pressed the
key the first time. The next input position
flashes.
Press softkey "Ok".
Press softkey "Ok".
The entry is now stored.
Note:
36
M
Zurück
Ok
ME
MEI
MEIE
MEIER
Speichern?
Zurück
Ok
Intern
Menü
• The numeric key 0 (_ . , -) can be used to enter a space, a full stop, a comma or
a hyphen.
• The numeric key 1 can be used to enter the German umlaut characters Ä, Ö, Ü
and the ß character.
• You can also enter digits in alpha mode (e.g. 2 by pressing numeric key 2 four
times).
• The Delete key C can be used to delete or correct typing errors either one
character at a time or an entire line.
• The sorting sequence is digits before alphabet.
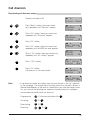
Enhanced-convenience dialling
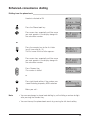
Storing an entry in the phone book
Handset switched to ON
Intern
1
2
3
4
5
6
7
8
9
0
Menü
Press the Phone book key
Suche m. ABC
Zurück
Neu
Press “New” softkey
Tel.-Nr.:?
Zurück
Ok
Key in the subscriber number
065242765
Zurück
Ok
or
1
2
3
4
5
6
7
8
9
0
Key in subscriber number of your choice
including temporary MSN selection
82012345678
Zurück
Ok
Press “Ok” softkey
Name:?
Zurück
Ok
Key in the name, e.g. Meier
MEIER
Zurück
Ok
Press “Ok” softkey
Speichern?
Zurück
Ok
Press “Ok” softkey a second time.
The entry is now stored.
Note:
Intern
Menü
• If you make a mistake, you can use the Delete key C to go back and delete
one position at a time, and then re-enter the correct sequence.
and
can be stored in the subscriber number but will only
• The characters
be dialled in dual-tone multifrequency dialling (DTMF).
• The function signal key and dial pause can also be stored.
• When the memory is full, the display “Memory Full” appears. You must then delete one or more memories before you can make a new entry.
37
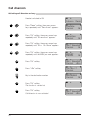
Enhanced-convenience dialling
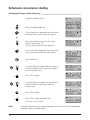
Storing an entry in the phone book from off-line call preparation
You can store a subscriber number directly from off-line call preparation.
Handset switched to ON
1
2
3
4
5
6
7
8
9
0
Intern
Key in subscriber number
(off-line call preparation)
Press "Save" softkey
1
2
3
4
5
6
7
8
9
0
Enter name, e.g. Meier
Press "Ok" softkey
Press "Ok" softkey
The entry is now saved.
The subscriber number appears again
in the off-line call preparation
Press the Connect key
The subscriber number is dialled.
Menü
065242765
Intern Spchr
Name:?
Zurück
Ok
MEIER
Zurück
Ok
Speichern?
Zurück
Ok
065242765
Intern Spchr
065242765
Intern Menü
You make your call…
Note:
• f you make a mistake, you can use the Delete key C to go back and delete
one position at a time, and then re-enter the correct sequence.
and
can be stored in the subscriber number but will only
• The characters
be dialled in dual-tone multifrequency dialling (DTMF).
• The function signal key and dial pause can also be stored.
• When the memory is full, the display "Memory Full" appears. You must then
delete one or more memories before you can make a new entry.
• In this way you can also store subscriber numbers from the redial memory or the
call list in the phone book.
38
Enhanced-convenience dialling
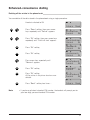
Dialling from the phone book
Handset switched to ON
Intern
Press the Phone book key
Menü
Suche m. ABC
Zurück
Neu
Press arrow keys repeatedly until the name
you want appears in the display along with
the subscriber number.
VOGT ERNST
065242765
Press the numeric key for the first letter
(e.g. 3 times digit 8 = V)
The first name with that letter appears.
VOEGTLI T.
012401313
Press arrow keys repeatedly until the name
you want appears in the display along with
the subscriber number.
VOGT ERNST
065242765
or
1
2
3
4
5
6
7
8
9
0
Press Connect key
The number is dialled
065242765
Intern Menü
or
Press right-hand softkey if the number was
stored including temporary MSN selection
82012345678
Menü
Make your call…
Note:
• You can complement a phone book dialling by suffix dialling a number of digits
after pressing the Connect key.
• You can interrupt the phone book search by pressing the left-hand softkey.
39
Enhanced-convenience dialling
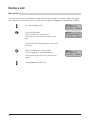
Changing/deleting a phone-book entry
Handset switched to ON
Intern
Menü
Press the Phone book key
Suche m. ABC
Zurück
Neu
Press arrow keys repeatedly until the name
and subscriber number you want appear.
VOEGTLI T.
012401313
or
1
2
3
4
5
6
7
8
9
0
Press the numeric key for the first letter
(e.g. 3 times digit 8 = V)
The first name with that letter appears.
Press arrow keys repeatedly until the name
and subscriber number you want appear.
C
C
C
Press Delete key
1
2
3
4
5
6
7
8
9
0
1
2
3
4
5
6
7
8
9
0
40
VOGT ERNST
065242765
065242765_
Zurück
Ok
Use the Delete key to go back one space at
a time and enter a new subscriber number
with the numeric keys.
012401313
Zurück
Ok
Press "Ok" softkey
VOGT ERNST
Zurück
Ok
Use the Delete key to go back one space at
a time and enter a new name with the
numeric keys.
LEIST SILKE
Zurück
Ok
Press "Ok" softkey
Speichern?
Zurück
Ok
Press "Ok" softkey a second time.
The entry is now stored.
Note:
VOEGTLI T.
012401313
Intern
Menü
• If you only delete the entry without entering a new one, the entry will be deleted
completely from the phone book.
Enhanced-convenience dialling
Deleting all the entries in the phone book
You can delete all the data stored in the phone book using a single procedure.
Handset switched to ON
Intern
Press "Menu" softkey, then press arrow
keys repeatedly until "Setup" appears.
Press "Ok" softkey, then press arrow keys
repeatedly until "Initialise" appears.
Note:
Menü
Einstellen
Zurück
Ok
Zurücksetzen
Zurück
Ok
Press "Ok" softkey
Handgerät
Zurück
Ok
Press "Ok" softkey
Lieferzust.
Zurück
Ok
Press arrow keys repeatedly until
"Memory" appears
Telefonbuch
Zurück
Ok
Press "Ok" softkey
Löschen?
Zurück
Ok
Press "Ok" softkey
All the entries in the phone book are now
deleted.
Telefonbuch
Zurück
Ok
Press "Back" softkey four times…
Intern
Menü
• If you have activated a handset PIN number, the handset will prompt you for
your four-digit, personal handset PIN number.
41
During a call
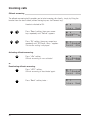
Mute switch
If you do not wish your call partner to hear what you are saying (for instance, when you confer
with someone in the room), you can switch the microphone integrated in the handset to Mute.
You are making a call...
C
Press the Mute key
The microphone is switched off.
The person at the other end cannot hear
you.
012401313
Intern Menü
Stummschalt.
Intern Menü
Confer with the other person(s) in the room
with you...
C
Press the Mute key a second time
The microphone is switched back on.
The person at the other end can hear you
again.
You proceed with your call...
42
012401313
Intern Menü
During a call
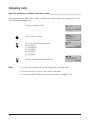
Adjusting the handset volume
During a call, you can increase the volume in the handset to hear the person at the other end
more clearly.
You are making a call...
012401313
Intern Menü
Press ”Menu” softkey, then press arrow
keys repeatedly until ”Handset Vol.”
appears.
Hörer-laut
Zurück ¢Ein
Press ”¢On” softkey.
The volume in the handset is increased.
012401313
Intern Menü
You proceed with your call...
Note:
• The increase in volume in the handset applies to this call only. When the call
is completed, the previous setting is automatically restored.
• The handset volume can also be set in such a way that it remains stored
permanently for other calls (see Page 17).
43
During a call
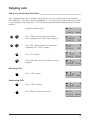
Send DTMF function
By switching over to the DTMF dialling method, you can use the special ”star”
and ”hash”
keys to enter information during a call, for such functions as Voicemail, City call, etc.
In such cases you can dispense with the use of a separate code transmitter.
Temporary switchover:
You have set up a call...
1
2
3
4
5
6
7
8
9
0
012401313
Intern Menü
Press ”Menu” softkey, then press arrow
keys repeatedly until ”Send DTMF”
appears.
Tonsender
Zurück ¢Ein
Press ”¢On” softkey.
012401313
Intern Menü
Enter the digits/characters
Permanent switchover:
Note:
Handset switched to ON
Intern
Press ”Menu” softkey, then press arrow
keys repeatedly until ”Setup” appears.
Einstellen
Zurück
Ok
Press ”Ok” softkey, then press arrow keys
repeatedly until ”Auto-DTMF” appears.
Auto DTMF
Zurück ¢Ein
Press ”¢On” softkey.
Auto DTMF
Zurück ¢Aus
Press ”¢Off” softkey.
The Auto DTMF function is now deactivated.
Auto DTMF
Zurück ¢Ein
Menü
• When you end a call, i.e. after pressing the Connect key, the DTMF function is
automatically switched off.
• BIf you use the Redial function, only the digits entered before the switch in
dialling method will be redialled.
• During the switchover, the units/charge display is suppressed.
44
During a call
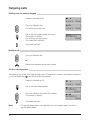
Automatic completion of call to busy subscriber
If you want to call an outside subscriber who is busy, you can activate an automatic completion
of call to busy subscriber (CCBS). As soon as the called party is free again, you will be called
back by the network and the connection to the called subscriber is set up.
Handset switched to ON
Intern
1
2
3
4
5
6
7
8
9
0
Key in the subscriber number
Press the Connect key within 15 seconds.
The subscriber number is dialled.
Menü
012401313
Intern Spchr
012401313
Intern Spchr
The subscriber is busy
Besetzt
Rückr.
Activating the automatic CCBS
Press ”CCBS” softkey
Rückr.
aktiviert
After approx. 2 seconds
Intern
Menü
Display for automatic CCBS
012401313
abweis
Press Connect key
You will hear the ringing tone
012401313
Menü
45
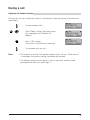
During a call
Parking
You can park an outside call and retrieve it again from another handset on your ISDN connection. The park duration is limited to 3 minutes.
Parking a call
You are making a call
01201313
Rückf. Menü
Press ”Menu” softkey, then press arrow
keys repeatedly until ”Park” appears.
Parken
Zurück
Press ”Ok” softkey. The park number
displayed can be altered with the Delete key
and the numeric keys.
Park-Nr.: 10
Rückf. Menü
Press ”Ok” softkey.
The call is now parked.
The subscriber is free again.
Anrufe: 07
Rückf. Menü
Ok
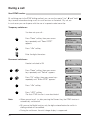
Retrieving a parked, external call (unparking)
Handset switched to ON
Intern
Press ”Menu” softkey, then press arrow
keys repeatedly until ”Services” appears.
Press ”Ok” softkey, then press arrow keys
repeatedly until ”Unpark” appears.
46
Dienste
Zurück
Menü
Ok
Entparken
Zurück
Ok
Press ”Ok” softkey. The park number
displayed can be altered with the Delete key
and the numeric keys.
Park-Nr.: 10
Zurück
Ok
Press ”Ok” softkey.
The call is now unparked.
The subscriber is connected through again.
012401313
Rückf. Menü
During a call
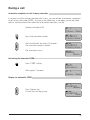
Answering call-waiting calls
You have the possibility of rejecting an outside call-waiting call, accepting it (in which case your
current call is interrupted) or holding the current call and taking the call-waiting call.
You are making a call
0326184068
Rückfr. Menü
You receive a call
MUSTER
MSN
HANS
Menü
Rejecting the call-waiting call
Press ”Menu” softkey.
Abweisen
Zurück
Press ”Ok” softkey.
The call-waiting caller is rejected.
You may continue your original call.
0326184068
Rückfr. Menü
Ok
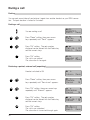
Accepting a call-waiting call
Press ”Menu” softkey, then press arrow
keys repeatedly until ”Take Over”
appears.
Press ”Ok” softkey.
Übernehmen
Zurück
Ok
MUSTER HANS
Rückfr. Menü
Holding the current call, taking the call-waiting call
Press ”Menu” softkey, then press arrow
keys repeatedly until ”Take Hold”
appears.
NehmenHalten
Zurück
Ok
Press ”Ok” softkey.
MUSTER HANS
Zurück Menü
47
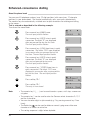
Call diversion
Your telephone supports three different call diversions. The multiple subscriber numbers are
diverted in each case.
• Call diversion always: all calls are diverted directly to the predetermined destination.
• Call diversion on busy: all calls are diverted to the predetermined destination if your multiple
subscriber number is busy.
• Call diversion no reply: the call is diverted to the predetermined destination if no-one answers
a called multiple subscriber number after 15 seconds.
The diversion is MSN-specific and is protected by the system secret number.
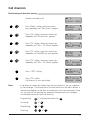
Activating call diversion always
Handset switched to ON
Intern
Press ”Menu” softkey, then press arrow
keys repeatedly until ”Services” appears.
Press ”Ok” softkey, then press arrow keys
repeatedly until ”Diversion” appears.
Press ”Ok” softkey.
Press ”Ok” softkey, then press arrow keys
repeatedly until the MSN you want appears.
1
2
3
4
5
6
7
8
9
0
Dienste
Zurück
Ok
Umleiten
Zurück
Ok
Uml. Sofort
Zurück
Ok
PRIVAT
Zurück
Ok
Press ”Ok” softkey.
Uml. Sofort
Zurück ¢Ein
Press ”¢On” softkey.
Tel.Nr.:?
Zurück
Key in the destination number
065384068
Zurück
Ok
Press ”Ok” softkey.
The function is carried out
Press ”Ok” softkey.
Call diversion is now activated.
48
Menü
Ausgeführt
Zurück
Ok
Uml. Sofort
Zurück ¢Ein
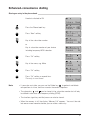
Call diversion
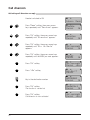
Deactivating call diversion always
Handset switched to ON
Intern
Press “Menu” softkey, then press arrow
keys repeatedly until “Services” appears.
Menü
Dienste
Zurück
Ok
Umleiten
Zurück
Ok
Press “Ok” softkey, then press arrow keys
repeatedly until “Diversion” appears.
Press “Ok” softkey.
Press “Ok” softkey, then press arrow keys
repeatedly until the MSN you want appears.
Uml. Sofort
Zurück
Ok
SPress “Ok” softkey, then press arrow keys
repeatedly until “Div. Always” appears.
PRIVAT
Zurück
Press “¢Off” softkey.
Uml. Sofort
Zurück ¢Aus
Press “Ok” softkey.
Call diversion is now deactivated.
Ok
Ausgeführt
Zurück
Ok
Uml. Sofort
Zurück ¢Aus
Note:
• If call diversion cannot be initiated, then the new protocol is not yet supported
by the exchange. The introduction of the new protocol to the public network is
planned and depends on the level of completion of your local exchange. However, you can use the following key sequences (keypad protocol) to program,
activate/deactivate and check call diversion.
Programming:
21 diversion destination No.
Activating:
21
Deactivating:
21
Checking:
21
49
Call diversion
Activating call diversion on busy
Handset switched to ON
Intern
Press ”Menu” softkey, then press arrow
keys repeatedly until ”Services” appears.
Press ”Ok” softkey, then press arrow keys
repeatedly until ”Diversion” appears.
Press ”Ok” softkey, then press arrow keys
repeatedly until ”Div. On Busy” appears.
Press ”Ok” softkey, then press arrow keys
repeatedly until the MSN you want appears.
1
2
3
4
5
6
7
8
9
0
Menü
Dienste
Zurück
Ok
Umleiten
Zurück
Ok
Uml. Besetzt
Zurück
Ok
PRIVAT
Zurück
Ok
Press ”Ok” softkey.
Uml. Besetzt
Zurück ¢Ein
Press ”¢On” softkey.
Tel.Nr.:?
Zurück
Key in the destination number
065384068
Zurück
Ok
Press ”Ok” softkey.
The function is carried out
Press ”Ok” softkey.
Call diversion is now activated.
50
Uml. Besetzt
Zurück ¢Ein
Call diversion
Deactivating call diversion on busy
Handset switched to ON
Intern
Press ”Menu” softkey, then press arrow
keys repeatedly until ”Services” appears.
Press ”Ok” softkey, then press arrow keys
repeatedly until ”Diversion” appears.
Press ”Ok” softkey, then press arrow keys
repeatedly until ”Div. On Busy” appears.
Press ”Ok” softkey, then press arrow keys
repeatedly until the MSN you want appears.
Press ”Ok” softkey, then press arrow keys
repeatedly until ”Div. On Busy” appears.
Note:
Menü
Dienste
Zurück
Ok
Umleiten
Zurück
Ok
Uml. Besetzt
Zurück
Ok
PRIVAT
Zurück
Ok
Uml. Besetzt
Zurück ¢Aus
Press ”¢Off” softkey.
Ausgeführt
Zurück
Ok
Press ”Ok” softkey.
Call diversion is now deactivated.
Uml. Sofort
Zurück ¢Aus
• If call diversion cannot be initiated, then the new protocol is not yet supported
by the exchange. The introduction of the new protocol to the public network is
planned and depends on the level of completion of your local exchange. However, you can use the following key sequences (keypad protocol) to program,
activate/deactivate and check call diversion.
Programming:
67 diversion destination No.
Activating:
67
Deactivating:
67
Checking:
67
51
Call diversion
Activating call diversion no reply
Handset switched to ON
Intern
Press ”Menu” softkey, then press arrow
keys repeatedly until ”Services” appears.
Dienste
Zurück
Ok
Press ”Ok” softkey, then press arrow keys
repeatedly until ”Diversion” appears.
Umleiten
Zurück
Ok
Press ”Ok” softkey, then press arrow keys
repeatedly until ”Div. No Reply”
appears.
Uml.verzoeg.
Zurück
Ok
Press ”Ok” softkey, then press arrow keys
repeatedly until the MSN you want appears.
1
2
3
4
5
6
7
8
9
0
52
Menü
PRIVAT
Zurück
Ok
Press ”Ok” softkey.
Uml.verzoeg.
Zurück ¢Ein
Press ”¢On” softkey.
Tel.Nr.:?
Zurück
Key in the destination number
065384068
Zurück
Ok
Press ”Ok” softkey.
The function is carried out
Ausgeführt
Zurück
Ok
Press ”Ok” softkey.
Call diversion is now activated.
Uml.verzoeg.
Zurück ¢Ein
Call diversion
Deactivating call diversion no reply
Handset switched to ON
Intern
Press ”Menu” softkey, then press arrow
keys repeatedly until ”Services” appears.
Press ”Ok” softkey, then press arrow keys
repeatedly until ”Diversion” appears.
Press ”Ok” softkey, then press arrow keys
repeatedly until ”Div. No Reply”
appears.
Press ”Ok” softkey, then press arrow keys
repeatedly until the MSN you want appears.
Note:
Menü
Dienste
Zurück
Ok
Umleiten
Zurück
Ok
Uml.verzoeg.
Zurück
Ok
PRIVAT
Zurück
Ok
Press ”Ok” softkey, then press arrow keys
repeatedly until ”Div. No Reply”
appears.
Uml.verzoeg.
Zurück ¢Aus
Press ”¢Off” softkey.
Ausgeführt
Zurück
Ok
Press ”Ok” softkey.
Call diversion is now deactivated.
Uml.verzoeg.
Zurück ¢Aus
• If call diversion cannot be initiated, then the new protocol is not yet supported
by the exchange. The introduction of the new protocol to the public network is
planned and depends on the level of completion of your local exchange. However, you can use the following key sequences (keypad protocol) to program,
activate/deactivate and check call diversion.
Programming:
61 diversion destination No.
Activating:
61
Deactivating:
61
Checking:
61
53
Charge/talk-time display
Introduction
Before you can use the unit/charge metering facility, you need to apply for a ”transfer of call
charges at end of call” from the Deutsche Telekom branch office responsible for your area, if you
do not possess an added-feature multipoint interface.
If you wish to have the unit/charge display indicated during the call, you need to order this
facility separately.
Please remember, however, that for technical reasons the indications on the phone bill may vary
from the values on your unit/charge display. The unit meter at the Deutsche Telekom exchange
is always binding.
The metering on the telephone is carried out separately for each handset. The amount for the
handsets and the total amount from the switched circuit (exchange) runs in the background and
can be checked or deleted.
The talk time display is de-activated as a default setting.
If the telephone is operated behind a PBX, it may well be that no call charges are indicated.
Charge display
If the charge display is activated, the display on your handset automatically indicates the charges with each outgoing call.
Current call
Indication of charges in DM amounts on the display
Rückf.
2.40
Menü
Talk-time display
If the talk-time display is activated, the display starts automatically as soon as you are through to
the subscriber you wanted.
Seconds
Minutes
Indication on the display
Rückf.
Note:
54
• Maximum display = 99 minutes, 59 seconds, then back to 00:00.
00:00
Menü
Charge/talk-time display
Activating/deactivating the charge/talk-time display
Handset switched to ON
Intern
Press ”Menu” softkey, then press arrow
keys repeatedly until ”Amount” appears.
Press ”Ok” softkey, then press arrow keys
repeatedly until ”Display” appears.
Press ”Ok” softkey
Menü
Entgelt
Zurück
Ok
Anzeige
Zurück
Ok
Keine
Zurück
Ok
Entgelt
Zurück
Ok
Dauer
Zurück
Ok
Keine
Zurück
Ok
Anzeige
Zurück
Ok
Activating the charge display:
Press arrow keys repeatedly until
”Amount” appears.
or
Activating on the talk-time display:
Press arrow keys repeatedly until
”Duration” appears.
or
Deactivating off the display:
Press arrow keys repeatedly until
”Nothing” appears.
Press ”Ok” softkey.
The corresponding display is set
Press ”Back” softkey twice…
Intern
Menü
55
Charge/talk-time display
Checking the amounts
You can check the total amount as well as the amount for the last telephone calls at any time
(charge incurred).
Handset switched to ON
Intern
56
Menü
Press ”Menu” softkey, then press arrow
keys repeatedly until ”Amount” appears.
Entgelt
Zurück
Ok
Press ”Ok” softkey
Abfragen
Zurück
Ok
Press ”Ok” softkey
The amount of the last call
appears in DM amounts
Letzt:
Zurück
Press the arrow keys
The total amount appears in DM amounts
Total: 25.60
Zurück
Press ”Back” softkey three times…
Intern
3.50
Menü
Charge/talk-time display
Changing the charge factor
Handset switched to ON
Press ”Menu” softkey, then press arrow
keys repeatedly until ”Amount” appears.
Ok
Faktor
Zurück
Ok
Amt:
Zurück
0.20
Neu
Amt:
Zurück
0.20
Ok
Key in the charge factor, e.g. 012 for 0.12
Amt:
Zurück
0.12
Ok
Press ”Ok” softkey
The factor is now stored.
Amt:
Zurück
0.12
Neu
Intern
Menü
Nr.1:
Zurück
0.30
Neu
Amt:
Zurück
0.30
Ok
Key in the charge factor, e.g. 015 for 0.15
Nr.1:
Zurück
0.15
Ok
Press ”Ok” softkey
The factor is now stored.
Nr.1:
Zurück
0.15
Neu
Intern
Menü
Press ”New” softkey
2
3
4
5
6
7
8
9
0
Press ”Back” softkey three times…
Setting the handset charge factor:
Press ”Ok” softkey, then press arrow
keys repeatedly until the handset you
want appears.
The previous factor appears, e.g. 0.30
Press ”New” softkey
1
2
3
4
5
6
7
8
9
0
Press ”Back” softkey three times…
Note:
Menü
Entgelt
Zurück
Press ”Ok” softkey, then press arrow keys
repeatedly until ”Factor” appears.
Keying in the line charge factor:
Press ”Ok” softkey
The previous factor for the line
appears, e.g. 0.20
1
Intern
• If you have activated a system PIN number, the Telephonewill prompt you for
your personal, four-digit system PIN number.
• To simply check the factor, carry out the same procedure except for
”Keying in the charge factor”.
• The charge factor can be set up to ”9.99”.
57
Charge/talk-time display
Checking and deleting the amounts of all handsets and MSN
Handset switched to ON
Intern
Press ”Menu” softkey, then press arrow
keys repeatedly until ”Charging” appears
Press ”Ok” softkey twice, then press arrow
keys repeatedly until ”System” appears
Press ”Ok” softkey
The total of the amounts incurred appears.
Press arrow key
The amount incurred by handset 1 appears.
Press arrow key
The amount incurred by handset 2 appears.
Menü
Entgelt
Zurück
Ok
System
Zurück
Ok
Amt: 345.50
Zurück Lösch
Nr.1: 20.10
Zurück Lösch
Nr.2:
5.20
Zurück Lösch
etc.
Press arrow key
The amount incurred by MSN A appears.
Press arrow key
The amount incurred by MSN B appears.
MSN A:120.50
Zurück Lösch
MSN B: 30.50
Zurück Lösch
etc.
Press ”Back” softkey four times…
Intern
To delete:
Note:
58
Menü
Press ”Delete” softkey
Löschen?
Zurück
Press ”Ok” softkey
The charge for the switched circuit is
deleted
Amt:
0
Zurück Lösch
Ok
• If you have activated a system PIN number, the Telephonewill prompt you for
your personal, four-digit system PIN number.
Direct call
Activating direct call
An important subscriber number can be stored as a direct call number. When direct call is
activated, this subscriber number can be dialled automatically by pressing any key (except
softkeys). Incoming calls can be answered.
Handset switched to ON
Intern
Press ”Menu” softkey, then press arrow
keys repeatedly until ”Setup” appears
Press ”Ok” softkey, then press arrow keys
repeatedly until ”Direct Call” appears
Press ”Ok” softkey
1
2
3
4
5
6
7
8
9
0
Key in the subscriber number of the
destination you want
Press ”Ok” softkey
Direct call is now activated
Note:
Menü
Einstellen
Zurück
Ok
Direktruf
Zurück
Ok
Tel.Nr.:?
Zurück
065242357_
Zurück
Ok
Direktruf
¢Aus
• If you have activated a system PIN number, the Telephonewill prompt you for
your personal, four-digit system PIN number.
59
Direct call
Dialling a direct call number
Press the Connect key for example
The direct call number stored is
dialled automatically.
065242357
Intern Menü
You make your call…
Ending the call:
Press the Connect key a second time
”Direct call” appears again on the display.
Note:
Direktruf
¢Aus
• Direct call is automatically re-activated when the call is ended.
Deactivating direct call
Press ”¢Off” softkey
Press ”Ok” softkey
Direct call is now deactivated
60
D-Ruf Aus?
Zurück
Ok
Intern
Menü
Call barring
Activating call barring
Call barring allows you to bar your telephone handset(s) individually for outgoing calls at the
exchange connection (with the exception of the direct call facility and the emergency numbers
110, 112, 115, 19222). You have a choice of three different barring options:
No Barring
External
National
International
=
=
=
=
No barring (all calls permitted)
No outside calls possible
No long distance calls possible (0-barring)
No international calls possible (00-barring)
Handset switched to ON
Intern
Menü
Press ”Menu” softkey, then press arrow keys
repeatedly until ”Setup” appears
Einstellen
Zurück
Ok
Press ”Ok” softkey, then press arrow keys
repeatedly until ”System” appears
System
Zurück
Press ”Ok” softkey, then press arrow keys
repeatedly until ”Call Barring” appears
Ok
Wahlsperre
Zurück
Ok
Press ”Ok” softkey
Call barring set for handset 1
appears on the display
1:Keine
Zurück
Neu
Press arrow keys repeatedly until the
handset you want appears on the display
(e.g. handset 2)
2:Keine
Zurück
Neu
Press ”New” softkey
2:Amtssperre
Zurück
Ok
Press arrow keys repeatedly until the barring
you want appears
(e.g. international)
2:Ausland
Zurück
Ok
Press ”Ok” softkey
The call barring is now set
Wahlsperre
Zurück
Ok
Press ”Back” softkey three times…
Intern
Menü
61
Paging
From base station to handset(s)
You can transmit an acoustic signal (paging ringing signal) from base station to handset(s), for
instance you may have mislaid your handset(s) and want to use this signal to help find it (them).
Press the ringing key on the base station
The paging ringing signal sounds for
approx. 60 seconds on the handset(s)
Note:
• You can use the Connect key to stop the paging ringing for all the handsets.
• With the ”¢Off” softkey you can stop the paging ringing for the corresponding
handset.
62
Ringing tone
Setting the ringing tone on the handset
You can modify the volume, tone sequence and melody of the ringing tone on the handset.
Handset switched to ON
Intern
Press ”Menu” softkey, then press arrow
keys repeatedly until ”Setup” appears
Press ”Ok” softkey, then press arrow keys
repeatedly until ”Ringer” appears
Press ”Ok” softkey
Press ”Ok” softkey
The ringing tone on the handset rings as
previously set, as indicated on the display
Menü
Einstellen
Zurück
Ok
Tonruf
Zurück
Ok
Handgerät
Zurück
Ok
Laut.: 0-4 3
Zurück
Ok
Setting the volume:
0
•••
4
Press numeric key 0…4 for the required
volume, e.g. 4 (0 = off / 4 = loud)
Laut.: 0-4 4
Zurück
Ok
Setting the tone sequence (pitch):
Press arrow keys
1
•••
8
Press numeric key 1…8 for the required
pitch, e.g. 2 (1 = slow / 8 = fast)
Takt: 1-8 1
Zurück
Ok
Takt: 1-8 2
Zurück
Ok
Setting the melody for internal calls:
Press arrow keys
1
•••
8
Press numeric key 1…8 for the required
melody, e.g. 2
Mel.I: 1-8 3
Zurück
Ok
Mel.I: 1-8 2
Zurück
Ok
63
Ringing tone
Setting the melody for digit 1
1
•••
8
Press arrow keys
Mel.1: 1-8 3
Zurück
Ok
Press numeric key 1…8 for the required
melody, e.g. 2
Mel.1: 1-8 2
Zurück
Ok
Setting the melody for digit 2
Press arrow keys
1
•••
8
Press numeric key 1…8 for the required
melody, e.g. 2
Mel.2: 1-8 3
Zurück
Ok
Mel.2: 1-8 2
Zurück
Ok
Setting the melody for digit 3
Press arrow keys
1
•••
8
Press numeric key 1…8 for the required
melody, e.g. 2
Press ”Ok” softkey
Digit barring is now set
Mel.3: 1-8 3
Zurück
Ok
Mel.3: 1-8 2
Zurück
Ok
Handgerät
Zurück
Ok
Press ”Back” softkey five times…
Intern
64
Menü
Ringing tone
Setting the ringing tone on the base station
You can modify the volume, tone sequende and melody of the ringing tone on the base station.
Handset switched to ON
Intern
Press ”Menu” softkey, then press arrow
keys repeatedly until ”Setup” appears
Press ”Ok” softkey, then press arrow keys
repeatedly until ”Ringer” appears
Press ”Ok” softkey, then press arrow keys
repeatedly until ”Basestation” appears
Menü
Einstellen
Zurück
Ok
Tonruf
Zurück
Ok
Feststation
Zurück
Ok
Press ”Ok” softkey
The ringing tone on the base station rings as
previously set, as indicated on the display
Laut.: 0-4 3
Zurück
Ok
Press numeric key 0…4 for the required
volume, e.g. 4
(0 = off / 4 = loud)
Laut.: 0-4 4
Zurück
Ok
Setting the volume:
0
•••
4
Setting the tone sequence (pitch):
Press arrow keys
1
•••
8
Press numeric key 1…8 for the required
melody, e.g. 2
Takt: 1-8 1
Zurück
Ok
Takt: 1-8 2
Zurück
Ok
Setting the melody:
Press arrow keys
1
•••
8
Press numeric key 1…8 for the required
melody, e.g. 2
Press ”Ok” softkey
The new setting is now stored
Press ”Back” softkey three times…
Mel.: 1-8 1
Zurück
Ok
Mel.: 1-8 2
Zurück
Ok
Feststation
Zurück
Ok
Intern
Menü
65
Operation with several handsets
Explanations
The telephone allows you to operate up to 6 handsets on one base station. Each additional
handset must be subscribed to the base station and obtain an internal subscriber number.
Each internal subscriber number (1-6) can only be allocated once.
Subscribing a handset to the base station
Handset switched to ON
Intern
1
2
3
4
5
6
7
8
9
0
1
2
3
4
5
6
7
8
9
0
1
2
3
4
5
6
7
8
9
0
Press ”Menu” softkey, then press arrow
keys repeatedly until ”De/Subscribe”
appears.
An-/Abmelden
Zurück
Ok
Press ”Ok” softkey
Anmelden
Zurück
Press ”Ok” softkey
An Feststat.
Zurück
Ok
Press ”Ok” softkey
System-PIN?
____
Key in the system PIN
System-PIN?
***_
Key in the handset number (internal
subscriber number 1 to 6) e.g. 2
Geräte-Nr:2
Zurück
Ok
Press ”Ok” softkey
Feststation
A B C D
Use the softkeys and arrows keys to key in the
base station you want: e.g. left-hand softkey
for base station A
Press ”Ok” softkey
Note:
• Each occupied base station is identified with an ”*”.
• See page 76 for MSN allocation
66
Menü
Ok
Anmelden?
Zurück
Ok
Station
vorbereiten
Operation with several handsets
Preparing the base station for subscription:
Press down the paging key on the base
station for 6 seconds.
The connection indicator on the base station
(red LED) starts flashing.
Display reading on the handset:
The following information is indicated
on the display during subscription.
Anmeldung
läuft
Intern 2
Anmeld.ok
The subscription procedure is completed.
The handset is now subscribed.
Press ”Back” softkey three times…
Note:
An Feststat.
Zurück
Ok
Intern
Menü
• When subscribing, you must always key in the correct system PIN for the base
station concerned, even if the PIN function has not been activated (digit
sequence ”0000”).
• If the subscription was not carried out correctly, the display reads
”Subscription Failed” and the procedure must be repeated.
67
Operation with several handsets
Desubscribing a handset from the base station
Handset switched to ON
Intern
Press ”Menu” softkey, then press arrow
keys repeatedly until ”De/Subscribe”
appears.
An-/Abmelden
Zurück
Ok
Press ”Ok” softkey, then press arrow keys
repeatedly until ”Desubscribe” appears.
Abmelden
Zurück
Ok
Press ”Ok” softkey
Gerät
Zurück
Ok
Press ”Ok” softkey
1
2
3
4
5
6
7
8
9
0
Geräte-Nr:?
Zurück
Ok
Key in the handset number to be
desubscribed (internal subscriber
number 1 to 6) e.g. 2
Geräte-Nr:2
Zurück
Ok
Press ”Ok” softkey
Gerät
abgemeldet
Press ”Back” softkey three times…
Note:
Menü
Gerät
Zurück
Ok
Intern
Menü
• To be able to desubscribe a handset you have to be in the vicinity of the base
station.
• If you have activated a system PIN, the handset will prompt you for your personal, four-digit system PIN.
68
Operation with several handsets
Making internal calls
You can set up an internal call to another handset (on the same base station) and make a call.
Handset switched to ON
Intern
1
2
3
4
5
6
7
8
9
0
Press ”Intern” softkey.
The handset’s internal number is indicated
on the bottom line of the display.
Nummer:?
Intern 1
Key in the internal subscriber number
(1 to 6) of the handset you want (e.g. 2)
2
Intern
Menü
Menü
You hear the ringing tone.
The subscriber answers.
You make your call…
Intern m. 2
Intern Menü
Display reading in the called handset
(The number of the calling handset is
displayed, e.g. 1)
Anruf von 1
abweis
Ok
Intern m. 1
Intern Menü
Note:
• Global call: If you key in the digit 9 as the internal subscriber number, a global
call is sent out to all the handsets (group hunting).
• If the handset you want is not reached, you will hear the busy tone after approx.
10 seconds and the display reads ”Busy”.
• If an outside call comes in during the internal call, you will hear the call waiting
tone (see section on call waiting).
69
Operation with several handsets
Checking the internal subscriber number
If you have forgotten a handset’s internal subscriber number, you can check it using a simple
procedure.
Handset switched to ON
Intern
Press ”Intern” softkey.
The handset’s internal number is indicated
on the display, e.g. Intern 1.
Menü
Nummer:?
Intern 1
Press the Connect key
Intern
Menü
Rejecting a call
An (internal or outside) call is signalled. You do not want to be disturbed and reject the call, e.g.
when another handset is to answer the call.
Internal call:
Handset is ringing
Press ”Reject” softkey
The call is rejected.
The caller hears the busy tone.
Anruf von 1
abweis
Ok
Intern
Menü
Outside call:
Base station and handsets are ringing
012345678
MSN
Menü
Press ”Menu” softkey
Abweisen
Zurück
Press ”Ok” softkey
The call is rejected from this handset.
The other handsets and the base station go
on ringing.
70
Intern
Ok
Menü
Operation with several handsets
Inquiry / Swap / Three-party conference / Call transfer
D
A
Öffentliches
Netz
Sinus 54 ISDN
C
B
Inquiry via telephone
You (subscriber A) are making a call with
subscriber C
MUELLER HANS
Rückf. Menü
Subscriber A wants to initiate an inquiry to
subscriber B (internal)
1
2
3
4
5
6
7
8
9
0
Press ”Inquiry” softkey
Rückfrage:
Zurück Handy
Press ”Handy” softkey
Rückfrage:
Zurück
Key in the internal subscriber number you
want (e.g. 2)
2
Zurück
Press ”Ok” softkey
You are now connected with the second
subscriber (B). The other call is held in the
base of the telephone.
Ok
Intern m. 2
Zurück Menü
71
Operation with several handsets
Swap via telephone
You (subscriber A) can now switch backwards and forwards between the two calls (B and C).
You (A) are connected with subscriber B
Subscriber C is on hold
Intern m. 2
Zurück Menü
Press ”Menu” softkey
Makeln
Zurück
Press ”Ok” softkey
You (A) are now connected with subscriber
C. Subscriber B is on hold.
MUELLER HANS
Zurück Menü
Ok
Disconnect current call and return to the other call:
Press ”Back” softkey
Intern m. 2
Rückf. Menü
Three-party conference via telephone
You (A) are connected with subscriber B and subscriber C is on hold. You can now link up with
the two subscribers to form a three-party conference.
You (A) are connected with subscriber B
Subscriber C is on hold
Intern m. 2
Zurück Menü
Press ”Menu” softkey, then press arrow
keys repeatedly until ”Three Party”
appears.
Konferenz
Zurück
Ok
Press ”Ok” softkey
All 3 subscribers (A, B and C) are now
connected together.
Konferenz
Zurück Menü
Cancelling the three-party conference:
Press ”Back” softkey
You now hear only one subscriber; the other
is on hold.
72
Intern m. 2
Zurück
Ok
Operation with several handsets
Call transfer via telephone
You (A) are connected with subscribers B and C (swap or conference status) and can now
connect them together.
You (A) are connected with subscriber B
Subscriber C is on hold
Press the Connect key.
Subscribers B and C are now connected.
Your handset and the B channel used are
now free again.
Note:
Intern m. 2
Zurück Menü
Intern
Menü
• Even after the call transfer, the call charges are charged to whichever party
set up the connection.
73
Operation with several handsets
Inquiry via telephone
You (subscriber A) are making a call with
subscriber C
MUELLER HANS
Rückf. Menü
Subscriber A wants to initiate an inquiry to
subscriber D (external)
1
2
3
4
5
6
7
8
9
0
Press ”Inquiry” softkey
Rückfrage:
Zurück Handy
Key in the external subscriber number you
want (e.g. 2345678)
2345678
Zurück
Ok
2345678
Zurück
Ok
Press ”Ok” softkey
You are now connected with the second
subscriber (D). The other call is held in the
exchange.
Swap
You (subscriber A) can now switch backwards and forwards between the two calls (C and D).
You (A) are connected with subscriber D
Subscriber C is on hold
Press ”Menu” softkey
Press ”Ok” softkey
You (A) are now connected with subscriber
C. Subscriber D is on hold.
2345678
Zurück Menü
Makeln
Zurück
Ok
MUELLER HANS
Zurück Menü
Disconnect current call and return to the other call:
Press ”Back” softkey
74
2345678
Rückf. Menü
Operation with several handsets
Three-party conference
You (A) are connected with subscriber D and subscriber C is on hold. You can now link up with
the two subscribers to form a three-party conference.
You (A) are connected with subscriber D
Subscriber C is on hold
2345678
Zurück Menü
Press ”Menu” softkey, then press arrow
keys repeatedly until ”Three Party”
appears.
Konferenz
Zurück
Ok
Press ”Ok” softkey
All 3 subscribers (A, C and D) are now
connected together.
Konferenz
Zurück Menü
Cancelling the three-party conference:
Press ”Back” softkey
You now hear only one subscriber; the other
is on hold.
2345678
Zurück
Ok
Call transfer
You (A) are connected with subscribers C and D (swap or conference status) and can now
connect them together.
You (A) are connected with subscriber D
Subscriber C is on hold
Press the Connect key.
Subscribers C and D are now connected.
Your handset is free again.
Note:
2345678
Zurück Menü
Intern
Menü
• Even after the call transfer, the call charges are charged to whichever party set
up the connection.
75
Operation with several handsets
Setting the ringing allocation for the handsets (exchange ring)
An incoming external call is signalled to all the handsets. You can switch off the ring signalling
(exchange ring) on individual handsets. You can then only be reached on that handset if another
handset calls you internally.
Handset switched to ON
Intern
Press ”Menu” softkey, then press arrow keys
repeatedly until ”Setup” appears
Press ”Ok” softkey, then press arrow keys
repeatedly until ”System” appears
Menü
Einstellen
Zurück
Ok
System
Zurück
Ok
Press ”Ok” softkey, then press arrow keys
repeatedly until ”Call Distribution”
appears
Rufverteiler
Zurück
Ok
Press ”Ok” softkey, then press arrow keys
repeatedly until the MSN to be configured
appears
MSN A
Zurück
Ok
Press ”Ok” softkey, then press arrow keys
repeatedly until the handset you want
appears
Nr.1:
Zurück
Ein
¢Aus
Switching off the exchange ring:
Press ”¢Off” softkey
The exchange ring is now deactivated.
Gerät 2: Aus
Zurück ¢Ein
or
Switching the exchange ring back on:
Press ”¢On” softkey
The exchange ring is now re-activated.
Press ”Back” softkey four times…
Note:
76
Gerät 2: Ein
Zurück ¢Aus
Intern
• If you have activated a system PIN, the handset will prompt you for your
personal, four-digit system PIN.
Menü
Operation on several base stations
General explanations
In addition to your own base station, you can operate your Telephonehandset on up to three
other base stations (a maximum of six handsets can be operated on each base station), for example on the one at home and also on the one at work.
The application possibilities for this function are almost limitless. For this reason, in the example
below, we shall restrict ourselves to explaining this feature using two base stations.
Application example
You own a Telephonecordless telephone at home and use the same handset at your workplace
in the office.
Home
Base station
Office
Base station
Handset
Handset
You can now also use the handset from the cordless telephone at the office on the base station
at home and vice versa. Obviously, incoming and outgoing calls are possible only within the range of each particular base station. The handsets must be subscribed on the base station at
home and on the base station at the office.
We recommend the following steps when putting other base stations into service:
You have two complete telephone sets as your initial equipment. As complete sets are supplied
preconfigured (both base stations as ”A” and both handsets as Intern No. 1), we recommend
that you desubscribe both handsets from the base stations (see Desubscribing handsets from
the base station, page 54).
77
Operation on several base stations
Specifying the configuration
Define one letter (A, B, C or D) in each case for the base station at home and one for the base
station at the office. Write the corresponding letter in the label area on each base station.
Home
Office
Base station
Base station
Handset
A
Handset
B
For the sake of clarity, we shall refer from now on to base station A and base station B.
Next allocate one internal subscriber number (1 to 6) to each of your handsets.
Home
Office
A
B
1
2
Note:
• The radio cells can of course overlap either partly or completely.
Home
A
B
1
2
78
Office
Operation on several base stations
Subscribing handsets to base stations
First subscribe handset 1 to base station A and then to base station B.
Subscribing handset 1 to base station A:
Handset switched to ON
Intern
Press ”Menu” softkey, then press arrow
keys repeatedly until ”De/Subscribe”
appears
1
2
3
4
5
6
7
8
9
0
1
2
3
4
5
6
7
8
9
0
Note:
Menü
An-/Abmelden
Zurück
Ok
Press ”Ok” softkey
Anmelden
Zurück
Press ”Ok” softkey
An Feststat.
Zurück
Ok
Press ”Ok” softkey
System-PIN?
____
Key in the system PIN
System-PIN?
***_
Key in the handset number (internal
subscriber number 1 to 6) e.g. 1
Geräte-Nr:1
Zurück
Ok
Press ”Ok” softkey
Feststation
A B C D
Press left-hand softkey for base station A
Anmelden?
Zurück
Ok
Press ”Ok” softkey
Station
vorbereiten
Ok
• Each occupied base station is identified with an “*”.
79
Operation on several base stations
Preparing base station A for subscription:
Press down the paging key on base station
A for 6 seconds.
The connection indicator on the base station
(red LED) starts flashing.
Display reading on the handset:
The following information is indicated on the
display during subscription.
Anmeldung
läuft
Intern 1
Anmeld.ok
The subscription procedure is completed.
The handset is now subscribed.
Press ”Back” softkey three times…
Note:
An Feststat.
Zurück
Ok
Intern
• For the subscription you must always key in the correct system PIN for each
base station concerned, even if the PIN function has not been activated (digit
sequence ”0000”).
• If the subscription was not carried out correctly, the display reads
”Subscription Failed” and the procedure must be repeated.
80
Menü
Operation on several base stations
Subscribing handset 1 to base station B:
Handset switched to ON
Intern
1
2
3
4
5
6
7
8
9
0
1
2
3
4
5
6
7
8
9
0
Note:
Menü
Press ”Menu” softkey, then press arrow
keys repeatedly until ”De/Subscribe”
appears
An-/Abmelden
Zurück
Ok
Press ”Ok” softkey
Anmelden
Zurück
Press ”Ok” softkey
An Feststat.
Zurück
Ok
Press ”Ok” softkey
System-PIN?
____
Key in the system PIN
System-PIN?
***_
Key in the handset number
(internal subscriber number 1 to 6)
e.g. 1
Geräte-Nr:1
Zurück
Ok
Press ”Ok” softkey
Feststation
*A B C D
Press backwards arrow key for base station B
Anmelden?
Zurück
Ok
Press ”Ok” softkey
Station
vorbereiten
Ok
• Each occupied base station is identified with an ”*”.
81
Operation on several base stations
Preparing base station B for subscription:
Press down the paging key on base station
B for 6 seconds.
The connection indicator on the base station
(red LED) starts flashing.
Display reading on the handset:
The following information is indicated on the
display during subscription.
Anmeldung
läuft
Intern 1
Anmeld.ok
The subscription procedure is completed.
The handset is now subscribed.
Press "Back" softkey three times…
An Feststat.
Zurück
Ok
Intern
Menü
Handset 1 is now subscribed onto base station A and base station B.
Next subscriber handset 2 to base stations A and B in exactly the same way as handset 1.
Remember to key in a 2 for the internal subscriber number.
Both handset 1 and handset 2 are now subscribed to base stations A and B.
Note:
• For the subscription you must always key in the correct system PIN for each
base station concerned, even if the PIN function has not been activated (digit
sequence "0000").
• If the subscription was not carried out correctly, the display reads
"Subscription Failed" and the procedure must be repeated.
82
Operation on several base stations
Automatic switchover or manual selection of base station
You can set your handset to
1. Automatic switchover of the base station (default setting)
In the case of separate radio cells the radio connection is set up with the base station in whose range you are in. In the case of overlapping radio cells the connection is set up with the
base station with the highest field strength. In both cases you can only be reached via the
base station indicated on the display.
Connected with base station A
Connected with base station B
Intern
Menü
Intern
Menü
2. Manual selection of the base station
The handset attempts to set up a radio connection only to the base station that has been set
manually.
Handset switched to ON
Intern
Press "Menu" softkey, then press arrow
keys rrepeatedly until "Choose Base"
appears
Menü
Stationswahl
Zurück
Ok
Press "Ok" softkey.
Previous setting appears.
Automatic switchover of base station:
Press arrow keys repeatedly until
"Automatic" appears.
Automatisch
Zurück
Ok
or
Manual switchover of base station:
Press arrow keys repeatedly until the station
you want appears, e.g. station B.
Station B
Zurück
Ok
Press "Ok" softkey
The corresponding selection is now set.
Note:
• The corresponding base station symbol (A, B, C or D) flashes during the
synchronisation phase or when the handset is searching for the base station.
83
Operation on the telephone system
Entering/deleting the exchange identification code (EIC)
If you operate your telephone behind a telephone system, you have the possibility of entering an
exchange identification code of up to 4 digits.
Handset switched to ON
Intern
Press "Menu" softkey, then press arrow
keys repeatedly until "Setup" appears
Press "Ok" softkey, then press arrow keys
repeatedly until "System" appears
Press "Ok" softkey, then press arrow keys
repeatedly until "TK System" appears
Press "Ok" softkey, then press arrow keys
repeatedly until "Exch. ID Code"
appears
Menü
Einstellen
Zurück
Ok
System
Zurück
Ok
TK-Anlage
Zurück
Ok
Amtskennzif.
Zurück
Ok
Entering:
Nummer:
Zurück
Ok
Key in the exchange identification code for
the telephone system
e.g. 0
Nummer:0
Zurück
Ok
Press "Ok" softkey
The exchange identification code is now
stored.
Amtskennzif.
Zurück
Ok
Press "Ok" softkey
1
2
3
4
5
6
7
8
9
0
Deleting:
C
84
Press "Ok" softkey
The exchange identification code currently
set appears.
Nummer:0
Zurück
Ok
Press the Delete key C to delete the
exchange identification code.
Nummer:
Zurück
Ok
Press "Ok" softkey
The exchange identification code is now
deleted.
Amtskennzif.
Zurück
Ok
Press "Back" softkey three times…
Intern
Menü
Operation on the telephone system
Sending an automatic keypad
If
or
is pressed as the first dialling key, there is an automatic switchover to keypad
signalling (“Auto Keypad” On). On some systems (e.g. systems on which automatic line fetch
is programmed) you need to set the menu item “Auto Keypad” to “Off” so that for example you
can connect internally with .
Handset switched to ON
Intern
Press "Menu" softkey, then press arrow
keys repeatedly until "Setup" appears
Press "Ok" softkey, then press arrow keys
repeatedly until "System" appears
Menü
Einstellen
Zurück
Ok
System
Zurück
Ok
Press "Ok" softkey, then press arrow keys
repeatedly until "TK System" appears
TK-Anlage
Zurück
Ok
Press "Ok" softkey, then press arrow keys
repeatedly until "Auto Keypad" appears
Auto Keypad
Zurück ¢Ein
Activating Auto Keypad:
Press "¢On" softkey
Auto Keypad
Zurück ¢Aus
Deactivating Auto Keypad:
Press "¢Off" softkey
Press "Back" softkey four times…
Note:
Auto Keypad
Zurück ¢Ein
Intern
Menü
• If you have activated a system PIN, the handset will prompt you for your
personal, four-digit system PIN.
85
Operation on the telephone system
Transfer with Disconnect
This setting depends on your TK system. You can test whether or not you need to carry out this
setting:
• During an inquiry transfer your two call partners by pressing the Connect key.
• If the transfer is not possible, you need to deactivate "Auto ECT".
Handset switched to ON
Intern
Press "Menu" softkey, then press arrow
keys repeatedly until "Setup" appears
Einstellen
Zurück
Ok
Press "Ok" softkey, then press arrow keys
repeatedly until "System" appears
System
Zurück
Press "Ok" softkey, then press arrow keys
repeatedly until "TK System" appears
TK-Anlage
Zurück
Ok
Press "Ok" softkey, then press arrow keys
repeatedly until "Auto ECT" appears
Press "¢Off" softkey
Auto ECT is now deactivated
Press "Back" softkey four times…
Note:
Menü
Ok
Auto ECT
Zurück ¢Aus
Auto ECT
Zurück ¢Ein
Intern
Menü
• If you have activated a system PIN, the handset will prompt you for your
personal, four-digit system PIN.
• Normally, transfer is effected during operation on a TK system with ECT (Euro
protocol). With "Auto ECT Off" the Euro protocol is deactivated. Ask your
system manufacturer or refer to the operating instructions of your TK system
for more details.
86
Operation on the telephone system
Subscribing a telophone handset to a foreign system
You can log on and operate your telephone handset on a foreign DECT system providing that
system also supports the GAP access profile. To log on the Telephonehandset, you need to
have the "AC" access code (authentication code) of the foreign DECT system at the ready.
See the user guide supplied with the foreign system for details.
Handset switched to ON
Intern
1
2
3
4
5
6
7
8
9
0
1
2
3
4
5
6
7
8
9
0
Menü
Press "Menu" softkey, then press arrow
keys repeatedly until "De/Subscribe"
appears
An-/Abmelden
Zurück
Ok
Press "Ok" softkey
Anmelden
Zurück
Press "Ok" softkey, then press arrow keys
repeatedly until "On Foreign" appears
An Fremdsys.
Zurück
Ok
Press "Ok" softkey
AC:
Zurück
Ok
Key in the AC access code, e.g. 0000
AC:0000
Zurück
Ok
Press "Ok" softkey
Feststation
*A B C D
Use the softkeys and arrow keys to key in the
base station you want: e.g. right-hand softkey
for base station D
Anmelden?
Zurück
Ok
Press "Ok" softkey
Station
vorbereiten
Ok
Continue as instructed in the user guide
supplied with the foreign system
Note:
• Each occupied base station is identified with an "*".
• To desubscribe a handset see page 68.
87
Operation on the telephone system
Subscribing a foreign telephone handset
You can log on and operate a foreign DECT handset on your Telephonebase station providing
that system also supports the GAP access profile.
The Telephonebase station and the foreign handset require an "AC" access code (known as the
authentication code or system code) for the subscription procedure. You yourself can determine
this access code, consisting of 4–8 characters, and pass it on to the base station using the
Telephonehandset. You must also notify the base station of the internal subscriber number
under which the foreign handset is to be subscribed.
Handset switched to ON
Intern
1
2
3
4
5
6
7
8
9
0
1
2
3
4
5
6
7
8
9
0
Menü
Press "Menu" softkey, then press arrow
keys repeatedly until "De/Subscribe"
appears
An-/Abmelden
Zurück
Ok
Press "Ok" softkey
Anmelden
Zurück
Press "Ok" softkey, then press arrow keys
repeatedly until "Foreign HS" appears
Fremdgerät
Zurück
Ok
Press "Ok" softkey
Geräte-Nr:?
Zurück
Ok
Ok
Key in the handset number
(internal subscriber number 1 to 6)
e.g. 6
Geräte-Nr:6
Zurück
Ok
Press "Ok" softkey
AC:
Zurück
Ok
Key in the AC access code, e.g. 0000
AC:0000
Zurück
Ok
Press "Ok" softkey
Fremdgerät
Zurück
Ok
Continue as instructed in the user guide
supplied with the foreign system
Note:
88
• If you have activated a system PIN, the handset will prompt you for your personal, four-digit system PIN.
• To desubscribe a handset see the user guide supplied with your foreign system.
Initialising
Restoring the handset to its default settings
This procedure restores the following handset settings to the default settings:
– handset ringer
– off-hook answering "OFF"
– handset volume (normal)
– choose base (automatic)
– keyclick ("ON")
– range warning tone ("OFF")
– language: English
– redial
– call register
and deletes the following data:
– phone book
– handset PIN ("0000")
Handset switched to ON
Intern
Press "Menu" softkey, then press arrow
keys repeatedly until "Setup" appears
Press "Ok" softkey, then press arrow keys
repeatedly until "Initialise" appears
Note:
Menü
Einstellen
Zurück
Ok
Zurücksetzen
Zurück
Ok
Press "Ok" softkey
Handgerät
Zurück
Ok
Press "Ok" softkey
Lieferzust.
Zurück
Ok
Press "Ok" softkey
Löschen?
Zurück
Ok
Press "Ok" softkey
The default settings have now
been restored.
Lieferzust.
Zurück
Ok
Press "Back" softkey four times…
Intern
Menü
• If you have activated a system PIN, the handset will prompt you for your
personal, four-digit system PIN.
89
Initialising
Restoring the base station (system) to its default settings
This procedure restores the following system settings to the default settings:
–
–
–
–
–
base station ringer
handset call barring
exchange ring signalling
direct call ("OFF")
charge factors (0.12)
–
–
–
–
charge display ("OFF")
MSNs
call waiting
CLIR
and deletes the following data:
– EIC
– charge amounts
– system PIN ("0000")
Handset switched to ON
Intern
Press "Menu" softkey, then press arrow
keys repeatedly until "Setup" appears
Press "Ok" softkey, then press arrow keys
repeatedly until "Initialise" appears
Press "Ok" softkey, then press arrow keys
repeatedly until "Basestation" appears
Note:
90
Menü
Einstellen
Zurück
Ok
Zurücksetzen
Zurück
Ok
Feststation
Zurück
Ok
Press "Ok" softkey
Lieferzust.
Zurück
Ok
Press "Ok" softkey
Löschen?
Zurück
Ok
Press "Ok" softkey
The default settings have now been
restored.
Lieferzust.
Zurück
Ok
Press "Back" softkey four times…
Intern
• If you have activated a system PIN, the handset will prompt you for your
personal, four-digit system PIN.
Menü
Initialising
Restoring all telephone parameters to the default settings
This procedure restores the following telephone parameters to their default settings:
– call barring
– call allocation
Handset switched to ON
Intern
Press "Menu" softkey, then press arrow
keys repeatedly until "Setup" appears
Press "Ok" softkey, then press arrow keys
repeatedly until "Initialise" appears
Press "Ok" softkey, then press arrow keys
repeatedly until "Basestation" appears
Note:
Menü
Einstellen
Zurück
Ok
Zurücksetzen
Zurück
Ok
Feststation
Zurück
Ok
Press "Ok" softkey
Lieferzust.
Zurück
Ok
Press arrow keys repeatedly until
"Tel.-Paramet." appears
Systemeinst.
Zurück
Ok
Press "Ok" softkey
Löschen?
Zurück
Press "Ok" softkey
The telephone parameters have now been
initialised.
Systemeinst.
Zurück
Ok
Press "Back" softkey four times…
Intern
Ok
Menü
• If you have activated a system PIN, the handset will prompt you for your
personal, four-digit system PIN.
91
Acoustic signals
Tones in general
Acoustic signal:
1
2
3
4
5
seconds
Ringers:
Outside call (transparent)
Internal call
Paging call
On-hook in inquiry call
Handset tones:
Internal dial tone
Busy tone
Call waiting tone
Handset information tones:
Permitted keypress
Error signal
Leaving radio range
Battery low (preliminary warning)
Battery empty
92
6
7
8
9
10
Acoustic signals
Activating/deactivating keyclick
If you do not want every keypress confirmed by a click, you can deactivate this function.
Handset switched to ON.
Intern
Press "Menu" softkey, then press arrow
keys repeatedly until "Setup" appears
Press "Ok" softkey, then press arrow keys
repeatedly until "Keyclick" appears
Press "Ok" softkey
The inactive setting is displayed
Menü
Einstellen
Zurück
Ok
Tastenklick
Zurück
Ok
Tastenklick
Zurück ¢Aus
Deactivating:
Press "¢Off" softkey
Keyclick is now deactivated
Tastenklick
Zurück ¢Ein
Activating:
Press "¢On" softkey
Keyclick is now activated
Press "Back" softkey twice…
Tastenklick
Zurück ¢Aus
Intern
Menü
93
Acoustic signals
Range warning
If you activate the range warning, a warning signal will sound if you leave the radio range in the
course of a call. This could be due, for instance, to building-related factors acting at the limit of
your base station’s transmission and reception range.
If this happens, move back towards the base station or out of the radio shadow until this
warning signal stops. If you do not return within the base station’s transmitting range within 10
seconds, the radio and telephone link is automatically disconnected.
Handset switched to ON.
Intern
Press "Menu" softkey, then press arrow
keys repeatedly until "Setup" appears
Press "Ok" softkey, then press arrow keys
repeatedly until "RangeWarning" appears
Menü
Einstellen
Zurück
Ok
RW-Warnton
Zurück ¢Ein
The inactive setting is displayed
RW-Warnton
Zurück ¢Ein
Press "¢On" softkey
The warning tone is now activated again
RW-Warnton
Zurück ¢Aus
Press "¢Off" softkey
The warning tone is now deactivated
RW-Warnton
Zurück ¢Ein
Activating:
Deactivating:
Press "Back" softkey twice…
94
Intern
Menü
General information
Faults and self-help troubleshooting
Most malfunctions will not be due to a defect on your telephone. You can often save time and
money by correcting minor faults yourself.
The following tips are intended to help you do this.
Symptom
Cause
Action
No display
Handset not switched on
Press Connect key
Battery cells empty
Charge handset on the base
station / charging station
Telephone connector plug
not correctly inserted
Check the plug at both
the telephone socket and
the base station, if necessary
remove and reconnect.
Mains transformer plug
not correctly inserted
Check the plug at both the 230V
socket and the base station,
if necessary remove and reconnect.
Handset not
subscribed
Subscribe handset (page 52)
Outside the range
Manual station selection
incorrectly set
Ringer deactivated or
set too low
Exchange ring deactivated
Ringer deactivated
or set too low
Move into the radio range
Change station selection
(page 66)
Set ringer volume
(page 46)
Activate exchange ring (page 59)
Set ringer volume
(page 47)
Cannot get a line,
no dial tone
No radio link to the base
station possible, "No System"
is displayed
Handset not ringing
Base station not ringing
"Invalid" appears on the display
On PBXs only:
No connection or wrong number
when dialling from memory
On PBXs only:
National barring acts like
exchange barring
Switch handset off and back on again
EIC not entered
PBX using "0"
as EIC
Enter EIC in system
((page 83)
Carry out barring
via TK system, set international
barring if necessary
95
General information
Warranty terms
Deutsche Telekom AG provides a 12 month warranty for material and manufacture of the telecommunication terminal from the moment of handover.
The purchaser initially has only the right to remedy of any defects. Rather than effect such remedies, Deutsche Telekom AG may at its discretion supply replacement equipment: any replaced equipment or parts become the property of Deutsche Telekom AG.
Should a remedy or replacement delivery prove ineffectivefail, the purchaser may, within the warranty period, demand cancellation of the agreement (repudiation) or a lowering of the purchase
price (diminution). The purchaser must inform Deutsche Telekom AG immediately of any defects
noted.
Evidence of a claim to warranty is to be provided by means of a proper confirmation of
purchase (purchase receipt, or invoice).
The warranty claim will lapse if the equipment is interfered with in any way either by the purchaser himself or by any unauthorised third party. Damage due to improper handling, operation,
storage as well as force majeure or to other outside factors of influence do not come under the
warranty.
All other warranty claims by the purchaser are excluded unless founded on the wrongful intent,
gross negligence or a particular assurance given by Deutsche Telekom AG.
In the event of warranty provided by our service agent, said agent will remedy the defects to the
equipment acknowledged as under warranty obligation without charging additional expenses.
Freight and shipping costs for the cheapest return consignment within the Federal Republic of
Germany will be borne by Deutsche Telekom AG.
Customer service
You have purchased a modern product by Deutsche Telekom AG that is subject to stringent
quality inspections.
If you have any questions about the equipment please contact the service hotline on
0180/ 51 99 0
In the event of a fault - even after the warranty period - our service department or our personnel
at the service point are at your disposal on
01171
Cleaning - when necessary
Simply wipe the telephone with a slightly damp cloth or anti-static pad. Never use a dry cloth.
Avoid the use of all polishes and abrasives.
96
General information
Recycling
The final ring - what actually happens to your telephone set when you’re unable to use
it any more?
It happens sooner or later: you replace your old telephone set with a new one, perhaps merely
because your tastes have changed. Or perhaps because you want a wide range of user facilities
- whatever the reason, the old set has to go. But what about the environment in all this? And
recycling? Did you know that some 2000 tonnes of telephone materials accumulate each year?
It’s comforting to know that we are able not simply to make that pile of material disappear but to
dispose of it in the most environmentally compatible way. So whether you’ve rented or bought
your set, simply bring your old one back to us.
How do we do it?
We at Deutsche Telekom work closely with a company in which other companies in the telecommunications industry and the Preussag Group participate. The project is known as the "Recycling Initiative". The first stage is known as "pre-dismantling", when we take the old sets apart.
All the individual parts that can still be used are recovered without further ado.
Next we separate materials into "plastics and electronics" - and then each of those categories
goes its own way:
Plastics are comminuted and used to make new casings. Electronic components are broken
down into the recyclable constituents "copper", "iron and steel" and "other metals", using complex yet environmentally friendly separating processes. The copper is made into new cables; metallurgical plants are only too pleased to get the iron and steel; and the so-called "other metals"
are channelled back into the free market. By now, 80 per cent of all telephones have already
been recycled.
So what’s left? Well, approx. 20 per cent of so-called "residual substances", mainly non-separable plastics. One process used is environmentally compatible high-pressure gasification, forming
a carbon/hydrogen compound which can be put to good use in chemical production methods.
What else can we do for our environment? Well, to simplify recycling and make it even more environmentally friendly, Deutsche Telekom has come up with a whole series of specifications for
the manufacture of terminals which stipulate the use of environmentally friendly materials and involve simple dismantling procedures (segregation of materials by type). In this way we intend to
reduce considerably the share of residual substances.
Deutsche Telekom is therefore already complying with the provisions of the future "Electronic
Scrap Order", which will regulate by law the return, reuse and recycling of electrical equipment
and electronic components.
97
Approvals
The telephone is approved by the German Federal Approvals Office for Telecommunications.
General type approval for terminal equipment for connecting to switched connections with analogue interconnection points.
CE labelling
This telephone complies with the requirements of the following EU Directives:
89/336/EWG
73/23/EWG
"Electromagnetic Compatibility"
"Electric Equipment for use within specific voltage limits"
Compliance of the telephone with the aforementioned Directives is confirmed through the
CE label.
98
Technical Data
Standard:
DECT
Number of channels:
20 duplex channels
Frequencies:
1880 MHz to 1900 MHz
Duplex method:
time division multiplex, 10 ms frame length
Channel spacing:
1728 kHz
Bit rate:
1152 kbit/s
Modulation:
GFSK
Voice coding:
32 kbit/s ADPCM
Transmit output:
250mW peak value
10 mW, mean output per channel
Range:
up to 300 m outdoors,
significantly less indoors
Power supply:
base station 220/230 V~/50 Hz (plug-in mains unit)
Base station power consumption:
9 VA
Operating time, handset
(battery fully charged):
standby: approx. 40 hours
talk time: approx. 5 hours
Admissible ambient conditions
for operation:
Handset:
Base station:
0° to 45 °C
5° to 40 °C
Admissible storage temperature:
-10 °C to +60 °C
Dialling method:
pulse dialling / DTMF
Signal key function:
earth / flash
Base station dimensions:
W / H / D = 129 x 37 x 180 mm
Handset dimensions:
L / W / H = 162 x 52 x 35 mm
Weight:
base station: 250 g
handset: 165 g
Cable length:
connecting cord = 3 m
mains unit cord = 3 m
Connecting plugs:
connecting cord: TAE 6F / TSV 6/4
mains unit cord: TSV 6/6
mains plug-in unit: euro-plug
99
Write-on labels
✁
P
✁
P
✁
P
✁
P
✁
P
100
✁
P
Notes
101
102
Bohrdurchmesser 5 mm
Schraube 3,5 x 25 mm
Einstellmass 90 mm
oben
BOHRSCHABLONE
Basisstation
Bohrdurchmesser 5 mm
Schraube 3,5 x 25 mm
Einstellmass 66 mm
oben
BOHRSCHABLONE
Ladestation
103
104
Bohrdurchmesser 5 mm
Schraube 3,5 x 25 mm
Einstellmass 90 mm
oben
BOHRSCHABLONE
Funkrelais
Stichwortverzeichnis
A
Abgehende Gespräche sperren ....................................................................................................................... 61
Abhören ............................................................................................................................................................. 10
Abweisen ........................................................................................................................................................... 28
Akkuzellen, einsetzen und aufladen ................................................................................................................. 14
Akkuzellen, Hinweis zum Gebrauch ................................................................................................................... 4
Akkuzellen, Leuchtanzeigen ............................................................................................................................. 15
Akustische Signalisierungen ............................................................................................................................. 92
Amtskennzahl (Akz) eingeben .......................................................................................................................... 84
Anklopfen ........................................................................................................................................................... 25
Entgeltanzeige ein-/ausschalten ...................................................................................................................... 55
Anmelden, Fremdgeräte ................................................................................................................................... 88
Anmelden, Handgeräte .............................................................................................................................. 79, 87
Anrufliste, CLIP Funktion .................................................................................................................................. 29
Anrufumleitung .................................................................................................................................................. 48
Anschließen der Feststation ............................................................................................................................. 13
Anzeige Akku-Ladung ....................................................................................................................................... 15
Anzeige der Rufnummer des Anrufers ............................................................................................................. 27
Anzeige Display ................................................................................................................................................... 5
Aufstellen, Aufstellungsort ................................................................................................................................ 10
Auswahl Mehrfachrufnummer ........................................................................................................................... 31
Auswählen Feststation ...................................................................................................................................... 83
Automatischer Rückruf bei Besetzt .................................................................................................................. 45
Automatisch Keypad senden ........................................................................................................................... 85
B
Bestätigungston ................................................................................................................................................ 93
Bezeichnungsschilder .............................................................................................................................. 13, 100
Bohrschablone ................................................................................................................................ 102,103, 104
C
Chiffrierung ........................................................................................................................................................ 10
CCBS ................................................................................................................................................................. 45
D
DECT ................................................................................................................................................................. 99
Deutsch, Menüführung ..................................................................................................................................... 26
Direktannahme ein-/ausschalten ...................................................................................................................... 30
Direktruf einschalten/ausschalten ............................................................................................................. 59, 60
Direktrufnummer eingeben ............................................................................................................................... 59
Direktrufnummer wählen ................................................................................................................................... 60
Display ................................................................................................................................................................. 5
Dreierkonferenz .......................................................................................................................................... 72, 75
E
Entgeltanzeige ................................................................................................................................................... 54
Entgeltanzeige ein-/ausschalten ...................................................................................................................... 55
Entgeltfaktor ...................................................................................................................................................... 57
Englisch, Menüführung ..................................................................................................................................... 26
105
Stichwortverzeichnis
F
Fehlersuche ....................................................................................................................................................... 95
Fehlerton ............................................................................................................................................................ 92
Feststation ........................................................................................................................................................ B1
Feststation, Anzeigen ...................................................................................................................................... B1
Frequenzbereich ............................................................................................................................................... 99
Funkreichweite, siehe Einleitung ...................................................................................................................... 10
Funkreichweite, siehe Reichweite .................................................................................................................... 10
G
GAP-Schnittstelle ....................................................................................................................................... 87, 88
Garantieerklärung .............................................................................................................................................. 96
Gebühren (Entgeltanzeige) ............................................................................................................................... 54
Geräte-PIN ......................................................................................................................................................... 23
Gespräch abweisen .......................................................................................................................................... 28
Gespräch beenden ........................................................................................................................................... 28
Gespräch entgegennehmen ............................................................................................................................. 28
Gesprächsdaueranzeige ................................................................................................................................... 54
Gesprächsdaueranzeige ein-/ausschalten ....................................................................................................... 55
Gesprächsübergabe .................................................................................................................................. 73, 75
Gewicht .............................................................................................................................................................. 99
H
Handgerät, Aus-Zustand .................................................................................................................................. 16
Handgerät, Ein-Zustand ................................................................................................................................... 16
Handgerät, Schutz-Zustand ............................................................................................................................. 16
Hörerlautstärke verstellen .......................................................................................................................... 24, 43
I
Inbetriebnahme ................................................................................................................................................... 9
Intern Makeln ..................................................................................................................................................... 72
Interne Rufnummer kontrollieren ...................................................................................................................... 70
Interngespräch führen ....................................................................................................................................... 69
Internruf ...................................................................................................................................................... 63, 92
K
Komplettieren Feststation ................................................................................................................................. 13
Kontrollieren der Summen ................................................................................................................................ 58
L
Laden der Akkuzellen ....................................................................................................................................... 14
Lautstärke Tonruf ....................................................................................................................................... 63, 65
Lieferzustand ....................................................................................................................................................... 9
LED Feststation ................................................................................................................................................ B1
106
Stichwortverzeichnis
M
Makeln ........................................................................................................................................................ 72, 74
Melodie Tonruf ..................................................................................................................................... 63, 64, 65
Menübaum ........................................................................................................................... Ausklappseite hinten
N
Name für MSN programmieren ........................................................................................................................ 19
Netzausfall, Spannungsausfall .......................................................................................................................... 13
Notruf, siehe Direktruf ................................................................................................................................ 59, 60
O
Optische Signalisierungen, Feststation; siehe LED ........................................................................................ B1
Optische Signalisierungen, Handgerät; siehe Display ....................................................................................... 5
P
Paging ................................................................................................................................................................ 62
Parken ............................................................................................................................................ 46
Persönliche Identifikations-Nummer (PIN) .......................................................................................... 21, 22, 23
PIN (Persönliche Identifikations-Nummer) .......................................................................................... 21, 22, 23
R
Reichweite ......................................................................................................................................................... 10
Reinigen - wenn's nötig wird ............................................................................................................................ 96
Rückfrage ................................................................................................................................. 71,74
Rückstellen der Summen .................................................................................................................................. 58
Rufnummer programmieren (MSN) .................................................................................................................. 18
Rufzuordnung Handgeräte ............................................................................................................................... 76
S
Schutz-Zustand, Handgerät ...................................................................................................................... 16, 17
Scrambling ........................................................................................................................................................ 10
Selbsthilfe .......................................................................................................................................................... 95
Sendeleistung .................................................................................................................................................... 99
Service ............................................................................................................................................................... 96
Sicherheitshinweise ............................................................................................................................................. 4
Spannungsausfall, Netzausfall .......................................................................................................................... 13
Sperre Handgerät ausschalten (Wahlsperre) ................................................................................................... 61
Sperre Handgerät einschalten (Wahlsperre) .................................................................................................... 61
Sprache einstellen ............................................................................................................................................. 26
Sprachverschlüsselung ..................................................................................................................................... 10
Störungen .......................................................................................................................................................... 95
Stromverbrauch ................................................................................................................................................. 99
Stummschaltung ............................................................................................................................................... 42
Summen kontrollieren ....................................................................................................................................... 58
Summen löschen .............................................................................................................................................. 58
System-PIN ....................................................................................................................................................... 22
107
Stichwortverzeichnis
T
Tarife .................................................................................................................................................................. 55
Tastatur ................................................................................................................................................................ 6
Tastenklick ......................................................................................................................................................... 93
Technische Daten .............................................................................................................................................. 99
Telefonbuch, Erläuterungen .............................................................................................................................. 36
Telefonbuch-Einträge löschen .......................................................................................................................... 40
Telefonbuch-Einträge speichern ....................................................................................................................... 37
Tonfolge ...................................................................................................................................................... 63, 65
Tonruf, Feststation ............................................................................................................................................ 65
Tonruf, Handgerät ............................................................................................................................................. 63
Tonsenderfunktion ............................................................................................................................................. 44
Trageclip ............................................................................................................................................................ 15
U
Überschreitung der Funkreichweite .......................................................................................................... 10, 94
Unterdrückung der Rufnummeranzeige ........................................................................................................... 33
V
Verbindungsanzeige, Feststation .................................................................................................................... B1
Verbindungsanzeige, Handgerät ........................................................................................................................ 5
Verpackungsinhalt ............................................................................................................................................... 9
Verlassen der Funkreichweite .................................................................................................................... 10, 94
Vermitteln mit DISCONNECT ............................................................................................................................ 86
W
Wahl ................................................................................................................................................................... 34
Wahl aus dem Telefonbuch ............................................................................................................................... 39
Wahl aus der Anrufliste ..................................................................................................................................... 29
Wahlsperre ......................................................................................................................................................... 61
Wahlvorbereitung .............................................................................................................................................. 34
Wahlwiederholung ............................................................................................................................................. 35
Warnton (Akku fast leer) ................................................................................................................................... 92
Warnton (Verlassen der Funkreichweite) ................................................................................................... 92, 94
Z
Ziffer für MSN-spezifische Melodie .................................................................................................................. 20
Zulassung .......................................................................................................................................................... 98
Zurücksetzen in den Lieferzustand ........................................................................................................... 89, 90
Zurücksetzen Telefonbuch ................................................................................................................................ 41
Zurücksetzen Systemeinstellungen .................................................................................................................. 91
108