1
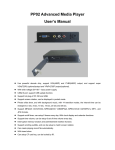
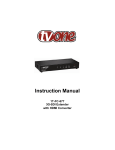
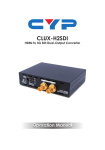
CLUX-SDI2HS SDI to HDMI Scaler with Audio Operation Manual CLUX-SDI2HS Disclaimers The information in this manual has been carefully checked and is believed to be accurate. Cypress Technology assumes no responsibility for any infringements of patents or other rights of third parties which may result from its use. Cypress Technology assumes no responsibility for any inaccuracies that may be contained in this document. Cypress also makes no commitment to update or to keep current the information contained in this document. Cypress Technology reserves the right to make improvements to this document and/or product at any time and without notice. Copyright Notice No part of this document may be reproduced, transmitted, transcribed, stored in a retrieval system, or any of its part translated into any language or computer file, in any form or by any means - electronic, mechanical, magnetic, optical, chemical, manual, or otherwise - without express written permission and consent from Cypress Technology. © Copyright 2011 by Cypress Technology. All Rights Reserved. Version 1.0 March 2011 Trademark Acknowledgments All products or service names mentioned in this document may be trademarks of the companies with which they are associated. Safety Precautions Please read all instructions before attempting to unpack or install or operate this equipment, and before connecting the power supply. Please keep the following in mind as you unpack and install this equipment: Always follow basic safety precautions to reduce the risk of fire, electrical shock and injury to persons. To prevent fire or shock hazard, do not expose the unit to rain, moisture or install this product near water. Never spill liquid of any kind on or into this product. Never push an object of any kind into this product through module openings or empty slots, as you may damage parts. Do not attach the power supply cabling to building surfaces. Do not allow anything to rest on the power cabling or allow it to be abused by persons walking on it. To protect the equipment from overheating, do not block the slots and openings in the module housing that provide ventilation. Revision History Version No VR0 Date 20110325 Summary of Change Preliminary Release Table of Contents 1. 2. 3. 4. 5. 6. 7. Introduction................................................................................... 1 Applications.................................................................................. 1 Package Contents....................................................................... 1 System Requirements................................................................... 1 Features......................................................................................... 1 Specifications............................................................................... 2 Operation Controls and Functions.............................................. 3 7.1 Front Panel..................................................................... 3 7.2 Rear Panel..................................................................... 3 8. OSD Menu and Function List........................................................ 4 9. Connection and Installation . ..................................................... 8 1. Introduction The SDI to HDMI Scaler with Audio allows SD, HD and 3G-SDI signals to be display on HDMI/SDI displays while ensuring high bit rates of 2.970 Gbit/s gives you fast signal transmission without signal loss. For professional this means that it is now easier to distribute and extend your SDI signal while giving you the ability to display your work on HDMI displays. Further, the design of coaxial and L/R audio output allows user to output audio with both digital and analog format and the loop-through 3G-SDI design also benefit user to enjoy both SDI and HDMI display synchronously. 2. Applications • Broadcast video signal to HDMI/SDI display • Broadcast video signal extension • 3G SDI signal conversion into HDMI signal 3. Package Contents • SDI to HDMI Scaler with Audio • 5V/2.6A DC power adaptor • Operation Manual 4. System Requirements Input source equipment such as SNG camera or any SDI signal with connection cables and output to LCD TV or SDI monitor with connection cables. 5. Features • • • • • • • • • Operation at 2.970Gb/s, 2.970/1.001Gb/s, 1.485Gb/s, 1.485/1.001Gb/s and 270Mb/s Supports SMPTE 425M (Level A and Level B), SMPTE 424M, SMPTE 292M, SMPTE 259M Equalized and re-clocked loop output Alternative audio output to coaxial and analog 2CH Integrated audio de-embedded for max 8 channels of 48kHz audio Auto video mode detection (3G/SD/HD) Conversion from SMPTE 425M level B to Level A for 1080p 50/59.94/60 4:2:2 10-bit SDI loop-through for long distance Convert SDI HD timing to PC timing 1 6. Specifications SMPTE Standard 425M Level A & B, 424M, 292M, 259M-C SDI Transmition Rates 2.970 Gbit/s and 2.970/1.001 Gbit/s Frequency Bandwidth 165MHz/link Input Port 1 x BNC (SD/HD/3G-SDI) Output Port 1 x BNC (SD/HD/3G-SDI), 1 x HDMI, 1 x Coaxial, 1 x L/R (RCA) SDI Supports SD: 480i, 576i HD: 720p 50/60, 1080i 50/60, 1080p 24/25/30 3G: 1080p 50/60 Power Supply 5V DC/ 2.6A (US/EU standards, CE/FCC/UL certified) ESD Protection Human body model: ± 8kV (air-gap discharge) ± 4kV (contact discharge) SDI Cable Distance 3G up to 100M (BELDEN 1694A) HD up to 200M (BELDEN 1694A) SD up to 300M (BELDEN 1694A) Dimension (mm) 180(W) x 142(D) x 25(H) Weight (g) 460 Chassis Material Aluminum Silkscreen Color Gray Operating Temperature 0°C ~ 40°C / 32°F ~ 104°F Storage Temperature -20°C ~ 60°C / -4°F ~ 140°F elative Humidity 20 ~ 90% RH (Non-condensing) Power Consumption (W) 4 2 7. Operation Controls and Functions 7.1 Front Panel 1 2 3 4 5 6 7 ①.Power LED: This blue LED will illuminate when the device is connected with power supply. .3G LED: This green LED illuminate when the input SDI signal is with 3G w format. e.HD LED: This green LED illuminate when the input SDI signal is with HD format. r.SD LED: This green LED illuminate when the input SDI signal is with SD format. t.MENU: Press this button to enter/exit the OSD menu. y.ENTER: Press this button to confirm your selection. Press both ENTER and – buttons together to switch output timing to 720p instantly and press with + buttons together to switch output timing to XGA. u.-/+: Press these buttons to move up or down the OSD selections. 7.2 Rear Panel 1 2 3 4 5 6 .SDI IN: This slot is where you connect the SDI source output for SDI signal ① sending to be display on screen. w.SDI OUT: This slot is where you connect the SDI display with SDI cable for input source display. e.AUDIO OUT COAXIAL: This slot is where you connect the amplifier with coaxial cable and from amplifier to speaker r.AUDIO OUT R/L: These slots are where you connect the speaker or amplifier with RCA jack for audio signal display. t.HDMI Out: This slot is where you connect the HDMI / DVI display with HDMI or HDMI to DVI cable. y.DC 5V: Plug the 5V DC power supply into the unit and connect the adaptor to AC wall outlet. Blue LED will illuminate when the power is ON. 3 8. OSD Menu and Function List 1st Layer 2nd Layer 3rd Layer NATIVE 800 x 600 @60 1024 x 768 @60 1280 x 768 @60 1360 x 768 @60 1280 x 800 @60 1280 x 1024 @60 1440 x 900 @60 1400 x 1050 @60 Output 1680 x 1050 @60 1600 x 1200 @60 1920 x 1200 @60 720 x 480p @60 Display 1280 x 720p @60 1920 x 1080p @60 720 x 576p @50 1280 x 720p @50 1920 x 1080p @50 1920 x 1080i @60 1920 x 1080i @50 Full Over Scan Size under 1 Under 2 Letter Box Pan Scan Exit 4 Color Contrast 0~255 (105) Brrightness 0~192 (96) R 0~255 (128) G 0~255 (128) B 0~255 (128) R Offset 0~63 (32) G Offset 0~63 (32) B Offset 0~63 (32) Exit Group 1 Group 2 SDI Audio Group 3 Group 4 Auto Off Factory Reset Yes Information Input Timing, Output Timing & Version 1. Display Output Timings: There are total 20 timings available for user’s selec tion. Size: Adjust the display’s screen size from full, over scan, under scan, letter box or Pan scan to fit the different timing’s display and make the viewing become more pleasure. 5 2. Color Adjust screen color RGB’s Contrast and or Brightness. 3. SDI Audio Select SDI audio output from 4 different group and each group contents 2CH or from auto which contain up to 7.1Ch follow by input source signal. If no audio output is require the audio can also be mute by selecting off. 6 4. Factory Reset Select YES to return to the factory setting. Factory setting on display is at 1280 x 720p @60Hz with full size screen, Color setting are as the bracket in the OSD chart and SDI audio is on auto. 5. Information Displaying both input source and output display timing with software firmware version. 7 9. Connection and Installation SNG SDI Monitor AMP or LCD TV 8 or Monitor A Acronyms Acronym Complete Term 3G Bandwidth 2.97G bit/s ≈ 3G SDI Serial Digital Interface HD High Definition 9 10 CYPRESSTECHNOLOGYCO.,LTD. Home page: http://www.cypress.com.tw MPM-CLUXSDI2HS