1
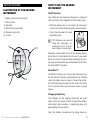
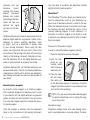
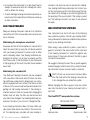
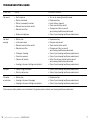
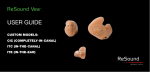
Hearing Instrument Supplement ReSound Vea™ Custom completely-In-the-canal (CIC) hearing instruments This supplement details the “how-to” aspects of your newly purchased hearing instruments. Please refer to the ReSound Vea User Guide that came with your hearing instruments for important information including warnings and precautions. __________________________________________ Model information: Your hearing instrument model designation is Manufactured by: GN ReSound North America 8001 Bloomington Freeway, Bloomington, MN 55420 1-888-735-4327 GN ReSound Canada 303 Supertest Road, Toronto, Ontario M3J 2M4 1-888-737-6863 gnresound.com [email protected] Battery information: Your hearing instrument uses battery size 10A __________________. ve10 MK603451 Rev. A 2012.02 __________________. Contents page Getting started Illustration of the hearing instrument������������������������� 2 How to use the hearing instrument��������������������������� 3 On/Off function SmartStart™ Changing the battery Inserting the hearing instrument . . . . . . . . . . . . . . . . 4 Removing the hearing instrument . . . . . . . . . . . . . . . 5 Controls and features Telephone use Acoustic phone program . . . . . . . . . . . . . . . . . . . PhoneNow™ . . . . . . . . . . . . . . . . . . . . . . . . . . . . Cell phone . . . . . . . . . . . . . . . . . . . . . . . . . . . . . . Listening to the radio or TV Using assistive listening (tele-loop) systems Low battery indicator . . . . . . . . . . . . . . . . . . . . . . . . 6 7 8 9 Maintenance Proper handling Daily maintenance . . . . . . . . . . . . . . . . . . . . . . . . . 10 Maintaining the sound inlet Maintaining the sound outlet Wax protection systems . . . . . . . . . . . . . . . . . . . . . 11 The CeruSTOP™ wax protection system The HF3 wax protection system . . . . . . . . . . . . 13 Troubleshooting guide . . . . . . . . . . . . . . . . . . . . . . 16 ReSound Vea™ supplement—Custom CIC 1 How to Use the Hearing Instrument Getting started Illustration of the Hearing InstrumenT On/Off function Your ReSound Vea hearing instrument is equipped with an on/off switch integrated into the battery door. 1.Battery door and on/off switch 2.Sound outlet 3.Wax filter 4.Microphone sound inlet 5.Removal cord/notch 6.Air vent 4 •When the battery door is fully closed, the instrument is turned on and the default program will be activated. •To turn the instrument off, open the battery door. 2/3 TIP: Whenever you are not using the instrument, remember to turn it off to reduce battery consumption. Off Generally, people prefer to turn on the hearing instrument after it is fully inserted into the ear. If you would like to turn on the instrument before inserting it into your ear, your hearing healthcare professional can activate the SmartStart™ function. 1 SmartStart™ 6 5 SmartStart™ allows you to insert the instrument into the ear without annoying, squealing sounds. Starting when the battery door is closed, it delays the activation of the hearing instrument for ten seconds. During this 10-second period you will hear a series of single beeps. Changing the battery The batteries for the hearing instrument are quite small, which may cause difficulty in seeing the battery and battery door markings. A magnifying glass and good lighting may be helpful. Open the battery compartment by pulling down on 2 ReSound Vea™ supplement—Custom CIC 3 the door with your fingernail. Remove the old battery, and insert a new one with the “+” (flat) side facing the “+” marking on the battery door. “+” It should fit in like a puzzle piece. The battery door should close very easily. Never use force to close the door as this may damage your hearing instrument. Always use a size 10A battery. Please note that if the battery is weak, the hearing instrument performance will be reduced. TIP: Removing the battery when you are not wearing the instrument will reduce battery consumption and extend battery life. Inserting the Hearing Instrument To insert the hearing instrument into your ear: 1.Hold the instrument with your thumb and forefinger, either on the sides (as shown) or above and below. 2.Place the sound outlet portion into your ear canal. 3.Insert the instrument into your ear canal with a gentle twisting movement. TIP: This process can be made easier if you use the other hand to pull 4 ReSound Vea™ supplement—Custom CIC back gently on your ear while sliding the instrument into place. By experimenting, you may find a method that is easier for you. When properly inserted, the instrument should fit comfortably in your ear. If the hearing instrument irritates your ear in any way and prevents you from wearing the instrument, please contact your hearing healthcare professional. NOTE: Never attempt to modify the shape of the hearing instrument yourself. Removing the Hearing Instrument To remove the hearing instrument from your ear: •Grasp the removal cord with your thumb and forefinger and pull out. or: •Place your thumb on the bottom and index finger on the top of the instrument. Using a slight corkscrew motion, carefully remove the instrument from your ear. By experimenting, you may find a method that is easier for you. Consult your hearing healthcare professional if you have difficulty removing the hearing instrument. Controls and features Telephone Use Telephone use may require some practice in order to 5 maximize your performance. Experimenting with various hearing instrument features and proper positioning of the telephone will help you optimize the signal you hear on the telephone. All ReSound hearing instruments are equipped with an adaptive digital feedback suppression system that is designed to reduce whistling (feedback) when an object, such as a telephone, is placed close to your hearing instrument. When using the telephone, we recommend that you hold it close to the microphone of the hearing instrument without laying it directly on the hearing instrument. If feedback occurs, hold the telephone still as the digital feedback suppression system adapts to suppress the whistle. Additional features that can facilitate telephone use, are described below. Consult your hearing healthcare professional to identify which options are available in your hearing instrument and are most appropriate for your needs. Acoustic phone program An acoustic phone program is a listening program that is specially designed for telephone use. It works in combination with the digital feedback suppression system and does not utilize a telecoil. You can access it by using the program selector to choose the acoustic phone program. Once the program is selected, hold the telephone close to the microphone of the hearing instrument. 6 ReSound Vea™ supplement—Custom CIC You may need to reposition the telephone handset slightly to find the best reception. PhoneNow™ The PhoneNow™ function allows your hearing instrument to automatically switch to your telephone program when a telephone receiver is raised to the ear. When the telephone receiver is removed from the ear, the hearing instrument automatically returns to the previous listening program. In most instances, it is necessary to mount a magnet on the phone in order to enhance your hearing instrument’s ability to detect the phone signal. Placement of PhoneNow magnet In order to place PhoneNow magnets properly: 1.Clean the telephone receiver thoroughly. 2.Hold the telephone as you typically would when making a telephone call. 3.Place the magnet just below the sound port on the telephone receiver. If necessary, move the magnet to another position to improve ease of use and comfort while speaking. NOTE: Only use a recommended cleaning agent to clean the telephone prior to placing the magnet on the phone. PhoneNow usage PhoneNow enables those who wear hearing instrument to use telephones in a normal manner. The hear7 ing instrument will generate a short melody of beeps to indicate that the PhoneNow feature has automatically switched the hearing instrument to your telephone program. Initially, you may need to move the telephone receiver slightly to find the best position for reliable PhoneNow activation and good hearing on the telephone. tening to news commentators since they usually speak clearly, then try other programs. If you find it difficult to listen to TV or radio, your hearing healthcare professional will be able to give you advice on available accessories to enhance your listening capabilities for TV and radio. NOTE: PhoneNow precautions: •Keep magnets out of the reach of pets, children and people with mental disabilities. If a magnet is swallowed, please seek advice from a medical practitioner. •The magnet is used to strengthen the magnetic field of a telephone receiver and may affect functionality of some medical devices or electronic systems. Always keep the magnet or a telephone equipped with the magnet at least 30 cm (12”) away from pacemakers, credit cards and other magnetically sensitive devices. •High distortion during dialing or phoning may mean that the magnet is not in the optimal position relative to the telephone receiver. To avoid the issue, please move the magnet to another place on the telephone receiver. •Only use magnets supplied by GN ReSound. Cell phone If you use a cell phone you may experience a buzzing or clicking noise. This is caused by a strong signal generated by the cell phone. Consult with your hearing healthcare professional to see if there are options to improve the sound quality. Listening to THE radio or TV When listening to the TV or the radio, start out by lis8 ReSound Vea™ supplement—Custom CIC Low battery indicator Your hearing healthcare professional can activate a low battery indicator in your hearing instrument. The hearing instrument will reduce amplification and play a melody of beeps if the battery voltage drops below a critical threshold. This signal will recur every five minutes until the hearing instrument automatically switches off. The timing of the low battery indicator can vary slightly, depending on the type of battery used. It is recommended that you keep spare batteries on hand. Maintenance Proper handling Your hearing instrument is protected by a layer of protective, hydrophobic nanocoat material. However, please follow these instructions to further prolong the durability of your hearing instrument. TIP: To avoid the need for unwanted repairs: • Never immerse the instrument in water or other liquids as this may cause permanent damage to the circuitry. • Protect your hearing instrument from rough handling, and avoid dropping it on hard surfaces or floors. 9 • Do not leave the instrument in or near direct heat or sunlight as excessive heat can damage the instrument or deform the casing. •To avoid damage, hearing instruments should be removed prior to the application of hairspray, make-up or other cosmetics. Daily maintenance Keep your hearing instrument clean and dry. Wipe the case with a soft cloth or tissue after use to remove skin oils or moisture. Maintaining the microphone sound inlet For proper function of the microphone, it is important to clean the sound inlet by using the soft brush provided with your hearing instrument to remove dust or other sound disturbing debris. Your hearing healthcare professional can instruct you on how to properly use this tool. Please refer to the illustration of your instrument at the beginning of this insert to locate the microphone sound inlet. Maintaining the sound outlet Your ReSound hearing instrument may be equipped with a wax filter in the sound outlet. (Consult your hearing healthcare professional to determine if your instrument is equipped with such a filter.) This filter is located at the end of the sound outlet and prevents debris from getting into the hearing instrument. If the hearing instrument seems to have lost power and changing the battery does not help, the filter may be blocked and may need to be changed. Your hearing healthcare professional can instruct you on how to change the filter. If your hearing instrument does not have a filter, earwax and/or other debris may collect in the sound outlet. The cleaning loop, provided with your hearing in10 ReSound Vea™ supplement—Custom CIC strument, can easily be used to remove this material. Your hearing healthcare professional can instruct you on how to properly use this tool. When using this tool, be careful not to damage or pull the tubing placed at the opening of the sound outlet. If the tubing is pulled out, the hearing instrument will need to be returned for repair. Wax protection systems Your instrument may be fit with one of the following wax protection systems. Consult your hearing healthcare professional to determine whether these systems apply to your hearing instrument. When using a wax protection system, a wax filter or guard is mounted in the sound outlet at the canal end of the hearing instrument for protection against wax and moisture. If it becomes blocked, the filter or guard will need to be replaced. We suggest checking the wax filter or guard regularly and exchanging it when it looks dirty or when the hearing instrument volume or sound quality is reduced. NOTE: Do not use a wax loop to remove debris from the canal end of the hearing instrument as it can damage the wax protection system Before changing the filter or guard, clean any visible wax from the shell of your hearing instrument with a soft cloth. The CeruSTOP™ wax protection system Wax guard tool Removal side Replacement side 11 To remove an old wax guard: The HF3 wax protection system 1.Insert the removal side of the wax guard tool into the used wax guard so that the shaft of the tool is touching the rim of the wax guard. To remove a used wax filter: 2.Slowly pull the wax guard tool straight out. Do not twist the wax guard from the bushing. 1 1.Insert the threaded end of the HF3 tool into the wax filter on the hearing instrument and then twist the tool approximately one and a half turns. 2.Pull the HF3 tool out and away from the hearing instrument. The wax filter should pull out with the tool. If not, repeat Step #1, with an additional twist of the tool. 1a 2 1b 2 Old wax guard To insert a new wax guard: 3.Gently press the replacement side of the wax guard tool straight into the hole of the sound outlet until the outer ring lies flush with the outside of your hearing instrument. 4.Pull the tool straight out—the new wax guard will remain in place. To dispose of a used wax filter: 3.With the used wax filter attached to the HF3 tool, insert the tool into the center slot of the filter package. 4.Slide the tool to the side. The used wax filter will remain in the slot when you lift the HF3 tool straight out. 3 4 3 New wax guard 4 12 ReSound Vea™ supplement—Custom CIC To install a new wax filter: 5.Press down on a new wax filter in the package with the plastic end of the HF3 tool. 5 13 6.Lift straight up. A new wax filter will cling to the end of the HF3 tool. NOTES: 6 ______________________________________________ ______________________________________________ 7.Press the new wax filter straight into the canal tip of the hearing instrument. ______________________________________________ 8.Gently move the HF3 tool side to side while pulling it away from the hearing instrument. The new wax filter is now installed. ______________________________________________ ______________________________________________ ______________________________________________ ______________________________________________ 7 8 ______________________________________________ ______________________________________________ Important: Please refer to the documentation provided with your hearing instrument for important precautions and warnings. ______________________________________________ ______________________________________________ ______________________________________________ ______________________________________________ ______________________________________________ ______________________________________________ ______________________________________________ ______________________________________________ 14 ReSound Vea™ supplement—Custom CIC 15 Troubleshooting Guide SYMPTOMCAUSE POSSIBLE REMEDY No sound • • • • • • Broken microphone • Turn on by closing the battery door • Replace battery • Insert battery properly • Clean sound inlet or outlet • Change wax filter, or consult your hearing healthcare professional • Consult your hearing healthcare professional Not loud enough • • • • • Change in hearing • Excessive earwax • Volume set too low • Hearing instrument settings not optimal • Replace battery • Remove and reinsert • Clean sound inlet or outlet • Change wax filter, or consult your hearing healthcare professional • Consult your hearing healthcare professional • Consult your hearing healthcare professional • Adjust the volume control and/or consult your hearing healthcare professional • Consult your hearing healthcare professional Whistles • Poorly fitting instrument • Build-up of earwax • Consult your hearing healthcare professional • Consult your hearing healthcare professional Distorted or not clear • Battery low • Hearing instrument damaged • Hearing instrument settings not optimal • Replace battery • Consult your hearing healthcare professional • Consult your hearing healthcare professional Not turned on Battery low/dead Battery improperly inserted Blocked sound inlet or outlet Blocked wax filter Battery low Instrument loose Blocked sound inlet or outlet Blocked wax filter If there are any other problems not mentioned in this guide, please contact your hearing healthcare professional. 16 ReSound Vea™ supplement—Custom CIC 17