1
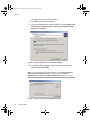
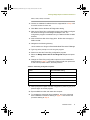
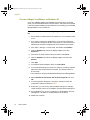
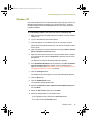
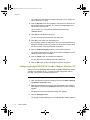
100413Portable_Install.book Page i Friday, March 25, 2005 2:22 PM INSTALLATION GUIDE Sniffer ® Portable VERSION 4.8 100413Portable_Install.book Page ii Friday, March 25, 2005 2:22 PM COPYRIGHT © 2005 Network General Corporation. All Rights Reserved. No part of this publication may be reproduced, transmitted, transcribed, stored in a retrieval system, or translated into any language in any form or by any means without the written permission of Network General Corporation or its suppliers or affiliate companies. TRADEMARK ATTRIBUTIONS Appera, InfiniStream, Know The Network, Netasyst, Network General, Network Performance Orchestrator, nPO, PrimeSupport, and Sniffer are registered trademarks or trademarks of Network General Corporation and/or its affiliates in the US and/or other countries. All other registered and unregistered trademarks in this document are the sole property of their respective owners. © 2005 Network General Corporation. All Rights Reserved. LICENSE AGREEMENT NOTICE TO ALL USERS: CAREFULLY READ THE APPROPRIATE LEGAL AGREEMENT CORRESPONDING TO THE LICENSE YOU PURCHASED, WHICH SETS FORTH THE GENERAL TERMS AND CONDITIONS FOR THE USE OF THE LICENSED SOFTWARE. IF YOU DO NOT KNOW WHICH TYPE OF LICENSE YOU HAVE ACQUIRED, PLEASE CONSULT THE SALES AND OTHER RELATED LICENSE GRANT OR PURCHASE ORDER DOCUMENTS THAT ACCOMPANIES YOUR SOFTWARE PACKAGING OR THAT YOU HAVE RECEIVED SEPARATELY AS PART OF THE PURCHASE (AS A BOOKLET, A FILE ON THE APPLICATION CD, OR A FILE AVAILABLE ON THE WEB SITE FROM WHICH YOU DOWNLOADED THE SOFTWARE PACKAGE). IF YOU DO NOT AGREE TO ALL OF THE TERMS SET FORTH IN THE AGREEMENT, DO NOT INSTALL THE SOFTWARE. IF APPLICABLE, YOU MAY RETURN THE PRODUCT TO NETWORK GENERAL OR THE PLACE OF PURCHASE FOR A FULL REFUND. March, 2005 / 100413 100413Portable_Install.book Page iii Friday, March 25, 2005 2:22 PM Contents Preface . . . . . . . . . . . . . . . . . . . . . . . . . . . . . . . . . . . . . . . . . . . . . . . v Audience . . . . . . . . . . . . . . . . . . . . . . . . . . . . . . . . . . . . . . . . . . . . . . . . . . . . . . . . . . . . . v Getting More Information . . . . . . . . . . . . . . . . . . . . . . . . . . . . . . . . . . . . . . . . . . . . . . . . . v Contacting Network General . . . . . . . . . . . . . . . . . . . . . . . . . . . . . . . . . . . . . . . . . . . . . viii 1 Installing Sniffer Portable . . . . . . . . . . . . . . . . . . . . . . . . . . . . . . . . 1 Overview . . . . . . . . . . . . . . . . . . . . . . . . . . . . . . . . . . . . . . . . . . . . . . . . . . . . . . . . . . . . . 1 System Requirements . . . . . . . . . . . . . . . . . . . . . . . . . . . . . . . . . . . . . . . . . . . . . . . . . . . 1 Power Considerations for Sniffer Portable Laptops . . . . . . . . . . . . . . . . . . . . . . . . . . 2 Before Installing Sniffer Portable . . . . . . . . . . . . . . . . . . . . . . . . . . . . . . . . . . . . . . . . . . . 3 Notes on Installing on top of Sniffer Portable 4.7.5 . . . . . . . . . . . . . . . . . . . . . . . . . . 3 Uninstalling Previous Versions of Sniffer Portable . . . . . . . . . . . . . . . . . . . . . . . . . . . . . . 4 Upgrading from Sniffer Portable 4.7.5 . . . . . . . . . . . . . . . . . . . . . . . . . . . . . . . . . . . . . . . 4 Updating WLAN Miniport Drivers after Upgrade . . . . . . . . . . . . . . . . . . . . . . . . . . . . 5 Installing Sniffer Portable . . . . . . . . . . . . . . . . . . . . . . . . . . . . . . . . . . . . . . . . . . . . . . . . 5 Uninstalling the QoS Packet Scheduler Service . . . . . . . . . . . . . . . . . . . . . . . . . . . . 7 Uninstalling the QoS Packet Scheduler Service after Installation . . . . . . . . . . . . . 8 Unbinding the QoS Packet Scheduler Service from Selected Adapters . . . . . . . . 9 Removing the MAC Bridge Miniport Driver on XP . . . . . . . . . . . . . . . . . . . . . . . . . . 10 Supported Adapters and Sniffer Enhanced Drivers . . . . . . . . . . . . . . . . . . . . . . . . . . . . 11 Additional Enhanced Driver Installation Resources . . . . . . . . . . . . . . . . . . . . . . . . . 12 2 Authorizing Sniffer Portable . . . . . . . . . . . . . . . . . . . . . . . . . . . . . 13 Overview . . . . . . . . . . . . . . . . . . . . . . . . . . . . . . . . . . . . . . . . . . . . . . . . . . . . . . . . . . . . 13 About Authorization . . . . . . . . . . . . . . . . . . . . . . . . . . . . . . . . . . . . . . . . . . . . . . . . . . . . 13 Authorizing Sniffer Portable . . . . . . . . . . . . . . . . . . . . . . . . . . . . . . . . . . . . . . . . . . . . . . 14 Creating a Request Authorization File . . . . . . . . . . . . . . . . . . . . . . . . . . . . . . . . . . . 14 Applying the Enable Authorization File . . . . . . . . . . . . . . . . . . . . . . . . . . . . . . . . . . 16 Upgrading Sniffer Portable . . . . . . . . . . . . . . . . . . . . . . . . . . . . . . . . . . . . . . . . . . . . . . 17 3 Installing Adapters and Sniffer Enhanced Drivers . . . . . . . . . . . 19 Overview . . . . . . . . . . . . . . . . . . . . . . . . . . . . . . . . . . . . . . . . . . . . . . . . . . . . . . . . . . . . 19 Installation Guide iii 100413Portable_Install.book Page iv Friday, March 25, 2005 2:22 PM Contents Installing Adapters and Sniffer Enhanced Drivers on Windows XP . . . . . . . . . . . . . . . . 19 Installing Adapters and Sniffer Enhanced Drivers on Windows NT . . . . . . . . . . . . . . . . 21 Installing Adapters and Sniffer Enhanced Drivers on Windows 2000 . . . . . . . . . . . . . . 23 First-time Installation (Windows 2000) . . . . . . . . . . . . . . . . . . . . . . . . . . . . . . . . . . . 24 Updating Existing Drivers (Windows 2000) . . . . . . . . . . . . . . . . . . . . . . . . . . . . . . . 25 4 Installing Madge Adapters and Enhanced Drivers . . . . . . . . . . . 29 Overview . . . . . . . . . . . . . . . . . . . . . . . . . . . . . . . . . . . . . . . . . . . . . . . . . . . . . . . . . . . . 29 Installing Madge Adapters and Enhanced Drivers . . . . . . . . . . . . . . . . . . . . . . . . . . . . . 30 Windows NT . . . . . . . . . . . . . . . . . . . . . . . . . . . . . . . . . . . . . . . . . . . . . . . . . . . . . . 30 Previous Adapter Installations on Windows NT . . . . . . . . . . . . . . . . . . . . . . . . . 32 Windows XP . . . . . . . . . . . . . . . . . . . . . . . . . . . . . . . . . . . . . . . . . . . . . . . . . . . . . . 33 Configuring Madge Mk2 PCMCIA\CardBus Adapters (Windows XP) . . . . . . . . . 34 Windows 2000 . . . . . . . . . . . . . . . . . . . . . . . . . . . . . . . . . . . . . . . . . . . . . . . . . . . . . 35 First Time Installation (Windows 2000) . . . . . . . . . . . . . . . . . . . . . . . . . . . . . . . 35 Updating Existing Drivers (Windows 2000) . . . . . . . . . . . . . . . . . . . . . . . . . . . . 36 Configuring Madge Mk2 PCMCIA\CardBus Adapters (Windows 2000) . . . . . . . 38 Installing Madge PCI Adapters and Enhanced Drivers . . . . . . . . . . . . . . . . . . . . . . . . . 39 Windows NT . . . . . . . . . . . . . . . . . . . . . . . . . . . . . . . . . . . . . . . . . . . . . . . . . . . . . . 39 Windows XP and 2000 . . . . . . . . . . . . . . . . . . . . . . . . . . . . . . . . . . . . . . . . . . . . . . . 40 Installing Madge PCMCIA and CardBus Adapters and Enhanced Drivers . . . . . . . . . . . 40 Windows NT . . . . . . . . . . . . . . . . . . . . . . . . . . . . . . . . . . . . . . . . . . . . . . . . . . . . . . 40 Windows XP and 2000 . . . . . . . . . . . . . . . . . . . . . . . . . . . . . . . . . . . . . . . . . . . . . . . 41 Index . . . . . . . . . . . . . . . . . . . . . . . . . . . . . . . . . . . . . . . . . . . . . . . . 43 iv Sniffer Portable 100413Portable_Install.book Page v Friday, March 25, 2005 2:22 PM Preface Sniffer® Portable is a powerful network analysis tool that enables you to monitor and troubleshoot your network. This document describes the system requirements and installation procedures for Sniffer Portable, including: Installing Sniffer Portable on page 1 Authorizing Sniffer Portable on page 13 Installing Adapters and Sniffer Enhanced Drivers on page 19 Installing Madge Adapters and Enhanced Drivers on page 29 Audience This guide is designed and produced for Network Administrators, Network Engineers, and Information Technology Managers who are responsible for monitoring, capturing, and analyzing data from their corporate networks. In addition, this guide will help other networking professionals with installation, connection, and configuration tasks required to establish connection to a Network General™ product on your network. Getting More Information Source Contents Sniffer Portable Installation Guide Provides the system requirements and installation instructions for Sniffer Portable and Sniffer Portable enhanced drivers. Sniffer Portable User’s Guide Provides a comprehensive overview of all Sniffer Portable features. Sniffer Portable Expert Alarms Reference Guide Describes each of the alarms generated by Sniffer Portable’s Expert analyzer, along with their related thresholds. Switch Expert Guide Describes how to connect and configure Sniffer Portable to use Switch Expert features. Installation Guide v 100413Portable_Install.book Page vi Friday, March 25, 2005 2:22 PM Preface vi Sniffer Portable Source Contents Sniffer Mobile Operations Guide Provides information specific to configuring, and operating Sniffer Mobile. Sniffer Mobile provides decodes and Expert Analysis for Mobile IP protocols. Sniffer Reporter Describes how to install and configure Sniffer Reporter to generate a wide variety of reports based on data collected by Sniffer network analysis and monitoring products. Sniffer Tool Collection’s Sniffer Focused Analysis Guide Describes how to use Sniffer Focused Analysis to leverage existing Sniffer trace files for additional analysis and troubleshooting. Sniffer Tool Collection’s Sniffer Capture Format Converter Describes how to use Sniffer Capture Format Converter to convert existing third-party trace files to .cap format. Sniffer Wireless Guide Describes how to install, configure, and operate Sniffer Portable with a supported wireless network adapter. Sniffer Voice Operations Guide Provides information specific to configuring and operating Sniffer Voice. Sniffer Voice provides decodes and Expert analysis for Voice over IP (VoIP) protocols. ATM Adapter Reference Guide Describes how to install, connect, and configure Sniffer Portable when using ATM hardware. Describes ATM interface pods. ATMbook Reference Guide Describes how to install, connect, and configure the ATMbook to capture and generate packets using Sniffer Portable. Full Duplex 10/100 Ethernet Reference Guide Describes how to install, connect, and configure Sniffer Portable when using the Full Duplex Ethernet PCI adapter. Upgrading the Full Duplex 10/100 Ethernet PCI Adapter Guide Describes how to use the FlashUpd utility provided with Sniffer Portable to upgrade the FPGA firmware used on the FDX 10/100 Ethernet PCI adapter. Gigabit Ethernet Reference Guide Describes how to install, connect, and configure Sniffer Portable when using the Gigabit Ethernet PCI adapter. WAN Adapter Cards Reference Guide Describes how to install, connect, and configure Sniffer Portable when using the LM2000 or HSSI adapter. Snifferbook Ultra Reference Guide Describes how to install and configure the Snifferbook Ultra unit and optional Phys. 100413Portable_Install.book Page vii Friday, March 25, 2005 2:22 PM Preface Source Contents Snifferbook Reference Guide Describes how to install, connect, and configure Sniffer Portable when using the Snifferbook. Help Product information that is accessed from within the application. Release Notes • The Help system provides high-level and detailed information. Access from either the Help menu option or the Help button in the application. • Context-sensitive (also called What’s This?) Help provides brief descriptions of the selections in the application. Access by right-clicking an option, pressing the [F1] control key, or dragging the question icon to an option. README file. Product information, system requirements, resolved issues, any known issues, and last-minute additions or changes to the product or its documentation. Installation Guide vii 100413Portable_Install.book Page viii Friday, March 25, 2005 2:22 PM Preface Contacting Network General Customer Service Get help with license entitlement, registrations, grant number inquiries, tech support validation and more by contacting the Network General Customer Service department at: North America phone: 1-800-764-3337 (1-800-SNIFFER) Email: [email protected] Web: http://www.networkgeneral.com/ContactUs.aspx The department's hours of operation are 7:00 AM to 7:00 PM Central time, Monday through Friday. International phone numbers: http://www.networkgeneral.com/ContactUs.aspx Latin America: +55 (11) 5180-6643 Europe: +44 (0) 1753 217500 Australia/New Zealand: +61 (2) 9761 4200 Asia: +65 6222 7555 Japan: +81 3-5219-1221 Mail: Network General Corporation (North America) Customer Service Department Mail Stop 2S362 5000 Headquarters Drive Plano, TX 75024 USA viii Sniffer Portable 100413Portable_Install.book Page ix Friday, March 25, 2005 2:22 PM Preface Customer Service International Address Network General International BV (EMEA) Customer Service Department PO Box 58326 1040 HH Amsterdam The Netherlands Technical Support Visit Network General Technical Support at: • Sniffer University http://www.networkgeneral.com/TechnicalSupport.aspx Sniffer University is a comprehensive educational resource for building and enhancing all network professionals' skills in fault and performance management. Sniffer University has trained over 70,000 network professionals worldwide. The Sniffer Certified Professional Program provides network professionals industry-recognized accreditation as experts in their field. For more information: Consulting Services • Toll-free: 866-764-3337 • Email: [email protected] • Web: http://www.networkgeneral.com/SnifferUniversity.aspx Our consultants provide an expert supplemental resource and independent perspective to resolve your problems. They are ready to assist you during all stages of network growth, from planning and design, through implementation, and with ongoing management. They will help integrate our products into your environment and troubleshoot or baseline network performance. Our consultants also develop and deliver custom solutions to help accomplish your project goals. Currently, custom and product consulting are available. For more information: • http://www.networkgeneral.com/Consulting.aspx Installation Guide ix 100413Portable_Install.book Page x Friday, March 25, 2005 2:22 PM Preface x Sniffer Portable 100413Portable_Install.book Page 1 Friday, March 25, 2005 2:22 PM Installing Snif fer Por table 1 Overview This chapter provides the system requirements, installation instructions, and upgrade instructions for the Sniffer Portable software, and introduces the Network General supported adapters and enhanced drivers. System Requirements on page 1 Before Installing Sniffer Portable on page 3 Uninstalling Previous Versions of Sniffer Portable on page 4 Installing Sniffer Portable on page 5 Supported Adapters and Sniffer Enhanced Drivers on page 11 System Requirements Table 1-1 lists the minimum recommended hardware and third-party software requirements to run Sniffer Portable. Table 1-1. Sniffer Portable System Requirements Item Requirement Computer Pentium IV running at 733 MHz or better (All Supported Operating Systems) Pentium III running at 600 MHz or better (All Supported Operating Systems) 256 MB RAM Minimum System Memory (All Supported Operating Systems) 150 MB or more of free hard drive space (All Supported Operating Systems) CD-ROM Drive Operating System Microsoft Windows XP Professional Edition with SP 2 Microsoft Windows NT 4.0 (Server & Workstation) with SP 6a and Security Rollup Package (SRP) Microsoft Windows 2000 (Professional & Advanced Server) w/ SP 4 Monitor VGA color monitor with 800x600 resolution (with 256 color support or updated VGA driver) Adapter Card Network adapter card configured with an IP address and connected to the network (see Supported Adapters and Sniffer Enhanced Drivers on page 11). Installation Guide 1 100413Portable_Install.book Page 2 Friday, March 25, 2005 2:22 PM Chapter 1 Table 1-1. Sniffer Portable System Requirements Item Requirement Browser with Internet Access Microsoft Internet Explorer 6.0 SP 1 Media Player Media Player: Additional Software • Version 6.4.07.1112 on Windows NT • Version 7.00.00.1954 on Windows 2000 • Version 8.00.00.4487 on Windows XP Crystal Reports 8.5 Power Considerations for Sniffer Portable Laptops Most laptop computers include power configuration options that let you specify whether the computer should be allowed to go into a standby or hibernate mode after a specified period of inactivity. For computers actively running Sniffer Portable, these options should always be disabled to preserve stable system performance! For example, MS-Windows 2000 and XP laptop computers include a Power Options Properties control panel. The Power Options Properties control panel is accessed by starting the Display control panel (Start > Settings > Control Panel > Display), clicking on the Screen Saver tab and then clicking the Power button. In this example, the following settings should be made for active Sniffer Portable operations: Power Schemes Tab - Turn off hard disks = Never - System standby = Never Hibernate Tab - Enable hibernate support = Disabled NOTE: Some laptop vendors include their own proprietary software to perform power configuration tasks. In these cases, you may need to make similar changes in the configuration menu provided by the vendor. 2 Sniffer Portable 100413Portable_Install.book Page 3 Friday, March 25, 2005 2:22 PM Installing Sniffer Portable Before Installing Sniffer Portable The Sniffer Portable Application CD includes the software you need to get started using Sniffer Portable. Before installing Sniffer Portable, review the following installation notes: For Windows XP and NT: To install the Sniffer Portable software on a Windows XP or NT system, you must have system administrator (sa) privileges. For IBM Thinkpad laptop users: Sniffer Portable supports the Intel (R) PRO + miniPCI Adapter card. Before you install Sniffer Portable, we recommend updating the latest BIOS for your laptop, then downloading and installing the latest Intel driver to minimize Sniffer Portable installation issues. With the Intel (R) PRO + miniPCI Adapter card, no additional Sniffer enhanced driver is necessary. Notes on Installing on top of Sniffer Portable 4.7.5 Unlike earlier versions of the Sniffer Portable software, Sniffer Portable 4.8 can be installed directly over any existing 4.7.5 version of Sniffer Portable. The procedure is described in Installing Sniffer Portable on page 5 . Before performing such an installation, however, you should be aware that you must update existing Network General enhanced drivers to gain the benefits of the new release. IMPORTANT: If your current installation is a version prior to 4.7.5 (including 4.7), uninstall the earlier version of the software before installing 4.8. If you install this release of Sniffer Portable on top of an existing Sniffer Portable installation, you must update the Network General drivers for any adapter cards supported by this release of Sniffer Portable to receive the benefits of the updated software! Installing Adapters and Sniffer Enhanced Drivers on page 19describes how to update existing Network General drivers. Installation Guide 3 100413Portable_Install.book Page 4 Friday, March 25, 2005 2:22 PM Chapter 1 Uninstalling Previous Versions of Sniffer Portable Installing Sniffer Portable 4.8 on top of an existing Sniffer Portable 4.5 or 4.7 release is not supported. Only upgrades from an existing Sniffer Portable 4.70.5xx installation are supported. To install on top of an earlier Sniffer Portable 4.5 or 4.7 release, uninstall the earlier and then install Sniffer Portable 4.8. Future updates of Sniffer Portable 4.8 can be installed on top of an existing Sniffer Portable 4.8 installation. However, downgrades from a new version of Sniffer Portable 4.8 to an earlier version of Sniffer Portable 4.8 is not supported. NOTE: If Sniffer Voice is installed on the target machine, it must be uninstalled before you uninstall the Sniffer Portable software. To uninstall a previous version of Sniffer Portable: 1 Log in to the Sniffer PC machine with Administrator privileges. 2 Go to Start > Settings > Control Panel > Add/Remove Programs. 3 In the Add/Remove Programs window that appears, is there an entry for Sniffer Voice? If yes — Uninstall Sniffer Voice and reboot the computer before uninstalling. Then access the Add/Remove Programs window again (Step 2) and uninstall the Sniffer Portable software. If no — Select the entry for the Sniffer Portable software and click Add/Remove. 4 During the uninstallation, the wizard will ask you if you would like to remove unused shared files. Click Yes to all to remove all unused shared files. 5 Reboot the computer. The target PC is now ready for installation of the Sniffer Portable software. Upgrading from Sniffer Portable 4.7.5 If you are upgrading from Sniffer Portable 4.7.5, please note the following settings are migrated during the Sniffer Portable 4.8 installation: 4 Sniffer Portable Monitor, capture, and display filters 100413Portable_Install.book Page 5 Friday, March 25, 2005 2:22 PM Installing Sniffer Portable Trigger files Display Setup settings Address Book entries Settings specified within the Tools > Options menu Settings specified within the Tools > Expert Options menu Switches added using the Monitor > Switch command Settings specified within the Database > Options menu NOTE: .csv files are updated with data for Sniffer Portable 4.8, however the .csv version in the file’s title bar displays the older version. Sniffer Protocol drivers are updated ART settings Local Agent settings NOTE: Any new multiple History Samples created by the user are not migrated. Updating WLAN Miniport Drivers after Upgrade If you are upgrading your Sniffer Portable installation to 4.8, after upgrading from 4.7 or 4.7.5, the miniport driver for all existing WLAN adapters needs to be updated. Installing Sniffer Portable Use the following procedure to install the Sniffer Portable software. To install Sniffer Portable: 1 Before installing Sniffer Portable, disable any unused adapters, including the built-in adapter, on the machine in which you plan to install the software. NOTE: After installing the adapter and driver you plan to use with the Sniffer Portable software and Sniffer Portable is successfully capturing Installation Guide 5 100413Portable_Install.book Page 6 Friday, March 25, 2005 2:22 PM Chapter 1 data, you can re-enable the unused adapter if desired. 2 From the Sniffer Portable Application CD, double-click SnifferPro.exe. If the target PC supports the autorun function, an installation menu will automatically appear after inserting the Application CD. Select the Install Product option from this menu. NOTE: If the installation menu does not appear automatically, you can also go to Start > Run, and enter < drive letter>:\setup and click OK. < drive letter > is the physical drive letter of the CD-ROM drive. 3 During the installation of the Sniffer Portable software, the Setup program will perform some different steps depending on the target system’s operating system and existing configuration. The following notes describe some common occurrences during Sniffer Portable installations, as follows: Uninstalling the QoS Packet Scheduler Service on page 7 (Windows XP and Windows 2000) Removing the MAC Bridge Miniport Driver on XP on page 10 (Windows XP) 4 In the Setup Complete window, click Finish and restart your computer as prompted. 5 Start Sniffer Portable from Start > Programs > Network General > Sniffer Portable > Sniffer. Sniffer Portable is installed with a temporary license configured to expire 15 days after the application is started for the first time. After connecting to Sniffer Portable for the first time, you will see a message indicating you need to authorize the software within 15 days. The 15-day period is called the "pre-authorization" period. Before the 15 day pre-authorization period expires, you must authorize the Sniffer Portable software option(s) that you legally own. Failure to authorize the Sniffer Portable software will cause the hardware to automatically reboot and revert to an "unauthorized" state. You will not be able to use the Sniffer Portable software until it is properly authorized. See Authorizing Sniffer Portable on page 13 for more information. 6 Sniffer Portable 100413Portable_Install.book Page 7 Friday, March 25, 2005 2:22 PM Installing Sniffer Portable Uninstalling the QoS Packet Scheduler Service The QoS Packet Scheduler service supports the 802.1P traffic prioritization system, allowing for the implementation of best-effort Quality of Service by conforming 802.1P equipment. The service is optional on Windows 2000. However, on Windows XP, the service is automatically bound to each installed adapter driver. To improve analyzer performance, Network General recommends that the QoS Packet Scheduler service provided with Windows XP and Windows 2000 be unbound from any adapters used with Sniffer Portable. Sniffer Portable can only check for the existence of the QoS Packet Scheduler Service during installation. If you rebind the QoS Packet Scheduler Service to a Sniffer adapter at a later time, that adapter will experience decreased Sniffer performance. IMPORTANT: Uninstalling the QoS Packet Scheduler service removes it from all installed adapters. Unbinding from individual adapters allows you to preserve the service for use with any non-Sniffer adapters. See Unbinding the QoS Packet Scheduler Service from Selected Adapters on page 9. To uninstall the QOS Packet Scheduler Service: 1 At the conclusion Sniffer Portable installation on Windows XP or Windows 2000, you are provided the option to completely remove the QoS (Quality of Service) Packet Scheduler service from the target system (Figure 1-1). 2 To uninstall the QoS Packet Scheduler service completely, enable the Uninstall the QoS Packet Scheduler Service option shown in Figure 1-1 and click Finish. Installation Guide 7 100413Portable_Install.book Page 8 Friday, March 25, 2005 2:22 PM Chapter 1 Figure 1-1. Uninstalling the QoS Packet Scheduler Service If you do not remove the QoS Packet Scheduler Service during the Sniffer Portable setup, you can also perform the following: Uninstalling the QoS Packet Scheduler Service after Installation on page 8 Unbinding the QoS Packet Scheduler Service from Selected Adapters on page 9 Uninstalling the QoS Packet Scheduler Service after Installation Use the following procedure to uninstall the QoS Packet Scheduler Service after Sniffer Portable is installed. To completely remove the QoS Packet Scheduler Service after completing the Sniffer Portable installation: 1 Open the Network Connections folder by selecting the Start > Settings > Network Connections option. 2 Right-click any of the Connection entries in the folder and select the Properties command from the menu that appears. The Connection Properties dialog box appears, as in Figure 1-2. The following example is for wireless connections. 8 Sniffer Portable 100413Portable_Install.book Page 9 Friday, March 25, 2005 2:22 PM Installing Sniffer Portable Figure 1-2. Local Area Connection Properties Dialog Box 3 De-select the QoS Packet Scheduler entry and click Uninstall. A confirmation box appears. 4 Click OK to confirm that you want to uninstall the QoS Packet Scheduler service completely. The QoS Packet Scheduler service is uninstalled. 5 Click OK on the Connection Properties dialog box. Unbinding the QoS Packet Scheduler Service from Selected Adapters Use the following procedure to unbind the QoS Packet Scheduler Service from selected adapters: To unbind the QoS Packet Scheduler Service from selected adapters: 1 Open the Network Connections folder by selecting the Start > Settings > Network Connections option. 2 Right-click the Network Connection entry from which you want to unbind the QoS Packet Scheduler service and select the Properties command from the menu that appears. Installation Guide 9 100413Portable_Install.book Page 10 Friday, March 25, 2005 2:22 PM Chapter 1 The Network Connection Properties dialog box appears, as in Figure 1-2 on page 9. 3 De-select the checkbox next to the QoS Packet Scheduler entry and click OK. 4 Repeat this procedure for each adapter you want to use with Sniffer Portable. Removing the MAC Bridge Miniport Driver on XP To improve analyzer performance, Network General recommends that the Network Bridge service provided with Windows XP not be used on a Sniffer Portable PC. During installation of Sniffer Portable, Setup checks to see if you have an existing Network Bridge. If an existing Network Bridge is found, Setup provides the option of removing it automatically. If you do not remove an installed network bridge automatically during installation, you can still remove it manually after installation using the procedure below. IMPORTANT: Sniffer Portable can only check for the existence of a network bridge during installation. If you add a network bridge after Sniffer Portable installation, Sniffer Portable performance will be decreased. To remove a network bridge in Windows XP: 1 Open the Network Connections folder by selecting the Start > Settings > Network Connections option. The Network Connections folder appears. 10 Sniffer Portable 2 Under the Network Bridge section, right-click the Network Bridge entry and select the Delete command in the menu that appears. 3 Click Yes to confirm that you want to delete the network bridge. 100413Portable_Install.book Page 11 Friday, March 25, 2005 2:22 PM Installing Sniffer Portable Supported Adapters and Sniffer Enhanced Drivers The Sniffer Portable Application CD includes Sniffer enhanced drivers for supported network adapter cards. Enhanced drivers modify the adapter to provide additional functionality to the card. For example, an enhanced driver may enable you to view additional network data or improve Sniffer Portable performance by capturing and decoding more traffic on busy networks. Later chapters detail how to install the Sniffer enhanced drivers listed in Table 1-2. Sniffer Portable works on a desktop PC with any Ethernet or Token Ring network adapter with an NDIS 3.0+ driver. Sniffer Portable works on a laptop computer with the Xircom CardBus Ethernet II 10/100 or Madge 16/4 Token Ring CardBus (Mk2) with an NDIS 5.0+ driver. However, you must use a supported adapter with a Sniffer enhanced driver to fully utilize all the features of Sniffer Portable. Table 1-2. Supported Adapters With Sniffer Enhanced Drivers Topology Network Adapter Cards with Sniffer Enhanced Drivers XP 2000 Ethernet 10/100/1000 Ethernet integrated NICs X X Broadcom 1000BT X X NT X NOTE: Broadcom 1000BT support does not include an enhanced driver. Token Ring Adaptec PCI Ethernet Adapter (ANA-21140/UC & ANA-6911/UC) X X Adaptec PCI Ethernet Adapter (ANA-6911A/TX/TXC) X X Adaptec 62011 10/100 PCI X X X IBM Etherjet CardBus Ethernet Adapter X X X Intel PRO/100 + Mini PCI Ethernet Adapter X X X Xircom CardBus Ethernet II 10/100 (CBE2) Cardbus X X X Xircom Realport CardBus Ethernet Adapter X X X Xircom Realport2 CardBus Ethernet Adapter X X X IBM 10/100 EtherJet CardBus Adapter X X X Madge PCMCIA Smart 16/4 Ringnode Mk2 (20-01) X X X Madge 16/4 CardBus Adapter Mk2 (20-03) X X X Madge Smart 16/4 PCI Ringnode Mk2/BM2 (51-02) X X Madge Smart 16/4 PCI Ringnode Mk3 (51-04) X X Installation Guide 11 100413Portable_Install.book Page 12 Friday, March 25, 2005 2:22 PM Chapter 1 Additional Enhanced Driver Installation Resources Table 1-3 contains a list of adapters and enhanced drivers supported by Sniffer Portable that are not documented in this guide. Please see the document listed below for detailed information and installation instructions for that adapter and enhanced driver. Table 1-3. Additional Supported Adapters and Enhanced Drivers Network Adapter Cards with Sniffer Enhanced Drivers Installation and Configuration Information Atheros AR5002X Chipset Wireless See the Sniffer Technologies Wireless Guide. Symbol Spectrum24 PCMCIA Cisco Aironet 340/350 PCMCIA Cisco Aironet 802.11a/b/g CardBus NOTE: Installing an 802.11a/b/g combination card with other instances of combination cards is not supported. Agere ORiNOCO Gold PCMCIA Enterasys RoamAbout PCMCIA Proxim Harmony 802.11a CardBus Proxim 8480WD 802.11a/b/g Cardbus Card World Gold Proxim 8660WD 802.11a/b/g Cardbus Card World Gold 12 Sniffer Portable Sniffer FDX PCI Card See the Sniffer Portable Full Duplex Ethernet Installation and Operations Guide. Sniffer HSSI PCI Adapter See the Sniffer Portable WAN Adapter Cards Installation, Connection, and Configuration Guide. Sniffer ATM SAR Adapter See the Sniffer Portable ATM Adapter Card Installation, Connection, and Configuration Guide. Sniffer (Xyratex) Gigabit Ethernet PCI Adapter (SX, LX) See the Sniffer Portable Gigabit Ethernet Installation and Operations Guide. 100413Portable_Install.book Page 13 Friday, March 25, 2005 2:22 PM Authorizing Snif fer Por table 2 Overview This chapter provides information on authorizing your Sniffer Portable installation: About Authorization Authorizing Sniffer Portable on page 14 Creating a Request Authorization File on page 14 Applying the Enable Authorization File on page 16 Upgrading Sniffer Portable on page 17 About Authorization Sniffer Portable is installed with a temporary license configured to expire 15 days after the application is started for the first time. To use Sniffer Portable beyond this grace period, you must authorize your software using the Authorization utility. The Authorization utility lets you perform a challenge-response scenario between the Sniffer Portable unit seeking authorization and the Network General Customer Care department. You will generate a Request Authorization file that is emailed to Customer Care. Once Customer Care receives the Request Authorization file, they will transmit an Enable Authorization file that enables a specific set of software options and functionality in Sniffer Portable. You can also use the Authorization utility at any time after your initial authorization to add new features or components to Sniffer Portable. See Upgrading Sniffer Portable on page 17 for more information. Installation Guide 13 100413Portable_Install.book Page 14 Friday, March 25, 2005 2:22 PM Chapter 2 Authorizing Sniffer Portable The Sniffer Portable software comes with a temporary license that is configured to expire 15 days after the application starts for the first time. After connecting to Sniffer Portable for the first time, you will see a message indicating you need to authorize the software within 15 days. This 15-day period is called the "pre-authorization" period. The pre-authorization period includes support for the feature-rich Sniffer Portable Field Service option, as well as Sniffer Voice and Sniffer Mobile. Before the 15 day pre-authorization period expires, you must authorize the Sniffer Portable software options that you legally own. Failure to authorize the Sniffer Portable software will cause the hardware to automatically reboot and revert to an ‘unauthorized’ state. You will not be able to use the Sniffer Portable software until it is properly authorized. The authorization process includes the following steps: Creating a Request Authorization File on page 14 Applying the Enable Authorization File on page 16 Creating a Request Authorization File NOTE: Local administrator rights are required to create a request file. To create a request options file: 14 Sniffer Portable 1 From the Sniffer Portable machine, go to Start > Programs > Network General > Sniffer Portable > Authorization. 2 Select Request Authorization and click OK. 3 The Request Authorization dialog box (Figure 2-1) appears. 100413Portable_Install.book Page 15 Friday, March 25, 2005 2:22 PM Authorizing Sniffer Portable Figure 2-1. Request Authorization Dialog Box 4 In the Request Authorization dialog box enter your company name and your grant number(s) in the fields provided. Separate multiple grant numbers with a comma. 5 Under Select Options to be enabled, select the options to be enabled for the Sniffer Portable machine. Options include: 6 Sniffer Portable LAN. Enable this option for 10/100/1000, wireless, Token Ring, and Sniffer Reporter activation. Sniffer Portable WAN. Enable this option for WAN, ATM, POS, and Sniffer Reporter activation. Sniffer Portable Field Service. Enable this option for Sniffer Portable LAN and Sniffer Portable WAN, Sniffer Reporter, as well as Sniffer Voice and Sniffer Mobile activation. VOIP. Enable this add-on option if you have purchased Sniffer Voice. Mobile IP. Enable this add-on option if you have purchased Sniffer Mobile. Click Save to generate a Request Authorization file. The Request Authorization file name is determined by the first grant number in the grant number field. However, you may assign a ‘user-friendly’ name, if you wish. Installation Guide 15 100413Portable_Install.book Page 16 Friday, March 25, 2005 2:22 PM Chapter 2 NOTE: The RequestOptions.log and EnableOptions.log are generated during the Request Authorization and Enable Authorization process. If you encounter problems, check the appropriate log file in the installation directory. The default directory on XP, Windows 2000 and NT machines is C:\Program Files\NAI\SnifferNT\Program. 7 Click OK when the Authorization window confirms the Request Authorization file was generated successfully. 8 Click Exit and Yes to confirm you want to exit. 9 From a machine with an Internet connection, open a browser window and navigate to the following Web site: https://licensing.networkgeneral.com The Web site provides online access to product licensing 24 hours a day, 7 days a week. 10 Enter the appropriate information provided from your grant letter in the fields provided. Follow the onscreen instructions to finish the automated license request process. 11 After receiving the Enable Authorization file from the automated licensing process, save the file to a location accessible to Sniffer Portable. Applying the Enable Authorization File Once you receive the Enable Authorization file from Customer Care, apply the file to your Sniffer Portable software to fully authorize the machine. NOTE: Local administrator rights are required to apply the Enable Authorization file. To apply the Enable Authorization file: 16 Sniffer Portable 1 On the Sniffer Portable PC, go to Start > Programs > Network General > Sniffer Portable > Authorization and select Enable Authorization then click OK. The Enable Authorization dialog box opens. 2 In the Enable Authorization dialog box, click Load and browse to the location you saved the Enable Authorization file. Select the file and click Open. A message will appear that verifies a successful authorization. 100413Portable_Install.book Page 17 Friday, March 25, 2005 2:22 PM Authorizing Sniffer Portable 3 Click OK and Exit. The Sniffer Portable PC will automatically reboot. 4 Confirm that the authorization process was successful after the machine reboots: a Start Sniffer Portable and go to Help > About. The newly enabled options will appear in the dialog box. NOTE: The RequestOptions.log and EnableOptions.log are generated during the Request Authorization and Enable Authorization process. If you encounter problems, check the appropriate log file in the installation directory. The default directory on XP, Windows 2000 and NT machines is C:\Program Files\NAI\SnifferNT\Program. Contact Customer Care if you are unable to properly authorize Sniffer Portable. See page viii for contact information. Upgrading Sniffer Portable If you would like to add additional features, you can re-authorize Sniffer Portable to expand your feature set using the same authorization method described in Authorizing Sniffer Portable on page 14. Contact your Sales Representative to purchase additional features prior to re-authorizing Sniffer Portable. Once you have purchased the desired features from your Sales Representative, follow the same authorization steps described in Authorizing Sniffer Portable to enable the features. When prompted to select the enabled features, select both the existing and new options and follow the on-screen instructions. Installation Guide 17 100413Portable_Install.book Page 18 Friday, March 25, 2005 2:22 PM Chapter 2 18 Sniffer Portable 100413Portable_Install.book Page 19 Friday, March 25, 2005 2:22 PM Installing Adapters and Snif fer Enhanced Drivers 3 Overview After installing the Sniffer Portable software, install the adapter and Sniffer enhanced driver appropriate to your Sniffer Portable configuration. This chapter provides detailed installation instructions for the Sniffer enhanced drivers for Ethernet adapters. NOTE: Unless otherwise noted, the instructions support Notebook PC, PAC 65, and Sniffer FlexPAC platforms. Use Table 3-1 to quickly find the adapter and Sniffer enhanced driver installation instructions you need for your Sniffer Portable PC configuration. Table 3-1. Finding What You Need in this Chapter To perform the following... for... see... Install Sniffer supported adapters and enhanced drivers for Ethernet topologies Windows XP page 19 Windows NT page 21 Windows 2000 page 23 Installing Adapters and Sniffer Enhanced Drivers on Windows XP The Sniffer enhanced drivers for Windows XP are plug and play drivers. The default installation location for the Sniffer enhanced drivers is C:\Program Files\ Nai\SnifferNT\Driver\en. Table 3-2 lists the supported adapters for Windows XP and the subdirectories where the Sniffer enhanced drivers can be found. Installation Guide 19 100413Portable_Install.book Page 20 Friday, March 25, 2005 2:22 PM Chapter 3 Table 3-2. Windows XP Sniffer Enhanced Driver Locations Supported Adapter <local install drive>: \Program Files\NAI \SnifferNT\Driver\en\... Sniffer (Intel Pro 100) Intel\WinXP Sniffer (Xircom) Xircom\WinXP Sniffer (IBM Etherjet) IBM\WinXP Adaptec 62011 Adaptec.620XX\WinXP To install a Sniffer supported adapter and driver in Windows XP: 1 Make sure the Sniffer Portable software is installed. If it is not installed, install it now. 2 Log in to Windows XP as an Administrator. 3 Insert the adapter in an available card slot on the target machine. Windows XP automatically detects the new card and installs its native device driver. 4 Open the Network Connections folder by selecting Start > Settings > Control Panel > Network Connections > Local Area Network. 5 Right-click the Network Connection entry associated with the adapter you just inserted and select Properties from the menu. 6 Click Configure to open the Network Connections Properties dialog box. 7 Click the Driver tab. 8 Click Update Driver. The Hardware Update Wizard starts. 9 Select the Install from a list or specific location (Advanced) option. and click Next. 10 Select the Don’t search option and click Next. 11 Click Have Disk. The Install from Disk dialog box appears prompting you to supply the path to the driver to install. 12 Click Browse and navigate to the path where the driver for the selected adapter is installed. See Table 3-2 for the location of the appropriate driver files. 20 Sniffer Portable 100413Portable_Install.book Page 21 Friday, March 25, 2005 2:22 PM Installing Adapters and Sniffer Enhanced Drivers 13 Click Open in the Browse dialog box. You are returned to the Install from Disk dialog box. 14 Click OK on the Install from Disk dialog box. If the operating system is configured to alert you to unsigned drivers, a dialog box will appear warning you that you are about to install a driver that has not been verified by Microsoft Corporation. 15 Click Continue Anyway to continue the installation. The wizard installs the driver. When it has finished, it displays a screen indicating that the driver is installed. 16 Click Finish. 17 Click OK to clear the Adapter Properties dialog box. Installing Adapters and Sniffer Enhanced Drivers on Windows NT The Sniffer enhanced drivers for Windows NT are not plug and play and must be manually installed. If you have a previously installed driver, you must first uninstall the driver before installing the Sniffer enhanced driver. The Sniffer enhanced drivers are placed in the <local install drive>:\Program Files \Nai\SnifferNT\Driver\en directory during the Sniffer Portable installation. Table 3-3 lists the supported adapters for Windows NT and the subdirectories where the Sniffer enhanced drivers can be found. Table 3-3. Windows NT Sniffer Enhanced Driver Locations Supported Adapter <local install drive>: \Program Files\Nai \SnifferNT\Driver\en\... Sniffer (Adaptec) PCI Ethernet Adapter (ANA-21140/UC & ANA-6911/UC) adaptec\WinNT Sniffer (Adaptec) PCI Ethernet Adapter (ANA-6911A/TX/TXC) Sniffer (Xircom) Xircom\WinNT Sniffer (IBM) Ibm\WinNT Adaptec 62011 Adaptec.620XX\WinNT Installation Guide 21 100413Portable_Install.book Page 22 Friday, March 25, 2005 2:22 PM Chapter 3 To install adapters and Sniffer enhanced drivers on Windows NT: 1 Ensure Sniffer Portable software is installed. If it is not installed, install it now. 2 If you have a previously installed driver (a previous version of a Sniffer driver or another vendor’s driver), you must first uninstall the driver before installing the Sniffer enhanced driver. Remove drivers in Windows NT through the Adapters tab of the Network control panel. 3 Shut down the computer. 4 Following the manufacturer’s instructions, insert the supported adapter into an available slot in your computer. 5 Start the computer and log in to Windows NT as an Administrator. 6 Go to Start > Settings > Control Panel, and double-click Network. 7 Click the Adapters tab. 8 Click Add. 9 In the Select Network Adapter dialog box, click Have Disk. 10 In the Insert Disk dialog box, enter the directory path where the Sniffer enhanced driver is located. See Table 3-3 for Sniffer enhanced driver locations. For example, enter C:\Program Files\Nai\SnifferNT\Driver\en\ Xircom\WinNT for a Xircom Sniffer enhanced driver. 11 Click OK. 12 Select the appropriate adapter in the Select OEM Option dialog box and click OK. 13 A Configuration dialog box with the adapter name in the title bar appears. Do not change the default setup specific to your installed adapter. Click OK. 14 Click the Bindings tab to initialize the adapter. 15 Click the Protocols tab, select TCP/IP Protocol, then click Properties. The Microsoft TCP/IP Properties dialog box opens. 16 In the Microsoft TCP/IP Properties dialog box, ensure the correct adapter name is highlighted in the Adapter field. 17 Select one of the following IP address settings for the adapter: 22 Sniffer Portable 100413Portable_Install.book Page 23 Friday, March 25, 2005 2:22 PM Installing Adapters and Sniffer Enhanced Drivers Obtain an IP address from a DHCP server. Reads and assigns the IP address for the driver automatically. Specify an IP address. You must manually enter IP address information for the driver in each field. 18 Click OK. 19 Click Close. 20 If an application error occurs in rundll32.exe, click Cancel in the error message box. All added or modified settings will be saved. 21 Restart your computer. Installing Adapters and Sniffer Enhanced Drivers on Windows 2000 The Sniffer enhanced drivers for Windows 2000 are plug and play drivers. The default installation location for the Sniffer enhanced drivers is C:\Program Files\ Nai\SnifferNT\Driver\en. Table 3-4 lists the supported adapters for Windows 2000 and the subdirectories where the Sniffer enhanced drivers can be found. Table 3-4. Windows 2000 Sniffer Enhanced Driver Locations Supported Adapter <local install drive>: \Program Files\Nai \SnifferNT\Driver\en\... Sniffer (Adaptec) PCI Ethernet Adapter (ANA-21140/UC & ANA-6911/UC) adaptec\Win2K Sniffer (Adaptec) PCI Ethernet Adapter (ANA-6911A/TX/TXC) Sniffer (Intel) Intel\Win2K Sniffer (Xircom) Xircom\Win2K Sniffer (IBM) Ibm\Win2K Adaptec 62011 Adaptec.620XX\Win2K The driver installation procedure for Windows 2000 is somewhat different depending on whether you are updating an existing driver (either a previous version of the Sniffer driver or another vendor’s driver) or installing the adapter and driver for the first time. Use the appropriate procedure below. First-time Installation (Windows 2000) on page 24 Installation Guide 23 100413Portable_Install.book Page 24 Friday, March 25, 2005 2:22 PM Chapter 3 Updating Existing Drivers (Windows 2000) on page 25 First-time Installation (Windows 2000) For Windows 2000, you install the adapter and driver for the first time by inserting the card in the PC and using the Found New Hardware Wizard, as follows. To install an adapter and driver in Windows 2000 for the first time: 1 Make sure the Sniffer Portable software is installed. If it is not installed, install it now. 2 Insert the supported adapter into an available slot in your computer following the manufacturer’s instructions. 3 Start the computer and log in as an Administrator. Windows 2000 presents the Found New Hardware Wizard to help you install a new driver for the newly detected adapter. NOTE: If Windows 2000’s plug-and-play feature automatically installs a driver for the adapter instead of starting the Found New Hardware Wizard, see Updating Existing Drivers (Windows 2000) on page 25 to update the existing driver. 4 Click Next in the Wizard window. The Install Hardware Device Drivers window appears. 5 Select the Search for a suitable driver for my device option and click Next. The Locate Driver Files window appears. 6 Check only the Specify a location option and click Next. The Found New Hardware Wizard prompts you to supply a path to the device driver. 7 Click Browse and browse to the location of the Sniffer enhanced driver. See Table 3-4 for Sniffer enhanced driver locations. 8 Click OK. Windows 2000 scans for the driver and presents the Driver Files Search Results window indicating that it has found the driver you specified in the previous step. 24 Sniffer Portable 100413Portable_Install.book Page 25 Friday, March 25, 2005 2:22 PM Installing Adapters and Sniffer Enhanced Drivers 9 Click Next on the Driver Files Search Results window. The Digital Signature Not Found warning appears asking you if you want to continue the installation. 10 Click Yes on the Digital Signature Not Found warning to continue the installation. 11 Click Finish. 12 Restart the computer. Updating Existing Drivers (Windows 2000) For Windows 2000, you update an existing driver using the Device Manager. The procedure is the same regardless of whether you are updating the vendor’s existing driver or a previous version of the Sniffer driver. To update an existing driver in Windows 2000: 1 Make sure the Sniffer Portable software is installed. If it is not installed, install it now. 2 Make sure a supported adapter is installed in the target machine. 3 Start the computer and log in to Windows 2000 as an Administrator. 4 Start the Device Manager as follows: 5 a Right-click the My Computer icon and select the Properties command from the menu that appears. b In the dialog box that appears, click the Hardware tab. c Click Device Manager. d Expand the Network Adapters entry by clicking the + sign adjacent to its entry. Right-click the entry for the adapter to be updated and select the Properties command from the menu that appears. NOTE: Right-click the Sniffer (Adaptec) PCI Fast Ethernet (ANA-6911/UC) adapter for DEC 21140 chips or Sniffer (Adaptec) PCI Fast Ethernet (ANA-6911ATXC/ATX) adapter for DEC 21143 chips. 6 In the Adapter Properties dialog box, click the Driver tab. 7 Click Update Driver. Installation Guide 25 100413Portable_Install.book Page 26 Friday, March 25, 2005 2:22 PM Chapter 3 The Upgrade Device Driver Wizard starts. 8 Click Next in the Welcome dialog box. 9 In the Install Hardware Device Drivers dialog box, select “Display a list of known drivers for this device so that I can choose a specific driver” and click Next. Figure 3-1. Install Hardware Device Drivers (Adaptec Example) 10 In the Select Network Adapter dialog box, select the appropriate adapter and click Have Disk. NOTE: If you installed Sniffer (Adaptec) adapters, select Sniffer (Adaptec) PCI Fast Ethernet (ANA-6911/UC) for DEC 21140 chips or Sniffer (Adaptec) PCI Fast Ethernet (ANA-6911ATXC/ATX) for DEC 21143 chips. Figure 3-2. Install From Disk Dialog Box (Adaptec Example) 26 Sniffer Portable 100413Portable_Install.book Page 27 Friday, March 25, 2005 2:22 PM Installing Adapters and Sniffer Enhanced Drivers 11 In the Install From Disk dialog box, browse to the location of the Sniffer enhanced driver. See Table 3-4 for Sniffer enhanced driver locations. Click OK. 12 In the Select Network Adapter dialog box, click Next. Figure 3-3. Select Network Adapter Dialog Box (Adaptec Example) 13 In the Start Device Driver Installation dialog box, click Next. Figure 3-4. Start Device Driver Installation (Adaptec Example) Installation Guide 27 100413Portable_Install.book Page 28 Friday, March 25, 2005 2:22 PM Chapter 3 14 At the message “Digital Signature Not Found,” click Yes to successfully continue the Sniffer enhanced driver update. 15 Click Finish. 16 Restart the computer. Notes on Previous Driver Installations on Windows 2000 For backup purposes, if you had previously installed drivers, your original drivers are copied into the <local install directory>:\Program Files\Nai\Sniffer\Driver\en\<Vendor name> \Win2K directory. 28 Sniffer Portable 100413Portable_Install.book Page 29 Friday, March 25, 2005 2:22 PM Installing Madge Adapters and Enhanced Drivers 4 Overview After installing the Sniffer Portable software, install the adapter and enhanced driver appropriate to your Sniffer Portable configuration. This chapter provides detailed installation instructions for Madge adapters and Sniffer enhanced drivers. NOTE: If you are installing a Madge Mk2 PCMCIA or CardBus adapter on either a Windows 2000 or Windows XP PC, you must set some configuration options for the card manually. Instructions on how to do this are found in the corresponding installation sections. See Configuring Madge Mk2 PCMCIA\CardBus Adapters (Windows XP) on page 34 and Configuring Madge Mk2 PCMCIA\CardBus Adapters (Windows 2000) on page 38. Use Table 4-1 to quickly find the adapter and enhanced driver installation instructions you need for your Sniffer Portable PC configuration. Table 4-1. Finding What You Need in this Chapter To perform the following... for... see... Install Madge adapters and enhanced drivers Windows NT page 30 Windows XP page 33 Windows 2000 page 35 Install Madge PCI adapters and enhanced drivers Windows NT page 39 Windows 2000 page 35 Installing Madge PCMCIA and CardBus adapters and enhanced drivers Windows NT page 40 Windows XP page 33 Windows 2000 page 35 Installation Guide 29 100413Portable_Install.book Page 30 Friday, March 25, 2005 2:22 PM Chapter 4 Installing Madge Adapters and Enhanced Drivers The instructions provided in this section detail installing supported Madge adapters and enhanced drivers for PII, PIII and FlexPAC systems. Windows NT The Madge adapters and the Sniffer enhanced drivers for Windows NT are not plug and play and must be manually installed. The Madge enhanced drivers are placed in the <local install drive>: \Program Files\Nai\SnifferNT\ Driver\en\TRMadge directory during the Sniffer Portable installation. NOTE: See Installing Madge PCI Adapters and Enhanced Drivers on page 39 for instructions on installing Madge PCI adapters and enhanced drivers on Windows NT, and Installing Madge PCMCIA and CardBus Adapters and Enhanced Drivers on page 40 for instructions on installing Madge PCMCIA and CardBus adapters and enhanced drivers on Windows NT. To install Madge ISA adapters and enhanced drivers on Windows NT: 1 Ensure Sniffer Portable software is installed. If it is not installed, install it now. 2 If you have a previously installed driver (a previous version of a Sniffer driver or another vendor’s driver), you must first uninstall the driver before installing the Sniffer enhanced driver. Remove drivers in Windows NT through the Adapters tab of the Network control panel. 3 Shut down the computer. 4 Following the manufacturer’s instructions, insert the supported adapter into an available slot in your computer. 5 Start the computer and log in to Windows NT as an Administrator. 6 Go to Start > Programs > Administrative Tools (Common) > Windows NT Diagnostics. 7 In the Windows NT Diagnostics dialog box, click the Resources tab. The interrupt numbers currently in use on the computer are listed. 8 Choose an available IRQ and record the number for later use. 9 Click I/O Port in the Windows NT Diagnostics dialog. The I/O addresses currently in use on the computer are listed. NOTE: The Madge ISA card only supports the following I/O locations: 30 Sniffer Portable 100413Portable_Install.book Page 31 Friday, March 25, 2005 2:22 PM Installing Madge Adapters and Enhanced Drivers 0A20, 1A20, 2A20, and 3A20 . 10 Choose an available I/O address from the supported list in Step 9 and record the number for later use. 11 Click OK to exit the Windows NT Diagnostics dialog. 12 Next run the Token Ring configuration program from DOS to configure the hardware settings on the Madge ISA adapter card. The configuration program is installed when you install the Sniffer Portable software. 13 Insert a DOS boot disk in the floppy drive. Sniffer does not supply a DOS boot disk. 14 Navigate to the following directory: <local install drive>:\Program Files\Nai\SnifferNT\Driver\en\TRMadge 15 Type trcfg at the prompt to run the trcfg.exe program. 16 Press F4 to start the Token Ring configuration program. 17 Select the Madge Smart 16/4 AT Plus Ringnode adapter and press Enter. 18 Change the Token Ring configuration options to the recommended settings listed in Table 4-2. Press Tab to select a field, then press Enter to see a list of possible values, and then press F4. Table 4-2. Token Ring Configuration Options Option Recommended Setting Transfers 16bit PIO IO Port The address recorded in Step 9. Ring Speed 4 or 16 depending on your network. Interrupt The number recorded in Step 8. Smartrom Disabled 19 When prompted to update the card configuration, press F4 (yes), and press F4 again to exit the program. 20 Eject the DOS boot disk and restart the computer. 21 To complete the enhanced driver installation, turn to the enhanced driver installation instructions starting on page 21 and continue the procedure starting at Step 6. Installation Guide 31 100413Portable_Install.book Page 32 Friday, March 25, 2005 2:22 PM Chapter 4 Previous Adapter Installations on Windows NT If you have a Madge adapter card installed and working with a non-Sniffer driver, you should install the Sniffer enhanced driver. The instructions provided in this section detail installing enhanced drivers for pre-existing or pre-installed Madge adapters on your Sniffer PC. To install enhanced drivers for existing Madge adapters on Windows NT: 1 Ensure Sniffer Portable software is installed. If it is not installed, install it now. 2 If you have a previously installed driver, you must first uninstall the driver before installing the Sniffer enhanced driver. Remove drivers in Windows NT through the Adapters tab of the Network control panel. 3 Go to Start > Settings > Control Panel, and double-click Network. 4 Click the Adapters tab, select the Madge adapter, then click Properties. 5 Record the I/O, IRQ, transfer method, and then click Cancel. 6 Click the Adapters tab, select the Madge adapter, and then click Remove. 7 Click Add. 8 In the Select Network Adapter dialog, click Have Disk. 9 In the Insert Disk dialog box, specify the directory (including complete path) where the enhanced driver is located. The default location is shown below: <local install drive>:\Program Files\Nai\SnifferNT\Driver\en\TRMadge\WinNt 10 Select Network General Smart 16/4 AT Plus Ringnode, then click OK. 11 In the Configuration dialog box, change the settings to match the configuration settings recorded in Step 5. 12 At this time, you can set any network related settings (for example, TCP/IP settings). When set, click OK to close the Network dialog box. 13 If an application error occurs in rundll32.exe, click Cancel in the error message box. All added or modified settings will be saved. 14 Restart the computer. 32 Sniffer Portable 100413Portable_Install.book Page 33 Friday, March 25, 2005 2:22 PM Installing Madge Adapters and Enhanced Drivers Windows XP The Sniffer enhanced drivers for Windows XP are plug and play drivers. The Madge enhanced drivers are placed in the <local install drive>: \Program Files\Nai\SnifferNT\Driver\en\TRMadge\WinXP directory during the Sniffer Portable installation. To install Madge adapters and enhanced drivers in Windows XP: 1 Make sure the Sniffer Portable software is installed. If it is not installed, install it now. 2 Log in to Windows XP as an Administrator. 3 Insert the adapter in an available card slot on the target machine. Windows XP automatically detects the new card and installs its native device driver. 4 Open the Network Connections folder by selecting the Start > Control Panel > Network Connections option. 5 Right-click the Network Connection entry associated with the adapter you just inserted and select the Properties command from the menu that appears. The Network Connections Properties dialog box appears. 6 If the QoS Packet Scheduler service is listed in the This connection uses the following items list, disable it now by deselecting the adjacent checkbox. See Unbinding the QoS Packet Scheduler Service from Selected Adapters on page 9 for details. 7 Click the Configure button. The Adapter Properties dialog box for the selected adapter appears. 8 Click the Driver tab. 9 Click the Update Driver button. The Hardware Update Wizard starts. 10 Select the Install from a list or specific location (Advanced) option. and click Next. 11 Select the Don’t search option and click Next. 12 Does your adapter appear in the Wizard’s list? - If yes, highlight its entry and click the Have Disk button. - If no, simply click the Have Disk button. Installation Guide 33 100413Portable_Install.book Page 34 Friday, March 25, 2005 2:22 PM Chapter 4 The Install from Disk dialog box appears prompting you to supply the path to the driver to install. 13 Click the Browse button and navigate to the path where the driver for the selected adapter is installed. The drivers for Madge adapters on Windows XP are located at: <local install drive>: \Program Files\Nai\SnifferNT\Driver\en\ TRMadge\WinXP 14 Click Open on the Browse dialog box. You are returned to the Install from Disk dialog box. 15 Click OK on the Install from Disk dialog box. If the operating system is configured to alert you to unsigned drivers, a dialog box will appear warning you that you are about to install a driver that has not been verified by Microsoft Corporation. 16 Click the Continue Anyway button to continue the installation. The wizard installs the driver. When it has finished, it displays a screen indicating that the driver is installed. 17 Click the Finish button to complete the installation. You are returned to the Adapter Properties dialog box. 18 Click the OK button to clear the Adapter Properties dialog box. Configuring Madge Mk2 PCMCIA\CardBus Adapters (Windows XP) Before you can use the Madge Mk2 PCMCIA or CardBus adapter with Sniffer Portable on a Windows XP PC, you must set some configuration options manually. The following procedure explains how. To configure the Madge Mk2 PCMCIA or CardBus adapter: 1 Open the Network Connections folder by selecting the Start > Settings > Network Connections option. 2 Right-click the Network Connection entry associated with the Madge Mk2 adapter and select the Properties command from the menu that appears. The Network Connections Properties dialog box appears. 3 Click the Configure button. The Adapter Properties dialog box for the Madge Mk2 adapter appears. 34 Sniffer Portable 100413Portable_Install.book Page 35 Friday, March 25, 2005 2:22 PM Installing Madge Adapters and Enhanced Drivers 4 5 Click the Advanced tab and make the following configuration changes: Set Promiscuous mode support to Yes. Set Respond to TEST/XID frames to No. Set Ring Speed to 16 Mbit/s. Click Close. Windows 2000 The Madge enhanced drivers are placed in the <local install drive>: \Program Files\Nai\SnifferNT\Driver\en\TRMadge directory during the Sniffer Portable installation. The driver installation procedure for Windows 2000 is somewhat different depending on whether you are updating an existing driver (either a previous version of the Sniffer driver or another vendor’s driver) or installing the adapter and driver for the first time. Use the appropriate procedure below. First Time Installation (Windows 2000) on page 35 Updating Existing Drivers (Windows 2000) on page 36 First Time Installation (Windows 2000) For Windows 2000, you install an adapter for the first time by inserting the card in the PC and using the Found New Hardware Wizard, as follows. To install an adapter and driver in Windows 2000 for the first time: 1 Make sure the Sniffer Portable software is installed. If it is not installed, install it now. 2 Insert the Madge adapter into an available slot in your computer following the manufacturer’s instructions. 3 Start the computer and log in as an Administrator. Windows 2000 presents the Found New Hardware Wizard to help you install a new driver for the newly detected adapter. NOTE: If Windows 2000’s plug-and-play feature automatically installs a driver for the adapter instead of starting the Found New Hardware Wizard, turn to Updating Existing Drivers (Windows 2000) on page 36 to update the existing driver. 4 Click Next in the Wizard window. Installation Guide 35 100413Portable_Install.book Page 36 Friday, March 25, 2005 2:22 PM Chapter 4 The Install Hardware Device Drivers window appears. 5 Select the Search for a suitable driver for my device option and click Next. The Locate Driver Files window appears. 6 Check only the Specify a location option and click Next. The Found New Hardware Wizard prompts you to supply a path to the device driver. 7 Click the Browse button and browse to the <local install drive>:\ Program Files\Nai\SnifferNT\Driver\en\TRMadge\Win2K directory. 8 Click the OK button. Windows 2000 scans for the driver and presents the Driver Files Search Results window indicating that it has found the driver you specified in the previous step. 9 Click Next on the Driver Files Search Results window. The Digital Signature Not Found warning appears asking you if you want to continue the installation. 10 Click Yes on the Digital Signature Not Found warning to continue the installation. 11 Click Finish. 12 Restart the computer. 13 Manually configure the Madge Mk2 driver for Sniffer Portable operations using the procedure in Configuring Madge Mk2 PCMCIA\CardBus Adapters (Windows 2000) on page 38. Updating Existing Drivers (Windows 2000) For Windows 2000, you update an existing driver using the Device Manager. The procedure is the same regardless of whether you are updating the vendor’s existing driver or a previous version of the Sniffer driver. To install Madge adapters and enhanced drivers on Windows 2000: 36 Sniffer Portable 1 Make sure that the Sniffer Portable software is installed. If it is not installed, install it now. 2 Make sure a supported adapter is installed in the target machine. 3 Start the computer and log in to Windows 2000 as an Administrator. 100413Portable_Install.book Page 37 Friday, March 25, 2005 2:22 PM Installing Madge Adapters and Enhanced Drivers 4 Start the Device Manager as follows: a Right-click the My Computer icon and select the Properties command from the menu that appears. b In the dialog box that appears, click the Hardware tab. c Click the Device Manager button. d Expand the Network Adapters entry by clicking the + sign adjacent to its entry. 5 Right-click the entry for the Madge adapter and select the Properties command from the menu that appears. 6 In the Adapter Properties dialog box, click the Driver tab. 7 Click the Update Driver button. The Upgrade Device Driver Wizard starts. 8 Click Next in the Welcome dialog box. 9 Select “Display a list of known drivers for this device so that I can choose a specific driver.” 10 Click Next. 11 In the Upgrade Device Driver wizard, click Have Disk. 12 In the Install From Disk dialog box, browse to the <local install drive>:\ Program Files\Nai\SnifferNT\Driver\en\TRMadge\Win2K directory. 13 Click OK. 14 In the Upgrade Device Driver wizard, select the installed Madge adapter. 15 Click Next. 16 In the dialog box that appears, click Next. 17 At the message “Digital Signature Not Found,” click Yes to continue the driver update. 18 Click the General tab in the Connection Properties dialog box. If the QoS Packet Scheduler service is listed in the Components checked are used by this connection list, disable it now by deselecting the adjacent checkbox. See Unbinding the QoS Packet Scheduler Service from Selected Adapters on page 9 for details. 19 Click Finish. 20 Restart the computer. Installation Guide 37 100413Portable_Install.book Page 38 Friday, March 25, 2005 2:22 PM Chapter 4 21 Manually configure the Madge Mk2 driver for Sniffer Portable operations using the procedure in Configuring Madge Mk2 PCMCIA\CardBus Adapters (Windows 2000) on page 38. Configuring Madge Mk2 PCMCIA\CardBus Adapters (Windows 2000) Before you can use the Madge Mk2 PCMCIA or CardBus adapter with Sniffer Portable on a Windows 2000 PC, you must set some configuration options manually. The following procedure explains how. To configure the Madge Mk2 PCMCIA or CardBus adapter: 1 Sniffer Portable a Right-click the My Computer icon and select the Properties command from the menu that appears. b In the dialog box that appears, click the Hardware tab. c Click the Device Manager button. d Expand the Network Adapters entry by clicking the + sign adjacent to its entry. 2 Right-click the entry for the Madge Mk2 adapter and select the Properties command from the menu that appears. 3 Click the Advanced tab and make the following configuration changes: 4 38 Start the Device Manager as follows: Set Promiscuous mode support to Yes. Set Respond to TEST/XID frames to No. Set Ring Speed to 16 Mbit/s. Click Close. 100413Portable_Install.book Page 39 Friday, March 25, 2005 2:22 PM Installing Madge Adapters and Enhanced Drivers Installing Madge PCI Adapters and Enhanced Drivers The instructions provided in this section detail installing supported Madge PCI adapters and enhanced drivers for PII, PIII and FlexPAC systems. NOTE: For Windows XP and 2000, the instructions for installing the Madge PCI adapter and enhanced driver are the same as the instructions for Installing Madge Adapters and Enhanced Drivers for Windows XP on page 33 and Windows 2000 on page 35. Windows NT To install Madge PCI adapters and enhanced drivers on Windows NT: 1 Ensure Sniffer Portable software is installed. If it is not installed, install it now. 2 If you have a previously installed driver (a previous version of a Sniffer driver or another vendor’s driver), you must first uninstall the driver before installing the Sniffer enhanced driver. Remove drivers in Windows NT through the Adapters tab of the Network control panel. 3 Shut down the computer. 4 Following the manufacturer’s instructions, insert the Madge PCI adapter card into an available slot in your computer. 5 Start the computer. 6 Go to Start > Settings > Control Panel. 7 Double-click the Network icon, then click the Adapters tab. 8 Click Add. 9 In the Select Network Adapter dialog box, click Have Disk. 10 In the Insert Disk dialog box specify the complete path for the Madge PCI Adapter enhanced driver. 11 Click OK. 12 In the Select OEM Option dialog box select Sniffer (Madge) Automated Installation - RECOMMENDED and click OK. The Network dialog box appears with the Madge PCI adapter installed. Installation Guide 39 100413Portable_Install.book Page 40 Friday, March 25, 2005 2:22 PM Chapter 4 13 In the Network dialog box, click Close to perform the bindings. The TCP/IP Setup dialog box appears. 14 In the Adapter drop down list, select the installed adapter. 15 Enter the IP Address and Subnet Mask, and click OK. 16 Restart the computer. Windows XP and 2000 For Windows XP and 2000, the instructions for installing the Madge PCI adapter and enhanced driver are the same as the instructions for Installing Madge Adapters and Enhanced Drivers. Please see: Windows 2000 on page 35 Windows XP on page 33 Installing Madge PCMCIA and CardBus Adapters and Enhanced Drivers The instructions provided in this section detail installing supported Madge PCMCIA and CardBus adapters and enhanced drivers. Windows NT To install Madge PCMCIA and CardBus adapters and enhanced drivers on Windows NT: 40 Sniffer Portable 1 Ensure Sniffer Portable software is installed. If it is not installed, install it now. 2 If you have a previously installed driver (a previous version of a Sniffer driver or another vendor’s driver), you must first uninstall the driver before installing the Sniffer enhanced driver. Remove drivers in Windows NT through the Adapters tab of the Network control panel. 3 Shut down the computer. 4 Following the manufacturer’s instructions, insert the Madge PCMCIA or CardBus adapter card into an available slot in your computer. 5 Start the computer. 6 Go to Start > Settings > Control Panel. 100413Portable_Install.book Page 41 Friday, March 25, 2005 2:22 PM Installing Madge Adapters and Enhanced Drivers 7 Double-click the Network icon, then click the Adapters tab. 8 Click Add. 9 In the Select Network Adapter dialog box, click Have Disk. 10 In the Insert Disk dialog box specify the complete path for the Madge PCMCIA or CardBus adapter enhanced driver. 11 Click OK. 12 In the Select OEM Option dialog box, select Sniffer (Madge) PCMCIA/CardBus Adapter MK2 and click OK. 13 In the Setup Message dialog box, click OK. The Network dialog box appears with the Madge PCMCIA or CardBus adapter installed. 14 In the Network dialog box, click Close to perform the bindings. The TCP/IP Setup dialog box appears. 15 In the Adapter drop down list, select the installed adapter. 16 Enter the IP Address and Subnet Mask, and click OK. 17 Restart the computer. Windows XP and 2000 For Windows XP and 2000, the instructions for installing the Madge PCMCIA and CardBus adapter and enhanced driver are the same as the instructions for Installing Madge Adapters and Enhanced Drivers. Please see: Windows 2000 on page 35 Windows XP on page 33 Installation Guide 41 100413Portable_Install.book Page 42 Friday, March 25, 2005 2:22 PM Chapter 4 42 Sniffer Portable 100413Portable_Install.book Page 43 Friday, March 25, 2005 2:22 PM Index installing on Windows 2000, 35 installing on Windows NT, 30 installing on Windows XP, 33 Enterasys RoamAbout adapter, 12 Ethernet supported adapters, 11 Numerics 2000 see Windows 2000 A Adaptec adapters, 11, 21 enhanced driver location, 21, 23 Adaptec 62011 enhanced driver location, 20 to 21, 23 adapters installing Madge adapters, 30 installing on Ethernet, 22 supported for Sniffer Portable, 11 ATM SAR adapter, 12 authorizing Sniffer Portable software, 14 F FDX PCI adapter, 12 G Gigabit Ethernet adapter, 12 H HSSI PCI adapter, 12 I IBM drivers see enhanced drivers adapters, 11 enhanced driver location, 21, 23 IBM Etherjet enhanced driver location, 20 installation requirements (Sniffer Portable), 1 installing enhanced drivers on Ethernet, 22 Madge adapters, 30 Sniffer Portable, 5 Intel Pro 100, enhanced driver location, 20 E L Enable Options file, 13 enhanced drivers function, 11 installing on Windows 2000, 21, 25 installing on Windows NT, 21 installing on Windows XP, 19 plug and play (Windows 2000), 19, 23, 33 enhanced Madge drivers laptop, supported, B Broadcom 1000BT, 11 C Cardbus adapter installation, Cisco adapter, 12 40 D 11 M MAC Bridge Miniport Driver, removing, 10 Madge Cardbus adapter installation, 40 Madge drivers see enhanced Madge drivers Madge ISA adapters Installation Guide 43 100413Portable_Install.book Page 44 Friday, March 25, 2005 2:22 PM installing on Windows NT, 30 installing the enhanced driver (Windows NT), 32 Madge ISA drivers installing on Windows 2000, 35 Madge PCI adapter installation, 39 Madge PCMIA adapter installation, 40 N Network General Enhanced drivers see enhanced drivers NT see Windows NT Q QoS Packet Scheduler Service, 7 R removing MAC Bridge Miniport Driver, 10 QoS Packet Scheduler Service, 7 Request Options file, 13 requirements for installation, 1 S SAR (ATM) adapter, 12 Sniffer enhanced drivers see enhanced drivers Sniffer Portable Authorization utility, 13 authorizing software, 14 installing, 5 power considerations, 2 supported adapters, 11 supported topologies, 11 uninstalling, 4 upgrading, 17 44 Sniffer Portable 11 1 T Token Ring supported adapters, topologies see supported topologies 11 U uninstalling QoS Packet Scheduler Service, Sniffer Portable, 4 upgrading Sniffer Portable, 17 P PCI adapters installation, 39 PCMIA adapter installation, 40 plug and play drivers, 19, 23, 33, 35 power considerations for Sniffer Portable, supported laptops, 11 supported topologies (Sniffer Portable), Symbol Spectrum adapter, 12 system requirements (Sniffer Portable), 7 W 2 Windows 2000 IBM enhanced driver location, 23 installing adapters, 23 installing enhanced drivers, 25 installing Madge enhanced drivers, 35 plug and play drivers, 19, 23, 33, 35 Xircom CardBus Ethernet II 10/100, 21 Xircom enhanced driver location, 23 Windows NT Adaptec enhanced driver location, 21 adapter and driver installation, 21 IBM enhanced driver location, 21 installing adapters, 22 installing enhanced drivers, 22 Madge ISA adapter installation, 30 Madge ISA driver installation, 30 Xircom enhanced driver location, 21 Windows XP Adaptec 62011 enhanced driver location, 20 to 21, 23 IBM Etherjet enhanced driver location, 20 installing adapters, 19 installing enhanced drivers, 19 installing Madge enhanced drivers, 33 Intel Pro 100 enhanced driver location, 20 Xircom enhanced driver location, 20 100413Portable_Install.book Page 45 Friday, March 25, 2005 2:22 PM X Xircom Cardbus Ethernet II on Windows 2000, 21 enhanced driver location, 20 to 21, 23 XP see Windows XP Xyratex adapter, 12 45 Sniffer Portable 100413Portable_Install.book Page 46 Friday, March 25, 2005 2:22 PM 46 Sniffer Portable