1
Installation Guide
Elise3
3
TD 92679GB
Description
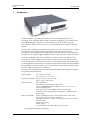
The Elise3 front side has different status indications and is used for maintenance. The LEDs
indicates the status of the module and the management port makes it possible to have
direct connection to the module. It also has an SD card slot and two USB ports for external
temporary devices.
The rear side is used for connecting supply voltage, communication to Ascom systems,
external systems, inputs/outputs etc.
3.1
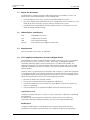
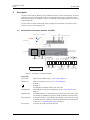
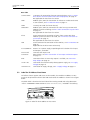
Overview of Connectors, Buttons and LEDs
Figure 1.
Status LED
USB
SD card slot ports
Power LED
Management port
Front side
Mode Restart
button button
Connection for
supply voltage
Rear side
Ethernet
ports 900-bus
COM ports
Not applicable for the
Elise3 Lite version
A-bus
1 2
LON
1 2
A-bus LON-bus
+V In In Out Out GND Error
Ext 1 2 1 2 Ext 1 2
galvanically
isolated
inputs/outputs
Error
relay
12-24 V DC
+ -
External
power supply
Figure 1. Connections, buttons and LEDs
Front side
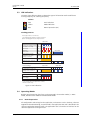
Status LED
Indicates the module status, see 3.3 LED Indications
Power LED
Indicates the power status, see 3.3 LED Indications
1
2
USB port 1
USB port 2
for upgrade of the Boot software on the field.
Management
Mini-USB port for device management, see 4.5 Accessing Elise3 on
page 17.
Mode button
The Mode button is a momentary push button with a blue LED. Used
for placing the module into specific modes by different push patterns.
Restart button
The Restart button is a hole button that requires a paper clip (or similar)
to be able to push. Used for performing controlled restart and forced
restart, see 7.2 Restarting the Elise3 on page 30.
SD card slot
Currently not used (for future releases)
12 April 2011 Ver. D
6