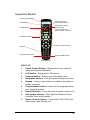
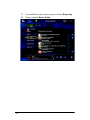
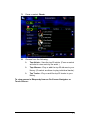
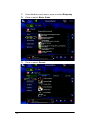
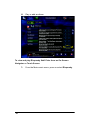
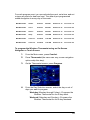
1
Disclaimer Control4® makes no representations or warranties with respect to this publication, and specifically disclaims any express or implied warranties of merchantability or fitness for any particular purpose. Control4 reserves the right to make changes to any and all parts of this publication at any time, without any obligation to notify any person or entity of such changes. Trademarks Control4 and the Control4 logo are registered trademarks of Control4 Corporation. Other product and company names mentioned in this document may be the trademarks or registered trademarks of their respective owners. Legal Notice Fraunhofer IIS and Thomson. MPEG Layer-3 audio coding technology licensed from Fraunhofer IIS and Thomson. Supply of this product does not convey a license nor imply any right to distribute content created with this product in revenue-generating broadcast systems (terrestrial, satellite, cable, and /or other distribution channels), streaming applications (via Internet, intranets, and/or other networks), other content distribution systems (pay-audio or audio-on-demand applications, and the like) or on physical media (compact discs, digital versatile discs, semiconductor chips, hard drives, memory cards, and the like). An independent license for such use is required. For details, visit http://mp3licensing.com. Decisionmark is the service provider of analog and digital TV off-air cable and satellite channel list. Radio Locator is the service provider of AM/FM channel list. © 2005-2008 All Media Guide, LLC provides music and video recognition technology that provides cover art and related text that enriches the Control4 user Navigators. Copyright © 2009 Control4. All rights reserved. Control4, Control4 logo and Everyday Easy are registered trademarks or trademarks of Control4 Corporation in the United States and/or other countries. All other brands or names may be claimed as property by their respective owners. Pricing and specifications subject to change without notice. No part of this publication may be reproduced, photocopied, stored on a retrieval system, or transmitted without the express written consent of the publisher. Contact Information Control4 Corporation 11734 S. Election Road Salt Lake City, UT 84020 USA http://www.control4.com Part Number: 200-00001 Rev E (Release 1.7.2) Contents Chapter 1 Getting Started .............................................. 1 System Overview ................................... 2 Composer and Director Overview..... 3 Chapter 2 Navigators Overview ..................................... 5 Navigator Devices.................................. 5 System Remote Controls.................. 6 On-Screen Navigator ........................ 7 Touch Screens.................................. 7 LLCD Keypad ................................... 8 2-, 3-, and 6-Button Keypads............ 8 4Sight Services—Web Navigator ..... 9 On-Screen Navigator Basics ................. 9 Touch Screen Basics ........................... 10 Main Menu Access ......................... 10 Programmable Buttons ................... 12 LCD Keypad Basics ............................. 12 About the LCD Keypad ................... 12 System Remote Control Basics ........... 14 Supported Models........................... 15 Install and Maintain the Batteries.... 17 System Remote Control Modes...... 18 System Remote Control Features .. 18 Set the Preferences for the System Remote Control's LCD .................... 20 View the Version Number, Date, Time or MAC Address ............................. 20 Internet Services Basics ...................... 22 Chapter 3 System Activities ......................................... 23 Setting Up Your my.control4.com Account 23 Registering Your Controller ................. 24 iii Playing the Radio................................. 25 About the Radio Options................. 26 Play a Station.................................. 26 Control a Tuner............................... 26 Playing Music....................................... 29 About the Music Options................. 30 Now Playing Display ....................... 42 Now Playing Dashboard ................. 42 Play Music (Create a Now Playing Queue)............................................ 43 Edit the Now Playing Queue........... 47 Save the Now Playing Queue as a Control4 Playlist.............................. 49 Play a Saved Playlist ...................... 51 Play a CD Stored in a Changer ...... 52 Play a CD Loaded in a CD Player .. 53 Add a CD to the CD Catalog Using a CD Changer.................................... 53 Edit a Digital Playlist ....................... 54 Play Music from an iPod ................. 54 Use Zones ...................................... 56 Manage Rhapsody Music ............... 57 Watching TV ........................................ 82 Change Channels ........................... 83 Use a Video Wall (10.5" Touch Screens Only) ................................. 84 Playing a Movie ................................... 86 Play a Video Stored in a Changer .. 86 Play a Video from a Standard DVD Player or VCR................................. 87 Edit DVD Information ..................... 87 Add a DVD to the DVD Catalog...... 87 Controlling Comfort .............................. 88 Control Ceiling Fans, Blinds, and Fireplaces ....................................... 88 Control Wireless Thermostat .......... 89 Program the Thermostat................. 91 iv Changing Locations ............................. 95 Controlling Lighting .............................. 96 Access the Lighting Options ........... 96 Control Your Lights ......................... 96 Create a Lighting Scene ................. 97 Activate a Lighting Scene ............... 97 Monitoring the House Security............. 98 View Contact Switches or Relay..... 99 Arm or Disarm Security Panels....... 99 Use Security Cameras.................... 99 Adjusting Pool Settings ...................... 100 Adjusting the Pool Temperature ... 100 Adding or Hiding Relays ............... 101 Changing System Information ........... 101 Access the Info Screen................. 101 Connect to a Director.................... 103 View or Change Network Settings 103 Allow Your Control4 Dealer to Access Your System Remotely ................. 105 Set Screen Saver Options ............ 105 Set Default Location ..................... 105 Enable or Disable Viewing Options106 Using Control4 Internet Services ....... 107 Access Web Navigator ................. 107 View the Control4 System at a Glance 108 View or Change Lighting............... 108 Check or Change Security Settings.... 109 View or Change Thermostat ......... 110 View Sensors or Motors................ 111 Setting Up a Custom Screen Saver ... 112 Setting Up a Wakeup Scene.............. 113 Using Additional Custom Options ...... 114 Announcement Agents ................. 114 Customizeable Buttons................. 114 v Chapter 4 vi Frequently Asked Questions ..................... 115 CHAPTER 1 Getting Started Welcome to the Control4 world of home automation. As a homeowner, the Control4 Home-Automation System lets you control the most important tasks and comforts in your home with the goal of making your living environment a more pleasant experience. Control all of the lights in your home from one button on a Keypad. Control your videos, lights, and window shades in the home theater. Play any music in any room of the house from a single user Navigator (known as a Navigator). Control your heating and air conditioning, alarm system, sprinkler system, garage door opener, fireplace, swimming pool temperature settings, and much more from your Keypad and Navigators. Monitor and adjust your Control4 system remotely. These are just a few of the possibilities for an automated home. This guide introduces the most important aspects of your HomeAutomation System, and it explains how to use the basic devices and services through the Control4 Navigators (for example, Wall-Mounted and Table Top Touch Screens and System Remote Controls). If at any time you have questions as you peruse this document, contact your Control4 Dealer. To obtain the latest version of this Control4 System User Guide, go to http://www.control4.com/products/documentation. 1 System Overview It helps to understand some basics about your Control4 system before you start to use it. 1. Control4 is a room-based control system. The user Navigators (Navigators) are set to control one room at a time unless you choose to control several rooms as a group, known as a zone. While most Navigators are already set up for their assigned room, it doesn’t hurt to remember that if nothing happens when you try to turn off the lights or turn on the music, your Navigator may be set up for a different room in the house. All Navigators show the currently-selected room on the graphical display, so you can easily check which room you are viewing or managing. 2. Control4 Navigators manage up to eight (8) devices per room. Depending on your setup, the menu options on a Navigator may differ from room to room, with unavailable options dimmed in the on-screen displays. For example, if you’re in a room where no music is available, the music icon appears darker than the Lights, House, and Info icons. Here’s a breakdown on everything you can do with a Control4 system: Radio—Browse available radio stations, including AM, FM, XM, Satellite, and Cable stations. Music—Browse digital music integrated into your Control4 system by artist, genre, playlist, or album cover art. Additional music sources such as iPorts or CD players are incorporated into the Music sub-menu if they are present in your system. TV—Browse available TV channels (UHF/VHF, Cable, or Satellite). Videos—Browse available videos in your DVD or Disc Changer or select a video source (DVD player, Controller, VCR, etc.) to control. Comfort—Adjust the temperature in your home and control the ceiling fans, blinds, fireplaces, and other 2 home settings. Access your Control4 Wakeup scene to set an alarm clock for any room in your home. Lights—Control the lights in your current room or the whole house, and access all Lighting Scenes in your home. House—Switch between rooms and access securityrelated devices in your home. Info—Display system information such as network status, Screen Savers, and other options. Composer and Director Overview The terms Composer and Director are used in this document. Familiarize yourself with these terms and their meaning so you can understand the context in which they’re referred. Composer. Composer is the Control4 software used by your Control4 Installer to set up and configure Control4 devices to communicate with each other in a Home-Automation System. Director. Each Control4 Controller (such as a Home Controller HC500) ships with pre-installed Director software. The Director communicates with Control4 products and third-party products to enable Home Automation and interaction of individual devices. You must connect to a Director first before you can use Composer to configure or update a Control4 system. 3 4 CHAPTER 2 Navigators Overview In this chapter, you’ll discover the user Navigators and learn about the System Remote Control devices. NOTE: You may not have purchased all of the Navigator types listed below. A user Navigator (Navigator) is any Control4 device you use to control your Control4-installed Home-Automation System devices, such as a System Remote Control or a Touch Screen. In this document, user Navigators are referred to as Navigators. You can own a Navigator to manage the devices for every room in your house. For example, the Kitchen may have a 10.5” In-Wall Touch Screen, the Theater may have a 7” In-Wall Touch Screen and a System Remote Control, the Master Bedroom may have a 7” Table Top Touch Screen or an LCD Keypad. Below is a breakdown of all of the Navigator models you may have to control your Control4 system. On-Screen (viewable on a TV screen) System Remote Control Touch Screen LCD Keypad 2, 3 and 6-Button Keypads (Optional) 4Sight Navigator Devices There are two (2) different general types of Navigation devices: OnScreen Navigators and List Navigators. On-Screen Navigators—These include On-Screen through a TV and Touch Screens. 5 LIst Navigators—These include the LCD Keypad and the System Remote Control. System Remote Controls When you own a Control4 System Remote Control, you no longer need to maneuver and worry about a separate remote for every device in your home. The Control4 System Remote Controls are standard control devices for the Control4 system, and function the same as a universal remote control. From one System Remote Control, you can control your home theater devices, your lights, music, room temperature, and any other installed device inside and outside your home. You can also use your System Remote Control to browse menus on a television or monitor screen (On-Screen Navigator) or in its own display window (LCD Navigator). 6 On-Screen Navigator Control4 On-Screen Navigator, accessed with the Control4 System Remote Control, uses a graphical menu you can view on a connected TV or monitor. Through the Navigator, you can access and manage every aspect of your Control4 system—from music and movies to lighting and temperature control by pressing a button on the System Remote Control. Touch Screens Control4 Touch Screens come in a variety of shapes and sizes and most can be installed in the wall or sit on your desktop. Every Control4 Touch Screen can control your entire Control4 system, and it uses the same display as the On-Screen Navigator (with the exception of the LCD Keypad) by tapping or pressing the Touch Screen. 7 L LCD Keypad The Control4 LCD Keypad offers an affordable way to add complete control to any room in your house. As an alternative to the Touch Screen, simple buttons and a dial help you navigate through the Control4 system menus. 2-, 3-, and 6-Button Keypads Control4 lighting Keypads include customizable buttons that can be programmed for any scenario. Most Control4 customers use these to control different Lighting Scenes in their home (for example, a button set to turn off all of the downstairs lights, or another button set to play a certain playlist in the teens’ rooms). 8 4Sight Services—Web Navigator Did you forget to turn off the lights before leaving for work? The 4Sight Internet Services offer the ability to monitor and control your home from any Web browser in the world. (This service requires a yearly subscription.) On-Screen Navigator Basics The On-Screen Navigator works via any HD TV connected to the Control4 system. Press the button on the System Remote Control to open your On-Screen Navigator menu, giving you access to your installed devices and functionality. Now you can start exploring your Home-Automation System, starting with the Main menu. 9 From the Navigator Main menu, you can control any device (Radio, Music, TV, Videos, Comfort, or Lights), view the status of your house, or access system Information. For example, are you tired of listening to Enya? Press the System Remote Control’s arrow keys to access your playlists, and then press the System Remote Control’s Select button to change your music. Your Music’s option bar appears. An arrow in the upper-right corner means you have more options. The arrow keys also help you navigate through the options. NOTE: You can always press the Main menu in case you get stuck. button to return to the NOTE: Press Cancel (CNCL) to return to the previous menu. Touch Screen Basics Control4 Touch Screens come in many different shapes and sizes, but each one features a similar menu, so it’s easy to wander from room to room and use a different Touch Screen model in each room. The Control4 10.5” Touch Screen, 7” Touch Screen, and Mini Touch Screen provide menu options that are nearly identical to the Control4 On-Screen Navigator options. However, these devices may differ slightly in the way the screens are presented. Main Menu Access Let’s get started. 10 1. Wake up the screen by tapping anywhere on the screen, or by holding and releasing the Power button (hand-held models only). 2. If a screen other than the Main menu is displayed, press the Main menu icon (4). Volume Control: Press the Volume control icon on the Touch Screen to adjust the volume. Press the arrow icons repeatedly to raise or lower the volume in 1% increments (or press and move the slider bar). Press the X icon to turn the volume off. Press anywhere in the screen to close the volume screen. Lighting Control: Press the Light Bulb icon to access light controls and Lighting Scenes. Press and slide the slider bar for the Dimmer, Fireplace and Lighting Scenes. TIP: As you move through the screens, you can always press 4 on the Touch Screen to return to the Main menu. 11 Programmable Buttons The 7” Touch Screen also has four physical (4) buttons (just below the screen) that can be programmed by your Control4 Installer. Check with your Installer, and the write their functions in the list below. Refer to this list when you need to. When you want to use the button, just press it. NOTE: You can always find the custom buttons programmed into your system in the House menu on any Navigator. Custom Buttons Programmed by Control4 Installer: A: ______________________________________ B: ______________________________________ C: ______________________________________ D: ______________________________________ LCD Keypad Basics The LCD Keypad uses a combination of hard button presses and the dial to navigate the devices. About the LCD Keypad 1. Selection Buttons—Selects the corresponding option (or icon) on the screen. 2. Selection Dial—Scrolls through the menus, acts as a selection button and sets room’s volume. 3. Shortcut Button— This button is programmable. You can choose a specific action such as turning off the lights, starting a playlist, or arming the Security system. If you have problems viewing a screen, or if the screen displays "connecting..." or “no location,” contact your 12 Control4 Dealer or visit my.Control4.com for troubleshooting options. 13 System Remote Control Basics Why waste time hunting for five (5) different remotes throughout the house when you can rely on one Control4 System Remote Control to manage your Home-Automation System. In addition to eliminating the need for multiple audio-video remotes, the Control4 System Remote Control also controls comfort settings, lights, security systems and much more. When your Control4 Installer sets up your Control4 system, the System Remote Control responds to each button-press in a different way— depending on the following conditions: 14 The mode of the System Remote Control The current location of the System Remote Control (room) The devices available in the current location (room) When the button is pressed If the button has been programmed for a custom function Supported Models Liquid Crystal Display Room Off button Sub-system buttons LCD button Sub-system buttons (including the programmable red, green, yellow, and blue) Contol4 button Navigation buttons Device Control buttons Keypad Programmable button Programmable button RCZ-SRC2-B SR-C2, V2 Liquid Crystal Display—Displays the room, controls, status and system information. LCD button—Displays the LCD menus. Programmable buttons—Items can be programmed by your Control4 Installer. Room Off button—Turns the room off (audio, videos, etc.) Device Control buttons—Controls the VCR, DVD, and other audio video devices, etc. Control4 button—Returns you to the Main menu. Navigation buttons—Lets you move through the menus. Keypad—Lets you type letters or numbers using the onscreen keyboard. Sub-system buttons—(See “System Remote Control Features” later in this section.) 15 Room Off button Liquid Crystal Display (LCD) Sub-system buttons Contol4 button Programmable buttons (red, green, yellow, blue) LCD List button Navigation buttons Device Control buttons Keypad More Programmable buttons (* and #) C4-SR250-Z-B C4-SR150-Z-B SR-150, V3 and SR-250, V3 16 Room Off button—Turns the room off (audio, videos, etc.) Sub-system button—(“System Remote Control Features” later in this section.) Control4 button—Returns you to the Main menu. LCD List button—(Not available on the SR-150). Displays the LCD list (House, Lights, Music, Videos, etc.) and menus. Navigation buttons—Lets you move through the menus, change channels, adjust the volume, and make selections. Device Control buttons—Controls the VCR, DVD, etc. Liquid Crystal Display—Displays the room, controls, status and system information. Programmable buttons—Items can be programmed by your Control4 Installer. Keypad—Lets you type letters or numbers using the onscreen keyboard. Additional programmable buttons—Items can be programmed by your Control4 Installer. Install and Maintain the Batteries AAA + - AAA Use and Care of the Batteries - Install the batteries in the back of the device according to the diagram provided in the battery compartment (with the + and - terminals aligned correctly). AAA AAA Four (4) batteries are included with your System Remote Control—either AAs or AAAs, depending on your model number. + - Install the Batteries Keep the battery contacts and compartment clean. Extreme temperatures reduce battery performance. Avoid putting the System Remote Control in very warm places. Remove the batteries from the System Remote Control if it is not going to be used for several months. + + Replacement Safety Rules for Batteries CAUTION! To prevent battery shorting, leakage or rupture: Use Alkaline batteries only in the System Remote Control. Four (4) AAs for C4-SR250-Z-B Four (4) AAAs for C4-SR150-Z-B and RCZ-SRC2-B Do not mix battery types, such as Alkaline and rechargeable NiMH batteries. Do not attempt to recharge a battery unless the battery is specifically marked “rechargeable.” Never place, throw, or dispose of batteries in a fire. 17 System Remote Control Modes Refer to the previous illustrations of your System Remote Control devices as you review the following lists. The System Remote Control modes are: On-Screen Navigator mode—Press the button to turn on the TV Navigator and bring up the Navigator menu. LCD Navigator mode—Use the System Remote Control’s LCD window (if available in your model) to manage your installed Control4 devices by pressing the LCD List button. A menu displays in the LCD’s window. Device-Control mode—Press the device-specific button to control devices such as your DVD player, HD TV or CD player. System Remote Control Features Below are explanations of some of the System Remote Control features. Liquid Crystal Display—Provides information related to system activity (not supported on the SR-150). LCD/List button—Changes the System Remote Control mode to LCD Navigator mode, displaying the menu in the LCD (not supported on the SR-150). Off /Room Off button—Turns off all AV devices in the current room (TV, DVD players, etc.). button—Places the System Remote Control in On-Screen mode and displays the On-Screen menu for the current location (for example, the Master Bedroom). Sub-System Buttons—From either the On-Screen or LCD Navigator mode you can press the Sub-system buttons (Watch, Listen, programmed functions, etc.) to access these options: One-Touch Action—If the devices in the current room are off or if the System Remote Control is being used in Device-Control mode, you can use the following buttons for Quick Access: 18 Radio, Music, TV, and Videos—On V2 System Remote Control (RCZ-SRC2-B). Watch and Listen—On V3 System Remote Controls (SR150-Z-B and SR250-Z-B). First button press—Turns on the last source used for that device. For example, press the Videos button once to turn on the DVD player. Subsequent button presses—Prior to LCD time-out, toggle through additional devices displayed in the LCD to power them up. For example, press the Videos button again to toggle to the VCR and power it on. Programmable Buttons—The following buttons can be custom programmed by your Control4 Installer (make a note of the assigned buttons below as needed.) Red: ___________________________________ Green: _________________________________ Yellow: _________________________________ Blue: ___________________________________ * ______________________________________ # ______________________________________ NOTE: To view a list of button descriptions for buttons with custom programming in your system, refer to the House menu on any Navigator. Press a programmable button to run the custom program assigned to that button. If none of your buttons have custom programming, you’ll only wake up the LCD to display the name of the current room. Set the Preferences for the System Remote Control's LCD NOTE: The LCD display is not supported on the SR-150. To set preferences: 19 1. Press the LCD/List button on the System Remote Control. 2. Use the arrow keys to scroll down the list. Press Select to select Info. Scroll down to Config, and then press Select to set the LCD display preferences or to view the battery level: Display Brightness (SR-250)—Use the Right or Left arrow keys to move the slider bar to brighten or dim display. Keypad Brightness (SR-250)—Use the Right or Left arrow keys to move the slider bar to brighten or dim the keypad display. Motion Detect (SR-250)—Use the Up or Down arrow keys for Off or On. Press Select again Battery Level (SR-250)—View the battery level in percent. About—Lists the software version, date and time. Set Contrast—Use the arrow keys to move slider bar to increase or decrease contrast, and then press Select. View current battery level—Battery level is displayed. View the Version Number, Date, Time or MAC Address To view the System Remote Control part number and MAC address: 1. (SR-250) Press List, scroll down to Info, and then scroll down to About to view the System Remote Control version, date and time. 2. Press Cancel (Cncl) to exit the LCD Navigator. NOTE: You can access the Preferences view on any Control4 Navigator (Info > Config) to adjust the brightness, Screen Savers, backlight options, battery life, etc. 20 Internet Services Basics Control4 offers two (2) levels of Internet services: 1. my.Control4.com—This is a free service provided to you when you register at my.control4.com. The benefits of registering at my.Control4.com are: 2. It enables access to Control4’s online media configuration services for media identification and TV/ radio channel configuration. It enables access to Rhapsody, a subscription-based online music service. It allows your Control4 Dealer to access your system remotely for configuration, maintenance, and troubleshooting service through a service connection. 4Sight—This is a subscription-based service with an annual renewal fee. Contact your Control4 Dealer for details. The benefits of subscribing to 4Sight are: It enables you to use Web Navigator. It enables the e-mail agent for notifications if something occurs in your home. For information about setting up your my.control4.com account, see “Setting Up Your my.control4.com Account” on page 23. 21 22 CHAPTER 3 System Activities In this chapter, you’ll learn about typical system activities, such as how to: Set up my.control4.com Register your Controller Play the radio Play music from an MP3 player Set up and play Rhapsody music Watch TV Play movies Control comfort (temperature, etc.) Change locations Control lighting Set Lighting Scenes Control security Control pool settings Change system settings Use Internet services Use Screen Savers Use custom options NOTE: To use all media services, including Rhapsody, you need to register your free my.control4.com account. Setting Up Your my.control4.com Account A my.control4.com account is required to use Control4 media services. To set up your free my.Control4.com account: 1. Open a Web browser. 23 1. Go to http://my.Control4.com. 2. Click Create Account. 3. Fill out the registration information according to the instructions on the page. 4. Click Create Account to create your account. Registering Your Controller Immediately after you have set up your my.Control4.com account, you are asked if you would like to complete your registration by registering your Controller, or you can register your Controller at any time by logging into your my.control4.com account and selecting My Account > Controller Registration. To register your Controller now: 1. Click Yes. 2. From your Web Navigator, click Info. 3. Select Remote Access. 4. Select the text box in Enter Code. 5. A keyboard pops up. Type your code. 6. When you are finished, select Done. 7. Select Activate. When you have set up Remote Access, you can enter your username and password to log in securely to your home from any Internet connection in the world through the Web Navigator. This service lets you monitor and control the lights, change your thermostat setting so the house is warm or cool when you get home, or check whether any doors or windows were accidentally left open. See “Using Control4 Internet Services” on page 107 for more information. 24 Playing the Radio Use any Control4 Navigator to choose the Radio icon for access to your radio options. 25 About the Radio Options The Radio options (Stations and Tuner) provide access to a Stations screen and any radio device you’ve added to a room in the system, such as a Receiver or Tuner. Use the Touch Screens to make your selections. NOTE: For quick access to volume controls, use the Volume Quick-Control button on your System Remote Control. Stations screen—Displays all available radio stations in your system. Tuners and other Radio Devices—Displays controls for AM, FM, XM, Satellite, Cable, or radio broadcast. Play a Station To play a radio station: 1. On the Radio screen, press Stations (usually selected by default). 2. View the list of available radio stations for the selected Tuner (such as XM, FM, or AM). Whatever is available will be displayed. 3. Change the Tuners broadcast (XM, FM, or AM) or scroll through the list as needed. Whatever is available will be displayed. 4. Select a station to broadcast. Control a Tuner NOTE: The control options for your radio system depend on what your device supports and may also display an intermediary device, for example, a Receiver. On-Screen Navigator 1. 26 From the Radio screen, choose a Tuner button. 2. After selecting the Tuner, you are returned to the Main menu on your On-Screen Navigator (the selected Tuner displays in the bottom right-hand corner of the screen). 3. Control the Tuner using the Device Control buttons, for example, on your System Remote Control. 4. If you have a list of favorite channels loaded already, you can select one of these channels by pressing Radio > Channels, and then picking a channel. Touch Screens 1. Press the Radio icon on the Touch Screen. 2. Press a Tuner button. Depending on what your Tuner supports, this may include: The ability to scan all stations, tune up and down, or choose a specific station. Control the volume. System Remote Control V2—In Radio > Stations, Select a station (highlight and press Select) if you have a favorites list loaded, or Enter the number of a station on the keypad, or Use the pre-programmed buttons to select a favorite station. V3—Press Listen > Radio, and the last station played begins to play. Use the Navigation buttons to choose a different Tuner (AM, FM, or in some cases XM). Use the Channel Up and Channel Down buttons (Ch+ and Ch-) to search for radio stations. 27 LCD Keypad 28 1. Highlight a radio selection and press the Select dial. 2. When you select a device, controls are displayed on the screen. 3. For screens such as the Stations option, scroll up or down to highlight your choice, and then press the Select dial. Playing Music Play either saved digital music or music from your online Rhapsody account using your Control4 system. NOTE: Rhapsody is a subscription-based music service that gives you unlimited access to a catalog of millions of fulllength, CD-quality tracks. You can listen to whatever you want, whenever you want, in any room of your house through your Control4 system. NOTE: To use Rhapsody, you must add an account using your Touch Screen or On-Screen Navigator. For Rhapsody-specific instructions, see the tasks beginning on page 46. 29 About the Music Options On the main Music menu, you will see your music sources and zones displayed across the top of the screen. Following are the default settings: 30 On-Screen Navigator and Touch Screen Digital Music (default)— LCD Keypad and Remote Controls with an LCD Screen My Library—Your saved artists, Displays main music options. My Library—Your saved artists, albums, genres, channels (Rhapsody only), and playlists. Rhapsody—Access to millions of tracks in Rhapsody’s online music database through your Rhapsody account (if you do not have an account, you can sign up for a free trial). Queue—The music queue for Now Playing. Settings—Configuration settings for digital music. Zones—Displays currentlyactive zones with a list of rooms in each session. Allows you to add or remove rooms from zones and control volume for an entire zone or an individual room. Now Playing Display—Shows the current track, artists, and album, and cover artwhich you can select for more information. Now Playing Dashboard (bottom of screen)—Shows the current track, displays Skip Forward, Skip Back, Play, Pause, and Clear buttons. Selecting the Playback controls bring up the Now Playing queue. albums, genres, channels (Rhapsody only), and playlists. Rhapsody—Access to millions of tracks in Rhapsody’s online music database through your Rhapsody account (if you do not have an account, you can sign up for a free trial). Now Playing—The music queue for Now Playing. Zones—Displays currently active zones with a list of rooms in each session. Allows you to add or remove rooms from zones and control volume for an entire zone or an individual room. Settings—Configuration settings for digital music. Digital Audio—Displays controls for your digital music. Browse CDs—CDs in CD players or CD/DVD changers in your system. Playlists—Your saved playlists. NOTE: If your system includes CD players or CD/DVD changers, these also display as sources in this area. NOTE: Selecting the Control4 icon returns you to the Now Playing view (the main Digital Music screen). 31 Digital Music: My Library My Library lists your Rhapsody library and your saved digital music. My Library contains the following menus: On-Screen Navigator and Touch Screen LCD Keypad and Remote Controls with an LCD Screen My Artists—All the artists My Rhapsody Library— in your saved music. My Albums—All your saved albums. My Genres—All the genres of your saved albums. My Channels—Your saved channels. My Playlists—Your saved playlists (digital music or Rhapsody). Your saved Rhapsody music (Rhapsody only). Albums—All your saved albums. Artists—All the artists in your saved music. Albums By Genre—All the genres of your saved albums. Artists By Genre—All the genres of your saved artists. 32 The Control4 music i icon indicates digital music files that are saved in your library. The Rhapsody icon indicates Rhapsody files that are accessible through your library. Digital Music: Rhapsody To browse Rhapsody, choose from the following menu options: On-Screen Navigator and Touch Screen Search Music Guide Channel Guide Playlist Central My Account LCD Keypad and Remote Controls with an LCD Screen Rhapsody Recommends Music Guide Channel Guide Playlist Central My Account 33 NOTE: You can select a song from Rhapsody Recommends (displayed next to the menu): a list of recommended music from Rhapsody based on your listening history. NOTE: To return to the main Rhapsody menu from a Rhapsody sub-menu, select the Rhapsody icon the Digital Music and Zones icons. beneath Search NOTE: Rhapsody Search is available through the On-Screen Navigators and Touch Screens only. View the search history, or select from the following search options: 34 Artist Keyword Track Album Composer 35 Music Guide Use the Navigators and press Music Guide to select from the following Rhapsody menus: On-Screen Navigator and LCD Keypad and Remote Controls with an LCD Touch Screen Screen Charts—View Top Artists. Play Top Albums and Top Tracks. Genres—Select a genre to 36 view the available music in the genre. (After you select a genre, you can sort the available music in a variety of ways, including by sub- genre.) New Releases—Play New Releases or add them to your library. Just Added—Play or add recently added music. Exclusives—Play exclusives or add them to your library. Staff Picks— Play staff picks or add them to your library. Top Artists Top Albums Top Tracks Genres—After you select a genre, you can sort the available music in a variety of ways, including by subgenre. New Releases Just Added Exclusives Staff Picks Channel Guide Use the Navigators to find Rhapsody channels using the Channel Guide: Top Channels—Play top channels. All Channels—Play or add any of the available Rhapsody channels to your library. 37 Genres—Select a channel by genre. Playlist Central Use the Navigators to view the available Rhapsody playlists. 38 Top Playlists—Play Top Playlists. Recent Playlists—Play or add Recent Playlists (playlists recently added by Rhapsody or by other users). Genres—Select a genre to play or add playlists. Dynamic Playlists—Play or add Dynamic Playlists (playlists generated for you based on your listening history) to your library. Featured Playlists—Play or add Featured Playlists. Select a playlist from the following categories (for On-Screen Navigators or Touch Screens, use the drop-down menu; the order of options is reversed for the LCD keypad and System Remote Controls with an LCD screen): Label Spotlights Single Artist Mixes Decade Mixes Theme/Holiday Mixes Celebrity Picks Genre Mixes Digital Music: Queue/Now Playing In Queue, choose from the following options: Shuffle—Select the Shuffle option to shuffle the Now Playing list randomly each time you start the music. (This setting is persistent, which means that the next time you start up different music, it will still be in Shuffle mode until you de-select it). Repeat—The Now Playing list continues to play and repeat until you either clear the playlist or stop the playback. When Repeat and Shuffle are selected, the playlist plays every song in the list before shuffling the list 39 and repeating any song in the list. Repeat and Shuffle activated together also continue to play music until you clear the playlist or stop the playback. Clear—Clear the Now Playing queue and stop the music. Save as Playlist—Save the queue as a playlist. Edit list—Edit the Now Playing queue. You can re-order the tracks, or select and remove individual tracks from the playlist. NOTE: To edit a playlist on an LCD Keypad or System Remote Control, select a song, and then choose Play Now or Remove from Queue. 40 Browse/Browse Library (LCD Keypad or System Remote Control only)—Use the shortcut to Browse/ Browse Library view to add items to the Now Playing queue. Digital Music: Settings Settings lets you choose what happens when you select the Play button. Choose from the following behaviors: Play now, Add to Queue, and Ask me. 41 Now Playing Display Digital Music: Now Playing Select the artist or album to view more information. Now Playing Dashboard Selecting an artist, album, or track from your library creates a Now Playing queue. Selecting more music add the additional music to the queue. Save your queue as a playlist at any time using any Control4 Navigator. The Now Playing Dashboard displays at the bottom of the On-Screen Navigators and Touch Screens. The controls have the following four (4 options: 42 Play/pause Skip forward Skip back Stop (clears queue) NOTE: Selecting the Now Playing controls section takes you to the a view of the Now Playing queue. NOTE: You can use the System Remote Control buttons to control the music currently playing in a room. Play Music (Create a Now Playing Queue) Playing a digital album or track automatically creates a Now Playing queue. Selecting more items in the My Library list adds to the queue. To create a queue, follow the steps indicated for your Navigator. 43 On-Screen Navigator and Touch Screen 44 1. From the Main menu, press Music > Digital Music. Then press My Library. 2. Choose one of the options below, and browse to a list of albums, channels, or playlists: My Artists (default selection): My Albums My Genres My Channels (Rhapsody only) My Playlists 3. Press the Play icon to play an album, channel, or playlist. 4. From the pop-up screen, press Play Now to immediately play your selection, Append to Queue to add your selection to the queue, or Cancel. 45 NOTE: You can change the behavior of Play to always play now or always append music to the queue by changing the default selection under Settings. See “Digital Music: Settings”. 5. Or press to select an artist or album to select individual tracks to play. LCD Keypad and Remote Controls with an LCD Screen 1. From the Main menu, select Music. Then select My Library. 2. Choose one of the options below, and browse to a list of albums, channels, or playlists: My Rhapsody Library Albums Artists Albums by Genre Artists by Genre 3. Select Play to play an album, channel, or playlist. 4. Select Play Now to immediately play your selection, Append to Queue to add your selection to the queue, or Cancel. NOTE: You can change the behavior of Play to always play now or always append music to the queue by changing the default selection under Settings. See “Digital Music: Settings”. 5. Or press to select an artist or album to select individual tracks to play. NOTE: The LCD keypad and the System Remote Controls with LCD screens show a music note next to the currently playing song. 46 Edit the Now Playing Queue You may want to edit the current queue to change the order of tracks played, or to remove individual tracks from the queue. To edit the queue from the On-Screen Navigator and Touch Screen: 1. From the Main menu, press Music > Digital Music > Queue. 2. Press Edit List, and use the following screen options to modify the list. Press the up or down arrow to change a track’s order in the queue. Press the Delete button the queue. to remove a track from 47 3. Press Save Changes to save your changes to the list and exit, or press Cancel to reject your changes and return to the previous screen. To edit the queue from the LCD Keypad and Remote Controls with an LCD Screen: 48 1. Press Music > Now Playing > Queue. 2. Press to select a song in the queue. Press Play Now or Remove from Queue. 3. Press Save Changes to save your changes to the list and exit, or press Cancel to reject your changes and return to the previous screen. Save the Now Playing Queue as a Control4 Playlist Control4 playlists save all tracks currently in the playlist (both locally stored and Rhapsody tracks). NOTE: For Touch Screen or On-Screen Navigators only. This feature is not supported on LCD Keypads or System Remote Controls. To save the Now Playing queue: 1. From the Main music menu, press Queue. 2. Press Save as Playlist. 49 50 3. Press Control4 Playlist. 4. Type the name of your playlist. 5. Press Done. 6. The playlist is saved and can be accessed by going to Music > Digital Music > My Library > My Playlists. Play a Saved Playlist To play a playlist on an On-Screen Navigator or Touch Screen: 1. From the Main menu, press Music > Digital Music > My Library > My Playlists. 51 2. Press the Play button next to the playlist you want to play. To save a playlist from the System Remote Control LCD and LCD Keypad: 1. From the Main menu, press Music > Playlist/Playlists. 2. Press and scroll through the playlists. 3. Highlight a playlist and select it. Play a CD Stored in a Changer To access a CD stored in a connected CD/DVD Changer: 1. From the Main menu, press Music > Browse CDs. 2. Choose a filter option, or browse all albums to select an album or track to play. NOTE: After selecting an album, if you select a second album, it does not queue to play after the first album, but begins playing immediately. 52 Play a CD Loaded in a CD Player To play a CD in a CD player from an On-Screen Navigator or Touch Screen: 1. Load the CDs into your CD player connected to the Control4 system. 2. From the Main menu, press Music > CD Player. 3. Use the On-Screen controls or the buttons on the System Remote Control to control the CD player directly. Add a CD to the CD Catalog Using a CD Changer To add a CD to the catalog from an On-Screen Navigator or Touch Screen: NOTE: Your Control4 Installer must have added at least one (1) CD in your CD Changer and in the Control4 system, or you cannot add music. If your system has at least one CD available in the Browse CDs music option, you can add additional CDs to your system using an On-Screen Navigator or a Touch Screen. 1. From the Main menu, press Music > Browse CDs. 2. Press Add. 3. In the list provided, choose the CD Disc Changer where the CD is loaded. 4. Select the slot in which the CD is loaded. 5. When prompted, enter the album title or artist, and press Search. The album is saved to your list and can be browsed. 6. Press Save. NOTE: You cannot add a CD from an LCD keypad or a System Remote Control. 53 NOTE: You can also add CDs to your library and edit your library using the Easy Importer program or ComposerME. Edit a Digital Playlist To edit a playlist: 1. Load the playlist into the Now Playing list. 2. To remove or edit the order of tracks, follow the instructions in “Edit the Now Playing Queue”. 3. To add tracks, add the tracks to the Now Playing list. 4. Save the new list with the old name. Play Music from an iPod To play iPod music: Music stored on an iPod can be accessed in two (2) ways, depending on how your iPod was added to the system. iPod connected through a USB port iPod connected to the Dock for iPod iPod connected through an iPort™ device (sold separately) iPods connected through a USB port are treated like any other music storage device. When the music stored there is scanned into the system, you can access it from any Navigator device by pressing Music > Digital Music > My Library (or Music > My Library). iPods connected through an iPort™ device are handled differently: 54 1. After the iPort is added to the system, play the music from the iPod by accessing the iPort device found among your Music device options: Go to Music > iPort. 2. In the On-Screen Navigators or Touch Screens the iPort controls and options are a lot like those found on the iPod. In the List Navigator screens (System Remote Control LCD and LCD Keypad), you select the iPort device, and then use the basic controls (Pause, Play, Next, Previous, FF, Rew). 55 Use Zones To view a list of all rooms in the home where music is currently playing or to add, remove, or control any room’s audio, on a Navigator press Zones from the Main music menu. When no music is playing in the entire system, only the No Session option is listed. When a zone (one or more rooms configured) is playing music, you can: 56 Join the current room to a session by selecting a session name. Remove the current room from a session. Select other rooms in your system to send music to. Control the volume for a zone or a room. Mute the volume for a zone or a room. Manage Rhapsody Music Control4 systems come with a free 30-day trial of Rhapsody. The following pages include instructions on how to access and use Rhapsody. To try Rhapsody with a ‘Free 30-day Trial’ account: 1. Press Music > Rhapsody. 2. A screen asks you whether you want to log in, or create a free trial account. Press Free 30-day Trial. 3. You must agree to the user terms to activate your free trial account. To create a Rhapsody account: 1. Open a Web browser. 2. From your Internet connection, go to http://www.control4.com/rhapsody/. 3. Click Join Now. 57 4. Follow the directions. When your account is set up, you may log in to Rhapsody using your Control4 system. To log in to Rhapsody (you only need to enter your Rhapsody account information one time): 1. From a Touch Screen or On-Screen Navigator, press Music > Rhapsody. 2. Press Sign In. 3. Select the blank box next to User Name. 4. From the On-Screen keyboard, type your user name. 5. Press Done. 6. Select the blank box next to Password. 7. From the On-Screen keyboard, type your password. 8. Press Done. 9. Press Login. To log out of Rhapsody: Log out of Rhapsody if you want to stop using Rhapsody or you want to switch user accounts. 1. From a Touch Screen or On-Screen Navigator, press Music > Rhapsody > My Account. 2. Press Log Out. To play music from Rhapsody (create a Now Playing queue from Rhapsody): 58 1. Press Music > Rhapsody. 2. Browse to a channel, playlist, or album, or press Music > My Library and select a Rhapsody track saved to your system. 3. Select an album or track. 4. Press Play. 5. From the pop-up window, select Play Now to play the selection immediately, Append to Queue to add it to the queue, or Cancel. To search for music in Rhapsody from On-Screen Navigators or Touch Screens only: 1. From the Main music menu, press Rhapsody. 2. Press Search. 3. In Search by, select a search category: Artist Keyword Track 59 60 Album Composer 4. Enter a search term. As you enter your search term, an automatic search begins displaying results in “Were you looking for.” 5. If you see the result you want under “Were you looking for,“ select it. Otherwise, finish entering your search term, and press Search. 61 6. Press to select an artist or composer to view or play albums and tracks or add the albums or tracks to your library. To view recent searches from On-Screen Navigators and Touch Screens only: 62 1. From the Main music menu, press Rhapsody. 2. Press Search. 3. The recent search history is displayed. The results are sorted by Artist, Keyword, Track, Album, and Composer. 4. Use the scrollbar and scroll down to view more searches. Select one of the entries in the search history to search on the selected item. To create a Rhapsody playlist from On-Screen Navigators or Touch Screens: Saving the tracks in the current queue as a Rhapsody playlist creates a new playlist in your Rhapsody library (which is accessible online also) that includes all of the Rhapsody tracks (no saved digital tracks) in the current queue. 1. From the Main music menu, press Queue. 2. Press Save as Playlist. 63 64 3. Press Cancel to return to the Queue screen. 4. Select Rhapsody Playlist. 5. Press Cancel to return to the Save as Playlist screen. 6. Type the name of the Playlist. 7. Press Done. 8. The playlist is saved and can be accessed by going to Music > Digital Music > My Library > My Playlists. To play or add a playlist in Rhapsody from an On-Screen Navigator or Touch Screen: 65 66 1. From the Main music menu, press Rhapsody. 2. Press Playlist Central. 3. Select one of the following categories: Top Playlists (default selection) Recent Playlists Genres Dynamic Playlists 4. Featured Playlists Press Play Add next to the list you want to play, or select to save the playlist to My Playlists. NOTE: When viewing an album, select the artist’s name to view the artist’s available work. To add music to a Rhapsody playlist from an On-Screen Navigator or Touch Screen: 1. 2. 3. To add music to a playlist, play the playlist. Add the music to the Now Playing queue. Save the updated list again with its old name. To edit a Rhapsody playlist from an On-Screen Navigator or Touch Screen: 1. 2. 3. Play the playlist you want to edit. From the Main music menu, press Queue. Press Edit List. 67 4. 5. Re-order the songs using the up/down arrows or delete using the Delete button . Press Save Changes. To delete a Rhapsody playlist from an On-Screen Navigator or Touch Screen: 1. From the Main music menu, press My Library > My Playlists. 2. Select or press the Delete button you want to delete. next to the playlist To play a Channel Rhapsody from an On-Screen Navigator or Touch Screen: 68 1. From the Main music menu, press or select Rhapsody. 2. Press or select Channel Guide. 3. Choose from: Top Channels—Play a top channel. All Channels—Play or add a channel to your library. 4. Genres—Play or add channels in a specific genre. Choose from Top Channels—Play top channels in the genre. All Channels—Play or add channels in the genre to your library. My Channels (On-Screen Navigator or Touch Screen only)—Play or add a channel to your library. Select a channel and select the add + button to add it to My Channels, or select the play button to play the channel. To view music charts in Rhapsody from an On-Screen Navigator or Touch Screen: 69 70 1. From the Main music menu, press or select Rhapsody. 2. Press or select Music Guide. 3. Press or select Charts. 4. Choose from the following: Top Artists—View the top 25 artists. (Press or select an artist to view work by the artist.) Top Albums—Play or add the top 25 albums to your library. (Or select an album to play individual tracks.) Top Tracks—Play or add the top 25 tracks to your library. To view genres in Rhapsody from an On-Screen Navigator or Touch Screen: 71 72 1. From the Main music menu, press or select Rhapsody. 2. Press or select Music Guide. 3. Press or select Genres. 4. Choose from the displayed genres. 5. Play or add an album to your library. To use Rhapsody’s Artist View from an On-Screen Navigator or Touch Screen: 1. Select an artist (from the search results, album view, Rhapsody lists, or Now Playing). 2. Choose from the following: Top Tracks (selected by default)—Play or add the artist’s top tracks. Top Albums—Play or add the artist’s top albums. All Albums—Play or add all albums by the artist. Artist Sampler—Play or add sample tracks by the artist. About the Artist—See a review of the artist. Artist Channel—Play or add the artist’s channel to your library. 73 Related Artists—View related artists. To use Rhapsody’s Album View from an On-Screen Navigator or Touch Screen: 1. 74 Select an album (from the search results, artist information, Rhapsody lists, or Now Playing). 2. Choose from the following: Album Tracks Album Review Similar Albums Play New Releases from Rhapsody To view and play newly released albums in Rhapsody from an OnScreen Navigator or Touch Screen: 1. From the Main music menu, press or select Rhapsody. 2. Press or select Music Guide. 3. Press or select New Releases. 75 4. Play or add an album. To play music just added to Rhapsody from an On-Screen Navigator or Touch Screen: 1. 76 From the Main music menu, press or select Rhapsody. 2. Press or select Music Guide. 3. Press or select Just Added. 77 4. Play or add an album. To view music content exclusive to Rhapsody from an On-Screen Navigator or Touch Screen: 1. 78 From the Main music menu, press or select Rhapsody. 2. Press or select Music Guide. 3. Press or select Exclusives. 79 4. Play or add an album. To view and play Rhapsody Staff Picks from an On-Screen Navigator or Touch Screen: 1. 80 From the Main music menu, press or select Rhapsody. 2. Press or select Music Guide. 3. Press or select Staff Picks. 81 4. Press or select to play or add an album. Watching TV You can use any Navigator in the Control4 system to turn on and control a TV, although the System Remote Control is usually the best method. TIP: If using a V3 System Remote Control (C4-SR-250 or C4-SR-150), the WATCH button provides one-button access to the TV when set up to do so. Your Control4 Installer can set this up for you. 82 Screen—Lists all local or other broadcast channels, such as Cable or Satellite/ Dish channels. TV Devices—Lists available TV devices, including local channels and Cable/ Satellite/Dish channels, in your current location. NOTE: If your system includes a Video Wall and a "center" room in your system, your TV will include a Video Wall button for access to the Video Wall (from 10.5” Touch Screens only). NOTE: Press and hold the TV button on the System Remote Control to display the TV options on the monitor or TV. Change Channels You can change the TV channel a number of ways using the System Remote Control: Press the or button on the Navigator. Press the Channel + or - button. Enter a specific channel number on the keypad. Choose a channel from the list in the LCD. 83 You can also change the channel from any Touch Screen by selecting Television, choosing the television you wish to control, and choosing a channel’s graphical button. Use a Video Wall (10.5" Touch Screens Only) Your Control4 Installer can create a Video Wall for you by installing multiple TVs on a single wall, so you can watch more than one video source at a time. While you’ll only hear audio from one TV at a time, you can use the Digital Video Recorder (DVR) feature for all supported views. The system supports view swapping between TVs or monitors. To use the Video Wall: 1. 84 From the Main menu on a 10.5” Touch Screen, press TV > Video Wall. 2. Press the Start button to start the television broadcasts on all TVs in your Video Wall and to activate the playback controls for your Video Wall. NOTE: The audio is only provided for the program shown on the center display. 3. Press Instant Replay to watch any action you missed on either the left or right display. 4. Press Swap to change your video source between displays, activating audio for any source shown in the center screen. 85 Playing a Movie Play a Video Stored in a Changer To access a DVD stored in a connected DVD changer from an OnScreen Navigator or Touch Screen only: 1. From the Main menu, press or select Videos. 2. From the options displayed, select Browse/Browse Library or Cover Art. 3. Select a movie. 4. Select Play. NOTE: Press and hold the Video button or Watch button on the System Remote Control to display the Video options on the TV. Browse/Browse Library The Control4 movie system makes it easy to find a title if your videos are organized in five (5) categories: Movies/All Genre Director Actor Rating NOTE: You can use the keypad on the System Remote Control to quickly jump to movies in the list that begin with the corresponding letters on the keypad. 86 Cover Art Choose Cover Art, and then highlight a movie in the list. On the System Remote Control, press Select/OK to view the movie details. Press Select/OK again to start the movie. Play a Video from a Standard DVD Player or VCR Select the player using any Navigator. You can control your DVD player or VCR using the System Remote Control or Touch Screen. Edit DVD Information To edit DVD information using an On-Screen Navigator or Touch Screen from a Disc Changer: 1. From the Main menu, select Videos > Browse/Browse Library > Movies, and then choose a movie to display its cover art. 2. Press Select Movie to view details about the DVD. 3. Select Edit and enter any changes as needed to the Title, Genre, or Rating. Add a DVD to the DVD Catalog NOTE: Your Control4 Installer must add at least one (1) DVD to your system, or you will not be able to add movies. To add a DVD to the DVD catalog from an On-Screen Navigator or Touch Screen from a Disc Changer: 87 NOTE: You cannot add a DVD from an LCD Keypad or System Remote Control. 1. If your system has Auto-scan enabled, you can add additional DVDs to your system. 2. From the Main menu, press Videos. 3. Press Browse Movies. 4. Press Add. 5. In the list provided, choose the DVD player where the DVD is loaded. 6. If prompted by the screen, complete the Title, Director, Studio, and Genre boxes. This information may have been completed for you. 7. Press Save. Controlling Comfort You can control your installed comfort devices using the Navigators. Supported comfort devices include ceiling fans, motorized blinds, remote-controlled fireplaces, and thermostats. Control Ceiling Fans, Blinds, and Fireplaces To control the ceiling fans, motorized blinds, remote-controlled fireplaces, and similar comfort devices: 1. From the Main menu, press Comfort. 2. Select a Comfort device. 3. Use the Navigator to control the device. Options vary according to the supported device. For example, a ceiling fan may have a High, Medium, Low, and Off setting, while a blind may have an Open, Closed, Up, and Down setting. The remainder of this section describes the specific comfort options available for the Control4 Wireless Thermostat, and how to use them from the Navigators (rather than at the Thermostat Controller). 88 Control Wireless Thermostat Use any of the Navigators to change the comfort settings on the Control4 Wireless Thermostat, described in these topics: Change Thermostat Mode Change Fan Settings Change Hold Options Program the Thermostat Change Thermostat Mode The Control4 Wireless Thermostat lets you select the mode of operation for the climate control system. Using modes helps keep your home running more efficiently. The modes are: Off—The Wireless Thermostat does not make any requests to the heating or cooling system. Emergency Heat—This option may not appear in your menu. It depends on the installation and what is required for your location. Heat—This mode uses the furnace exclusively, leaving any installed cooling systems off. Cool—This mode uses both installed heating and cooling systems. For example, during the spring and fall it is used to warm or to cool your home based on the desired heating and cooling points. 89 To change modes: 1. From the Main menu, press Comfort. 2. From the options that appear, select Thermostat (name may vary; some Navigators skip this step). 3. From the Thermostat screen, press Mode (if it appears). 4. From the pull-down menu, select one of the mode options: Off, Heat, Cool, or Auto (if it appears). The screen updates immediately to reflect the new mode and sets the temperature. Change Fan Settings You can turn the fan on manually or set it to be automatically controlled by the heating and/or cooling system. When you turn on the fan manually, it stays on through the programmed schedule, creating more circulation. (The next pre-programmed time does not overcome the change you made.) 90 You can set the fan to: On—This overrides the settings and turns the fan on until manually turned off. Low—This places the fan speed to the lowest setting. Medium—This places the fan speed to the medium setting. High—The places the fan speed to the highest setting. Auto— This lets the heating and cooling system control the fan usage as necessary to maintain the temperature Heat Point or Cool Point. NOTE: The system displays the large fan icon in the upperright corner whenever the fan is operating. Change Hold Options The Thermostat Hold options allow you to hold a desired temperature setting, overriding the programmed schedule. You can set the system to hold the temperature: (1) Until the next programmed event, (2) For two hours, or (3) Permanently. Hold Off—Cancels the current hold setting and prompts the Wireless Thermostat to follow the programmed schedule. NOTE: The system automatically makes sure that the Heat Point (the setting that turns the furnace on) is at least two (2) degrees lower than the Cool Point (the setting that turns the air conditioning on). This keeps the two (2) systems from competing with each other. Program the Thermostat The Control4 Wireless Thermostat comes with a pre-programmed schedule. 91 You can modify this pre-programmed schedule through the On-Screen Navigator or Touch Screen. You can also program the Wireless Thermostat using Composer Home Edition. There are six (6) program events per day for each day of the week. 92 For each program event, you can activate the event, set a time, and set unique set points for heat and cool. The default pre-programmed schedule applies to every day of the week: MTuWThFSaSu Awake: Enabled 6:00 AM Heat Point: 70 Cool Point: 78 MTuWThFSaSu Leave: Enabled 8:00 AM Heat Point: 62 Cool Point: 85 MTuWThFSaSu Return: Enabled 6:00 PM Heat Point: 70 Cool Point: 78 MTuWThFSaSu Sleep: Enabled 10:00 PM Heat Point: 62 Cool Point: 82 MTuWThFSaSu Custom 1: Disabled 11:00 PM Heat Point: 62 Cool Point: 85 MTuWThFSaSu Custom 2: Disabled 11:00 PM Heat Point: 62 Cool Point: 85 To program the Wireless Thermostat using an On-Screen Navigator or Touch Screen: 1. From the Main menu, press Comfort. 2. Press Thermostat (the name can vary; some navigation options skip this step). 3. On the Thermostat screen, press Program. 4. From the Day Selection screen, select the day or set of days you want to program. Weekday (Monday through Friday)—Programs the Wireless Thermostat for the 5-day week. Weekend (Saturday and Sunday)—Programs the Wireless Thermostat for the 2-day weekend. 93 Mon through Sun (Monday through Sunday)— Programs the Wireless Thermostat for individual days. New schedule changes automatically override any conflicting existing schedule. 5. For the day (or set of days) you selected, program these six (6) events as needed, beginning with Awake: Awake, Leave, Return, Sleep, Custom 1 and Custom 2. When you chose a day (or set of days), a programming wizard displays the Awake event screen (see the example below). This is the first of six (6) screens you can edit. Edit the Awake program event, or press Next one or more times to skip to the next event you want to edit (such as Leave). NOTE: The program event you are programming appears in the upper-left corner of your screen next to the selected day. To continue to the next program event, press Next (in the lowerright corner of your screen). 94 6. To edit the program event currently displayed (for example, Awake) for the day(s) selected (for example, Weekday), do the following: Press Enable to make this program event active. Set a time for this program event. Set a Heat Point and a Cool Point for this program event. 7. To edit another program event (Leave, Return, Sleep, Custom 1 or Custom 2), press Next one or more times until the event appears on the screen (as shown), then repeat. 8. When you are finished programming events, press Done to save your changes and exit the programming wizard. Changing Locations Have you ever gone to bed, and then noticed the sound of the TV coming from an unoccupied room in the house? With a Control4 system, you don't need to be in a room to control the devices in that room. No matter where you are in the house, you can change your Navigator to the room you want to control by changing the current location. To change locations from an On-Screen Navigator or a Touch Screen: NOTE: When using the LCD Keypad or the System Remote Control, go to List > House > Location to change rooms. 1. Scroll down to and press Location to view all rooms currently available for control. 2. Select the device you want to control in that room. For example, in Location, you might select Family Room. Then select Music, and then press to stop playing the music. 95 Controlling Lighting Access the Lighting Options To access lighting from and On-Screen Navigator or a Touch Screen: 1. Choose the room you want to control. 2. From the Main menu, press Lights. The lighting options for the selected location are displayed, including Lights and Lighting Scenes. 3. Select what you’d like to do with the light. Control Your Lights To control the lights in your home, use any of the Navigators: 1. On the Lighting options screen, press or select Lights. 2. For light Switches, select the switch to turn it On or Off. 3. For light Dimmers and Dimmable loads: For incremental changes—Select the light or load, and then move the slider up or down. On-screen users may use the System Remote Controlbuttons or keypad numbers to ramp the setting up and down. LCD Keypad users may use the Scroll Dial or the buttons. For 100% on or off: Press Toggle to switch between 100% on or off (0%). 4. 96 When you are finished, select Back or press the arrow icon to return to the Main menu. Create a Lighting Scene Lighting Scenes can be created using a Touch Screen for a variety of personalized settings. You can create a scene for a room, a floor, or an entire home. To create a Lighting Scene: 1. On the Lighting Options screen, press Light Scenes. 2. Press New Scene to create a scene using the scenebuilding options: Add lighting loads from this scene— Press Add/ Remove Loads. Press Room > Light. Set individual load levels (Touch, Touch and Drag, or Touch and Hold as needed). Press Finished. Press Save Scene. Press Execute Scene to activate the scene. To edit a Lighting Scene: 1. Press Edit Scene. 2. Adjust or press Add/Remove Loads. 3. Select the load to edit. 4. Edit the load. 5. Press Finished. 6. Press Save Scene. Activate a Lighting Scene To activate a Lighting Scene from a Mini Touch Screen, System Remote Control or LCD Keypad: 1. On the Lights screen, press or select Light Scenes. 97 2. Select the scene you want to activate. 3. Press Select (or press the Select dial). 4. When you are finished, select Back (or press the left arrow button). To activate a Lighting Scene from a 10.5” Touch Screen: 1. On the Lights screen, press the scene you want to activate. 2. When you are finished, press Back (or press the left arrow button). To activate a Lighting Scene from an On-Screen Navigator: 1. On the Lights screen, highlight the scene you want to activate. 2. Press Select. 3. When you are finished, select Back (or press the left arrow button). Monitoring the House Security House system options include security and communication features, including status information on contact switches (such as those found on doors, windows, door locks, motion sensors, IP cameras, and sprinklers.) 98 View Contact Switches or Relay From the Main menu, choose House to view the status of any installed contact or relay (as shown, for example, on a Mini Touch Screen). Arm or Disarm Security Panels If your home security system is integrated with your Control4 system, you can use an On-Screen Navigator or Touch Screen to control your security system. To view security system status or to arm or disarm the security panel: 1. From the Main menu, press House > Security System. 2. Control the security system by using the buttons to arm and disarm, or by using the keypad Navigator (if available for your security system). NOTE: Your Control4 Dealer can configure security system zones to appear on the Navigator for your visual reference and to create programming events. For example, when the front door (security system zone) opens at night, you can set the program to turn on the porch lights. Use Security Cameras To access on-screen controls for IP security cameras from an OnScreen Navigator or Touch Screen: 1. From the Main menu, press House > Cameras. 99 2. From the grid summary that appears, select a camera to display the on-screen controls. 3. Control the camera from the Small View (the default view), or choose the Full View. Controls vary per camera. Typical controls are: Pan Tilt Zoom Presets NOTE: Not all cameras can be controlled using these functions. It all depends on the model of the camera configured in your system. Adjusting Pool Settings The pool settings available depend on which Controller you are using and what additional pool relays are in your system. Adjusting the Pool Temperature To view and adjust the pool temperature settings: 1. Select House. 2. Press Pool. 3. The Navigator allows control of: Pool heat Spa heat Air heat In each of these categories, select one of these types of heating: 100 None Heater Solar 4. Use the up and down arrows to adjust the temperature settings. Adding or Hiding Relays The default relays available are Filter Pump and Spa Heat. You or your Control4 Installer can add additional relays (up to 31 relays total; called auxiliary circuits) through the Composer software. You can also rename relays using Composer. NOTE: Use Composer to hide controls not available on your pool controller. Changing System Information System information can be viewed or edited on the Navigator you are using. The Navigator displays system information, including software versions, current Director IP address, network addresses, and Screen Savers. Access the Info Screen To use the Info screen from an On-Screen Navigator or Touch Screen: 1. From the Main menu, press Info. 2. Select the desired Info option. About—Provides system information, such as Navigation version, Director IP, and Director version. Director—Provides a list of all home network instances of Director, including the IP address for the Controller (such as Media Controller). Network/Wireless—Provides wireless network information, such as the IP address, the MAC address, and the DNS server. 101 Remote Access—Lets the Controller give the Control4 Dealer access. Config—Provides preference settings for the Screen Saver, Default, Disable View. Touch Screens also have a Backlight setting option. Update—Accesses update information. To use the Info screen from an LCD Keypad: 1. From the Main menu, select Info. 2. On the Info screen, view the software version, the date, and the time, or select Config to open the following menu: Contrast—Set the LCD screen contrast. Brightness—Set the LCD screen brightness. Sleep Brightness—Adjust the LCD screen brightness for sleep. Sleep Time—Set the time at which the LCD screen should adjust brightness for sleep. About—View EUID, channel, and firmware information. To use the Info screen from a System Remote Control with an LCD Screen: 102 1. Press LCD (V2) or List (V3). 2. From the Main menu, select Info. 3. Select one of the following: Watch—Select to watch the TV or movies. Listen—Select to listen to the radio or playlists. Help—Select for access to the AV Help Wizard, AV Device Control, and Programmable Buttons. Config—Set brightness, contrast, and backlight, check battery level, and view the product number and MAC number. About—View the software version, the date, and the time. Connect to a Director To connect to a Director (or to change Directors and switch the system your Navigators are accessing) using a Touch Screen: NOTE: For access to your system, you must be connected to a Director. 1. From the Main menu, select Info. The Info options bar or list is displayed. 2. From the Info options, choose the Director button. The Connect to a Director screen appears. 3. In the Connect to a Director list of IP addresses, highlight your Controller's IP address and select Connect. View or Change Network Settings From the Network Settings screen, you can view or change IP address settings, DNS server settings, or wireless settings. NOTE: The default IP configuration is DHCP Client. This default setting assumes that your network system has a device serving as the DHCP Server, such as a network gateway, switch, or router. If there is not a DHCP server in the network, you must choose another option. Contact your Control4 Dealer for inquiries. 103 To view or change the network IP settings from a Touch Screen: 1. From the Info options, press the Network button. The Network screen is displayed. 2. On the Network screen, press the IP Address button. The IP Settings screen is displayed. 3. On the IP Settings screen: Either accept the DHCP default (for dynamic IP addresses), or press the arrows and Select button to choose Assigned (for static IP address). 104 4. If you chose Assigned, press the arrows and Select button, enter the IP Address for this device in the keypad provided, and then press OK. 5. Press OK to return to the Network screen. 6. To exit the Network screen, press the left arrow icon or 4. Allow Your Control4 Dealer to Access Your System Remotely If your Control4 Dealer requests access to your system from my.control4.com, do the following to have your Controller check in once every 24 hours to give the Control4 Dealer access. To allow Control4 Dealer access: 1. Go to Info > Remote Access > Service Connection. 2. Select Check In. Set Screen Saver Options To set Screen Saver options: 1. From the Info options, select Config. 2. On the Config screen, select the Screen Saver button. The Screen Saver screen is displayed. 3. Select a Screen Saver option from the list. 4. Select Turn on After <time> setting from the list. 5. Preview the screen saver by selecting Preview. 6. Press the screen to return to Settings. 7. Exit the Screen Saver screen by selecting Back. Set Default Location To set a default location: 105 1. From the Info options, select Config. 2. On the Config screen, select Default. The Default screen is displayed. 3. Select Default Location and View options from the dropdown list. 4. (Touch Screens only) Select a Show View or Disable View option. 5. Choose a Reset to default option from the drop-down list. The options include: 6. After Screensaver After Suspend Specific times, ranging from 15 seconds to 1 hour To exit the Default screen, select Back or press the left arrow icon. NOTE: When a view is locked, you cannot change that setting unless you know the passcode. Your Control4 Installer may have chosen to lock one or more settings. Enable or Disable Viewing Options To disable views: 106 1. From the Info options, select Config. 2. On the Config screen, select Disable View. 3. If the Disable View setting is passcode-protected:, use the keyboard to type the passcode. Click OK. On the Disable View screen, select one or more views to lock (or de-select views to unlock), and then select Back or press the left arrow icon. Using Control4 Internet Services Control4 makes it easy to access your home systems from anywhere in the world through your favorite Web browser. Do you think you left the lights on at home? With your 4Sight account, you can securely view your system and make any necessary adjustments, for example, turning the lights off. Access Web Navigator To access the Web Navigator: If you are already logged into My.Control4.com, from the My Account tab, choose Web Navigator (left side). If you have successfully connected a Controller, Web Navigator (the user Navigator) opens. If you are not currently logged into My.Control4.com, log in now. Web Navigator opens automatically. 107 The Overview page in Web Navigator is selected by default. View the Control4 System at a Glance To view the Control4 system in Web Navigator: 1. Log in to the Web Navigator. 2. From the Overview page, use the scrollbar on the right side to navigate. All installed components are grouped by systems. The status of each component is indicated by its displayed icon. For example, in a system that has lights, contacts, and relays, here are some of the status icons you might see: Hall Light - Off Bedroom Light - On Front Door - Closed Back Door - Opened Family Room Fireplace - Off Bedroom Fireplace - On View or Change Lighting To view or change the lights in Web Navigator: 108 1. At the top of the page, click Lighting. 2. In Lighting Controls, the lighting status icons are displayed along with a slider bar. To turn a light on, click the right end of the slider bar. To turn a light off, click the left end of the slider bar. To set a dimming level, click and drag the slider to the desired percentage. NOTE: Supported Switch settings are on and off only. Dimming levels apply only to dimmers. Check or Change Security Settings To change security settings in Web Navigator: NOTE: The Security Navigator displayed depends on the installed security system. Use the steps provided here as a guideline for exploring your model-specific security options. 1. At the top of the page, click Security. 109 2. Click the Toggle: Keypad slide-down tab to obtain modelspecific instructions or options. For example, some users are prompted at this point to enter a security code, and click OK in order to view their model-specific Navigator. 3. In your model-specific Navigator, click an option on the screen to select the option (for example, an option at the LCD of the local security panel). The following screen provides the options Stay, Away, Arm with Code, and Disarm with Code (among other options). The text in this example (Ready to Arm) is the same text viewable on the LCD of the local security panel. View or Change Thermostat To view or change a Thermostat setting in Web Navigator: 1. At the top of the page, click Climate. 2. In Thermostat Controls: View the current temperature, set points, mode status, and fan status. Change the Set Heat point by clicking the + or symbols. 110 Change the Set Cool point by clicking the + or symbols. Change the Mode by clicking Auto, Heat, Cool, or Off options. Set the fan to Auto or On. NOTE: On the Control4 Thermostat, a Hold: Permanent tab is available. When selected, it provides a variety of Hold options. View Sensors or Motors To view sensors or motors in Web Navigator: 1. At the top of the page, click Sensors and Motorization. 2. In Sensor Status, you can view the status of each sensor. 3. In Motorization Status, you can view or change the motorization status. 4. To open or close a relay, click the relay's icon. 111 Setting Up a Custom Screen Saver The Custom Screen Saver option lets you mix and match available Screen Saver options, including the use of stored photos. NOTE: Screen Savers are available for On-Screen Navigators and Touch Screens only. To set up a custom screen saver from an On-Screen Navigator or Touch Screen: 1. From the Main menu, press Info > Config > Screen Saver. 2. Press the Custom option. 3. From the Screen Saver, select the settings. Choose from the following display options: Media Time Date Temp Photo Shuffle (photo) - Change photos . . . Every 4. After selecting the attributes of your Custom Screen Saver, press Settings. NOTE: Your Control4 Installer can set the Screen Savers to go black at night (‘Go To Bed’ mode), or at any time or will show photos during the day. Contact your Control4 Installer for more information. 112 Setting Up a Wakeup Scene You can use a Touch Screen or On-Screen Navigator to set up a Wakeup scene. NOTE: Using the System Remote Control or LCD Keypad to configure Wakeup events (such as an alarm clock) much like the Wakeup option already found in the Navigators (Comfort > Wakeup). If this option appears in your list of Comfort options, you can set alarm clock-like settings. To set up a Wakeup scene: 1. On the Comfort screen, press the Wakeup button. 2. Press the on/off button. 3. Choose the wakeup time in the drop-down list (hour, minutes, AM or PM). 4. Select Wakeup from the drop-down list. Typically there is only one Wakeup scene (a playlist with or without lights, etc.). You can modify this setting in Composer Home Edition. 113 Using Additional Custom Options Additional custom options are available for your Control4 system. These include Announcement agents and programmable buttons. Ask your Control4 Installer to set up any options that interest you. Announcement Agents The Announcement agent displays a textual message on your Navigators, or plays a sound clip. The Announcement agent can notify you when someone rings your doorbell, or use the Announcement agent to let your family know that dinner is ready when you press a button on the lighting Keypad. Customizeable Buttons Many of the devices in your project, including Touch Screens and System Remote Controls, have programmable buttons. Your Control4 Installer can set these buttons to activate a Lighting Scene, turn on a playlist, adjust the house temperature, or send out an Announcement, among other automated functions. Ask your Control4 Dealer or Installer about some of the settings they can configure for you. 114 CHAPTER 4 Frequently Asked Questions In this chapter, frequently-asked questions are addressed. Do I have to use my TV as the Navigator to select music, listen to the radio, control my lights, etc.? No. Your TV Navigator is just one of a variety of Navigators you can use with your Control4 system. You can also use the LCD Navigator on your System Remote Control to control most of the automated functions in your home! You can also purchase a variety of Control4 Touch Screens to install in your wall or to sit on your night stand or coffee table. Do I need to point the Control4 System Remote Control at the TV? No. Your System Remote Control uses a wireless communication standard to give you ultimate flexibility, enabling you to use the System Remote Control 50 feet away from your Control4 system! Can I use my Rhapsody account on my Control4 system and on my PC or my portable player? Yes. If you sign up for Rhapsody, your account can be used on your PC and your portable music player that supports Rhapsody, as well as for your Control4 system. How many streams from Rhapsody can I have going at once? Rhapsody allows three (3) simultaneous streams to be used. What happens if my Rhapsody account expires? You will no longer be able to use Rhapsody on your Control4 system. You will be prompted to renew your account. After it is renewed, Rhapsody will begin working again as before. 115 Can I listen to the music on my MP3 player or USB hard drive with my Control4 system? Yes. If you have music in digital format on your MP3 player or USB hard drive, you can plug it into the USB port on your Controller, scan your music and stream it to any room in your house. You can use Control4's Composer Media Edition (sold separately) to scan your music and import album cover art and information for your entire music collection. How do I add lamps and other appliances to my Control4 System? By using the Control4 Outlet Switch or Dimmer, you can add stand-alone lamps and appliances (curling irons, coffee pots, etc.) to your Control4 system. These devices allow you to turn your appliances on or off at certain times of the day automatically, or to add your stand-alone lamps to your existing Lighting Scenes. How do I change the color of the LEDs on my Control4 Dimmers and Switches? Contact your Control4 Dealer for information about custom programming of your Control4 system. Why are some of the icons on the display grayed out? Features that are grayed out on your On-Screen or Touch Screen Navigators are not currently set up on your Control4 system. Contact your Control4 Dealer to add cool new features to your Control4 system! Who should I call if I have a problem? Support for Control4 products is provided by the Control4 Dealer who installed your Control4 system. To locate a Control4 Dealer, visit www.control4.com to find a Control4 Dealer closest to you. For more information about Control4 products and services, please visit us at: www.control4.com. 116 Index Symbols "4" Button 9, 10, 18 Numerics 2-, 3-, and 6-Button Keypads 8 4Sight 107 4Sight Internet Services Basics 22 4Sight Services 9 7" Touch Screen 10 Shortcut and Programmable Buttons 12 A Activate a Lighting Scene 97 Add a CD to the CD Catalog 53 Add a CD using a CD Changer 53 Add a DVD to the DVD Catalog 87 Add Music 53 Add or Remove Lighting Loads from a Scene 97 Adjusting Pool Settings 100 Announcement Agents 114 Auto 91 AV Device Control 102 AV Help Wizard 102 B Batteries, System Remote Controls 17 Blinds 88 Browse/Browse Library 40, 86 117 C Ceiling Fans 88 Change Channels 83 Change Fan Settings 90, 91 Change Hold Options 91 Change Thermostat Mode 89 Changing Locations 95 Contact Information 116 Contact Switches 99 Control Blinds 88 Control Ceiling Fans 88 Control Fireplaces 88 Control Wireless Thermostat 89 Change Fan Settings 90 Auto 91 On 91 Change Hold Options 91 Change Thermostat Mode 89 Emergency Heat Mode 89 Heat Mode 89 Off Mode 89 Change Thermostat Mode Cool Mode 89 Control4 2 Control4 System Basics 2 Room-based Control System 2 Sub-Systems 2 Controlling Lighting 96 Access the Lighting Options 96 Activate a Lighting Scene 97 Control Your Lights 96 Create a Lighting Scene 97 Add or Remove Lighting Loads 97 Cool Mode 89 Cover Art 87 Create a Lighting Scene 97 Create a Now Playing Queue 44 Rhapsody 58 118 Custom Buttons 10.5" Touch Screen 12 Custom Options 114 Customizable Buttons 8 Customizeable Buttons 114 D Dimmers Changing LED Color 116 DVD, Add to Catalog 87 E Edit 40 Edit an MP3 Playlist 54 Edit CD Information 54 Edit DVD Information 87 Emergency Heat Mode 89 F Fireplaces 88 First Button Press 19 Frequently Asked Questions 115 G Getting Started 1 Grayed-Out Icons on Display 116 H Heat Mode 89 Help 116 System Remote Control 102 I Interface Devices 5 2-, 3-, and 6-Button Keypads 8 119 4Sight Services—Web Navigator 9 LCD Keypad 8 On-Screen Navigator 7 System Remote Control 6 Touch Screens 7 Interface Selection 115 Interfaces Overview 5 L Lamps 116 LCD 18 LCD Button 18 LCD Keypad 8 About 12 Selection Buttons 12 Selection Dial 12 Shortcut Button 12 Basics 12 About Troubleshooting 12 Controlling a Tuner 28 Lighting Activate a Lighting Scene 97 Adding Appliances 116 Adding Lamps 116 Change 108 View 108 Lighting Scene 97 M Mini Touch Screen 10 Modes Device-Control Mode 18 LCD Navigator Mode 18 On-Screen Navigator Mode 18 Monitoring the House Security 98 Motors 120 View 111 Music Using a USB Hard Drive 116 Using an MP3 Player 116 Music Options Menu 30 N Network Settings View or Change 103 Now Playing Dashboard 42 Now Playing Display 42 O Off Button 18 Off Mode 89 On 91 One-Touch Action 19 On-Screen Navigator 7 Basics 9 Main Menu 10 Controlling a Tuner 26 Info Screen 101 Other Radio Options 26 P Play a CD Loaded in a CD Player 53 Play a CD Store in a Changer 52 Play a Saved MP3 Playlist 51 On-Screen Navigator or Touch Screens 51 Play a Video Stored in a Changer 86 Browse/Browse Library 86 Cover Art 87 Play Music Edit an MP3 Playlist 54 Edit CD Information 54 Edit the Now Playing Queue 47 121 Browse/Browse Library 40 Edit 40 Shuffle 40 Play a CD Loaded in a CD Player 53 Play a CD Stored in a Changer 52 Play a Saved Album or Track Create a Now Playing Queue 44 Play a Saved MP3 Playlist 51 LCD Keypad 52 System Remote Control LCD 52 Play Music from an iPod 54 Rhapsody 58 Play Music from an iPod 54 Playing a Movie 86 Play a Video Stored in a Changer 86 Playing Music Music Options Menu 30 Playing the Radio 25 About the Radio Options 26 Other Radio Devices 26 Stations Screen 26 Tuners 26 Control a Tuner 26 LCD Keypad 28 On-Screen Navigator 26 System Remote Control 27 Touch Screens 27 Play a Station 26 Pool Control Adding or Hiding Relays 101 Basics 100 Adjust Temperature 101 Air Heat 100 Pool Heat 100 Spa Heat 100 Types of Heating 100 Program the Thermostat 91 122 Using On-Screen Navigator or Touch Screen 93 Programmable Buttons 102 10.5" Touch Screen 12 Programmable Sub-System Buttons 19 R Radio 25 Radio Options 26 Relay 99 Remote Access 105 Check In 105 Remote Controls 6 Rhapsody 33, 57 Add Music to a Playlist 67 Album View 74 Artist View 73 Create a Now Playing Queue 58 Create a Playlist 63 Delete a Playlist 68 Free 30-day Trial 57 Genres 71 Just Added 76 Log out 58 New Releases 75 Play a Channel 68 Play Music from 58 Play or Add a Playlist 65 Playlist, Create a 63 Playlist, Play or Add 65 View Music Charts 69 Room-based Control System 2 S Security Cameras 99 Security Settings Change 109 Check 109 123 Selection Buttons 12 Selection Dial 12 Sensors View 111 Setting Up a Custom Screen Saver 112 Setting Up a Wakeup Scene 113 Shortcut Button 12 Shuffle 40 Stations Screen 26 Subsequent Button Presses 19 Sub-System Buttons as Shortcuts 18 First Button Press 19 One-Touch Action 19 Subsequent Button Presses 19 Sub-Systems 2 Comfort 2 House 3 Info 3 Lights 3 Music 2 Radio 2 TV 2 Videos 2 Support 116 Switches Changing LED Color 116 System Activities 23 System Information Change 101 Access the Info Screen 101 About 101 Director 101 LCD Keypad 102 About 102 Brightness 102 Contrast 102 Sleep Brightness 102 124 Sleep Time 102 Network 101 On-Screen Navigator 101 System Remote Control 102 About 102 Config 102 Help 102 Touch Screen 101 Connect to a Director 102, 103 Enable or Disable Viewing Options 106 Set Default Location 105 Set Screen Saver Options 105 View or Change Network Settings 103 System Overview 2 Basics 2 Room-based Control System 2 Sub-Systems 2 System Remote Control 6 Basics 14 Features "4" Button 18 LCD 18 LCD Button 18 Off Button 18 Programmable Sub-System Buttons 19 Sub-System Buttons as Shortcuts 18 First Button Press 19 One-Touch Action 19 Subsequent Button Presses 19 View Part Number or MAC Address 20 Modes Device-Control Mode 18 LCD Navigator Mode 18 On-Screen Navigator Mode 18 Set LCD Preferences 20 Controlling a Tuner 27 Info Screen 102 125 System Remote Control Part Number or MAC Address 20 System Remote Control Use 115 System Remote Controls 6 T Thermostat Change 110 View 110 Touch Screen 7 10.5" Touch Screen Use a Video Wall 84 Basics 10 10.5" Touch Screen Programmable Buttons 12 Main Menu 10 Volume Control 11 Info Screen 101 Touch Screens 7" Touch Screen 10 Shortcut and Programmable Buttons 12 Controlling a Tuner 27 Mini Touch Screen 10 Tuners 26 TV 115 TV Devices 83 U Use a Video Wall 84 Use Security Cameras 99 Using 4Sight Internet Services 107 Access Web Navigator 107 Check or Change Security Settings 109 View Entire System at a Glance 108 View or Change Lighting 108 View or Change Thermostat 110 View Sensors or Motors 111 Using Additional Custom Options 114 126 Using the System Remote Control 115 Using Zones 56 V View Contact Switches or Relay 99 Volume Control Touch Screen 11 W Wakeup Scene 113 Watching TV 82 Change Channels 83 TV Devices 83 Use a Video Wall 84 Web Navigator 9 Wireless Thermostat 89 Z Zones 56 127 128