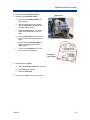
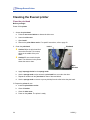
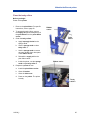
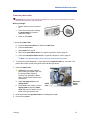
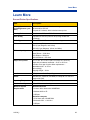
1
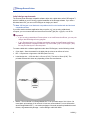
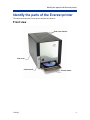
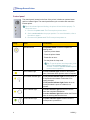
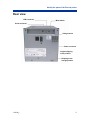
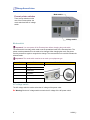
Everest™ Printer
User Guide
Contents
Contents
Introduction ...................................................................................... 1
Printer Requirements.......................................................................................1
Operating System requirements............................................................................ 1
Media requirements............................................................................................... 1
Ribbon requirements ............................................................................................. 1
Label design requirements .................................................................................... 2
Identify the parts of the Everest printer ......................................... 3
Front view ........................................................................................................3
Control panel ......................................................................................................... 4
Rear view ........................................................................................................5
Everest printer switches ........................................................................................ 6
Operate the Everest printer ............................................................. 7
Powering on and off the Everest printer ..........................................................7
Installing the Everest printer driver ..................................................................7
Installing the Everest printer driver on Windows ................................................... 7
Installing the Everest printer driver on Macintosh ................................................. 8
Placing a CD on the printer drawer..................................................................9
Setting up your printing preferences on a Windows PC ................................10
Navigate to printing preferences ......................................................................... 10
Setting media size, media type, orientation, and ribbon type.............................. 11
Setting print quality, color matching, and image adjustments ............................. 12
Setting the printable area .................................................................................... 13
Adjusting the print alignment and color density................................................... 14
Setting up your printing preferences on a Macintosh.....................................15
Navigate to printing preferences ......................................................................... 15
Setting media type, ribbon type, and print quality ............................................... 15
Setting color matching, brightness, and threshold .............................................. 16
Setting the printable area .................................................................................... 17
Adjusting the print alignment and color density................................................... 18
Maintain the Everest printer .......................................................... 19
Maintenance schedule...................................................................................19
Changing the print ribbon ..............................................................................20
Changing the retransfer ribbon ......................................................................22
Cleaning the Everest printer ..........................................................................24
110632_L
i
Rimage Everest Printer
Clean the print head ............................................................................................ 24
Clean the tacky rollers......................................................................................... 25
Clean the air filter ................................................................................................ 26
Clean the platen roller ......................................................................................... 27
Learn More ...................................................................................... 29
Everest Printer Specifications ............................................................................. 29
Technical support and product updates .............................................................. 30
Safety information ............................................................................................... 30
Safety testing....................................................................................................... 31
Rimage Everest Printer Limited 1 Year Warranty ............................................... 32
ii
Introduction
Introduction
This manual provides the information needed to operate the Rimage Everest printer, identify the
parts, and configure printing preferences. To unpack and set up your Everest printer, refer to the
Everest Unpacking and Setup Instructions included with your product.
Printer Requirements
Operating System requirements
The Rimage Everest printer is compatible only with Windows® 2000 and XP, and Macintosh®
OSX v 10.3/10.4.
Media requirements
You must use discs that are coated with a surface designed for thermal retransfer printing. The
media in Rimage Media Kits™ is designed for optimum use in the Everest printer.
For more information about Rimage Media Kits™ – convenient packages of thermal retransferprintable discs and ribbons, all guaranteed by Rimage – contact Rimage at 800-445-8288.
Ribbon requirements
The Everest printer requires a print ribbon and a retransfer ribbon. The standard print ribbon has
three colors: Cyan, Magenta, and Yellow (CMY). These three colors combine in printing to create
full color discs. Print ribbons are also available in black and CMY+White (CMY+W).
Ribbons
Part Number
Number of Discs Printed
3-Color (CMY)
202944-001
500
4-Color (CM+W)
202945-001
375
Black (monochrome)
202946-001
1000
Retransfer ribbon
203384-001
1000
110632_L
1
Rimage Everest Printer
Label design requirements
The Everest printer Windows compatible software ships with a label editor called CD Designer™,
which is installed on your PC during a typical installation of the Rimage software. If you have a
Windows based PC, you can use CD Designer to design your labels.
Note: CD Designer is not Macintosh compatible and will not be installed with the Macintosh
compatible software.
If you have another software application that you prefer, or if you are using a Macintosh
computer, you can create a label and save it as an Acrobat®(.pdf) file, a .jpg file, or a .tiff file.
- Important!
o
If you are using a standalone Everest printer or an AutoEverest AutoPrinter, you can print
using a label file designed in any program.
o
If your Everest printer is on a Rimage autoloader (except the AutoEverest AutoPrinter)
and using Windows compatible software, only the Acrobat (.pdf) or CD Designer (.btw)
file can print directly to the Everest printer.
To create a label with a software application other than CD Designer, use the following criteria:
•
Color depth – Save the artwork for the label with the color set to millions of colors.
•
DPI – Use pictures or logos set to 300 DPI (Dots Per Inch).
•
Label design size – A full size disc is 120 mm (4.723”). The hole is 15mm (0.59”). The
printable area and hub sizes vary depending on the disc manufacturer.
Printable Area
118 mm
Hub Size
24 mm
•
2
Media – The media that is in Rimage Media Kits™ has a printable area of 24-118 mm. On
most labels, print settings of 24 mm and 118 mm are recommended. For more information
about Rimage Media Kits™ – convenient packages of thermal retransfer-printable discs and
ribbons, all guaranteed by Rimage – contact Rimage at 800-445-8288.
110632_L
Identify the parts of the Everest printer
Identify the parts of the Everest printer
This section describes the Everest printer hardware and features.
Front view
Side cover latches
Side cover
Control panel
Printer drawer
110632_L
3
Rimage Everest Printer
Control panel
The control panel, located on the front of the printer, includes an operator button
and four indicator lights. The control panel allows you to monitor and control the
Everest printer.
# Tip: If all indicator lights are blinking, the printer did not initialize properly. To
correct this issue:
1. Remove the power cord. The Everest printer powers down.
2. Set the mode switch to the proper position. For more information, refer to
the table on page 6.
3. Reconnect the power cord. The Everest printer powers on.
Image
Name
Functionality
Operator Button
The operator button is used to complete the
following tasks:
• Open the printer drawer
• Close the printer drawer
• Reset after an error
• Put the printer in sleep mode
# Tip: To put the printer into sleep mode, press
and hold the operator button for 10
seconds. Press the operator button again to
resume normal operation.
Error indicator light
The error indicator light, located on the operator
button, illuminates when operator action is required.
CD Present indicator light
The CD present indicator light illuminates when a
CD is placed on the drawer or when the CD is
properly clamped.
The CD present indicator light flashes when an
Everest print latch is open or a ribbon is not
detected.
Active indicator light
The active indicator light illuminates when the
printer has completed initialization.
The active indicator light flashes when the Everest
printer is receiving data from the host.
Power indicator light
4
The power indicator light illuminates when the
Everest printer is powered on.
110632_L
Identify the parts of the Everest printer
Rear view
USB connector
Mode switch
Serial connector
Voltage switch
Power connector
Original shipping
screw position
Shipping screw
storage position
110632_L
5
Rimage Everest Printer
Mode switch
Everest printer switches
There are two switches on the
rear of the Everest printer: the
mode switch and the AC voltage
switch.
Voltage switch
Mode switch
- Important! You must power off the Everest printer before changing the mode switch.
The mode switch is a rotary switch used to set the operational mode of the Everest printer. The
printer must be powered off for the mode to be changed. After changing the mode, the printer
must be powered on again to recognize the change. The recessed line on the switch indicates the
selected mode.
- Important: The mode switch must be set to match your equipment type.
Switch Position
Mode
0
Everest standalone
1
Rimage autoloader
2
AutoPrinter
3
Diagnostic
4
Firmware update
5–9
Reserved
Mode Switch
AC voltage switch
The AC voltage switch is used to select the AC voltage of the power outlet.
n Warning! Set the AC voltage switch to match the AC voltage of the AC power outlet!
6
110632_L
Operate the Everest printer
Operate the Everest printer
This section provides the information needed to use your Everest printer.
Powering on and off the Everest printer
The Everest printer does not have a power switch:
Note: The printer will go into sleep mode if it is idle for more than 30 minutes. When this
occurs, the printer will take 2-3 minutes to warm up after a job is sent to the printer.
•
If the Everest printer is on an autoloader, the printer is powered on when the autoloader is
powered on. To power off the Everest printer, power off the autoloader.
•
If the Everest printer is a standalone printer, connect the power cord from the Everest printer
to a power outlet to power on the printer. To power off the Everest printer, disconnect the
power cord.
Installing the Everest printer driver
Before printing, you must install the printer driver. If your Rimage Everest printer was included
with an autoloader that has an embedded PC or a control center, the Everest printer driver
is already installed.
Before you begin:
1. Connect the USB cable.
2. Connect the power cord.
3. Ensure that the Everest printer is powered on.
Note: If the Everest printer is a standalone printer (not on an autoloader), the Everest
printer will power on when you connect the power cord. If the Everest printer is on an
autoloader, the Everest printer will power on when you power on the autoloader. For
more information, refer to ‘Powering on and off the Everest printer’ on page 7.
4. If the Found New Hardware Wizard opens, select Cancel.
5. On the computer, close all applications.
Installing the Everest printer driver on Windows
- Important: If an older version of the Everest printer driver was previously installed, remove
the previous version before installing the new one.
- Important! To install the Everest printer driver on the PC, you must have administrative
privileges.
1. Place the software CD in the PC disc drive.
2. Navigate: Start > Run > Browse.
3. From the software CD, select the Everest printer driver Setup.exe file.
4. Follow the prompts to complete the installation.
110632_L
7
Rimage Everest Printer
Installing the Everest printer driver on Macintosh
- Important! To install the Everest printer driver, you must log on with an administrator
account.
1. Install the printer driver.
a. Insert the software CD in the computer disc drive.
b. Run the Rimage Everest Installer.
c. Select the Install button. The installation begins.
d. When the installation is complete, select Quit. The installation completes and the
installation window closes.
2. Add the Everest printer to your printer list.
•
Using OSX v 10.4
a. Navigate: System Preferences > Print & Fax. The Print & Fax window opens.
b. From the Print & Fax window, select
c.
. The Printer Browser window opens.
From the Printer Name list, select CDPR21.
d. Select Add. The printer is added to the printer list and the Printer Browser window
closes.
e. Close the Print & Fax window.
•
Using OSX v 10.3
a. Navigate: System Preferences > Print & Fax. The Print & Fax window opens.
b. From the Print & Fax window, select Setup Printers. The Printer List window opens.
c.
From the Printer List window, select Add. The Printer List window updates to display
available printers.
d. From the printer list popup menu, select USB. In the printer list, CDPR21 displays.
e. From the printer list, select CDPR21.
f.
Select Add. The printer is added to your printer list and the Printer List window
closes.
g. Close the Print & Fax window.
8
110632_L
Operate the Everest printer
Placing a CD on the printer drawer
Use this procedure to place a disc on the printer drawer.
- Important! To avoid scratching or damaging the recording surface of the disc, you must
place the disc properly on the printer drawer.
1. To open the printer drawer,
press the operator button.
Print pad
Holding pins
2. Place the disc on the print
pad with the printable
surface facing up and the
stacking ring facing the print
pad.
- Important: The disc
must not rest on the
holding pins or the
centering pin.
Printer
drawer
Centering
pin
110632_L
9
Rimage Everest Printer
Setting up your printing preferences on a
Windows PC
Printing preferences allows you to set up your Everest printer to produce the best possible labels
on your discs.
Navigate to printing preferences
Use either procedure below to navigate to the Everest Printing Preferences.
Accessing Printing Preferences through Windows Start menu
Note: Using this method, printing preferences are saved in the printer driver settings. If you
are printing labels from CD Designer, use the procedure below.
1. Navigate: Start > Settings > Printers.
2. Right-click on the appropriate Everest printer. The dropdown menu displays.
3. From the dropdown menu, select Printing Preferences. The Rimage Everest II Printing
Preferences dialog opens.
Accessing Printer Preferences through CD Designer
Note: Using this method, printing preferences are saved with the label file and are used
instead of the printer driver settings.
1. Open the desired label file in CD Designer.
2. From the File menu, select Print. The Print window opens.
3. From the Printer Name dropdown list, select Everest.
4. Select the Document Properties button. The Rimage EVEREST Properties dialog opens.
Accessing Printer Preferences when printing PDFs
Use the procedure below to access printing preferences for PDF files.
- Important! The procedure below applies only if you are printing PDF labels using a Rimage
autoloader (except the AutoEverest AutoPrinter).
1. Navigate: Start > Settings > Printers.
2. Right-click on the appropriate Everest printer. The dropdown menu displays.
3. From the dropdown menu, select Properties. The Rimage Everest II Properties dialog opens.
4. From the Rimage Everest II Properties dialog, select the Advanced tab.
5. At the bottom of the Advanced tab, select Printing Defaults… The Rimage Everest II
Printing Defaults dialog opens.
10
110632_L
Operate the Everest printer
Setting media size, media type, orientation, and ribbon type
1. Navigate to printing preferences (refer to page 10).
2. Select the Main tab.
3. View or change the printing preferences.
a. From the Media Type dropdown list, select the appropriate Media Type.
b. From the Media Size dropdown list, select the appropriate Media Size.
c.
Select the desired number of copies.
d. Select the desired Orientation.
e. From the Ribbon dropdown list, select the appropriate Ribbon Type.
If you select CMY+White ribbon, select Manual or Auto:
•
Select the Manual radio button to send one color label file and then manually send
another label file telling the printer where to apply the white background.
•
Select the Auto radio button option to automatically print a white background.
If you select Auto, select Complete White Undercoat or Make Pure White
Transparent from the dropdown list.
•
The Complete White Undercoat selection applies a white background to the
entire printable area of the disc. The printable area is defined on the Advanced
tab.
•
The Make Pure White Transparent selection does not print the areas of a label
that are pure white.
4. When you have made the desired choices, select Apply.
5. To close the Preferences window, select OK.
110632_L
11
Rimage Everest Printer
Setting print quality, color matching, and image adjustments
1. Navigate to printing preferences (refer to page 10).
2. Select the Advanced tab.
3. View or change the printing preferences.
a. From the Print Quality pane, select the desired Print Quality.
b. From the Color Matching pane, select the desired Color Matching.
Note: The default setting for color matching is CMYK.
c.
From the Image Adjustments dropdown list, select None, High contrast, Vivid color,
or Custom.
If you select Custom:
i.
Select the Settings button. The Custom Settings window opens.
ii.
From the dropdown list, select the desired Print Threshold settings.
iii. To adjust image contrast and saturation, move the Contrast and Saturation sliders.
iv. To close the Custom Settings window, select OK.
4. When you have made the desired choices, select Apply.
5. To close the Preferences window, select OK.
12
110632_L
Operate the Everest printer
Setting the printable area
This functionality allows you to adjust the printable area settings for standard CD/DVD 120 mm
media. This allows you to set the outer and inner diameters to print the disc label without
overlapping the disc edges.
1. Navigate to printing preferences (refer to page 10).
2. Select the Advanced tab.
3. View or change the printing preferences.
a. To print on the disc hub, in the Printable Area pane,
select Print on Hub.
# Tip: Most discs like the one
shown above have the
following printable areas:
b. To modify the printable area, select Modify. The
Printable Area Settings window opens.
c.
Standard Area
Outer Diameter 118 mm
Inner Diameter 38 mm
Hub Area
In the Standard Settings pane, enter:
•
The desired outer diameter
•
The desired inner diameter
d. To print on a disc with a stacking ring, in the Hub
Settings pane, enter:
Outer Diameter 35 mm
•
The desired outer diameter
Inner Diameter 24 mm
•
The desired inner diameter
e. To apply the settings, select OK.
f.
To close the window without applying the settings,
select Cancel.
4. When you have made the desired choices, select Apply.
# Tip: Most discs like the one
5. To close the Preferences window, select OK.
shown above have the
following printable areas:
Outer Diameter 118 mm
Inner Diameter 24 mm
110632_L
13
Rimage Everest Printer
Adjusting the print alignment and color density
1. Navigate to printing preferences (refer to page 10).
2. Select the Utility tab.
3. From the Utility tab, select Status Monitor. The Status Monitor dialog displays minimized on
your taskbar.
4. From your taskbar, select the Status Monitor. The Status Monitor dialog is active.
# Tip: On the Status tab, you can view information about the Everest printer such as the
current firmware version, the progress of a print job, the installed ribbon type, and the
percentage of retransfer sheet remaining.
5. Select the Printer Information tab.
6. View or change the Print Alignment Settings.
a. From the Print Alignment Settings pane, select the Modify button.
b. Select the desired print alignment settings.
7. View or change the Color Density Settings.
a. From the Color Density Settings pane, select the Modify button.
b. Select the desired color density settings.
8. To close the Status Monitor dialog, select Close.
14
110632_L
Operate the Everest printer
Setting up your printing preferences on a
Macintosh
Printing preferences allow you to set up your Everest printer to produce the best possible labels
on your discs.
Note: The location of the preferences described in this section will change depending on the
program used to print the label file.
Navigate to printing preferences
1. Open the label file in the application of your choice.
2. From the File menu, select Print. The Print dialog opens.
3. From the Printer dropdown list, select CDPR21.
Setting media type, ribbon type, and print quality
1. Navigate to printing preferences (refer to page 15).
2. From the presets pane popup menu select Everest II Settings. The Everest II Settings pane
displays.
3. View or change the printing preferences.
a. From the Media Type dropdown list, select the appropriate media type.
b. From the Ribbon dropdown list, select the appropriate ribbon type.
If you select CMY + White from the Ribbon dropdown list, from the Mode dropdown list
select one of the following options:
c.
•
The Auto: Complete white undercoat selection applies a white background
everywhere on the printable area of the disc.
•
The Auto: Make Pure white transparent selection makes pure white areas of an
image transparent.
•
Manual: Step 1 (CMY) and Manual: Step 2 (White) allow you to manually determine
where a white background is applied.
Select the desired print quality.
4. When you have made the desired choices, select Print.
110632_L
15
Rimage Everest Printer
Setting color matching, brightness, and threshold
1. Navigate to printing preferences (refer to page 15).
2. From the presets pane popup menu select Everest II Colors. The Everest II Colors pane
displays.
3. View or change the printing preferences.
a. From the Color Matching dropdown list, select the desired color matching.
b. From the Matching Method dropdown list, select the desired matching method.
c.
To modify the image brightness, move the Brightness slider.
d. From the Threshold dropdown list, select the desired threshold.
4. When you have made the desired choices, select Print.
16
110632_L
Operate the Everest printer
Setting the printable area
This functionality allows you to adjust the printable area settings for standard CD/DVD 120 mm
media. This allows you to set the outer and inner diameters to print the disc label without
overlapping the disc edges.
1. Navigate to printing preferences (refer to page 15).
2. From the presets pane popup menu select Printable Area
Settings. The Printable Area Settings pane displays.
3. View or change the printing preferences.
# Tip: Most discs like the
one shown above have the
following printable areas:
Standard Area
a. To increase or decrease the printable area, enter the
desired values in the Outer and Inner fields.
b. To set the printable area for a disc with a stacking ring,
select Advanced. The advanced settings display.
i.
To print on the inner hub of the disc, select Print
on Hub.
ii.
In the Outer Hub and Inner Hub fields, enter the
desired settings.
Outer Diameter 118 mm
Inner Diameter 38 mm
Hub Area
4. When you have made the desired choices, select Print.
Outer Diameter 35 mm
Inner Diameter 24 mm
# Tip: Most discs like the
one shown above have the
following printable areas:
Outer Diameter 118 mm
Inner Diameter 24 mm
110632_L
17
Rimage Everest Printer
Adjusting the print alignment and color density
In the Everest II Utility, you can adjust the print alignment and the color density.
# Tip: The Everest II Utility allows you to view information such as the current firmware version,
the serial number, and the installed ribbon type. Through the Everest II Utility, you can also
update your printer firmware.
1. Navigate to the Everest II Utility.
Note: The settings in the Everest II Utility can be modified only when the Everest printer
is idle (no jobs currently printing).
a. Navigate: System Preferences > Print & Fax. The Print & Fax window opens.
b. If you are using OS X v10.3, in the Print & Fax window, select Set up Printers. The
Printer list opens.
c.
From the printer list, select CDPR21. The CDPR21 window opens.
d. From the CDPR21 toolbar, select Utility. The Everest II Utility opens.
2. In the Everest II Utility, select the Alignment tab. The alignment settings display.
3. View or change the alignment settings.
a. To modify the horizontal alignment, in the Horizontal Alignment Settings pane, move the
All Color slider.
b. To modify the vertical alignment, in the Vertical Alignment Settings pane, move the Color
and Monochrome sliders.
4. View or change the color density settings.
a. In the Everest II Utility, select the Density tab. The density settings display.
b. To modify the color density settings, in the Color Density Settings pane, move the Cyan,
Magenta, and Yellow sliders.
c.
To modify the grayscale density settings, in the Grayscale Density Settings pane, move
the Black slider.
5. To save the modified settings, select Save.
Or
To close the window without saving your changes, select Quit.
18
110632_L
Maintain the Everest printer
Maintain the Everest printer
- Important! For optimum performance, keep the Everest printer in a clean, dust-free
environment.
To keep the Everest printer operating at optimum performance, you must maintain the Everest
printer. Maintenance tasks and frequency are described in the table below.
Maintenance schedule
Task
Change the print ribbon
Frequency
3-Color Ribbon (CMY)
After 500 discs
4-Color Ribbon (CMY+W)
After 375 discs
Black Ribbon (monochrome)
After 1000 discs
Change the retransfer ribbon
After 1000 discs
Clean the print head
Every 500 discs (every time you change the print ribbon)
Clean the tacky rollers
Every 500 discs (every time you change the print ribbon)
Clean the air filter
Every 500 discs (every time you change the print ribbon)
Clean the platen roller
As needed
The platen roller should be cleaned only if you notice a
diminished print quality, such as white specks, on the printed
disc.
Required tools:
# Tip: For best results, use the Everest cleaning kit, which includes the tools listed below.
•
Sponge swabs with long handles
•
High grade isopropyl alcohol
110632_L
19
Rimage Everest Printer
Changing the print ribbon
Before changing the Everest print ribbon, allow time for the new ribbon to become acclimated to
the environment. Allow more time for greater temperature and/or humidity differences.
- Important! Ribbons must be stored at a temperature between 50°– 90°F (10–32°C). Avoid
moisture and direct sunlight. Do not reuse ribbons.
Before you begin:
Power off the printer.
1. Remove the print ribbon.
Cover latches
a. Press the two cover latches to
release the side cover.
b. Lower the side cover.
Side cover
c.
Turn latch 1 counter-clockwise.
d. Remove the print ribbon
carrier.
Print ribbon carrier
Latch 1
e. Remove the print ribbon from
the carrier.
2. Discard the used print ribbon.
# Tip: Perform cleaning
procedures while the print
ribbon is removed. Refer to
‘Cleaning the Everest printer’ on
page 24.
20
110632_L
Maintain the Everest printer
3. Install the new print ribbon.
a. Remove the new ribbon
from the packaging.
Large
opening
Small
shaft
Tacky roller
b. Install the supply roll end
of the print ribbon on the
top of the carrier.
c.
Insert the large shaft in
the large opening and
press the small shaft into
place.
Note: The ribbon must
come over the tacky
roller.
Supply
roll
d. Wrap the ribbon around the
guide rollers.
Guide rollers
e. Install the take up roll.
f.
Rotate the take up roll so the
ribbon is aligned and lies flat.
# Tip: You may need to lift
the ribbon up from the
tacky roller to straighten it.
Note: If you installed a
monocolor ribbon,
advance the ribbon so the
ink portion of the ribbon is
advanced to the take up
roll.
Pull handle
Supply roll
Take up roll
4. Reassemble the printer.
a. Slide the carrier into the printer.
b. Close latch 1.
c.
Close the side cover.
5. Power on the printer. The printer is ready.
110632_L
21
Rimage Everest Printer
Changing the retransfer ribbon
Before changing the Everest retransfer ribbon, allow time for the new ribbon to become
acclimated to the environment. Allow more time for greater temperature and/or humidity
differences.
Ribbons must be stored at a temperature between 50°– 90°F (10–32°C). Avoid moisture and
direct sunlight. Do not reuse ribbons.
Before you begin:
Power off the printer.
Cover latches
1. Remove the retransfer ribbon.
a. Press the two cover latches to
release the side cover.
b. Lower the side cover.
c.
Open latches 1, 2, and 3.
d. Pull out the retransfer ribbon carrier.
Note: The retransfer ribbon
carrier cannot be removed from
the printer.
Side cover
Retransfer ribbon carrier
e. To remove the retransfer ribbon from
the carrier, lift the retransfer rolls up
and carefully slide the retransfer
ribbon from the retransfer ribbon
carrier.
Latch 2
Latch 3
22
110632_L
Maintain the Everest printer
2. Discard the used retransfer ribbon.
Supply roll
3. Install the new retransfer ribbon.
a. Remove the retransfer ribbon from
the packaging.
b. With the supply roll on the left side,
slide both retransfer rolls under the
retransfer ribbon carrier.
c.
Install the supply roll on the left side
of the carrier and snap the roll into
place.
d. Bring the take up roll up and around
the guide rollers and snap the roll into
place.
Take up roll
e. Ensure that the retransfer ribbon is
aligned and straight across all the
ribbon guides.
f.
To take up the ribbon slack, turn the
take up roll counterclockwise
Position of
lower guide
4. Reassemble the printer.
a. Slide the retransfer carrier into the printer.
b. Close latches 1, 2, and 3.
c.
Close the side cover.
5. Power on the printer. The printer is ready.
110632_L
23
Rimage Everest Printer
Cleaning the Everest printer
Clean the print head
Before you begin:
Power off the printer.
1. Access the print head.
a. Press the two cover latches to release the side cover.
b. Lower the side cover.
c.
Open latch 1.
d. Remove the print ribbon carrier. For specific instructions, refer to page 20.
2. Clean the print head.
Latch 1
Printhead
p Caution! Wipe the print head from
one end to the other. Do not stop
wiping in the middle of the print
head.
p Caution! Do not scratch the print
head. The white area in the picture
shows the area to clean.
Wipe
direction
a. Apply isopropyl alcohol to the sponge swab.
b. Use the sponge swab to wipe across the print head from one end to the other.
c.
Repeat as needed until the print head is clean of dust and debris.
d. Use the sponge swab to remove any waxy buildup from the roller below the print head.
3. Prepare the printer for use.
a. Install the print ribbon carrier.
b. Close all latches.
c.
Close the side cover.
d. Power on the printer. The printer is ready.
24
110632_L
Maintain the Everest printer
Clean the tacky rollers
Before you begin:
Power off the printer.
1. Remove the print ribbon. For specific
instructions, refer to page 20.
Ribbon
carrier
2. To access the tacky rollers, remove
the supply roll (the unused portion) of
the print ribbon from the print ribbon
carrier.
Tacky
roller 1
3. Clean the tacky rollers.
a. Apply isopropyl alcohol to the
sponge swab.
b. Use the sponge swab to clean
tacky roller 1.
c.
Use the sponge swab to remove
any waxy buildup from other parts
of the ribbon carrier.
d. Reinstall the supply roll on the
print ribbon carrier.
e. Inside the printer, use the sponge
swab to wipe tacky roller 2.
Ribbon carrier
4. Prepare the printer for use.
a. Install the print ribbon carrier.
b. Close all latches.
c.
Close the side cover.
d. Power on the printer. The printer
is ready.
Tacky
roller 2
110632_L
25
Rimage Everest Printer
Clean the air filter
Before you begin:
Power off the printer.
1. Remove the air filter.
a. At the rear of the Everest
printer, remove the two screws
holding the fan cover.
Fan cover
b. Remove the air filter.
2. Clean the air filter.
a. Use water to clean the air filter.
Screws
b. Allow the air filter to dry.
3. Prepare the printer for use.
a. When the air filter is dry, place it inside the fan cover.
b. Use the two screws to attach the fan cover.
c.
26
Power on the printer. The printer is ready.
110632_L
Maintain the Everest printer
Clean the platen roller
- Important! The platen roller should be cleaned only if you notice a diminished print quality,
such as white specks on the printed disc.
Before you begin:
1. Ensure that the printer is powered
off.
2. At the back of the printer, change
the mode switch to position 3
(Diagnostic Mode).
3. Power on the printer.
1. Access the platen roller.
a. Press the two cover latches to release the side cover.
b. Lower the side cover.
c.
Open latches 1, 2, and 3.
d. Remove the print ribbon carrier. For specific instructions, refer to page 20.
e. Pull out the retransfer ribbon carrier. For specific instructions, refer to page 22.
Note: The retransfer ribbon carrier cannot be removed from the printer.
2. To access and select diagnostic 1, press and hold the operator button for 2 seconds. The
platen roller rotates and the front panel Active indicator light blinks.
3. Clean the platen roller.
p Caution! Do not apply pressure
when cleaning the platen roller with
the sponge swabs. Applying
pressure may damage the platen
roller, leaving scratch marks on the
printed disc.
a. Apply isopropyl alcohol to the
sponge swab.
b. As the platen roller rotates, use the
sponge swab to wipe the platen
roller, allowing it to rotate a full turn
before moving to the next area.
Platen
roller
Retransfer
ribbon
carrier
4. Press and release the operator button to exit diagnostics mode.
5. Power off the printer.
110632_L
27
Rimage Everest Printer
6. Prepare the printer for use.
a. Install the print ribbon carrier.
b. Install the retransfer ribbon carrier.
c.
Close all latches.
d. Close the side cover.
e. Turn the mode switch to the correct operating position. For more information, refer to
page 6.
f.
28
Power on the printer. The printer is ready.
110632_L
Learn More
Learn More
Everest Printer Specifications
Item
Description
Printing Speed
(including drawer cycle
time)
60 seconds or less for CMY color coverage.
66 seconds for CMY+W
First print is 5 minutes, which includes warm-up time.
Printing Modes
Monochrome, CMY, and CMY+W
Print Quality
Equivalent of 160 LPI (Lines Per Inch) using variable dot
technology
Media Types
CDs or DVDs with Everest-compatible coating
Ribbons
Monochrome (Black)
CMY (Cyan, Magenta, and Yellow)
CMY+W (Cyan, Magenta, Yellow, and White)
Ribbon Capacity
Retransfer Ribbon = 1000 discs
Black Ribbon = 1000 discs
CMY Ribbon = 500 discs
CMY+W Ribbon = 375 discs
Physical Properties
9.5” H x 9.5” W x 15.35” D (24.2 cm x 24.2 cm x 39.0 cm)
Depth with print drawer extended – 22.25” or 56.5 cm
Left side cover open for print ribbon replacement –
add additional 9.1” or 23 cm
44 lbs (20 Kg)
Shipping Weight – 49 lbs
Interface
USB (Universal Serial Bus) – B type connector
Power
100-240 VAC, 50-60 Hz, 500 Watts, 3.9 Amps at 115 VAC/ 2.9
Amps at 220 VAC.
Operating Temperature
59° F to 86° F (15 ° C to 30° C)
Relative Humidity
30% to 70% non-condensing
Minimum System
Requirements
Windows-based PC
Pentium 300 or better with 128MB RAM
Windows 2000 or XP
USB port
Macintosh computer
G3 or better with 128 MB RAM
Macintosh OS X v 10.3/10.4
USB port
110632_L
29
Rimage Everest Printer
Technical support and product updates
Support for the Rimage Everest printer is available through your authorized reseller.
- Important: Register your Rimage Everest printer so we can notify you of upgrades as they
become available.
Safety information
This manual and the indications on the product allow proper and safe operation. The indication marks below
help protect you and other persons from injury, and equipment from damage.
n
Warning! According to ANSI (American National Standards Institute) standards, a warning is used to
indicate situations that could result in bodily injury to personnel operating or maintaining the equipment.
p Caution: Indicates that failure to observe this guideline could result in loss or damage to the equipment,
product, software, or data.
To ensure safety, please read the precautions in the User Guide and familiarize yourself with their meaning
before using the equipment.
Safety Precautions
n
Warning! This printer has a voltage slide switch on the back of the unit. Before use, check that it is set
to the correct voltage. Please do not use any voltage other than 110VAC or 220VAC. This could result
in a fire and an electric shock.
n
Warning! Do not disassemble or use tools on the printer. All service procedures should be performed
by an authorized field technician, or sent in for repair. Do not service the printer with the power cord
plugged in the AC outlet.
n
Warning! The front bezel of the printer can be opened by hand. Do not insert your fingers.
n
Warning! Do not touch the heater roller.
n
Warning! The interior of the printer contains sharp edges.
n
Warning! Keep out of reach of children.
p Caution! Any equipment that has AC line voltage, or low DC voltages, such as switches, power
supplies, fuses, fans, non-stepper motors, must be replaced with Rimage–approved components to
maintain the safety approval issued by UL.
p Caution! This printer has no power switch. Power is disconnected completely by unplugging the cable.
Rimage recommends installing the printer in a position that allows immediate disconnection of the
power cable. Always hold the plug when disconnecting the cable from the outlet.
p Caution! Do not use the printer if it is overheating, or an abnormal smell is detected. This may result in
a fire and an electric shock. In case of heating or abnormal smell, immediately disconnect the cable
from the outlet. Contact your dealer for repairs.
p Caution! This product is designed for an office environment.
p Caution! Allow sufficient free space for opening the printer drawer. Do not touch the printer drawer
while it is moving.
p Caution! If the side cover is opened while power is supplied, the printer will stop. Never reach into the
printer while it is operating. Do not attempt to bypass the door interlock.
30
110632_L
Learn More
Safety testing
Product name: Everest printer
Model: CDPR21
Notice for USA
Federal Communications Commissions (FCC) Statement
This device complies with Part 15 of the FCC Rules. Operation is subject
to the following two conditions: (1) This device may not cause harmful
interference, and (2) this device must accept any interference received,
including interference that may cause undesired operation.
Additional FCC Statement
Any unauthorized modification to this equipment may result in the
revocation by the FCC of the user’s authority to operate this equipment.
Product Safety Statement
This product complies with UL 1950 3rd Edition.
Notice for Canada
Canadian Department of Communications (DOC) Statement
This digital apparatus does not exceed the Class A limits for radio noise for
digital apparatus specified in the Radio Interference Regulations of the
Canadian Department of Communications.
C
Product Safety Statement
This product complies with CSA C22.2 No. 950.
Notice for Europe
This product is in conformity with the EMC Directive (89/336/EEC) and the LowVoltage Directive (73/23/EEC) through compliance with the following European
standards:
EN60950, EN55022 (Class B), EN55024, EN61000-3-2, EN61000-3-3. The CE
mark has been affixed in accordance with the CE Marking Directive 93/68/EEC.
110632_L
31
Rimage Everest Printer
Rimage Everest Printer Limited 1 Year Warranty
Rimage warrants, to the original end user only, that all non-consumable parts of the Everest Printer or
Everest II Printer will be free from defects in material or workmanship for 12 months, according to the
following terms:
•
Rimage will replace or repair, at Rimage's discretion, any non-consumable parts found defective within
the Warranty period.
•
Valid from the date Rimage ships the product to you.
•
Factory depot repair:
•
To Rimage’s location in Minnesota from a location within the US or Canada with a typical
response of 15 business days.
•
To Rimage’s location in Germany from a location in Europe with a typical response of 15
business days.
•
To Rimage Minnesota from a location that is not in the US or Canada with a typical
response of up to 25 business days.
•
Advanced Replacement, or faster response Maintenance Contracts are available for an additional fee.
•
Rimage will pay ground service freight charges for components shipped to you.
The use of non-Rimage certified parts may void this warranty.
This Warranty does not include the following:
•
Work done at the customer's location, or customer's loss of data.
•
Shipment costs of equipment or components returned to the Rimage factory.
•
Equipment malfunctions as a result of repairs made by technicians who are not authorized or certified
by Rimage.
•
Software and/or firmware enhancements released after purchase of the product.
•
Equipment or parts that were tampered with, misused, neglected, or that were modified in any respect
without the written consent of Rimage.
•
Equipment or parts that have been damaged due to shipping or accidents, or damaged by lightning,
storms, water, or power surges.
•
Printer consumables including ribbons, retransfer sheets, or print head.
You may not assign this Warranty without Rimage's written consent. Rimage is the intended beneficiary of
this Warranty; if there is any inconsistency between this Warranty and any other agreement included with or
relating to Rimage products, this Warranty shall govern. If any term of this Warranty is illegal or
unenforceable, the legality and enforceability of the remaining provisions are not affected or impaired. This
Warranty is to be interpreted under the laws of the State of Minnesota, without giving effect to conflict of law
rules.
Rimage must receive written notice of any claimed defect or failure to perform within five (5) days after such
failure or defect is first observed. For warranty service, call Rimage at (952) 946-0004.
The Limited Warranty set forth above is Rimage's only Warranty in connection with the Rimage Everest
family of Perfect Image® CD printers. All other Warranties, whether written or oral, express or implied,
contractual or statutory, including, but not limited to any Warranties of merchantability or fitness for any
particular purpose are specifically excluded and disclaimed. In no event shall Rimage's liability under this
Warranty exceed the obligation to repair or replace, at Rimage's discretion, a Warranted product, and,
without limiting the foregoing, Rimage's liability under this Warranty shall not exceed the cost of the covered
product.
32
110632_L