1
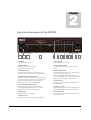
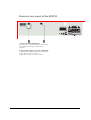
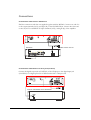
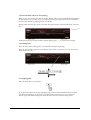
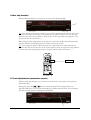
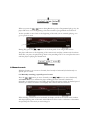
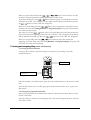
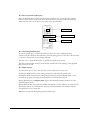
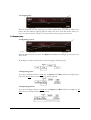
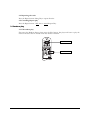
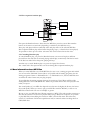
Multi CD/MP3 Player MCD15 AUDAC PROFESSIONAL AUDIO EQUIPMENT Multi CD/MP3 Player MCD15 User Manual & Installation guide AUDAC PROFESSIONAL AUDIO EQUIPMENT User Manual & Installation Guide AUDAC http://www.audac.eu [email protected] Index INTRODUCTION ............................................................................................................................................................................................................. 3 ENVIRONMENT .............................................................................................................................................................................................................. 4 SAFETY REQUIREMENTS ............................................................................................................................................................................................. 5 CAUTION – SERVICING..........................................................................................................................................................................................................................................5 BEFORE USE..................................................................................................................................................................................................................... 6 1. CD’S ...............................................................................................................................................................................................................................................................................6 2. MCD15 MULTI CD/ MP3 PLAYER ........................................................................................................................................................................................................................6 OVERVIEW FRONT PANEL OF THE MCD15............................................................................................................................................................. 8 OVERVIEW REAR PANEL OF THE MCD15 ................................................................................................................................................................ 9 CONNECTIONS.............................................................................................................................................................................................................. 10 CONNECTING THE OUTPUT TERMINALS................................................................................................................................................................................................ 10 CONNECTING THE DIGITAL OUTPUT JACK (COAXIAL).................................................................................................................................................................. 10 OVERVIEW DISPLAY......................................................................................................................................................................................................11 REMOTE CONTROL UNIT.......................................................................................................................................................................................... 12 GETTING STARTED...................................................................................................................................................................................................... 13 1. PLAYING CD’S .......................................................................................................................................................................................................................................................... 13 2. REPLACING DISCS DURING PLAY......................................................................................................................................................................................................................... 15 3. PLAYING A CERTAIN DISC/CERTAIN TRACK (REMOTE CONTROL UNIT ONLY) ....................................................................................................................................... 15 4. DISC SKIP FUNCTION .............................................................................................................................................................................................................................................. 16 5. TRACK SKIP FUNCTION (AUTOMATIC SEARCH)................................................................................................................................................................................................ 16 6. MANUAL SEARCH ..................................................................................................................................................................................................................................................... 17 7. CUEING AND STOPPING PLAY (REMOTE CONTROL UNIT ONLY).................................................................................................................................................................... 18 8. PROGRAMMED PLAY............................................................................................................................................................................................................................................... 19 9. REPEAT PLAY............................................................................................................................................................................................................................................................ 21 10. RANDOM PLAY....................................................................................................................................................................................................................................................... 22 PLAYING MP3 FILES ..................................................................................................................................................................................................... 24 1. NORMAL PLAY .......................................................................................................................................................................................................................................................... 24 2. REPEAT PLAY ............................................................................................................................................................................................................................................................ 25 3. RANDOM PLAY ......................................................................................................................................................................................................................................................... 26 4. MORE INFORMATION ABOUT MP3 FILES .......................................................................................................................................................................................................... 27 ADDITIONAL INFORMATION MCD15...................................................................................................................................................................... 29 TECHNICAL SPECIFICATIONS .................................................................................................................................................................................................................................... 29 PERSONAL NOTES........................................................................................................................................................................................................ 30 2 Introduction T he MCD15 Multi CD/MP3 Player was developed as an easy to use, flexible solution. During the development of the MCD15 Multi CD/MP3 Player, the AUDAC-engineers wanted to achieve three goals: - Easy to use - Excellent sound quality - A modern and advanced design The combination of features offered by the MCD15 make this item suitable for professional as well as private applications. Its extensive range of functions offers a spectrum of possibilities, depending on the need and personal preference of users, while the user-friendly design makes it accessible to everyone. The MCD15 uses high precision, 8-times oversampling digital filters. Its disc drawer can accommodate up to five discs, of which four can be changed during play, by rotating the disc tray clockwise as well as counterclockwise. The five disc trays for normal discs are provided with an ‘inner tray’ which can be used to play 8 cm discs (no adaptor needed). The optional remote control unit MCD15RMT, enables you to not only start, pause and stop playing, but also to create programs, review these programs and so on. Its no-nonsense design only provides the necessary buttons, which makes this remote control unit easy to operate. 3 Chapter 1 Environment Do not place this unit in an enclosed environment such as a bookshelf or closet. Ensure there is adequate ventilation to cool the unit. Do not block the ventilation openings. Do not place the unit in environments which contain high levels of dust, heat, moisture or vibration. Do not use the unit near water or other liquids. Make sure no water or other liquids can be spilled, dripped or splashed on the unit. The unit was developed for indoor use only. Do not use the unit outdoors. Do not place objects on top of the unit. Place the unit on a stable base. 4 Safety Requirements Always handle the unit with care. This unit is not a toy. It should not be operated by children. Do not stick objects through the openings of the MCD15. Do not open the unit (risk for electrical shock). This unit is designed for operation on 230-240 VAC only. The units is double isolated, an earth connection is not necessary. Read the user manual before getting started. CAUTION – SERVICING This unit contains no user serviceable parts. Refer all servicing to qualified service personnel. Do not perform any servicing unless you are qualified to do so. Note This product conforms to the following European Standards: EN 50081-1: 1992, EN 50082-1: 1992, EN 60065: 1994 5 Before use 1. CD’s 1.1. Cleaning CD’s Try not to touch the signal surface of a disc with your fingers. When holding a disc, hold it using the centre hole. The sound/picture quality of a disc can reduce when its got dirt, grease or fingerprints on its surface. This can even cause interruptions when trying to play the disc. You can wipe off fingerprints or dirt using a disc cleaning set or a soft cloth. When you want to write something on the labelled (printed) side of a disc, don’t do this with a ballpoint pen or a pencil. Remove discs from their cases carefully in order not to scratch them. Never bend or heat discs. Do not attempt to enlarge the centre hole. When a disc is moved from a cold to a warm space, water droplets may form on its surface (condensation). Do not use a hairdryer or any other heating equipment to dry the disc. If condensation forms on a disc, wipe the disc clean. 1.2. Playing CD’s The MCD15 only plays discs (optical digital audio discs) with the following logo: Only normal, round discs can be played. Discs shaped like e.g. hearts can’t be played. When this does happen, they may cause the MCD15 to break down. When you’re done playing discs, eject them and put them back in their cases. Never leave discs out of their cases, as they protect them against dust, scratches and warping. Never expose discs for long periods of time to direct sunlight. Never store discs in humid or dusty places or places exposed to heat from heaters and comparable heating equipment. 2. MCD15 Multi CD/MP3 Player 1.1. Setup precautions Provide a space of more than 2cm between the top, rear and sides of the CD/MP3 player and wall/other audio/video equipment, … When you use the MCD15 unit or other electronic equipment containing microprocessors the same time as using a tuner or TV, noise or screen interference may occur on the audio and video of the tuner or TV. If this happens, take into account the following remarks: - Separate the MCD15 from the tuner or TV as much as possible. - Separate the antenna line of the tuner or TV from the power cable and in-/output connection cables of this unit as much as possible. - Indoor antennas and 300Ω feedlines are especially susceptible to such interference. The use of outdoor antennas and 75Ω coaxial cable is recommended. 6 1.2. When not using the MCD15 When you are not using the MCD15, make sure you’ve taken all discs out. The power must be off. When you’re planning not to use the device for a longer period of time (vacation, …), make sure you unplug the power supply cord. When you want to move the MCD15, try to avoid shocks. Before moving, make sure there are no discs in the disc drawer and disconnect the connection cords. 1.3. Condensation When the unit undergoes a sudden raise of temperature (e.g. the unit was used in a very cold room and is now being moved to a reasonably warm one/the unit is standing in the living room/kitchen/… and the heating is turned up so that the temperature in the room is suddenly raised), condensation will form on the operating parts within the unit. When this happens, normal operation is no longer possible. Condensation can also be caused by air conditioning. (e.g. it’s summer and the air conditioning is switched on). If the cool air from an air conditioner strikes the unit directly, this may cause condensation. You can easily solve this by moving the unit to another location, away from the air conditioning. When condensation has formed, switch on the MCD15 and leave the unit like that for a while. Depending on the circumstances (temperature, …), the MCD15 should be ready to use again in one to two hours. 1.4. Cleaning the MCD15 Use a soft cloth and wipe the MCD15 softly. When you use cloths that were treated with chemicals, follow the precautions described below: Avoid using volatile chemicals like benzene, thinners or other organic solvents or insecticides, because they may reduce the quality of the CD/MP3 Player and its color. Avoid using record sprays or antistatic sprays. 7 Chapter 2 Overview front panel of the MCD15 13 12 11 1 2 3 4 5 6 7 8 9 10 1. Display Overview display: page 11. 8. Play button Press this button to start Play. 2. Repeat button Press this button to play a track, a disc or all discs repeatedly. 9. Open/close button Press this button to open or close the disc drawer. 3. Random button Press this button when you want to play the tracks on a disc/several discs in a random order. 10. Disc Skip button Press this button to move on to the next CD, or to do the following: when loading/unloading discs, the disc drawer is open and four discs can be changed. Press this button to rotate the opened disc drawer. 4. Backward Skip Search button Press this button to replay from the beginning of the current track or to return to a previous track. Press and hold down this button to search a specific part of a track in fast backward. 5. Forward Skip Search button Press this button to skip to the next track. Press and hold down this button to search a specific part of a track in fast forward. 11. Disc drawer Load up to 5 compact discs in the disc trays in the Disc drawer. 12. Remote sensor This sensor receives infrared signals from the optional MCD15RMT remote control unit. 6. Stop button Press this button to stop Play. 13. Power button Press this button to power-up the system or to turn off the power. 7. Pause button Press this button to interrupt Play temporarily. 8 Overview rear panel of the MCD15 1 Output terminals (LINE OUT) The connection cords from these terminals need to be connected to the input terminals of the amplifier. 2 Digital Audio Output connector (COAXIAL) A commercially available 75Ω pin-plug cord needs to be connected to this connector. Digital data is output from this connector. 9 Connections CONNECTING THE OUTPUT TERMINALS Find the connection cord that was supplied together with the MCD15. Connect one end of it to the output terminals, left (L) and right (R), of the CD/MP3 Player. Connect the other end to the CD, AUX or TAPE PLAY input terminals, left (L) and right (R), of the amplifier. R AMPLIFIER POWER SUPPLY OUTLET SIGNAL GND SPEAKER SYSTEMS R INPUTS PHONO CD TUNER PB AUX REC TAPE1 TAPE2 /DAT /MD L A TAPE1 TAPE2 /DAT /MD L L B R R R AC OUTPUT CONNECTING THE DIGITAL OUTPUT JACK (COAXIAL) Connect the digital output jack (COAXIAL) of the CD player to the digital input jack (COAXIAL) on a digital processor or MD recorder with a 75Ω pin cord. DIGITAL PROCESSOR OR MD RECORDER OPTICAL 10 Overview display 1 . 2 10 3 4 11 5 12 6 13 7 8 9 14 1. Disc number indicator 13. Time indicator modes These indicators show the Time mode the player is in (which time display is being showed on the display). For more information, read 14. Time indicator. 2. Play indicator 3. Pause indicator 4. MP3 indicator 14. Time indicator This indicator indicates the elapsed/remaining playing time of the track that is currently being played or the remaining playing time for all tracks yet to be played. 5. CD indicator 6. Random play indicator 7. Repeat play indicator This indicator lights up when you press the Repeat button a first time. When the repeat indicator lights up, it means the player is in Repeat mode. Default: elapsed playing time of the current track is displayed. Press the Time button a first time: the ‹ Each › and ‹ Remain › indicators will light up. In this mode, the display will show the remaining playing time for the current track. 8. Repeat 1/1disc/disc This indicator is an additional indicatior: it indicates the Repeat mode the player is in: Press the Repeat button a first time: ‹ Repeat 1 › = repeat 1 track. Press the Repeat button a second time: ‹ Repeat 1 disc › = repeat 1 disc. Press the Repeat button a third time: ‹ Repeat disc › = repeat all loaded discs. Press the Repeat button a fourth time: ‹ no indication › = repeat is canceled. Press the Time button a second time: the ‹ Total ›, ‹ Remain › and ‹ – › indicators will light up. The display will now show the number (quantity) of tracks on the disc that are to be played and their remaining playing time. 9. Music calendar display 10. Currently playing disc number indicator 11. Programmed play indicator 12. Total track number/Currently playing track number indicator 11 Press the button a third time: the ‹ Total › and ‹ Remain › indicators will go away. The display will now show the elapsed playing time of the current track. During Play, the total remaining time is the remaining playing time of the disc. More information about the Time display can be found in the part about Programmed play (p. 19). Remote control unit (optional) (MCD15RMT) 1. Open/close button Use this button to open/close the disc drawer. 2. Play button Use this button to start playing. 3. Pause button Use this button to interrupt playing temporarily. 4. Stop button Use this button to stop playing. 5. Skip forward button Use this button to move on to a next track or to search for a specific part of a track in fast forward. 6. Skip backward button Use this button to move back to the beginning of the current track or to a previous track or use it to search for a specific part of a track in fast backward. 7. Fast forward button Use this button during play, to wind on rapidly (fast forward). 8. Reverse button Use this button during play, to rewind rapidly (fast backward). 9. Time button Use this button to select a certain time display (remaining/elapsed playing time, …) 12 10. Disc button Use this button to skip one/several discs. When using the Disc (skip) button on the remote control unit, the player moves back to the previous disc. When using this button on the MCD15, the player moves forward to the following disc. This button will not function in the Random and Programmed play modes. 11. Disc number buttons Use these buttons to select the disc(s) you wish to play. 12. Track number buttons Use these buttons to select the track(s) you wish to play. 13. Repeat button Use this button to repeat a disc/a track/all discs/all tracks. 14. Random button Use this button to play a selection of discs/tracks randomly. 15. Prog. (Program) button Use this button to create a program you wish to play. 16. Review button Use this button to check the tracks you programmed. The programmed tracks will appear on the display one at a time. Chapter 3 Getting Started 1. Playing CD’s Only audio compact discs indicated with this logo can be played. When trying to play other discs, an error will occur and playing will stop. 1.1. Turn on the power 1.2. Open the disc drawer with the Open/close button and load one or several discs (with the printed side up) in the disc drawer Loading discs means that you open the disc drawer and put discs in the provided disc trays. It’s possible to load up to five discs. The disc drawer has five disc trays, but because it can’t slide out completely, only four trays come out at a time. You need to press the Disc Skip button to rotate the disc trays. 8 cm discs can also be placed on the inside circle of the trays. 13 1.3. Press the Play button to start playing When you’ve pressed the play button, the disc drawer will close automatically. Before pressing the play button, you can also close it yourself by pressing the Open/close button. NEVER close the disc drawer by pushing it with your hands. Playing starts from the first track of the first disc and continues until the final track of the last disc. All information (disc & track number, elapsed playing time, …) is shown on the display. 1.4. Pausing Play Press the Pause button during Play to temporarily interrupt the playing. Press the Pause button again to restart playing from where you paused. You can also use the Play button to do this. 1.5. Stopping Play Press the Stop button to stop Play. If you press the Open/close button during Stop, the trays will automatically rotate until the disc which was playing is at the front of the disc drawer, where you can see it when the drawer opens. The drawer will open when the disc has been rotated to this position. 14 2. Replacing discs during Play While a disc is playing, the other four discs can be changed. Open the disc drawer by pressing the Open/close button and change the discs as desired. To rotate the disc tray while its open, press the Disc skip button. 3. Playing a certain disc/certain track (remote control unit only) 3.1. Step 1: selecting a disc Press the corresponding Disc number button (1 to 5) to start playing from the desired disc (disc 1 = button 1, disc 2 = button 2, …). 3.2. Step 2: selecting a track After selecting a disc with the Disc number buttons, select a track using the track number buttons (1 to 10 and >10). With these buttons, you can select the number of the track you want to play (track 1 = button 1, track 2 = button 2, … tracks with a number higher than 10 = >10) . Disc number buttons 1 to 5. Track number buttons 1 to 10 and >10 E.g.: You want to play the 5th track on the 4th disc: Press Disc number button 4 on the remote control unit to select the 4th disc. Then press Track number button 5 to select the 5th track on that disc. OR th st You want to play the 11 track on the 1 disc: Press Disc number button 1 on the remote control unit to select the 1st disc. Then press Track number button >10 (because your track number is higher than 10). Then press 1 (10 + 1 = 11 = track 11). For track 17 this would be >10 and 7, for track 14 this would be >10 and 4, … When you’ve selected a disc (and a track on that disc), playing will start from the number of the disc (and the number of the track) you’ve selected. 15 4. Disc skip function With the Disc skip button, you can move on to the next disc during Play. E.g.: You’re listening to Disc number 3. When you press the Disc skip button on the MCD15, the disc trays in the disc drawer will turn and the player will start playing Disc number 4. When you Press the Disc skip button then, you’ll move on to disc number 5. When you press the Disc skip button when playing the 5th disc, the player will move on to disc number 1. When using the Disc (skip) button on the remote control unit, the disc trays will turn in the opposite direction and the player will move back to the previous disc. E.g.: You’re playing disc number 2. When pressing the Disc (skip) button on the remote control unit, the player will move back to the previous disc, in this case disc number 1. When pressing the Disc (skip) button on the remote control unit when playing disc number 1, the player will move back to disc number 5. Disc button 5. Track skip function (automatic search) With the Track skip function, you can move on to the next or move back to the previous track during Play. During play, press the button on the front panel for no longer than 0.5 sec.. The player will move on to the next track and play continuously from there. You can repeat this action until the player is playing the desired track. 16 When you press the button during Random (p.22) or Programmed play (p.19), the player will move on to the beginning of the next random or programmed track selection. It’s also possible to move back to the beginning of the track you are currently playing, or to go to a previous track. During Play, press the button on the front panel for no longer than 0.5 sec.. The player will return to the beginning of the current track and play continuously from there. Each time you press, the player will go back to the preceding track. You can repeat this action until the player is playing the desired track. 6. Manual search With this function, you can move forward (fast forward) or backward (fast backward) to a specific part of a track. 6.1. Manually searching a specific part of a track Press the button (to move forward) or the button (to move backward) and hold it down. You will hear the player winding the track forward or backward, depending on which button you’re holding down. When the player reaches the desired part of the track, you release the button. Normal play will continue from that moment. When winding a track forward or backward, the display will show the current track number and elapsed playing time of the track. This indication can be used as a reference to determine the specific part of the track you are looking for. 17 When you press and hold down the or button for more than 5 seconds, the player will wind forward/backward approximately 4 times faster. If you keep holding down the button when the player has reached the end of the final track of the disc, “00” will appear on the display and the Manual search will stop. Press the button to return, until “00” disappears. button when the player has reached the end of When you keep holding down the the final track of the disc during Random or Programmed play, the player will search the next track and start playing. button: when you keep holding down this button when the The same goes for the player has reached the beginning of the first track of the disc, “00” will appear on the display and the Manual search will stop. Press the button to return, until “00” disappears. button when the player has reached the When you keep holding down the beginning of the first track of the disc during Random or Programmed play, the player will search the next track and start playing. 7. Cueing and stopping Play (remote control unit only) 7.1. Cueing by direct selection Cueing by direct selection and then Pausing is convenient for practicing vocals with background music. Pause button Track number buttons 1 to 10 and >10 Select the number of the desired track: press the track number buttons on the remote control unit. Press the Pause button. To start Play again, press the Pause button once more, or press the Play button. 7.2. Cueing by programmed selection First create a program with the desired track selections. Then press the Pause button on the remote control unit. The player will now advance to the beginning of the first track in Program memory and wait in the Pause mode. 18 8. Programmed Play It’s possible to program up to 32 tracks. With Programmed play, you can play certain tracks of the discs that are loaded in the order you desire. You can program tracks on a disc that is not loaded, but when you try to play that unloaded disc, the player will detect that it’s not loaded and automatically continue to the next disc. 8.1 Programming (remote control unit only) Disc button Disc number buttons Track number buttons Prog. button Press the Prog. button. The PROGRAM indicator will light up. Select the disc you wish to program, using the Disc number buttons 1 to 5 . Select the track you wish to program, using the Track number buttons 1 to 10 and >10 . E.g.: You want to select and program the 4th track on the 1st disc and the 11th track on the 5th disc: Press PROG, press Disc number button 1, press Track number button 4. Press Disc number button 5, press Track number buttons >10 and 1 (=track 11). 8.2. Checking the programmed tracks (remote control unit only) Review button Press the Review button on the remote control unit. The display will show one programmed track after the other, each time you press. 19 8.3. Playing a program Press the Play button on the front panel of the MCD15 or on the remote control unit. The programmed selections will now be played in the order in which they were programmed. 8.4. Clearing the entire program Press the PROG button on the remote control unit once more. This will erase the entire program. You can also erase the entire program by pressing the Open/close button. 8.5. Cancelling Programmed Play When you press the PROG button while a program is being played, you will cancel this program. The player will then play the tracks on the disc currently being played, and in the order in which they are on the disc. At the end of the disc, the player will automatically stop playing. 8.6. Other actions It’s not possible to conduct Programmed play with MP3 discs. If you do specify MP3 discs, those steps in the program will be ignored. During Programmed Play, Repeat Disc (repeat all loaded discs) is the only available Repeat mode. If you start a program when the player is already playing a track in Normal play OR if you start a program when the player is in Pause mode, the track which is currently being played or paused will become the first track in the program. It’s not possible to make a direct selection (=pressing a track number button to hear a specific track) while a program is being played. When you press a track number button on the remote control unit while a program is being played, the player will add this track to the end of the program. When you are programming, make sure you don’t program a track number which is not recorded on the disc. E.g.: you have a disc with 10 tracks and by mistake, you program track 14, which doesn’t exist. If this happens, the player will ignore the program. Time display: the remaining playing time for the program will only be displayed when all programmed tracks are on the same disc. When tracks of more than one disc are programmed, the following indication will be shown on the display : - - - - . When the total playing time of the programmed tracks is more than 99:59, the following indication will be shown on the display : - - : - - . 20 9. Repeat Play 9.1. Repeating all tracks Press the REPEAT button on the front panel. The REPEAT indicator will light up: the player is in Repeat mode. Next press the Play button. You can also press the Play button first, and then the Repeat button. This will have the same result: the player will repeat all tracks. 9.2. Repeating 1 track When you press the Repeat button a second time, the REPEAT indicator will light up together with the 1 indicator. In this mode, the track that is currently playing will be repeated. 9.3. Repeating 1 disc When you press the Repeat button a third time, the REPEAT indicator will light up together with the 1 DISC indicator. In this mode, the disc that is currently playing will be repeated. 9.4. Repeating all discs When you press the Repeat button a fourth time, the REPEAT indicator will light up together with the DISC indicator. In this mode, all discs that are currently loaded, will be repeated. 9.5. Cancelling Repeat mode To cancel Repeat mode, press the Repeat button a fifth time. 9.6. Other actions When you press the Repeat button during Play, the player will repeat all the tracks. When you press the Repeat button during Programmed play (page 17), the player will repeat the tracks in the program in the order in which you programmed them. When you press the Repeat button during Random play (page 20), the player will repeat the tracks that were selected for Random play in a random order. 21 10. Random Play Random play using the remote control unit: 10.1. Full random play Play button Random button Press the Random button. Next press the Play button. The player will play the tracks of the discs that are loaded in a random order. 10.2. Programmed random play (remote control unit only) Play button Disc number buttons Random button Track number buttons Prog. button First press the Program button and program a selection of discs (and tracks) with the Disc and Track number buttons. Next Press the Random button. Then press the Play button. The player will now play the tracks from your program in a random order. 22 10.3. Disc sequential random play Press the Random button. Then specify the disc numbers (1 to 5) with the Disc number buttons on the remote control unit. Press the Play button. The player will now randomly select and play tracks of the discs in the order of the specified discs. Play button Disc number buttons Random button 10.4. Cancelling Random play To cancel random play, you push the random button once more. Playing will then continuously proceed from the track that is currently being played, to the end of the last track on the disc. After that last track, playing will stop. Another way to cancel Random play, is pushing the Open/close button. The Disc sequential play mode is automatically cancelled when the playing of the specified discs comes to an end. 10.5. Other actions You can select up to 5 discs. The same disc can be selected more than once. Pushing the Random play button during Normal play will start Full random play. Pushing the Random play button during Programmed play will start Random play of the tracks in the program, including the tracks which have already been played. During Random play, the Repeat Disc (repeat all loaded discs) Repeat mode is the only available Repeat mode. During Random Play, the player may display the number of a disc which is not loaded in the disc drawer. This is not a malfunction. The player will read the disc information and then automatically reset to correct this. MP3 discs are ignored during Programmed random play. 23 Playing MP3 files The internet offers lots of websites on which you can download MP3 music files, following the instructions on the site. These files can be stored on CD-R/RW discs. It’s possible to play these discs on the MCD15. With an MP3 encoding program, you can convert the music on regular CD’s (sold in shops) into MP3 files. When doing this, you reduce the data to approximately 1/10 of the original size. When storing these converted files on a CD-R/RW disc afterwards, it’s possible to create a single 12cm CD-R/RW disc which contains about 10 times more music than a regular music CD. Pay attention: These values count for MP3 files or tracks that are about 5 min. long, which are converted at a standard bit rate (128kbps) and stored on a CD-R/RW disc with a capacity of 650MB. The recordings you make are for your personal use. Do not use them in a way that infringes on the copyright holder, taking into account the copyright laws. More information about the use of MP3 files can be found at the end of this chapter. 1. Normal play 1.1. Starting Play The MCD15 is compatible with discs with up to 256 tracks. Turn on the power with the Power button. Open the disc drawer with the Open/close button and place the MP3 disc in the disc drawer. Press the Play button (after pressing this button, the disc drawer will close automatically). The player will play the disc that was loaded. Disc and track number, elapsed playing time and other information about the currently playing disc will appear on the display. When you press the Open/close button during Play, Play will continue, but the disc drawer will open, which makes it possible to replace four discs. If you want the disc tray to rotate, press the Disc skip button on the front panel. When you’re finished, press the Open/close button again to close the disc drawer. Do not close the drawer with your hands. 24 1.2. Stopping Play Press the Stop button to stop playing. If you want to replace discs, you press the Open/close button. The disc which was playing will be rotated to the front of the disc drawer, where you can see it, and the drawer will open. Close the drawer with the Open/close button. 2. Repeat play 2.1. Repeating 1 track Press the Repeat button two times. The Repeat and 1 indicators will light up. Next press the Play button. In the Repeat 1 mode, the track that is currently playing, will be repeated. 2.2. Repeating 1 disc If you press the Repeat button a third time, the Repeat and 1 Disc indicators will light up. In this mode, the disc that is currently playing, will be repeated. 2.3. Repeating all discs If you press the Repeat button a fourth time, the Repeat and Disc indicators will light up. All discs that are currently loaded, will be repeated. 25 2.4. Repeating all tracks Press the Repeat button during Play to repeat all tracks. 2.5. Cancelling Repeat play Press the Repeat button a fifth time to cancel Repeat Play. 3. Random play 3.1. Full random play First press the Random button, then press the Play button. The player will start to play the tracks of the discs that are loaded in the disc drawer at random. Play button Random button 26 3.2. Disc sequential random play Play button Disc button Track number buttons Random button First press the Random button. Then select the MP3 disc: press the correct Disc number button on the remote control unit (depending on which tray the MP3 disc is in). Press play. The player will now randomly select and play tracks of the selected MP3 disc. Disc sequential random play will end when the playing stops (= all tracks have been played). It’s possible to select up to five discs. The same disc can be selected more than once. 3.3. Cancelling Random play To cancel Random play, you press the Random button once more. The player will then proceed from the track that is currently playing and will play continuously until the last track of the disc has ended. After that point, playing will stop. Another way to cancel Random play is to press the Open/close button. The 1 track and 1 disc repeat modes can’t be set during Disc sequential random play. 4. More information about MP3 files When you write MP3 files on a CD-R/RW disc, be sure to use a writing program with which you can record in “ISO9660” format (this is not possible with all writing programs). Set the writing program’s format to “ISO9660 level 1” or “ISO9660 level 2”, because MP3 files that are written in other formats may not play properly. It’s possible that the writing program changes the positions of the folders and files while writing MP3 files on the CD-R/RW disc. Hence it’s possible that the files aren’t played in the order you expect. The sound quality of your MP3 disc depends on its bit rate: the higher the bit rate, the better the sound quality. When you want to play your MP3 files with the MCD15, it’s best to use MP3 files written with a bit rate of 128 kbps or greater. Be sure to give you MP3 files the following extension: “MP3”. Files with another extension or files with no extension at all can’t be played. When using a Macintosh computer, it’s possible to play MP3 files, when adding the extension “MP3” after the file name. This name may consist of a maximum of 8 Roman capital letters and/or numerals when recording them on CD-R/RW discs. 27 The MCD15 is compatible with “MPEG-1 Audio Layer-3”, “MPEG-2 Audio Layer-3” and “MPEG -2.5 Audio Layer-3” standards (sampling frequencies-32KHz, 44.1KHz and 4KHz). The MCD15 is not compatible with MP1 or MP2 standards. The MCD15 is mixed-audio compatible. Only music files can be played. Its also multi-session compatible. The MCD15 is not compatible with packet write programs, play lists or ID3-Tag. The MCD15 can play a maximum of 99 folders. Folders over 8 layers down can’t be played. The maximum number of files is 512 files. If there are more than 512 files, only the first 512 will be played. Files other than those with the “MP3” extension are not counted. When a CD-R/RW disc has dirt or scratches on it, it’s possible that the MCD15 doesn’t play this CD. Depending on the disc’s properties, it’s also possible that the MCD15 doesn’t play certain CD’s. To protect copyrights, no digital signals are output when playing MP3 files. If the first session is a music CD, only music CD’s can be played. If the first session consists of MP3 files, only MP3 files can be played. Program selection and Programmed random play are not available with MP3 discs. Pay attention: do not apply seals or tape to the label or signal side of CD’s or CD-R/RW discs. The glue could get on the disc surface, which would cause the disc to get stuck inside the set. 28 Chapter 4 Additional Information MCD15 Technical specifications MCD15 Power supply Power consumption Channels Frequency characteristics Dynamic range S/N ratio High frequency distortion Separation AC230V, 50Hz 14W 2 20Hz ~ 20KHz 98dB 102dB 0,006% 95dB Discs Disc drawer Audio compact discs – 8cm, 12cm Loads up to 5 discs Dimensions (WxHxD) Weight 43.5 x38.8 x 11.5 cm 6.8 kg Remote control unit MCD15RMT Power supply Dimensions (WxHxD) Weight (batteries included) Infrared pulse system 3V DC Two R6P (standard SIZE AA) 5 x 17.5 x 1.8 cm 100 g 29 Personal Notes 30