1
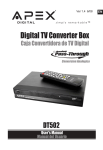
Warning
CAUTION
RISK OF ELECTRIC SHOCK
DO NOT OPEN
WARNING:
TO REDUCE THE RISK OF ELECTRIC SHOCK DO NOT REMOVE COVER (OR BACK). NO USER SERVICEABLE PARTS
INSIDE. REFER TO QUALIFIED PERSONNEL.
The lighting flash with arrowhead symbol, within an equilateral triangle, is intended to alert the user to the presence of uninsulated “dangerous voltage” within the product’s enclosure that may be of sufficient magnitude to constitute a risk of electric
shock to persons.
The exclamation point within an equilateral triangle is intended to alert the user to the presence of important operating and
maintenance (servicing) insturctions in the literature accompanying the appliance.
WARNING:
TO PREVENT FIRE OR SHOCK HAZARDS, DO NOT EXPOSE THIS PRODUCT TO RAIN OR MOISTURE.
NOTE TO CABLE/TV INSTALLER:
This reminder is provided to call the CATV system installer’s attention to Article 820-40 of the National Electric Code (U.S.A.) The code
provides guidelines for proper grounding and, in particular, specifies that the cable ground shall be connected to the grounding system of
the building, as close to the point of the cable entry as practical.
REGULATORY INFORMATION
This equipment has been tested and found to comply with the limits for a Class B digital device, pursuant to Part 15 of the FCC Rules.
These limits are designed to provide reasonable protection against harmful interference in a residential installation. This equipment generates, uses and can radiate radio frequency energy and, if not installed and used in accordance with the instructions, may cause harmful interference to radio communications. However, there is no guarantee that interference will not occur in a particular installation. If this
equipment does cause harmful interference to radio or television reception, which can be determined by turning the equipment off and on,
the user is encouraged to try to correct the interference by one or more of the following measures:
- Reorient or relocate the receiving antenna.
- Increase the separation between the equipment and receiver.
- Connect the equipment into an outlet on a circuit different from that to which the receiver is connected.
- Consult the dealer or an experienced radio/TV technician for help.
Any changes or modifications not expressly approved by the party responsible for compliance could void the user’s authority to operate
the equipment.
3
Thank you for purchasing the Apex Digital AVL2076 20”
LCD Television. This LCD TV is designed to be versatile,
ergonomic, and easy-to-use. It has a wide variety of inputs
for connecting to most any video device you already own.
Please take a moment and inspect the contents of your LCD
display. You should have:
- 20” LCD TV and display base
- AC power cord and power adapter
- Remote Control (2 “AAA” batteries included)
- Cables:
- 15 pin D-sub VGA cable
- Composite video cable (yellow ends)
- Stereo audio cable (red and white ends)
If any of these items are missing, please contact your retailer immediately. Please keep the original carton and packing
materials, as they are the best method of transportation for
your LCD TV, in case of moving or warranty repair.
1
Safety Instructions
2-3
Table of Contents
4
Remote Control Functions
Remote Control Battery Installation
5
6
Top Panel Controls
7
Rear Panel Connections
8
Connecting to External Video Devices
9-10
Menu Adjustments
TV Mode
S-Video / AV Mode
Component (YPbPr) Mode
VGA Mode
11
12
13
14
TV Menu
Closed Caption
V-Chip
Change Password
Channel Scan
CATV / AIR
Add / Delete Channel
15
Picture-in-Picture Menu
16
Troubleshooting
17
FAQ - Frequently Asked Questions
18
Specifications
19
Limited Warranty
20
Table of Contents
Congratulations!
Warning
4
Functions
Remote Control
- All functions can be controlled using the remote control.
- Some functions can also be adjusted with the buttons on the top panel of the set
1. POWER
Turns the LCD display on or off.
2
2. MTS
Cycles through available sound options on certain television programming.
3. MUTE
Press once to turn off the sound of the LCD TV. Press again, or press volume +/ , to restore the sound.
4. ADD (FAV CH)
Allows for programming of favorite channels. Go to the channel to be memorized and press the ADD key.
5. DEL (FAV CH)
Allows for quick deletion of favorite channels. Press the DEL key, and select the channel to delete.
3
1
6
4
5
9
7
6. SLEEP
Shuts off the LCD TV after a preset time. Press SLEEP multiple times to choose 30, 60, or 90 minutes.
7. FAV CH Cycles through your stored favorite channels.
8
10
8. INPUT - MAIN/PIP (MAIN p. 9-10; PIP p. 16)
Cycles through the available video sources. Pressing MAIN will change the main display input; pressing PIP will
change the PIP window input, if it is active. Available options are TV, AV, S Video, YPbPr, VGA.
9. SWAP - VIDEO/AUDIO
Changes the active video or audio source. Pressing AUDIO will swap the audio being heard on the speakers
between the main display and ther PIP window. Pressing VIDEO will swap the images being seen between the
main display and PIP window.
10. NUMERIC KEYPAD (0~9)
Allows direct entry of channel numbers, up to 99.
11. “100”
Allows entry of channels over 100. Press 100, then the next two numbers. Highest channel number is 125.
11
12
13
14
12. RETURN
Returns to last channel viewed
13. DISPLAY
Displays current settings on the LCD TV screen.
14. MENU (p. 11-14)
Activates on screen menu for LCD TV adjustments.
15. DIAMOND (CH VOL )
Allows for volume adjustment (side to side) and channel changing (top to bottom) These keys are also used
when navigating the on screen menus.
5
15
TV Mode
Menu Adjustments
Menu adjustments are available to change the settings of your LCD TV to your preferences.
Over the next few pages you will be shown how to adjust all available input sources.
Press the MAIN button on the remote until TV mode is displayed. Use / buttons on the ‘diamond’ to select each sub menu. Once you’ve
selected your desired menu, you may then use the / buttons on the ‘diamond’ to adjust the settings.
TV
DISPLAY
CONTRAST
44
CH SCAN
BRIGHTNESS
35
CCD
COLO R
26
V-CHIP
HUE
26
CA-TV/AIR
S HARPNESS
4
CH ADD/DELETE
MISCELLANEOUS
AUDIO
VOLUME
OFF
BASS
TREBLE
AIR
(+)
SUBWOOFER
OFF
SURROUND
OFF
BALANCE
L
RE SET</>
O
7
OSD TIMER
30 SEC
12
LANGUAGE
ENGLISH
12
PIP SIZE
4
PIP POSITION
3
R
RESET</>
Highlight Contrast to Increase or
decrease the picture contrast.
Refer to page 15.
Highlight Volume to adjust the volume
to the level you want.
Highlight Brightness to make picture
brighter or darker.
Highlight
decrease
Highlight Color to increase
decrease the saturation of color.
or
Highlight Treble to Increase or
decrease
Highlight Hue to change the colors
towards a red or green tint.
Highlight Reset () to return all
Audio items to default.
Highlight Sharpness to make the pic
ture sharper or softer.
Highlight Reset () button to restore
all setups of the Display to the default.
Bass
to
Increase
Highlight OSD Timer to select the
time to be shown on the menu 5 sec
15 sec 20 sec 25 sec 30 sec.
or
Highlight Language to select:
English French Spanish German
Italian
Japanese
Chinese
(Traditional) Chinese(Simplified).
Highlight PIP Size to select the size of
small picture. (5 size) (Use this func
tion under PIP Mode).
Highlight PIP Position to move the
small picture to upper left, upper right,
center, lower left, or lower right.(Use
this function under PIP Mode).
Highlight Reset () to return all
Miscellaneous items to default.
11
AUDIO
44
VOLUME
BRIGHTNESS
35
CO LOR
26
HUE
26
SHARPNESS
4
MISCELLANEOUS
7
OSD TIMER
30 SEC
BASS
12
LANGUAGE
ENGLISH
TREBLE
12
PIP SIZE
4
PIP POSITION
3
RESET</>
RESET</>
RESET</>
Highlight Contrast to Increase or
decrease the picture contrast.
Highlight Volume to adjust the vol
ume to the level you want.
Highlight Brightness to make picture
brighter or darker.
Highlight
decrease
Highlight Color to increase
decrease the saturation of color.
Highlight Treble Increase or decrease
or
Highlight Hue to change the colors
towards a red or green tint.
Highlight Sharpness to make the pic
ture sharper or softer.
Highlight Reset () button to restore
all setups of the Display to the default.
Bass
to
Increase
Menu Adjustments
DISPLAY
CO NTRAST
S-Video/AV Mode
Press the MAIN button on the remote until AV or S-VIDEO mode is displayed. Use / buttons on the ‘diamond’ to
select each sub menu. Once you’ve selected your desired menu, you may then use the / buttons on the ‘diamond’
to adjust the settings.
Highlight OSD Timer to select the time
to be shown on the menu 5 sec 15 sec
20 sec 25 sec 30 sec.
or
Highlight Reset () to return all
Audio items to default.
Highlight Language to select:
English French Spanish German
Italian
Japanese
Chinese
(Traditional) Chinese(Simplified).
Highlight PIP Size to select the size of
small picture. (5 size) (Use this func
tion under PIP Mode).
Highlight PIP Position to move the
small picture to upper left, upper right,
center, lower left, or lower right.(Use
this function under PIP Mode).
Highlight Reset ( ) to return all
Miscellaneous items to default.
12
Component (YPbPr) Mode
Menu Adjustments
Press the MAIN button on the remote until COMPONENT (YPbPr) mode is displayed. Use / buttons on the ‘diamond’ to select each
sub menu. Once you’ve selected your desired menu, you may then use the / buttons on the ‘diamond’ to adjust the settings.
DISPLAY
7
OSD TIMER
30 SEC
BASS
12
LANGUAGE
ENGLISH
TREBLE
12
PIP SIZE
3
PIP POSITION
4
42
VOLUME
BRIGHTNESS
35
CO LOR
26
HUE
25
SHARPNESS
FOCUS
MISCELLANEOUS
AUDIO
CO NTRAST
4
15
RESET</>
RESET</>
Highlight Contrast to Increase
decrease the picture contrast.
or
Highlight Brightness to make picture
brighter or darker.
Highlight Volume to adjust the volume to
the level you want.
Highlight Color to increase or decrease
the saturation of color.
Highlight Hue to change the colors
towards a red or green tint.
Highlight Sharpness to make the picture
sharper or softer.
Highlight Focus to focus the picture.
Highlight Reset () button to restore all
setups of the Display to the default.
Highlight OSD Timer to select the time to
be shown on the menu 5 sec 15 sec 20
sec 25 sec 30 sec.
Highlight Bass to Increase or decrease
Highlight Treble Increase or decrease
13
RESET</>
Highlight Reset () to return all Audio
items to default.
Highlight Language to select:
English French Spanish German
Italian Japanese Chinese (Traditional)
Chinese(Simplified).
Highlight PIP Size to select the size of
small picture. (5 size) (Use this function
under PIP Mode).
Highlight PIP Position to move the small
picture to upper left, upper right, center,
lower left, or lower right.(Use this function
under PIP Mode).
Highlight Reset ( ) to return all
Miscellaneous items to default.
D I S P L AY
GEOM ETRIC
MISCELLANEOUS
AUDI O
CONTRAST
34
CLOCK
1
V O L UM E
7
OSD TIMER
30 SEC
BRIGHTNESS
49
PHASE
1
BAS S
12
LANGUAGE
ENGLISH
H POSITION
1
T RE BL E
12
PIP SIZE
3
V POSITION
1
PIP POSITION
4
COLOR TEMP
USER
RED
128
GREEN
128
BLUE
128
RESET</>
RESET</>
RE S E T </ >
WHITE BALANCE
R E S E T </ >
Highlight Auto (Automatic adjust
ment) for television circuitry to auto
matically adjust the picture.
Highlight Contrast to Increase or
decrease the picture contrast.
Highlight Clock to stabilize the dis
play of VGA images.
Highlight Volume to adjust the vol
ume to the level you want.
Highlight Brightness to make picture
brighter or darker.
Highlight Phase to adjust the
focus and sharpness of VGA
images.
Highlight Bass to Increase or
decrease
Highlight Color Temp to select a
color setting High, Mid, Low or
User.
In User mode, red, green and blue
can be manually adjusted (see
below.)
Highlight Red, Green, or Blue to
manually adjust the level of that par
ticular color.
Highlight Reset () button to
restore all setups of the Display to
the default.
Highlight White Balance to have the
LCD TV self adjust the white bal
ance. You will need to display a 2”
x2” square in the center of the
screen. Special home video cali
braiton DVDs can do this. Check
with your retailer for further informa
tion.
Highlight H Position to adjust the
horizontal position of VGA images.
Highlight V Position to adjust the
vertical position of VGA images.
Higlight Reset () to return
adjustments to default.
Highlight
decrease
Treble
Increase
or
Highlight Reset () to return all
Audio items to default.
Menu Adjustments
A U TO
VGA Mode
Press the MAIN button on the remote until VGA mode is displayed. Use / buttons on the ‘diamond’ to select each sub menu. Once
you’ve selected your desired menu, you may then use the / buttons on the ‘diamond’ to adjust the settings.
Highlight OSD Timer to select the
time to be shown on the menu 5
sec 15 sec 20 sec 25 sec 30 sec.
Highlight Language to select:
English
French
Spanish
German
Italian
Japanese
Chinese
(Traditional)
Chinese(Simplified).
Highlight PIP Size to select the size
of the small picture. (5 size) (Use
this function under PIP Mode).
Highlight PIP Position to move the
small picture to upper left, upper
right, center, lower left, or lower
right.(Use this function under PIP
Mode).
Highlight Reset () to return all
Miscellaneous items to default.
14
TV Menu
Press the TV button on the remote then MENU button. Then press button once. Use / button to select each sub menu.
Once you’ve selected your desired menu, you may then use the / buttons to adjust the setting.
Descriptions
TV
Rating
CCD
Use this to activate the subtitle and teletext function. Each sequential press of the CCD
button will show:
CCI-CC4, T1-T4, OFF.
CH Scan (automatic channel scanning)
To activate CH Scan, press button to execute the automatic channel scanning. You need
to execute the automatic channel scanning when you install your LCD TV the first time.
ADD/DEL Channels
Press button on the remote control to select the channel you wish to +(ADD) / - (DEL) by
scrolling using CH / .
Directed Towards Older Children
PG
Parental Guidance Suggested
TV 14
V-CHIP (grading system)
Enter password to enter the MENU for V-CHIP settings. You can press button to select the
grade you want; and then press button to set up if you'd like to watch the programs.
CATV / AIR (TV signal source)
Press button on the remote control to select either Cable or Antenna.
Cable: If you receive channels through CATV.
Antenna: If you receive channels through antenna.
Y7
MPAA
Rating
MA
Mature Audiences Only
FV
Fantasy Violence
D
Sexual Dialogue
L
Adult Language and Profanity
S
Sex
V
Violence
G
General Audiences All Ages
PG
Parental Guidance Suggested (Some
Material May Not Be Suitable for Younger
Children)
PG 13
Parents Strongly Cautioned
(Some Material May Not Be Suitable for
Children Under 13)
R
Restricted
(Not Recommended for Ages 17 and
Under)
NC 17
G
U
PG
U
FV
TV Y7 U
TV PG
TV 14
TV MA
15
V CHIP
MPAA RATING
PG 13
R
U
U
V
U
U
U
TV RATING
S
U
U
U
NC 17
U
X
U
L
D
U
U
U
U
U
B: BLOCKED
(NOT ALLOWED TO
WATCH THIS PROGRAM)
U: UNBLOCKED
(ALLOWED TO WATCH
THIS PROGRAM)
Parents Strongly Cautioned
X
Children Under 17 Not Permitted
Adult Material
Please visit these websites for further information regarding
motion picture and television ratings:
TV - http://www.tvguidelines.org/
Movies - http://www.mpaa.org/
Troubleshooting
17
We encourage you to visit our website at www.apexdigitalinc.com and review the Customer Support and FAQ’s page for updates to
this list. You should register to validate your warranty at this website. You can also order accessories for all of your Apex products.
Problems
No picture
Abnormal or no colors
Solutions
Connect power cord correctly.
Turn on power via the button on LCD TV.
(p. 7)
Check your video connections. (p. 9-10)
Press the input button to cycle through the
connected video sources (p. 5)
Check your video connections for correct
cable placement or bent pins. (p. 9-10)
Check your video input device for its settings. If the device is setup incorrectly, then
it can produce an improper signal. Please
check your device’s user’s manual for
more information.
Distorted picture
Fuzzy picture
Check your antenna connection. (p. 9)
Adjust your antenna.
Relocate your antenna.
Picture too dark
Check brightness (p. 11-14)
Check contrast (p. 11-14)
Check white balance (VGA only - p. 14)
Voice only, no images
Check your video connection. (p. 9-10)
Make sure the LCD TV is set to the correct
input. (p. 5)
Adjust brightness and contrast. (p. 11-14)
Picture only, no sound
Check your audio connection. (p. 9-10)
Adjust volume. (p. 5)
Make sure MUTE is off. (p. 5)
Cannot receive certain channels through
antenna
Check for the correct antenna setting (p. 15)
Use the Channel Scan feature (p. 15)
Adjust or relocate your antenna.
Video noise or choppy picture
Check your video connections. (p. 9-10)
Use a power conditioner on the AC adapter. See
your local electronics retailer for one of these.
TV blocked at certain
channels
Check the V-Chip functions (p. 15)
Check your antenna
Overlapping images
or ghost image
Check your antenna connection. (p. 9)
Adjust or relocate your antenna.
Use a different video connection, if available. (p. 910)
Black box on screen
Make sure the CC/TT function is off. (p. 15)
Check the settings on the video input device. Some
movies have black bars around them to preserve
the widescreen format. This is not a malfunction - it
is a part of the movie or program.
Remote control does
not operate
Change the batteries, and make sure they are
inserted properly (p. 6)
Make sure remote is pointed at the remote sensor
on the front of the LCD TV.
Move LCD TV away from fluorescent lights.
Q: Why is the power LED on but the screen is blank?
A: Make sure the video cable is securely connected to both the LCD TV
and the device you have attached. Also, make sure you have correctly
connected all of the cables required for your device. Refer to the user’s
manual that came with your equipment for further information.
Q: How do I adjust the “tilt”, or angle, of my LCD TV?
A:You can adjust the LCD display viewing angle from an upright position
to a back-tilted angle of up to 7 degrees and a forward-tilted angle of 4
degrees. When tilting the screen, hold the base firmly and adjust the
viewing angle by moving the top of the display forward or backward. Do
not press the LCD panel when tilting the display. (See picture A, below.)
WARNING - Forcing the LCD TV past its maximum extension point will
damage the unit.
A
Q: Why is my TV too dark or too bright?
A: You can adjust the brightness of the LCD screen. Refer to “Adjusting
the Display” on page 13.
Q: Why is there no sound coming from the speakers?
Check your audio cables to make sure they are connected properly.
Also, make sure the mute is turned off. Finally, check the sound mode
by press the MTS key on the remote control to switch between SAP,
Mono and Stereo. Press the Display key to view the setting on the
screen.
Q: Why is the LCD TV blurred when I connect it to my PC?
A: The LCD TV supports VGA (640x480) video mode. Make sure the TV
settings of your computer are adjusted to this setting. Setting your computer’s TV resolution to a higher resolution will result in a poor quality
image or no picture at all.
Q: Why can’t I view any TV channels?
A: You must scan for channels before you can view TV channels. For
more information, see page 15.
Q: Why is my reception bad when watching TV?
A: This could be a variety of reasons, including local interference, if using
an over-the-air antenna. Make sure you use a coaxial cable for TV input.
Make sure the connection is secure, and grounded. (You may need an
electrician to check this for you.) Reception is best from cable TV, satellite dish, or a high-powered rooftop antenna.
Q: Why is the screen too light/dark when in VGA mode?
A: You may need to adjust the white balance. See “White Balance” on
page 14. Also, try adjusting the brightness. You can also find this on
page 14.
B
Q: How do I mount my LCD TV to the wall?
A: You will need to purchase a standard wall mount kit (100 mm x 100
mm screw mount area, minimum 35 kg load-carrying weight) from your
local retailer if you want to attach the LCD TV to a wall or other fixed surface. First, prepare a flat, stable working area with a soft cloth or foam
pad to place the LCD TV on. Next, turn the LCD TV power off, disconnect it from the power adapter, and gently lay the display on its front
(screen side.) Third. remove the four screws located at the rear of the
LCD TV as illustrated in picture B, above. Remove the LCD TV display
stand. For final attachment and hanging, refer to and follow the instructions included with the wall mount kit that you purchased.
Q: If I have more questions, where should I go?
A: Try the Customer Support section of www.apexdigitalinc.com. There
are many more Frequently Asked Questions there, as well as many
other helpful options.
FAQ - Frequently Asked Questions
Q: Why doesn’t the LCD TV turn on?
A: Check the AC power adapter to make sure it is securely connected to
the DC-in power jack at the rear of the LCD TV. Make sure the power
cord is plugged into a functioning electrical outlet.
18
Specifications
19
Pixel Pitch
0.6375 mm (H) x 0.6375 mm (W)
Maximum Display Area
16.1 in. (V) x 12.1 in. (H) (408 mm x 306 mm)
20.1 in. diagonally
Aspect Ratio
4:3
Native Resolution
640x480 interlaced or progressive
Display Colors
16.7 million (RGB 8-bit color)
Contrast Ratio
500:1
Brightness
450 cd/m2 (typical)
Response Time
16 ms typical (Tr + Tf)
View Angle
Horizontal - 160 degrees
Vertical - 140 degrees
Horizontal Frequency
31kHz ~ 65kHz
Vertical Frequency
56 Hz ~ 75 Hz
Signal I/O Ports
Composite Video RCA type (x1)
S Video (x1)
Component Video RCA type; YPbPr (x1)
RF w/ NTSC Tuner (x1)
VGA 15 pin D sub (x1)
Stereo Audio RCA type, L&R ch. (x2)
PC Audio In (x1)
TV Systems
NTSC (480 i/p SDTV)
PIP Function
De-Interlace Support
3D noise reduction filter
SAP/MTS
V-chip & CCD
Power Consumption (off)
<8W
Power Source
12 VDC 5A (60W)
Speakers
5W (maximum) x 2
Unit Dimensions
23.6 x 17.6 x 6.9 (WxHxD, inches)
600 x 446 x 174 (WxHxD, mm)
Net Weight
17.7 lbs (8 kg)
Wall Mount Area
3.9 in x 3.9 in (100mm x 100mm)
Operating Temperature
32 ~ 104 degrees Fahrenheit (0 ~ 40 degrees Celsius)
Apex Digital AVL2076
Apex Digital, Inc. expresses the following limited warranty. This warranty extends to the original consumer, purchaser or product received as a gift and no other purchaser or trans
feree. You must retain the original bill of sale for proof of purchase.
Limited One (1) Year Warranty
Apex Digital warrants the parts in this product against defects in material or workmanship for a period of one (1) year from the date of original purchase with the exception of the
remote control and LCD backlight which are guaranteed for 90 days only. During this period Apex Digital will replace a defective part with a new or refurbished part without charge
to you. It is the responsibilty of the consumer to retain original packaging or provide like packaging in order to facilitate the warranty process. Apex Digital, Inc. will incur no liability
whatsoever to provide packaging for warranty items. Upon receipt of the warranty item, should it be determined that the packaging was insufficient, Apex Digital Inc., at its discre
tion, may void the warranty. The consumer is responsible for the transportation (cost) and insurance charges (if applicable) for the set to the Service Center or Apex Digital. The
consumer will be responsible for all tariffs, duty and taxes imposed to ship or receive warranty or warranty replacement units to and from the U.S. You must receive a return author
ization number before sending a unit in for service.
Limited Ninety (90) Day Labor Warranty
Apex Digital warrants It will be responsible for labor charges on this product for a period of ninety days from the date of original retail purchase. During this period, Apex Digital will
repair or replace a defective part or product at its sole option, with a new or refurbished part or product without charge to you, except for the shipping charges incurred by the con
sumer, to the Service Center.
Rental Product
The warranty for a rental product begins with the original date of receipt by the rental firm.
Limited Warranty
Limited North American Warranty
Your Responsibility
The above warranties are subject to the following conditions:
You must retain the original bill of sales to provide proof of purchase. There are no exceptions.
You must call the provided phone number for an assessment of the problem. No service or shipment of product will be accepted unless an RMA# is provided, attached
or printed to shipping carton along with an enclosed bill of sale. You will be responsible for all tariffs and taxes imposed to ship or receive warranty or warranty replace
ment units to and from the U.S.
These warranties are effective only if product is purchased through an Authorized North American retail reseller and the unit is operated in North America.
Labor service charges for set installation, setup, adjustment of consumer controls and installation or repair of any type of antenna or cable systems are not covered by
this warranty. Reception problems caused by inadequate antenna or cable systems are your responsibility.
Warranties extend only to defects in materials or workmanship as limited and do not extend to any other products or parts that have been lost, discarded or damaged
by misuse, accident, neglect, acts of God, such as lightning or voltage surges in the home, improper installation, improper maintenance or use in violation of instruc
tions provided or product which has been modified, have had the serial number removed, altered, or rendered illegible. Warranties do not cover cosmetic damage or
lost accessories.
How to Obtain Warranty Service
If after following the operating instructions, the Troubleshooting Guide and the FAQ pages on televisions, found at our website, www.apexdigitalinc.com. Should it be necessary to
contact Customer Service Center directly, call (800)880 1227 Monday through Friday, 8am to 6pm (Pacific Time). You will be instructed on how your claim will be processed. Have
your pertinent information available including proof of purchase and an understanding of the problem.
Limitations
Your LCD panel is an innovative device that is manufactured to precise tolerances with active performing pixels of at least 99.99%. As such, it is NOT a malfunction to view multi
ple non performing pixels on your screen. All warranties implied by state law are expressly limited to the duration of the limited warranties set forth above with the exception of war
ranties implied by state law as herby limited, the foregoing warranty is exclusive and in lieu of all other warranties, guarantees, agreements etc., with respect to repair or replace
ment of any parts. Apex Digital shall not be liable for consequential or incidental damage.
The warranty gives you specific rights and you may also have these rights that may vary from state to state. Some states do not allow limitation on how long a warranty lasts, or
the exclusions or limitation of incidental or consequential damages, so the above may not apply to you.
20