1
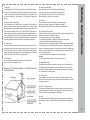
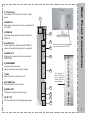
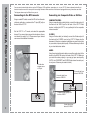
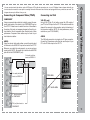
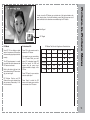
20" LCD TV
AVL-2076
Register your product to validate your warranty online
Safety Instructions
Important safeguards for you and your new product
Your product has been manufactured and tested with your safety in mind. However, improper use can result in potential electrical shock or fire hazards.
To avoid defeating the safeguards that have been built into your new product, please read and observe the following safety points when installing and
using your new product, and save them for future reference. Observing the simple precautions discussed in this booklet can help you get many years of
enjoyment and safe operation that are built into your new product. This product complies with all applicable U.S. Federal safety requirements, and those
of the Canadian Standards Association.
1. Read Instructions
All the safety and operating instructions should be read
before the product is operated.
2. Follow Instructions
All operating and use instructions should be followed.
PORTABLE CART WARNING
3. Retain Instructions
The safety and operating instructions should be retained for
future reference.
4. Heed Warnings
All warnings on the product and in the operating instructions should be
adhered to.
5. Cleaning
Unplug this product from the wall outlet before cleaning. Do not use liquid cleaners or aerosol cleaners. Use a damp cloth for cleaning.
6. Water and Moisture
Do not use this product near water, for example, near a bath tub, wash
bowl, kitchen sink, or laundry tub, in a wet basement, or near a swimming pool.
7. Accessories Carts and Stands
Do not place this product on a slippery or tilted surface, or on an unstable cart, stand, tripod, bracket, or table. The product may slide or fall,
causing serious injury to a child or adult, and serious damage to the
product. Use only with a cart, stand, tripod, bracket, or table recommended by the manufacturer, or sold with the product. Any mounting of
the product should follow the manufacturer’s instructions, and should
use a mounting accessory recommended by the manufacturer.
8. Attachments
Do not use attachments not recommended by the product manufacturer
as they may cause hazards.
1
9. Transporting Product
A product and cart combination should be moved with care. Quick stops,
excessive force, and uneven surfaces may cause the product and cart combination to overturn.
10. Ventilation
Slots and openings in the cabinet are provided for ventilation and to ensure
reliable operation of the product and to protect it from overheating, and these
openings must not be blocked or covered. The openings should never be
blocked by placing the product on a bed, sofa, rug, or other similar surface.
This product should not be placed in a built-in installation such as a bookcase
or rack unless proper ventilation is provided or the manufacturer’s instructions have been adhered to.
11. Power Sources
This product should be operated only from the type of power source indicated on the marking label. If you are not sure of the type of power supply to
your home, consult your product dealer or local power company. For products intended to operate from battery power, or other sources, refer to the
operating instructions.
12. Power-Cord Polarization
This product is equipped with a three-wire grounding type plug, a plug having a third (grounding) pin. This plug will only fit into the grounding-type
power outlet. This is a safety feature. If you are unable to insert the plug into
the outlet, contact your electrician to replace your obsolete outlet. Do not
defeat the safety purpose of the grounding-type plug.
13. Power-Cord Protection
Power-supply cords should be routed so that they are not likely to be walked
on or pinched by items placed upon or against them, paying particular attention to cords at plugs, convenience receptacles, and the point where they exit
from the product.
15. Outdoor Antenna Grounding
If an outside antenna or cable system is connected to the product, be
sure the antenna or cable system is grounded so as to provide some
protection against voltage surges and built-up static charges. Article 810
of the National Electrical Code (U.S.A.), ANSI/ NFPA 70 provides information with regard to proper grounding of the mast and supporting structure, grounding of the lead-in wire to an antenna discharge unit, size of
grounding conductors, location of antenna-discharge unit, connection to
grounding electrodes, and requirements for the grounding electrode.
16. Power Lines
An outside antenna system should not be located in the vicinity of overhead power lines or other electric light or power circuits, or where it can
fall into such power lines or circuits. When installing an outside antenna
system, extreme care should be taken to keep from touching such power
lines or circuits as contact with them might be fatal.
17. Overloading
Do not overload wall outlets and extension cords as this can
result in a risk of fire or electric shock.
Example of Grounding According to National Electrical
Code Instructions
18. Object and Liquid Entry
Never push objects of any kind into this product through
openings as they may touch dangerous voltage points or
short-out parts that could result in a fire or electric shock.
Never spill liquid of any kind on the product.
19. Servicing
Do not attempt to service this product yourself as opening or
removing covers may expose you to dangerous voltage or
other hazards. Refer all servicing to qualified service personnel.
20. Damage Requiring Service
Unplug this product from the wall outlet and refer servicing to qualified service personnel under the following conditions:
a. If the power-supply cord or plug is damaged.
b. If liquid has been spilled, or objects have fallen into the product.
c. If the product has been exposed to rain or water.
d. If the product does not operate normally by following the operating instructions. Adjust only those controls that are covered by the operating instructions as an improper adjustment of other controls may result in damage and
will often require extensive work by a qualified technician to restore the product to its normal operation.
e. If the product has been dropped or the cabinet has been
damaged.
f. If the product exhibits a distinct change in performance.
Safety Instructions
14. Lightning
For added protection for this product (receiver) during a lightning storm,
or when it is left unattended and unused for long periods of time, unplug
it from the wall outlet and disconnect the antenna or cable system. This
will prevent damage to the product due to lightning and power-line
surges.
21. Replacement Parts
When replacement parts are required, be sure the service technician has
used replacement parts specified by the manufacturer or have the same
characteristics as the original part. Unauthorized substitutions may result in
fire, electricshock, or other hazards.
22. Safety Check
Upon completion of any service or repairs to this product, ask the service
technician to perform safety checks to determine that the product is in proper operating condition.
23. Wall or Ceiling Mounting
The product should be mounted to a wall or ceiling only as recommended
by the manufacturer. The product may slide or fall, causing serious injury to
a child or adult, and serious damage to the product.
NEC - National Electrical Code
24. Heat
The product should be situated away from heat sources such as radiators,
heat registers, stoves, or other products (including amplifiers) that produce
heat.
2
Warning
CAUTION
RISK OF ELECTRIC SHOCK
DO NOT OPEN
WARNING:
TO REDUCE THE RISK OF ELECTRIC SHOCK DO NOT REMOVE COVER (OR BACK). NO USER SERVICEABLE PARTS
INSIDE. REFER TO QUALIFIED PERSONNEL.
The lighting flash with arrowhead symbol, within an equilateral triangle, is intended to alert the user to the presence of uninsulated “dangerous voltage” within the product’s enclosure that may be of sufficient magnitude to constitute a risk of electric
shock to persons.
The exclamation point within an equilateral triangle is intended to alert the user to the presence of important operating and
maintenance (servicing) insturctions in the literature accompanying the appliance.
WARNING:
TO PREVENT FIRE OR SHOCK HAZARDS, DO NOT EXPOSE THIS PRODUCT TO RAIN OR MOISTURE.
NOTE TO CABLE/TV INSTALLER:
This reminder is provided to call the CATV system installer’s attention to Article 820-40 of the National Electric Code (U.S.A.) The code
provides guidelines for proper grounding and, in particular, specifies that the cable ground shall be connected to the grounding system of
the building, as close to the point of the cable entry as practical.
REGULATORY INFORMATION
This equipment has been tested and found to comply with the limits for a Class B digital device, pursuant to Part 15 of the FCC Rules.
These limits are designed to provide reasonable protection against harmful interference in a residential installation. This equipment generates, uses and can radiate radio frequency energy and, if not installed and used in accordance with the instructions, may cause harmful interference to radio communications. However, there is no guarantee that interference will not occur in a particular installation. If this
equipment does cause harmful interference to radio or television reception, which can be determined by turning the equipment off and on,
the user is encouraged to try to correct the interference by one or more of the following measures:
- Reorient or relocate the receiving antenna.
- Increase the separation between the equipment and receiver.
- Connect the equipment into an outlet on a circuit different from that to which the receiver is connected.
- Consult the dealer or an experienced radio/TV technician for help.
Any changes or modifications not expressly approved by the party responsible for compliance could void the user’s authority to operate
the equipment.
3
Thank you for purchasing the Apex Digital AVL2076 20”
LCD Television. This LCD TV is designed to be versatile,
ergonomic, and easy-to-use. It has a wide variety of inputs
for connecting to most any video device you already own.
Please take a moment and inspect the contents of your LCD
display. You should have:
- 20” LCD TV and display base
- AC power cord and power adapter
- Remote Control (2 “AAA” batteries included)
- Cables:
- 15 pin D-sub VGA cable
- Composite video cable (yellow ends)
- Stereo audio cable (red and white ends)
If any of these items are missing, please contact your retailer immediately. Please keep the original carton and packing
materials, as they are the best method of transportation for
your LCD TV, in case of moving or warranty repair.
1
Safety Instructions
2-3
Table of Contents
4
Remote Control Functions
Remote Control Battery Installation
5
6
Top Panel Controls
7
Rear Panel Connections
8
Connecting to External Video Devices
9-10
Menu Adjustments
TV Mode
S-Video / AV Mode
Component (YPbPr) Mode
VGA Mode
11
12
13
14
TV Menu
Closed Caption
V-Chip
Change Password
Channel Scan
CATV / AIR
Add / Delete Channel
15
Picture-in-Picture Menu
16
Troubleshooting
17
FAQ - Frequently Asked Questions
18
Specifications
19
Limited Warranty
20
Table of Contents
Congratulations!
Warning
4
Functions
Remote Control
- All functions can be controlled using the remote control.
- Some functions can also be adjusted with the buttons on the top panel of the set
1. POWER
Turns the LCD display on or off.
2
2. MTS
Cycles through available sound options on certain television programming.
3. MUTE
Press once to turn off the sound of the LCD TV. Press again, or press volume +/-, to restore the sound.
4. ADD (FAV CH)
Allows for programming of favorite channels. Go to the channel to be memorized and press the ADD key.
5. DEL (FAV CH)
Allows for quick deletion of favorite channels. Press the DEL key, and select the channel to delete.
3
1
6
4
5
9
7
6. SLEEP
Shuts off the LCD TV after a preset time. Press SLEEP multiple times to choose 30, 60, or 90 minutes.
7. FAV CH Cycles through your stored favorite channels.
8
10
8. INPUT - MAIN/PIP (MAIN p. 9-10; PIP p. 16)
Cycles through the available video sources. Pressing MAIN will change the main display input; pressing PIP will
change the PIP window input, if it is active. Available options are TV, AV, S-Video, YPbPr, VGA.
9. SWAP - VIDEO/AUDIO
Changes the active video or audio source. Pressing AUDIO will swap the audio being heard on the speakers
between the main display and ther PIP window. Pressing VIDEO will swap the images being seen between the
main display and PIP window.
10. NUMERIC KEYPAD (0~9)
Allows direct entry of channel numbers, up to 99.
11. “100”
Allows entry of channels over 100. Press 100, then the next two numbers. Highest channel number is 125.
11
12
13
14
12. RETURN
Returns to last channel viewed
13. DISPLAY
Displays current settings on the LCD TV screen.
14. MENU (p. 11-14)
Activates on-screen menu for LCD TV adjustments.
15. DIAMOND (CH VOL )
Allows for volume adjustment (side to side) and channel changing (top to bottom) These keys are also used
when navigating the on-screen menus.
5
15
1
Remove the rear cover by pressing firmly in the middle of the cover and sliding
it down, towards to bottom of the
remote. Then, lift the cover off of the
remote control.
2
Insert the two batteries. Make sure the
positive (+) and negative (-) signs on the
remote control and the batteries line up.
3
Replace the rear cover, by grasping it
and sliding it upwards, towards the top
of the remote.
Remote Control
INSTALLATION INSTRUCTIONS
Battery Installation
Your remote control requires two “AAA” batteries (included.)
To avoid damage from possible battery leakage, remove the batteries if you do not plan to use the remote control for an extended period
of time. Do not mix batteries of different age and type. Always discard of used batteries in a safe manner.
6
Top Panel Controls
1
2
3
4
5
1. POWER
Press the power button to turn on/off the LCD TV.
When the power is on, the LED indicator turns green.
The screen image will appear after a few seconds.
When the power is off, the LED indicator turns red.
These controls are located on
the top right of the LCD TV.
2. INPUT
After connecting your DVD,VCR, or other devices,
press the INPUT button to cycle between the various
inputs. They are:
TV
AV
S-VIDEO
YPbPr
VGA (D sub 15 pin)
3. MENU
Press the MENU button to activate the on-screen
menu. Use the remote control, or the channel & volume
buttons on the panel, to navigate the on-screen menu.
4. CHANNEL Press the button to select the channel in TV mode,
or to navigate in MENU mode.
5. VOLUME Press button to adjust volume. These buttons are
also used to adjust settings in the MENU mode.
7
1
2) AUDIO IN
Stereo audio connection for a device connected to AV
or S-VIDEO
3) VIDEO IN
Composite video connection; shares audio with SVIDEO IN
4) S-VIDEO IN
S-Video connection; shares audio with VIDEO IN
(cable not included; quality superior to composite)
5) AUDIO IN 2
Stereo audio connection for device connected to
COMPONENT
6) COMPONENT
Component video connection
(cable not included - best possible quality)
2
3
4
These inputs are found on the right-hand
side of the rear panel of the LCD TV.
5
Rear Panel Connections
1) TV (RF Jack)
For connection of RF cable from antenna or other
device
6
This diagram is
found on the rear
panel. It shows the
location of the various connections.
7) VGA
VGA connection for set-top box or PC
8) PC AUDIO IN
PC Audio input for VGA connection
7
9) AUDIO OUT
PC Speaker connection for audio output
10) DC 12V
DC 12V connection for LCD display power supply
8
9
10
8
Connecting Video Devices
You can connect external video devices, such as DVD players, VCRs, cable box, camcorders, etc., to your LCD TV. However, please check with your
device’s instruction manual for more specific connecting information. Make sure that all devices are unplugged before any connections are made.
The diagrams shown may be different from your set.
Connecting via the RF Connector
Connecting via Composite Video or S-Video
Using a coaxial RF cable, connect the RF out from the external device, cable box, or antenna to the TV input (RF jack) on
the back of the LCD TV.
COMPOSITE VIDEO
Using a composite video cable (yellow), connect the video output of
the device to the VIDEO input on the back of the LCD TV. Most
devices, including the LCD TV, use a yellow jack for the composite
video connection.
Set the LCD TV to TV mode, and select the appropriate
channel. If you are not using an over-the-air antenna, the correct channel is usually 3 or 4. Please consult your device’s
user manual for additional information.
S-VIDEO
Using an S-video cable (not inclued), connect the S-video output of
the device to the S-VIDEO input on the LCD TV. Please note the
placement of the pins, as improper installation may result in bent pins
on your cable, and poor picture quality. S-Video cables may be found
at your local electronics retailer.
AUDIO
Using the red and white audio cables, connect the audio output of the
device to the AUDIO IN input on the back of the LCD TV. Make sure
you match the colors properly, or you may get poor sound quality.
(NOTE - the COMPOSITE and S-VIDEO jacks share the audio port,
so only one of them may be used at a time.)
RF cable from
antenna source
to RF jack.
L ch audio (white) from
device to AUDIO IN.
Composite Video (yellow) from
device to VIDEO.
9
S-video (black) from
device to S-VIDEO.
R ch audio (red) from
device to AUDIO IN.
Connecting via Component Video (YPbPr)
Connecting via VGA
COMPONENT
Using a component video cable (not included), connect the component video output of the device to the COMPONENT input on
the LCD TV. Please be sure to match the colors of the cables to
the colors of the jacks, as improper placement will result in picture distortion. Use of component video offers the best of video
performance. Component video cables may be found at your
local electronics retailer.
VGA (PC only)
Using a VGA (D sub 15 pin) cable, connect the VGA output of
your PC to the VGA input on the LCD TV. Be careful to match the
shape of the connector to the connection, and not to bend any of
the pins when installing. (NOTE: For best performance, set the
resolution on your PC to 640x480.)
AUDIO
Using the red and white audio cables, connect the audio output
of the device to the AUDIO IN 2 input on the back of the LCD TV.
Make sure you match the colors properly, or you may get poor
sound quality. (NOTE - Be careful not to confuse the red AUDIO
jack with the red COMPONENT jack.)
AUDIO
The VGA audio connection is a single wire PC-type connection.
Connect the 3.5mm stereo cable from the sound output of your
PC to the PC Audio input on the LCD TV.
R ch audio (red) from
device to AUDIO IN 2.
L ch audio (white) from
device to AUDIO IN 2.
“Pr” (green) from device to
COMPONENT.
Connecting Video Devices
You can connect external video devices, such as DVD players, VCRs, cable box, camcorders, etc., to your LCD display. However, please check with your
device’s instruction manual for more specific connecting information. Make sure that all devices are unplugged before any connections are made. The
diagrams shown may be different from your set.
VGA cable
PC audio cable
“Y” (blue) from device
to COMPONENT.
“Pb” (red) from device to
COMPONENT.
10
TV Mode
Menu Adjustments
Menu adjustments are available to change the settings of your LCD TV to your preferences.
Over the next few pages you will be shown how to adjust all available input sources.
Press the MAIN button on the remote until TV mode is displayed. Use / buttons on the ‘diamond’ to select each sub menu. Once you’ve
selected your desired menu, you may then use the / buttons on the ‘diamond’ to adjust the settings.
TV
DISPLAY
CONTRAST
44
CH SCAN
BRIGHTNESS
35
CCD
COLO R
26
V-CHIP
HUE
26
CA-TV/AIR
S HARPNESS
4
CH ADD/DELETE
MISCELLANEOUS
AUDIO
VOLUME
OFF
BASS
TREBLE
AIR
(+)
SUBWOOFER
OFF
SURROUND
OFF
BALANCE
L
RE SET</>
O
7
OSD TIMER
30 SEC
12
LANGUAGE
ENGLISH
12
PIP SIZE
4
PIP POSITION
3
R
RESET</>
Highlight Contrast to Increase or
decrease the picture contrast.
Refer to page 15.
Highlight Volume to adjust the volume
to the level you want.
Highlight Brightness to make picture
brighter or darker.
Highlight
decrease
Highlight Color to increase
decrease the saturation of color.
or
Highlight Treble to Increase or
decrease
Highlight Hue to change the colors
towards a red or green tint.
Highlight Reset () to return all
Audio items to default.
Highlight Sharpness to make the picture sharper or softer.
Highlight Reset () button to restore
all setups of the Display to the default.
Bass
to
Increase
Highlight OSD Timer to select the
time to be shown on the menu 5 sec
15 sec 20 sec 25 sec 30 sec.
or
Highlight Language to select:
English - French - Spanish - German
- Italian - Japanese - Chinese
(Traditional) - Chinese(Simplified).
Highlight PIP Size to select the size of
small picture. (5 size) (Use this function under PIP Mode).
Highlight PIP Position to move the
small picture to upper left, upper right,
center, lower left, or lower right.(Use
this function under PIP Mode).
Highlight Reset () to return all
Miscellaneous items to default.
11
AUDIO
44
VOLUME
BRIGHTNESS
35
CO LOR
26
HUE
26
SHARPNESS
4
MISCELLANEOUS
7
OSD TIMER
30 SEC
BASS
12
LANGUAGE
ENGLISH
TREBLE
12
PIP SIZE
4
PIP POSITION
3
RESET</>
RESET</>
RESET</>
Highlight Contrast to Increase or
decrease the picture contrast.
Highlight Volume to adjust the volume to the level you want.
Highlight Brightness to make picture
brighter or darker.
Highlight
decrease
Highlight Color to increase
decrease the saturation of color.
Highlight Treble Increase or decrease
or
Highlight Hue to change the colors
towards a red or green tint.
Highlight Sharpness to make the picture sharper or softer.
Highlight Reset () button to restore
all setups of the Display to the default.
Bass
to
Increase
Menu Adjustments
DISPLAY
CO NTRAST
S-Video/AV Mode
Press the MAIN button on the remote until AV or S-VIDEO mode is displayed. Use / buttons on the ‘diamond’ to
select each sub menu. Once you’ve selected your desired menu, you may then use the / buttons on the ‘diamond’
to adjust the settings.
Highlight OSD Timer to select the time
to be shown on the menu 5 sec 15 sec
20 sec 25 sec 30 sec.
or
Highlight Reset () to return all
Audio items to default.
Highlight Language to select:
English - French - Spanish - German Italian - Japanese - Chinese
(Traditional) - Chinese(Simplified).
Highlight PIP Size to select the size of
small picture. (5 size) (Use this function under PIP Mode).
Highlight PIP Position to move the
small picture to upper left, upper right,
center, lower left, or lower right.(Use
this function under PIP Mode).
Highlight Reset ( ) to return all
Miscellaneous items to default.
12
Component (YPbPr) Mode
Menu Adjustments
Press the MAIN button on the remote until COMPONENT (YPbPr) mode is displayed. Use / buttons on the ‘diamond’ to select each
sub menu. Once you’ve selected your desired menu, you may then use the / buttons on the ‘diamond’ to adjust the settings.
DISPLAY
42
VOLUME
BRIGHTNESS
35
CO LOR
26
HUE
25
SHARPNESS
FOCUS
MISCELLANEOUS
AUDIO
CO NTRAST
7
OSD TIMER
30 SEC
BASS
12
LANGUAGE
ENGLISH
TREBLE
12
PIP SIZE
3
PIP POSITION
4
4
15
RESET</>
RESET</>
Highlight Contrast to Increase
decrease the picture contrast.
or
Highlight Brightness to make picture
brighter or darker.
Highlight Volume to adjust the volume to
the level you want.
Highlight Color to increase or decrease
the saturation of color.
Highlight Hue to change the colors
towards a red or green tint.
Highlight Sharpness to make the picture
sharper or softer.
Highlight Focus to focus the picture.
Highlight Reset () button to restore all
setups of the Display to the default.
Highlight OSD Timer to select the time to
be shown on the menu 5 sec 15 sec 20
sec 25 sec 30 sec.
Highlight Bass to Increase or decrease
Highlight Treble Increase or decrease
13
RESET</>
Highlight Reset () to return all Audio
items to default.
Highlight Language to select:
English - French - Spanish - German Italian - Japanese - Chinese (Traditional)
- Chinese(Simplified).
Highlight PIP Size to select the size of
small picture. (5 size) (Use this function
under PIP Mode).
Highlight PIP Position to move the small
picture to upper left, upper right, center,
lower left, or lower right.(Use this function
under PIP Mode).
Highlight Reset ( ) to return all
Miscellaneous items to default.
D I S P L AY
GEOM ETRIC
MISCELLANEOUS
AUDI O
CONTRAST
34
CLOCK
1
V O L UM E
7
OSD TIMER
30 SEC
BRIGHTNESS
49
PHASE
1
BAS S
12
LANGUAGE
ENGLISH
H-POSITION
1
T RE BL E
12
PIP SIZE
3
V-POSITION
1
PIP POSITION
4
COLOR-TEMP
USER
RED
128
GREEN
128
BLUE
128
RESET</>
RESET</>
RE S E T </ >
WHITE BALANCE
R E S E T </ >
Highlight Auto (Automatic adjustment) for television circuitry to automatically adjust the picture.
Highlight Contrast to Increase or
decrease the picture contrast.
Highlight Clock to stabilize the display of VGA images.
Highlight Volume to adjust the volume to the level you want.
Highlight Brightness to make picture
brighter or darker.
Highlight Phase to adjust the
focus and sharpness of VGA
images.
Highlight Bass to Increase or
decrease
Highlight Color Temp to select a
color setting - High, Mid, Low or
User.
- In User mode, red, green and blue
can be manually adjusted (see
below.)
Highlight Red, Green, or Blue to
manually adjust the level of that particular color.
Highlight Reset () button to
restore all setups of the Display to
the default.
Highlight White Balance to have the
LCD TV self-adjust the white balance. You will need to display a 2”
x2” square in the center of the
screen. Special home video calibraiton DVDs can do this. Check
with your retailer for further information.
Highlight H-Position to adjust the
horizontal position of VGA images.
Highlight V-Position to adjust the
vertical position of VGA images.
Higlight Reset () to return
adjustments to default.
Highlight
decrease
Treble
Increase
or
Highlight Reset () to return all
Audio items to default.
Menu Adjustments
A U TO
VGA Mode
Press the MAIN button on the remote until VGA mode is displayed. Use / buttons on the ‘diamond’ to select each sub menu. Once
you’ve selected your desired menu, you may then use the / buttons on the ‘diamond’ to adjust the settings.
Highlight OSD Timer to select the
time to be shown on the menu 5
sec 15 sec 20 sec 25 sec 30 sec.
Highlight Language to select:
English - French - Spanish German - Italian - Japanese Chinese
(Traditional)
Chinese(Simplified).
Highlight PIP Size to select the size
of the small picture. (5 size) (Use
this function under PIP Mode).
Highlight PIP Position to move the
small picture to upper left, upper
right, center, lower left, or lower
right.(Use this function under PIP
Mode).
Highlight Reset () to return all
Miscellaneous items to default.
14
TV Menu
Press the TV button on the remote then MENU button. Then press button once. Use / button to select each sub menu.
Once you’ve selected your desired menu, you may then use the / buttons to adjust the setting.
Descriptions
TV
Rating
CCD
Use this to activate the subtitle and teletext function. Each sequential press of the CCD
button will show:
CCI-CC4, T1-T4, OFF.
CH Scan (automatic channel scanning)
To activate CH Scan, press button to execute the automatic channel scanning. You need
to execute the automatic channel scanning when you install your LCD TV the first time.
ADD/DEL Channels
Press button on the remote control to select the channel you wish to +(ADD) / - (DEL) by
scrolling using CH / .
Directed Towards Older Children
PG
Parental Guidance Suggested
TV-14
V-CHIP (grading system)
Enter password to enter the MENU for V-CHIP settings. You can press button to select the
grade you want; and then press button to set up if you'd like to watch the programs.
CATV / AIR (TV signal source)
Press button on the remote control to select either Cable or Antenna.
Cable: If you receive channels through CATV.
Antenna: If you receive channels through antenna.
Y7
MPAA
Rating
MA
Mature Audiences Only
FV
Fantasy Violence
D
Sexual Dialogue
L
Adult Language and Profanity
S
Sex
V
Violence
G
General Audiences - All Ages
PG
Parental Guidance Suggested (Some
Material May Not Be Suitable for Younger
Children)
PG-13
Parents Strongly Cautioned
(Some Material May Not Be Suitable for
Children Under 13)
R
Restricted
(Not Recommended for Ages 17 and
Under)
NC-17
G
U
PG
U
FV
TV-Y7 U
TV-PG
TV-14
TV-MA
15
V-CHIP
MPAA RATING
PG-13
R
U
U
V
U
U
U
TV RATING
S
U
U
U
NC-17
U
X
U
L
D
U
U
U
U
U
B: BLOCKED
(NOT ALLOWED TO
WATCH THIS PROGRAM)
U: UNBLOCKED
(ALLOWED TO WATCH
THIS PROGRAM)
Parents Strongly Cautioned
X
Children Under 17 Not Permitted
Adult Material
Please visit these websites for further information regarding
motion picture and television ratings:
TV - http://www.tvguidelines.org/
Movies - http://www.mpaa.org/
Main Signal
PIP Signal
PIP Mode
To Activate PIP
Your LCD TV can display a signal
input in the main area of the screen,
and an auxillary signal input simultaneously.
Press PIP on the remote control to
activate the PIP feature.
The PIP signal appears in a small
box within the screen whenever the
PIP feature is activated.
Refer to the chart at right as to the
inputs allowed using PIP when viewing your main signal.
PIP Window Position and PIP
Window Size can be adjusted from
the main menu. Please see p. 11-14
for further details.
For example, say you are watching
TV in TV mode. While your main
signal (TV) is displayed, press PIP
from the remote. An OSD will
appear with the source input
options available to display in the
PIP box.
PIP Modes That Function Together are Checked below:
TV
AV
S-VIDEO
YPbPr
VGA
TV
X
X
AV
X
X
S-VIDEO
X
X
YPbPr
X
X
X
VGA
X
X
X
Picture-in-Picture Menu
In order to use the PIP feature you must take note of the input selected as the
main (larger) picture. You should familiarize yourself with this page as not all
inputs connected to the television are available using the PIP feature.
Press “PIP-Input” on your remote to
select an input option.
Press “Swap” to switch the PIP
screen to the main screen, and the
main screen to the PIP screen.
16
Troubleshooting
17
We encourage you to visit our website at www.apexdigitalinc.com and review the Customer Support and FAQ’s page for updates to
this list. You should register to validate your warranty at this website. You can also order accessories for all of your Apex products.
Problems
No picture
Abnormal or no colors
Solutions
Connect power cord correctly.
Turn on power via the button on LCD TV.
(p. 7)
Check your video connections. (p. 9-10)
Press the input button to cycle through the
connected video sources (p. 5)
Check your video connections for correct
cable placement or bent pins. (p. 9-10)
Check your video input device for its settings. If the device is setup incorrectly, then
it can produce an improper signal. Please
check your device’s user’s manual for
more information.
Distorted picture
Fuzzy picture
Check your antenna connection. (p. 9)
Adjust your antenna.
Relocate your antenna.
Picture too dark
Check brightness (p. 11-14)
Check contrast (p. 11-14)
Check white balance (VGA only - p. 14)
Voice only, no images
Check your video connection. (p. 9-10)
Make sure the LCD TV is set to the correct
input. (p. 5)
Adjust brightness and contrast. (p. 11-14)
Picture only, no sound
Check your audio connection. (p. 9-10)
Adjust volume. (p. 5)
Make sure MUTE is off. (p. 5)
Cannot receive certain channels through
antenna
Check for the correct antenna setting (p. 15)
Use the Channel Scan feature (p. 15)
Adjust or relocate your antenna.
Video noise or choppy picture
Check your video connections. (p. 9-10)
Use a power conditioner on the AC adapter. See
your local electronics retailer for one of these.
TV blocked at certain
channels
Check the V-Chip functions (p. 15)
Check your antenna
Overlapping images
or ghost image
Check your antenna connection. (p. 9)
Adjust or relocate your antenna.
Use a different video connection, if available. (p. 910)
Black box on screen
Make sure the CC/TT function is off. (p. 15)
Check the settings on the video input device. Some
movies have black bars around them to preserve
the widescreen format. This is not a malfunction - it
is a part of the movie or program.
Remote control does
not operate
Change the batteries, and make sure they are
inserted properly (p. 6)
Make sure remote is pointed at the remote sensor
on the front of the LCD TV.
Move LCD TV away from fluorescent lights.
Q: Why is the power LED on but the screen is blank?
A: Make sure the video cable is securely connected to both the LCD TV
and the device you have attached. Also, make sure you have correctly
connected all of the cables required for your device. Refer to the user’s
manual that came with your equipment for further information.
Q: How do I adjust the “tilt”, or angle, of my LCD TV?
A:You can adjust the LCD display viewing angle from an upright position
to a back-tilted angle of up to 7 degrees and a forward-tilted angle of 4
degrees. When tilting the screen, hold the base firmly and adjust the
viewing angle by moving the top of the display forward or backward. Do
not press the LCD panel when tilting the display. (See picture A, below.)
WARNING - Forcing the LCD TV past its maximum extension point will
damage the unit.
A
Q: Why is my TV too dark or too bright?
A: You can adjust the brightness of the LCD screen. Refer to “Adjusting
the Display” on page 13.
Q: Why is there no sound coming from the speakers?
Check your audio cables to make sure they are connected properly.
Also, make sure the mute is turned off. Finally, check the sound mode
by press the MTS key on the remote control to switch between SAP,
Mono and Stereo. Press the Display key to view the setting on the
screen.
Q: Why is the LCD TV blurred when I connect it to my PC?
A: The LCD TV supports VGA (640x480) video mode. Make sure the TV
settings of your computer are adjusted to this setting. Setting your computer’s TV resolution to a higher resolution will result in a poor quality
image or no picture at all.
Q: Why can’t I view any TV channels?
A: You must scan for channels before you can view TV channels. For
more information, see page 15.
Q: Why is my reception bad when watching TV?
A: This could be a variety of reasons, including local interference, if using
an over-the-air antenna. Make sure you use a coaxial cable for TV input.
Make sure the connection is secure, and grounded. (You may need an
electrician to check this for you.) Reception is best from cable TV, satellite dish, or a high-powered rooftop antenna.
Q: Why is the screen too light/dark when in VGA mode?
A: You may need to adjust the white balance. See “White Balance” on
page 14. Also, try adjusting the brightness. You can also find this on
page 14.
B
Q: How do I mount my LCD TV to the wall?
A: You will need to purchase a standard wall mount kit (100 mm x 100
mm screw mount area, minimum 35 kg load-carrying weight) from your
local retailer if you want to attach the LCD TV to a wall or other fixed surface. First, prepare a flat, stable working area with a soft cloth or foam
pad to place the LCD TV on. Next, turn the LCD TV power off, disconnect it from the power adapter, and gently lay the display on its front
(screen side.) Third. remove the four screws located at the rear of the
LCD TV as illustrated in picture B, above. Remove the LCD TV display
stand. For final attachment and hanging, refer to and follow the instructions included with the wall mount kit that you purchased.
Q: If I have more questions, where should I go?
A: Try the Customer Support section of www.apexdigitalinc.com. There
are many more Frequently Asked Questions there, as well as many
other helpful options.
FAQ - Frequently Asked Questions
Q: Why doesn’t the LCD TV turn on?
A: Check the AC power adapter to make sure it is securely connected to
the DC-in power jack at the rear of the LCD TV. Make sure the power
cord is plugged into a functioning electrical outlet.
18
Specifications
19
Pixel Pitch
0.6375 mm (H) x 0.6375 mm (W)
Maximum Display Area
16.1 in. (V) x 12.1 in. (H) (408 mm x 306 mm)
20.1 in. diagonally
Aspect Ratio
4:3
Native Resolution
640x480 interlaced or progressive
Display Colors
16.7 million (RGB 8-bit color)
Contrast Ratio
500:1
Brightness
450 cd/m2 (typical)
Response Time
16 ms typical (Tr + Tf)
View Angle
Horizontal - 160 degrees
Vertical - 140 degrees
Horizontal Frequency
31kHz ~ 65kHz
Vertical Frequency
56 Hz ~ 75 Hz
Signal I/O Ports
Composite Video - RCA type (x1)
S-Video (x1)
Component Video - RCA type; YPbPr (x1)
RF w/ NTSC Tuner (x1)
VGA 15-pin D sub (x1)
Stereo Audio - RCA type, L&R ch. (x2)
PC Audio In (x1)
TV Systems
NTSC (480 i/p SDTV)
PIP Function
De-Interlace Support
3D noise reduction filter
SAP/MTS
V-chip & CCD
Power Consumption (off)
<8W
Power Source
12 VDC 5A (60W)
Speakers
5W (maximum) x 2
Unit Dimensions
23.6 x 17.6 x 6.9 (WxHxD, inches)
600 x 446 x 174 (WxHxD, mm)
Net Weight
17.7 lbs (8 kg)
Wall Mount Area
3.9 in x 3.9 in (100mm x 100mm)
Operating Temperature
32 ~ 104 degrees Fahrenheit (0 ~ 40 degrees Celsius)
Apex Digital AVL2076
Apex Digital, Inc. expresses the following limited warranty. This warranty extends to the original consumer, purchaser or product received as a gift and no other purchaser or transferee. You must retain the original bill of sale for proof of purchase.
Limited One (1) Year Warranty
Apex Digital warrants the parts in this product against defects in material or workmanship for a period of one (1) year from the date of original purchase with the exception of the
remote control and LCD backlight which are guaranteed for 90 days only. During this period Apex Digital will replace a defective part with a new or refurbished part without charge
to you. It is the responsibilty of the consumer to retain original packaging or provide like packaging in order to facilitate the warranty process. Apex Digital, Inc. will incur no liability
whatsoever to provide packaging for warranty items. Upon receipt of the warranty item, should it be determined that the packaging was insufficient, Apex Digital Inc., at its discretion, may void the warranty. The consumer is responsible for the transportation (cost) and insurance charges (if applicable) for the set to the Service Center or Apex Digital. The
consumer will be responsible for all tariffs, duty and taxes imposed to ship or receive warranty or warranty replacement units to and from the U.S. You must receive a return authorization number before sending a unit in for service.
Limited Ninety (90) Day Labor Warranty
Apex Digital warrants It will be responsible for labor charges on this product for a period of ninety days from the date of original retail purchase. During this period, Apex Digital will
repair or replace a defective part or product at its sole option, with a new or refurbished part or product without charge to you, except for the shipping charges incurred by the consumer, to the Service Center.
Rental Product
The warranty for a rental product begins with the original date of receipt by the rental firm.
Limited Warranty
Limited North American Warranty
Your Responsibility
The above warranties are subject to the following conditions:
You must retain the original bill of sales to provide proof of purchase. There are no exceptions.
You must call the provided phone number for an assessment of the problem. No service or shipment of product will be accepted unless an RMA# is provided, attached
or printed to shipping carton along with an enclosed bill of sale. You will be responsible for all tariffs and taxes imposed to ship or receive warranty or warranty replace
ment units to and from the U.S.
These warranties are effective only if product is purchased through an Authorized North American retail reseller and the unit is operated in North America.
Labor service charges for set installation, setup, adjustment of consumer controls and installation or repair of any type of antenna or cable systems are not covered by
this warranty. Reception problems caused by inadequate antenna or cable systems are your responsibility.
Warranties extend only to defects in materials or workmanship as limited and do not extend to any other products or parts that have been lost, discarded or damaged
by misuse, accident, neglect, acts of God, such as lightning or voltage surges in the home, improper installation, improper maintenance or use in violation of instruc
tions provided or product which has been modified, have had the serial number removed, altered, or rendered illegible. Warranties do not cover cosmetic damage or
lost accessories.
How to Obtain Warranty Service
If after following the operating instructions, the Troubleshooting Guide and the FAQ pages on televisions, found at our website, www.apexdigitalinc.com. Should it be necessary to
contact Customer Service Center directly, call (800)880-1227 Monday through Friday, 8am to 6pm (Pacific Time). You will be instructed on how your claim will be processed. Have
your pertinent information available including proof of purchase and an understanding of the problem.
Limitations
Your LCD panel is an innovative device that is manufactured to precise tolerances with active performing pixels of at least 99.99%. As such, it is NOT a malfunction to view multiple non-performing pixels on your screen. All warranties implied by state law are expressly limited to the duration of the limited warranties set forth above with the exception of warranties implied by state law as herby limited, the foregoing warranty is exclusive and in lieu of all other warranties, guarantees, agreements etc., with respect to repair or replacement of any parts. Apex Digital shall not be liable for consequential or incidental damage.
The warranty gives you specific rights and you may also have these rights that may vary from state to state. Some states do not allow limitation on how long a warranty lasts, or
the exclusions or limitation of incidental or consequential damages, so the above may not apply to you.
20