1
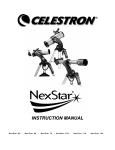
Addendum For NexStar GPS Hand Control Section Of The Owner's
Manual.
The following is an addendum to the NexStar Hand Control section of the owner's manual that
explains the current operation and added features of your NexStar GPS hand control. Please refer to
these pages for specific information regarding telescope alignment and hand control functions.
Celestron
Technical Support Dept.
2835 Columbia St.
Torrance, CA 90503
310-328-9560
www.celestron.com
The NexStar has a removable hand controller built into the side of the fork arm designed to give you instant access to all the
functions the NexStar has to offer. With automatic slewing to over 40,000 objects, and common sense menu descriptions,
even a beginner can master its variety of features in just a few observing sessions. Below is a brief description of the
individual components of the NexStar hand controller:
1.
2.
3.
Liquid Crystal Display (LCD) Window: Has a dual-line, 16 character display screen that is backlit for
comfortable viewing of telescope information and scrolling text.
Align: Instructs the NexStar to use a selected star or object as an alignment position.
Direction Keys: Allows complete control of the NexStar in any direction. Use the direction keys to move the
telescope to the initial alignment stars or for centering objects in the eyepiece.
1
7
2
8
3
9
10
4
5
11
6
12
Figure 4-1
The NexStar Hand Control
4.
Catalog Keys: The NexStar has keys on the hand control to allow direct access to each of the catalogs in its
database. The NexStar contains the following catalogs in its database:
Messier – Complete list of all Messier objects.
NGC – Complete list of all the deep-sky objects in the Revised New General Catalog.
Caldwell – A combination of the best NGC and IC objects.
Planets - All 8 planets in our Solar System plus the Moon.
Stars – A compiled list of the brightest stars from the SAO catalog.
List – For quick access, all of the best and most popular objects in the NexStar database have been broken
down into lists based on their type and/or common name:
Named Stars
Named Objects
Double Stars
Variable Stars
Asterisms
CCD Objects
IC Objects
Abell Objects
Common name listing of the brightest stars in the sky.
Alphabetical listing of over 50 of the most popular deep
sky objects.
Numeric-alphabetical listing of the most visually stunning
double, triple and quadruple stars in the sky.
Select list of the brightest variable stars with the shortest
period of changing magnitude.
A unique list of some of the most recognizable star
patterns in the sky.
A custom list of many interesting galaxy pairs, trios and
clusters that are well suited for CCD imaging with the
NexStar telescope.
A complete list of all the Index Catalog deep-sky objects.
A complete list of all the Abell Catalog deep-sky objects.
5.
6.
Info: Displays coordinates and useful information about objects selected from the NexStar database.
Tour: Activates the tour mode, which seeks out all the best objects for the current date and time, and
automatically slews the NexStar to those objects.
7. Enter: Pressing Enter allows you to select any of the NexStar functions and accept entered parameters.
8. Undo: Undo will take you out of the current menu and display the previous level of the menu path. Press Undo
repeatedly to get back to a main menu or use it to erase data entered by mistake.
9. Menu: Displays the many setup and utilities functions such as tracking rate and user defined objects and many
others.
10. Scroll Keys: Used to scroll up and down within any of the menu lists. A double-arrow will appear on the right
side of the LCD when there are sub-menus below the displayed menu. Using these keys will scroll through those
sub-menus.
11. Rate: Instantly changes the rate of speed of the motors when the direction buttons are pressed.
12. RS-232 Jack: Allows you to interface with a computer and control the NexStar remotely.
Hand Control Operation
This section describes the basic hand control procedures needed to operate the NexStar. These procedures are grouped into
three categories: Alignment, Setup and Utilities. The alignment section deals with the initial telescope alignment as well as
finding objects in the sky; the setup section discusses changing parameters such as tracking mode and tracking rate; finally,
the last section reviews all of the utilities functions such as the slew limits, PEC and backlash compensation.
Alignment Procedures
Definition
In order for the NexStar to accurately point to objects in the sky, it must first be aligned to two known positions (stars) in
the sky. With this information, the telescope can create a model of the sky, which it uses to locate any object with known
coordinates. There are many ways to align the NexStar with the sky depending on what information the user is able to
provide: GPS Align Mode allows the NexStar to acquire all the necessary information needed to point itself to the required
alignment stars; AutoAlign will ask the user to input date and location information in order to locate the alignment stars;
Two-Star Alignment does not require the user to input date and location data, but does require the user to identify and
manually slew the telescope to the two alignment stars. Quick-Align will ask you to input all the same information as you
would for the AutoAlign procedure. However, instead of slewing to two alignment stars for centering and alignment, the
telescope bypasses this step and simply models the sky based on the information given. Finally, EQ North and EQ South
alignments are designed to assist you in aligning the NexStar when polar aligned using an equatorial wedge. Each
alignment method is discussed in detail below.
"Altazimuth" or "Alt-Az" refers to a type of mounting that allows a telescope to move in both altitude (up and down) and
azimuth (left and right) with respect to the ground. This is the simplest form of mounting in which the telescope is attached
directly to a tripod without the use of an equatorial wedge.
G
GP
PS
SA
Alliiggnnm
meenntt
GPS Align must be used with the telescope mounted in altazimuth. With GPS Align mode, the NexStar automatically levels
the optical tube, its built-in electronic compass points the telescope in the direction of the northern horizon, while the GPS
receiver links with and acquires information from 3 of the 24 orbiting GPS satellites. With this information, the built-in GPS
system calculates the scope’s location on Earth with an accuracy of a few meters and calculates universal time down to the
second. After quickly making all these calculations and automatically entering the information for you, the NexStar GPS
orients itself with the sky, slews to an alignment star and asks you to position the star in the center of the eyepiece. The
NexStar is then ready to start finding and tracking any of the objects in its 40,000+ object database. Before the telescope is
ready to be aligned, it should be set up in an outside location with all accessories (eyepiece, diagonal and finderscope)
attached and lens cover removed as described in the Assembly section of the manual. Before turning on the NexStar, make
sure that the tube is pointed downward and both the altitude and azimuth clutches are locked down. To begin the GPS
alignment:
1.
2.
Power on the NexStar by flipping the switch located on the
bottom portion of the drive base, to the "on" position. Once
turned on the hand control display will say NexStar
Ready. Press ENTER to choose GPS Align or use the
UP/Down scroll keys (10) to select a different mode of
alignment. Pressing the ALIGN key will bypass the other
alignment options and the scrolling text and automatically
begins GPS Align.
Once GPS Align has been selected, the telescope will begin
to move to its north and level position. While the NexStar is
positioning itself, the GPS receiver automatically begins to
establish a link with the GPS satellites orbiting the Earth.
The hand control screen will display the message GPS
Searching to let you know that it is linking with the
satellites.
3.
Once the NexStar has established a link with the required
satellites, the hand control display will read
GPS
Linked.
The GPS satellites will then report the
current time and position directly to your NexStar. The
NexStar now has all the necessary data to make a virtual
model of the sky, select two bright stars for alignment and
begin slewing to the first star.
4.
When the NexStar has finished slewing to its first alignment
star, the hand control display will ask you to use the arrow
buttons to center the alignment star in the cross hairs of the
finderscope. At this point the telescope is only roughly
aligned, so the alignment star should only be close to the
field of view of the finderscope. Once centered in the
finderscope, press ENTER. If for some reason the chosen
star is not visible (perhaps behind a tree or building) you
can press the UNDO button to have the NexStar select and
slew to a different star.
5.
If the finderscope has been properly aligned with the
telescope tube, the alignment star should now be visible
inside the field of view of the eyepiece. The NexStar will
ask that you center the bright alignment star in the center of
the eyepiece and press the ALIGN button. This will accept
the star as the first alignment position. (There is no need to
adjust the slewing rate of the motors after each alignment
step. The NexStar automatically selects the best slewing rate
for aligning objects in both the finderscope and the
eyepiece).
A Few Words on GPS:
The NexStar GPS uses an on-board GPS to take
the guesswork out of aligning your telescope with
the sky. Once GPS Align is selected, the NexStar
automatically initiate the internal GPS module.
However, there are a few things you should be
aware of in order to get the full use of its many
capabilities:
GPS alignment will only work when the
telescope is set-up outdoors with an
unobstructed view of the sky. If the
NexStar is set-up in a location that has a
limited horizon in any direction, the GPS
alignment may still work, however it will
take much longer for the telescope to find
and link with the needed satellites.
When using GPS alignment for the first
time, it may take 3-5 minutes for the
NexStar to link-up with its satellites.
Once the telescope is successfully linked,
leave the telescope powered on for at
least 20 minutes. During this time the
NexStar will download the complete
almanac of orbital elements (called the
ephemeris) for the orbiting GPS
satellites.
Once this information is
received it will be stored for future
alignments.
If your NexStar is transported over a
long distance (say from the northern to
the southern hemisphere) it may take as
long as one hour to establish a satellite
link from its new location. Observers
wishing to travel long distances with their
telescope are advised to begin the GPS
alignment in advance to allow the unit to
acquire the necessary data.
6.
Observing
Tip
After the first alignment star has been recorded, the NexStar will automatically slew to a second alignment star
and have you repeat the alignment process for that star. When the telescope has been aligned to both stars, the
display will read "Alignment Successful" and you are now ready to find your first object.
For the best possible pointing accuracy, always center the alignment stars using the up arrow button and the right arrow
button. Approaching the star from this direction when looking through the eyepiece will eliminate much of the backlash
between the gears and assure the most accurate alignment possible.
A
Auuttoo--A
Alliiggnn
Alternatively, if you are observing at a location where it is difficult to establish a link with the proper satellites, AutoAlign
will allow the user to input the necessary information needed to align the telescope. After choosing AutoAlign and moving
the telescope into the north and level position, the NexStar will ask you to input first the date and time information then it
will ask for your location. Just like with GPS align, once this information is received, NexStar will automatically choose a
bright alignment star and automatically slew to it. Follow the steps below to AutoAlign the NexStar:
1.
2.
3.
4.
Once the NexStar is powered on , Press ENTER to begin alignment.
Use the Up and Down scroll keys (10) to select AutoAlign and press ENTER.
The telescope will then ask you to use the direction keys (3) to level the telescope tube and point the front of the
telescope towards north. North can be found by finding the direction of the North Star (Polaris) or by using a compass.
You do not need to point at the North Star, only the north horizon. Alignment only needs to be approximate, however a
close alignment will make the auto alignment more accurate. Once the telescope is in the north and level position, press
ENTER.
The hand control will display the following information. Use the Up and Down buttons to scroll through the
information. If any of the parameters need to be updated, press the UNDO button and enter the current information. If
all the information is correct, press ENTER.
Time - Enter the current local time for your area. You can enter either the local time (i.e. 08:00), or you can
enter military time (i.e. 20:00 ).
•
Select PM or AM. If military time was entered, the hand control will bypass this step.
•
Choose between Standard time or Daylight Savings time. Use the Up and Down scroll buttons (10) to toggle
between options.
•
Select the time zone that you are observing from. Again, use the Up and Down buttons (10) to scroll through
the choices. Refer to Time Zone map in Appendix E for more information.
Date - Enter the month, day and year of your observing session.
Helpful
Hint
If the wrong information has been input into the hand control, the UNDO button will act as a backspace allowing the user to
re-enter information.
5.
Trouble
Shooting
Finally, you must enter the longitude and latitude of the location of your observing site. Use the table in Appendix C to
locate the closest longitude and latitude for your current observing location and enter those numbers when asked in the
hand control, pressing ENTER after each entry. Remember to select "West" for longitudes in North America and
"North" for latitudes in the North Hemisphere. For international cities, the correct hemisphere is indicated in the
Appendix listings.
Based on this information, the NexStar will automatically select a bright star that is above the horizon and slew towards it.
Once finished slewing, the display will ask you to use the arrow buttons to align the selected star with the cross hairs in the
center of the finderscope. If for some reason the chosen star is not visible (perhaps behind a tree or building) you can press
UNDO to select and slew to a different star. Once centered in the finder, press ENTER. The display will then instruct you to
center the star in the field of view of the eyepiece. When the star is centered, press ALIGN to accept this star as your first
alignment star. After the first alignment star has been entered the NexStar will automatically slew to a second alignment star
and have you repeat this procedure for that star. When the telescope has been aligned to both stars the display will read
Alignment Successful, and you are now ready to find your first object.
If the wrong star was centered and aligned to, the NexStar display will read Alignment Failed and scroll the message,
"the positions of the alignment stars did not match the database". Should this occur, press the UNDO button and re-align the
telescope. Remember the alignment star will always be the brightest star nearest the field of view of the finder.
TTw
woo S
Sttaarr A
Alliiggnnm
meenntt
With the two-star alignment method, the NexStar requires the user to know the positions of only two bright stars in order to
accurately align the telescope with the sky and begin finding objects. Here is an overview of the two-star alignment
procedure:
1.
2.
3.
4.
Helpful
Hint
Once the NexStar is powered on, use the Up and Down scroll keys to select Two-Star Align, and press
ENTER.
The NexStar display will ask you to move the telescope tube until it is horizontal to the ground. To do this, use
the direction keys (3) to move the telescope until it is roughly level with the ground. Press ENTER.
The SELECT STAR 1 message will appear in the top row of the display. Use the Up and Down scroll keys (10) to
select the star you wish to use for the first alignment star. Press ENTER.
NexStar then asks you to center in the eyepiece the alignment star you selected. Use the direction buttons to slew
the telescope to the alignment star and carefully center the star in the eyepiece.
In order to accurately center the alignment star in the eyepiece, it will be necessary to decrease the slew rate of the
motors for fine centering. This is done by pressing the RATE key (11) on the hand controller then selecting the number
that corresponds to the speed you desire. (9 = fastest , 1 = slowest).
6.
7.
Once the alignment star is centered in the field of view of the eyepiece, press the ALIGN key (2) to accept this
position.
NexStar will then ask you to select and center a second alignment star and press the ALIGN key. It is best to
choose alignment stars that are a good distance away from one another. Stars that are at least 40º to 60º apart from
each other will give you a more accurate alignment than stars that are close to each other.
Once the second star alignment is completed properly, the display will read Alignment Successful, and you will hear the
tracking motors turn-on and begin to track.
Q
Quuiicckk--A
Alliiggnn
Quick-Align allows you to input all the same information as you would for the AutoAlign procedure. However, instead of
slewing to two alignment stars for centering and alignment, the NexStar bypasses this step and simply models the sky based
on the information given. This will allow you to roughly slew to the coordinates of bright objects like the moon and planets
and gives the NexStar the information needed to track objects in altazimuth in any part of the sky. Quick-Align is not meant
to be used to accurately locate small or faint deep-sky objects or to track objects accurately for photography. Note: Once a
Quick-Align has been done, you can use the Re-alignment feature (see below) to improve your telescopes pointing and
tracking accuracy.
To use Quick-Align:
1.
2.
3.
4.
Select Quick-Align from the alignment options.
Use the arrow buttons to level the tube and position the telescope tube towards north and press ENTER.
The hand control will then ask you to input all the same time and location information as you would for the
AutoAlign procedure.
Once entered, the NexStar will model the sky based on this information and display Alignment Successful.
E
EQ
QN
Noorrtthh // E
EQ
QS
Soouutthh A
Alliiggnnm
meenntt
EQ North and EQ South Alignments assist the user in aligning the telescope when polar aligned on an optional equatorial
wedge. Just as with the Altazimuth alignments described earlier, the EQ alignments give you the choice of doing an
AutoAlign or a Two-Star alignment.
•
The EQ AutoAlign follows many of the same steps as the Alt-Az AutoAlign, except instead of asking you to
position the scope north and level, it will ask you to rotate the telescope base until the tube is pointed towards
the Meridian For more information on finding the Meridian and accurately polar aligning your telescope,
refer to the Astronomy Basics section of the manual.
•
The EQ Two-Star Align requires the user to locate and align the telescope on two bright stars. When
selecting alignment stars it is best to choose stars that, a) have a large separation in azimuth and b) both are
either positive or negative in declination. Following these two guidelines will result in a more accurate EQ
Two-Star alignment.
Helpful
Hint
If you would like the NexStar to assist you in polar aligning the mount, choose Wedge Align from the Utility Menu before
aligning your scope. For more information on polar aligning on a wedge, see the section on Wedge Align later in the
manual.
N
NeexxS
Sttaarr R
Ree--A
Alliiggnnm
meenntt
The NexStar has a re-alignment feature which allows you to replace either of the two original alignment stars with a new star
or celestial object. This can be useful in several situations:
•
•
If you are observing over a period of a few hours, you may notice that your original two alignment stars have
drifted towards the west considerably. (Remember that the stars are moving at a rate of 15º every hour).
Aligning on a new star that is in the eastern part of the sky will improve your pointing accuracy, especially on
objects in that part of the sky.
If you have aligned your telescope using the Quick-Align method, you can use re-align to align to two actual
objects in the sky. This will improve the pointing accuracy of your telescope without having to re-enter
addition information.
To replace an existing alignment star with a new alignment star:
1.
2.
3.
4.
5.
6.
7.
Select the desired star (or object) from the database and slew to it.
Carefully center the object in the eyepiece.
Once centered, press the UNDO button until you are at the main menu.
With NexStar Ready displayed, press the ALIGN key on the hand control.
The display will then ask you which alignment star you want to replace.
Use the UP and Down scroll keys to select the alignment star to be replaced. It is usually best to replace the star
closest to the new object. This will space out your alignment stars across the sky.
Press ALIGN to make the change.
Object Catalog
S
Seelleeccttiinngg aann O
Obbjjeecctt
Now that the telescope is properly aligned, you can choose an object from any of the catalogs in the NexStar's extensive
database. The hand control has a key (4) designated for each of the catalogs in its database. There are two ways to select
objects from the database: scrolling through the named object lists and entering object numbers.
Helpful
Hint
Pressing the LIST key on the hand control will access all objects in the database that have common names or types.
Each list is broken down into the following categories: Named Stars, Named Object, Double Stars, Variable Stars,
Asterisms and CCD Objects. Selecting any one of these catalogs will display a numeric-alphabetical listing of the
objects under that list. Pressing the Up and Down keys (10) allows you to scroll through the catalog to the desired
object.
When scrolling through a long list of objects, holding down either the Up or Down key will allow you to scroll through the
catalog at a rapid speed.
Pressing any of the other catalog keys (M, CALD, NGC, or STAR) will display a blinking cursor below the name of the
catalog chosen. Use the numeric key pad to enter the number of any object within these standardized catalogs. For
example, to find the Orion Nebula, press the "M" key and enter "042".
S
Slleew
wiinngg ttoo aann O
Obbjjeecctt
Once the desired object is displayed on the hand control screen, choose from the following options:
•
Press the INFO Key. This will give you useful information about the selected object such as R.A. and
declination, magnitude size and text information for many of the most popular objects.
•
Press the ENTER Key. This will automatically slew the telescope to the coordinates of the object.
Caution: Never slew the telescope when someone is looking into the eyepiece. The telescope can move at fast slew
speeds and may hit an observer in the eye.
If you slew to an object that is below the horizon, NexStar will notify you by displaying a message reminding you that you
have selected an object outside of your slew limits (see Slew Limits in the Utility Features section of the manual). Press
UNDO to go back and select a new object. Press ENTER to ignore the message and continue the slew.
Object information can be obtained without having to do a star alignment. After the telescope is powered on, pressing any
of the catalog keys allows you to scroll through object lists or enter catalog numbers and view the information about the
object as described above.
Finding Planets
The NexStar can located all 8 of our solar systems planets plus the Moon. However, the hand control will only display the
solar system objects that are above the horizon (or within its slew limits). To locate the planets, press the PLANET key on
the hand control. The hand control will display all solar system objects that are above the horizon:
•
•
•
Use the Up and Down keys to select the planet that you wish to observe.
Press INFO to access information on the displayed planet.
Press ENTER to slew to the displayed planet.
Tour Mode
The NexStar includes a tour feature which automatically allows the user to choose from a list of interesting objects based on
the date and time in which you are observing. The automatic tour will display only those objects that are within your set
filter limits (see Filter Limits in the Setup Procedures section of the manual). To activate the Tour mode, press the TOUR
key (6) on the hand control. The NexStar will display the best objects to observe that are currently in the sky.
•
•
•
To see information and data about the displayed object, press the INFO key.
To slew to the object displayed, press ENTER.
To see the next tour object, press the Up key.
Direction Buttons
The NexStar has four direction buttons (3) in the center of the hand control which control the telescope's motion in altitude
(up and down) and azimuth (left and right). The telescope can be controlled at nine different speed rates.
Rate Button
Pressing the RATE key (11) allows you to instantly change the speed rate of the motors from high speed slew rate to precise
guiding rate or anywhere in between. Each rate corresponds to a number on the hand controller key pad. The number 9 is
the fastest rate (3º per second, depending on power source) and is used for slewing between objects and locating alignment
stars. The number 1 on the hand control is the slowest rate (.5x sidereal) and can be used for accurate centering of objects in
the eyepiece and photographic guiding. To change the speed rate of the motors:
•
•
Press the RATE key on the hand control. The LCD will display the current speed rate.
Press the number on the hand control that corresponds to the desired speed. The number will
appear in the upper-right corner of the LCD display to indicate that the rate has been changed.
The hand control has a "double button" feature that allows you to instantly speed up the motors without having to choose a
speed rate. To use this feature, simply press the arrow button that corresponds to the direction that you want to move the
telescope. While holding that button down, press the opposite directional button. This will increase the slew rate to the
maximum slew rate.
When pressing the Up and Down arrow buttons in the slower slew rates (6 and lower) the motors will move the telescope in
the opposite direction than the faster slew rates (7 thru 9). This is done so that an object will move in the appropriate
direction when looking into the eyepiece (i.e. pressing the Up arrow button will move the star up in the field of view of the
eyepiece). However, if any of the slower slew rates (rate 6 and below) are used to center an object in the finderscope, you
may need to press the opposite directional button to make the telescope move in the correct direction.
1
2
3
4
5
=
=
=
=
=
.5x*
1x (sidereal)*
4x
8x
16x
6
7
8
9
= 64x
= .5º / sec
= 2º / sec
= 3º / sec
Nine available slew speeds
*Rate 1 and 2 are photographic guide rates and are meant to be used when the telescope is set up on a wedge in equatorial
mode. These rates can be used while set up in altazimuth, however the actual speed rate may differ slightly.
Setup Procedures
The NexStar contains many user defined setup functions designed to give the user control over the telescope's many
advanced features. All of the setup and utility features can be accessed by pressing the MENU key and scrolling through the
options:
Tracking Mode This allows you to change the way the telescope tracks depending on the type of mount being
used to support the telescope. The NexStar has three different tracking modes:
Tracking Rate
Alt-Az
This is the default tracking rate and is used when the telescope is placed on
a flat surface or tripod without the use of an equatorial wedge. The
telescope must be aligned with two stars before it can track in altazimuth
(Alt-Az).
EQ North
Used to track the sky when the telescope is polar aligned using an
equatorial wedge in the Northern Hemisphere.
EQ South
Used to track the sky when the telescope is polar aligned using an
equatorial wedge in the Southern Hemisphere.
Off
When using the telescope for terrestrial (land) observation, the tracking
can be turned off so that the telescope never moves.
In addition to being able to move the telescope with the hand control buttons, the NexStar will
continually track a celestial object as it moves across the night sky. The tracking rate can be
changed depending on what type of object is being observed:
Sidereal
This rate compensates for the rotation of the Earth by moving the
telescope at the same rate as the rotation of the Earth, but in the opposite
direction. When the telescope is polar aligned, this can be accomplished
by moving the telescope in right ascension only. When mounted in AltAz mode, the telescope must make corrections in both R.A. and
declination.
Lunar
Used for tracking the moon when observing the lunar landscape.
Solar
Used for tracking the Sun when solar observing.
View Time-Site - Displays the current time and longitude/latitude downloaded from the GPS receiver. It will also
display other relevant time-site info like time zone, daylight saving and local sidereal time. Local sidereal time (LST) is
useful for knowing the right ascension of celestial objects that are located on the meridian at that time. View Time-Site will
always display the last saved time and location entered while it is linking with the GPS. Once current information has been
received, it will update the displayed information. If GPS is switched off, the hand control will only display the last saved
time and location.
MENU
User Defined Objects - The NexStar can store up to 400 different user defined objects in
its memory. The objects can be daytime land objects or an
interesting celestial object that you discover that is not included
in the regular database. There are several ways to save an
object to memory depending on what type of object it is:
Save Sky Object:
Save Land Object:
Enter R.A. - Dec:
GoTo Object:
The NexStar stores celestial objects to its database by saving its
right ascension and declination in the sky. This way the same
object can be found each time the telescope is aligned. Once a
desired object is centered in the eyepiece, simply scroll to the
"Save Sky Obj" command and press ENTER. The display
will ask you to enter a number between 1-200 to identify the
object. Press ENTER again to save this object to the database.
The NexStar can also be used as a spotting scope on terrestrial
objects. Fixed land objects can be stored by saving their
altitude and azimuth relative to the location of the telescope at
the time of observing. Since these objects are relative to the
location of the telescope, they are only valid for that exact
location. To save land objects, once again center the desired
object in the eyepiece. Scroll down to the "Save Land
Obj" command and press ENTER. The display will ask you to
enter a number between 1-200 to identify the object. Press
ENTER again to save this object to the database.
You can also store a specific set of coordinates for an object
just by entering the R.A. and declination for that object. Scroll
to the "Enter RA-DEC " command and press ENTER. The
display will then ask you to enter first the R.A. and then the
declination of the desired object.
To go to any of the user defined objects stored in the database,
scroll down to either GoTo Sky Obj or Goto Land Obj
and enter the number of the object you wish to select and press
ENTER. NexStar will automatically retrieve and display the
coordinates before slewing to the object.
To replace the contents of any of the user defined objects, simply save a new object using one
of the existing identification numbers; NexStar will replace the previous user defined object
with the current one.
SCOPE SETUP
SETUP TIM E-SITE
ANTI-BACKLASH
AZM POSITIVE
AZM NEGATIVE
ALT POSITIVE
ALT NEGATIVE
SLEW LIMITS
SLEW ALT MAX
SLEW ALT MIN
FILTER LIM ITS
ALTMAX IN LIST
ALTMIN IN LIST
DIRECTION BUTTONS
GOTO APPROACH
AZM APPROACH
ALT APPROACH
AUTOGUIDE RATES
AZM RATE
ALT RATE
CORDWRAP
UTILITIES
GPS ON/OFF
COMPASS
MOVE NORTH
CALIBRATE NORTH
LEVEL
MOVE LEVEL
CALIBRATE LEVEL
WEDGE ALIGN
PEC
PLAYBACK
RECORD
LIGHT CONTROL
FACTORY SETTING
PRESS UNDO
PRESS "0"
VERSION
GET ALT-AZ
GOTO ATL-AZ
HIBERNATE
Get RA/DEC - Displays the right ascension and declination for the current position of the telescope.
Goto R.A/ Dec - Allows you to input a specific R.A. and declination and slew to it.
Helpful
Hint
To store a set of coordinates (R.A./Dec) permanently into the NexStar database, save it as a User Defined Object as
described above.
S
Sccooppee S
Seettuupp FFeeaattuurreess
Setup Time-Site - Allows the user to customize the NexStar display by changing time and location parameters (such as
time zone and daylight savings).
Anti-backlash – All mechanical gears have a certain amount of backlash or play between the gears. This play is evident
by how long it takes for a star to move in the eyepiece when the hand control arrow buttons are pressed (especially when
changing directions). The NexStar's anti-backlash features allows the user to compensate for backlash by inputting a value
which quickly rewinds the motors just enough to eliminate the play between gears. The amount of compensation needed
depends on the slewing rate selected; the slower the slewing rate the longer it will take for the star to appear to move in the
eyepiece. Therefore, the anti-backlash compensation will have to be set higher. You will need to experiment with
different values; a value between 20 and 50 is usually best for most visual observing, whereas a higher value may be
necessary for photographic guiding.
To set the anti-backlash value, scroll down to the anti-backlash option and press ENTER. Enter a value from 0-100 for both
azimuth and altitude and press ENTER after each one to save these values. NexStar will remember these values and use
them each time it is turned on until they are changed.
Slew Limits – Sets the limits in altitude that the telescope can slew without displaying a warning message. By default the
slew limits are set to 0º to 90º and will only display a warning message if an object is below the horizon. However, the
slew limits can be customized depending on your needs. For example, if you have certain photographic accessories attached
to your telescope preventing it from pointing straight-up, you can set the maximum altitude limit to read 80º, thus preventing
the telescope from pointing to any objects that are greater than 80º in altitude without warning.
Filter Limits – When an alignment is complete, the NexStar automatically knows which celestial objects are above the
horizon. As a result, when scrolling through the database lists (or selecting the Tour function), the NexStar hand control
will display only those objects that are known to be above the horizon when you are observing. You can customize the
object database by selecting altitude limits that are appropriate for your location and situation. For example, if you are
observing from a mountainous location where the horizon is partially obscured, you can set your minimum altitude limit to
read +20º. This will make sure that the hand control only displays objects that are higher in altitude than 20º. If you
manually enter an object that is below the horizon using the numeric keypad, the hand control will display a warning
message before slewing to the object.
Observing
Tip!
If you want to explore the entire object database, set the maximum altitude limit to 90º and the minimum limit to –90º. This
will display every object in the database lists regardless of whether it is visible in the sky from your location.
Direction Buttons –The direction a star moves in the eyepiece varies depending on the accessories being used. This
can create confusion when guiding on a star using an off-axis guider versus a straight through guide scope. To compensate
for this, the direction of the drive control keys can be changed. To reverse the button logic of the hand control, press the
MENU button and select Direction Buttons from the Utilities menu. Use the Up/Down arrow keys (10) to select either the
azimuth (left and right) or altitude (up and down) button direction and press ENTER. Pressing ENTER again will reverse
the direction of the hand control buttons from their current state. Direction Buttons will only change the eyepiece rates (rate
1-6) and will not affect the slew rates (rate 7-9).
Goto Approach - lets the user define the direction that the telescope will approach when slewing to an object. This
allows the user the ability to minimize the effects of backlash For example, if your telescope is back heavy from using
heavy optical or photographic accessories attached to the back, you would want to set your altitude approach to the negative
direction. This would ensure that the telescope always approaches an object from the opposite direction as the load pulling
on the scope. Similarly, if using the NexStar polar aligned on a wedge, you would want to set the azimuth approach to the
direction that allows the scope to compensate for different load level on the motors and gears when pointing in different
parts of the sky.
To change the goto approach direction, simply choose Goto Approach from the Scope Setup menu, select either Altitude or
Azimuth approach, choose positive or negative and press Enter.
Autoguide Rate – Allows the user to set an autoguide rate as a percentage of sidereal rate. This is helpful when
calibrating your telescope to a CCD autoguider for long exposure photography.
Cordwrap - – Cord wrap safeguards against the telescope slewing more than 360º in azimuth and wrapping accessory
cables around the base of the telescope. This is useful when autoguiding or any time that cables are plugged into the base of
the telescope. By default, the cord wrap feature is turned off when the telescope is aligned in altazimuth and turn on when
aligned on a wedge.
Utility Features
Scrolling through the MENU (9) options will also provide access to several advanced utility functions within the NexStar
such as; Compass Calibration, Periodic Error Correction, Hibernate as well as many others.
GPS On/Off - Allows you to turn off the GPS module. When aligning the telescope using AutoAlign, the NexStar still
receives information, such as current time, from the GPS. If you want to use the NexStar database to find the coordinates of
a celestial object for a future date you would need to turn the GPS module off in order to manually enter a date and time
other than the present.
Compass – These compass features that allows you to automatically move your telescope to the north position and
calibrate north for increased accuracy.
•
•
Move North – Automatically finds and moves the telescope to its true north position.
Calibrate North - After completing a successful GPS Alignment, use the Calibrate North feature to
compensate for magnetic declination errors and local anomalies. This will greatly improve the accuracy of
your initial star alignments the next time you align your telescope.
Level – Here you have leveling features that allows you to automatically move your telescope to its level position and
calibrate level for increased accuracy.
•
•
Move Level - Automatically finds and moves the telescope to its level position.
Calibrate Level– After completing a successful Altazimuth alignment this utility function calibrates the
internal downstop switch in the fork arm with the actual position of the optical tube. This downstop position
is then stored and used to assist in polar alignment when EQ North (or South) Alignment or Wedge Align is
selected. See Polar Alignment section in the Astronomy Basics chapter of the manual for more details on
using Calibrate Level.
Wedge Align – The NexStar has two equatorial wedge alignment modes (one for the northern hemisphere and one for
the southern) that will help you polar align your telescope by using its internal downstop to position the tube parallel to the
fork arms. Wedge Align uses a one-star alignment to determine the position of Polaris and slews the telescope to where
Polaris should be. By using the tripod and wedge to center Polaris in the eyepiece the fork arm (polar axis) will then be
pointing towards the actual North Celestial Pole. A Wedge Align can be done without having to do an initial star alignment.
Once Wedge Align is complete, align your telescope using either the EQ Two-Star or EQ AutoAlign methods. To wedge
align the NexStar in the Northern Hemisphere:
1.
2.
3.
4.
5.
Select Wedge Align from the Utilities menu and press Enter.
The NexStar will then level its tube perpendicular to its fork arms.
Once level, the NexStar will display the current time and site information. If any of this information needs to be
updated, press Undo and make the necessary changes. If the displayed information is correct, press Enter to
continue with Wedge Align.
The NexStar will then instruct you to rotate the telescope in right ascension (azimuth) until the front of the tube is
pointing up towards the Meridian. You can use the hand control buttons to rotate the scope or rotate it manually
by loosening the R.A. clutch.
Once you press Enter, the NexStar will slew to a bright alignment star and ask you to center the star in the finder
and the eyepiece and press Align.
6.
Based on this one-star alignment, the NexStar will slew to where it thinks Polaris should be. Use the tripod and
wedge adjustments to place Polaris in the center of the eyepiece. Do not use the direction buttons to position
Polaris. Once Polaris is centered in the eyepiece the polar axis will be pointed towards the North Celestial Pole.
Periodic Error Correction (PEC) - PEC is designed to improve photographic quality by reducing the amplitude of
the worm gear errors and improving the tracking accuracy of the drive. This feature is for advanced astrophotography and is
used when your telescope is polar aligned with the optional equatorial wedge. For more information on using PEC, see the
section on “Celestial Photography”.
Light Control – This feature allows you to turn off both the red key pad light and LCD display for daytime use to
conserve power and to help preserve your night vision.
Factory Setting – Returns the NexStar hand control to its original factory setting. Parameters such as backlash
compensation values, initial date and time, longitude/latitude along with slew and filter limits will be reset. However, stored
parameters such as PEC and user defined objects will remain saved even when Factory Settings is selected. The hand
control will ask you to press the "0" key before returning to the factory default setting.
Version - Selecting this option will allow you to see the current version number of the hand control and motor control
software. For the motor control, the hand control will display two sets of numbers; the first numbers are for azimuth and the
second set are for altitude.
Get Alt-Az - Displays the relative altitude and azimuth for the current position of the telescope.
Goto Alt-Az - Allows you to enter a specific altitude and azimuth position and slew to it.
Helpful
Hint
Hibernate - Hibernate allows the NexStar to be completely powered down and still retain its alignment when turned
back on. This not only saves power, but is ideal for those that have their telescopes permanently mounted or leave their
telescope in one location for long periods of time. To place your telescope in Hibernate mode:
1. Select Hibernate from the Utility Menu.
2. Move the telescope to a desire position and press ENTER.
3. Power off the telescope. Remember to never move your telescope manually while in Hibernate mode.
Once the telescope is powered on again the display will read Wake Up. After pressing Enter you have the option of
scrolling through the time/site information to confirm the current setting. Press ENTER to wake up the telescope.
Pressing UNDO at the Wake Up screen allows you to explore many of the features of the hand control without waking the
telescope up from hibernate mode. To wake up the telescope after UNDO has been pressed, select Hibernate from the
Utility menu and press ENTER. Do not use the direction buttons to move the telescope while in hibernate mode.
NexStar Ready
MENU
TRACKING
MODE
ALT-AZ
EQ NORTH
EQ SOUTH
OFF
RATE
SIDEREAL
SOLAR
LUNAR
VIEW TIME-SITE
SCOPE SETUP
SETUP TIME-SITE
ANTI-BACKLASH
SLEW LIMITS
FILTER LIMITS
DIRECTION BUTTONS
GOTO APPROACH
AUTOGUIDE RATE
CORDWRAP
UTILITIES
GPS ON/OFF
COMPASS
LEVEL
WEDGE ALIGN
PEC
LIGHT CONTROL
FACTORY SETTING
VERSION
GET ALT-AZ
GOTO ALT-AZ
HIBERNATE
USER OBJECTS
GOTO SKY OBJ
SAVE SKY OBJ
ENTER RA & DEC
SAVE LAND OBJ
GOTO LAND OBJ
GET RA-DEC
GOTO RA-DEC
ALIGNMENT
LIST
GPS ALIGNMENT
SEARCHING..
FINDING NORTH
Center Alignment Star 1
Center Alignment Star 2
AUTO ALIGN
POINT TUBE NORTH & LEVEL
ENTER TIME
ENTER DATE- MM/DD/YY
ENTER LONG/LAT
Center Alignment Star 1
Center Alignment Star 2
TWO-STAR ALIGNMENT
LEVEL TUBE
SELECT STAR 1
CENTER STAR 1
SELECT STAR 2
CENTER STAR 2
EQ ALIGNMENT
FINDING LEVEL
EQ AUTOALIGN
EQ TWO-STAR ALIGN
QUICK-ALIGN
POINT TUBE NORTH & LEVEL
ENTER TIME
ENTER DATE - MM/DD/YY
ENTER LONG/LAT
NAMED STAR
NAMED OBJECT
ASTERISM
TOUR
VARIABLE STAR
DOUBLE STAR
CCD OBJECTS
ABELL
IC CATALOG
CALDWELL
MESSIER
NGC
SAO
SOLAR SYSTEM