1
IP WatchDog HWg-WR02a
MANUAL
IP WatchDog HWg-WR02a
HW group
Shipment contents
IP Watchdog HWg-WR02a device
Printed Manual in Czech or English
Default network parameters configuration:
IP address:
192.168.1.60
Network mask :
255.255.255.0
Default gateway:
192.168.1.1
IP configuration via DHCP: Enabled
User name:
Not set
Password:
Not set
www.HWgroup.com
2 / 30
IP WatchDog HWg-WR02a
HW group
Characteristics and features
IP WatchDog is a device intended for monitoring Ethernet and serial
(RS232, RS485) devices by tracking the serial communication, ICMP
ping function or requesting a WWW page. By the means of these
functions it can RESET up to two monitored devices, such as servers,
routers or access and security systems.
Features
Ethernet - RJ45 (10BASE-T - IEEE 802.3).
1x RS-232 serial port (RxD, TxD, CTS, RTS, GND) - Setup mode 9600 8N1
1x RxD serial channel input
Automatic reset or start of 2 devices in terms of monitored actions.
Methods of monitoring Ethernet devices:
o Incoming ping
o Outgoing ping
o Incoming WWW
o Outgoing WWW page
Monitoring two RS-232 serial devices - IP WatchDog awaits the defined string on a serial
port in regular intervals.
Two independent relays for resetting or starting monitored devices up to 240V/16A
Manual control (startup/shutdown/restart) of the monitored devices.
Time synchronization from internet / intranet using protocols :
o TIME – older but simple and popular protocol (UDP port 37).
o NTP/SNTP – most used time synchronization protocols (UDP port 123).
o DayTime – protocol which is implemented in Windows (TCP/UDP port13).
Configuration methods:
o WWW page – device’s behavior configuration including manual relay control.
o RS-232 Setup – main parameters configuration over serial port from any RS-232
terminal - 9600 8N1.
o UDP Setup – configuration of main network parameters.
o TCP Setup – remote configuration of basic parameters in terminal over TCP.
Access security and relay control:
o It’s possible to define the range of IP which will be allowed to communicate with the
device.
o Access to WWW pages can be restricted to certain user names and passwords.
o Serial / TCP setup can be secured by user name and password.
Power supply 9-15 V DC.
Plastic box dimensions: 145x90x45 [mm]
www.HWgroup.com
3 / 30
IP WatchDog HWg-WR02a
HW group
Technical parameters
Ethernet port
+ Interface
+ Compatibility
+ Supported protocols
RJ45 (10BASE-T / 100BASE-Tx)
Ethernet: version 2.0/IEEE 802.3
IP: ARP, TCP/IP, NVT, RFC2217, UDP/IP, TIME, NTP, SNTP, DAYTIME
Serial port 1 DB9M
+ Data / stop bits / Parity
+ RS-232 Interface
+ Baud rate
8 / 1 / None
RxD,TxD,RTS,CTS,GND
Configurable in range from 50..115200 Bd
Relay outputs
Max. load of the contacts
max. 24V / 16A DC; max. 250V / 16A AC
Environment parameters
+ Operation conditions
+ Storage conditions
-5 to +60 °C / 10 to 90 %
-25 to +75 °C / 5 to 95 %
LED indication
+ RJ45 POWER (green)
+ RJ45 LINK & Activity (green)
+ Channel 1 (yellow)
Power supply on.
Ethernet connection.
Quick blinks when channel 1 in Reset state.
Short blink – Heartbeat received
+ Channel 2 (yellow)
Quick blinks – channel 2 in Reset state.
Short blink – Heartbeat received
+ Ch1 Manual / Setup NTP (red) RED Quick blinks – device in Setup (Serial / Telnet)
RED Short blink – time synchronized
GREEN lit – channel in manual reset
+ Ch2 Manual
GREEN lit – channel in manual reset
DIP switches
+ DIP1 SETUP
+ DIP2 SAFE
ON = RS-232 Setup mode (9600 8N1)
OFF = Ethernet mode
ON = require username & password every time (Web / Telnet)
OFF = do not require username & password
Note: Default username & password is blank
www.HWgroup.com
4 / 30
IP WatchDog HWg-WR02a
HW group
Monitored functions and parameters
+ Incoming Ping
IP range – range of IP addresses defined by IP and mask, from which the receiving PING
can be accepted.
Timeout delay for reboot – time interval, in range from 0 to 1800 s ( 0 = disabled ), that IP
WatchDog waits for incoming PING before causing RESET.
+ Outgoing Ping
Primary target IP – primary IP address where IP Watchdog sends the PING and from
which it awaits reply.
Secondary target IP – secondary IP address where IP Watchdog sends the PING and from
which it awaits reply, if primary target does not respond.
Quantity of failed ping for reboot – number of PINGs, that IP Watchdog assumes for lost
before causing RESET.
Outgoing ping interval – interval between sent PINGs in range from 0 to 1800 s ( 0 =
disabled).
+ Incoming HTML page
Server IP – IP address, which IP WatchDog requests HTML page from.
(WWW client)
Timeout delay for reboot – time intervals, in range from 0 to 1800 s (0 = disabled),
between RESETs, which are performed if IP WatchDog does not receive required string
in the HTML page.
Reading HTML page period – interval between requests for a WWW page in range from 0
to 1800 s ( 0 = disabled).
Incoming string inside incoming HTML page – string in ASCII, HEX or DEC format, that
is searched within the HTML page ( * stands for any character).
+ Outgoing HTML page
Request Page – HTML page address offered to the monitored device. Provides channel
(WWW server)
number and information about acceptable IP address and client’s IP address which
requested the page.
Device IP – IP address of the monitored device’s WWW client, from which the request for
HTML page was accepted.
Timeout delay for reboot – time interval, from the range of 0-1800 s ( 0 = disabled ), that
IP Watchdog waits for the request for HTML page before performing RESET.
+ Incoming RS232 String Incoming string – string in ASCII, HEX or DEC format which is expected on the RS-232
port ( * stands for any character).
Timeout delay for reboot – time interval, from the range of 0-1800 s ( 0 = disabled ), that
IP Watchdog waits for the requested string before causing RESET.
Other parameters
+ Time synchronization
+ Power supply
+ Dimensions
+ Weight
Interval 1800 s
12 - 30 V/ 150 mA DC- coaxial power connector, GND on shield
145 x 90 x 45 [mm] (H x W x D ).
225 g
Main WatchDog functions
Monitoring Ethernet devices using incoming ICMP command - PING.
IP WatchDog awaits incoming ping from the monitored device in preset intervals.
Monitoring Ethernet devices using outgoing ICMP command - PING.
IP WatchDog sends a ping command to the defined IP address in regular intervals and then it awaits
a reply. It’s also possible to set a secondary IP, used in case the primary address is busy.
Monitoring HTTP servers’ activity by requesting a WWW page.
IP WatchDog regularly requests a WWW page from a monitored device (suitable in case the target IP
has the ping function blocked.)
Monitoring the activity of HTTP clients by providing a WWW page.
IP WatchDog awaits requests for its own WWW page in regular intervals. Suitable for systems without
a WWW server
Monitoring the RS-232 line data stream by awaiting requested string.
IP WatchDog detects a specific string in a serial port data stream in regular intervals.
Reset of monitored devices or Starting backup systems in case of a dropout.
Manual control of both channels.
www.HWgroup.com
5 / 30
IP WatchDog HWg-WR02a
HW group
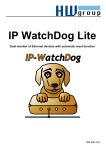
Connectors
Layout of connectors, operating elements and relay connection is shown below:
www.HWgroup.com
6 / 30
IP WatchDog HWg-WR02a
HW group
Serial - DB9M
Connector DB9M (RS-232)
Channel 1
Channel2
1
TxD
-->
Unused
2
3
RxD1
<--
Receive Data
4
GND
5
6
7*
CTS
8
RTS
RxD
Transmit Data
Unused
---
System Ground
<--
Unused
-->
Request to Send
Clear to Send, (Receive Data)
9
Unused
* In the Setup mode it works as CTS for configuring UART. In the operating mode it
works as a data input for channel 2.
Switching the DIP1 during the first 5 seconds since power-on will cause Master
Reset, which restores all factory configuration. All user’s settings, including IP
and passwords will be lost!
www.HWgroup.com
7 / 30
IP WatchDog HWg-WR02a
HW group
Connection and basic configuration
In this chapter you will learn connecting the IP WatchDog to your PC or company network, setting it
up the way it would satisfy your needs and putting it into service.
Device connection
The following procedure is recommended for quick setup of the device. Detailed description of all
parameters and commands can be found in the chapter called “Parameters description”.
Cable connection
Set switches from DIP1 to DIP4 into OFF position.
Connect the IP WatchDog to the Ethernet 10 Mbit or 10/100 Mbit network. For direct connection
to the PC use a crossed TP cable, and for connection to hub/switch/router use classic TP patch
cable.
If you are planning to connect some RS-232 device to the WatchDog, connect it using the
supplied Laplink cable (Serial1 interface RS-232 is on the DB9F connector).
Connect the supplied power adaptor to the grid and plug it into the power connector of the IP
relay. The Power LED indicator should light up.
If the Ethernet connection is OK, the LINK indicator should light up and then blink according to
network data transfer (Activity signalization).
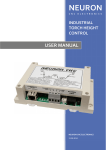
IP WatchDog connection topology
www.HWgroup.com
8 / 30
IP WatchDog HWg-WR02a
HW group
Primary configuration of Ethernet parameters
The primary configuration of the IP WatchDog’s Ethernet parameters (IP address, network mask
and gateway) can be done in the following ways:
UDP Setup – the IP WatchDog must be located on a local Ethernet network segment.
RS-232 Setup – In case no Ethernet connection is available.
TCP Setup – only if you know the IP address of the device! TCP setup allows setting the
same parameters as Serial Setup. It also allows changing the parameters remotely via
Ethernet / Internet.
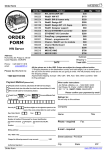
Configuring the IP address – UDP Config
UDP Config utility – root directory of the
supplied CD (Windows and Linux versions).
Available for download at www.HWgroup.com
Software > UDP Config.
Click the icon to launch UDP Config.
The program automatically looks for
connected devices.
To search for devices, click the Find
Devices icon.
The program searches for devices in your local network. Individual Poseidon units are identified by
their MAC addresses (printed on the label at the bottom side of the unit). Double-click a MAC
address to open a basic device configuration dialog.
Configure network parameters
IP address / HTTP port (80 by
default)
Network mask
Gateway IP address for your
network
Device name (optional)
Click the Apply Changes button to save the
settings.
Enter the IP address of the device into your
WWW browser and press Enter. You will get
a Main Page of the www interface.
Detailed information on configuration
methods over www interface can be found in
the chapter called Device configuration via
WWW.
www.HWgroup.com
9 / 30
IP WatchDog HWg-WR02a
HW group
Connecting to IP WatchDog using terminal and RS-232 Setup
Below you will find description of the supplied
Hercules Setup Utility program. If you do not
have this program you can configure the
device using any RS-232 terminal.
Disconnect the power adaptor.
Set DIP1 = ON, DIP2 = OFF, DIP3 =
OFF, DIP4 = OFF.
Connect the device to your PC using the
supplied RS-232 cable. Use Port 1 (DB9F)
at the IP Watchdog.
Go to the “Serial” tab of the Hercules Setup
Utility.
Set the proper serial port and
communication parameters - 9600 8N1
(step 1).
Press the “Open“ button.
Connect the power adaptor to the power connector of the IP relay, the green Power indicator
should light up.
The list of configuration parameters should now appear in the “Received/Sent data“ window.
The desired parameter can be set using the letter of the corresponding option and a proper
value. (Example: „I192.168.6.8“ for configuration of device’s IP address).
Connecting to IP WatchDog using terminal and TCP Setup
Go to the ”TCP Client“ tab.
Enter the preset IP address to the ”Module
IP“ field (step 1).
Into the “Port“ field enter “99“ (step 2), no
matter which port you have set for
communication with the device. (Port 99 is
reserved for TCP setup).
Press the “Connect“ button (step 3).
The prompt ”WEB51>“ will appear in the
”Received / Sent data“ window. Click into
this field and press Enter. The window will
be filled with actual configuration.
Specific parameters can be set by choosing
the letter of the corresponding option and a
proper value (example: „I192.168.6.8“ for
configuration of device’s IP address).
Note: Complete list of parameters and commands with detailed descriptions can be found in the
“Description of configuration parameters” chapter.
Help for the commands is available through sending command in format “command?” and pressing
Enter. Example: “I?” + Enter.
When the configuration is finnished, you must restart the device with the “R” command. Disconnect
by pressing the “Close” button.
Serial Setup can be closed temporarily by “x” command. Don’t forget to switch DIP1 back to the
OFF position when you finished your work, or IP WatchDog will not be able to communicate via
Ethernet.
www.HWgroup.com
10 / 30
IP WatchDog HWg-WR02a
HW group
Configuration of basic network parameters using a terminal program
For primary launch the IP WatchDog needs to have configured only several main Ethernet
parameters – the IP address, network mask and gateway which can be found in the IP Setup
section.
WatchDog’s IP address
I: IP address
Entry example: I192.168.6.4
192.168.6.19
Network mask
M: Mask
Entry example: M255.255.255.0
255.255.255.0
Default gateway
G: Gateway
Entry example: G192.168.6.1
192.168.6.1
Note: Serial Setup allows setting lots of other parameters. These, though, are more easily
configurable via Ethernet using the Hercules Setup Utility or via WWW interface. Detailed
description of configuration parameters of the terminal Setup can be found in chapter: “Description
of configuration parameters”.
Configuration troubleshooting
The MAC address of the device did not appear in the “Modules MAC list” or the device does
not communicate over Ethernet.
Check the power adaptor’s connection (the Power indicator of the device must be lit).
Your Ethernet network must support 10 Mbit devices.
Check whether you are using a correct TP cable (TP Patch cable for connection to a
hub/switch/router; crossed TP cable for direct connection to a PC).
Check configuration of DIP switches of the device (all should be in OFF position). If DIP1 is ON,
the device is in RS-232 Setup mode and will not communicate over Ethernet. After
switching DIP1 into OFF position, it’s necessary to restart the device by disconnecting the power
supply for at least 3 seconds.
If you are using a firewall, make sure it does not block the communication with the device.
www.HWgroup.com
11 / 30
IP WatchDog HWg-WR02a
HW group
Device configuration via WWW
The IP WatchDog contains a WWW interface allowing easy and detailed control of the device’s
activity. The interface consists of four HTML pages which can be accessed by entering the IP
address of the device to your web browser.
IP WatchDog Main Page
After entering WatchDog’s IP address to the web browser you will get a main page showing the
basic parameters of WatchDog’s channels and statistics for the last 20 operations of each channel.
In the upper part of the screen you can see links for advanced properties configuration of the IP
WatchDog:
www.HWgroup.com
12 / 30
IP WatchDog HWg-WR02a
HW group
Displayed data
Refresh page stop (Refresh page for): - Interval of the Main Page refresh (see Setup
Page).
Refresh now – Immediately refreshes the Main Page. Because of used scripts it’s not
possible to use browser’s Refresh (F5).
Device name – name of the monitored device (see Channel Admin Page).
Channel – information on closing or opening of the channel (Enable / Disable).
Channel type – Information on relay pin configuration of the given channel (PO / PF / NO /
NC – see chapter Device versions)
Initial Channel State – channel state after startup (Open / Close / PowerOn / PowerOff)
depending on configuration used (see chapter Device versions).
Reboot Channel State – channel state after reset (Open / Close / PowerOn / PowerOff)
depending on configuration used (see chapter Device versions).
Monitoring method – actual function assigned to the channel (see Channel Admin Page):
o Incoming Ping – IP WatchDog waits for ICMP command - PING from the defined
address or range of addresses defined by IP and mask.
o Outgoing Ping – IP WatchDog sends the ICMP command PING to the defined
primary IP address and awaits response. If not received, the same command is sent to
the secondary IP.
o Outgoing HTML page – IP WatchDog requests the HTML page from a WWW server
located on the defined IP address.
o Incoming HTML page – IP WatchDog awaits the request for its own WWW page from
the device defined by IP address.
o Incoming RS232 String – IP WatchDog monitors the data on RS-232 port and awaits
the required string.
Monitoring period – maximal interval between resetting impulses.
Reboot Hold Time – the length of a reboot impulse (see Channel Admin Page)
Channel state – information on actual channel state:
o Channel Inactive - channel is deactivated. Allows manual relay control using Channel
Admin Page.
o Device Checking – Channel waits for a refreshing impulse.
o Device Idle – Channel was reset. Awaiting the first refreshing impulse.
o Power Cycle Reboot - Performing channel reset.
o Manual WWW reboot – Channel was reset manually.
Manual Reboot – Resetting button.
Last 20 Actions – last 20 stored actions:
o --- IP-WatchDog: startup --- starting IP WatchDog
o First synchronizations of time – synchronization by NTP/Time/DayTime server.
o Ready – after Watchdog’s turning on/reset the channel is ready
o Shutdown – channel shutdown.
o Run – channel start.
o Automatic reboot – automatic Reset.
o Manual reboot: from website – manual reset from the WWW page.
o Reset by response to outg. ping – received the response for outgoing PING.
o Reset by response to inc. ping – received an incoming PING.
o Reset: by incoming HTML page – requested WWW page received.
o Reset by response to inc. HTML page – request for HTML page accepted.
o Reset by response to inc. RS232 String – received a valid RS-232 string.
www.HWgroup.com
13 / 30
IP WatchDog HWg-WR02a
HW group
IP-WatchDog Channel Admin Page
HTML pages IP-WatchDog Channel 1 Admin Page and IP-WatchDog Channel 2 Admin Page allow
complete administration of the monitored channels.
www.HWgroup.com
14 / 30
IP WatchDog HWg-WR02a
HW group
Channel 1 Setup
Device name – Makes orientation easier when configuring channels and solving the
problems with the monitored device. It can contain at most 20 characters.
Reboot Hold Time – duration of the Reset state. Allows setting time when the channel/relay
stays in reset state (manual or automatic). Duration can be set from 1 to 1800 seconds. If this
parameter is set to “0” then the Reset state lasts until the next refreshing impulse comes.
This mode is suitable for activation of the backup device or identification of the error state
using other signalization means. More information can be found in the Reboot Hold Time
paragraph of the chapter “Application hints”.
Timeout After Reboot – time interval that IP WatchDog waits before causing other Reset
after the previous one (or after first launch of the device), if monitored data are not received.
The Interval can be from 0 to 1800 seconds. The “0” value causes device to wait for first
incoming data from the monitored device.
Channel enabled/disabled – enables/disables a channel. If the channel is deactivated, the
additional Manual Control button will be available above the Save values button:
o ManualControl : Inititial State – indicates a default channel state (or relay). Pressing
the button changes the state to reset state.
o ManualControl : Reboot State – indicates channel state (or relay) in reset level.
Pressing this button changes the state to idle state.
Channel type – Information on relay pin configuration of specific channel (see Channel type
in Main Page)
Initial Channel State – idle state of the channel after startup (Open / Close / PowerOn /
PowerOff) Depending on configuration used (see chapter Device versions).
Reboot Channel State – Channel state when in Reset state (opposite to the Initial Channel
State value).
Reset by Ping – Incoming Ping
IP range – range of IP addresses given by IP address and network mask, which PING will
be accepted from.
Timeout for reboot – interval, that IP WatchDog waits for incoming PING from the monitored
device before causing Reset. This interval can be from 0 to 1800 seconds, where 0 means
disabling the function.
Reset by Ping – Outgoing Ping
Primary target IP – IP address of the target device.
Secondary target IP – secondary IP address of the target device. In case of monitoring a
single device (IP), both primary and secondary address will be the same.
Pinging Timeout– interval between individual sent pings from 0 to 1800 seconds. “0” value =
function disabled.
Failed pings per timeout for reboot– Number of allowed sent PINGs without response from
the IP WatchDog during a Pinging Timeout interval
www.HWgroup.com
15 / 30
IP WatchDog HWg-WR02a
HW group
Monitoring by HTML page – HTML page (TCP Server)
Request Page – http address of the WWW page which must be requested from the IP
WatchDog to prevent Reset.
Device IP – IP address that can send a valid request for a WWW page to reset the timer.
Timeout for reboot – interval, that IP Watchdog waits for the request for the WWW page
before causing Reset. Interval can be from 0 to 1800 seconds, where the 0 value stands for
disabled function.
Monitoring by HTML page – WWW page Request (TCP Client)
Server IP – IP address of the server which the request for WWW page will be addressed to.
Address of HTML page on the server – name of required file (e.g. index.html, index.htm,
default.html etc.), file must be saved in a root directory of the server.
Actual address of HTML page on the server – complete file address allowing fast address
verification.
Timeout for reboot – interval, that the IP WatchDog waits for a WWW page before causing
Reset. This parameter must be set in consideration of the speed of the transfer line and
server load. Interval can be set from 0 to1800 seconds, where 0 stands for disabled function.
Failed attempts to read HTML page – Number of allowed failed attempts to read HTML
page before Reset.
Monitoring by RS-232 String
Timeout for reboot – interval, that IP WatchDog waits for a string on the appropriate RS-232
port before causing Reset. Interval can be set from 0 to 1800 seconds where 0 represents
disabled function.
Incoming string inside incoming HTML page – sets a string that will be considered as a
prove of device activity. The string can be defined in HEX, DEC or ASCII format. Combining
HEX, DEC and ASCII chars can be achieved using prefixes:
o # - for HEX characters;
o $ - for DEC characters;
o <string> - for ASCII characters.
Note: It is also possible to use alternative symbols: ? for any individual character and * for any
character string – for example, if you set string IP_WTD – string like * IP_WTD #10#13 will be
accepted.
www.HWgroup.com
16 / 30
IP WatchDog HWg-WR02a
HW group
IP WatchDog Setup Page
The IP WatchDog Setup Page contains two groups of configuration parameters: Global and Time
and Date.
IP WatchDog Global
Current Network settings – Actual device’s network parameters configuration. If the DHCP
server is allowed to assign them (DHCP enabled), the gained values are then damped.
o IP address – actual device’s IP address
o Mask – actual network mask
o Gateway – actual Gateway
o DHCP enabled/disabled – information whether assigning of the network parameters
by DHCP server is enabled
RS232 speed (baudrate) – baudrate configuration of the RS-232 ports – required for
receiving valid strings when monitoring the serial channel.
Main Page Refresh time – Main Page refresh rate.
www.HWgroup.com
17 / 30
IP WatchDog HWg-WR02a
HW group
Time and Date
Time – shows actual time in HH:MM:SS format that can be set in IP WatchDog.
Date – shows actual date in DD/MM/YYYY format that can be set in IP WatchDog.
Time server IP address – server IP address, which IP WatchDog will be synchronized with.
Time server protocol - protocol for time synchronization. If the server is not located within
internal network, proper router or firewall communication ports must be also enabled for this
server.
o NTP – most common time synchronization protocols (UDP port 123). Requires filling
of the following IP-WatchDog fields: time zone and Time server: time zone.
o Time – older but easy protocol (UDP port 37).
o DayTime – not very common protocol that is implemented in Windows (TCP/UDP
port13).
IP-WatchDog: time zone – time zone according to GMT in the +/- HH:MM:SS format, where
IP WatchDog is located.
Refresh Time now – button for immediate time synchronization.
IP WatchDog – File Upload
IP WatchDog – File upload is a page for easy firmware update over the www interface. It consists of
two lines and two buttons:
Current version – displays actual firmware version
Browse – allows easy search for the proper HWG firmware file.
Upload – performs upload of the firmware to the IP WatchDog
Note:
o When firmware is uploaded the IP WatchDog will be automatically rebooted.
o The page is accessible ONLY via IP-WatchDog Setup Page
www.HWgroup.com
18 / 30
IP WatchDog HWg-WR02a
HW group
Description of configuration parameters
In the following chapter you will find a detailed description of all configuration parameters used for
device settings, which can be done via serial or TCP terminal. Information on the connection to
Serial or TCP Setup can be found in the chapter „Quick Setup“.
Device’s default configuration
Bellow you can find the list of standard configuration of any supplied IP WatchDog. The default
configuration can be set anytime by choosing option “D0” or “D1” from Setup. Description of device
configuration and command entering can be found in chapter “Quick Setup”.
*** IP-WatchDog - version 1.4.7 - May 28 2005 19:10:31 ***
============================================================
ActualTime: 0:07:42 ActualDate: 6/6/2005
Time is synchronized with: NTP Server[192.43.244.18]
============================================================
MAC Address
00:0A:59:03:02:EF
========== IP Setup ========================================
I: IP address
192.168.5.20
M: Mask
255.255.255.0
G: Gateway
192.168.5.1
B: DHCP configuration
OFF
========== In IP access WEB filter =========================
W: IP address
0.0.0.0
N: Mask
0.0.0.0
========== Security Setup ==================================
%A: TCP authorization
OFF
%K: TEA key
0:[01:02:03:04]
1:[05:06:07:08]
2:[09:0A:0B:0C]
3:[0D:0E:0F:10]
%S: Remote setup
UDP & TCP(Port:99)
========== WebPage-Security Setup ==========================
AN: Authorization username (not set)
AP: Authorization password (not set)
========== Other ===========================================
P: Port for NVT
(Port: 23)
D: Load Settings from EEPROM
R: Reboot
X: Exit
WatchDog>
www.HWgroup.com
19 / 30
IP WatchDog HWg-WR02a
HW group
Device’s network parameters
I=========== IP Setup ======================
IP WatchDog’s IP address
MASK, IP address and Gateway
description:
I: IP address
192.168.6.19
Entry example: I192.168.6.4
Sets the IP WatchDog’s IP address.
Ethernet device communicates:
Network Mask
M: Mask
255.255.255.0
Entry example: M255.255.255.0
Configuration of local network IP mask. The IP relay will
communicate via Gateway with all IP addresses except
those defined by Mask and own IP address.
Default Gateway
G: Gateway
192.168.6.1
Entry example: G192.168.6.1
Gateway address, which grants device an access to
external networks. Except for the IP addresses defined
by configured IP address and Mask.
Within local Ethernet. You don’t
need a Gateway, but IP addresses of
both devices must be in the range
allowed by the Mask setting. If you
set the Mask to 255.255.255.0 it
means that IP addresses may differ
only in the last byte of the IP address.
Outside the local network – via
Gateway, which is located in the
range or IP addresses allowed by the
mask.
You can also restrict the range of IP
addresses that the device will not
communicate with. This can be set using
„In IP Setup“. For debugging purposes
we recommend keeping this parameter at
0.0.0.0.
Enabling automatic configuration by DHCP server
B: DHCP configuration
OFF
Possible options: 0 / 1 (0 – disabled, 1 - enabled)
Entry example: B1
DHCP server allows automatic device configuration without the need of any user’s actions. IP
address, network mask and default gateway parameters can be assigned. Because DHCP assigns
IP address that is available at the moment, it does not always have to be the same.
Securing by restricting the range of IP addresses
====== In IP access filter ======
IP address for remote configuration
W: IP address
0.0.0.0
Entry example: G192.168.6.1
IP address of the network or computer, which can establish the connection with the device. After bit
multiplication of the opposite IP address by restrictive Mask (N option) you can gain the address
mentioned here. Otherwise the device will not react.
Mask for remote configuration
N: Mask
0.0.0.0
Entry example: G192.168.6.1
Mask restricting access addresses, which can establish communication with the device. With the
help of this mask you have a higher chance to prevent a security break or avoid unwanted
communication with unauthorized device.
www.HWgroup.com
20 / 30
IP WatchDog HWg-WR02a
HW group
====== Security Setup ===================
Allowing remote configuration via TCP/IP or UDP/IP
%S: Remote setup
UDP & TCP
Possible options: 0 / 1 / 2 / 3 (0 – disabled, 1 – UDP, 2 – TCP, 0 – UDP & TCP)
Entry example: %S1
Allowing TCP/IP setup at port 99.
Securing access to WWW interface administration
========= WebPage-Security Setup ========
User name
AN: Administrator username
(not set)
Entry example: ANname
User name that will be required on access to the Channel Admin Page and SetupPage or when
accessing serial / TCP setup (if DIP3 is closed).
Password
AP: Administrator password
(not set)
Entry example: APpassword
Password that is required when accessing the Channel Admin Page and SetupPage or accessing
the serial / TCP setup (if DIP3 is closed).
Note : Securing by user name and password can be deactivated by inputting empty user name and
password.
Other device parameters
=========== Other =====================
Loading the default configuration
D: Load Settings from EEPROM
Possible options: 0 / 1 (0 – Load from EEPROM, 1 – Saving actual configuration into EEPROM).
Entry example: D0
Allows saving WatchDog’s parameters for later reload in case of necessary return to former
configuration.
Device Restart
R: Reboot
Entry example: R
Software restart of the IP relay. Necessary e.g. for changing the IP address etc.
Leaving the Setup mode
X: Exit
Entry example: x
Allows to exit the Setup temporarily and to run the IP WatchDog in the operational mode even with
closed DIP1. If the DIP1 is closed at next WatchDog’s startup as well, the device will enter the
Setup mode.
www.HWgroup.com
21 / 30
IP WatchDog HWg-WR02a
HW group
Application hints
Security
Access to the configuration WWW page - Channel Admin Page and Setup Page can be also
restricted by user name and password, which can be defined in the serial / TCP Setup. If user name
of password has been set, it is required for every access to these pages and for every manual reset
using the Manual Reboot button of the Main Page. This precaution can be deactivated by sending
an empty user name and password (default state).
Advanced security provides DIP3, which, if activated, requires user name and password
authorization even for access to serial / TCP Setup. When DIP3 is closed the UDP Setup is
deactivated, because it would allow changing the network parameters easily, even for beginner.
Reboot Hold Time
Besides the classic reset of the monitored device and its following release, the IP WatchDog Lite
allows also the possibility of permanent Reset state in case the monitored device does not respond
to the WatchDog Lite’s requests or does not send regular refresh impulses. This mode can be
activated by setting the Reboot Hold Time parameter to “0”. If the RESET state is called in this
mode, the channel (or its output) remains in this state until the monitored device reports itself again
or the channel is deactivated.
The function is suitable for cases when IP WatchDog Lite does not reset directly monitored device
or when one of the channels serves for activation of the backup device or other alarm system.
Note: If the value of the Reboot Hold Time = 0, the WatchDog Lite enters the Permanent Reboot
Hold Time mode where the Reset function and especially Manual Reset behave the different way
than in the standard mode that were described above. This Reset state can’t be ended by itself.
Especially using Manual Reset with deactivated channel when there is no way to end the Reset
state and only possibility is to activate the channel and initialize the refresh impulse.
Time protocol
The Time protocol consists in the server listening on the port 37 and after establishing connection it
(using the TCP or UDP protocol) sends user a 32bit number with a mark (in a binary supplement format).
The number represents the number of seconds since 00:00:00 of the January 1, 1900 GMT. The number
2.398.291.200 therefore corresponds to 00:00:00 of the January 1, 1976 GMT and number 1.297.728.000 corresponds to 00:00:00 of the November 17, 1858 GMT. If the server does not support
this function the connection will be either refused or closed immediately. The time synchronization
accuracy using this protocol is not very high and lies around 1 second. Detailed description of the Time
protocol can be found in RFC-868 document.
www.HWgroup.com
22 / 30
IP WatchDog HWg-WR02a
HW group
NTP
Network Time Protocol (port 123 UDP, for tracing it’s also TCP), which also uses 64bit time mark in the
number format with fixed base point, is much more sophisticated than Time protocol and more accurate
as well. It’s intended for permanent time synchronization of more computers on network. The NTP
protocol is based on the fact, it doesn’t try to synchronize the computer times mutually (that means it
does not “average out” the times), but the time is synchronized in comparison with the UTC time
("Universal Time Coordinated").
The synchronized servers are thus placed into hierarchical multi-level tree structure. Thanks to this the
load can be poised and the NTP service can be distributed according to the user’s needs. In the top layer
there are main time devices (atomic clock, GPS, clock set by a time signal, etc.) Each server is in a
specific layer (stratum), while the first layer (stratum-1) represents the server that is connected to some
external time device (stratum-0). Its “descendants” (e.g. in second, third or fourth layer) are assumed to
be less accurate.
The synchronization accuracy lays in tenths of milliseconds. The main transfer protocol UDP. The NTP
protocol description can be found in the RFC-1305 document.
SNTP
The SNTP (Simple Network Time Protocol) is based on the NTP (Network Time Protocol) and for
communication it uses port 123 as well. Main difference makes the client, which only supports SNTP,
cannot serve as a server for other clients, allows time synchronization by one server only and has lower
synchronization accuracy. The synchronization accuracy of this protocol lays from units to tenths of
milliseconds which is sufficient for common usage. Detailed description of the SNTP protocol can be
found in the RFC-2030 document.
Using IP WatchDog in P2P networks
In case you use the IP WatchDog in the environment of the Peer-to-Peer networks, such as DC++,
Kazz, Bittorent etc, there might occur flooding of the IP WatchDog’s network interface, caused by a
large amount of residual packets which can cause the false restarts of the monitored devices. Then
it is recommended to lower the @R parameter in TCP Setup to circa 60 (according to the monitoring
period). The value gives the number of minutes between individual restart of the IP WatchDog.
Monitored devices WILL NOT be restarted.
Master Reset
In case the TCP Setup or WWW becomes blocked by either wrong configuration or erroneous
Firmware upload, the Master Reset can be executed. This will restore the default factory
configuration.
Warning : Executing Master Reset will cause that all the user’s settings including IP and
passwords will be lost!
Procedure of the Master Reset:
Disconnect the power from the IP WatchDog Lite
Turn the power on.
During first 5 seconds since power-on change the DIP1 position to the second position and
then back again.
Wait for circa 30 seconds. The IP WatchDog Lite default configuration will be restored.
www.HWgroup.com
23 / 30
IP WatchDog HWg-WR02a
HW group
Testing and operation hints for Windows and Linux
Testing the function of Incoming Ping
Testing command of the Incoming Ping function for Windows
Application of the ICMP PING function in
Windows is very simple but can be even a
little tricky. Main ping testing can be
managed via Windows command line
(START menu -> Run -> enter “cmd” and
press OK). Command line application will
appear (in older Windows versions it is MSDOS window). In that just enter the
command in following format:
ping watchdog_ip_address, for example ping 192.168.5.60
You will see a screen similar to this one:
Microsoft Windows XP [Verze 5.1.2600]
(C) Copyright 1985-2001 Microsoft Corp.
C:\Documents and Settings\Vít Olmr>ping 192.168.5.60
Příkaz PING na 192.168.5.60 s délkou 32 bajtů:
Odpověď od 192.168.5.60: bajty=32 čas=1ms TTL=64
Odpověď od 192.168.5.60: bajty=32 čas < 1ms TTL=64
Odpověď od 192.168.5.60: bajty=32 čas=1ms TTL=64
Odpověď od 192.168.5.60: bajty=32 čas < 1ms TTL=64
Statistika ping pro 192.168.5.60:
Pakety: Odeslané = 4, Přijaté = 4, Ztracené = 0 (ztráta 0%),
Přibližná doba do přijetí odezvy v milisekundách:
Minimum = 0ms, Maximum = 1ms, Průměr = 0ms
If you wish to send the PING permanently, enter the command with the –t parameter: :
ping 192.168.5.60 –t
Command line can be also launched using the standard windows shortcuts, that can be located in the
program menu:
Windows 98: Start | Programs | MS-DOS Prompt
Windows NT: Start | Programs | Command Prompt
Windows ME: Start | Programs | Accessories | MS-DOS Prompt
Windows 2000: Start | Programs | Accessories | Command Prompt
Problems in using PING under Windows can appear when using firewall or having Windows XP with
SP2 (service pack), that already contains a simple firewall. So if you are unable to use PING to the
Watchdog or from it, check that the firewall configuration does not block ICMP commands echo reply and
echo request (if it does, unblock them) or use other method (like WWW page). Some servers themselves
block the PING commands to prevent overloading and “pinging to death” (so called Ping of Death
attack).
www.HWgroup.com
24 / 30
IP WatchDog HWg-WR02a
HW group
Test command for Incoming Ping under Linux/Unix
Using the PING command under Unix and Linux OS is as simple as in the case of Windows, maybe
even easier because you don’t have to run the command line. Just enter the following into the console:
ping 192.168.5.60
Operational command of the function Incoming Ping under Windows
Windows provide a free service for Windows Server 2000/2003 and Windows 2000/XP, that can be
downloaded from
http://www.hw-group.com/download/IPWDT_Setup_1.0.zip
allowing sending ping to the defined address in regular intervals. The form of services is applied to allow
running it automatically even on server systems without a need of logging in. After Unpacking and
installation it is necessary to modify a configuration file IPWDT.ini, that can be located at C:\Program
Files\HW group\IPWD Tools .
It contains the following:
[PING]
IP=192.168.1.9
INTERVAL=10
DEBUG=2
Interval is measured in seconds, Debug parameter defines
whether the communication will be logged in the directory
C:\Program Files\HW group\IPWD Tools (max. file size is
5MB).
An icon for IP WatchDog Tools Control created in Control
panel allows activation and deactivation of the services.
Operational command for Incoming Ping under Linux/Unix
In Unix systems a so called demon cron is used. It executes commands according to the crontab
which is a simple text document that contains data in a tab in following format:
1
*/1
2
*
3
*
4
*
5
*
6
user’s account
7
command
Where :
1. minute
2. hour
3. day of a month
4. month
5. day of a week (0 - Sunday, 1 - Monday... 6 - Saturday)
6. user’s account
7. path to the program or command that should be executed
This tab can be edited easily using a command crontab –e, that opens the specific document. The
created entry can look like this :
*/1
*
*
*
*
root
ping 192.168.5.60
This command will execute the ping every minute.
www.HWgroup.com
25 / 30
IP WatchDog HWg-WR02a
HW group
Testing the Outgoing HTML Page function
Testing the Outgoing HTML Page function
For the primary test of this function it is possible to use an online form, that can be found at
http://www.hwg.cz/products/ip_watchdog/test/test_outgoing_page.html
Just enter IP address of the IP Watchdog and the port where it listens. In fact IP WatchDog always
listens at port 80, but in case there is a lack of the public IP, it is possible to use address translation (NAT
– network address translation). Then enter your public IP address and port number configured in the
NAT.
Operational command Outgoing HTML Page under Linux/Unix
Unlike Windows, the Unix systems again provide a popular cron, while in the command position we
will use function wget – wget http://192.168.0.1/index.html
Example :
*/1
*
*
*
*
root
wget http://192.168.0.1/index.html
This will execute ping every minute.
www.HWgroup.com
26 / 30
IP WatchDog HWg-WR02a
HW group
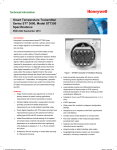
Mechanical dimensions
www.HWgroup.com
27 / 30
IP WatchDog HWg-WR02a
HW group
Contact
HW group s.r.o.
Rumunska 26 / 122
Prague 2
120 00
Tel. +420 222 511 918
Fax. +420 222 513 833
–
http://www.HW-group.com/
www.HWgroup.com
28 / 30