1
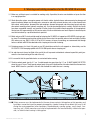
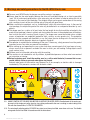
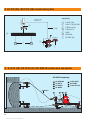
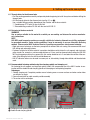
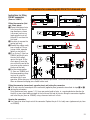
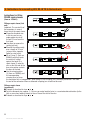
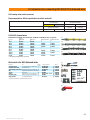
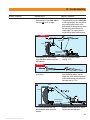
9. Instructions for connecting Hilti DS-W 10.5 diamond wire Instructions for fitting DS-WC connectors 1 2 (Item no. 340427) 13 mm Fitting the connector (first 10 mm end, clevis piece) Clamp the diamond wire 3 in the vice with the cutting direction as shown (see arrow) and use an 10 mm angle grinder to cut off the end 13 mm from the first bead. 4 Use pliers to remove the y x spring (pull out). Remove the rubber neatly over a length of 10 mm (using a knife, cigarette lighter or wire brush). Fit an O-ring 쩸 (Item no. 5 235844) pushing it onto the wire until seated against the bead. Fit the c clevis piece 쩹 onto the 1 mm wire so that the end of the bare wire section contacts the base of the hole. Use the crimping pliers 쩺 (Item no. 235845) and the corresponding crimping jaws to crimp the connector fully in one operation. When doing so, the crimping jaws should be positioned 1 mm from the end of the connector. Worn or deformed crimping jaws should not be used. Fitting the connector (second end, opposite piece) and joining the connectors ■ To fit and crimp the second part of the connector (opposite piece) proceed as described at steps to . ■ Joining the connectors Twist the diamond wire, approx. 1–1.5 turns per metre length of wire, in a counterclockwise direction (to the left) as seen when looking straight at the cut face of the end of the wire. Bring the connectors together and insert the pin (item no. 235842) using a hammer to drive it in flush. Opening the connectors ■ Use a punch to drive the pin out of the connector. Replace the pin if it is badly worn (replacement pin, item no. 235842). 21 Printed: 08.07.2013 | Doc-Nr: PUB / 5069762 / 000 / 01