1
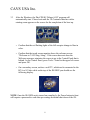
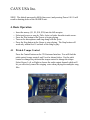
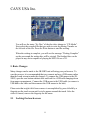
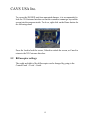
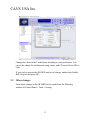
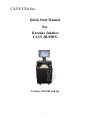
CAVS USA Inc.
Quick Start Manual
For
Karaoke Jukebox
CAVS JB-99RX
Version 1.0.0.261 and up
1
CAVS USA Inc.
Contents
1. Unpacking
2. Installation
2.1 Touch Screen monitor
2.2 Mixer-Amplifier
2.3 Microphone
3. Booting up
4. Basic Operation
4.1 Pitch & Tempo Control
4.2 Record
5. Basic Changes
5.1 Locking the touch screen
5.2 Bill acceptor changes
5.3 Other changes
6. Mixer-amplifier
6.1 Master volume control
6.2 Vocal volume control
6.3 Base (LO) level control
6.4 Echo level control
7. Cassette recorder
8. Frequently Asked Questions (FAQ)
9. Technical Support
2
Page
3
4
4
5
5
7
9
9
10
11
11
12
13
14
15
15
15
15
16
16
17
CAVS USA Inc.
1. Unpacking
The unit will come in two pieces, one carton box and one wooden crate.
The carton box includes:
Touch screen monitor
Monitor stand
The wooden crate includes:
JB-99RX
In the side pockets of JB-99RX:
Power cable
2 Keys
4 Screws for Touch screen attachment
2 Microphone hangers with 4 screws
In the back bottom compartment:
USB cable extension from the main PC
This extension is for connecting a USB mouse or a USB Hub
that in turn can be connected to a mouse, a keyboard, and a
USB flash drive for program and song updates
Together they weigh 350lbs with dimensions 19” x 18” x 9” for the carton box and
45” x 35” x 35” for the wooden crate. You are advised to have a forklift in the
receiving location to unload them from a truck.
1.1
To dismantle the wooden crate, use a screwdriver to take out the screws
from each side of the crate. Then using a crowbar, gently pry open the top
cover followed by four sidewalls. Next using the steel handles located on
three sides of the JB-99RX, lift the JB-99RX out of the bottom holder and
gently place it on the floor. Unlock the wheels on the bottom of JB-99RX
and roll the unit into its place.
1.2
When transporting the unit without its wooden crate, it is best to do so in its
upright position. If a height restriction does not allow such positioning, then
lay down the unit on its backside, preferably on top of a soft carpet for easy
3
CAVS USA Inc.
sliding and protection. Use cushions on both ends of the unit for a balance
against the steel handle on the backside.
2. Installation
2.1 Touch screen monitor
2.1.1 Remove the touch screen monitor from its carton box. There are 4 screws in
a plastic bag attached to the monitor.
2.1.2 Use the screws to attach the bottom of the touch screen monitor stand onto
the top of the JB-99RX. There are four screw holes on the top of the JB99RX for the attachment.
The monitor stand is designed to tilt the monitor back and forward, up and
down, and rotate. Adjust the monitor position according to your preference.
WARNING: When tightening the screws to attach the monitor stand onto the JB99RX, use a moderate force so as not to tear out the metal grooves implanted in the
screw holes of the JB-99RX top.
2.1.3 Connect the three cables coming out of the JB-99RX top to the touch screen
monitor. The three cables (the power, DVI, and USB) have different
connectors thus preventing from wrong connection.
4
CAVS USA Inc.
2.1.4 Use the yellow RCA or black S-video cable on the top of the JB-99RX to
connect to an external TV monitor. If you have multiple TV monitors, use
both the RCA and S-video connectors or the splitters.
2.2 Mixer-Amplifier
2.2.1 Set all round knobs of the mixer-amplifier at the 12 o’clock (center) position
except for the master volume (the largest round knob) that should be set at 9
o’clock position.
2.2.2 Set all 4 white push buttons so that they are pressed out. Also set the power
button on.
WARNING: To avoid any damage to the mixer-amplifier and the speakers, please
consult with CAVS Tech Support before attaching any additional speakers to the
mixer-amplifier.
2.3 Microphones
2.3.1 There are no microphones included in the package. You may use your own
wireless or wired microphones.
5
CAVS USA Inc.
2.3.2 When using the wireless microphone, attach the receiver to the microphone
jack Mic1of the mixer-amplifier using the quarter inch jack cable. If you
have two wireless microphone receivers, connect them to the Mic1 and Mic2
of the mixer-amplifier.
2.3.3 When using the wired microphones, connect the microphones to the Mic1
and Mic2 of the mixer-amplifier.
2.3.4 Place the microphones in the microphone hangers when not in use with the
switches (located on the headpieces) turned off.
WARNING: When using wired microphones, to prevent a possible damage to the
mixer-amplifier from sudden pull of the microphones, tie the cords of the
microphones to the steel handle on the back of JB-99RX before connecting to the
Mic1 and Mic2 jacks.
6
CAVS USA Inc.
3. Booting up
3.1 Find a power cord in a side pocket of JB-99RX and connect it to the AC
power socket on the back (bottom) of the JB-99RX. Plug the other end of the
power cord into a wall power outlet of 110V.
o Confirm that the red power light of the mixed-amplifier becomes lit on
the back of the JB-99RX.
o Confirm that the red power light of the cassette recorder becomes lit on
the left side of the JB-99RX.
o Confirm that the bill acceptor begins to flash red lights on the front of the
JB-99RX.
o Confirm that the red power light of the touch screen monitor becomes lit.
3.2
Press the Power button on the front of the JB-99RX to turn it on. The boot
up process for Windows 7 will begin on the touch screen monitor.
7
CAVS USA Inc.
3.3
After the Windows, the PlayCDG KJ Deluxe 64 LT program will
automatically start. Please wait until the 3D Customer Interface with a
rotating room appears on the screen for the completion of the boot up.
o Confirm that the red flashing lights of the bill acceptor change to blue in
color.
o Confirm that the touch screen monitor shows the welcome screen
“Welcome to CAVS Sing Along”. If the screen does not show the
Welcome message, minimize the screen to go to the Control Panel that is
behind. In the Control Panel, press Tools > Serial in the upper left corner
and press OK.
o On a secondary screen, such as a wall TV, which can be connected to the
RCA or S-Video cable on the top of the JB-99RX you should see the
following display.
NOTE: Once the JB-99RX unit is turned on completely, the Power button in front
will require a password to work thus preventing accidental shut down of the JB-
8
CAVS USA Inc.
99RX. The default password is 0000 (four zeros) and pressing Power 0 0 0 0 will
result in shutting down of the JB-99RX unit.
4. Basic Operation
o
o
o
o
o
Insert the money ($1, $5, $10, $20) into the bill acceptor.
Select and reserve a song by Title, Artist, or Index from the touch screen.
Press the Play button in the Queue to begin playing.
Turn on the microphones and sing along with the lyrics.
Press the Stop button in the Queue to stop playing. The Stop button will
work only within first 10 seconds of the song in play.
4.1 Pitch & Tempo Control
Press the Control button on the 3D Customer Interface. You will find the
pitch control, tempo control, and Vocal as shown below. Use the pitch
control to change the pitch and the tempo control to change the tempo.
Select Stereo, Left, or Right to choose the audio output channel which will
let you effectively cancel the singing voice when playing the multiplex song
files.
9
CAVS USA Inc.
4.2
Record
To record, click on Queue. Press the Record button at the bottom and you
will see the letter R appearing next to the credit score indicating that the
recording has started.
The Record feature will automatically record and store the recorded files
separated by each song. The list of recorded files can be viewed by pressing
the Disc button.
To write a recorded file onto a disc, press the Disc button.
Next press the Eject button to open the disc drive in the back of the JB99RX unit. Insert a blank disc into the disc drive and close the disc tray by
pressing the Close button on the disc drive. Be sure to use a blank disc.
Back on the touch screen, press the Refresh button to detect the newly
inserted disc.
10
CAVS USA Inc.
You will see the status “No Disc” of the disc drive change to “CD Media”.
Next select the recorded file that you wish to write by placing X marks on
the left side of the file. Press the Write button to start the writing.
When the writing is complete, you will see the message “Writing Complete”
on the screen and the written disc will be ejected. The finished disc can be
played in any device capable of playing the MP3 file on a CD.
5. Basic Changes
Many changes can be made to the JB-99RX unit reflecting your preferences. To
ease the process, it is recommended that you connect and use a USB mouse rather
than the touch screen to make the changes. To connect the USB mouse to the JB99RX, open the rear bottom cabinet door and look for a USB cable hanging down
from upper compartment. Connect the USB mouse to the USB cable (or connect a
USB hub to the cable and then connect the USB mouse to the hub).
Please note that a right click from a mouse is accomplished by press & hold by a
fingertip on the touch screen until a circle appears around the touch. After the
circle is formed, remove the fingertip for the menu.
5.1
Locking the touch screen
11
CAVS USA Inc.
To secure the JB-99RX unit from unwanted changes, it is recommended to
lock the 3D Customer Interface so that the customers cannot go beyond the
screen into the program inside. To do so, right click on the Home button for
the following menu
Press the Lock to lock the screen, Unlock to unlock the screen, or Cancel to
return to the 3D Customer Interface.
5.2
Bill acceptor settings
The credit and debit of the bill acceptor can be changed by going to the
Control Panel > Tools > Serial.
12
CAVS USA Inc.
Change the values in the Credit Setup according to your preferences. You
can set the charge for each karaoke song, music, and CD record. Press OK to
close.
If you wish to operate the JB-99RX unit free of charge, uncheck the Enable
Bill Acceptor and press OK.
5.3
Other changes
Other basic changes to the JB-99RX can be made from the following
window of Control Panel > Tools > Setting.
13
CAVS USA Inc.
Here you can select to display the lyrics of karaoke songs only on the
secondary screen, such as the wall TV, and not on the touch screen by
removing the check mark on the “Enable Display Lyric”.
You can also convert the JB-99RX unit into a regular karaoke player
PlayCDG KJ Deluxe 64 LT by removing the check mark on “Enable RX
Mode”.
6. Mixer-Amplifier
CAVS CA-242RA mixer-amplifier comes with many individual and independent
controls for Mic1, Mic2, Echo, Music, and Master. For each of these categories,
there are following controls:
14
CAVS USA Inc.
MIC 1
MIC 2
ECHO
MUSIC
MASTER
VOLUME
VOLUME
VOLUME
VOLUME
VOLUME
CONTROLS
BALANCE ECHO
BALANCE ECHO
x
x
BALANCE x
x
x
LO
LO
LO
LO
LO
MID
MID
x
MID
MID
HI
HI
HI
HI
HI
x
x
REPEAT
x
x
x
x
DELAY
x
x
Before making adjustment of the controls, it is recommended to begin with all
control knobs at the 12 o’clock (center) position except for the master volume
(large round knob) that is to be set at 9 o’clock position.
6.1 Master Volume Control
Go to the master volume control knob located on the mixer-amplifier on the back
of the JB-99RX.
6.2 Microphone Volume Control
Increase or decrease the microphone volume level by adjusting the volume level
controls of Mic1 and Mic 2 located on the back of JB-99RX.
If the volume level controls of Mic 1 and Mic 2 are at 3 O’clock positions and you
still need to increase the vocal volume, it is recommended instead to decrease the
volume level of the music and at the same time increase the volume level of the
master from the back of JB-99RX.
6.3 Base (LO) Level Control
If you are finding too much Base (LO) level in the master volume, you can
decrease the Base (LO) level by decreasing the LO level of the master or the LO
level of the music.
6.4 Echo Level Control
15
CAVS USA Inc.
Depending on the individual who is singing, he/she may prefer to increase or
decrease the Echo volume level. Increase or decrease the Echo volume level by
adjusting the volume level of the Echo or adjusting the Echo level of Mic 1 and
Mic 2.
7. Cassette Recorder
The cassette recorder of JB-99RX comes with the standard functions of Play,
Rewind, F.Forward, Stop/Eject, and Record. And it is ready at any time to record
all master audio output of JB-99RX onto a cassette tape.
o Insert a standard cassette tape into the cassette recorder.
o Press the Rec button to begin recording.
o The recording will continue for the time length of the cassette tape (for
example 30 min, 60 min, etc.)
o Press the Eject button and remove the cassette tape when finished.
8. Frequently Asked Questions
8.1 Can the JB-99RX unit be connected to more than one TV monitor?
Answer: Yes, using a video distributor, the RCA or S-video cable coming out from
the top of the JB-99RX can be connected to 2 or more TV monitors
simultaneously. A video distributor can be purchased from CAVS or any electronic
stores.
8.2 Can the JB-99RX unit be connected to external speakers or external audio
system?
Answer: Although the mixer-amplifier of the JB-99RX has additional speaker
connectors, it is strongly recommended not to connect any external speakers
16
CAVS USA Inc.
directly to the mixer-amplifier as it may cause serious damage to the mixeramplifier and the speakers. A safer and better way is to connect from the Line Out
of the mixer-amplifier using an audio RCA cable to an external amplifier, and then
connect the external speakers to the external amplifier.
To connect an audio RCA cable to the Line Out of the mixer-amplifier, you will
need to open the front panel of the JB-99RX. Please contact the CAVS technical
support department before proceeding.
8.3 How can one learn more about all available functions of the JB-99RX?
Answer: The main engine of the JB-99RX karaoke jukebox is the PlayCDG KJ
Deluxe 64 LT karaoke program designed and manufactured by CAVS. To
understand all functions and flexibilities of the program, please begin by reading
the User’s Manual of the PlayCDG KJ Deluxe 64 LT program at
www.cavsusa.com/help/playcdgkjdeluxe64lt.htm
You can also contact us at CAVS USA Inc. Tech Support 562-777-1846 or email:
[email protected]
8.4 How can the previous credits be erased?
Answer: To erase the credit remaining in the JB-99RX, go to the Control Panel >
Tools > Serial and press the Default button.
9. Tech Support
For detail description of the available features in JB-99RX, please refer to the
Online User Manual of the PlayCDG KJ Deluxe 64 LT at
www.cavsusa.com/help/playcdgkjdeluxe64lt.htm
17
CAVS USA Inc.
You can also contact us at CAVS USA Inc. Tech Support 562-777-1846 or email:
[email protected]
18