1
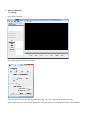
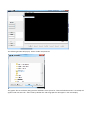
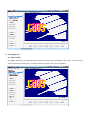
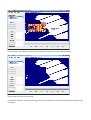
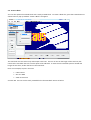
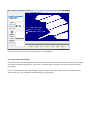
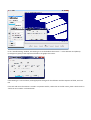
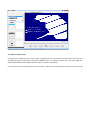
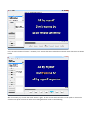
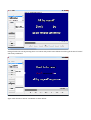
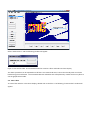
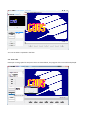
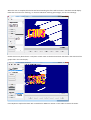
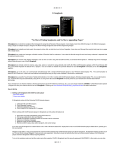
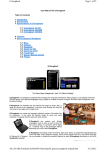
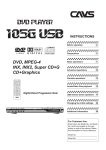
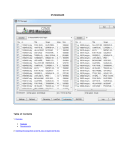
CAVS CDG Editor
Version 1.0.1.0
July, 2012
CAVS CDG Editor Program enables editing of graphic files commonly known as CDG, MCG, and NCG. The program
deletes or replaces any unwanted blocks in the graphic files. It does so without disturbing the embedded
synchronization between the graphic files and the music.
We have selected the name “CDG Editor” over “CDG Nanny”, “Cuss Buster”, etc. As the names reflect, we wish for the
concerned users of karaoke songs to be able to remove offensive or foul words or blocks in the graphic files for better
enjoyment .
Table of Contents
1. Open a graphic file
1.1 Settings
1.2 Open a file
1.3 Open a folder
2. Edit a graphic file
2.1 Delete a block
2.2 Create a block
2.3 Replace a block
2.4 Create a block with Autofill
2.5 Deleting a word in lyrics
3. Scan a graphic file
3.1 Create a filter
3.2 View a filter
3.3 Scan a file
1. Open a graphic file
1.1. Settings
Go to Tools > Settings.
The following pop-up window will appear.
Place the check marks on the type of graphic files (.cdg, .ncg, .mcg, .zip) that you would like to edit.
Place a check mark on “Search All Subdirectories” only if you wish to see all the graphics files in the subfolders.
Place a check mark on “AutoSave” only if you wish to have the graphic files that you edited saved automatically
when opening a new file. To use this option, we recommend that you make a copy of graphic files before starting
the program to edit.
Next, the match criteria can be set to scan automatically for a design or shape in a graphic file. The design or shape
would be stored in a filter, and the method to store a design or shape in a filter is described in Section ***** of this
Manual. The default values for the Pixel and Block match criteria are 50% and 50%. Higher the percentages mean
higher the search criteria and less matches will result.
Press OK to return to the main screen.
1.2. Open a file
Go to File > Open.
The following pop-up window will appear. Select a graphic file that you wish to edit.
Press Open and the selected file will open in the main display.
1.3. Open a folder
You can also open a folder by pressing the Path button as below.
The following window will pop up. Select a folder and press OK.
The graphic files in the folder (along with the subfolders if the option for “Search All Subdirectories” is checked) will
appear under Current Path. Select a file by double click and the graphic file will appear in the main display.
2. Edit a graphic file
2.1. Delete a block
The graphic file shown in the main display can move forward (>, >>) or backward (<, <<) in time. You can also fine
tune the display by pressing the (-, +) buttons under the screen, next to the time display.
For example, by pressing the + button once, we move forward in time from 00:02:456 to 00:02:073 and obtained
the full picture of CAVS logo.
You can mark any part of the screen by simple click and drag. That is, left click and drag over an area and then let go
the left click. For example, we mark the CAVS logo as shown below.
Next, right click on the screen for a menu of Commands.
From the menu, select Delete to delete the marked block (area) which will be removed as below.
Press Control-Z to undo any command.
If no block is marked on the screen and a right-click is made, the entire screen becomes marked and subject to the
commands.
2.2. Create a block
You can also replace the marked block with a newly created block. To create a block first, press the Create button as
shown below. A pop-up window “Create a Block” will appear.
The new block uses two colors only and accepts 3 text lines. There is no limit on the length of the text lines, but
note that the new block has to fit into the space of the old block. It means that the available space is limited and
longer the text lines, smaller the fonts in the new block.
Here as an example, we put in the texts
•
•
•
CAVS USA Inc
562-777-1850
www.cavsusa.com
and click OK. You can see the newly created block in the New Block section as below.
2.3. Replace a block
Next we again mark a block on the main screen as before and right click for the menu of commands.
This time we select the command “Replace with New Block”. As shown below, the new block has replaced the
marked block in the graphic file.
Press Save to save the new block and Load to open an existing block.
2.4. Create a block with Autofill
New block can be created using Autofill option that will insert the title and artist information of the current graphic
file into the new block automatically. Thus when a new graphic file is opened, a new block will also be created
accordingly.
Press “Create” button for the “Create a Block” pop-up window. Then place a check mark on “Autofill Title and
Artist” option for a pop-up window “Autofill Naming” as shown below.
In the “Autofill Naming” window, File Naming is set as the default choice with “-“ as the delimiter and (Album)(Track)-(Artist)-(Title) as the sequence of fields in the graphic file names.
If File Naming is a correct choice, make appropriate changes for the delimiter and the sequence of fields, and click
OK.
If the title and artist information is stored in a separate text file, rather than in the file names, place a check mark on
“Pull from txt in Folder” as shown below.
The following pop-up window will appear to select a txt file in the same folder as the graphic files.
Select the txt file that has the title and artist information of the graphic files. Click Open, OK, and OK. The txt file
must be of the following format.
•
•
•
•
The first field is the file name followed by the pipe "|" sign.
The pipe "|" sign is inserted by typing Shift-\.
The second field is the title followed by another pipe "|" sign.
The third field is the artist name followed by Enter for the next line.
When saving the song list, be sure to save it as a text (txt) file.
Please note that this txt file of the song list is automatically generated in CAVS JB-199 and PlayCDG KJ Deluxe 64 LT
players.
Below is a picture of CAVS CDG Editor editing the NCG files of JB-199 player using Autofill option. The txt file in a
subfolder JB001000 loads into the new block the title and artist information of each NCG file.
2.5. Delete a word in lyrics
A word in lyrics is different from a name or logo in a graphic file in the sense that it will be written twice, first time
for display and then second time for timing by a different color. So to delete a word in lyrics, you must apply the
delete method demonstrated above twice in order to remove it completely.
Let’s start with a screen display of lyrics as shown below. Here we will remove the word “wanna” from the screen.
Frist, we mark the word “wanna”. However, let’s assume that we marked the word with much clumsiness as shown
below.
We can certainly try to mark the word “wanna” again. Or we can use Shift-Left Click on each pixel to reverse the
selection one pixel at a time to refine our marking which will result in the following.
Next, right click on the screen and select Delete to remove the word.
The word “wanna” will be removed from the screen as below.
Next go forward in time by pressing the > or + button and you will see as below the coloring of the word “wanna”
which we just deleted.
Again mark the word “wanna” and delete as shown below.
Now the word “wanna” has been deleted twice and you may feel compelled to congratulate yourself for a job well
done. But unfortunately that could be premature. Always continue to go forward in time to check for any error in
the graphic file. If none are found, then you are done. For the example here, by going forward, we find the error as
below.
When such error is found, use the - or + button to move forward and backward to isolate the pixels causing the
error. Moving back in time, we find the cause of error as below.
Next mark the error pixels using perhaps the Shift-Left Click and delete.
The following screen shows a successful removal of the pixels.
We continue to check by going forward and backward in time and found no other errors. This completes the
removal of a word in lyrics.
3. Scan a graphic file
3.1. Create a filter
To scan a graphic file to find a design or shape, we must first create a filter containing the design or the shape. This
is simply done by marking a design or shape already in a graphic file and saving it as a filter.
As shown below, mark a block and right-click.
Select “Add to Filters” and the following window will appear.
Input a name and click OK. The marked block will be saved as a filter and load into Filters display.
The above procedure can be repeated until all filters are created and saved. Filters that already exist can also be
loaded using the Load button. The commands Remove and Delete are self-explanatory. Double click on any filter to
see the graphic block inside.
3.2. View a filter
To view a filter which is in the Filters display, double click on the filter. The following “Preview Filter” window will
appear.
You can see what is captured in the filter
3.3. Scan a file
Next open a new graphic file and press Scan. As shown below, the progress of the scan will be displayed.
When the scan is complete, blocks that are found matching the filters will be shown in the Blocks Found display.
Note that the criteria for matching, i.e. the Pixel and Block matching percentages, are set in the Settings.
Double click on any block found. It will place a check mark on the block and show the block in the context of the
graphic file in the main display.
Press Replace to replace the block with a new block or Delete to remove. Press Undo to reverse the action.
When done, it is important to press Scan again to find more possible matches in the graphic file. Repeat the steps
above until there are no more matches found in the graphic file.