1
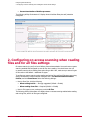
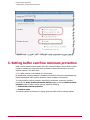
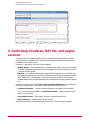
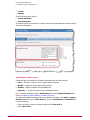
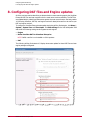
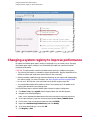
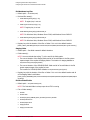
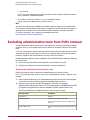
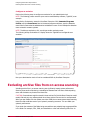
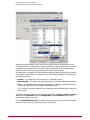
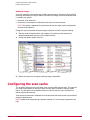
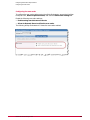
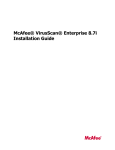
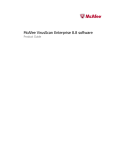
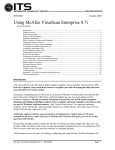
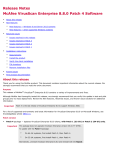
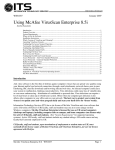
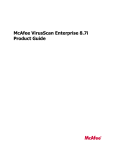
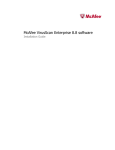
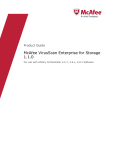
McAfee VirusScan Enterprise 8.8
Best Practices Guide
COPYRIGHT
Copyright © 2010 McAfee, Inc. All Rights Reserved.
No part of this publication may be reproduced, transmitted, transcribed, stored in a retrieval system, or translated into any language in any form
or by any means without the written permission of McAfee, Inc., or its suppliers or affiliate companies.
TRADEMARK ATTRIBUTIONS
AVERT, EPO, EPOLICY ORCHESTRATOR, FOUNDSTONE, GROUPSHIELD, INTRUSHIELD, LINUXSHIELD, MAX (MCAFEE SECURITYALLIANCE
EXCHANGE), MCAFEE, NETSHIELD, PORTALSHIELD, PREVENTSYS, SECURITYALLIANCE, SITEADVISOR, TOTAL PROTECTION, VIRUSSCAN,
WEBSHIELD are registered trademarks or trademarks of McAfee, Inc. and/or its affiliates in the US and/or other countries. McAfee Red in
connection with security is distinctive of McAfee brand products. All other registered and unregistered trademarks herein are the sole property
of their respective owners.
LICENSE INFORMATION
License Agreement
NOTICE TO ALL USERS: CAREFULLY READ THE APPROPRIATE LEGAL AGREEMENT CORRESPONDING TO THE LICENSE YOU PURCHASED,
WHICH SETS FORTH THE GENERAL TERMS AND CONDITIONS FOR THE USE OF THE LICENSED SOFTWARE. IF YOU DO NOT KNOW WHICH
TYPE OF LICENSE YOU HAVE ACQUIRED, PLEASE CONSULT THE SALES AND OTHER RELATED LICENSE GRANT OR PURCHASE ORDER DOCUMENTS
THAT ACCOMPANY YOUR SOFTWARE PACKAGING OR THAT YOU HAVE RECEIVED SEPARATELY AS PART OF THE PURCHASE (AS A BOOKLET,
A FILE ON THE PRODUCT CD, OR A FILE AVAILABLE ON THE WEBSITE FROM WHICH YOU DOWNLOADED THE SOFTWARE PACKAGE). IF YOU
DO NOT AGREE TO ALL OF THE TERMS SET FORTH IN THE AGREEMENT, DO NOT INSTALL THE SOFTWARE. IF APPLICABLE, YOU MAY RETURN
THE PRODUCT TO MCAFEE OR THE PLACE OF PURCHASE FOR A FULL REFUND.
2
McAfee VirusScan Enterprise 8.8
Contents
Preface . . . . . . . . . . . . . . . . . . . . . . . . . . . . . . . . . . . . . . . . . . . . . . . . . . . . . . . . . . . . . . . . . . . . . . . . . . . . . . . . . . . . . . 4
Audience. . . . . . . . . . . . . . . . . . . . . . . . . . . . . . . . . . . . . . . . . . . . . . . . . . . . . . . . . . . . . . . . . . . . . . . . . . . . . . . . . 4
Conventions. . . . . . . . . . . . . . . . . . . . . . . . . . . . . . . . . . . . . . . . . . . . . . . . . . . . . . . . . . . . . . . . . . . . . . . . . . . . . . . 4
How this guide is organized. . . . . . . . . . . . . . . . . . . . . . . . . . . . . . . . . . . . . . . . . . . . . . . . . . . . . . . . . . . . . . . . . . 5
Finding product documentation. . . . . . . . . . . . . . . . . . . . . . . . . . . . . . . . . . . . . . . . . . . . . . . . . . . . . . . . . . . . . . . 5
Getting Started. . . . . . . . . . . . . . . . . . . . . . . . . . . . . . . . . . . . . . . . . . . . . . . . . . . . . . . . . . . . . . . . . . . . . . . . . . . . . 6
Configuring Essential Security. . . . . . . . . . . . . . . . . . . . . . . . . . . . . . . . . . . . . . . . . . . . . . . . . . . . . . . . . . . . 7
1. Configuring self protection. . . . . . . . . . . . . . . . . . . . . . . . . . . . . . . . . . . . . . . . . . . . . . . . . . . . . . . . . . . . . . . . . 7
2. Configuring on-access scanning when reading files and for all files settings. . . . . . . . . . . . . . . . . . . . . . . . . 8
3. Setting buffer overflow minimum protection. . . . . . . . . . . . . . . . . . . . . . . . . . . . . . . . . . . . . . . . . . . . . . . . . . 9
4. Confirming VirusScan, DAT file, and engine versions. . . . . . . . . . . . . . . . . . . . . . . . . . . . . . . . . . . . . . . . . . . 10
5. Enabling "Artemis". . . . . . . . . . . . . . . . . . . . . . . . . . . . . . . . . . . . . . . . . . . . . . . . . . . . . . . . . . . . . . . . . . . . . . 11
6. Configuring daily memory scans. . . . . . . . . . . . . . . . . . . . . . . . . . . . . . . . . . . . . . . . . . . . . . . . . . . . . . . . . . . 12
7. Configuring regular on-demand scans. . . . . . . . . . . . . . . . . . . . . . . . . . . . . . . . . . . . . . . . . . . . . . . . . . . . . . . 13
8. Configuring DAT files and Engine updates. . . . . . . . . . . . . . . . . . . . . . . . . . . . . . . . . . . . . . . . . . . . . . . . . . . 16
Configuring Performance Improvements. . . . . . . . . . . . . . . . . . . . . . . . . . . . . . . . . . . . . . . . . . . . . . 18
Disabling processes on enable on-access scanning. . . . . . . . . . . . . . . . . . . . . . . . . . . . . . . . . . . . . . . . . . . . . . 18
Changing a system registry to improve performance. . . . . . . . . . . . . . . . . . . . . . . . . . . . . . . . . . . . . . . . . . . . . 19
Defining the default high and low processes during scans. . . . . . . . . . . . . . . . . . . . . . . . . . . . . . . . . . . . . . . . 20
Configuring file exclusions on Windows Domain Controller. . . . . . . . . . . . . . . . . . . . . . . . . . . . . . . . . . . . . . . . 22
Excluding administration tools from PUPs removal. . . . . . . . . . . . . . . . . . . . . . . . . . . . . . . . . . . . . . . . . . . . . . . 25
Excluding archive files from on-access scanning. . . . . . . . . . . . . . . . . . . . . . . . . . . . . . . . . . . . . . . . . . . . . . . . 26
Configuring system utilization to match system use. . . . . . . . . . . . . . . . . . . . . . . . . . . . . . . . . . . . . . . . . . . . . . 27
Configuring on-demand scan file scan threads for best performance. . . . . . . . . . . . . . . . . . . . . . . . . . . . . . . . 30
Configuring the scan cache. . . . . . . . . . . . . . . . . . . . . . . . . . . . . . . . . . . . . . . . . . . . . . . . . . . . . . . . . . . . . . . . . 32
Other Common Configuration Changes. . . . . . . . . . . . . . . . . . . . . . . . . . . . . . . . . . . . . . . . . . . . . . . . 34
Configuring on-access scanning of network drives. . . . . . . . . . . . . . . . . . . . . . . . . . . . . . . . . . . . . . . . . . . . . . . 34
Configuring exclusions on Exchange servers with GroupShield. . . . . . . . . . . . . . . . . . . . . . . . . . . . . . . . . . . . . 35
Configuring on-access scanning of trusted installers. . . . . . . . . . . . . . . . . . . . . . . . . . . . . . . . . . . . . . . . . . . . . 39
Filtering 1051 and 1059 events. . . . . . . . . . . . . . . . . . . . . . . . . . . . . . . . . . . . . . . . . . . . . . . . . . . . . . . . . . . . . . 39
McAfee VirusScan Enterprise 8.8
3
Preface
Contents
Audience
Conventions
How this guide is organized
Finding product documentation
Audience
McAfee documentation is carefully researched and written for the target audience.
The information in this guide is intended primarily for:
• Administrators — People who implement and enforce the company's security program.
• Security officers — People who determine sensitive and confidential data, and define the
corporate policy that protects the company's intellectual property.
Conventions
This guide uses the following typographical conventions.
4
Book title or Emphasis
Title of a book, chapter, or topic; introduction of a new
term; emphasis.
Bold
Text that is strongly emphasized.
User input or Path
Commands and other text that the user types; the path
of a folder or program.
Code
A code sample.
User interface
Words in the user interface including options, menus,
buttons, and dialog boxes.
Hypertext blue
A live link to a topic or to a website.
Note
Additional information, like an alternate method of
accessing an option.
Tip
Suggestions and recommendations.
Important/Caution
Valuable advice to protect your computer system, software
installation, network, business, or data.
Warning
Critical advice to prevent bodily harm when using a
hardware product.
McAfee VirusScan Enterprise 8.8
Preface
How this guide is organized
How this guide is organized
This document is meant as a reference to use along with the VirusScan Console and ePolicy
Orchestrator user interfaces.
• Getting Started — Describes VirusScan Enterprise 8.8 what it does and what is new in this
release.
• Configuring Minimum Security — Describes the minimum VirusScan Enterprise settings
that have protected hundreds of customers from malware attacks.
• Configuring Performance Improvements — Describes some of the default configuration
settings for VirusScan Enterprise that might not be the best settings for optimal performance.
These best practices describes some of those settings and their alternate configurations.
• Improving Various Functions — Describes some changes you can make to the VirusScan
Enterprise 8.8 default settings to add or improve some special functionality.
Finding product documentation
McAfee provides the information you need during each phase of product implementation, from
installing to using and troubleshooting. After a product is released, information about the product
is entered into the McAfee online KnowledgeBase.
1
Go to the McAfee Technical Support ServicePortal at http://mysupport.mcafee.com.
2
Under Self Service, access the type of information you need:
To access...
Do this...
User documentation
1
Click Product Documentation.
2
Select a Product, then select a
Version.
3
Select a product document.
KnowledgeBase
McAfee VirusScan Enterprise 8.8
•
Click Search the KnowledgeBase for answers
to your product questions.
•
Click Browse the KnowledgeBase for articles
listed by product and version.
5
Getting Started
To properly use VirusScan Enterprise 8.8 you must understand what it does and what is new
in this release.
What it is and does
VirusScan Enterprise offers easily scalable protection, fast performance, and mobile design to
protect your environment from the following:
• Viruses, worms and Trojan horses
• Access protection violations and exploited buffer overflows
• Potentially unwanted code and programs
It detects threats, then takes the actions you configured to protect your environment.
This guide describes how to configure and use VirusScan Enterprise.
You can configure VirusScan Enterprise as a standalone product or you can use ePolicy
Orchestrator versions 4.0, or later, to centrally manage and enforce VirusScan Enterprise policies,
then use queries and dashboards to track activity and detections.
NOTE: This document addresses using McAfee ePolicy Orchestrator, 4.5, or 4.6. For information
about using these versions of ePolicy Orchestrator, see that verson's product documentation.
What is new
®
The VirusScan Enterprise 8.8.0 release has been updated to include the following new features
and enchantments:
• Enhanced performance.
• Allows ePolicy Orchestrator 4.5 or 4.6 to manage your VirusScan Enterprise systems.
• A new ScriptScan URL exclusion user interface has been added to allow you to configure
these exclusions instead of manually editing ScriptScan settings in the registry.
• Support for Outlook 2010 email scanning.
• Support for Lotus Notes 8.0x through 8.5.1 email scanning.
6
McAfee VirusScan Enterprise 8.8
Configuring Essential Security
The VirusScan Enterprise settings described in this chapter have protected hundreds of customers
from malware attacks. McAfee Sales Engineers and Support staff have tested these settings,
and when configured correctly and in the order listed, they are very effective in protecting your
systems.
NOTE: If any one of the settings described in the following best practices is not configured,
your system is vulnerable to threats.
Contents
1. Configuring self protection
2. Configuring on-access scanning when reading files and for all files settings
3. Setting buffer overflow minimum protection
4. Confirming VirusScan, DAT file, and engine versions
5. Enabling "Artemis"
6. Configuring daily memory scans
7. Configuring regular on-demand scans
8. Configuring DAT files and Engine updates
1. Configuring self protection
Configuring VirusScan Enterprise self protection is one of the most important settings when
trying to protect your systems from malware attacks. Disabling your system security software
is one of the first things malware attempts to do during an attack.
No user, administrator, developer, or security professional should ever need to disable VirusScan
Enterprise protection on their system.
To configure the minimum VirusScan Enterprise self protection using ePolicy Orchestrator,
access the VirusScan Enterprise 8.8.0, Access Protection Policies, and click the Access
Protection tab. Select the following settings:
• Next to Access protection settings click:
• Enable access protection
• Prevent McAfee services from being stopped
• In the Categories list, click Common Standard Protection.
• In the Block/Report/Rules list, click Block and Report for all of the following rules:
• Prevent modification of McAfee files and settings
• Prevent modification of McAfee Common Management Agent files and settings
• Prevent modification of McAfee Scan Engine files and settings
McAfee VirusScan Enterprise 8.8
7
Configuring Essential Security
2. Configuring on-access scanning when reading files and for all files settings
• Prevent termination of McAfee processes
The following ePolicy Orchestrator 4.5 display shows VirusScan Enterprise self protection
configured.
2. Configuring on-access scanning when reading
files and for all files settings
On-access scanning is your first line of defense from malware attacks. You must have on-access
scanning enabled and configured to scan all files when reading. You should never turn off
on-access scanning when reading from and writing to disk. Also, make sure you scan all types
of files and not the default + additional file types.
To configure on-access scanning when reading and writing files and for all files types scan using
ePolicy Orchestrator, access VirusScan Enterprise 8.8.0, On-Access Default Processes
Policies, and click Scan Items. Select the following settings:
• Next to Scan files, click the following:
• When writing to disk — Strongly suggested (Default = Enable)
• When reading from disk — Required (Default = Enable)
• Next to File types to scan, make sure you click All files.
The following ePolicy Orchestrator 4.5 display shows on-access scanning enabled when reading
and writing files, and for all file types configured.
8
McAfee VirusScan Enterprise 8.8
Configuring Essential Security
3. Setting buffer overflow minimum protection
3. Setting buffer overflow minimum protection
Buffer overflow attacks compose greater than 25% of malware attacks. Without buffer overflow
protection enabled your systems are more vulnerable to attacks that attempt to overwrite
adjacent memory in the stack frame.
NOTE: Buffer overflow is not installed on 64-bit systems.
By default buffer overflow protection is enabled on all VirusScan Enterprise protected machines.
McAfee recommends buffer overflow protection remain enabled on all machines.
To configure buffer overflow protection using ePolicy Orchestrator, access the VirusScan
Enterprise 8.8, Buffer Overflow Protection Policies category, and click Buffer Overflow
Protection. Next to Buffer overflow settings, enable the following:
• Enable buffer overflow protection
• Protection mode
The following ePolicy Orchestrator 4.5 display shows the buffer overflow settings enabled.
McAfee VirusScan Enterprise 8.8
9
Configuring Essential Security
4. Confirming VirusScan, DAT file, and engine versions
4. Confirming VirusScan, DAT file, and engine
versions
The importance of an update strategy cannot be overstated. Without the latest VirusScan
Enterprise detection definition (DAT) files and scanning engine installed your system is not
protected from the latest viruses.
Following is a description of the DAT files and engines:
• McAfee Engine — A new McAfee Engine is released a few times a year and then released
to the Auto-update site 90 days later. You should accept the new scan engine by the time
it reaches the Auto-Update.
• DAT files — The McAfee Labs typically releases DAT file updates at 3:00 PM (GMT) every
day. Naturally, outbreaks will still occur at awkward times and require emergency releases.
When a daily DAT is released early, to pre-empt a potential outbreak, no second DAT is
released that day at the normally scheduled time, unless another emergency situation requires
one.
Using the VirusScan Console, click Help | About VirusScan Enterprise in the toolbar and
the splash screen appears. Confirm you have the following minimum versions:
• VirusScan Enterprise — Confirm VirusScan Enterprise is the latest version available.
NOTE: VirusScan Enterprise 8.5i is the absolute minimum — Released October 2009:
Patch 8 is the minimum.
• Scan Engine Version — 5400 engine, minimum, released October 2009.
• DAT Created On — Released within the last 30 days.
The following VirusScan Console display shows where this version information appears.
10
McAfee VirusScan Enterprise 8.8
Configuring Essential Security
5. Enabling "Artemis"
To schedule automatic DAT and engine updates, refer to 8. Configuring DAT files and Engine
updates.
5. Enabling "Artemis"
Artemis, the heuristic network check feature, looks for suspicious programs and DLLs running
on VirusScan Enterprise protected client systems. The Artemis feature catches malware before
the regular DATs are deployed. It has been deployed successfully to more than 27 million
endpoints and should be enabled at all times.
With Artemis enabled, when VirusScan Enterprise detects a suspicious file it sends a DNS request
containing a fingerprint of the suspicious file to a central database server hosted by McAfee
Avert Labs. In less than a second, if the fingerprint is identified as known malware, an appropriate
response is sent to the user to block or quarantine the file.
Configure the sensitivity level you wish to use when determining if a detected sample is malware.
There are five sensitivity levels, between Very low and Very high, plus Disabled. The higher the
sensitivity level you choose, the higher the number of malware detections. However, by allowing
more detections, you might also get more false positive results.
To configure Artemis using ePolicy Orchestrator, access VirusScan Enterprise 8.8.0, On-Access
General Policies, and click the General tab.
Find the Artemis (Heuristic network check for suspicious files) settings list and confirm
the Sensitivity level is set to a minimum of Low.
NOTE: Consider moving the sensitivity level to Medium depending on the number of false
positive malware detections found.
The following ePolicy Orchestrator 4.5 display shows Artemis configured.
McAfee VirusScan Enterprise 8.8
11
Configuring Essential Security
6. Configuring daily memory scans
6. Configuring daily memory scans
On-demand scanning of processes and memory is the early warning system for your VirusScan
Enterprise protected computers. You must enable this feature, as part of your essential
protection, to scan running processes and memory for rootkits at least once per day. This
on-demand scan finishes in 30-90 seconds with virtually no impact to the end-users.
NOTE: Any system with a detection from this memory scan should have a full on-demand scan
performed immediately.
Rootkits and hidden processes function at the operating system level and are very hard to find
once they gain access. They allow the attacker to have hidden access to your system at the
Administrator level and they are your worst nightmare.
Malware rootkits can inadvertently be installed on a target computer when you:
• Open rich-content files, such as PDF documents.
• Open malicious links that appear legitimate.
• Install a legitimate application with a rootkit added as part of the installation.
To configure a client task to scan running processes and memory for rootkits, using ePolicy
Orchestrator, click Menu | System | System Tree and click Client tasks. Click the
Configuration and Scan Locations tabs. Confirm the following features are enabled in the
Locations to scan lists:
12
McAfee VirusScan Enterprise 8.8
Configuring Essential Security
7. Configuring regular on-demand scans
• Memory for rootkits
• Running processes
The following ePolicy Orchestrator 4.5 display shows the memory rootkits and running processes
scan configured:
You must click Schedule and configure when you want the daily memory rootkits and running
processes client task scan to occur.
7. Configuring regular on-demand scans
Configuring regularly scheduled on-demand scans is an essential part of the protection process
for your VirusScan Enterprise protected computers. The on-demand scan configuration is a two
stage process that includes:
• Configuring what locations to scan
• Scheduling how often to scan
Configuring what locations to scan
Regular on-demand scans should, at a minimum, include the following McAfee default
On-Demand Scan locations:
• Memory for rootkits
• Running processes
• All local drives
NOTE: To improve system performance during on-demand scanning of All local drives set
the scanner system utilization to Below Normal or Low. Refer to Configuring system
utilization to match system use.
McAfee VirusScan Enterprise 8.8
13
Configuring Essential Security
7. Configuring regular on-demand scans
• Cookies
• Registry
Click the following Scan Options:
• Include subfolders
• Scan boot sectors
The following ePolicy Orchestrator 4.5 display shows these on-demand scan location settings
and options configured:
Scheduling how often to scan
McAfee strongly recommends you schedule on-demand scans at these intervals:
• Daily — Too often, unless you have a major malware outbreak.
• Weekly — Aggressive and provides good protection.
• Monthly — Decent protection with acceptable risk.
• Quarterly — The absolute bare minimum scheduling interval.
NOTE: Configure throttling using the Performance tab and the System utilization slider.
Refer to Configuring system utilization to match system use.
To configure scheduled on-demand scans using ePolicy Orchestrator, click Menu | System |
System Tree and select the Client tasks tab. Click the Configuration and Schedule tabs
to set the following:
• Select how often to run the on-demand scan from the Run task list.
• Set the Start Time.
14
McAfee VirusScan Enterprise 8.8
Configuring Essential Security
7. Configuring regular on-demand scans
• Set the specific information depending on how often you configured the on-demand scan
to run.
The following ePolicy Orchestrator 4.5 display shows these scheduled scan settings configured:
Configuring frequent active user on-demand scans
McAfee suggests configuring specific active user workstation on-demand scans, as opposed to
server on-demand scans. These active user on-demand scans should be run more frequently
than other scans, but since they have limited locations to scan should not impact the users.
These scans only include the following scan locations:
• User profile folder
• Cookies
• Temp folder
• Registry
• Registered files
• Windows folder
These scan locations are frequent targets of malware attacks and should be scanned at least
weekly, or even daily.
McAfee VirusScan Enterprise 8.8
15
Configuring Essential Security
8. Configuring DAT files and Engine updates
8. Configuring DAT files and Engine updates
All of the previous sections describing on-demand and on-access scanning require the VirusScan
Enterprise DAT files and scan engines to be the most recent versions available. The DAT files
are updated daily to identify and take action against the most recent threats. See best practice
4. Confirming VirusScan, DAT file, and engine versions for descriptions and how to confirm your
DAT and engine versions.
To configure a VirusScan Enterprise autoupdate task using ePolicy Orchestrator, click Menu |
System | System Tree and Client tasks. Click Edit settings for the VSE AutoUpdate Task
and select the following settings under Signatures and engines:
• Engine
• Buffer Overflow DAT for VirusScan Enterprise
NOTE: Buffer overflow is not installed on 64-bit systems.
• DAT
The following ePolicy Orchestrator 4.5 display shows auto update for these DAT files and scan
engine packages configured:
16
McAfee VirusScan Enterprise 8.8
Configuring Essential Security
8. Configuring DAT files and Engine updates
You must click Schedule and configure how often and when you want to update these packages.
Refer to the McAfee VirusScan Enterprise 8.8 software Product Guide, Configuring the AutoUpdate
task section.
McAfee VirusScan Enterprise 8.8
17
Configuring Performance Improvements
Some of the default settings for VirusScan Enterprise might not be the best settings for optimal
performance. These best practices describes some of those settings and their alternate
configurations.
CAUTION: Changing some of these setting can affect your system security.
Contents
Disabling processes on enable on-access scanning
Changing a system registry to improve performance
Defining the default high and low processes during scans
Configuring file exclusions on Windows Domain Controller
Excluding administration tools from PUPs removal
Excluding archive files from on-access scanning
Configuring system utilization to match system use
Configuring on-demand scan file scan threads for best performance
Configuring the scan cache
Disabling processes on enable on-access scanning
Disabling processes on enable during system startup reduces your system startup time.
If the on-access scanning process on enable feature is configured, all programs or executables
are scanned when they are started. When you start your system some programs or executables
start automatically. These executables might start prior to starting mcshield.exe. If the process
on enable feature is configured and the mcshield.exe starts after these other executables the
on-access scanner will scan each of the previously running executables in the order they started.
This can slow your system and increase your system start up time.
To change the processes on enable setting using ePolicy Orchestrator, access the VirusScan
Enterprise 8.8.0, On-Access General Policies, and click the General tab. Confirm Processes
on enable is not selected.
The following ePolicy Orchestrator 4.5 shows processes on enable deselected.
18
McAfee VirusScan Enterprise 8.8
Configuring Performance Improvements
Changing a system registry to improve performance
Changing a system registry to improve performance
By default the McAfee Agent registry setting is configured to run at normal priority. Changing
the McAfee Agent registry setting to use LowerWorkingThreadPriority improves VirusScan
Enterprise performance.
CAUTION: This best practice contains information about opening or modifying the registry.
• The following information is intended for System Administrators. Registry modifications are
difficult to restore and could cause system failure if done incorrectly.
• Before proceeding, McAfee strongly recommends backing up your registry and understanding
the restore process. For more information, see: http://support.microsoft.com/kb/256986
• Do not run a .REG file that is not confirmed to be a genuine registry import file.
• You must disable McAfee Self Protection to allow a new registry key to be added on the
registry path described in the following steps.
Use the following steps to edit the McAfee Agent framework registry configuration:
1
Click Start | Run, type regedit and the Registry Editor user interface appears.
2
Navigate to the following Registry:
[HKEY_LOCAL_MACHINE\SOFTWARE\Network Associates\TVD\Shared Components\Framework]
3
In the right-hand pane, right-click a blank space and select New | DWORD Value.
4
For the name, type LowerWorkingThreadPriority and click ENTER.
5
Right-click LowerWorkingThreadPriority and click Modify.
6
In the Value data field type 1, then click OK.
7
Click Registry | Exit.
McAfee VirusScan Enterprise 8.8
19
Configuring Performance Improvements
Defining the default high and low processes during scans
8
Restart the McAfee Framework Service using the following steps:
• Click Start | Run, type services.msc.
• From the General tab, scroll up or down and select the McAfee Framework Service,
right-click to open Properties dialog box.
• Next to Startup Type, in the middle of the dialog box, click Manual from the list.
• From Service Status, click Start and OK.
Defining the default high and low processes during
scans
You can change the default configuration of some high- and low-risk process policies on the
on-access scanner to improve system performance and focus the scanning where it is most
likely to detect malware.
CAUTION: There is some risk associated with adding exclusions to high-and low-risk process
policies. The risk is determined by other policy settings, but generally the risk is minimal and
should be assessed on a case-by-case basis. Be careful when you determine the degree of
acceptable risk to obtain the desired performance improvement.
To change the default low-risk process policies using ePolicy Orchestrator, access the VirusScan
Enterprise 8.8.0, On-Access Low-Risk Processes Policy, and click the Low-Risk Processes
tab. Click Add and refer to the Low-risk processes table for some of the low-risk processes that
could be added to the on-access scanner exclusion.
Configure the Scan Items, Exclusions, and Actions tab options to change the behavior of
the on-access scanner.
NOTE: One or more of these options must be changed for the low-risk processes to have an
effect on performance.
The following ePolicy Orchestrator 4.5 display shows some processes added as low-risk.
20
McAfee VirusScan Enterprise 8.8
Configuring Performance Improvements
Defining the default high and low processes during scans
Table 1: Low-risk processes
Application
Process
Effect
McAfee Agent
FrameworkService.exe
Improves overall performance
McAfee VirusScan Enterprise
McScanCheck.exe
Improves DAT update performance
McScript_InUse.exe
Improves DAT update performance
mcupdate.exe
Improves DAT update performance
apache.exe
Improves ePO console performance
eventparser.exe
Improves event insertion performance
significantly
tomcat5.exe
Improves ASCI performance
McAfee Host Data Loss Prevention —
Server
dlpwcfservice.exe
Improves overall performance
McAfee SiteAdvisor Enterprise
mcsacore.exe
Improves overall browser performance,
especially startup time
Microsoft SQL Server
sqlservr.exe
Improves overall performance
sqlwriter.exe
Improves overall performance
vmware.exe
Improves overall performance
vmware-vmx.exe
Improves overall performance
McAfee ePolicy Orchestrator
VMware Workstation and Player
McAfee VirusScan Enterprise 8.8
21
Configuring Performance Improvements
Configuring file exclusions on Windows Domain Controller
Configuring file exclusions on Windows Domain
Controller
To improve VirusScan Enterprise on-access scan performance, configure exclusions for some
files used by Windows Domain Controller with Active Directory or File Replication Services. Only
the following server operating systems include these files:
• Microsoft Windows 2008
• Microsoft Windows 2003
• Microsoft Windows 2000
CAUTION: This best practice contains information about opening or modifying the registry.
• The following information is intended for System Administrators. Registry modifications are
difficult to restore and could cause system failure if done incorrectly.
• Before proceeding, McAfee strongly recommends backing up your registry and understanding
the restore process. For more information, see: http://support.microsoft.com/kb/256986
• Do not run a .REG file that is not confirmed to be a genuine registry import file.
CAUTION: Where a specific set of files is identified by name for exclusion, exclude only those
files instead of the whole folder to minimize vulnerability. In some cases entire folders must be
excluded. Do not exclude any of these files based on the filename extension. For example, do
not exclude all files with the .dit extension.
To configure these exclusions using ePolicy Orchestrator, access the VirusScan Enterprise 8.8.0,
On-Access Default Processes Policy, and click the Exclusions tab. Add exclusions for the
files listed in the following section Active Directory and Active Directory-Related Files.
The following ePolicy Orchestrator 4.5 display shows exclusions configured for Main NTDS
database files:
22
McAfee VirusScan Enterprise 8.8
Configuring Performance Improvements
Configuring file exclusions on Windows Domain Controller
Active Directory and Active Directory-Related Files
Create exclusions for the following files and folders:
Main NTDS Database Files
• Default path — %windir%\ntds\
• File names:
• Ntds.dit
• Ntds.pat
• Registry key with the location of the files or folder if it is not in the default location:
[HKEY_LOCAL_MACHINE\System\CurrentControlSet\Services\NTDS\Parameters\DSA Database File]
Active Directory Transaction Log Files
• Default path — %windir%\ntds\
• File name(s):
• EDB*.log
NOTE: The wildcard character indicates that there may be multiple files.
• Res1.log
• Res2.log
• Ntds.pat
• Registry key with the location of the files or folder if it is not in the default location:
[HKEY_LOCAL_MACHINE\System\CurrentControlSet\Services\NTDS\Parameters\Database Log Files
Path]
NTDS Working Folder
• Default path — None. See the bullet Registry key with the location of the files or folder if it
is not in the default location.
• File names:
• Temp.edb
• Edb.chk
• Registry key with the location of the files or folder if it is not in the default location:
[HKEY_LOCAL_MACHINE\System\CurrentControlSet\Services\NTDS\Parameters\DSA Working Directory]
File Replication Service (FRS)
Create exclusions for the following files and folders:
FRS files
• Default path — None. See Path and file names bullet.
• Path and file names:
• %FRS Working Dir%\jet\sys\edb.chk
• %FRS Working Dir%\jet\ntfrs.jdb
• %FRS Working Dir%\jet\log\*.log
NOTE: The wildcard character indicates that there may be multiple files.
• Registry key with the location of the files or folder if it is not in the default location:
[HKEY_LOCAL_MACHINE\System\CurrentControlSet\Services\NtFrs\Parameters\Working Directory]
McAfee VirusScan Enterprise 8.8
23
Configuring Performance Improvements
Configuring file exclusions on Windows Domain Controller
FRS Database Log files
• Default path — %windir%\ntfrs\
• Path and file name(s):
• %FRS Working Dir%\jet\log\*.log
NOTE: If registry key is not set.
• %DB Log File Directory%\log\*.log
NOTE: If registry key is not set.
• %FRS Working Dir%\jet\log\edbres00001.jrs
NOTE: For Windows Vista, Windows Server 2008, and Windows Server 2008 R2.
• %FRS Working Dir%\jet\log\edbres00002.jrs
NOTE: For Windows Vista, Windows Server 2008, and Windows Server 2008 R2.
• Registry key with the location of the files or folder if it is not in the default location:
[HKEY_LOCAL_MACHINE\system\currentcontrolset\services\NtFrs\Parameters\DB Log File Directory]
Staging folder
• Default path — See folder names for default locations.
• Folder name(s):
NOTE: You must include the trailing "\" at the end of the folder paths.
• The current location of the Staging folder and all of its sub-folders is the file system
reparse target of the replica set staging folders. The location for staging defaults to
%systemroot%\sysvol\staging areas\.
• The current location of the SYSVOL\SYSVOL folder and all of its sub-folders is the file
system reparse target of the replica set root.
The location for SYSVOL\SYSVOL defaults to %systemroot%\sysvol\sysvol\.
• Registry key with the location of the files or folder if it is not in the default location and all
of the Staging folder's sub-folders:
[HKEY_LOCAL_MACHINE\system\currentcontrolset\services\NtFrs\Parameters\Replica Sets\GUID\Replica
Set Stage]
FRS Pre-Install Folder
• Default path — %systemroot%\sysvol\
NOTE: The Preinstall folder is always open when FRS is running
• File or folder name(s):
• Exclude
• domain Scan
• domain\DO_NOT_REMOVE_NtFrs_PreInstall_Directory Exclude
• domain\Policies Scan
• domain\Scripts Scan
• staging Exclude
• staging areas Exclude
24
McAfee VirusScan Enterprise 8.8
Configuring Performance Improvements
Excluding administration tools from PUPs removal
• sysvol Exclude
NOTE: If any one of these folders or files have been moved or placed in a different location,
scan or exclude the equivalent element.
• The location of the files or folder if it is not in the default location:
Replica_root\DO_NOT_REMOVE_NtFrs_PreInstall_Directory
DFS
The same resources that are excluded for a SYSVOL replica set must also be excluded when
FRS is used to replicate shares. These shares are mapped to the DFS root and link targets on
Windows 2000 or Windows Server 2003-based member computers or domain controllers.
For further information, refer to Microsoft Knowledge Base article:
http://support.microsoft.com/kb/822158/
Excluding administration tools from PUPs removal
VirusScan Enterprise might consider some of the system tools you use as potentially unwanted
programs (PUPs). If you configure exclusions for those files VirusScan Enterprise won't delete
them.
CAUTION: Some malware might be delivered with the same name as an administrator tool. But
VirusScan Enterprise would usually find and stop any malware attack, using other protection
processes, caused by the files described in this best practice for exclusion.
Excluding the administration tool from modification by VirusScan Enterprise requires the following
two-step process:
1
Look in the log file to determine the detection name contained in the DAT.
2
Configure an exclusion to stop the administration tool from modification.
Determine the administration tool detection name
Perform the following steps to determine the administration tool detection name:
NOTE: The following process uses the open source remote desktop software, TightVNC, as an
example.
1
Open the OnAccessScanlog.txt or Ondemandscanlog.txt files found at the following path:
C:\Documents and Settings\All Users\Application Data\McAfee\DesktopProtection
2
Find the log entry for the TightVNC PUP detection. Following is an example:
3/6/2009 4:50:17 PM No Action Taken ??????????\\administrator C:\WINDOWS\Explorer.EXE
C:\Program Files\TightVNC\vncviewer.exe RemAdm-TightVNC (Remote Admin Tool)
The following table lists the needed information from the log file output:
Example output
Description
vncviewer.exe
Filename
RemAdm-TightVNC
Detection name contained in the DAT.
NOTE: This is the name to use when configuring an
exclusion.
(Remote Admin Tool)
McAfee VirusScan Enterprise 8.8
Group this Unwanted Program is associated with in the
DAT
25
Configuring Performance Improvements
Excluding archive files from on-access scanning
Configure an exclusion
Perform the following steps to configure an exclusion for your administrator tool:
NOTE: The following process uses the open source remote desktop software, TightVNC, as an
example.
Using ePolicy Orchestrator, access the VirusScan Enterprise 8.8.0, Unwanted Programs
Policies, and click Scan Items. Next to Unwanted program exclusions, type the detection
name found in Determine the administration tool detection name. In this example the detection
name entered is RemAdm-TightVNC.
NOTE: To add more exclusions, click + and type another exclusion name.
The following ePolicy Orchestrator 4.5 display shows the TightVNC tool configured as an
exclusion:
Now your administration tools will not be considered PUPs by VirusScan Enterprise.
Excluding archive files from on-access scanning
Including archive files in on-access scanning can significantly impact system performance.
Scanning these archive files during a scheduled on-demand scan off-hours avoids impacting
users and eliminates any threats from these files.
CAUTION: Some malware might be stored in these archive file. But VirusScan Enterprise would
usually find and stop any malware attack when these archive files are read or uncompressed.
When you open folders with a lot of data, more than 20GB, the on-access scanner starts scanning
these files and could take most of your system's processing resources. This can affect your
system's performance.
If you check the contents of the folder being scanned there are probably large compressed files
in the folder. For example, ZIPs, CABs, and installation or other self-extracting EXEs files. As
26
McAfee VirusScan Enterprise 8.8
Configuring Performance Improvements
Configuring system utilization to match system use
each of these files is opened Windows Explorer decompresses these files looking for icons to
add to the icon cache. As each file is opened the on-access scanner checks it for malware.
To configure the off-hours scans of compressed archive using ePolicy Orchestrator, access the
VirusScan Enterprise 8.8.0, On-Access Default Processes Policy, and click Scan Items.
Deselect Scan inside archives (e.g. .ZIP).
The following ePolicy Orchestrator 4.5 display shows scanning compressed files deselected.
Configuring system utilization to match system use
Previous versions of VirusScan Enterprise used a proprietary thread priority process. VirusScan
Enterprise 8.8 uses the Windows Set Priority setting for the scan process and thread priority.
This lets the operating system set the amount of CPU time that the on-demand scanner receives
at any point in the scan process. The system utilization setting in the On-Demand Scan Properties
maps to the Windows Set Priority control.
McAfee VirusScan Enterprise 8.8
27
Configuring Performance Improvements
Configuring system utilization to match system use
The following figure shows the corresponding Windows Set Priority setting for the on-demand
scan set priority configured as Normal in Task Manager.
28
McAfee VirusScan Enterprise 8.8
Configuring Performance Improvements
Configuring system utilization to match system use
Setting the system utilization for the scan to low provides improved performance for other
running applications. The low setting is useful for systems with high end user activity. Conversely,
by setting the system utilization to normal the scan completes faster. The normal setting is
useful for systems that have large volumes and very little end user activity.
You might want to configure the system utilization differently depending what type of activity
is performed on your system. For example, use one of the following setting for systems with
the listed user activity:
• Normal — For systems with little user activity. For example, servers.
• Below Normal — For systems with typical user activity. For example, individual workstations.
• Low — For systems with above average user activity. For example, workstations used for
CPU intensive activities such as computer aided design (CAD).
NOTE: Setting the system utilization to low could cause your on-demand scan to take up to
twice as long.
To configure the system utilization using ePolicy Orchestrator, click Menu | System | System
Tree and click Client tasks. Click the Configuration and Performance tabs to specify
performance options for the scan.
Use the System Utilization slider to configure the setting for the scan process and threads
priority best for the type of activity performed on your system.
McAfee VirusScan Enterprise 8.8
29
Configuring Performance Improvements
Configuring on-demand scan file scan threads for best performance
Configuring on-demand scan file scan threads for
best performance
If you are running on-demand scans on a system with dual core processors, or very fast hard
drives, you can change some registry setting to improve on-demand scan performance.
CAUTION: This best practice contains information about opening or modifying the registry.
• The following information is intended for System Administrators. Registry modifications are
difficult to restore and could cause system failure if done incorrectly.
• Before proceeding, McAfee strongly recommends backing up your registry and understanding
the restore process. For more information, see: http://support.microsoft.com/kb/256986
• Do not run a .REG file that is not confirmed to be a genuine registry import file.
CAUTION: Where a specific set of files is identified by name for exclusion, exclude only those
files instead of the whole folder to minimize vulnerability. In some cases entire folders must be
excluded. Do not exclude any of these files based on the filename extension. For example, do
not exclude all files with the .dit extension.
Table 2: Scan thread setting
Scan thread
System utilization System user activity
1
Low (single
threaded)
Above average — For example, workstations used for CPU intensive
activities such as computer aided design (CAD).
1 per system core
Below normal
Typical — For example, individual workstations.
3* per system core Normal
Little — For example, servers.
* For example, dual core processors have 6 file scan threads configured by default.
See Configuring system utilization to match system use for additional information.
These default settings might not provide the best on-demand scan performance for system
with multi-core processors or very fast hard drives. McAfee encourages you to override the
default file scan thread configuration if your system:
• Is unresponsive during an on-demand scan or if the disk I/O is saturated. McAfee recommends
you lower the absolute number of file scan threads if your System utilization is set to Normal
and Below Normal.
• Has dual core processors, very fast hard drives (for example solid state drives [SSD]), or
your processors are underutilized. McAfee recommends you increase the absolute number
of file scan threads for all system utilization settings.
If your system displays any of these symptoms you should override the default file scan thread
configuration. Use the Registry Editor to modify the default file scan thread configuration using
the following:
1
30
From the VirusScan Console, right-click the Access Protection task and click Disable,
to temporarily disable Access Protection.
McAfee VirusScan Enterprise 8.8
Configuring Performance Improvements
Configuring on-demand scan file scan threads for best performance
2
Start the windows Registry Editor and navigate to the following local machine key:
HKLM\Software\McAfee\DesktopProtection\Tasks
3
Depending on whether you want to increase or lower the number of absolute file scan
threads, create one of the following DWORD registry settings:
• dwMaxThreadsNormal — For Normal system utilization
• dwMaxThreadsBelowNormal — For below normal system utilization
• dwMaxThreadsLow — For low system utilization
4
Modify the REG-DWORD data value to correspond to the system utilization listed in the
Scan thread setting table. For example, the following example adds a dwMaxThreadsNormal
key with a data value of 1 for a system with normal utilization.
NOTE: You might need to try different data value numbers with these setting to find the
best performance improvement for your system.
5
Save the registry changes.
6
From the VirusScan Console, right-click the Access Protection task and click Enable, to
reenable Access Protection.
McAfee VirusScan Enterprise 8.8
31
Configuring Performance Improvements
Configuring the scan cache
Additional change
If you still experience unresponsiveness, McAfee recommends you change the way the DATS
are being consumed by the engine. Before you make this change you should understand that
it increases your system:
• Boot time, by at most 10%
• Peak memory consumption of McShield by four times the current amount
NOTE: This setting is suggested for systems that do not have tight memory requirements
and boot time restriction.
Change the way the VirusScan Enterprise engine consumes the DATs using the following:
1
Start the windows Registry Editor and navigate to the following local machine key:
HKLM\SOFTWARE\McAfee\SystemCore\Vscore\NoRuntimeDats
2
Change the default registry value to 2.
3
Reboot the system for the registry setting change to take effect.
Configuring the scan cache
The VirusScan Enterprise scan cache saves a list of scanned files that are clean. This improves
your system performance by saving this clean file scan cache information during a system
reboot. This also allows the on-demand scanner to use this clean file cache information to
reduce duplicate file scanning.
These options should remain enabled for the best boot time and overall system responsiveness
during on-demand scans.
NOTE: Disable these settings during a malware outbreak or if your security requirements are
high.
32
McAfee VirusScan Enterprise 8.8
Configuring Performance Improvements
Configuring the scan cache
Configuring the scan cache
To configure the scan cache settings using the ePolicy Orchestrator, access the VirusScan
Enterprise 8.8.0, General Options Policies, and click the Global Scan Settings tab.
Enable the following scan cache settings:
• Enable saving scan data across reboots
• Allow On-Demand Scans to utilize the scan cache
The following ePolicy Orchestrator 4.5 shows the scan cache enabled.
McAfee VirusScan Enterprise 8.8
33
Other Common Configuration Changes
You can make changes to the VirusScan Enterprise 8.8 default configuration to add or improve
other performance characteristics.
Contents
Configuring on-access scanning of network drives
Configuring exclusions on Exchange servers with GroupShield
Configuring on-access scanning of trusted installers
Filtering 1051 and 1059 events
Configuring on-access scanning of network drives
Network access drives are not, by default, scanned for malware when you access the drive.
On-access scanning of a shared network drive could significantly reduce the performance of
the scanning system offsetting that small security risk. This is potentially a large security risk.
This risk can be reduced by having anti-virus protection on the remote network drives.
If you decide to enable on-access network drive scanning you should understand the:
• Limited system security risks involved — Allowing users to connect to network drives
without scanning those drives on-access does introduce minor security risks to the users
system during the initial connection phase. But, if the user copies any file or folder from the
network drive that information is automatically scanned for malware during the write process.
• Possible performance changes — The performance impact of scanning an entire remotely
connected drive is determined by the drive's proximity and the network connection speed.
• Configuration processes — You should not, under normal security requirements allow
on-access scanning of network drive connections for performance reasons. But if your security
environment requires scanning of network accessed drives, perform the following two tasks:
• Enable on-access scanning of the network drives
• Configure the permissions on the remotely connected shared drives.
To enable on-access scanning of the network drives using ePolicy Orchestrator, access VirusScan
Enterprise 8.8.0, On-Access Processes Policies, and click Scan Items. Next to Scan files,
click On network drives. The following ePolicy Orchestrator 4.5 display shows scanning of
the network drives enabled.
34
McAfee VirusScan Enterprise 8.8
Other Common Configuration Changes
Configuring exclusions on Exchange servers with GroupShield
Configuring exclusions on Exchange servers with
GroupShield
Microsoft Exchange Server 2010 system running McAfee GroupShield should have VirusScan
Enterprise 8.8.0 on-access scanning exclusions configured for the files listed in this best practice.
If you don't configure these exclusions your system performance could be significantly slower.
Configuring the Exchange 2010 servers with GroupShield exclusions requires these tasks,
described in this best practice:
• Configuring the exclusions
• Configuring the Exchange 2010 processes
Configuring the exclusions
To configure the exclusions using the ePolicy Orchestrator, access the VirusScan Enterprise
8.8.0, On-Access Default Processes Policies, and click the Exclusions tab. The following
ePolicy Orchestrator 4.5 shows the Exchange Application-related extension exclusions added
as exclusions.
McAfee VirusScan Enterprise 8.8
35
Other Common Configuration Changes
Configuring exclusions on Exchange servers with GroupShield
Add all of the exclusions lists in the following tables:
• Exchange Application-related extension exclusions
• Exchange Database-related extension exclusions
• Exchange Offline Address Book-related extension exclusions
• Exchange Content Index-related extension exclusions
• Exchange Unified Messaging-related extension exclusions
• Exchange file exclusion
• Internet Information Services (IIS) Working folder exclusions
• Miscellaneous McAfee GroupShield Exchange exclusions
Configuring the Exchange 2010 processes
The exclusions listed in the following tables should only be applied to the following processes:
• EdgeTransport.exe
• MicrosoftTransportLayer.exe
To apply these exclusions to a process using ePolicy Orchestrator, access the VirusScan Enterprise
8.8.0, On-Access Low-Risk Processes Policies, and click Low-Risk Processes.
Add the following processes to the Low-Risk Processes list:
• EdgeTransport.exe
• MicrosoftTransportLayer.exe
The following ePolicy Orchestrator 4.5 shows these processes added to the Low-Risk Processes
list.
36
McAfee VirusScan Enterprise 8.8
Other Common Configuration Changes
Configuring exclusions on Exchange servers with GroupShield
Exchange Application-related extension exclusions
Exclusion
Applicable to...
**\Microsoft\Exchange Server\**\*.config
Exchange Server 2010
**\Microsoft\Exchange Server\**\*.dia
Exchange Server 2010
**\Microsoft\Exchange Server\**\*.wsb
Exchange Server 2010
Exchange Database-related extension exclusions
Exclusion
Applicable to...
**\Microsoft\Exchange Server\**\*.edb
Exchange Server 2010
**\Microsoft\Exchange Server\**\*.log
Exchange Server 2010
**\Microsoft\Exchange Server\**\*.chk
Exchange Server 2010
**\Microsoft\Exchange Server\**\*.jrs
Exchange Server 2010
**\Microsoft\Exchange Server\**\*.que
Exchange Server 2010
Exchange Offline Address Book-related extension exclusions
Exclusion
Applicable to...
**\Microsoft\Exchange Server\**\*.lzx
Exchange Server 2010
Exchange Content Index-related extension exclusions
Exclusion
Applicable to...
**\Microsoft\Exchange Server\**\*.ci
Exchange Server 2010
**\Microsoft\Exchange Server\**\*.wid
Exchange Server 2010
**\Microsoft\Exchange Server\**\*.dir
Exchange Server 2010
**\Microsoft\Exchange Server\**\*.000
Exchange Server 2010
**\Microsoft\Exchange Server\**\*.001
Exchange Server 2010
McAfee VirusScan Enterprise 8.8
37
Other Common Configuration Changes
Configuring exclusions on Exchange servers with GroupShield
Exclusion
Applicable to...
**\Microsoft\Exchange Server\**\*.002
Exchange Server 2010
Exchange Unified Messaging-related extension exclusions
Exclusion
Applicable to...
**\Microsoft\Exchange Server\**\*.cfg
Exchange Server 2010
**\Microsoft\Exchange Server\**\*.grxml
Exchange Server 2010
Exclusion
Applicable to...
Security notes...
**\Temp\
Exchange Server 2010
These exclusions might compromise security since
all files created under this folder are not scanned.
Configure exclusions for only the exchange server
processes to minimize risk. See Configuring the
Exchange processes.
NOTE: Some content
conversions are performed in
this folder
**\Microsoft\Exchange
Server\MDBTEMP\
Exchange Server 2010
**\Microsoft\Exchange
Server\Working\OleConvertor\
Exchange Server 2010
Exchange file exclusion
Exclusion
Applicable to...
Security notes...
**\\Microsoft\Exchange
Server\Bin\EdgeTransport.exe
Exchange Server 2010
Will not be very useful since the image will not
be scanned over and over again.
Internet Information Services (IIS) Working folder exclusions
Exclusion
Applicable to...
**\System32\Inetsrv\
Exchange Server 2010
**\IIS Temporary Compressed
Files\
Exchange Server 2010
**\MNS_FSW_DIR*\
Exchange Server 2010
Security notes...
There are multiple different directories per Hub
Transport server to support the various clusters
in each data center.
Miscellaneous McAfee GroupShield Exchange exclusions
VirusScan Enterprise 8.8.0 can add exclusions automatically to certain locations from the following
list if VirusScan Enterprise 8.8.0 is installed after installing Microsoft Exchange.
Exclusion
Path...
Security notes...
postgres.exe
C:\Program Files
(x86)\McAfee\MSME\PostgreSQL\bin\postgres.exe
MaseRulesUpdater.exe
C:\Program Files
(x86)\McAfee\MSME\bin\MaseRulesUpdater.exe
It is best to add these exclusions
into the low risk category and
disable their scanning.
RPCServ.EXE
C:\Program Files (x86)\McAfee\MSME\bin\RPCServ.EXE
SAFeService.exe
38
McAfee VirusScan Enterprise 8.8
Add this file to the exclusion list
for the access protection rule
"Anti-virus Standard
Protection:Prevent mass mailing
worms from sending mail".
Other Common Configuration Changes
Configuring on-access scanning of trusted installers
Configuring on-access scanning of trusted installers
The Microsoft Windows Trusted Installer, or TrustedInstaller service, protects certain system
files from being replaced, changed, or deleted. This protects these files from threats that would
install a rootkit or other malware on the system. These "Trusted installer" files are very difficult
for malware to change and should not require on-access scanning.
The on-access scan trusted installer setting is disabled by default with VirusScan Enterprise 8.8.
This allows the installation of trusted software without on-access scanning, which improves
performance. This is specifically true for service pack installations for Microsoft Windows.
For security reasons, you could enable this feature so all files being installed by the trusted
installer are also being scanned, but this increase the installation time and reduces the overall
system performance.
To configure on-access scanning of Trusted Installer files using ePolicy Orchestrator, access
the VirusScan Enterprise 8.8.0, On-Access General Policies, and click General . Next to
Scan, click Trusted installers.
The following ePolicy Orchestrator 4.5 shows on-access scanning of trusted installers enabled.
Filtering 1051 and 1059 events
Filtering 1051 and 1059 events sent by the McAfee Agent can improve your ePolicy Orchestrator
dashboard readability and help you find actual events that occur.
By default, all 1051 and 1059 events are sent to ePolicy Orchestrator from McAfee Agents. A
large number of these events could hide actual events that are a threat to your clients. The
following, relatively non-threatening, event types could add up to 95% of received client events
in the ePolicy Orchestrator database.
• 1051 - Unable to scan password protected (Medium)
• 1059 - Scan Timed Out (Medium)
McAfee VirusScan Enterprise 8.8
39
Other Common Configuration Changes
Filtering 1051 and 1059 events
These two events are displayed in the VSE: Threats Detected that appear on your ePolicy
Orchestrator dashboard.
NOTE: By filtering these events there is a slight chance ePolicy Orchestrator you might not
capture an actual threat of this type.
To disable these two events using ePolicy Orchestrator, complete this task.
1
click Menu | Configuration | Server Settings and the Server Settings page appears.
2
Select Event Filtering and click Edit and the Event Filtering page appears.
3
In The agent forwards configuration pane, click Only selected events to the server.
4
From the forwarded events list, scroll down until you see the following events and deselect
them:
• 1051 - Unable to scan password protected (Medium)
• 1059 - Scan Timed Out (Medium)
The following ePolicy Orchestrator 4.5 display shows these events disabled.
40
McAfee VirusScan Enterprise 8.8
Index
1051 and 1059 events, filtering 39
A
Active Directory exclusions 22
archive files exclusions 26
Artemis, minimum settings 11
audience for this guide 4
B
buffer overflow protection
minimum settings 9
on-access scanning 8
C
common maximum protection settings, table 7
conventions used in this guide 4
D
DAT files
updating 10
documentation
organization 5
typographical conventions 4
documentation for products, finding 5
O
on-access scanning
minimum protection 8
network drives 34
Trusted Installers 39
Artemis settings 11
on-demand scanning
active user settings 13
minimum settings 13
using scan cache 32
P
potentially unwanted programs
exclusions 25
process scanning 12
processes on enable on-access scanning
disabling at system startup 18
protection, minimum
buffer overflow protection 9
DAT files 10
memory scans 12
on-access scanning 8
on-demand scanning 13
scan engine 10
without impacting productivity 7
Artemis settings 11
PUPs, see potentially unwanted programs 25
E
exclusions
archive files 26
for Windows Domain Controller with Active Directory or File
Replication Services 22
potentially unwanted programs 25
F
File Replication Services exclusions 22
H
heuristics, minimum settings 11
M
McAfee Agent
registry change to improve performance 19
McAfee Labs
download DATs 10
McAfee ServicePortal, accessing 5
memory scans, minimum settings 12
N
network drives
on-access scanning 34
McAfee VirusScan Enterprise 8.8
R
registry change to improve performance 19
rootkit scanning 12
S
scan cache settings to improve boot time 32
scan engine
updating 10
Scan timeout, 1059 event 39
schedule
on-demand scanning 13
ServicePortal, finding product documentation 5
system performance
configuring file exclusions 22
configuring high- and low-risk process policies 20
excluding archive files 26
exclusions for potentially unwanted programs 25
improve boot time with scan cache 32
setting system utilization 27
with maximum protection 7
disabling processes on enable on-access scanning at startup 18
system registry change 19
system registry change to improve performance 19
system utilization for best performance 27
41
Index
T
V
Trusted Installer
configure on-access scanning 39
virtual machine protection settings, table 7
VirusScan Enterprise
registry change to improve performance 19
VSE Threats Detected, ePolicy Orchestrator dashboard 39
U
Unable to scan password protected, 1051 event 39
W
Windows Domain Controller exclusions 22
42
McAfee VirusScan Enterprise 8.8