1
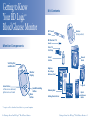
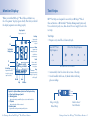
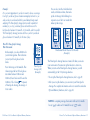
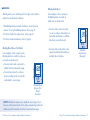
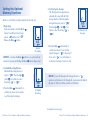
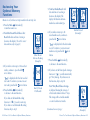
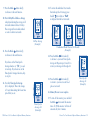
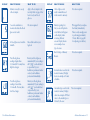
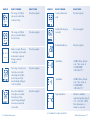
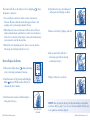
Owner’s Guide
Logic
TM
Blood Glucose Monitor
You will notice these symbols on your vials of test strips and control
solution as well as the label on the back of your BD LogicTM Blood
Glucose Monitor. These symbols alert you to important
information. Below is an explanation of what they mean:
Stands for “In Vitro Diagnostic” use. This
means the product is intended to be used
outside of the body.
This symbol means “Caution.” It is on your vial
of strips and control solution to warn you to
read your instructions before using them.
Distributed by: Becton Dickinson Canada Inc.
Oakville, ON L6H 6R5
BD, BD Logo and BD Logic are trademarks of
Becton, Dickinson and Company. © 2003 BD.
Franklin Lakes, NJ 07417
System and test strips manufactured for BD by
Nova Biomedical Corporation, Waltham, MA 02454
NEED TO CONTACT US?
Call BD Consumer Services toll-free, 24 hours a day, 7 days a week,
in Canada at 1-888-BDCARES (1.888.232.2737)* or visit our
website at www.BDdiabetes.com.
*NOT FOR EMERGENCY OR MEDICAL INFORMATION.
U.S. Patent No. 6,258,229 and other
U.S. and foreign patents pending.
Made in USA.
P80098
BD Logic™ Blood Glucose Monitor
Notes
BD Logic™
Blood Glucose Monitor
BD™ Control
Solution
BD Ultra-Fine™ 33
Lancets
BD™ Test Strips
BD™ Lancet Device
Welcome
Thank you for choosing the BD LogicTM Blood Glucose Monitor.
This Owner’s Guide contains important information on the monitor
and how it works. Please read it carefully before using your new monitor.
The BD Logic™ Blood Glucose Monitor is designed to be convenient and
easy to use. It gives accurate results in just 5 seconds using a very small
blood sample. This small blood sample allows you to use a thinner lancet
because not as much blood is needed to do a blood sugar test. BD offers
the thinnest lancet available with its BD Ultra-FineTM 33 Lancet, resulting
in less pain. In addition, the new BD Logic™ Blood Glucose Monitor has
a memory that stores your blood sugar test results and has optional features,
such as insulin recording and mealtime averaging, to help you and your
healthcare professional manage your diabetes care.
Helping people with diabetes live healthy lives has been BD’s goal for
over 75 years. The BD Logic™ Blood Glucose Monitor is intended to
provide the comfort and convenience you need in managing your diabetes.
Before you get started, it is important to complete the Warranty Registration
Card included in your Kit and mail it back to BD. Doing this will help us
better serve your needs.
If you need to contact us, please call BD Consumer Services toll-free,
24 hours a day, 7 days a week, in Canada at 1.888.BDCARES
(1.888.232.2737)* or visit our website at www.BDdiabetes.com.
* NOT FOR EMERGENCY OR MEDICAL INFORMATION.
Important
Information
!
• Before you begin using your new BD Logic Blood Glucose Monitor,
please read all of the instructions provided in this
Owner’s Guide.
TM
• Use the monitor only if the protective seal on the box containing
your BD Logic™ Blood Glucose Monitor is unbroken.
• Perform all quality control checks recommended in your
Owner’s Guide.
Your BD LogicTM
Blood Glucose Monitor
• Is intended for use outside the body (in vitro diagnostic use).
• Should only be used with BD™ Test Strips and BD™
Control Solution.
• Should be used for testing glucose (sugar) and only with fresh
capillary whole blood samples.
• Should not be used to diagnose diabetes or to test newborns.
• Should not be stored in the refrigerator or in the car.
• Consult with your diabetes healthcare professional and follow his
or her guidance for your blood glucose monitoring routine.
• These recommendations apply to all blood glucose monitors.
• Degree of safety in the presence of flammable anesthetic mixture: Not
suitable for use in the presence of flammable anesthetic mixture with
air or with oxygen or nitrous oxide.
CAUTION: The BD LogicTM Blood Glucose Monitor contains small
parts. Keep the monitor out of reach of small children
and pets.
How to Use Your Monitor’s Basic Memory Functions
Table of
Contents
Getting to Know Your BD Logic™
Blood Glucose Monitor
Monitor Components ..................................................................................2
Kit Contents.................................................................................................3
Monitor Display ..........................................................................................4
Test Strips ....................................................................................................5
Lancet Device...............................................................................................7
Getting Started
Setting the Time, Date, and Beeper ............................................................. 8
How to Set the Time, Date, and Beeper .............................................. 9
Coding Your Monitor ............................................................................... 12
Why Coding Your Monitor Before Testing Is Necessary.................... 12
How to Code Your Monitor .............................................................. 13
Running a Control Solution Test................................................................14
Why Running a Control Solution Test Is Important.......................... 14
How to Run a Control Solution Test................................................. 16
How to Test Your Blood Glucose
Preparing the Lancet Device...................................................................... 21
Inserting the BD™ Test Strip .................................................................... 23
Getting and Applying a Blood Sample to the BD™ Test Strip .................. 24
Understanding Your Test Result................................................................ 26
What Are the Basic Memory Functions?................................................... 28
Memory ............................................................................................. 28
14-Day Average ................................................................................. 28
Reviewing Your Basic Memory Functions................................................. 29
How to Use Your Monitor’s Optional
Memory Functions .............................................................................. 31
What Are the Optional Memory Functions?............................................. 32
Insulin Recording .............................................................................. 32
7-Day Average ................................................................................... 32
Time-Specific Averages....................................................................... 33
Marking ............................................................................................. 36
Setting the Optional Memory Functions ................................................... 38
Labeling Your Insulin Types.......................................................................42
Recording Your Insulin Doses....................................................................43
Marking a Blood Glucose Test.................................................................. 45
Marking an Insulin Dose ...........................................................................46
Reviewing Your Optional Memory Functions........................................... 48
Summary: How to Review Your
Basic and Optional Memory Functions ................................... 52
Additional Information
Display Messages and Troubleshooting Guide .......................................... 53
Caring for Your Monitor .......................................................................... 59
Storing and Cleaning ......................................................................... 59
Battery ............................................................................................... 59
Healthcare Precautions and Limitations.................................................... 62
Conditions That May Affect Results......................................................... 63
3-Year Warranty ....................................................................................... 63
Specifications ............................................................................................ 64
How to Contact Us................................................................................... 65
Getting to Know
Your BD Logic
Blood Glucose Monitor
Kit Contents
TM
Monitor
(Battery installed)
BD™ Lancet
Device
BD Ultra-Fine™ 33
Lancet
Monitor Components
Vial of 10
Test Strips
Owner's Guide
BD Logic ™
Blood Glucose Monito
r
Owner’s
Guide
Control
Solution
Test Strip Slot
and Data Port *
Logbook
Monitor
Display
High/Low
Blood Sugar
Reference Card
BD Logic ™
Blood Glucose Monitor
Quick Reference Guide
BD Logic
™
Blood Glucose Monitor
Arrow Buttons
Left arrow moves backward;
right arrow moves forward
Getting Started
Insulin Recording
Button
Mode
Button
Warranty Card
Getting Started Poster
1
Logbook
Prepare the
lancet device
Depth Setting
Arming
Knob
Depth Penetration Dial
(1 = shallow to 6 = deep)
Important:
Please read your Owner’s Guide
for complete information
before testing your
Trigger
Button
blood glucose.
Body
Quick
Reference
Guide
* Accepts a cable to download stored data to a personal computer.
2 • Getting to Know Your BD LogicTM Blood Glucose Monitor
Getting to Know Your BD LogicTM Blood Glucose Monitor • 3
Monitor Display
Test Strips
When you turn the BD LogicTM Blood Glucose Monitor on,
the “all segments” display appears briefly. This tells you that all
the display segments are working properly.
BD™ Test Strips are designed for use with your BD LogicTM Blood
Glucose Monitor or BD LatitudeTM Diabetes Management System only.
Use each test strip only once, then discard. Do not reapply blood to the
test strip.
Beep Symbol
Beeper is preset to ON
A.
Battery
B.
Appears when
battery should be
replaced
Mem.
Test Results
Display Area
C.
Appears when
viewing a test result
or insulin dose
stored in memory
Units
U
Refers to units of
measurement for
blood glucose
Mem. mg/dL
Avg. mmol/L
D.
Blood Drop
AM
PM
Appears when monitor
is ready for you to apply
sample to test strip
Month
Avg.
Appears when viewing
averages (7-day, 14-day,
or Time-Specific)
Hour
Day
Test Strips:
• Require a very small blood volume (0.3 µL).
New BD™ Test
Strip Requires
0.3 µL
Other Test Strips Require
10 µL
4 µL
2 µL
1 µL
Not actual size. Scale is relative.
• Automatically draw blood into the test area of the strip.
• Can be handled with clean, dry hands without affecting
glucose readings.
Minutes
Symbols for Optional Memory Functions That Require Setup
A. Time-Specific Averages Symbol
B. Marking Symbol
Appears when viewing a marked blood glucose test or marked insulin dose.
C. U Symbol
Appears when units of insulin are entered.
D. Insulin Symbol
Edge to Apply
Blood Drop
End to Insert
Into Monitor
Appears when recording or reviewing insulin injections.
4 • Getting to Know Your BD LogicTM Blood Glucose Monitor
Getting to Know Your BD LogicTM Blood Glucose Monitor • 5
Important BD™ Test Strip Information
Lancet Device
• Use only BD™ Test Strips when testing.
The diagram below shows the components of the BD™ Lancet Device.
• Remove the test strip from the vial only when ready to test.
• Store test strips at room temperature below 30°C (86°F).
Do not refrigerate or freeze.
• Test strips should be stored only in original vial.
• Keep vial cap closed tightly after each use.
• Do not use the test strip if the expiration date has passed,
for this may cause inaccurate results.
Depth Penetration Dial
(1 = shallow to 6 = deep)
Cap
Arming
Knob
• Test strips should only be stored for 3 months after opening
the vial. When first opening a new vial of test strips, count
forward 3 months and write that date on vial. Discard any
remaining test strips after the date you have written on the vial.
• Do not tamper with test strip.
Depth Setting
Trigger
Button
Body
CAUTION: The test strip vial contains small parts. Keep the test strip
vial away from children and pets.
6 • Getting to Know Your BD LogicTM Blood Glucose Monitor
Getting to Know Your BD LogicTM Blood Glucose Monitor • 7
Getting Started
Setting the Time,
Date, and Beeper
Having the correct time and date of each blood glucose test result and
insulin dose helps you and your healthcare professional track changes
in your therapy. It is important to set the correct time and date so you
have records of when you test and inject. If you do not set the time
and date, all blood glucose monitoring results and insulin doses will
be marked and will not be included in averages (refer to page 36).
Your BD LogicTM Blood Glucose Monitor offers a beeper function that
is preset to “ .” This tells you when enough blood is applied to the
test strip, when a test is completed, and prompts you through other
steps in using your monitor.
NOTE: Remember to adjust time and date settings as needed to
match the local time or daylight savings time and after you replace
the battery.
HOW TO SET THE TIME, DATE, AND BEEPER
Monitor is off, with no test strip inserted in the test strip slot.
1. Begin Setup:
Press and continue to hold the
Mode
button until you hear a short
beep and see the flashing hour displayed.
Release the Mode
button.
AM
Flashing Hour
Display
2. Set Hour:
Press the right
or left
arrow
button until the correct hour (with AM
or PM) appears.
3. Press the Mode
button briefly to
confirm your choice and to advance to
set the minutes.
PM
Set Hour
(Example)
4. Set Minutes:
Press the right
or left
arrow
button until the correct minutes appear.
PM
5. Press the Mode
button briefly to
confirm your choice and to advance to
set the year.
(Continued on next page.)
8 • Getting Started
Set Minutes
(Example)
Getting Started • 9
6. Set Year:
Press the right
or left
arrow
button until the correct year appears.
7. Press the Mode
button briefly to
confirm your choice and to advance
to set the month.
12. Set Beeper:
Beeper is preset to “ .” Press the
right
or left
arrow button to
select the beeper setting (ON or OFF).
Set Year
(Example)
Set Beeper
(Example)
NOTE: Instructions in this guide assume the beeper is set to
8. Set Month:
Press the right
or left
arrow
button until the correct month appears.
“ .” If you have set the beeper to “
beep as described throughout the guide.
9. Press the Mode
button briefly to
confirm your choice and to advance
to set the day.
13. Press the Mode
button briefly to
confirm your choice and to advance
to the end of setup.
Set Month
(Example)
10. Set Day:
Press the right
or left
arrow
button until the correct day appears.
11. Press the Mode
button briefly to
confirm your choice and to advance to
set the beeper. A long beep will sound.
10 • Getting Started
,” you will not hear the
14. End Setup:
The display shows your set time
and date. Setup is complete.
15. Return to Setup:
Press the Mode
button briefly to
return to start of setup. The flashing
hour that you set is displayed.
Set Day
(Example)
16. Turn Off Monitor:
Press and hold the Mode
button
until the monitor turns off, OR the
monitor will turn off automatically after
1 minute.
PM
End of Setup
(Example)
Getting Started • 11
Coding Your Monitor
HOW TO CODE YOUR MONITOR
Monitor is off, with no test strip inserted in the test strip slot.
WHY CODING YOUR MONITOR BEFORE
TESTING IS NECESSARY
Your BD LogicTM Blood Glucose Monitor must be manually “coded” to
match the vial of test strips you will be using in order
to provide accurate blood glucose test results.
1. Insert a BD™ Test Strip into the test strip
slot. The monitor turns on and briefly
displays the “All Segments” display.
You should code your monitor:
• When you first receive your new monitor,
before you test your blood glucose.
• If the monitor display shows flashing
“– – –” as pictured.
• Before using each new box of
test strips.
IMPORTANT: If the code number on the display does not match the
code number on the test strip vial, the test results may not be accurate.
Insert Test Strip
2. While the flashing code number appears
on the display, code the monitor to match
the test strip being used. Press the right
or left
arrow button (within 3 seconds)
to match the code printed on the test
strip vial.
When you first use your monitor, the
display shows “– – –.” This means the
monitor is not coded and needs to be
coded.
Code the
Monitor
NOTE: If your monitor advances to the blinking blood drop
before you coded your monitor to match the test strips being used, take
out the test strip from the test strip slot and reinsert to start again.
(Continued on next page.)
12 • Getting Started
Getting Started • 13
3. When the codes match, press the
Mode
button. A blinking blood drop
shows that the monitor is ready for you
to test. To run a control solution test,
refer to page 16. To run a blood glucose
test, refer to page 21.
To turn off the monitor, remove and
discard the used test strip. The monitor
turns off automatically.
Important Control
Solution Information
• Use only the BD™ Control Solution for the test.
• Check the expiration date on the control solution vial.
Do not use the control solution if the expiration date has
passed.
Finish Coding
Running a Control
Solution Test
WHY RUNNING A CONTROL SOLUTION TEST
IS IMPORTANT
• Store only for 3 months after first opening. When you open a
new vial of control solution, count forward 3 months and write
that date on the label of the control solution vial. Discard any
remaining solution after the date you have written on the vial.
• Store the control solution tightly closed at room temperature
below 30°C (86°F). Do not refrigerate or freeze.
• Shake control solution well before using.
The control solution test confirms that your monitor and test strips are
working correctly. A control solution test is similar to a blood glucose
test, except you use BD™ Control Solution and not a blood sample.
You Should Run a Control Solution Test:
• Before using your monitor for the first time and at least once
a week thereafter.
• Each time you open a new box of BD™ Test Strips.
• If you leave the test strip vial cap open.
• If you drop your monitor.
• If your results do not match the way you feel, or you think
your results are higher or lower than expected.
CAUTION: The BD™ Control Solution range printed on the
test strip vial is for control solution only. It is used to test the
performance of the monitor and test strip. It is not a recommended
range for your blood glucose level.
• To check the performance of the monitor and test strips.
14 • Getting Started
Getting Started • 15
HOW TO RUN A CONTROL SOLUTION TEST
Monitor is off, with no test strip inserted in the test strip slot.
3. A blinking blood drop
tells you that
the monitor is ready for the next step.
1. Insert a BD™ Test Strip into the test strip
slot. The monitor turns on and displays
the code number.
Blinking
Blood Drop
Insert Test Strip
4. Mark as a control solution test by
pressing the right
or left
arrow
button until a “ ” appears.
2. Match the code number on the display
with the code on the test strip vial.
Mark as Control
Solution Test
If the codes match, you are ready to
begin testing.
If the codes do not match, review
“Coding Your Monitor” (refer to
page 12).
Match Codes
(Example)
IMPORTANT: It is important to mark a control solution
test so the test result does not appear to be one of your blood glucose
test results.
(Continued on next page.)
16 • Getting Started
Getting Started • 17
5. Shake the control solution vial and
discard a drop before use. Squeeze a drop
of control solution onto a clean, hard,
dry surface.
7. The display counts down from
5 seconds as the monitor performs
the test.
Squeeze Drop of
Control Solution
Test Countdown
8. When the test is finished, a long
beep sounds and the monitor
displays the result.
6. While holding the monitor, touch the
edge of the inserted test strip to the drop
of control solution. A short beep sounds
and the monitor begins to count down
from 5 to 1.
Test Result
(Example)
Touch Edge of
Test Strip to
Control Solution
Correct
18 • Getting Started
Incorrect
9. Compare the result on the display with
the range printed on the test strip vial.
If the result falls within the range, your
monitor and test strips are working
correctly.
10. Remove and discard the used test strip.
The monitor turns off automatically.
Range
4.4 - 6.7
(Example)
Getting Started • 19
Out-of-range results may be caused by the following:
• You may not be doing the test properly. Retest and follow the
instructions carefully.
• The BD LogicTM Blood Glucose Monitor may not be coded properly
to match the test strips being used.
• The control solution may have expired or have been contaminated.
Check the expiration date on the control solution vial. Control
solution is good for only 3 months after opening. Make sure the
control solution vial is closed when not in use.
• The test strip may have expired. Check the expiration date on the
test strip vial.
• The test strip may have been damaged. This can be caused by
extreme temperatures or by leaving the test strip vial cap open.
Retest using a new test strip.
• The BD Logic™ Blood Glucose Monitor may not be working
properly.
How to Test Your
Blood Glucose
Preparing the Lancet Device
Before testing, wash your hands with soap and warm water.
Dry thoroughly.
1. Unscrew the cap from the
BD™ Lancet Device.
Unscrew Cap
2. Select the penetration depth by turning
the cap dial from 1 (shallow) to 6 (deep).
NOTE: If the control solution test result is outside the range
(is either higher or lower), your monitor and test strip may not be
working as a system. Repeat the test using a new test strip.
Do not use the monitor until test results fall within the appropriate
range. If the problem continues, call BD Consumer Services toll-free,
24 hours a day, 7 days a week, in Canada at 1.888.BDCARES
(1.888.232.2737)* for help.
* NOT FOR EMERGENCY OR MEDICAL INFORMATION.
20 • Getting Started
Skin Type
Soft
Average
Callused
Suggested Setting
1-2
3-4
5-6
Select Penetration
Depth
(Continued on next page.)
How to Test Your Blood Glucose • 21
3. Insert a BD Ultra-FineTM 33 Lancet into
the lancet holder.
Inserting the BD™ Test Strip
Insert Lancet
Monitor is off, with no test strip inserted in the test strip slot.
1. Insert a BD™ Test Strip into the test strip
slot. The monitor turns on and briefly
displays “All Segments.”
4. Remove the lancet cover while holding
the base of the lancet.
Remove Lancet
Cover
5. Screw the cap back onto the lancet
device.
Screw Cap Back On
6. Pull out the arming knob as far as it will
go and then release it. The lancet device is
now armed.
Edge to Apply
Blood Drop
End to Insert
Into Monitor
2. Match the code number on the display
with the code on the test strip vial. If the
codes do not match, press the right
or left
arrow button to match the code
printed on the test strip vial. When the codes
match, press the Mode
button briefly
(refer to page 12 for “Coding Your
Monitor”).
Insert Test Strip
Match Codes
(Example)
3. A blinking blood drop
tells you that the
monitor is ready for the next step.
Arm Lancet Device
NOTE: Use only BD Test Strips when testing.
(Continued on next page.)
22 • How to Test Your Blood Glucose
Blinking Blood
Drop
How to Test Your Blood Glucose • 23
Getting and Applying
a Blood Sample to the
BD™ Test Strip
1. Place the armed BD™ Lancet Device
securely on the side of your finger and
press the trigger button to activate the
device. If necessary, gently squeeze your
finger to help form a drop of blood.
2. Apply blood drop to the edge of the test
strip. The blood is drawn into the test
strip. Hold your finger to the edge of
the test strip until you hear a short beep
or see the monitor display begin to
count down.
Apply Blood
Drop
Lance Finger
Correct
Incorrect
Correct Blood Drop
NOTE: Lancets are for one-time use only. Use a new, sterile lancet each
time you test. Test different areas on your fingertips to avoid developing
calluses. After completing the blood test, remove the cap from the
BD™ Lancet Device, carefully place the lancet cover on the lancet and
remove the lancet. Dispose of the used lancet per your local disposal
regulation where applicable.
CAUTION: Your BD™ Lancet Device and BD™ Lancets are for your
personal use only. DO NOT share with others. Sharing the lancet device
or lancets can transmit serious, even grave infections. To avoid accidental
sticks, do not store used lancets in the device after testing or arm lancet
device with a new sterile lancet unless ready to use.
24 • How to Test Your Blood Glucose
Completely Filled
Not Completely
Filled
3. The display counts down from 5 seconds
as the monitor performs the test.
(Continued on next page.)
Countdown
How to Test Your Blood Glucose • 25
4. A long beep sounds and the result is
displayed and stored in the monitor’s
memory. You should also write your
result down in your logbook.
5. Remove and discard the used test strip.
The monitor turns off automatically.
mmol/L
PM
Test Result
(Example)
6. Remove the used lancet from the lancet
device. Follow your local disposal
regulations where applicable.
If the test result is higher than 33.3 mmol/L,
the monitor sounds 3 quick beeps and the
.” You may have
display will read “
high blood sugar. Retest your blood glucose
immediately using a new test strip. If your
reading is still high, you should treat as
prescribed by your healthcare professional
and/or contact your healthcare professional
immediately.
If the test result is lower than 1.1 mmol/L,
the monitor sounds 3 quick beeps and the
display will read “ .” You may have
low blood sugar. Retest your blood glucose
immediately using a new test strip. If your
reading is still low, you should treat as
prescribed by your healthcare professional
and/or contact your healthcare professional
immediately.
Understanding Your
Test Result
PM
Blood Glucose
Test Higher Than
33.3 mmol/L
PM
Blood Glucose
Test Lower Than
1.1 mmol/L
Your blood glucose test result is displayed
on the monitor.
mmol/L
PM
Test Result
(Example)
26 • How to Test Your Blood Glucose
NOTE: Test results greater than 13.3 mmol/L may mean high blood
sugar (hyperglycemia). Test results lower than 3.3 mmol/L may mean
low blood sugar (hypoglycemia). If you get results in these ranges,
retest your blood glucose. If your reading is still in these ranges, you
should treat as prescribed by your healthcare professional and/or
contact your healthcare professional immediately.
How to Test Your Blood Glucose • 27
How to Use Your Monitor’s
Basic Memory Functions
The Basic Memory functions help you and your healthcare professional
track changes in your blood glucose levels over time.
What Are the Basic
Memory Functions?
MEMORY
Your BD LogicTM Blood Glucose Monitor has a memory that stores up to
250 of your blood glucose test results. You can view up to 30 of your most
recent test results on your monitor display.
14-DAY AVERAGE
You can review the average of all test results taken in the last 14 days. The
average will not include marked test results or control solution test results.
(For information on “Marking,” refer to page 36.)
NOTE: In computing averages, the monitor will use 33.3 mmol/L
” results and 1.1 mmol/L for any “
” results.
for any “
28 • How to Use Your Monitor’s Basic Memory Functions
Reviewing Your Basic
Memory Functions
Monitor is off, with no test strip inserted in the test strip slot.
1. Press the Mode
the monitor on.
button briefly to turn
2. Your Most Recent Blood Glucose Test
Result with date and time of testing is
shown on the display. (To set the correct
date and time, refer to page 8.)
3. If you wish to review up to 30 stored test
results, continue to press the left
arrow button.
“
” is displayed after the last recorded
test result. To return to the most recent
test result, press the left
arrow button.
4. Press the Mode
button briefly to
advance to your 14-Day Blood Glucose
Test Average.
Mem. mmol/L
PM
Most Recent Blood
Glucose Reading
(Example)
Mem.
End of Stored
Test Results
(Continued on next page.)
How to Use Your Monitor’s Basic Memory Functions • 29
5. The display shows the average of all
test results taken in the last 14 days.
The average will not include marked
or control solution test results.
Mem. mmol/L
Avg.
14-Day Average
(Example)
6. Press the Mode
button briefly to
return to your most recent blood glucose
test result.
How to Use Your Monitor’s
Optional Memory Functions
Your BD LogicTM Blood Glucose Monitor has Optional Memory
functions that can help you and your healthcare professional manage
your diabetes.
The Optional Memory functions allow you to:
1. Record and review your insulin injections.
2. Look at the 7-Day Average of your blood glucose test results.
7. To turn off the monitor, press and hold
the Mode
button until the monitor
turns off, OR the monitor will turn off
automatically after 1 minute.
3. View Time-Specific Averages of your blood glucose test results.
4. Mark specific blood glucose test results and insulin doses.
NOTE: The Optional Memory functions are included with your
monitor. These functions are turned off when you receive your new
monitor and must be manually set up. (Refer to page 38 for setup.)
30 • How to Use Your Monitor’s Basic Memory Functions
How to Use Your Monitor’s Optional Memory Functions • 31
What Are the Optional
Memory Functions?
INSULIN RECORDING
Your BD Logic™ Blood Glucose Monitor allows you to record
and review the insulin dose and type that you inject each day. You can
review up to 30 of your 250 stored insulin records on your monitor
display. An advantage of this function is that you can compare
changes in the results of your blood glucose test results to your
insulin injections. Once you have set the Insulin Recording function
to “ ,” you can record and save your insulin injections by insulin
type and dose.
• The Insulin Recording function is turned off when you receive your
new monitor. To set up the Insulin Recording function, refer to page 38.
• After you set up the function, you can review your insulin injections.
For complete information on how to review this and other Optional
Memory functions, refer to page 48.
• To set up the 7-Day Average function, refer to page 38.
• After you set up the function, you can review your 7-Day Average.
For complete information on how to review this and other Optional
Memory functions, refer to page 48.
TIME-SPECIFIC AVERAGES
This function is designed to help you adjust your insulin dose based
on a pattern of blood glucose values over 3 to 5 days (“pattern-control”
of your insulin). It provides information to help make these insulin
adjustments.
You can use the monitor to compute the average of 3 blood glucose test
results that you took at roughly the same time of day over the last few
days. You can select the 2-hour time period that you want this average
to be drawn from (ie, before or after meals, before or after exercise).
This function lets you and your healthcare professional:
• Choose up to 4 time periods during the day for which you want to
track results. The monitor labels these times as A1, A2, A3, and A4.
7-DAY AVERAGE
• View your Time-Specific Averages on the monitor display.
Your BD Logic™ Blood Glucose Monitor allows you to review the
average of all test results taken in the last 7 days. The average will not
include marked or control solution test results. (For information on
“Marking,” refer to page 36.)
• View the 3 test results that make up each Time-Specific Average.
NOTE: To get a Time-Specific Average, your 3 tests must be
The 7-Day Average function is turned off when you receive your new
monitor. It is automatically turned ON when you set the Time-Specific
Average function to ON.
An example of how you may use the Time-Specific Average function
is shown on the next page.
32 • How to Use Your Monitor’s Optional Memory Functions
performed on 3 of the last 5 days.
How to Use Your Monitor’s Optional Memory Functions • 33
Example:
For your next appointment, your doctor wants to know, on average,
how high your blood glucose has been running before lunch so you
and your doctor can decide whether your diabetes therapy needs
adjusting. The Time-Specific Average function will compute that
number for you. Say your blood glucose at lunchtime over the
last few days has been 10.6 mmol/L, 12.1 mmol/L, and 8.1 mmol/L.
The Time-Specific Average function will show you that your blood
glucose has been 10.3 mmol/L for this time of day.
You can also view the 3 individual test
results, with date and time, that make
up the A2 Average. Each flashing box
represents one of the 3 test results that
makes up the average.
Mem. mmol/L
AM
Mem. mmol/L
PM
Mem. mmol/L
AM
How This Time-Specific Average
Was Determined:
In the example, you chose 12:00 PM for
your A2 Average time. This is the time
you test your blood glucose before
lunch.
Your A2 Average is 10.3 mmol/L. This
value averages the last 3 blood glucose
tests taken between 11:00 AM and
1:00 PM (1 hour before and 1 hour after
represent
12:00 PM). The 3 boxes
a Time-Specific Average, the average of
3 test results.
Mem. mmol/L
Avg.
PM
Time-Specific
Average (A2)
(Example)
3 Individual Blood Glucose Test Results
(Example)
The Time-Specific Average function is turned off when you receive
your new monitor. You must set up this function to turn it on.
When you turn on the Time-Specific Average function, you will
automatically get the 7-Day Average function.
• To set up the Time-Specific Average function, refer to page 39.
• After you set up the function, you can review your Time-Specific
Averages. For complete information on how to review this and other
Optional Memory functions, refer to page 48.
NOTE: In computing averages, the monitor will use 33.3 mmol/L
” results and 1.1 mmol/L for any “
” results.
for any “
34 • How to Use Your Monitor’s Optional Memory Functions
How to Use Your Monitor’s Optional Memory Functions • 35
MARKING
Marking Insulin Doses:
Marking allows you to identify specific blood glucose test results or
insulin doses in the monitor’s memory.
Some examples of how you may use
the Marking function to mark an
insulin dose are shown below.
• The Marking function is turned off when you receive your new
monitor. To set up the Marking function, refer to page 41.
—You may wish to mark a dose that
you are recording to indicate that you
entered the information at a different
time than you actually injected.
• For how to mark a blood glucose test, refer to page 45.
• For how to mark an insulin dose, refer to page 46.
Marking Blood Glucose Test Results:
—You may wish to indicate that a dose
amount was different than what you
normally take at that time.
Some examples of how you may use the
Marking function to mark blood glucose
test results are shown below.
U
Marked
Insulin Dose
(Example)
—You may wish to mark a test result to
identify that it was taken after eating.
—You may have retested to confirm a
previous reading and do not want the
result added to your averages.
mmol/L
PM
Marked Blood
Glucose Test
Result
(Example)
NOTE: Marked test results are not included in any averages. If you
have not set the time and date, all blood glucose monitoring results and
insulin doses will be marked and will not be included in averages.
36 • How to Use Your Monitor’s Optional Memory Functions
How to Use Your Monitor’s Optional Memory Functions • 37
Setting the Optional
Memory Functions
Monitor is off, with no test strip inserted in the test strip slot.
1. Begin Setup:
Press and continue to hold the Mode
button. You will hear 2 short beeps
and see
and the word “
.”
Release the Mode
button.
Insulin
Recording
NOTE: If you release the Mode
button too soon, turn off your
monitor by pressing and holding the Mode
button. Repeat step 1.
2. Set Insulin Recording Function:
The Insulin Recording function is
preset to “
.” Press the right
or left
arrow button to select
”).
the setting (“ ” or “
3. Press the Mode
button briefly to
confirm your choice and to advance
to set Time-Specific Averages.
4. Set Time-Specific Averages:
The Time-Specific Averages function
automatically comes with the 7-Day
Average function. The Time-Specific
Averages function is preset to “
.”
Press the right
or left
arrow
button to select the setting (“ ” or
“
”).
Avg.
Set Time-Specific
Averages
5. Press the Mode
button briefly to
confirm your choice. If you set TimeSpecific Averages to “
,” skip to step 9.
If you set to “ ,” you will advance to
set the first of 4 times (A1, A2, A3, A4).
NOTE: If you set the Time-Specific Averages function to “
”
and do not set the times for A1 through A4, your monitor will default
the times to 7:00 AM, 12:00 PM, 6:00 PM, and 10:00 PM.
Set Insulin
Recording
(Continued on next page.)
38 • How to Use Your Monitor’s Optional Memory Functions
How to Use Your Monitor’s Optional Memory Functions • 39
6. Set Time for A1:
Press the right
or left
arrow
button to select the time when you
usually do your first blood glucose test.
The time will advance in 15-minute steps.
The Time-Specific Average will include
test results within a 2-hour range:
1 hour before and 1 hour after the
time you select.
Avg.
AM
Set Time for
Your First
Time-Specific
Average (A1)
7. Press the Mode
button briefly to
confirm your choice and to advance to
set time for A2.
8. Set Time for A2 Through A4:
Repeat steps 6 and 7. When complete,
you will advance to set Marking
function.
Set Marking
Function
10. End of Setup:
Optional Function Setup is complete.
The word “
” will be displayed on
your monitor.
11. Return to Setup:
Press the Mode
button briefly
to return to start of setup. You will see
,”
and the word “ ” or “
indicating whether you set the Insulin
Recording function to on or off.
End of Optional
Function Setup
Avg.
PM
Set Time for A2
40 • How to Use Your Monitor’s Optional Memory Functions
9. Set Marking Function:
The Marking function is preset
to “
.” Press the right
or
left
arrow button to select the
setting (“ ” or “
”). Press the
Mode
button briefly to confirm your
choice and to advance to end of setup.
12. Turn Off Monitor:
Press and hold the Mode
button
until the monitor turns off, OR the
monitor will turn off automatically after
1 minute.
How to Use Your Monitor’s Optional Memory Functions • 41
Labeling Your
Insulin Types
Recording Your
Insulin Doses
The labels P1, P2, P3, and P4 are used by your monitor to identify up to
4 different types of insulin. You decide what label to use for each type
of insulin you take. Keep a record of the labels you have chosen for each
insulin type.
NOTE: The monitor will not enter into insulin recording mode if:
• The test strip is in the test strip slot, or
• The Insulin Recording function has not been turned on in the Optional
Memory function Setup. (Refer to page 38 for setup.)
Monitor is off, with no test strip inserted in the test strip slot.
The chart below shows examples of labeling
up to 4 different types of insulin.
1. Inject your insulin.
Example 1:
Uses 1 insulin
type only
Example 2:
Uses 2 insulin
types
Example 3:
Uses 3 insulin
types
Example 4:
Uses 4 insulin
types
P1 __________
NPH
P1 __________
NPH
P1 __________
NPH
P1 __________
NPH
*P2 __________
P2 __________
Humalog*
P2 __________
Humalog*
P2 __________
Humalog*
P3 __________
P3 __________
P3 __________
Regular
P3 __________
Regular
P4 __________
P4 __________
P4 __________
P4 __________
30/70
A blank chart like this can be found in the back of your logbook.
You can use it to record what labels you are using for your insulin types.
* Humalog is a trademark of Eli Lilly and Company.
2. After you inject your insulin, press and
release the Insulin Recording button.
The monitor turns on and advances
to insulin recording. The
and
a flashing “1” appear on the display.
Insulin
Recording
3. Press the left
or right
arrow
button to select the label (P1, P2, P3, or P4)
that matches the type of insulin you injected.
(Refer to page 42 for labeling your
insulin.)
4. Press the Mode
button briefly to
confirm your choice and to advance to
record your insulin dose.
Select Insulin
Type
(Continued on next page.)
42 • How to Use Your Monitor’s Optional Memory Functions
How to Use Your Monitor’s Optional Memory Functions • 43
5. Press the right
arrow button
to enter your insulin units. Use the
right
or left
arrow buttons
to adjust units up or down.
6. To save the insulin dose, press the
Mode
button briefly, or press the
Insulin Recording button. A long
beep sounds to confirm that the insulin
dose was saved. (Refer to page 46 for
marking your insulin dose.)
U
A blood glucose test can be marked after completing a test. For an
explanation of situations in which you may wish to mark a blood
glucose test, refer to page 36.
Select
Insulin Dose
7. If you inject more than one type of
insulin at one time, turn off the monitor
by pressing and holding the Mode
button. Repeat steps 2 through 6
to record your next insulin type.
8. You have finished recording your insulin
information. To turn off your monitor,
press and hold the Mode
button
until the monitor turns off, OR the
monitor will turn off automatically
after 1 minute.
NOTE: It is recommended that you record your insulin within
10 minutes after injecting to make sure it is recorded with the correct
date and time.
44 • How to Use Your Monitor’s Optional Memory Functions
Marking a Blood
Glucose Test
1. Test your blood glucose. (Refer to page
21 for how to test.)
2. After a blood drop is applied to the
test strip, the display counts down from
5 seconds and shows your test result.
mmol/L
PM
Blood Glucose
Test Result
(Example)
3. To mark your test result, press the
right
or left
arrow button. An
asterisk (*) appears, to confirm that the
test result is marked. To unmark the test
result, press the right
or left
arrow button until the asterisk
disappears.
mmol/L
PM
Marked Blood
Glucose Test Result
(Example)
(Continued on next page.)
How to Use Your Monitor’s Optional Memory Functions • 45
4. To save the marked test result, press the
Mode
button.
NOTE: Once a marked test result or insulin dose is saved, you
cannot unmark. Marked tests are not included in averages.
2. After you press the Mode
button
briefly or press the Insulin Recording
button, a long beep sounds to confirm
that the insulin dose was saved.
5. The marked test result is stored in the
monitor’s memory.
6. To turn off the monitor, press and hold
the Mode
button until the monitor
turns off, OR the monitor will turn off
automatically after 1 minute.
Marking an
Insulin Dose
An insulin dose can be marked after the injection is recorded. For an
explanation of situations in which you may wish to mark an insulin
dose, refer to page 37.
3. To mark your insulin dose, press the
right
or left
arrow button.
An asterisk (*) appears, to confirm
that the dose is marked. Marking
is complete.
4. To turn off the monitor, press and hold
the Mode
button until the monitor
turns off, OR the monitor will turn off
automatically after 1 minute.
U
Marked
Insulin Dose
(Example)
1. Record your insulin dose. (Refer to page
43 for how to record your insulin doses.)
46 • How to Use Your Monitor’s Optional Memory Functions
How to Use Your Monitor’s Optional Memory Functions • 47
Reviewing Your
Optional Memory
Functions
5. Your Last Insulin Record with
date and time of recording is
shown on the display. The
display will alternate between
insulin dose and insulin type.
Monitor is off, with no test strip inserted in the test strip slot.
1. Press the Mode
button briefly
to turn the monitor on.
2. Your Most Recent Blood Glucose Test
Result with date and time of testing is
shown on the display. (To set the correct
date and time, refer to page 8.)
6. If you wish to review up to 30
stored insulin records, continue to
press the left
arrow button.
“
” is displayed after the last recorded
test result. To return to your most recent
test result, press the left
arrow button.
4. Press the Mode
button briefly
to advance to the next function.
If you have set the Insulin Recording
function to “ ,” proceed to next step.
If you have not set the Insulin Recording
function, skip to step 8.
48 • How to Use Your Monitor’s Optional Memory Functions
Mem.
Mem.
PM
PM
Insulin Record
(Example)
Mem. mmol/L
PM
Most Recent
Glucose Reading
(Example)
3. If you wish to review up to 30 stored test
results, continue to press the left
arrow button.
U
Mem.
End of Stored
Test Results
“
” is displayed after the last insulin
record. To return to your most recent
insulin record, press the left
arrow
button.
7. Press the Mode
button briefly
to advance to the next function.
8. If you have set the Time-Specific Averages
function to “ ,” you will automatically
get 7-Day Average. If you have not set
this function, skip to step 10.
Your 7-Day Blood Glucose Average
is displayed showing the average of
all test results taken in the last 7 days.
The average will not include marked
or control solution test results.
(Continued on next page.)
Mem. mmol/L
Avg.
7-Day Average
(Example)
How to Use Your Monitor’s Optional Memory Functions • 49
9. Press the Mode
button briefly
to advance to the next function.
10. Your 14-Day Blood Glucose Average
is displayed showing the average of all
test results taken in the last 14 days.
The average will not include marked
or control solution test results.
13. To review the individual 3 test results
that make up the A1 average, press
the left
arrow button. “
”
is displayed after the last test result.
Mem. mmol/L
Avg.
Mem. mmol/L
Mem. mmol/L
Mem. mmol/L
AM
AM
AM
14-Day Average
(Example)
3 Individual Blood Glucose Test Results
(Example)
11. Press the Mode
button briefly
to advance to the next function.
14. Press the Mode
button briefly
to advance to your next Time-Specific
Average A2. Repeat steps 12 and 13 to
review your Averages A2 through A4.
If you have set the Time-Specific
Averages function to “ ,” proceed
to next step. If you have not set the
Time-Specific Averages function, skip
to step 16.
12. Your first Time-Specific Average
(A1) is displayed. This is the average
of 3 tests taken during the 2-hour time
period that you set.
15. Press the Mode
button briefly
to return to your most recent blood
glucose test result.
Mem. mmol/L
Avg.
AM
Time-Specific
Average A1
(Example)
50 • How to Use Your Monitor’s Optional Memory Functions
Mem. mmol/L
Avg.
PM
Time-Specific
Average A2
(Example)
16. Memory Review is now complete.
17. To turn off the monitor, press and hold
the Mode
button until the monitor
turns off, OR the monitor will turn off
automatically after 1 minute.
How to Use Your Monitor’s Optional Memory Functions • 51
Additional
Information
Summary: How to Review Your Basic
and Optional Memory Functions
STEPS
RESULT
Press
Mode
Monitor turns
ON
DISPLAY
SETUP
REQUIRED?
No
Display Messages and
Troubleshooting Guide
No
This section addresses the messages that appear on your display,
what they mean, and what action you need to take.
U
Mem. mg/dL
Avg. mmol/L
AM
PM
Press
arrow buttons
Review up to
Last 30 Test
Results
Mem. mmol/L
DISPLAY
PM
Press
Mode
Press
Mode
Press
Mode
Review up to
Last 30 Insulin
Doses
(if turned ON)
Review 7-Day
Average
(if turned ON)
Yes
(see page 38)
U
Mem.
U
Mem. mg/dL
Avg. mmol/L
PM
Yes
(see page 38)
Mem. mmol/L
Avg.
Review
14-Day Average
No
AM
PM
WHAT IT MEANS
WHAT TO DO
System Check. Verifies that
all segments are working.
Appears when:
• Monitor is turned on for
Setup and Memory Review
• Test strip is inserted into
the monitor
No action required.
If all segments are not
displayed on monitor,
call BD toll-free, 24 hours
a day, 7 days a week, at
1.888.BDCARES
1.888.232.2737.*
The monitor is not coded.
Code your monitor. Refer
to page 12 for coding your
blood glucose monitor.
This is an example of a code
number stored in your
monitor.
Match the code number that
appears on the display with
the code on the vial of test
strips that you are using.
Mem. mmol/L
Avg.
Press
Mode
Review TimeSpecific Average
(if turned ON)
Yes
(see page 38)
Mem. mmol/L
Avg.
AM
Press and hold Monitor turns
Mode
OFF
52 • Summary: How to Review Your Basic and Optional Memory Functions
* NOT FOR EMERGENCY OR MEDICAL INFORMATION.
Additional Information • 53
DISPLAY
WHAT IT MEANS
WHAT TO DO
Monitor is ready to accept
a blood sample.
Apply a blood sample to the
test strip. Refer to page 21 for
how to test your blood
glucose.
DISPLAY
WHAT IT MEANS
WHAT TO DO
A blood glucose test
result in mmol/L stored
in the monitor’s memory.
No action required.
Battery is getting low
but you can still perform
a test. Battery will appear
on the display when
reviewing different
screens. Display shown
is an example of one
type of screen.
We suggest that you replace
the battery immediately.
There is only enough power
to perform approximately
50 tests. Refer to page 60
for replacing your battery.
End of Setup or Memory
Review.
No action required.
An insulin dose record in the
monitor’s memory. Display
shows an example of 8 units
of insulin.
No action required.
Mem. mmol/L
PM
5-second countdown as
monitor calculates the blood
glucose test result.
No action required.
mmol/L
PM
A blood glucose test result in
mmol/L.
Record the result in your
logbook.
mmol/L
PM
Your blood glucose
reading is higher than
33.3 mmol/L. You may have
high blood sugar.
PM
Your blood glucose
reading is lower than
1.1 mmol/L. You may have
low blood sugar.
PM
54 • Additional Information
Retest your blood glucose
immediately. If your reading is
still “
,” you should treat
as prescribed by your
healthcare professional and/or
contact your healthcare
professional immediately.
Retest your blood glucose
immediately. If your reading is
still “
,” you should treat
as prescribed by your
healthcare professional and/or
contact your healthcare
professional immediately.
U
Mem.
AM
Mem.
AM
An insulin type record in the
monitor’s memory. Display
shows an example of P1 that
refers to the insulin type as
labeled by the user.
No action required.
Additional Information • 55
DISPLAY
WHAT IT MEANS
WHAT TO DO
The average of all blood
glucose test results taken
in the last 7 days.
No action required.
DISPLAY
The average of all blood
glucose test results taken in
the last 14 days.
No action required.
AM
Mem. mmol/L
AM
A control solution test
result.
No action required.
A marked blood glucose
test result.
No action required.
A marked insulin dose.
No action required.
System Error.
Call BD toll-free, 24 hours
a day, 7 days a week, at
1.888.BDCARES
(1.888.232.2737).*
System Error.
Call BD toll-free, 24 hours
a day, 7 days a week, at
1.888.BDCARES
(1.888.232.2737).*
Temperature Error.
Monitor is outside the
required temperature range of
15°C - 39°C (59°F - 102°F).
Move the monitor to a
warmer or cooler area.
mmol/L
Mem. mmol/L
Avg.
Mem. mmol/L
Avg.
WHAT TO DO
mmol/L
Mem. mmol/L
Avg.
Mem. mmol/L
WHAT IT MEANS
PM
Memory is empty. There are
no blood glucose test results
in the monitor’s memory.
Averages cannot be
calculated.
No action required.
The average of 3 most recent
blood glucose test results
taken during the first TimeSpecific time period (A1).
A similar display will appear
for A2, A3, and A4.
No action required.
One of the 3 individual
blood glucose test results
that make up a TimeSpecific Average. Example
shows most recent of the
3 test results.
No action required.
U
* NOT FOR EMERGENCY OR MEDICAL INFORMATION.
56 • Additional Information
Additional Information • 57
DISPLAY
WHAT IT MEANS
WHAT TO DO
Incorrect application of blood Insert a new test strip
sample or control solution onto and perform the
the test strip. Test strip may be test again.
damaged.
Monitor does
not turn on
after inserting
a test strip.
• Battery is dead.
• Battery is installed
incorrectly or there is no
battery in the monitor.
• Test strip is inserted
upside down or
incompletely.
Replace the battery.
Check that the battery is
correctly installed with the
“+” sign facing you.
• Monitor may not be
working properly.
Call BD toll-free, 24 hours
a day, 7 days a week, at
1.888.BDCARES
(1.888.232.2737).*
Insert the test strip correctly
with the “BD” name facing
up and the correct end
inserted into the test strip slot.
Monitor does
not begin test
countdown
after applying
a blood sample.
• Not enough blood
sample.
• Test strip may be
damaged.
Repeat the test with
a new test strip.
• Sample applied after
monitor automatically
turned off.
Repeat the test with
a new test strip.
• Monitor may not be
working properly.
Call BD toll-free, 24 hours
a day, 7 days a week, at
1.888.BDCARES
(1.888.232.2737).*
Repeat the test with
a new test strip.
Caring for Your Monitor
STORING AND CLEANING
• Keep your BD LogicTM Blood Glucose Monitor clean and protect it
from extremes in temperature. Do not store your monitor in the car
or in the refrigerator.
• No cleaning is required. If necessary, clean the outside of the
monitor with a clean cloth dampened with water.
BATTERY
Your BD Logic™ Blood Glucose Monitor comes with one installed
2450 3-volt coin cell battery or equivalent. It is important to replace the
battery immediately when the battery is low.
(Continued on next page.)
* NOT FOR EMERGENCY OR MEDICAL INFORMATION.
58 • Additional Information
* NOT FOR EMERGENCY OR MEDICAL INFORMATION.
Additional Information • 59
The monitor will tell you the battery is low by displaying
the monitor is turned on.
when
4. Open the battery door by pushing back
on the opener and lifting up as shown.
• You can still get accurate test results or review your memory
functions. However, when the symbol first appears, there is only
enough power to perform approximately 50 tests.
Open Battery Door
• When the battery runs out, the monitor will not turn on. The test
result and insulin injection information you have stored in memory
will not be lost, however, if the battery is removed from the monitor,
you may need to reset the date and time.
5. Remove old battery by pulling on the tab.
• Battery life varies depending on how often you use your monitor.
On average, the battery should last for 1 year.
Remove Old Battery
6. Put in a new battery with the “+”
side facing up and the tab showing
as illustrated in step 5.
How to Replace the Battery
1. The monitor display shows
when performing
a test or reviewing your memory functions.
Put in New Battery
mmol/L
PM
2. Turn the monitor off by pressing and holding the
Mode
button, OR the monitor will turn off
automatically after 1 minute.
7. Replace battery door as shown.
Low Battery
Replace Battery Door
3. Turn the monitor around so that the display is
facing away from you.
Turn Monitor
Around
60 • Additional Information
NOTE: After replacing the battery, reset the time and date to match the
local time. (Refer to page 9 for how to set the time and date.) Follow your
local regulations on battery disposal.
Additional Information • 61
Healthcare Precautions
and Limitations
• Severe dehydration and excessive water loss may cause false low
results. If you think you may be dehydrated, consult your healthcare
professional immediately.
• Test results greater than 13.3 mmol/L may mean high blood sugar
(hyperglycemia). Test results lower than 3.3 mmol/L may mean low
blood sugar (hypoglycemia). If you get results in these ranges, retest
your blood glucose. If your reading is still in these ranges, you should
treat as prescribed by your healthcare professional and/or contact
your healthcare professional immediately.
• If your blood glucose test results do not match the way you feel
AND you have followed all of the instructions described in your
Owner’s Guide, contact your healthcare professional.
Conditions That May
Affect Results
• Elevated levels of acetaminophen, tolazamide, uric acid, bilirubin,
ephedrine, and methyldopa may affect results.
• Sodium heparin may be used. EDTA is not recommended for use
with the BD LogicTM Blood Glucose Monitor.
3-Year Warranty
• Becton Dickinson Canada Inc. guarantees the BD Logic™ Blood
Glucose Monitor will operate as described in this Owner’s Guide for a
period of 3 years from the date of purchase when used and maintained
in accordance with the instructions or BD will replace it. Battery life
and defect or damage due to misuse or abuse are excluded from this
warranty. This warranty extends only to the original purchaser and is
not transferable.
• If, within 60 days of original purchase, you are not completely
satisfied with your BD Logic™ Blood Glucose Monitor,
you may return it for a full refund. Your BD Logic™ Blood Glucose
Monitor must be accompanied by an original receipt, indicating the
date of purchase. This guarantee extends only to
the original purchaser and is not transferable.
62 • Additional Information
Additional Information • 63
Specifications
Test
Capillary blood glucose referenced to plasma
Assay Method
Glucose oxidase biosensor
Test Result Range
1.1 mmol/L to 33.3 mmol/L
Test Time
5 seconds
Test Strip Volume
0.3* µL
Power Source
One replaceable 2450 3-volt coin cell battery or equivalent
Battery Life
1460 tests or about 1 year at 4 tests per day
Glucose Units
mmol/L
Display
LCD
Memory
Up to 250 Blood Glucose and Control Solution Tests
Up to 250 Insulin Records
Functions
• Averaging: 7-Day, 14-Day, and 4 Time-Specific Averages
• Insulin Recording
• Marking
• Your monitor’s Serial
Number (located on the
back of your monitor)
Data Port
Yes
• Test strip information:
Automatic Shutoff
One (1) minute after last user action**
Size
91.4 mm x 58.4 mm x 22.9 mm
(3.6” x 2.3” x 0.9”)
Weight
75 g (2.65 ounces) (with battery)
Operating Ranges:
Altitude
Temperature
Humidity
Hematocrit
Up to 3,000 meters (10,000 ft)
15°C to 39°C (59°F to 102°F)
10% to 90% relative humidity
25% to 60
Type of Protection
Class II
Protection Against
Ingress of Water
IPXO
Mode of Operation
Continuous
How to Contact Us
BD Consumer Services is available to help you 24 hours a day,
7 days a week. If you have any comments or questions about your
BD Logic™ Blood Glucose Monitor, call BD Consumer Services
toll-free, in Canada at 1.888.BDCARES (1.888.232.2737).*
Please have your BD LogicTM Blood Glucose Monitor and the following
information readily available when you call:
Lot Number
Code Number
Expiration Date
Control Solution Range
• Control Solution Information:
Lot Number
Expiration Date
* NOT FOR EMERGENCY OR MEDICAL INFORMATION.
*Blood sample required 0.4 µL
**10 minutes in insulin mode or when downloading to a computer.
64 • Additional Information
Additional Information • 65
Notes
Notes