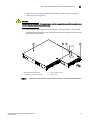
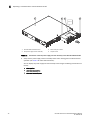
1
53-1002390-08 5 August 2013 Brocade VDX 6710-54 Hardware Reference Manual ® Copyright © 2011-2013 Brocade Communications Systems, Inc. All Rights Reserved. ADX, AnyIO, Brocade, Brocade Assurance, the B-wing symbol, DCX, Fabric OS, ICX, MLX, MyBrocade, OpenScript, VCS, VDX, and Vyatta are registered trademarks, and HyperEdge, The Effortless Network, and The On-Demand Data Center are trademarks of Brocade Communications Systems, Inc., in the United States and/or in other countries. Other brands, products, or service names mentioned may be trademarks of their respective owners. Notice: This document is for informational purposes only and does not set forth any warranty, expressed or implied, concerning any equipment, equipment feature, or service offered or to be offered by Brocade. Brocade reserves the right to make changes to this document at any time, without notice, and assumes no responsibility for its use. This informational document describes features that may not be currently available. Contact a Brocade sales office for information on feature and product availability. Export of technical data contained in this document may require an export license from the United States government. The authors and Brocade Communications Systems, Inc. shall have no liability or responsibility to any person or entity with respect to any loss, cost, liability, or damages arising from the information contained in this book or the computer programs that accompany it. The product described by this document may contain “open source” software covered by the GNU General Public License or other open source license agreements. To find out which open source software is included in Brocade products, view the licensing terms applicable to the open source software, and obtain a copy of the programming source code, please visit http://www.brocade.com/support/oscd. Brocade Communications Systems, Incorporated Corporate and Latin American Headquarters Brocade Communications Systems, Inc. 130 Holger Way San Jose, CA 95134 Tel: 1-408-333-8000 Fax: 1-408-333-8101 E-mail: [email protected] Asia-Pacific Headquarters Brocade Communications Systems China HK, Ltd. No. 1 Guanghua Road Chao Yang District Units 2718 and 2818 Beijing 100020, China Tel: +8610 6588 8888 Fax: +8610 6588 9999 E-mail: [email protected] European Headquarters Brocade Communications Switzerland Sàrl Centre Swissair Tour B - 4ème étage 29, Route de l'Aéroport Case Postale 105 CH-1215 Genève 15 Switzerland Tel: +41 22 799 5640 Fax: +41 22 799 5641 E-mail: [email protected] Asia-Pacific Headquarters Brocade Communications Systems Co., Ltd. (Shenzhen WFOE) Citic Plaza No. 233 Tian He Road North Unit 1308 – 13th Floor Guangzhou, China Tel: +8620 3891 2000 Fax: +8620 3891 2111 E-mail: [email protected] Document History Document title Publication number Summary of changes Date Brocade VDX 6710-54 Hardware Reference Manual 53-1002390-01 New document September 2011 Brocade VDX 6710-54 Hardware Reference Manual 53-1002390-02 Added KAP and RLO information. Made smaller corrections to certifications. December 2011 Brocade VDX 6710-54 Hardware Reference Manual 53-1002390-03 Added Canadian French translation of compliance statement. Serial cable pinouts added. February 2012 Brocade VDX 6710-54 Hardware Reference Manual 53-1002390-04 Serial cable pinout information corrected. March 2012 Document title Publication number Summary of changes Date Brocade VDX 6710-54 Hardware Reference Manual 53-1002390-05 Rack mount kit information corrected. Added CCC statement. April 2012 Brocade VDX 6710-54 Hardware Reference Manual 53-1002390-06 Management options for the switch have been updated. May 2012 Brocade VDX 6710-54 Hardware Reference Manual 53-1002390-07 Rack mount kit information corrected. August 2012 Brocade VDX 6710-54 Hardware Reference Manual 53-1002390-08 Optical port LED patterns August 2013 updated. Added USB device to items included, new information for configuration when Layer 3 code is loaded, removed ‘Brocadeapproved” text for directattach cables, made slight adjustments to physical specs. Brocade VDX 6710-54 Hardware Reference Manual 53-1002390-08 iii iv Brocade VDX 6710-54 Hardware Reference Manual 53-1002390-08 Contents About This Document In this chapter . . . . . . . . . . . . . . . . . . . . . . . . . . . . . . . . . . . . . . . . . . . xiii How this document is organized . . . . . . . . . . . . . . . . . . . . . . . . . . . . xiii Supported hardware and software . . . . . . . . . . . . . . . . . . . . . . . . . . xiii What’s new in this document . . . . . . . . . . . . . . . . . . . . . . . . . . . . . . . xiv Document conventions . . . . . . . . . . . . . . . . . . . . . . . . . . . . . . . . . . . . xiv Text formatting . . . . . . . . . . . . . . . . . . . . . . . . . . . . . . . . . . . . . . . xiv Command syntax conventions . . . . . . . . . . . . . . . . . . . . . . . . . . xiv Command examples . . . . . . . . . . . . . . . . . . . . . . . . . . . . . . . . . . xv Notes, cautions, and warnings . . . . . . . . . . . . . . . . . . . . . . . . . . xv Key terms . . . . . . . . . . . . . . . . . . . . . . . . . . . . . . . . . . . . . . . . . . . xv Notice to the reader . . . . . . . . . . . . . . . . . . . . . . . . . . . . . . . . . . . . . . xv Additional information. . . . . . . . . . . . . . . . . . . . . . . . . . . . . . . . . . . . . xvi Brocade resources . . . . . . . . . . . . . . . . . . . . . . . . . . . . . . . . . . . . xvi Other industry resources . . . . . . . . . . . . . . . . . . . . . . . . . . . . . . . xvi Getting technical help . . . . . . . . . . . . . . . . . . . . . . . . . . . . . . . . . . . . . xvi Document feedback . . . . . . . . . . . . . . . . . . . . . . . . . . . . . . . . . . . . . .xvii Chapter 1 Brocade VDX 6710-54 Introduction In this chapter . . . . . . . . . . . . . . . . . . . . . . . . . . . . . . . . . . . . . . . . . . . . 1 Brocade VDX 6710-54 overview. . . . . . . . . . . . . . . . . . . . . . . . . . . . . . 1 Platform components and capabilities. . . . . . . . . . . . . . . . . . . . . 1 Software features . . . . . . . . . . . . . . . . . . . . . . . . . . . . . . . . . . . . . 2 Views of the Brocade VDX 6710-54 switch . . . . . . . . . . . . . . . . . . . . . 3 Chapter 2 Brocade VDX 6710-54 Installation In this chapter . . . . . . . . . . . . . . . . . . . . . . . . . . . . . . . . . . . . . . . . . . . . 5 Items included with the Brocade VDX 6710-54 . . . . . . . . . . . . . . . . . 5 Installation and safety considerations. . . . . . . . . . . . . . . . . . . . . . . . . 5 Electrical considerations . . . . . . . . . . . . . . . . . . . . . . . . . . . . . . . . 6 Environmental considerations . . . . . . . . . . . . . . . . . . . . . . . . . . . 6 Rack considerations . . . . . . . . . . . . . . . . . . . . . . . . . . . . . . . . . . . 6 Recommendations for cable management . . . . . . . . . . . . . . . . . 6 Items required for installation. . . . . . . . . . . . . . . . . . . . . . . . . . . . 7 Standalone installation for a Brocade VDX 6710-54 . . . . . . . . . . . . . 7 Rack installation for a Brocade VDX 6710-54. . . . . . . . . . . . . . . . . . . 8 Brocade VDX 6710-54 Hardware Reference Manual 53-1002390-08 v Providing power to the switch. . . . . . . . . . . . . . . . . . . . . . . . . . . . . . . . 8 Verifying operation . . . . . . . . . . . . . . . . . . . . . . . . . . . . . . . . . . . . . . . . 8 Chapter 3 Brocade VDX 6710-54 Configuration In this chapter . . . . . . . . . . . . . . . . . . . . . . . . . . . . . . . . . . . . . . . . . . . 11 Configuration modes for the Brocade VDX 6710-54 . . . . . . . . . . . . 11 Creating a serial connection. . . . . . . . . . . . . . . . . . . . . . . . . . . . . . . . 12 Serial cable pinouts . . . . . . . . . . . . . . . . . . . . . . . . . . . . . . . . . . . 12 Assigning permanent passwords . . . . . . . . . . . . . . . . . . . . . . . . . . . . 13 Changing the default account passwords . . . . . . . . . . . . . . . . . 13 Setting the switch IP address. . . . . . . . . . . . . . . . . . . . . . . . . . . . . . . 13 Using DHCP to set the IP address. . . . . . . . . . . . . . . . . . . . . . . . 14 Setting a static IP address . . . . . . . . . . . . . . . . . . . . . . . . . . . . . 14 Setting stateless IPv6 autoconfiguration . . . . . . . . . . . . . . . . . . 15 Enabling and disabling Brocade VCS mode . . . . . . . . . . . . . . . . . . . 15 Enabling VCS mode . . . . . . . . . . . . . . . . . . . . . . . . . . . . . . . . . . . 16 Disabling VCS mode. . . . . . . . . . . . . . . . . . . . . . . . . . . . . . . . . . . 16 Setting the date and time. . . . . . . . . . . . . . . . . . . . . . . . . . . . . . . . . . 17 Understanding time zones . . . . . . . . . . . . . . . . . . . . . . . . . . . . . 17 Understanding time synchronization . . . . . . . . . . . . . . . . . . . . . 17 Synchronizing local time using NTP . . . . . . . . . . . . . . . . . . . . . . 18 Setting the clock (date and time) . . . . . . . . . . . . . . . . . . . . . . . . 18 Setting time zones . . . . . . . . . . . . . . . . . . . . . . . . . . . . . . . . . . . . 18 Connecting network devices. . . . . . . . . . . . . . . . . . . . . . . . . . . . . . . . 19 Connecting to Ethernet or Fast Ethernet hubs . . . . . . . . . . . . . 19 Connecting to workstations, servers, or routers . . . . . . . . . . . . 19 Connecting a network device to a fiber port . . . . . . . . . . . . . . . 19 Testing connectivity . . . . . . . . . . . . . . . . . . . . . . . . . . . . . . . . . . . 19 Creating Brocade inter-switch link trunks . . . . . . . . . . . . . . . . . . . . . 20 Chapter 4 Brocade VDX 6710-54 Operation In this chapter . . . . . . . . . . . . . . . . . . . . . . . . . . . . . . . . . . . . . . . . . . . 21 Powering on the Brocade VDX 6710-54 . . . . . . . . . . . . . . . . . . . . . . 21 Powering off the Brocade VDX 6710-54. . . . . . . . . . . . . . . . . . . 21 LED activity interpretation . . . . . . . . . . . . . . . . . . . . . . . . . . . . . . . . . 21 Brocade VDX 6710-54 LEDs . . . . . . . . . . . . . . . . . . . . . . . . . . . . 21 LED locations . . . . . . . . . . . . . . . . . . . . . . . . . . . . . . . . . . . . . . . . 22 LED patterns. . . . . . . . . . . . . . . . . . . . . . . . . . . . . . . . . . . . . . . . . 23 POST and boot specifications. . . . . . . . . . . . . . . . . . . . . . . . . . . . . . . 25 POST . . . . . . . . . . . . . . . . . . . . . . . . . . . . . . . . . . . . . . . . . . . . . . . 25 Boot. . . . . . . . . . . . . . . . . . . . . . . . . . . . . . . . . . . . . . . . . . . . . . . . 26 Interpreting POST results . . . . . . . . . . . . . . . . . . . . . . . . . . . . . . . . . . 26 vi Brocade VDX 6710-54 Hardware Reference Manual 53-1002390-08 Brocade VDX 6710-54 maintenance . . . . . . . . . . . . . . . . . . . . . . . . . 27 Supported transceivers . . . . . . . . . . . . . . . . . . . . . . . . . . . . . . . . 27 Installing an SFP+ transceiver . . . . . . . . . . . . . . . . . . . . . . . . . . 27 Diagnostic tests and monitoring . . . . . . . . . . . . . . . . . . . . . . . . . 28 Brocade VDX 6710-54 management. . . . . . . . . . . . . . . . . . . . . . . . . 29 Chapter 5 FRU Removal and Replacement Procedures In this chapter . . . . . . . . . . . . . . . . . . . . . . . . . . . . . . . . . . . . . . . . . . . 31 Before beginning the installation . . . . . . . . . . . . . . . . . . . . . . . . . . . . 31 Replacing a combined FRU in a Brocade VDX 6710-54. . . . . . . . . . 32 Time and items required . . . . . . . . . . . . . . . . . . . . . . . . . . . . . . . 34 Replacing the power supply and fan assembly . . . . . . . . . . . . . 34 Appendix A Brocade VDX 6710-54 Specifications In this appendix . . . . . . . . . . . . . . . . . . . . . . . . . . . . . . . . . . . . . . . . . . 37 Weight and physical dimensions . . . . . . . . . . . . . . . . . . . . . . . . . . . . 37 Facility requirements . . . . . . . . . . . . . . . . . . . . . . . . . . . . . . . . . . . . . 37 Power supply specifications . . . . . . . . . . . . . . . . . . . . . . . . . . . . . . . . 38 Environmental requirements . . . . . . . . . . . . . . . . . . . . . . . . . . . . . . . 39 General specifications . . . . . . . . . . . . . . . . . . . . . . . . . . . . . . . . . . . . 39 Data transmission ranges . . . . . . . . . . . . . . . . . . . . . . . . . . . . . . . . . 40 Memory specifications . . . . . . . . . . . . . . . . . . . . . . . . . . . . . . . . . . . . 40 Regulatory compliance . . . . . . . . . . . . . . . . . . . . . . . . . . . . . . . . . . . . 40 FCC warning (US only) . . . . . . . . . . . . . . . . . . . . . . . . . . . . . . . . . 41 German statement. . . . . . . . . . . . . . . . . . . . . . . . . . . . . . . . . . . . 41 KCC statement (Republic of Korea) . . . . . . . . . . . . . . . . . . . . . . 41 VCCI statement (Japan) . . . . . . . . . . . . . . . . . . . . . . . . . . . . . . . . 41 Power cords (Japan DENAN) . . . . . . . . . . . . . . . . . . . . . . . . . . . . 42 BSMI statement (Taiwan) . . . . . . . . . . . . . . . . . . . . . . . . . . . . . . 42 CE statement . . . . . . . . . . . . . . . . . . . . . . . . . . . . . . . . . . . . . . . . 42 Canadian requirements. . . . . . . . . . . . . . . . . . . . . . . . . . . . . . . . 42 China statement. . . . . . . . . . . . . . . . . . . . . . . . . . . . . . . . . . . . . . 43 Laser compliance. . . . . . . . . . . . . . . . . . . . . . . . . . . . . . . . . . . . . 44 Electrical cautions. . . . . . . . . . . . . . . . . . . . . . . . . . . . . . . . . . . . . . . . 44 RTC battery . . . . . . . . . . . . . . . . . . . . . . . . . . . . . . . . . . . . . . . . . . 44 Electrical safety . . . . . . . . . . . . . . . . . . . . . . . . . . . . . . . . . . . . . . 44 DC-DC power source cautions. . . . . . . . . . . . . . . . . . . . . . . . . . . 45 DC power safety . . . . . . . . . . . . . . . . . . . . . . . . . . . . . . . . . . . . . . 46 Regulatory certifications. . . . . . . . . . . . . . . . . . . . . . . . . . . . . . . . . . . 47 Environmental regulation compliance . . . . . . . . . . . . . . . . . . . . . . . . 47 China RoHS . . . . . . . . . . . . . . . . . . . . . . . . . . . . . . . . . . . . . . . . . 47 Environmental protection use period (EPUP) disclaimer. . . . . . 48 TS/HS dual language sheet . . . . . . . . . . . . . . . . . . . . . . . . . . . . 49 Brocade VDX 6710-54 Hardware Reference Manual 53-1002390-08 vii Index viii Brocade VDX 6710-54 Hardware Reference Manual 53-1002390-08 DRAFT: BROCADE CONFIDENTIAL Tables Table 1 Serial cable pinouts . . . . . . . . . . . . . . . . . . . . . . . . . . . . . . . . . . . . . . . . . . . . . . . . 12 Table 2 Default administrative account names and passwords . . . . . . . . . . . . . . . . . . . 13 Table 3 Port side LED patterns during normal operation . . . . . . . . . . . . . . . . . . . . . . . . . 23 Table 4 Non-port side LED patterns during normal operation . . . . . . . . . . . . . . . . . . . . . 25 Table 5 Management options for the Brocade VDX 6710-54 . . . . . . . . . . . . . . . . . . . . . 29 Table 6 Brocade VDX 6710-54 LED behavior, descriptions, and required actions. . . . . 33 Table 7 Physical specifications . . . . . . . . . . . . . . . . . . . . . . . . . . . . . . . . . . . . . . . . . . . . . . 37 Table 8 Facility requirements . . . . . . . . . . . . . . . . . . . . . . . . . . . . . . . . . . . . . . . . . . . . . . . 38 Table 9 System power specifications . . . . . . . . . . . . . . . . . . . . . . . . . . . . . . . . . . . . . . . . . 38 Table 10 Environmental requirements . . . . . . . . . . . . . . . . . . . . . . . . . . . . . . . . . . . . . . . . . 39 Table 11 General specifications . . . . . . . . . . . . . . . . . . . . . . . . . . . . . . . . . . . . . . . . . . . . . . 39 Table 12 Data transmission ranges . . . . . . . . . . . . . . . . . . . . . . . . . . . . . . . . . . . . . . . . . . . 40 Table 13 Brocade VDX 6710-54 memory specifications . . . . . . . . . . . . . . . . . . . . . . . . . . 40 Table 14 Regulatory compliance standards . . . . . . . . . . . . . . . . . . . . . . . . . . . . . . . . . . . . . 47 Table 15 China ROHS hazardous substances/toxic substances (HS/TS) concentration chart . . . . . . . . . . . . . . . . . . . . . . . . . . . . . . . . . . . . . . . . . . . . . . . . 49 Brocade VDX 6710-54 Hardware Reference Manual 53-1002390-08 ix DRAFT: BROCADE CONFIDENTIAL x Brocade VDX 6710-54 Hardware Reference Manual 53-1002390-08 DRAFT: BROCADE CONFIDENTIAL Figures Figure 1 Port side view of the Brocade VDX 6710-54 . . . . . . . . . . . . . . . . . . . . . . . . . . . . . 4 Figure 2 Non-port side view of the Brocade VDX 6710-54 . . . . . . . . . . . . . . . . . . . . . . . . . 4 Figure 3 LEDs on the port side of the Brocade VDX 6710-54 . . . . . . . . . . . . . . . . . . . . . 22 Figure 4 LEDs on the non-port side of the Brocade VDX 6710-54 . . . . . . . . . . . . . . . . . . 23 Figure 5 Installing an SFP or SFP+ transceiver in the upper row of port slots. . . . . . . . . 28 Figure 6 Examples of airflow symbols. . . . . . . . . . . . . . . . . . . . . . . . . . . . . . . . . . . . . . . . . 32 Figure 7 Brocade VDX 6710-54 AC power supply and fan assemblies on the non-port side . . . . . . . . . . . . . . . . . . . . . . . . . . . . . . . . . . . . . . . . . . . . . . . . . . . . . . 32 Figure 8 Brocade VDX 6710-54 DC power supply and fan assemblies on the non-port side . . . . . . . . . . . . . . . . . . . . . . . . . . . . . . . . . . . . . . . . . . . . . . . . . . . . . . 33 Figure 9 Orientation of the AC power supply and fan assembly in the Brocade VDX 6710-54 . . . . . . . . . . . . . . . . . . . . . . . . . . . . . . . . . . . . . . . . . . . . . . 35 Figure 10 Orientation of the DC power supply and fan assembly in the Brocade VDX 6710-54 . . . . . . . . . . . . . . . . . . . . . . . . . . . . . . . . . . . . . . . . . . . . . . 36 Brocade VDX 6710-54 Hardware Reference Manual 53-1002390-08 xi DRAFT: BROCADE CONFIDENTIAL xii Brocade VDX 6710-54 Hardware Reference Manual 53-1002390-08 About This Document In this chapter • How this document is organized . . . . . . . . . . . . . . . . . . . . . . . . . . . . . . . . . . • Supported hardware and software. . . . . . . . . . . . . . . . . . . . . . . . . . . . . . . . . • What’s new in this document . . . . . . . . . . . . . . . . . . . . . . . . . . . . . . . . . . . . . • Document conventions . . . . . . . . . . . . . . . . . . . . . . . . . . . . . . . . . . . . . . . . . . • Notice to the reader . . . . . . . . . . . . . . . . . . . . . . . . . . . . . . . . . . . . . . . . . . . . • Additional information . . . . . . . . . . . . . . . . . . . . . . . . . . . . . . . . . . . . . . . . . . . • Getting technical help . . . . . . . . . . . . . . . . . . . . . . . . . . . . . . . . . . . . . . . . . . . • Document feedback . . . . . . . . . . . . . . . . . . . . . . . . . . . . . . . . . . . . . . . . . . . xiii xiii xiv xiv xv xvi xvi xvii How this document is organized This document is organized to help you find the information that you want as quickly and easily as possible. The document contains the following components: • Chapter 1, “Brocade VDX 6710-54 Introduction” provides an overview of the Brocade VDX 6710-54 switch. • Chapter 2, “Brocade VDX 6710-54 Installation” provides the information needed to install the switch in your network. • Chapter 3, “Brocade VDX 6710-54 Configuration” lays out the tasks and commands necessary to get the switch up and running. • Chapter 4, “Brocade VDX 6710-54 Operation” discusses the day-to-day operational procedures for using the switch. • Chapter 5, “FRU Removal and Replacement Procedures” provides procedures for removing and replacing the field-replaceable units (FRUs), including the power supply and fan assemblies. • Appendix A, “Brocade VDX 6710-54 Specifications” provides tables of physical, environmental, and general specifications. Supported hardware and software This document is specific to the Brocade VDX 6710-54 under Network OS v2.1.0. Brocade VDX 6710-54 Hardware Reference Manual 53-1002390-08 xiii What’s new in this document The following information has been added: • The LED patterns for the 1 GbE ports have been updated. Refer to “LED patterns.” Document conventions This section describes text formatting conventions and important notice formats used in this document. Text formatting The narrative-text formatting conventions that are used are as follows: bold text Identifies command names Identifies the names of user-manipulated GUI elements Identifies keywords and operands Identifies text to enter at the GUI or CLI italic text Provides emphasis Identifies variables Identifies paths and Internet addresses Identifies document titles code text Identifies CLI output Identifies command syntax examples For readability, command names in the narrative portions of this guide are presented in mixed lettercase: for example, switchShow. In actual examples, command lettercase is all lowercase. Command syntax conventions Command syntax in this manual follows these conventions: xiv command Commands are printed in bold. --option, option Command options are printed in bold. -argument, arg Arguments. [] Optional elements appear in brackets. variable Variables are printed in italics. In the help pages, values are underlined or enclosed in angled brackets < >. ... Repeat the previous element, for example “member[;member...]” value Fixed values following arguments are printed in plain font. For example, --show WWN | Boolean. Elements are exclusive. Example: --show -mode egress | ingress Brocade VDX 6710-54 Hardware Reference Manual 53-1002390-08 Command examples This book describes how to perform configuration tasks using the Network OS command line interface, but does not describe the commands in detail. For complete descriptions of all Network OS commands, including syntax, operand description, and sample output, see the Brocade Network OS Command Reference Guide. Notes, cautions, and warnings The following notices and statements are used in this manual. They are listed below in order of increasing severity of potential hazards. NOTE A note provides a tip, guidance, or advice, emphasizes important information, or provides a reference to related information. ATTENTION An Attention statement indicates potential damage to hardware or data. CAUTION A Caution statement alerts you to situations that can be potentially hazardous to you or cause damage to hardware, firmware, software, or data. DANGER A Danger statement indicates conditions or situations that can be potentially lethal or extremely hazardous to you. Safety labels are also attached directly to products to warn of these conditions or situations. Key terms For definitions specific to Brocade and Fibre Channel, see the technical glossaries on MyBrocade. See “Brocade resources” on page xvi for instructions on accessing MyBrocade. For definitions of SAN-specific terms, visit the Storage Networking Industry Association online dictionary at: http://www.snia.org/education/dictionary Notice to the reader This document may contain references to the trademarks of the following corporations. These trademarks are the properties of their respective companies and corporations. Brocade VDX 6710-54 Hardware Reference Manual 53-1002390-08 xv Corporation Referenced Trademarks and Products Microsoft Corporation Windows, Windows NT, Internet Explorer Sun Microsystems, Inc. Sun, Solaris Netscape Communications Corporation Netscape Red Hat, Inc. Red Hat, Red Hat Network, Maximum RPM, Linux Undercover Velcro Industries B.V. Velcro Additional information This section lists additional Brocade and industry-specific documentation that you might find helpful. Brocade resources To get up-to-the-minute information, go to http://my.brocade.com to register at no cost for a user ID and password. White papers, online demonstrations, and data sheets are available through the Brocade website at: http://www.brocade.com/products-solutions/products/index.page For additional Brocade documentation, visit the Brocade website: http://www.brocade.com Release notes are available on the MyBrocade website. Other industry resources For additional resource information, visit the Technical Committee T11 website. This website provides interface standards for high-performance and mass storage applications for Fibre Channel, storage management, and other applications: http://www.t11.org For information about the Fibre Channel industry, visit the Fibre Channel Industry Association website: http://www.fibrechannel.org Getting technical help Contact your switch support supplier for hardware, firmware, and software support, including product repairs and part ordering. To expedite your call, have the following information available: 1. General Information • Switch model xvi Brocade VDX 6710-54 Hardware Reference Manual 53-1002390-08 • • • • Switch operating system version Error numbers and messages received copy support command output Detailed description of the problem, including the switch or fabric behavior immediately following the problem, and specific questions • Description of any troubleshooting steps already performed and the results • Serial console and Telnet session logs • syslog message logs 2. Switch Serial Number The switch serial number and corresponding bar code are provided on the serial number label, as illustrated below: *FT00X0054E9* FT00X0054E9 The serial number label is located on the switch ID pull-out tab located on the bottom of the port side of the switch. 3. World Wide Name (WWN) Use the licenseIdShow command to display the WWN of the chassis. Document feedback Quality is our first concern at Brocade and we have made every effort to ensure the accuracy and completeness of this document. However, if you find an error or an omission, or you think that a topic needs further development, we want to hear from you. Forward your feedback to: [email protected] Provide the title and version number of the document and as much detail as possible about your comment, including the topic heading and page number and your suggestions for improvement. Brocade VDX 6710-54 Hardware Reference Manual 53-1002390-08 xvii xviii Brocade VDX 6710-54 Hardware Reference Manual 53-1002390-08 Chapter Brocade VDX 6710-54 Introduction 1 In this chapter • Brocade VDX 6710-54 overview . . . . . . . . . . . . . . . . . . . . . . . . . . . . . . . . . . . . 1 • Views of the Brocade VDX 6710-54 switch . . . . . . . . . . . . . . . . . . . . . . . . . . . 3 Brocade VDX 6710-54 overview The Brocade VDX 6710-54 is a top-of-rack switch designed to accommodate traditional 1 Gigibit Ethernet (GbE) server connections to the Brocade 10 GbE VCS™ technology. The Brocade VDX 6710-54 features Brocade’s CloudPlex™ architecture and runs on the Brocade Network Operating System (Network OS) v2.1.0. For details about Network OS, refer to the Brocade Network OS Administrator’s Guide. The Brocade VDX 6710-54 switch offers 48 1 GbE, direct-attach copper ports along with 6 10 GbE SFP+ optical ports. A key feature of the Brocade VDX 6710-54 switch is Brocade VCS™ technology, which includes virtual cluster switching, a new set of technologies that allows users to create flatter, virtualized, and converged data center networks. VCS fabrics are scalable, permitting users to expand at their own pace, and simplified, allowing users to manage the fabric as a single entity. VCS-based Ethernet fabrics are convergence-capable, with technologies such as Fibre Channel over Ethernet (FCoE) for storage. Another feature of the Brocade VDX 6710-54 switch is reversible airflow. You can order fans that move air either port side to nonport side or nonport side to port side depending on your needs. Platform components and capabilities The Brocade VDX 6710-54 switch offers the following features and capabilities: • A system motherboard that features a Reduced Instruction Set Computer (RISC) CPU running at 1.3 GHz with integrated peripherals • • • • • • • An RJ45 10/100/1000 Ethernet out-of-band management port An RJ45-fronted serial (RS-232) port for terminal access A USB port for firmware upgrades and system log downloads 48 1 GbE direct-attach copper RJ45 ports 6 10 GbE SFP+ ports (also configurable to 1 GbE) One forwarding ASIC 600 nanosecond (ns) port-to-port latency Brocade VDX 6710-54 Hardware Reference Manual 53-1002390-08 1 1 Brocade VDX 6710-54 overview • Dual, hot-swappable 250W AC power supplies with three integrated cooling fans each, or dual, hot-swappable 12V 250 W DC power supplies with three integrated cooling fans each • • • • Support for long-range and short-range SFP+ 10 GbE transceivers Support for optical cables and active twin axial (twinax) copper cables Support for direct-attach copper cables Support for inter-switch link (ISL) trunking - Frame-level hardware-based trunking (even distribution of frames across trunk links) • A rack-mount design using existing rail kits (fixed and mid-mount or Telco rail kits) on a 19-inch EIA rack (also suitable for reduced-depth racks) • Extensive diagnostics and system-monitoring capabilities for enhanced high Reliability, Availability, and Serviceability (RAS) • • • • • • • Optimized airflow (a choice of front-to-back or back-to-front flow) A real-time clock (RTC) with battery SEEPROM for switch identification Voltage monitoring Fan monitoring Three temperature sensors I2C interface to monitor and control environmental aspects NOTE Port numbering for the Brocade VDX 6710-54 begins with 1, not 0. Software features The Brocade VDX 6710-54 switch supports the following features. For more details on these features, refer to the Brocade Network OS Administrator’s Guide. Layer 2 and Layer 3 security features • • • • • • • • VLANs Spanning Tree Protocol (STP, RSTP, MSTP and PVST+ and PVRST+) Support for unicast and multicast capabilities Support for IGMP snooping Layer 2 multi-path based on Transparent Interconnection of Lots of Links (TRILL) Layer 2 access control lists (ACLs) Switch Port Analyzer (SPAN) (also known as port mirroring) Management access ACLs Virtualization • Automatic Migration of Port Profiles (AMPP) 2 Brocade VDX 6710-54 Hardware Reference Manual 53-1002390-08 Views of the Brocade VDX 6710-54 switch 1 • Support for VLAN, QoS, security, and FCoE port profiles • Virtual Machine-aware network automation Link aggregation • 802.3ad LACP support • Virtual Link Aggregation Group (vLAG) (a LAG that spans multiple physical switches) QoS • 802.1p marking • Eight queues per port • Scheduling: Strict priority (SP), Shaped Deficit Weighted Round-Robin (SDWRR) Management • • • • • • IPv4 or IPv6 management CLI management utilities on Network OS v2.1.0 Out-of-band management (standalone mode) sFlow TRILL Operations, Administration, and Management (OAM) Distributed configuration management (DCM) Licensing • VCS licensing: Available multi-node license up to 24 nodes (enables Ethernet Fabric functionality) Views of the Brocade VDX 6710-54 switch The port side of the Brocade VDX 6710-54 switch includes the system LEDs, management ports and LEDs, USB port, and Gigabit Ethernet (GbE) ports and the corresponding port status LEDs. Figure 1 shows the port side of the Brocade VDX 6710-54. Brocade VDX 6710-54 Hardware Reference Manual 53-1002390-08 3 1 Views of the Brocade VDX 6710-54 switch 2 3 4 9 10 11 5 7 6 8 1 1 System power LED 7 1 Gbps Ethernet ports 25 through 36 (25-30 above, 31-36 below) with status LEDs above 2 System status LED 8 1 Gbps Ethernet ports 37 through 48 (37-42 above, 43-48 below) with status LEDs above 3 Serial console port (RJ45) 9 USB port 4 10 Gbps Ethernet SFP+ ports 1 through 6 10 Ethernet management port (RJ45) 5 1 Gbps Ethernet ports 1 through 12 (1-6 above, 7-12 below) with status LEDs above 11 Switch ID pull-out tab 6 1 Gbps Ethernet ports 13 through 24 (13-18 above, 19-24 below) with status LEDs above FIGURE 1 Port side view of the Brocade VDX 6710-54 Figure 2 shows the non-port side of the Brocade VDX 6710-54, which contains the combined power supply and fan assemblies. 1 3 4 5 6 7 8 1 Power supply and fan assembly #2 5 Handle 2 Power cord receptacle 6 Airflow label 3 Power supply and fan status LED 7 Captive screw 4 On/off switch 8 Power supply and fan assembly #1 FIGURE 2 4 2 Non-port side view of the Brocade VDX 6710-54 Brocade VDX 6710-54 Hardware Reference Manual 53-1002390-08 Chapter 2 Brocade VDX 6710-54 Installation In this chapter • Items included with the Brocade VDX 6710-54 . . . . . . . . . . . . . . . . . . . . . . . • Installation and safety considerations . . . . . . . . . . . . . . . . . . . . . . . . . . . . . . . • Standalone installation for a Brocade VDX 6710-54 . . . . . . . . . . . . . . . . . . . • Rack installation for a Brocade VDX 6710-54 . . . . . . . . . . . . . . . . . . . . . . . . . • Providing power to the switch . . . . . . . . . . . . . . . . . . . . . . . . . . . . . . . . . . . . . . • Verifying operation. . . . . . . . . . . . . . . . . . . . . . . . . . . . . . . . . . . . . . . . . . . . . . . 5 5 7 8 8 8 Items included with the Brocade VDX 6710-54 The following items are included with the standard shipment of a fully-configured Brocade VDX 6710-54. When you open the Brocade VDX 6710-54 packaging, verify that the items are included in the package and that no damage has occurred during shipping: • The Brocade VDX 6710-54 switch • One accessory kit, containing the following items: - Serial cable with an RJ45 connector - 6 ft. power cords (2) - Rubber feet, required for setting up the switch as a standalone unit - Brocade 2 GB USB memory device - Brocade VDX 6710-54 QuickStart Guide Installation and safety considerations You can install a Brocade VDX 6710-54 switch in the following ways: • As a standalone unit on a flat surface. • In an EIA four-post rack using a fixed-rail rack mount kit. The fixed-rail rack mount kit can be ordered from your switch retailer. • In a Telco rack using a flush mount rack kit. The flush mount rack kit for switches can be ordered from your switch retailer. Brocade VDX 6710-54 Hardware Reference Manual 53-1002390-08 5 2 Installation and safety considerations Electrical considerations To install and operate the switch successfully, ensure compliance with the following requirements: • The primary outlet is correctly wired, protected by a circuit breaker, and grounded in accordance with local electrical codes. • The supply circuit, line fusing, and wire size are adequate, as specified by the electrical rating on the switch nameplate. Environmental considerations For successful installation and operation of the switch, ensure that the following environmental requirements are met: • Because the Brocade VDX 6710-54 switch can be ordered with fans that move air either front to back or back to front, be sure to orient your switch with the airflow pattern of any other devices in the rack. All equipment in the rack should force air in the same direction to avoid intake of exhaust air. • A maximum of 101.9 cubic meters/hour (60 cubic feet/minute) and a nominal flow of 74.8 cubic meters/hour (44 cubic feet/minute) of airflow is available to the air intake vents. • The ambient air temperature does not exceed 40° C (104° F) while the switch is operating. Rack considerations For successful installation and operation of the switch in a rack, ensure the following rack requirements are met: • The rack must be a standard EIA cabinet. • The rack space required is one rack unit (1U); 4.45 cm (1.75 in.) high and 48.3 cm (19 in.) wide. • The equipment in the rack is grounded through a reliable branch circuit connection and maintains ground at all times. Do not rely on a secondary connection to a branch circuit, such as a power strip. • Airflow and temperature requirements are met on an ongoing basis, particularly if the switch is installed in a closed or multirack assembly. • The additional weight of the switch does not exceed the rack’s weight limits or unbalance the cabinet in any way. • The rack is secured to ensure stability in case of unexpected movement, such as an earthquake. Recommendations for cable management The minimum radius to which a 50 micron cable can be bent under full tensile load is 5.1 cm (2 in.). For a cable under no tensile load, that minimum is 3.0 cm (1.2 in.). 6 Brocade VDX 6710-54 Hardware Reference Manual 53-1002390-08 Standalone installation for a Brocade VDX 6710-54 2 Cables can be organized and managed in a variety of ways; for example, use cable channels on the sides of the cabinet or patch panels to reduce the potential for tangling the cables. The following list provides some recommendations for cable management: NOTE You should not use tie wraps with optical cables because they are easily overtightened and can damage the optic fibers. Velcro-like wraps are recommended. • Plan for the rack space required for cable management before installing the switch. • Leave at least 1 m (3.28 ft) of slack for each port cable. This provides room to remove and replace the switch, allows for inadvertent movement of the rack, and helps prevent the cables from being bent to less than the minimum bend radius. • For easier maintenance, label the cables and record the devices to which they are connected. • Keep LEDs visible by routing port cables and other cables away from the LEDs. Items required for installation The following items are required for installing, configuring, and connecting the Brocade VDX 6710-54 switch for use in a network and fabric: • • • • • A workstation with an installed terminal emulator, such as HyperTerminal. An unused IP address and corresponding subnet mask and gateway address. A serial cable (provided). An Ethernet cable. 1 GbE direct-attach copper cables and Brocade-branded 10 GbE SFP+ optical transceivers and cables. • (Optional) Access to an FTP server or Brocade-branded USB device for backing up the switch configuration. • If mounting in the iDataplex IBM 15.5-inch depth rack, the Brocade iDataplex rack mount kit. Standalone installation for a Brocade VDX 6710-54 Complete the following steps to install the Brocade VDX 6710-54 as a standalone unit. 1. Unpack the Brocade VDX 6710-54 switch and verify the items listed in “Items included with the Brocade VDX 6710-54” on page 5 are present and undamaged. 2. Apply the adhesive rubber feet. Applying the rubber feet to the switch helps prevent the switch from sliding off the supporting surface. a. Clean the indentations at each corner of the bottom of the switch to ensure that they are free of dust or other debris that might lessen the adhesion of the feet. b. With the adhesive side against the chassis, place one rubber foot in each indentation and press into place. 3. Place the switch on a flat, sturdy surface. Brocade VDX 6710-54 Hardware Reference Manual 53-1002390-08 7 2 Rack installation for a Brocade VDX 6710-54 4. Provide power to the switch as described in “Providing power to the switch” on page 8. ATTENTION Do not connect the switch to the network until the IP address is correctly set. For instructions on how to set the IP address, see “Setting the switch IP address” on page 13. Rack installation for a Brocade VDX 6710-54 Follow the installation instructions shipped with the appropriate rack mount kit: • To install the switch into a 4-post fixed-rail rack, refer to the latest version of the Fixed Rack Mount Kit Installation Procedure, 53-1001274-0x. • To install the switch into a 2-post Telco rack, refer to the Flush Mount Rack Mount Kit Installation Procedure, 53-1002127-0x. Providing power to the switch Perform the following steps to provide power to the Brocade VDX 6710-54. 1. Connect the power cords to both power supplies, and then to power sources on separate circuits to protect against failure. Ensure that the power cords have a minimum service loop of 15.2 cm (6 in.) available and are routed to avoid stress. 2. Power on the Brocade VDX 6710-54 by turning both on/off switches to "I." The power supply LEDs display amber until POST is complete, and then change to green. The switch usually requires several minutes to boot and complete POST. ATTENTION Power is supplied to the switch as soon as the first power supply is connected and powered on. Verifying operation After you have powered on the system and POST is complete, verify that the switch is working properly. 1. Verify that the power supply LEDs are solid green. See Figure 4 on page 23 for the location of these LEDs. 2. Verify that the system power LED and the system status LED are solid green. See Figure 3 on page 22 for the specific locations of these LEDs. 8 Brocade VDX 6710-54 Hardware Reference Manual 53-1002390-08 Verifying operation 2 3. The port LEDs should be lit during POST activities. When POST is complete, only the LEDs for ports connected to other devices should be green. See Figure 3 on page 22 for the specific locations of these LEDs. See Table 3 on page 23 and Table 4 on page 25 for more details on the LED patterns. Brocade VDX 6710-54 Hardware Reference Manual 53-1002390-08 9 2 10 Verifying operation Brocade VDX 6710-54 Hardware Reference Manual 53-1002390-08 Chapter 3 Brocade VDX 6710-54 Configuration In this chapter • Configuration modes for the Brocade VDX 6710-54. . . . . . . . . . . . . . . . . . . • Creating a serial connection . . . . . . . . . . . . . . . . . . . . . . . . . . . . . . . . . . . . . . • Assigning permanent passwords . . . . . . . . . . . . . . . . . . . . . . . . . . . . . . . . . . • Setting the switch IP address . . . . . . . . . . . . . . . . . . . . . . . . . . . . . . . . . . . . . • Enabling and disabling Brocade VCS mode. . . . . . . . . . . . . . . . . . . . . . . . . . • Setting the date and time . . . . . . . . . . . . . . . . . . . . . . . . . . . . . . . . . . . . . . . . • Connecting network devices . . . . . . . . . . . . . . . . . . . . . . . . . . . . . . . . . . . . . . • Creating Brocade inter-switch link trunks . . . . . . . . . . . . . . . . . . . . . . . . . . . 11 12 13 13 15 17 19 20 Configuration modes for the Brocade VDX 6710-54 The Brocade VDX 6710-54 can be configured in either standalone mode or VCS™ mode. In standalone mode, the switch acts as an Ethernet switch, receiving and transmitting packets like any independent switch. It is configured and managed independently. In VCS mode, the switch is part of an Ethernet fabric involving two or more VCS-enabled switches. VCS technology embodies the concepts of distributed intelligence and logical chassis. Distributed intelligence means that all configuration and destination information is automatically distributed to each member switch in the fabric. Distributed intelligence has three major characteristics: • The fabric is self-forming. When two VCS-enabled switches are connected, the fabric is automatically created and the switches discover the common fabric configuration. • The fabric is masterless. No single switch stores configuration information or controls fabric operations. Any switch can fail or be removed without causing disruptive fabric downtime or delayed traffic. • The fabric is aware of all members, devices, and Virtual Machines (VMs). Automatic Migration of Port Profiles (AMPP) supports VM migration to another physical server. If the VM moves, it is automatically reconnected to all of its original resources. Logical chassis means that the entire VCS fabric appears and can be managed as a single Layer 2 switch. There are three major characteristics to logical chassis: • Each physical switch in the fabric can be managed as if it were a blade in a chassis. When a VCS-enabled switch is connected to the fabric, it inherits the configuration of the fabric and the new ports become available immediately. • You can manage the entire fabric from any switch. • You can manage the edge switches in the fabric as if they were a single switch. Brocade VDX 6710-54 Hardware Reference Manual 53-1002390-08 11 3 Creating a serial connection Creating a serial connection You perform all configuration tasks in this guide using a serial connection from a workstation or terminal to the switch. Complete the following steps to create a serial connection to the switch. 1. Connect the serial cable to the serial port on the switch and to an RS-232 serial port on the workstation or terminal device. If the serial port on the workstation or terminal device is RJ45 instead of RS-232, remove the adapter on the end of the serial cable and insert the exposed RJ45 connector into the RJ45 serial port on the workstation. 2. Open a terminal emulator application (such as HyperTerminal on a PC, or TERM, TIP, or Kermit in a UNIX environment), and configure the application as follows: • In a Windows environment, enter the following values: 9600 bits per second, 8 databits, no parity, 1 stop bit, and no flow control. • In a UNIX environment using TIP, enter the following string at the prompt: tip /dev/ttyb -9600 If ttyb is already in use, use ttya instead. Serial cable pinouts The serial port is located on the port side of the VDX 6710. The switch uses an RJ-45 connector for the serial port. An RJ-45 to DB9 adaptor is also provided with the VDX 6710. The cable supplied with the switch is a rollover cable. NOTE To protect the serial port from damage, keep the cover on the port when not in use. The serial port can be used to connect to a workstation to configure the VDX 6710 IP address before connecting the switch to a fabric or IP network. The serial port’s parameters are fixed at 9600 baud, 8 data bits, and no parity, with flow control set to None. Table 1 lists the serial cable pinouts. TABLE 1 12 Serial cable pinouts PIN Signal Description 1 Not supported NA 2 Not supported NA 3 TXD Transmit data 4 GND Logic ground 5 Not supported NA 6 RXD Receive data 7 Not supported NA 8 Not supported NA Brocade VDX 6710-54 Hardware Reference Manual 53-1002390-08 Assigning permanent passwords 3 Assigning permanent passwords When you log in for the first time, Brocade recommends that you change the passwords for the default accounts. The factory-configured default accounts on the switch are admin, user, and root. Use the default administrative account as shown in Table 2 to log in to the switch for the first time and to perform the basic configuration tasks. The root account is reserved for development and manufacturing. The user account is read-only and used primarily for system monitoring. TABLE 2 Default administrative account names and passwords Account type Login name Password Administrative admin password User account (read-only) user password Changing the default account passwords When you change the default account password after you log in for the first time, only the default password rule is in effect. The rule specifies a minimum password length of eight characters. For advanced user and role management, including setting password rules, refer to the Security chapter of the Brocade Network OS Administrator’s Guide. 1. Enter the configure terminal command to enter global configuration mode. 2. Enter the username command followed by the account name and the password parameter. 3. When prompted, enter the new password. and press Enter. Switch# configure terminal Entering configuration mode terminal switch(config)# username admin password (<WORD>;;User password satisfying password-attributes):******** Setting the switch IP address You can configure the Brocade VDX 6710-54 with a static IP address, or you can use a Dynamic Host Configuration Protocol (DHCP) server to set the IP address of the switch. DHCP is enabled by default. The Brocade VDX 6710-54 supports both IPv4 and IPv6 format addresses. Brocade VDX 6710-54 Hardware Reference Manual 53-1002390-08 13 3 Setting the switch IP address Using DHCP to set the IP address When using DHCP, the Brocade VDX 6710-54 obtains its IP address, subnet mask, and default gateway address from the DHCP server. The DHCP client can only connect to a DHCP server that is on the same subnet as the switch. If your DHCP server is not on the same subnet as the Brocade VDX 6710-54, use a static IP address. To set an IPv4 IP address using DHCP, complete the following steps. 1. Log in to the switch using the admin account. 2. Configure the management interface with the following command: switch(config)# interface Management 1/0 3. Configure the IP address using the following command: switch(config-Management-1/0)# ip address dhcp Setting a static IP address Complete the following steps to set a static IP address. 1. Log in to the switch using the default password (the default password is password). 2. Use the ip address command to set the Ethernet IP address. If you are going to use an IPv4 IP address, enter the IP address in dotted decimal notation. You should also disable DHCP and enter a gateway address as well. switch(config)# interface Management 1/0 switch(config-Management-1/0)# no ip address dhcp switch(config-Management-1/0)# ip address 10.24.85.81/20 switch(config-Management-1/0)# ip gateway-address 10.24.80.1 ATTENTION The ip gateway-address command will not be available on the VDX 6710 if the L3 or Advanced license is installed. In that case, use the following command sequence: switch(config)# rbridge-id 1 switch(config-rbridge-id 1)# ip route 0.0.0.0/0 <default-gateway> If you are going to use an IPv6 address, enter the network information in semicolon-separated notation as prompted after the ipv6 address operand. switch(config)# interface Management 1/0 switch(config-Management-1/0)# no ip address dhcp switch(config-Management-1/0)# ipv6 address \ fd00;60;69bc;832;e61f;13ff;fe67;4b94/64 3. To display the configuration, use the show running-config interface Management command. switch# show running-config interface Management 1/0 interface Management 1/0 no ip address dhcp ip address 10.24.85.81/20 ip gateway-address 10.24.80.1 ipv6 address fd00;60;69bc;832;e61f;13ff;fe67;4b94/64 14 Brocade VDX 6710-54 Hardware Reference Manual 53-1002390-08 Enabling and disabling Brocade VCS mode 3 no ipv6 address autoconfig ! Setting stateless IPv6 autoconfiguration IPv6 allows assignment of multiple IP addresses to each network interface. Each interface is configured with a link local address in almost all cases, but this address is only accessible from other hosts on the same network. To provide for wider accessibility, interfaces are typically configured with at least one additional global scope IPv6 address. IPv6 autoconfiguration allows more IPv6 addresses, the number of which is dependent on the number of routers serving the local network and the number of prefixes they advertise. When IPv6 autoconfiguration is enabled, the platform will engage in stateless IPv6 autoconfiguration. When IPv6 autoconfiguration is disabled, the platform will relinquish usage of any autoconfigured IPv6 addresses that it may have acquired while IPv6 autoconfiguration was enabled. This same enabled or disabled state also enables or disables the usage of a link local address for each managed entity (though a link local address will continue to be generated for each switch) because those link local addresses are required for router discovery. The enabled or disabled state of autoconfiguration does not affect any static IPv6 addresses that may have been configured. Stateless IPv6 autoconfiguration and static IPv6 addresses can co-exist. 1. Issue the configure terminal command to enter global configuration mode. 2. Take the appropriate action based on whether you want to enable or disable IPv6 autoconfiguration: • Enter the ipv6 address autoconfig command to enable IPv6 autoconfiguration for all managed entities on the target platform. • Enter the no ipv6 address autoconfig command to disable IPv6 autoconfiguration for all managed entities on the target platform. Enabling and disabling Brocade VCS mode Enable or disable a single switch for VCS™ mode as soon as passwords have been assigned and an IP address has been set. Enabling VCS mode is disruptive because a reboot is required once the mode has been enabled. Enabling or disabling VCS mode also causes the default configuration file for that mode to be applied. The Brocade VDX 6710-54 ships with a two-node VCS license by default. VCS mode is disabled by default. The basic configuration tasks include enabling or disabling VCS mode explicitly, setting VCS parameters, and applying the default configuration. If you disable VCS mode, you do not have to set the other parameters. For more details about enabling VCS mode and setting VCS parameters, refer to the Brocade Network OS Administrator’s Guide and the Brocade Network OS Command Reference Guide. Brocade VDX 6710-54 Hardware Reference Manual 53-1002390-08 15 3 Enabling and disabling Brocade VCS mode Enabling VCS mode Perform the following steps to enable VCS mode. 1. Log in to the switch using an account that has the admin role. 2. Enter the vcs enable command, including the RBridge parameter, as in the following example. vcs rbridge-id 1 enable The switch reboots when you confirm that you want to enable VCS mode. When the switch comes back up, if it is connected to other VCS-enabled switches, the negotiation protocols begin, determining which switch in the fabric is the principal switch and making sure that all domain IDs, and therefore RBridge IDs, are unique. Should the insistent domain ID not be unique, you can change it. Once the domain IDs are determined to be unique, they are equated to the RBridge IDs. The switch with the lowest World Wide Name (WWN) becomes the principal switch, primarily for purposes of determining the uniqueness of the ID of the other switches in the fabric. The WWN is a unique identifier burned into the switch at the factory. Another parameter that can be changed if necessary is the VCS ID. This identifies the VCS fabric of which the switch can be a part. By default, the VCS ID of every Brocade VDX 6710-54 is 1. Change the VCS ID if you need to create a new, separate VCS fabric. 3. If you need to change the VCS ID, enter the vcs vcs-id x command, where x is the new VCS ID number. 4. Enter the copy running-config startup-config command to apply the current running configuration to the startup configuration. This is important to capture any changes that have been made to the running configuration so that they will persist the next time the switch reboots in the same mode. Disabling VCS mode Perform the following steps to disable VCS mode. 1. Log in to the switch using an account that has the admin role. 2. Enter the no vcs enable command. 3. Reboot the switch. 4. When the switch comes back up, enter the copy running-config startup-config command to apply the default configuration to the startup configuration. This is important to capture any changes that have been made to the running configuration so that they will persist the next time the switch reboots in the same mode. 16 Brocade VDX 6710-54 Hardware Reference Manual 53-1002390-08 Setting the date and time 3 Setting the date and time The Brocade VDX 6710-54 maintains the current date and time inside a battery-backed real-time clock (RTC) circuit. Date and time are used for logging events. Switch operation does not depend on the date and time; a Brocade VDX 6710-54 with an incorrect date and time value functions properly. Because the date and time are used for logging, error detection, and troubleshooting, you should set them correctly. Understanding time zones You can set the time zone for a switch by using the clock TimeZone command. The time zone setting has the following characteristics: • The clock TimeZone setting automatically adjusts for Daylight Savings Time. • Changing the time zone on a switch updates the local time zone setup and is reflected in local time calculations. • By default, all switches are in the Greenwich Mean Time (GMT) time zone (0,0). If all switches in a fabric are in one time zone, it is possible for you to keep the time zone setup at the default setting. • System services that have already started will reflect the time zone changes only after the next reboot. • Time zone settings persist across failover for high availability. • Time zone settings are not affected by Network Time Protocol (NTP) server synchronization. The following regions are supported: Africa, America, Antarctica, Asia, Atlantic, Australia, Europe, Indian, and Pacific. One of these, along with a city name, establishes the time zone. Understanding time synchronization To keep the time in your network current, it is recommended that the principal switch has its time synchronized with at least one external NTP server. The other switches in the fabric will automatically take their time from the principal switch. All switches in the fabric maintain the current clock server value in nonvolatile memory. By default, this value is the local clock server of the principal switch. Changes to the clock server value on the principal switch are propagated to all switches in the fabric. When a new switch enters the fabric, the time server daemon of the principal switch sends out the addresses of all existing clock servers and the time to the new switch. The ntp server command accepts multiple server addresses in IPv4 format. When multiple NTP server addresses are passed, ntp server sets the first obtainable address as the active NTP server. If there are no reachable time servers, then the local switch time is the default time. Brocade VDX 6710-54 Hardware Reference Manual 53-1002390-08 17 3 Setting the date and time Synchronizing local time using NTP Perform the following steps to synchronize the local time using NTP. 1. Log in to the switch using the default password (the default password is password). 2. Enter the ntp server "<IPv4 address>" command, where <IPv4 address> is the IP address of the first NTP server in IPv4 format, which the switch must be able to access. The <IPv4 address> variable is optional. By default, this value is LOCL, which uses the local clock of the principal switch as the clock server. switch:admin> ntp server "132.163.135.131" To display the NTP server IP address, use the show ntp status [switchid <switchid> | all] command. switch:admin> show ntp status switchid 132.163.135.131 The request is for the local switch unless a switch ID is specified. Specify the all parameter to send the request to all switches in the cluster. If you need to remove an NTP server, use the no form of the ntp server command. switch:admin> no ntp server "132.163.135.131" Setting the clock (date and time) The following procedure sets the local clock date and time. An active NTP server, if configured, automatically updates and overrides the local clock time. Time values are limited to between January 1, 1970 and January 19, 2038. NOTE You should set the clock only if there are no NTP servers configured. Time synchronization from NTP servers override the local clock. 1. Log in to the switch using the default password (the default password is password). 2. Enter the clock set <year>-<month>-<day>T<hours>:<minutes>:<seconds> command. The following example sets the clock to March 17, 2010, 15 minutes past noon: switch:admin > clock set 2010-03-17T12:15:00 3. To show the clock and time zone settings, use the show clock [switchid <switchid> | all] command. switch:admin > show clock switchid 1 Setting time zones You must perform this procedure on all switches for which the time zone must be set. However, you only need to set the time zone once on each switch, because the value is written to nonvolatile memory. While not necessary for switch operation, setting a time zone is part of ensuring accurate logging and audit tracking. Time zone changes take effect after a reboot. 18 Brocade VDX 6710-54 Hardware Reference Manual 53-1002390-08 Connecting network devices 3 Use the clock TimeZone command to set the time zone. 1. Connect to the switch and log in using an account assigned to the admin role. 2. Enter the clock TimeZone <region>/<city> command. The following example changes the time zone to US/Pacific Standard Time: switch:admin > clock timezone America/Los_Angeles Connecting network devices Connecting to Ethernet or Fast Ethernet hubs For copper connections to Ethernet hubs, a 1000Base-T switch, or another Brocade device, a crossover cable is required. If the hub is equipped with an uplink port, it requires a straight-through cable instead of a crossover cable. NOTE The 802.3ab standard (automatic MDI or MDIX detection) calls for automatic negotiation of the connection between two 1000Base-T ports. Therefore, a crossover cable may not be required; a straight-through cable may work as well. Connecting to workstations, servers, or routers Straight-through UTP cabling is required for direct UTP attachment to workstations, servers, or routers using network interface cards (NICs). Fiber cabling is required for direct attachment to Gigabit NICs or switches and routers through fiber ports. Connecting a network device to a fiber port For direct attachment from the Brocade device to a Gigabit NIC, switch, or router, fiber cabling with an LC connector is required. See “Installing an SFP+ transceiver” on page 27 for details about installing transceivers and cables. Testing connectivity After you install the network cables, you can test network connectivity to other devices by observing the LEDs related to network connection and performing trace routes. See Table 3 on page 23 for a description of the port states. Brocade VDX 6710-54 Hardware Reference Manual 53-1002390-08 19 3 Creating Brocade inter-switch link trunks Creating Brocade inter-switch link trunks In VCS mode, unless specifically disabled, inter-switch link (ISL) trunking between adjacent switches is automatic. All ports must be in the same port group and must be configured at the same speed. There is a limit of eight ports per trunk group. No separate licensing is required. For more information about Brocade trunks, see the Brocade Network OS Administrator’s Guide. 20 Brocade VDX 6710-54 Hardware Reference Manual 53-1002390-08 Chapter 4 Brocade VDX 6710-54 Operation In this chapter • Powering on the Brocade VDX 6710-54. . . . . . . . . . . . . . . . . . . . . . . . . . . . . • LED activity interpretation. . . . . . . . . . . . . . . . . . . . . . . . . . . . . . . . . . . . . . . . • POST and boot specifications . . . . . . . . . . . . . . . . . . . . . . . . . . . . . . . . . . . . . • Interpreting POST results . . . . . . . . . . . . . . . . . . . . . . . . . . . . . . . . . . . . . . . . • Brocade VDX 6710-54 maintenance . . . . . . . . . . . . . . . . . . . . . . . . . . . . . . . • Brocade VDX 6710-54 management . . . . . . . . . . . . . . . . . . . . . . . . . . . . . . . 21 21 25 26 27 29 Powering on the Brocade VDX 6710-54 For details about powering on the Brocade VDX 6710, refer to “Providing power to the switch” on page 8. Powering off the Brocade VDX 6710-54 To power off the Brocade VDX 6710-54, power off both power supplies by setting each power supply switch to “O.”. LED activity interpretation System activity and status can be determined through the activity of the LEDs on the switch. There are three possible LED states: off (no light), a steady light, and a flashing light. Flashing lights may be slow, fast, or flickering. The LED colors are either green or amber. See Table 3 on page 23 and Table 4 on page 25 for details on LED behavior. Sometimes, the LEDs flash either of the colors during boot, POST, or other diagnostic tests. This is normal; it does not indicate a problem unless the LEDs do not indicate a healthy state after all boot processes and diagnostic tests are complete. Brocade VDX 6710-54 LEDs The Brocade VDX 6710-54 switch has the following LEDs: Brocade VDX 6710-54 Hardware Reference Manual 53-1002390-08 21 4 LED activity interpretation • One bicolor system status LED (green and amber) on the port side. • One power status LED (green) on the port side. • Two Ethernet management port LEDs (green) for the Ethernet management port. The two LEDs show the status of the port link and the port activity. • One bicolor port status LED (green and amber) for each port on the switch. These LEDs are arrayed above each pair of 1 Gbps Ethernet ports on the Brocade VDX 6710-54 and between each upper and lower pair of 10 Gbps Ethernet ports. The left LED corresponds to the upper port of the pair and the right LED corresponds to the lower port. • One power supply and fan assembly LED (green) above the AC power switch on each combined power supply and fan assembly on the non-port side of the switch on the Brocade VDX 6710-54. LED locations Figure 3 shows the LEDs on the port side of the Brocade VDX 6710-54. The port status LEDs for the GbE ports are staggered to correspond to the upper (left LED) and lower (right LED) ports in each pair. Refer to Figure 1 on page 4 for the numbering and locations of the GbE ports. 2 3 4 9 10 5 6 7 8 1 1 System power LED 6 10 GbE port status LED (port 6 - bottom row) 2 System status LED 7 1 GbE port status LED (port 2 - top row) 3 Switch management Ethernet port link LED 8 1 GbE port status LED (port 6 - bottom row) 4 Switch management Ethernet port activity LED 9 Console management port link LED 5 10 GbE port status LED (port 2 - top row) 10 Console management port activity LED FIGURE 3 LEDs on the port side of the Brocade VDX 6710-54 Figure 4 shows the LEDs on the non-port side of the Brocade VDX 6710-54. 1 22 2 Brocade VDX 6710-54 Hardware Reference Manual 53-1002390-08 LED activity interpretation 1 Power supply and fan assembly #2 status LED FIGURE 4 2 4 Power supply and fan assembly #1 status LED LEDs on the non-port side of the Brocade VDX 6710-54 LED patterns Table 3 describes the port side LEDs and their behaviors. TABLE 3 Port side LED patterns during normal operation LED name LED color Status of hardware Recommended action System power (one LED [green]) Off (no light) System is off or there is an internal power supply failure. Verify the system is powered on (power supply switches to “l”), the power cables are attached, and your power source is live. If the system power LED is not green, the unit may be faulty. Contact your switch service provider. Steady green System is on and power supplies are functioning properly. No action required. Off (no light) System is off or there is no power. Verify the system is on and has completed booting. Steady green System is on and functioning properly. No action required. Steady amber (for more than 5 seconds) A system fault has occurred or the switch is in an initialization state. Check the management interface and the error log for details on the cause of the status. Contact your switch service provider. Blinking amber (for more than 5 seconds) A power supply or fan has faulted, is absent, or is unplugged or a system fault has occurred. Check the power supply and fan assembly and the management interface and the error log for details on the cause of the status. Contact your switch service provider. Ethernet Link (Management and LOMM [Remote Lights Out] port) (one LED [green]) Off (no light) There is no link. No action required. Steady green Link is present. No action required. Ethernet Activity (Management and LOMM [Remote Lights Out] port) (one LED [green]) Off (no light) There is no activity. No action required. Blinking green There is activity (traffic). No action required. System status (one bicolor LED [green and amber]) Brocade VDX 6710-54 Hardware Reference Manual 53-1002390-08 23 4 LED activity interpretation TABLE 3 Port side LED patterns during normal operation (Continued) LED name LED color Status of hardware Recommended action Optical media port status (one bicolor LED [green and amber] for each 10 GbE port) Off (no light) No light or signal carrier on the media interface. Verify that the transceiver is installed correctly and that the cable is connected correctly. Steady green Link is present. No action required. Flickering green Online, frames flowing through port. No action required. Steady amber Carrier (light) is present, but not online. No action required. Fast blinking amber (1/2 second interval) Port is faulted. Change the transceiver or reset the switch from the workstation. Slow blinking amber (2 second interval) Port disabled. Enable the port. Off (no light) No light or signal carrier on the media interface. Verify that the transceiver is installed correctly and that the cable is connected correctly. Steady green Link is present. No action required. Flickering green Online, frames flowing through port. No action required. Steady amber Carrier (light) is present, but not online. No action required. Fast blinking amber (1/2 second interval) Port is faulted. Change the transceiver or reset the switch from the workstation. Slow blinking amber (2 second interval) Port is disabled. Enable the port. Optical and copper media port status (one bicolor LED [green and amber] for each 1 GbE port) 24 Brocade VDX 6710-54 Hardware Reference Manual 53-1002390-08 POST and boot specifications 4 Table 4 describes the LEDs on the non-port side of the switches. TABLE 4 Non-port side LED patterns during normal operation LED name LED color Status of hardware Recommended action Power supply and fan assembly status (one LED [green] per power supply and fan assembly) Off (no light) Assembly is not receiving power or is turned off. Verify the assembly is on and seated and the power cord is connected to a functioning power source. Steady green Assembly is operating normally. No action required. Blinking green One of the following may have occurred: • Mismatched airflow on power supply and fan assembly. Take one of the following actions: • • • • • One or more of the fans in the fan assembly has failed or the power supply has failed. The power cord has been unplugged. The power supply and fan assembly was disabled by the user. The power supply power switch has been turned off or the unit has been unplugged. • Replace power supply and fan assembly with a power supply and fan assembly that has correct airflow direction. Replace if necessary. Replace the power supply and fan assembly. • Check the power plug. • Verify that the power supply and fan assembly is enabled. • Check the power switch and plug. POST and boot specifications When the switch is turned on or rebooted, the switch performs a power-on, self-test (POST). Total boot time with POST can be several minutes. POST can be omitted after subsequent reboots by using the fastboot command or entering the no diag post command to persistently disable POST. For more information about these commands, refer to the Brocade Network OS Command Reference. POST The success or failure results of the diagnostic tests that run during POST can be monitored through LED activity, the error log, or the command line interface. POST includes the following tasks: • Conducts preliminary POST diagnostics. • Initializes the operating system. Brocade VDX 6710-54 Hardware Reference Manual 53-1002390-08 25 4 Interpreting POST results • Initializes hardware. • Runs diagnostic tests on several functions, including circuitry, port functionality, memory, statistics counters, and serialization. Boot In addition to POST, boot includes the following tasks after POST is complete: • Performs universal port configuration. • Initializes links. • Analyzes fabric. If any ports are connected to other switches, the switch participates in a fabric configuration. • Obtains a domain ID and assigns port addresses. • Constructs unicast routing tables. • Enables normal port operation. Interpreting POST results POST is a system check that is performed each time the switch is powered on, rebooted, or reset. During POST, the LEDs flash either amber or green. Any errors that occur during POST are listed in the error log. Complete the following steps to determine whether POST completed successfully and whether any errors were detected. 1. Verify that the switch LEDs indicate that all components are healthy. See Table 3 and Table 4 for descriptions and interpretations of LED patterns. 2. Verify that the switch prompt displays on the terminal of a computer workstation connected to the switch. If there is no switch prompt when POST completes, press Enter. If the switch prompt still does not display, try opening a Telnet session or accessing the switch through another management tool. If this is not successful, the switch did not successfully complete POST. Contact your switch supplier for repair. 3. Review the switch system log for errors. Any errors detected during POST are written to the system log, accessible through the show logging raslog command. For information about all referenced commands, and on accessing the error log, refer to the Brocade Network OS Administrator’s Guide. For information about error messages, refer to the Brocade Network OS Message Reference. 26 Brocade VDX 6710-54 Hardware Reference Manual 53-1002390-08 Brocade VDX 6710-54 maintenance 4 Brocade VDX 6710-54 maintenance The Brocade VDX 6710-54 is designed for high availability and low failure; it does not require any regular physical maintenance. The SFP+ optical transceivers and diagnostic tests are described in the following sections. Supported transceivers The Brocade VDX 6710-54 supports only Brocade-branded SFP+ optical transceivers for its 10 Gbps DCB ports. The optical SFP+ transceivers support both Short Reach (SR) and Long Reach (LR) modules. Direct-attach copper cables support distances of 1 meter, 3 meters, and 5 meters. Non-branded active twinax cables can be used, but Brocade does not support them. Installing an SFP+ transceiver For its DCB connections, the Brocade VDX 6710 uses SFP+ transceivers that support either optical or Brocade-branded direct-attached copper (Laserwire) and optical cables. The optical SFP+ transceivers support both Short Reach (SR) and Long Reach (LR) modules. Direct attached copper cables support distances of 1 meter, 3 meters, and 5 meters. Direct attached optical cables support distances of 10 meters and 20 meters. To monitor the transceivers, the showmedia command output shows the transceiver information for all interfaces on the switch. Third party transceivers are allowed. Brocade will provide support for such a system but may require that a Brocade transceiver be used for troubleshooting. Support will not be provided if there is an issue with the third party transceiver. Complete the following steps to install an SFP or SFP+ transceiver. 1. Remove any protector plugs from the transceivers and the ports. 2. Making sure that the bail (wire handle) is in the unlocked position, place the SFP or SFP+ transceiver in the correctly oriented position on the port, as shown in Figure 5. 3. Slide the SFP or SFP+ transceiver into the port until you feel it click into place; then close the bail. NOTE Each SFP or SFP+ transceiver has a 10-pad gold-plated edge connector on the bottom. The correct position to insert an SFP or SFP+ transceiver in the upper row of ports is with the gold-plated edge down. The correct position to insert an SFP or SFP+ transceiver in the lower row of ports is with the gold-plated edge up. Brocade VDX 6710-54 Hardware Reference Manual 53-1002390-08 27 4 Brocade VDX 6710-54 maintenance ! FIGURE 5 Installing an SFP or SFP+ transceiver in the upper row of port slots Diagnostic tests and monitoring In addition to POST, the Network OS includes diagnostic tests to help you troubleshoot the hardware and firmware. This includes tests of internal connections and circuitry, fixed media, and the transceivers and cables in use. The tests are implemented by command, either through a Telnet session or through a console set up to the serial connection to the switch. Some tests require the ports to be connected by external cables, to allow diagnostics to verify the serializer/deserializer interface, transceiver, and cable. Some tests require loopback plugs. See the Brocade Network OS Administrator’s Guide and the Brocade Network OS Command Reference Guide for more details about diagnostic tests and commands. Diagnostic tests run at link speeds of 1 or 10 Gbps depending on the speed of the link being tested and the type of port. NOTE Diagnostic tests might temporarily lock the transmit and receive speed of the links during diagnostic testing. To monitor the transceivers, the show media command output shows the transceiver information for all interfaces on the switch. Any unqualified transceiver is disabled and a log message is generated. 28 Brocade VDX 6710-54 Hardware Reference Manual 53-1002390-08 Brocade VDX 6710-54 management 4 Brocade VDX 6710-54 management You can use the management functions built into the Brocade VDX 6710-54 to monitor the fabric topology, port status, physical status, and other information to help you analyze switch performance and to accelerate system debugging. For information about upgrading the version of Network OS installed on your switch, see the Brocade Network OS Administrator’s Guide. You can manage the Brocade VDX 6710-54 using any of the management options listed in Table 5. TABLE 5 Management options for the Brocade VDX 6710-54 Management tool Out-of-band support In-band support Command line interface (CLI) Up to two admin sessions and four user sessions simultaneously. For more information, refer to the Brocade Network OS Administrator’s Guide and the Brocade Network OS Command Reference Guide. Ethernet or serial (console port) connection In standalone mode only. Not available in VCS mode. Standard SNMP applications For information, refer to the Brocade Network OS MIB Reference. Ethernet or serial (console port) connection N/A Brocade Network Advisor For information, refer to the Brocade Network Advisor SAN+IP User Manual. Ethernet (preferred) or serial (console port) connection N/A Brocade VDX 6710-54 Hardware Reference Manual 53-1002390-08 29 4 30 Brocade VDX 6710-54 management Brocade VDX 6710-54 Hardware Reference Manual 53-1002390-08 Chapter FRU Removal and Replacement Procedures 5 In this chapter • Before beginning the installation . . . . . . . . . . . . . . . . . . . . . . . . . . . . . . . . . . 31 • Replacing a combined FRU in a Brocade VDX 6710-54 . . . . . . . . . . . . . . . . 32 Before beginning the installation The field-replaceable units (FRUs) in the Brocade VDX 6710-54 switch can be removed and replaced without special tools. The switches can continue operating during the FRU replacements if the conditions specified in the procedure are followed. This covers both the AC-DC (AC) and DC-DC (DC) versions of the combined power supply and fan FRUs in the Brocade VDX 6710-54 switch and the separate power supply and fan FRUs in the Brocade VDX 6710- switch. NOTE Read the “Installation and safety considerations” on page 5 before servicing. CAUTION This document describes how to change field-replaceable units (FRUs) for units with either a port-side air exhaust or a port-side air intake. You must replace a failed FRU with a FRU of the same type. This applies to both power supplies and fan assemblies. A new FRU must have the same part number (P/N) as the FRU being replaced. The manufacturing P/N is located on the top of the FRU. The P/N ends in either -F (front-to-rear airflow) or -R (rear-to-front airflow). You must use a replacement FRU that has the same airflow designator with the part number. If a mismatched power source or fan assembly is installed by mistake, a warning is sent to the console. The warning messages will be similar to the following: • For a fan mismatch: [WARNING, Brocade VDX 6710, MISMATCH in FAN Air Flow direction. Replace FRU with fan air flows in same direction. • For a power supply or combined power supply and fan mismatch: [WARNING, Brocade VDX 6710, MISMATCH in PSU-FAN FRUS Air Flow direction. Replace PSU with fan air flows in same direction. You can use external labels as a guide. The power supply and fan assemblies are labeled with an airflow symbol on the faceplate to indicate whether the assembly takes in or exhausts air. The symbol also appears on the top of the FRU. All FRUs in a chassis must have the same label affixed so that airflow direction is consistent. Figure 6 illustrates examples of the airflow labels. Brocade VDX 6710-54 Hardware Reference Manual 53-1002390-08 31 5 Replacing a combined FRU in a Brocade VDX 6710-54 E AIRFLOW FIGURE 6 AIRFLOW Examples of airflow symbols The green E symbol indicates an exhaust FRU. This unit pulls air in from the port side of the switch and exhausts it out the non-port side. This is called front-to-back airflow or forward airflow. This symbol should appear on FRUs with part numbers ending with -F. The orange I symbol indicates an intake FRU. This unit pulls air in from the non-port side of the switch and exhausts it out the port side. This is called back-to-front airflow or reverse airflow. This symbol should appear on FRUs with part numbers ending with -R. The show environment fan command will indicate either “forward” or “reverse” airflow. Replacing a combined FRU in a Brocade VDX 6710-54 Figure 7 shows the two combined AC power supply and fan assemblies in the Brocade VDX 6710-54. The Network OS identifies the FRUs from left to right as power supply and fan assembly #2 and power supply and fan assembly #1. Figure 8 shows the combined DC power supply and fan assemblies. 1 3 4 5 6 7 8 1 Power supply and fan assembly #2 5 Handle 2 AC power cord receptacle 6 Airflow label 3 Status LED 7 Captive screw 4 On/off switch 8 Power supply and fan assembly #1 FIGURE 7 32 2 Brocade VDX 6710-54 AC power supply and fan assemblies on the non-port side Brocade VDX 6710-54 Hardware Reference Manual 53-1002390-08 Replacing a combined FRU in a Brocade VDX 6710-54 2 1 3 4 5 6 8 7 1 Power supply and fan assembly #2 5 Handle 2 Status LED 6 Airflow label 3 On/off switch 7 Captive screw 4 DC power cord receptacle 8 Power supply and fan assembly #1 FIGURE 8 5 Brocade VDX 6710-54 DC power supply and fan assemblies on the non-port side ATTENTION Maintain all power supply and fan assemblies in operational condition to provide redundancy. CAUTION Because the cooling system relies on pressurized air, do not leave any of the power supply and fan assembly slots empty longer than two minutes while the switch is operating. If a power supply and fan assembly fails, leave it in the switch until it can be replaced. CAUTION Disassembling any part of the power supply and fan assembly voids the warranty and regulatory certifications. There are no user-serviceable parts inside the power supply and fan assembly. Table 6 describes the power supply and fan assembly status LED colors, behaviors, and actions required, if any. TABLE 6 Brocade VDX 6710-54 LED behavior, descriptions, and required actions LED color and behavior Description Action required Off (no light) Assembly is not receiving power or is turned off. Verify the assembly is on and seated and the power cord is connected to a functioning power source. Brocade VDX 6710-54 Hardware Reference Manual 53-1002390-08 33 5 Replacing a combined FRU in a Brocade VDX 6710-54 TABLE 6 Brocade VDX 6710-54 LED behavior, descriptions, and required actions LED color and behavior Description Action required Steady green Assembly is operating normally. No action required. Blinking green One of the following may have occurred: • Mismatched airflow on power supply and fan assembly • • • • The power supply and fan assembly was disabled by the user. The power supply and fan assembly power switch has been turned off or the unit has been unplugged. One or more of the fans in the fan assembly has failed or the power supply has failed. Take one of the following actions: Replace the power supply and fan assembly with one that has the correct airflow direction. • Verify that the power supply and fan assembly is enabled. • Check the power switch and plug. • Replace the power supply and fan assembly. Time and items required Replacing a combined power supply and fan assembly in the switch should take less than two minutes. You need the following items to replace a power supply and fan assembly in a Brocade VDX 6710-54: • A new power supply and fan assembly (must have the same part number and the same airflow label as the power supply and fan assembly being replaced) • A #1 Phillips screwdriver Replacing the power supply and fan assembly Complete the following steps to replace a combined power supply and fan assembly in a Brocade VDX 6710-54. 1. Unplug the power cord from the combined power supply and fan assembly you are replacing. 2. Unscrew the captive screw on the power supply and fan assembly you are replacing using the Phillips screwdriver. 3. Remove the power supply and fan assembly from the chassis by pulling the handle out and away from the chassis. CAUTION The power supply switch must be in the off position when inserting it in the chassis. 4. Ensure that the new power supply and fan assembly has the same part number as the FRU being replaced and then install the new FRU in the chassis: 34 Brocade VDX 6710-54 Hardware Reference Manual 53-1002390-08 Replacing a combined FRU in a Brocade VDX 6710-54 a. 5 Orient the new power supply and fan assembly with the captive screw on the right as shown in Figure 9 or Figure 10. CAUTION Do not force the installation. If the power supply and fan assembly does not slide in easily, ensure that it is correctly oriented before continuing. b. Gently push the power supply and fan assembly into the chassis until it is firmly seated. c. Using the Phillips screwdriver, secure the power supply and fan assembly to the chassis by tightening the captive screw. 1 2 3 4 P/N: xxxxxxx-xx 1 Brocade VDX 671054 chassis 3 Label with part number 2 AC power supply and fan assembly 4 Captive screw FIGURE 9 Orientation of the AC power supply and fan assembly in the Brocade VDX 6710-54 Brocade VDX 6710-54 Hardware Reference Manual 53-1002390-08 35 5 Replacing a combined FRU in a Brocade VDX 6710-54 1 2 4 3 P/N: xxxxxxx-xx 1 Brocade VDX 6710-54 chassis 3 Label with part number 2 DC power supply and fan assembly 4 Captive screw FIGURE 10 Orientation of the DC power supply and fan assembly in the Brocade VDX 6710-54 5. Verify that the power supply and fan assembly status LED is steady green to indicate normal operation (see Table 6 for more LED information). You can display the power supply and fan assembly status using the following commands from the CLI: • show system • show environment fan • show environment power 36 Brocade VDX 6710-54 Hardware Reference Manual 53-1002390-08 Appendix A Brocade VDX 6710-54 Specifications In this appendix • Weight and physical dimensions . . . . . . . . . . . . . . . . . . . . . . . . . . . . . . . . . . • Facility requirements . . . . . . . . . . . . . . . . . . . . . . . . . . . . . . . . . . . . . . . . . . . . • Power supply specifications . . . . . . . . . . . . . . . . . . . . . . . . . . . . . . . . . . . . . . • Environmental requirements . . . . . . . . . . . . . . . . . . . . . . . . . . . . . . . . . . . . . • General specifications. . . . . . . . . . . . . . . . . . . . . . . . . . . . . . . . . . . . . . . . . . . • Data transmission ranges. . . . . . . . . . . . . . . . . . . . . . . . . . . . . . . . . . . . . . . . • Memory specifications . . . . . . . . . . . . . . . . . . . . . . . . . . . . . . . . . . . . . . . . . . • Regulatory compliance . . . . . . . . . . . . . . . . . . . . . . . . . . . . . . . . . . . . . . . . . . • Electrical cautions . . . . . . . . . . . . . . . . . . . . . . . . . . . . . . . . . . . . . . . . . . . . . . • Regulatory certifications . . . . . . . . . . . . . . . . . . . . . . . . . . . . . . . . . . . . . . . . . • Environmental regulation compliance . . . . . . . . . . . . . . . . . . . . . . . . . . . . . . 37 37 38 39 39 40 40 40 44 47 47 Weight and physical dimensions Table 7 lists the weight and dimensions of the Brocade VDX 6710-54. TABLE 7 Physical specifications Dimension Value Height 1U or 4.37 cm (1.72 in.) Depth 40.97 cm (16.13 in.) Width 44.0 cm (17.32 in.) Weight (with all power supply and fan assemblies, and no transceivers installed) approx. 8.57 kg (18.09 lb) Facility requirements Table 8 provides the facilities requirements that must be met for the Brocade VDX 6710-54. Brocade VDX 6710-54 Hardware Reference Manual 53-1002390-08 37 A Power supply specifications TABLE 8 Facility requirements Type Requirements Electrical • • Primary AC input 85-265 VAC nominal, 47-63 Hz; switch autosenses input voltage Adequate supply circuit, line fusing, and wire size, as specified by the electrical rating on the switch nameplate • Circuit protected by a circuit breaker and grounded in accordance with local electrical codes Refer to Table 9 on page 38 for complete power supply specifications. Thermal • • • • • Cabinet (when rack-mounted) Ambient air temperature not exceeding 40° C (104° F) while the switch is operating One rack unit (1U) in a 48.3 cm (19-inch) cabinet All equipment in cabinet grounded through a reliable branch circuit connection Additional weight of switch not to exceed the cabinet’s weight limits Cabinet secured to ensure stability in case of unexpected movement Power supply specifications The power supplies are universal and capable of functioning worldwide without voltage jumpers or switches. They meet IEC 61000-4-5 surge voltage requirements and are autoranging in terms of accommodating input voltages and line frequencies. Table 9 lists the power supply specifications for the Brocade VDX 6710-54. TABLE 9 38 System power specifications Specification Value Maximum output (per power supply) 250 watts, 12 VDC AC input power draw Idle: 106 W Maximum: 131 W AC input voltage 85-264 VAC, nominal 100-240 VAC AC input line frequency 47-63 Hz, nominal 50-60 Hz AC inrush current Maximum of 50A @ 240 VAC for 10ms or less Input line protection AC lines are fused Brocade VDX 6710-54 Hardware Reference Manual 53-1002390-08 Environmental requirements A Environmental requirements Table 10 lists the acceptable environmental ranges for both operating and nonoperating (such as during transportation or storage) conditions. TABLE 10 Environmental requirements Condition Acceptable during operation Acceptable during non-operation Ambient Temperature 0º to 40ºC (32º to 104ºF) -25º to 70ºC (-13º to 158ºF) Humidity 10% to 85% RH non-condensing, at 40ºC (104ºF) 10% to 90% RH non-condensing, at 70ºC (158ºF) Altitude 0 to 3 km (9,842 feet) above sea level 0 to 12 km (39,370 feet) above sea level Shock 20 G, 6 ms, half-sine wave 33 G, 11 ms, half-sine wave, 3/eg Axis Vibration 0.5 G sine, 0.4 gms random, 5-500 Hz 2.0 G sine, 1.1 gms random, 5-500 Hz Airflow Maximum - 101.9 cmh (60 cfm) Nominal - 74.8 cmh (44 cfm) N/A Heat dissipation 444 BTU/hr N/A General specifications Table 11 lists the general specifications for the Brocade VDX 6710-54. TABLE 11 General specifications Specification Description System architecture Nonblocking shared-memory switch System processor 1.3 GHz PowerPC Aggregate switch I/O bandwidth 108 Gbps Port-to-port latency Less than 600 nanoseconds on the same ASIC, 1.8 microseconds for multi-ASIC Brocade VDX 6710-54 Hardware Reference Manual 53-1002390-08 39 A Data transmission ranges Data transmission ranges Table 12 provides the data transmission ranges for different cable types and port speeds for all ports. TABLE 12 Data transmission ranges Cable and connector type Connector Cable Distance Active copper (Laserwire) SFP copper Plastic optical fiber Up to 20 m (65.62 ft) [1 m (3.28 ft), 3 m (9.84 ft), and 5 m (16.40 ft) supported] Active optical cable SFP+ optical Plastic optical fiber 10m (32.81 ft) and 20m (65.62 ft) 10GE-SR SFP+ SFP+ MMF, SR MM OM2 MM OM3 82 m (269.03 ft) 300 m (984.25 ft) 10GE-LR SFP+ SFP+ SMF, LR SM 10 km (6.2 miles) 10GBase-T RJ45 CAT 6a/7 Up to 100 m (328.08 ft) Memory specifications The Brocade VDX 6710-54 has three types of memory devices: boot flash, compact flash, and main memory. The size of each is listed in Table 13. TABLE 13 Brocade VDX 6710-54 memory specifications Type Size Boot flash 4 MB Compact flash 4 GB Main memory (DDR2 SDRAM) 2 GB Regulatory compliance This section describes the following regulatory compliance requirements for the Brocade VDX 6710-54: • • • • • • • 40 “FCC warning (US only)” “German statement” “KCC statement (Republic of Korea)” “VCCI statement (Japan)” “Power cords (Japan DENAN)” “BSMI statement (Taiwan)” “CE statement” Brocade VDX 6710-54 Hardware Reference Manual 53-1002390-08 Regulatory compliance A • “Canadian requirements” • “China statement” • “Laser compliance” FCC warning (US only) This equipment has been tested and complies with the limits for a Class A computing device pursuant to Part 15 of the FCC Rules. These limits are designed to provide reasonable protection against harmful interference when the equipment is operated in a commercial environment. This equipment generates, uses, and can radiate radio frequency energy, and if not installed and used in accordance with the instruction manual, might cause harmful interference to radio communications. Operation of this equipment in a residential area is likely to cause harmful interference, in which case the user will be required to correct the interference at the user’s own expense. German statement Maschinenlärminformations-Verordnung – 3 GPSGV, der höchste Schalldruckpegel beträgt 71.0 dB(A) gemäss EN ISO 7779. Machine noise information regulation – 3. GPSGV, the highest sound pressure level value is 71.0 dB(A) in accordance with EN ISO 7779. KCC statement (Republic of Korea) Class A device (Broadcasting Communication Device for Office Use): This device obtained EMC registration for office use (Class A), and may be used in places other than the home. Sellers and/or users need to take note of this. VCCI statement (Japan) This is a Class A product based on the standard of the Voluntary Control Council for Interference by Information Technology Equipment (VCCI). If this equipment is used in a domestic environment, radio disturbance might arise. When such trouble occurs, the user might be required to take corrective actions. Brocade VDX 6710-54 Hardware Reference Manual 53-1002390-08 41 A Regulatory compliance Power cords (Japan DENAN) BSMI statement (Taiwan) Warning: This is Class A product. In a domestic environment, this product may cause radio interference, in which case the user may be required to take adequate measures. CE statement ATTENTION This is a Class A product. In a domestic environment, this product might cause radio interference, and the user might be required to take corrective measures The standards compliance label on the Brocade VDX 6710-54 contains the CE mark which indicates that this system conforms to the provisions of the following European Council directives, laws, and standards: • Electromagnetic Compatibility (EMC) Directive 2004/108/EEC • Low Voltage Directive (LVD) 2006/95/EC • EN50082-2/EN55024:1998 (European Immunity Requirements) - EN61000-3-2/JEIDA (European and Japanese Harmonics Spec) - EN61000-3-3 Canadian requirements This Class A digital apparatus meets all requirements of the Canadian Interference-Causing Equipment Regulations, ICES-003 Class A. Cet appareil numérique de la classe A est conforme à la norme NMB-003 du Canada. 42 Brocade VDX 6710-54 Hardware Reference Manual 53-1002390-08 Regulatory compliance A China statement China-CCC Warning statements 在维修的时候一定要断开所有电源 (English translation“disconnect all power sources before service”) For non tropical use: 汉文 “仅适用于非热带气候条件下安全使用。” 藏文 安全 说明 和标 记 蒙古 文 壮文 Dan hab yungh youq gij dienheiq diuzgen mbouj dwg diegndat haenx ancienz sawjyungh. 维文 For altitude 2000 meter and below: 汉文 仅适用于海拔2000m以下地区安全使用。 藏文 安全 说明 和标 记 蒙古 文 壮文 Dan hab yungh youq gij digih haijbaz 2000m doxroengz haenx ancienz sawjyungh. 维文 Warning for Class A: English translation of above statement This is a Class A product. In a domestic environment this product may cause radio interference, in which case the user may be required to take adequate measures. Brocade VDX 6710-54 Hardware Reference Manual 53-1002390-08 43 A Electrical cautions Laser compliance This equipment contains Class 1 laser products and complies with FDA Radiation Performance Standards, 21 CFR Subchapter I and the international laser safety standard IEC 825-2. ATTENTION Use only optical transceivers that are qualified by Brocade Communications Systems, Inc. and comply with the FDA Class 1 radiation performance requirements defined in 21 CFR Subchapter I, and with IEC 825-2. Optical products that do not comply with these standards might emit light that is hazardous to the eyes. Electrical cautions RTC battery CAUTION Do not attempt to replace the real-time clock (RTC) battery. There is danger of explosion if the battery is incorrectly replaced or disposed of. Contact your switch supplier if the real-time clock begins to lose time. Electrical safety CAUTION This switch might have more than one power cord. To reduce the risk of electric shock, disconnect both power cords before servicing. CAUTION Connect the power cord only to a grounded outlet. CAUTION This product is designed for an IT power system with phase-to-phase voltage of 230V. After operation of the protective device, the equipment is still under voltage if it is connected to an IT power system. 44 Brocade VDX 6710-54 Hardware Reference Manual 53-1002390-08 Electrical cautions A DC-DC power source cautions Each statement below appears in English, German, French, and Spanish, respectively. A caution calls your attention to a possible hazard that can damage equipment. "Vorsicht" weist auf eine mögliche Beschädigung des Geräts hin. Sie finden die folgenden Vorsichtshinweise in diesem Handbuch. Une mise en garde attire votre attention sur un risque possible d'endommagement de l'équipement. Ci-dessous, vous trouverez les mises en garde utilisées dans ce manuel. Un mensaje de precaución le advierte sobre un posible peligro que pueda dañar el equipo. Las siguientes son precauciones utilizadas en este manual. CAUTION For a DC system (VDX 6710/6720/6730), use a grounding wire of at least 14 American Wire Gauge (AWG). The 14 AWG wire should be attached to an agency-approved crimp connector (provided on the VDX 6710/6720/6730 chassis), crimped with the proper tool. The crimp connector should allow for securement to both ground screws on the enclosure. VORSICHT Für ein Gleichstromsystem (VDX 6710/6720/6730) ist ein Erdleiter von mindestens 6 AWG (amerikanische Norm für Drahtquerschnitte) zu verwenden. Der 14-AWG-Leiter sollte an einem geprüften gecrimpten Anschluss (am VDX 6710/6720/6730 Chassis bereitgestellt) angebracht und mit dem vorschriftsmäßigen Werkzeug gecrimpt werden. Der gecrimpte Anschluss sollte eine Sicherung an beiden Erdungsschrauben am Gehäuse ermöglichen. MISE EN GARDE Pour un système à alimentation continue (VDX 6710/6720/6730), utiliser un câble de mise à la terre de calibre AWG 14 (2 mm²) au minimum. Le conducteur de 2 mm² doit être fixé à un raccord à sertir agréé (directement présent sur le châssis du VDX 6710/6720/6730) à l'aide de la pince à sertir appropriée. Le raccord à sertir doit pouvoir être raccordé aux deux vis de mise à la terre du châssis. PRECAUCIÓN Para un sistema de CC (VDX 6710/6720/6730), utilice un conductor de tierra de al menos 14 CAE (Calibre de Alambre Estadounidense, American Wire Gauge 14 AWG en sus siglas en inglés). El conductor de 14 CAE debe estar acoplado a un conector rizado homologado (suministrado con el chasis VDX 6710/6720/6730), que haya sido rizado con la herramienta apropiada. El conector rizado debe permitir el acoplamiento a los dos tornillos de tierra del recinto. Brocade VDX 6710-54 Hardware Reference Manual 53-1002390-08 45 A Electrical cautions CAUTION For the DC input circuit to the system of a VDX 6710/6720/6730, make sure there is a UL-Listed 15 amp circuit breaker, minimum 48Vdc, double pole, on the input lugs to the power supply. The input wiring for connection to the product should be Listed copper wire, 14 AWG, marked VW-1, and rated minimum 90°C. VORSICHT Bei der Gleichstromeingangsschaltung zum System eines VDX 6710/6720/6730 muss sichergestellt werden, dass an den Eingangskabelschuhen zur Stromversorgung ein zweipoliger Schalter mit UL-Zulassung, 15 Ampere und mindestens 48 Vdc Gleichstrom vorhanden ist. Die Eingangsleitung zum Anschluss an das Produkt sollte als Kupferdraht, 8 AWG, angegeben, als VW-1 gekennzeichnet und für mindestens 90°C bemessen sein. MISE EN GARDE Pour le circuit d'alimentation en courant continu du système VDX 6710/6720/6730, vérifier la présence d'un disjoncteur bipolaire homologué de 15 A, minimum 48Vdc, sur l'entrée de l'alimentation. Les câbles d'alimentation du produit doivent être des fils de cuivre homologués de section 2 mm² (14 AWG), marqués VW-1 et testés à 90° C. PRECAUCIÓN Para el circuito de entrada de CC al sistema de un VDX 6710/6720/6730, verifique que existe un disyuntor catalogado por UL de 15 amperios, 48Vdc como mínimo, bipolar, en las orejetas de entrada a la fuente de alimentación. El cableado de entrada para la conexión al producto deberá ser de cable de cobre catalogado, 14AWG, marcado con VW-1, y tener una capacidad nominal mínima para 90°C. DC power safety CAUTION All devices with DC power supplies are intended for installation in restricted access areas only. A restricted access area is where access can be gained only by service personnel through the use of a special tool, lock and key, or other means of security, and is controlled by the authority responsible for the location. CAUTION For the DC input circuit, make sure there is a 15 amp circuit breaker, minimum 48Vdc, double pole, on the input to the power supply. The input wiring for connection to the product should be Listed copper wire, 14 AWG, marked VW-1, and rated minimum 90 C. 46 Brocade VDX 6710-54 Hardware Reference Manual 53-1002390-08 Regulatory certifications A CAUTION For a DC system, use a grounding wire of at least 14 American Wire Gauge (AWG). The 14 AWG wire should be attached to an agency-approved crimp connector (Tyco 34120 or certified Lug), crimped with the proper crimping tool and attached to the protective grounding lug, using a size #6-32 screw and a star washer, on the chassis with the other end to building ground. Each DC-DC power supply must have a separate grounding cable. Regulatory certifications Table 14 lists the regulatory compliance standards for which the Brocade VDX 6710-54 is certified. TABLE 14 Regulatory compliance standards Country Standards Agency certifications and markings Safety EMC Safety EMC United States Bi-Nat UL/CSA 60950-1 2nd Ed or latest ANSI C63.4 cCSAus FCC Class A and Statement Canada Bi-Nat UL/CSA 60950-1 2nd Ed or latest ICES-003 Class A cCSAus ICES A and Statement Japan European Union CISPR22 and JEIDA (Harmonics) EN60950-1 or latest Australia, New Zealand EN55022 and EN55024 VCCI-A and Statement TUV-GS EN55022 and CISPR22 or AS/NZS CISPR22 Argentina IEC60950-1 or latest Russia IEC60950-1 or latest Korea CE marking C-Tick mark “S” mark 51318.22-99 and 51318.24.99 or latest GOST mark KN22 and KN24 GOST mark KCC mark Class A China GB4943-2001 and GB9254-1998 or latest GB17625.1-2003 or latest CCC logo CCC logo Taiwan CNS 14336(94) or latest CNS 13438(95) or latest BSMI mark BSMI mark Environmental regulation compliance This section describes the “China RoHS” environmental regulatory compliance requirements for the Brocade VDX 6710-54 switch. China RoHS The contents included in this section are per the requirements of the People's Republic of ChinaManagement Methods for Controlling Pollution by Electronic Information products. Brocade VDX 6710-54 Hardware Reference Manual 53-1002390-08 47 A Environmental regulation compliance 䙉ᅜ⦃๗⊩㾘 Ё RoHS ᴀ㡖Ёࣙⱘݙᆍ䛑䙉ᅜњЁढҎ⇥݅lj⬉ᄤֵᙃѻક∵ᶧࠊㅵ⧚ࡲ⊩NJⱘ 㽕∖DŽ Environmental protection use period (EPUP) disclaimer In no event do the EPUP logos shown on the product and FRUs alter or expand that warranty that Brocade provides with respect to its products as set forth in the applicable contract between Brocade and its customer. Brocade hereby disclaims all other warranties and representations with respect to the information contained on this CD including the implied warranties of merchantability, fitness for a particular purposes and non-infringement. The EPUP assumes that the product will be used under normal conditions in accordance with the operating manual of the product. ⦃ֱՓ⫼ᳳ䰤 (EPUP) ܡ䋷ໄᯢ˖ EPUP ᷛᖫϡӮߎ⦄ѻક FRU ⱘᬍ㺙ѻકЁˈгϡӮᇍ Brocade ᠔ᦤկⱘⳌ݇ѻકֱׂᴵℒ˄䆹ֱׂᴵℒ Brocade ঞ݊ᅶ᠋䯈䖒៤ⱘ䗖⫼ড়ৠЁ߫ߎ˅䖯㸠㸹DŽᇍѢℸ CD ϞࣙⱘⳌֵ݇ᙃˈབ䗖䫔ᗻǃ䩜ᇍ⡍ᅮ⫼䗨ⱘ䗖⫼ᗻ䴲։ᴗᗻⱘᱫ⼎ֱ䆕ˈBr ocade ℸ䚥䞡ໄᯢᴀ݀ৌᇍѢϢϞ䗄ֵᙃⳌ݇ⱘ᠔᳝݊Ҫֱ䆕䰜䗄ὖϡ䋳䋷DŽ EPUP ؛䆒Āѻક᪡ݠāЁ⊼ᯢⱘᐌ㾘ᴵӊϟՓ⫼䆹ѻકDŽ 48 Brocade VDX 6710-54 Hardware Reference Manual 53-1002390-08 Environmental regulation compliance A TS/HS dual language sheet In accordance with China's Management Measures on the Control of Pollution caused by Electronic Information products (Decree No. 39 by the Ministry of Information Industry), the information in Table 15 is provided regarding the names and concentration level of Hazardous substances (HS) which may be contained in this product. TABLE 15 China ROHS hazardous substances/toxic substances (HS/TS) concentration chart Name of the component Hazardous/Toxic Substance/Elements Lead (PB) Mercury (Hg) Cadmium (CD) Hexavalent Chromium (CR6+) Polybrominated Biphenyl (PBB) Polybrominated Diphenyl Ether (PBDE) Ethernet Switch X O O O O O Fan, Blower assemblies X O O O O O PCBA cards X O O O O O Power Supply kit X O O O O O SFPs (SFP+ optical cable connectors) X O O O O O Sheet Metal X O O O O O Chassis Assembly X O O O O O Mechanical brackets and Slides X O O O O O Slot Filler X O O O O O Cable management tray X O O O O O Cable Comb O O O O O O Cables and power cords O O O O O O Replacement Doors X O O O O O Software/ Documentation CDs O O O O O O X indicates that the concentration of such hazardous/toxic substance in all the units of homogeneous material of such component is higher than the SJ/T11363-2006 Requirements for Concentration Limits. O indicates that no such substances are used or that the concentration is within the aforementioned limits. Brocade VDX 6710-54 Hardware Reference Manual 53-1002390-08 49 A 50 Environmental regulation compliance Brocade VDX 6710-54 Hardware Reference Manual 53-1002390-08 Index A accessing NTP server, 18 airflow reversible, 1 symbols, 31 warning, 31 B boot, 26 boot flash memory, 40 Brocade Network Advisor, 29 BSMI compliance statement (Taiwan), 42 C cable bending limit, 6 cable management, 6 Canadian complaiance statement, 42 CE compliance statement, 42 China (CCC) compliance statement, 43 China RoHS, 47 CLI, 29 clock set command, 18 clock timezone command, 17, 19 Brocade VDX 6710-54 Hardware Reference Manual 53-1002390-08 command clock set, 18 clock timezone, 17, 19 configure terminal, 13, 15 copy running-config startup-config, 16 fastboot, 25 interface management, 14 ip address, 14 ip address dhcp, 14 ip gateway-address, 14 ipv6 address autoconfig, 15 no diag post, 25 no ipv6 address autoconfig, 15 no ntp server, 18 no vcs enable, 16 ntp server, 17, 18 show clock, 18 show logging raslog, 26 show media, 28 show ntp status, 18 show running-config, 14 username, 13 vcs enable, 16 vcs vcs-id, 16 command line interface see CLI compact flash memory, 40 configuration date and time, 17 provide power, 8 serial connection, 12 switch IP address, 13 terminal emulator, 12 configuration modes, 11 configure terminal command, 13, 15 connecting Ethernet hubs, 19 workstations, servers, routers, 19 copy running-config startup-config command, 16 crossover cable, 19 51 D I data transmission ranges, 40 diagnostic tests, 28 distributed intelligence, 11 installation cabinet install, 8 items required, 7 options, 5 safety considerations, 5 standalone Brocade VDX 6710-54, 7 installing SFP or SFP+, 27 interface management command, 14 interpreting POST results, 26 inter-switch links, 20 ip address command, 14 ip address dhcp command, 14 ip gateway-address command, 14 ipv6 address autoconfig command, 15 ISL trunking, 20 items included with the Brocade VDX 6710-54, 5 E electrical considerations, 6 safety, 44, 46 EMC compliance, 47 environmental considerations, 6 requirements, 39 event date and time, 17 F facility requirements, 37 fans, 4 fastboot command, 25 FCC compliance statement (US), 41 Fibre Channel Association, xvi field-replaceable units see FRUs front panel LEDs, 21 FRUs airflow warning, 31 combined power supply and fan, replacing in VDX 6710-54, 32 removing and replacing, 31 G general specifications, 39 German compliance statement, 41 Gigabit NICs, 19 K KCC compliance statement (Republic of Korea), 41 L laser compliance, 44 LEDs, 3 activity, 21 interpretation, 23 location, 22 patterns, 23 port side, 21 VDX 6710-54 combined power supply and fan assembly, 33 local clock, 18 LOCL, 18 logging, date and time, 17 logical chassis, 11 M main memory, 40 maintenance, 27 management functions, 29 memory specifications, 40 52 Brocade VDX 6710-54 Hardware Reference Manual 53-1002390-08 N network connectivity, testing, 19 no diag post command, 25 no ipv6 address autoconfig command, 15 no ntp server command, 18 no vcs enable command, 16 NTP server access, 18 ntp server command, 17, 18 P physical dimensions, 37 platform components, 1 POST, 25 POST and boot specifications, 25 power cord statement (Japan DENAN), 42 power off, 21 power supplies, 4 specifications, 38 power-on, self-test see POST R rack considerations, 6 regulatory certifications, 47 regulatory compliance, 40 removal and replacement procedures, 31 replacing combined power supply and fan assembly in VDX 6710-54, 32 requirements environmental, 39 facility, 37 RTC battery, 44 S safety standards, 47 safety, electrical, 44, 46 setting date and time, 17 IP address using DHCP, 14 static IP address, 14 time zone, 19 SFP or SFP+ installation, 27 Brocade VDX 6710-54 Hardware Reference Manual 53-1002390-08 show clock command, 18 show logging raslog command, 26 show media command, 28 show ntp status command, 18 show running-config command, 14 Simple Network Management Protocol see SNMP SNMP, 29 software features, 2 specifications general, 39 memory, 40 power supplies, 38 static IP address IPv4, 14 IPv6, 14 straight-through cable, 19 switch capabilities, 1 management, 29 non-port side view, 4 port side view, 3 switch IP address, 13 static, 14 using DHCP, 14 synchronize local time using NTP, 18 T terminal emulator configuration, 12 testing network connectivity, 19 time and date, 17 time zone explanation, 17 setting, 19 transceivers direct-attach, 27 supported, 27 trunking group, 20 U username command, 13 UTP cable, 19 53 V VCCI compliance statement (Japan), 41 VCS, 1 vcs enable command, 16 VCS mode, 11 enable and disable, 15 VCS trunking, 20 vcs vcs-id command, 16 verifying operation, 8 virtual cluster switching see VCS W weight, 37 54 Brocade VDX 6710-54 Hardware Reference Manual 53-1002390-08