1
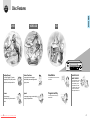
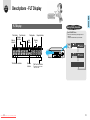
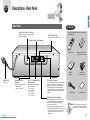
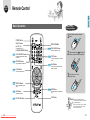
DVD PLAYER
DVD
ELECTRONICS
DVD / VIDEO - CD / CD
BEFORE USAGE CONNECTIONS
DVD-927
SAMSUNG ELECTRONICS AMERICA INC.
105 CHALLENGER ROAD RIDGEFIELD
PARK NJ 07660 U.S.A.
VIDEO-CD
CD
BASIC FUNCTIONS
AH68-10322A
Downloaded From Disc-Player.com Samsung Manuals
SERVICE
“FOR YOUR NEAREST SAMSUNG
SERVICE STATION DIAL
1-800-SAMSUNG”
3
5
9
11
13
15
19
21
How to set up Surround Sound
65
How to play a VIDEO-CD
How to use the Menu Function
How to use the Disc View Function
69
71
73
Disc type and characteristics
Maintenance and Storage
Troubleshooting Guide
Definition of Terms
Specifications
Audio & Subtitle Languages
Warranty
91
92
94
95
96
97
99
CD
How to play a CD
77
BASIC FUNCTIONS
Search and Skip Functions
To Perform Time or Chapter Search
Slow Motion and Step Playback
80
81
83
Display Function
Repeat Playback
84
85
To Program in desired order
To playback from the last stop point
87
89
SERVICE
1
Downloaded From Disc-Player.com Samsung Manuals
23
33
35
37
38
39
40
41
43
45
47
49
51
53
55
57
59
61
63
BASIC FUNCTIONS
Connections
How to Play a DVD
How to change to Another Title while in Play
How to change Audio
How to change Subtitle
How to change Angle
How to select Subtitle
How to use the On-Screen Menus
How to select Audio Languages
How to select the desired Subtitle
How to select the desired Screen Angle
How to change the SetUp Menu
How to set up Screen Menu Language
How to set up the Audio Language
How to set up the Subtitle Language
How to set up the Screen Angle Mark
How to set up the Parental Level
How to set up the Screen Ratios
How to set up Audio Output
BEFORE MAKING AREPAIR INQUIRY
CD
CONNECTIONS
VIDEO-CD
VIDEO-CD
Disc Features
Safety Instructions
Descriptions-Front Panel
Descriptions-FLT Display
Descriptions-Rear Panel
Remote Control
Controlling your TV with the Remote
Preparation before usage
DVD
DVD
BEFORE USAGE
BEFORE USAGE CONNECTIONS
Excellent Sound!
Clear Screen!
2
BEFORE
USAGE
Disc Features
VIDEO-CD
BEFORE USAGE
DVD
CD
STANDBY
DIMMER
POWER
SKIP/SEARCH
OPEN/CLOSE
Excellent Sound
Various Functions
Slow Motion
The Dolby Digital(AC-3) system
developed by Dolby Labs provides
crystal clear sound reproduction.
You can select various languages
(Audio/Subtitle) and screen angles while
enjoying movies.
An important scene can be viewed in
slow motion.
Screen
Repeat
Programmed Play
Both regular and
Widescreen(16:9) pictures can be
viewed.
You can repeat a song or movie simply by
pressing the Repeat button.
You can program tracks to play in
desired order.
3
Downloaded From Disc-Player.com Samsung Manuals
Parental Lock
Level Control
The parental lock control
allows users to set the
level necessary to prevent children from viewing harmful movies such
as those with violence,
adult subject matter, etc...
4
Safety Instructions
BEFORE
USAGE
CLASS 1
LASER PRODUCT
RISK OF ELECTRIC SHOCK.
DO NOT OPEN
CAUTION:
TO REDUCE THE RISK OF ELECTRIC SHOCK,
DO NOT REMOVE REAR COVER, NO USER SERVICEABLE PARTS INSIDE, REFER SERVICING TO QUALIFIED
SERVICE PERSONNEL.
safety and operating instructions should be read before
•Allthetheappliance
is operated.
RETAIN INSTRUCTIONS
safety and operating instructions should be retained for
•The
future reference.
CLASS 1 LASER PRODUCT
This DVD player is classified as a CLASS 1 LASER product.
Use of controls adjustments or performance of procedures other
than those specified herein may result in hazardous radiation.
HEED WARNINGS
warnings on the appliance and in the operating instructions
•Allshould
be adhered to.
FOLLOW INSTRUTIONS
DANGER
This symbol is intended to alert you to the presence of dangerous voltage within the product.
CAUTION
This symbol is intended to alert you to the presence of important
instructions accompanying the product.
CAUTION-INVISIBLE LASER RADIATION WHEN OPEN
AND INTERLOCK DEFEATED, AVOID EXPOSURE TO
BEAM.
SPECIAL NOTICE
Warning:
•This unit contains no user serviceable parts.
•Never remove covers unless qualified to do so.
unit contains dangerous voltages. Always remove main
•This
plug from the socket before performing any service operation
and when not in use for a long period.
Important:
WARNING
To reduce the risk of fire or electric shock, do not expose this
appliance to rain or moisture.
•
This unit is designed for your enjoyment in your home. We
cannot be liable for the quality of the unit if you use it for commercial use.
IMPORTANT NOTICE
NOTE TO CATV SYSTEM INSTALLER;
reminder is provided to call the CATV system installer’s
•This
attention to article 820-40 of the NEC provides guidelines for
•All operating and use instructions should be followed.
WATER AND MOISTURE
not use this video product near water, for example, near a
•Do
bathtub, wash bowl, kitchen sink, or laundry tub, in a wet basement, or near a swimming pool, and the like.
OVERLOADING
•
Do not overload wall outlets and extension cords as this can
result in the risk of fire or electric shock.
VENTILATION
Slots and openings in the cabinet are provided for ventilation and to ensure reliable operation of the video product
and to project it from overheating these openings must
not be blocked or covered.
The openings should never be blocked by placing the
video product on a bed, sofa, rug, or other similar surface.
This video product should never be placed near or over a
radiator or heat register. This video product should not be
placed in a built-in installation such as a bookcase or rack
unless proper ventilation is provided or the manufacturer’s
instructions have been followed.
•
BEFORE USAGE
READ INSTRUCTIONS
CAUTION
POWER CORD PROTECTION
cords should be routed so that they are not likely
•Power-supply
to be walked on or pinched by items placed upon or against
them, paying particular attention to cords at plugs, convenience
receptacles, and the point where they exit from the appliance.
CLEANING
this video product from the wall outlet before cleaning.
•Unplug
Do not use liquid cleaners or aerosol cleaners.
Use a damp cloth for cleaning.
LIGHTNING
For added protection of this video product receiver during
a lightning storm, or when it is left unattended and unused
for long periods of time, unplug it from the wall outlet and
disconnect the antenna or cable system. This will prevent
damage to the video product due to lightning and powerline surges.
•
OBJECT AND LIQUID ENTRY
Never push objects of any kind into this product through
openings as they may touch dangerous voltage points or
short-out parts that could result in a fire or electric shock.
Never spill liquid of any kind on the video product.
•
ACCESSORIES
not place this video product on an unstable cart, stand, tri•Do
pod, bracket, or table. The video product may fall, causing serious injury to a child or adult, and serious damage to the appliance.
Use only with a cart, stand, tripod, bracket, or table recommended by the manufacturer, or sold with the video product.
Any mounting of the appliance should follow the manufacturer’s
instructions and should use a mounting accessory recommended by the manufacturer.
proper grounding and, in particular, specifies that the cable
ground shall be connected to the grounding system of the
building, as close to the point of cable entry as practical.
5
Downloaded From Disc-Player.com Samsung Manuals
6
OUTDOOR ANTENNA GROUNDING
•
outside antenna is connected to the antenna terminal, be
•Ifsurean the
antenna system is grounded so as to provide some
An appliance and cart combination should be moved with care.
Quick stops, excessive force, and uneven surfaces may cause
the appliance and cart combination to overturn.
POWER SOURCES
video product should be operated only from the type of
•This
power source indicated on the marking label.
If you are not sure of the type of supply to your home, consult
your appliance dealer or local power company.
For video products intended to operated from battery power, or
other sources, refer to the operating instructions.
BEFORE USAGE
CART
protection against voltage surges and built-up static charges.
In the U.S.A section 810 of the National Electrical Code.
ANSI/NFPA No. 70-1984, provides information with respect to
proper grounding of the mast and supporting structure, grounding of the lead-in wire to an antenna discharge unit, size of
grounding conductors location of antenna discharge unit, connection to grounding electrodes, and requirements for the
grounding electrode. See the below figure.
•
ANTENNA
LEAD IN WIRE
ANTENNA
DISCHARGE UNIT
(NEC SECTION, 810~20)
ATTACHMENTS
POWER LINES
outside antenna system should not be located in the vicinity
•An
of overhead power lines or other electric light or power circuits,
or where it can fall into such power lines or circuits.
When installing an outside antenna system, extreme care
should be taken to keep from touching such power lines or circuits as contact with them might be fatal.
not use attachments not recommended by the video prod•Do
uct manufacturer as they may cause hazards.
ELECTRIC
SERVICE
EQUIPMENT
GROUNDING CONDUCTORS
(NEC SECTION 810~21)
GROUND CLAMPS
POWER SERVICE GROUNDING
ELECTRODE SYSTEM
(NEC ART 250, PART H)
SERVICING
not attempt to service this product yourself as opening or
•Do
removing covers may expose you to dangerous voltage or
other hazards.
Refer all servicing to qualified service personnel.
SAFETY CHECK
c. If the video product has been exposed to rain or water.
completion of any service or repairs to this video product,
•Upon
ask the service technician to perform safety checks to deter-
d. If the video product does not operate normally by following
the operating instructions.
Adjust only those controls that are covered by the operating
instructions as an improper adjustment of other controls may
result in damage and will often require extensive work by a
qualified technician to restore the video product to its normal
operation.
POLARIZATION
•
video product is equipped with a polarized alternating cur•This
rent line plug (a plug having one blade wider than the other).
REPLACEMENT PARTS
DAMAGE REQUIRING SERVICE
•
this video product from the wall outlet and refer servic•Unplug
ing to qualified service personnel under the following conditions.
This plug will fit into the power outlet only one way. This is a
safety feature. If you are unable to insert the plug fully into the
outlet, try reversing the plug.
If the plug should still fail to fit, contact your electrician to
replace your obsolete outlet.
Do not defeat the safety purpose of the polarized plug.
7
Downloaded From Disc-Player.com Samsung Manuals
When replacement parts are required, be sure the service
technician has used replacement parts specified by the manufacturer or having the same characteristics as the original part.
Unauthorized substitutions may result in fire, electric shock or
other hazards.
mine that the video product is in proper operating condition.
a. When the power-supply cord or plug is damaged.
b. If liquid has been spilled, or objects have fallen into the
video product.
e. If the video product has been dropped or the cabinet has
been damaged.
f. When the video product exhibits a distinct change in performance. This indicates a need for service.
8
BEFORE
USAGE
Descriptions - Front Panel
BEFORE USAGE
Front Panel
Refer to page mentioned
POWER/STANDBY Indicator
the unit is first plugged in, the indicator lights.
•When
When power is pressed on, the indicator goes out.
Display
Remote Control
Sensor
11~12
FLT Brightness
Control Button
12
•To control the brightness of the display
PLAY/PAUSE Button
DIMMER
STANDBY
POWER
SKIP/SEARCH
SKIP/SEARCH
OPEN/CLOSE
POWER Button
•POWER ON/OFF
Disc Tray
•
Place DVD, Video-CD, or CD
here for playback.
OPEN/CLOSE Button
•To open or close the tray.
STOP Button
SKIP/SEARCH Buttons
80
•To skip or search scenes or music.
9
Downloaded From Disc-Player.com Samsung Manuals
10
BEFORE
USAGE
Descriptions - FLT Display
BEFORE USAGE
FLT Display
Adjusting Display Illumination
Press 'DIMMER' Button.
Title Indicator Track Indicator
Chapter
Indicator
Memory
Indicator
Total play time
once to dim the display. Press again to turn the
•Press
display off.
Repeat Indicator
To return to normal illumination, press a third time.
Angle
Indicator
Remaining
Time
DIMMER
ON/STAND BY
POWER
DIMMER
SKIP/SEARCH
OPEN/CLOSE
Title/Track No. Indicator
11
Downloaded From Disc-Player.com Samsung Manuals
Operation
Indicator
Title/Track No. Indicator
when the disc contains
•Lights
more than 14 titles.
12
BEFORE
USAGE
Descriptions - Rear Panel
BEFORE USAGE
Rear Panel
Accessories
Optical Digital Audio Out Terminal
•
Connect to audio system with optical digital
audio input connector.
Video Out Terminal
purchase accessories, please contact SAMSUNG at
* To
1-800-SAMSUNG.
•Connect to video in terminal on TV.
B
at
te
ry
2 Channel Audio Out Terminals
te
at
B
ry
Remote Control
Batteries (AAA Dry-Cell
1.5V) for Remote control
T
Owner's
Warr
anty
Card
Manual
Owner's
Manual
Power Cord
•
120V only.
Digital Audio Out
Terminal
to audio system with
•Connect
coaxial digital
audio input connector.
AC-3 5.1 Channel Audio
Out Terminals
•
•
Connect 5.1 Channel Amplifier.
R/R : Rear Right
R/L : Rear Left
S/W : Subwoofer
C/T : Center
F/R : Front Right
F/L : Front Left
Video/Audio
Connection Cable
S-Video Out Terminal
The S (separate)video output connector separates
the color (C) and luminance (Y) signals before
transmitting them to the TV set in order to achieve
a sharper picture. Use the S-video cable When
connecting the player to a TV set equipped with an
S-video input connector for the best picture clarity
possible.
S-Video Cable
Registration Card
Component Video Out terminals
The component video output connector outputs
the color difference signals (Pr,Pb) and luminance
signal (Y) separately in order to achieve high
fidelity in reproducing colors.
The description of the component video input
connectors may differ depending on the TV set or
monitor (e.g. Y/Pr/Pb, Y/R-Y/B-Y, Y/Cr/Cb and so
on). Refer to the instruction manual of your TV
set for details.)
•
13
Downloaded From Disc-Player.com Samsung Manuals
Note •Be sure to select the proper audio and
video output in the setup menu before
operating the unit. Refer to pages 49-50.
14
BEFORE
USAGE
Remote Control
BEFORE USAGE
Basic Operations
Remote Control
Battery Installation
1
Open battery cover in the direction
shown.
2
Carefully check the Polarity + – of batteries and
load them correctly into the battery compartment.
3
Close battery cover in the
direction shown.
POWER Button
SELECT Buttons
(for DVD, TV)
OPEN / CLOSE Button
To operate DVD or TV.
81~82
CHANNEL/NUMBER Buttons
To search for a position on a disc.
VOL.CONTROL Button
83
To control the sound volume of analog
AC-3 output.
To advance playback one frame at
a time.
PROGRAM Button
To program selections in desired order.
SLOW Button
To enjoy video in slow motion during DVD /
VIDEO - CD playback.
ry
te
at
B
at
CLEAR Button
B
82,87
83
ry
87~88
STEP Button
te
65
TIME SEARCH Button
To cancel a memorized program.
B
SEARCH Buttons
te
B
at
To search through tracks easily and
rapidly.
80
89
SKIP Buttons
ry
ry
te
at
80
85~86
REPEAT Button
To skip selections on discs.
To repeat the entire disc, or a desired title or
track.
PLAY/PAUSE Button
STOP Button
LAST MEMORY
Note •Remove the batteries from the
remote control if it will not be used for
an extended period.
After you press the TV button, certain
DVD function buttons will not work.
Press the DVD button.
•
15
Downloaded From Disc-Player.com Samsung Manuals
16
BEFORE
USAGE
Remote Control
PREV. CH
37
Press to select the previous channel on the TV.
AUDIO Selector
To select Audio when playing a DVD disc.
38
41~48,71
TV/VIDEO Selector
To select TV or VIDEO.
49~66
1.Check the polarity + – of the batteries
(Dry-Cell)
2.Check if the batteries are drained.
3.Check if remote sensor is blocked by obstacles.
4.Check if there is any fluorescent lighting
nearby
SET UP/MUTE Selector
To bring up the setup menu or to mute the TV sound temporarily.
ANGLE Selector
To change the screen angle.
81~82
22
If remote doesn’t operate properly:
DISPLAY Button
To see the current DISC mode.
39
TV POWER Button
SUBTITLE Selector
To select the sub title when playing
a DVD disc.
84
22
BEFORE USAGE
Buttons for TV
Buttons for DVD
CHAPTER Button
To search chapters.
CHANNEL Selector
MENU Button
VOLUME CONTROL Buttons
To change audio, subtitle, angle, etc...
35~36,73
TITLE Button
Note •When ‘!!’ appears while a button is being
35~65
operated, it means that the function does
not work the disc corrently playing.
DIRECTION Buttons
When using the menus, press these buttons when
you want to move to desired position.
35~66
ENTER Button
To play a selected title.
43~66
RETURN Button
LAST MEMORY
To return to a previous menu.
40
SUBTITLE Button
To turn subtitles on or off.
17
Downloaded From Disc-Player.com Samsung Manuals
18
BEFORE
USAGE
Controlling your TV with the Remote
This remote control works not only with Samsung TVs, but also with other
manufacturer's TVs.
BEFORE USAGE
Programming TV-List of Compatible TV's
To Control a Compatible TV
To program your DVD remote to control a specific brand of TV;
Ex1) for Samsung TVs
•Press 0 , 1
1
Turn the TV on and point the remote at the TV.
2
Press and hold down
key when pressing TV button.
Keep
pressing
. At the same time, press the appropriate buttons respectively according to the chart below.
When the TV turns off, programming is completed. The remote then controls the TV as shown in the chart.
A “YES” indicates the remote button works as marked, a “NO” indicates the button does not work. Any other functions are
marked.
(For example: for an Emerson TV,
works for DISPLAY.)
It will not operate all TV’s made by these manufacturers. If your TV does not respond to any of the button combinations,
the TV probably cannot be controlled by this remote control. The DVD remote will now control certain functions of your TV
depending on the type of TV.
Ex2) for Panasonic TVs
•Press 1 , 2
key when pressing TV button.
Press Button ¢”
TV Brand ¢”Samsung Sharp
Keep
pressing
Select ¡
old
new
YES
YES
YES
YES
YES
YES
YES
YES
YES
YES
YES
YES
Sony
Magnavox Sanyo Goldstar RCA/GE Goldstar Toshiba Hitachi J V C
new
YES
YES
YES
YES
YES
YES
YES
YES
YES
YES
YES
YES
YES
YES
YES
YES
YES
NO
YES
YES
YES
YES
YES
NO
Panasonic 1
old
YES
A-K
YES
YES
YES
YES
YES
YES
YES
YES
YES
NO
YES
YES
YES
YES
YES
NO
YES
YES
YES
YES
YES
NO
YES
YES
NO
YES
YES
YES
YES
YES
NO
YES
YES
YES
To operate DVD while watching TV
• Press DVD button, then
Press Button ¢”
press the function you
want.
TV Brand ¢”Mitsubishi S amsung Samsung Sharp Zenith Goldstar Daewoo Sanyo Emerson
Select ¡
YES
YES
NO
YES
YES
YES
19
Downloaded From Disc-Player.com Samsung Manuals
new
Latin
old
YES
YES
YES
YES
YES
YES
YES
YES
NO
YES
YES
NO
YES
YES
NO
YES
YES
NO
Sharp S amsung Panasonic 2
Latin
YES
YES
YES
YES
YES
NO
YES
YES
NO
YES
YES
NO
Latin new
YES
A-K
NO
YES
YES
YES
YES YES YES
YES YES YES
Y E S DISPLAY N O
YES YES YES
YES YES YES
YES
NO
NO
YES
YES
YES
YES
YES
NO
YES
YES
NO
YES
YES
YES
20
Preparation before usage
BEFORE
USAGE
For better performance be sure to read the following carefully.
BEFORE USAGE
T
OPTICAL
DIGITAL
AUDIOOUT
DIGITAL
AUDIOOUT
ANALOG AUDIO OUT
VIDEO OUT
COMPONENT VIDEO OUT
S-VIDEO
OUT
Connection to
AC outlet
Connection to Audio
Connection to TV
• Connections differ
depending on the Amplifier.
(L)
CD/DVD or
AUX IN (R)
VIDEO IN
Connect TV & Audio to the unit as
shown in picture above.
Refer to pages 23-30 for more detailed
connections(including AC-3).
DISC
Analog
Audio Out
DVD
VIDEO-CD
CD
2 Channel
(R1,L1)
48/96KHz
sampling
44.1KHz
sampling
44.1KHz
sampling
5.1Channel
(R/R,R/LC/T,S/W,F/R,F/L)
48KHz
sampling
48KHz
sampling
_
_
44.1KHz
sampling
44.1KHz
sampling
48KHz
sampling
44.1KHz
sampling
44.1KHz
sampling
Digital Audio Out
Optical Digital Audio Out
For DVDs, Sound having 96KHz Sampling is not output from the Optical
Digital Output and Digital Audio Output connector.
21
Press power button.
Power is turned on while
Power/STANDBY indicator
light goes out.
•
DVD-907 Audio Output Specifications
OUTPUT
1
DVD Power On
Downloaded From Disc-Player.com Samsung Manuals
2
TV Power On &
Selection
Press TV power button &
TV/VIDEO Selector and select
Video function.
TV
Press audio power button &
select desired input.
Example: CD, DVD or AUX.
•
AUDIO
Note• AUTOPOWEROFF FUNCTION
This unit has an Automatic
power off feature. If the unit is
left 30 minutes in stop mode
without any button being
pressed, the power will automatically shut off.
3
Audio Power On &
Input Selection
TV/VIDEO
VIDEO
22
Connections
CONNECTIONS
This shows you how to connect the DVD to a TV or Audio system.
Please make sure that the power switches of the player and other equipment are OFF
before connecting.
Connecting to an
Audio System
T
OPTICAL
DIGITAL
AUDIOOUT
DIGITAL
AUDIOOUT
ANALOG AUDIO OUT
VIDEO OUT
COMPONENT VIDEO OUT
S-VIDEO
OUT
CONNECTION
Connecting to
a TV
T
OPTICAL
DIGITAL
AUDIOOUT
DIGITAL
AUDIOOUT
ANALOG AUDIO OUT
VIDEO OUT
COMPONENT VIDEO OUT
S-VIDEO
OUT
T
T
OPTICAL
DIGITAL
AUDIOOUT
DIGITAL
AUDIOOUT
ANALOG AUDIO OUT
VIDEO OUT
COMPONENT VIDEO OUT
S-VIDEO
OUT
OPTICAL
DIGITAL
AUDIOOUT
DIGITAL
AUDIOOUT
ANALOG AUDIO OUT
VIDEO OUT
COMPONENT VIDEO OUT
S-VIDEO
OUT
VIDEO IN
L
CD or
AUX IN
AUDIO IN
L
R
R
How to use the TV
1
Turn on the TV.
2
Set the TV/Video button to the
Video position.
•Input signal will appear.
How to use the Audio System
1
Turn on your Audio
System.
2
Select the AUX or CD button
on your Audio system.
or AUX IN is selected
•CD
depending on the input you use
on the Audio system.
VIDEO
23
Downloaded From Disc-Player.com Samsung Manuals
24
Connections
CONNECTIONS
These connections will provide superior sound and video reproduction.
AC-3 5.1 channel
and Y,Pr,Pb Video
connection
* Component signals(Y, Pr, Pb) are output from the Y,Pr,Pb jacks.
T
OPTICAL
DIGITAL
AUDIOOUT
DIGITAL
AUDIOOUT
ANALOG AUDIO OUT
VIDEO OUT
COMPONENT VIDEO OUT
CONNECTION
S-VIDEO
Connection
Manufactured under license by Dolby Laboratories Licensing Corporation.
“Dolby”, “AC-3”, “Pro Logic” and the double-D symbol are trademarks of
Dolby Laboratories Licensing Corporation.
S-VIDEO
OUT
with TV
* Connect
having S-VIDEO IN.
T
OPTICAL
DIGITAL
AUDIOOUT
DIGITAL
AUDIOOUT
ANALOG AUDIO OUT
VIDEO OUT
COMPONENT VIDEO OUT
S-VIDEO
OUT
T
OPTICAL
DIGITAL
AUDIOOUT
DIGITAL
AUDIOOUT
ANALOG AUDIO OUT
VIDEO OUT
COMPONENT VIDEO OUT
S-VIDEO
OUT
Amplifier with
5.1 channel analog Input
L
AUDIO IN
R
center speaker
S-VIDEO IN
Using the S-Video connection plug.
Pr
front
speaker
(left)
How to use the TV
1
Turn on the TV.
2
Pb
Y
front
speaker
(right)
TV or MONITOR with
Y,Pr,Pb VIDEO in
Select 'S-Video' mode by pressing the
TV/Video button to the Video positon.
sub-woofer
for supporting
bass sound.
appear depending
•’onS-Video’'will
each TV.
S-VIDEO
rear
speaker
(left)
25
Downloaded From Disc-Player.com Samsung Manuals
rear
speaker
(right)
26
CONNECTIONS
Connections
Manufactured under license by Dolby Laboratories Licensing corporation. “Dolby”, “AC-3”, “Pro Logic”, and the double-D symbol are
trademarks of Dolby Laboratories Licensing Corporation.
AC-3 5.1 channel and
S-Video connection
* Normal stereo amplifier and S-VIDEO connection. (2-channel)
T
OPTICAL
DIGITAL
AUDIOOUT
DIGITAL
AUDIOOUT
CONNECTION
* AC-3 5.1 channel connection.
Stereo amplifier and
S-Video connection
(2-channel)
T
ANALOG AUDIO OUT
VIDEO OUT
COMPONENT VIDEO OUT
S-VIDEO
OUT
Amplifier with
5.1 channel analog Input
OPTICAL
DIGITAL
DIGITAL
AUDIOOUT
AUDIOOUT
ANALOG AUDIO OUT
VIDEO OUT
COMPONENT VIDEO OUT
S-VIDEO
OUT
Stereo amplifier
center speaker
front
speaker
(left)
front
speaker
(right)
TV or MONITOR
with S-VIDEO in
rear
speaker
(left)
27
Downloaded From Disc-Player.com Samsung Manuals
speaker
(left)
speaker
(right)
sub-woofer
for supporting
bass sound.
rear
speaker
(right)
28
CONNECTIONS
Connections
AC-3 decoder amplifier
digital connection
Dolby Pro-Logic
Connection
* Either the Optical Digital Audio Out or the Digital Audio Out should be connected to the AC-3 decoder
amplifier.
* The Optical Digital Audio Out and Digital Audio Out both output the same signal.
T
T
OPTICAL
DIGITAL
AUDIOOUT
DIGITAL
AUDIOOUT
CONNECTION
* Either the Optical Digital Audio Out, Digital Audio Out or Analog Audio Out (R/L) should be connected
to the Dolby Pro-Logic amplifier.
* The Optical Digital Audio Out and Digital Audio Out both output the same signal.
ANALOG AUDIO OUT
VIDEO OUT
COMPONENT VIDEO OUT
S-VIDEO
OUT
Amplifier equipped with
'Dolby Pro-Logic'.
OPTICAL
DIGITAL
AUDIOOUT
DIGITAL
AUDIOOUT
ANALOG AUDIO OUT
VIDEO OUT
COMPONENT VIDEO OUT
S-VIDEO
OUT
Amplifier with 5.1
channel digital input.
center speaker
center speaker
front
speaker
(left)
left
speaker
front
speaker
(right)
right
speaker
sub-woofer
for supporting
bass sound.
surround
speaker
29
Downloaded From Disc-Player.com Samsung Manuals
rear
speaker
(left)
rear
speaker
(right)
30
DVD
PLAYBACK
DVD Playback
DVD Features
DVD contains excellent sound and video
due to the AC-3 digital audio and MPEG2
video systems.
DVD makes your home feel like a movie
theater.
DVD
DVD disc contains audio and video up to
•The
135 minutes (single side, single layer disc) of
playing time.
Various screen and audio functions can be
easily selected through the on-screen menu.
•
1
DVD LOGO
Playback Region
Number
This unit will only play discs with the Playback
Region Number 1 (This unit can’t play a disc
which has a different playback region number.)
STANDBY
DIMMER
POWER
SKIP/SEARCH
OPEN/CLOSE
31
Downloaded From Disc-Player.com Samsung Manuals
32
How to Play a DVD
DVD
PLAYBACK
Press your TV and Audio system POWER Buttons ON.
Depending on the disc, some DVD playback functions may not operate.
1
TV / AUDIO selection
How to play DVD
Select Video mode by pressing
TV/VIDEO Button on the TV.
1
mode may be marked as
•Video
input.
turns on, the tray opens
•Power
and the STANDBY indicator light
Press POWER Button and
OPEN/CLOSE Button.
2
Load the DVD disc.
•Load the disc label-side up.
3
Press PLAY/PAUSE
Button.
tray closes and playback
•The
begins.
goes out.
DVD
LAST MEMORY
Select Audio input CD, DVD or Aux on
your decoder/amp
audio amplifier is different.
•Each
Please refer to your audio amplifier
owner's manual.
3
LAST
MEMO
RY
To Pause Playback
To STOP Playback
To Remove Disc
Press PLAY/PAUSE Button.
Press STOP Button.
Press OPEN/CLOSE Button.
•
STANDBY
To play again, press PLAY/PAUSE
Button once again.
DIMMER
POWER
SKIP/SEARCH
OPEN/CLOSE
LAST MEMORY
play is stopped, the unit records the point where
Note •When
STOP was pressed(RESUME function). Press PLAY again,
and play will resume from this point. When the tray is
opened or STOP is pressed again, the RESUME function
will be cleared.
If the unit is left in the STOP mode for more than one
minute without any user interaction, a screensaver will be
activated, and the TV screen will fade in and fade out
repeatedly. Press PLAY button to resume normal play.
If the unit is left for 30 minutes in pause during play or
menu, it will be stopped.
•
33From Disc-Player.com Samsung Manuals
Downloaded
•
34
DVD
PLAYBACK
How to Change to another Title while in Play
If there are two or more titles on a disc, this function allows you to select another title.
1
Press TITLE Button.
can see the title menu that is
•You
encoded on the disc.
2
Move to desired title by
using UP or DOWN Button.
3
ex) You want to see 'Africa the
Serengeti'
Press ENTER Button.
•Selected title will play.
What is a Title?
Each movie is a title and a title
is composed of a number of
chapters.
the UP/DOWN Buttons until
•Press
the desired title is highlighted.
DVD
1
2
3
No screen even after pressing
Title Button?
It may be that no title menu is listed on the disc and
only one movie is present.
35
Downloaded From Disc-Player.com Samsung Manuals
36
DVD
PLAYBACK
How to change Audio
DVD
PLAYBACK
How to Change Subtitle
You can select a desired language quickly and easily with the AUDIO Button.
If a menu is encoded on the disc, you can also select by use of the MENU Button
You can select a desired subtitle language easily with the SUBTITLE Button.
If a menu is encoded on the disc, you can also select by use of the MENU Button.
43~44
45~46
Press AUDIO Button.
Press SUBTITLE Button.
the button is pressed, English,
•When
French and Spanish will appear in
the button is pressed, English,
•When
French and Spanish will appear in
order.
order.
DVD
Note : This function depends on what languages
are encoded on the disc.
Note : This function depends on what languages
are encoded on the disc.
LAST
MEMO
RY
LAST
How to have the same audio
language come up whenever
you play back a DVD.
53~54
37
Downloaded From Disc-Player.com Samsung Manuals
Please refer to “How to set up the
Audio Language”.
MEMO
RY
How to have the same subtitle
language come up whenever
you play back a DVD.
Please refer to pages 55~56 for more information.
38
DVD
PLAYBACK
How to change Angle
By pressing the angle Button, you can view the picture from a variety of angles.
DVD
PLAYBACK
How to Select Subtitle
If you want to see the subtitle while watching a movie, follow the steps below.
47~48
Check to see if an ‘ANGLE’ mark is present.
When an ‘ANGLE’ mark is
shown, press ANGLE Button.
Press SUBTITLE ON/OFF button.
the Button is pressed,
•When
numbers1➔ 2➔ 3➔ 4➔ ... will be select-
button turns the subtitles on and
•The
off. “SUBTITLE : ON” or “SUBTI-
ed repeatedly and the angle will be
changed.
TLE:OFF” will appear on the display.
DVD
LAST
MEMO
LAST
ME
RY
Note
39
Downloaded From Disc-Player.com Samsung Manuals
MORY
function will only work with discs on
•This
which angles have been encoded.
40
How to use the On-Screen Menus
DVD
MENU
Various Menus are listed on a DVD, and menus difter from disc to disc.
You can see the menu screen only when a menu is contained on the disc.
To see MENU
1
Press MENU Button while in
play mode.
To move MENU
2
Press UP or DOWN
Buttons.
To select MENU
3
Press ENTER Button after making
your selection.
DVD
1
43~44
AUDIO
selection
2
3
Note •Menus will appear different
45~46
from disc to disc.
LAST
SUBTITLE
selection
MEMO
RY
To make menu screen disappear.
Press MENU
Button until menu
screen disappears.
When menu
appears as below
•Press <L, R> button
to move to the left or
right.
47~48
ANGLE
selection
Note •Depending on the disc, the menu
screen may not disappear when the
menu button is pressed. You may
have to press a different button.
41
Downloaded From Disc-Player.com Samsung Manuals
42
Menu listed on the disc
How to select Audio Languages
DVD
MENU
You can select one of the audio soundtrack languages recorded on the disc by
using the menu button.
Depending on the disc, the menus on the screen may look different.
Ex) When selecting FRENCH.
1
3
Press MENU Button
while in play mode.
Press the UP or DOWN
Button to move to
“FRENCH”
4
Press the Enter Button
•Title plays back in FRENCH
DVD
2
Press ENTER Button.
1
3
2
4
LAST
MEMO
RY
If you want to return to
the original menu
Note •This function depends on which
languages are encoded on the disc.
43
Downloaded From Disc-Player.com Samsung Manuals
Press the RETURN Button.
•
Depending on the disc, the
RETURN Button may not work.
Note •Up to eight audio languages can be
recorded on a DVD disc.
44
Menu listed on the disc
How to select the desired Subtitle
DVD
MENU
You can select the desired subtitle language easily from the menu recorded on the disc.
Depending on the disc, the menus on the screen may look different.
Ex) When selecting GERMAN.
1
Press MENU Button while in play
mode.
4
Press the UP or DOWN Button
to move to ‘GERMAN’.
5
Press the ENTER
Button.
subtitle language changes
•The
to GERMAN.
Press Up or DOWN Button
to move to SUBTITLE.
3
Press the ENTER
Button.
DVD
2
1
2
4
3
5
LAST
MEMO
RY
If you want to return to
the original menu
Press the RETURN Button.
Note •The DVD subtitle can contain
up to 32 languages.
on the disc, the
•Depending
RETURN Button may not work.
45
Downloaded From Disc-Player.com Samsung Manuals
46
Menu listed on the disc
How to select the desired Screen Angle
DVD
MENU
You can see different angles recorded on the disc.
Depending on the disc, the menus on the screen may look different.
Ex) How to select the 'Front angle'
1
Press the MENU Button
while in play mode.
4
Press the UP or DOWN
Button to move to
“FRONT”.
5
Press the ENTER
Button.
•Title plays back “FRONT” angle.
DVD
2
Press UP or DOWN Button to move to ‘ANGLE’
3
Press the ENTER
Button.
1
2
4
3
5
LAST
MEMO
RY
If you want to return to the
original menu
Press the RETURN Button.
on the disc, the RETURN Button
•Depending
may not work.
47
Downloaded From Disc-Player.com Samsung Manuals
Note •Angles must be recorded on the disc
in order to use the screen angle
function.
48
How to change the SETUP MENU
DVD
MENU
The SETUP MENU allows you to preset menu value. Once this
Operation is performed, the DVD will playback with the same menu values each
time it is turned on.
How to view the SETUP MENU
1
Press SETUP/MUTE Button
when in Stop mode.
To move within the SETUP
MENU(up/down)
2
To make a selection
3
Press the UP or DOWN
Button.
Press the ENTER Button.
DVD
1
To make the set up screen
disappear after setting up
2
Press SET UP Button.
usage of Menu
UP/DOWN Button
3
LAST
usage of
ENTER Button
MEMO
RY
Note •Depending on the disc, some
SETUP MENU selections
may not work.
It is recommended that you
perform all setups using the
“SETUP MENU” before
loading a disc.
•
Set up of the
Menu Language
Set up of
the Subtitle
Language
49
Downloaded From Disc-Player.com Samsung Manuals
51~52
55~56
Set up of the
Audio Language
Set up of the
Screen Angle
Mark
53~54
57~58
Set up of
the Parental Level
Set up of
the Audio Output
59~60
Set up of
the Screen Ratios
61~62
63~64
Set up of
the surround Sound
65~66
50
How to set up Screen
Menu Language
DVD
SET-UP
You can select the menu language recorded on the disc.
Ex) For instance, setting up in SPANISH.
1
Press SET UP/MUTE Button
when in Stop mode.
4
Press UP or DOWN Button
to select ‘SPANISH’.
5
Press the ENTER Button.
1
2
4
3
5
LAST
2
Press UP or DOWN Button
to move to Menu.
3
Press the ENTER
Button.
MEMO
RY
Note •If the selected menu language is
not recorded on the disc, the
original pre-recorded language is
selected.
51
DVD
SPANISH is selected and the
•screen
returns to SETUP MENU.
Downloaded From Disc-Player.com Samsung Manuals
How to return to menu
screen during set up.
Press RETURN Button.
52
How to set up the Audio
Language
DVD
SET-UP
If you set up the audio language in advance, you can watch movies
with pre-selected audio. You don't need to set up audio every time
you watch a movie.
Ex) For instance, setting up in SPANISH.
1
Press the SET UP/MUTE
Button when in Stop mode.
4
Press the UP or DOWN
Button to select ‘SPANISH’.
5
Press the ENTER Button.
is selected and the
•SPANISH
screen returns to SETUP MENU.
DVD
1
2
Press the UP or DOWN
Button to select Audio.
2
4
3
Press the ENTER
Button.
3
5
Press SETUP Button
when done.
LAST
MEMO
RY
Note
•If the selected audio language is not
recorded on the disc, the original
pre-recorded audio language is
selected.
53
Downloaded From Disc-Player.com Samsung Manuals
How to return to menu
screen during set up.
Press RETURN Button.
54
How to set up the Subtitle
Language
DVD
SET-UP
If you set up the subtitle language in advance,
it will come up automatically every time you watch a movie.
Ex) For instance, setting up in SPANISH.
1
Press SET UP/MUTE Button when in
stop mode.
4
Press the UP or DOWN Button to
select ‘SPANISH’.
5
Press the ENTER Button.
1
2
4
3
5
LAST
2
Press the UP or DOWN
Button to select 'subtitle'.
3
Press the ENTER Button.
Press SETUP Button
when done.
MEMO
RY
Note
•If the selected subtitle is
not recorded on the disc,
the original pre-recorded
Subtitle is selected.
55
Downloaded From Disc-Player.com Samsung Manuals
DVD
is selected and the screen
•SPANISH
returns to SETUP MENU.
How to return to menu
screen during set up.
Press RETURN Button.
56
How to set up the Screen
Angle Mark
DVD
SET-UP
This function allows you to turn the screen angle mark on or off in order to view various screen angles.
Ex) Setting up the ANGLE mark.
1
Press the SET UP/MUTE Button
when in stop mode.
4
Press UP or DOWN Button
to select ‘ON’.
5
Press the ENTER Button.
is selected and the screen
•‘ON’
returns to SETUP MENU.
1
2
Press the UP or DOWN
Button to move to angle
mark.(Check to see if the ANGLE
MARK is ON')
2
4
3
If not, press the
ENTER Button.
3
5
LAST
Press SETUP Button
when done.
MEMO
RY
Once you set up as above,
can change the screen angle
•You
with the ANGLE or MENU Button
when the disc is encoded with
screen angles.
37,47~48
Downloaded From Disc-Player.com Samsung Manuals
57
Note
DVD disc is encoded
•Ifwithyourscreen
angles, “
”
will be displayed when the
screen angle mark is set to
‘ON’.
How to return to menu
screen during set up.
Press the RETURN Button.
58
DVD
SET-UP
How to set up the Parental Level
The Parental Level control allows users to set the level necessary to prevent children
from viewing unsuitable movies such as those with violence, adult subject matter, etc...
There are up to 8 parental levels on a disc and they can be used to prevent the viewing of
certain movies. For example, Level 1 is the “Kids Safe” level and is the most restrictive.
Only youth oriented movies will be played back when the player is set to Level 1. Level 8
is the “Adult” level and is the least restrictive. All types of movies will play when the
player is set to this level.
(When the correct password has
been entered and you want to
change PARENTAL LEVEL)
(When the correct password has
been entered and you want to
change PASSWORD)
EX)For instance Setting up in LEVEL6
1
2
4 4’
1
Press SET UP/MUTE button
when in stop mode.
2
Press UP or DOWN Button
to move to PARENTAL.
Move to the PARENTAL LOCK
by using the UP/DOWN button
and press the ENTER button.
4
Move to LEVEL 6 by using
the UP or DOWN button
and press ENTER button.
5
•When the player is set to this level,
3
Press the ENTER button
and enter the 4 digit
password by pressing
the 0-9 button.
discs rated above Level 6 will not play.
4’
5’
Move to PASSWORD CHANGE
by using the UP or DOWN button
and press ENTER button.
Enter the new password.
entering the new password, re-enter
•itAfter
onemore time to make sure the password
works.
LEVEL6
3
5 5’
LAST
MEMO
RY
the re-entered password doesn’t coincide
•When
with the password that you just entered.
When the correct
•password
has been
entered.
How to return to menu
screen during set up.
Press RETURN Button.
Downloaded From Disc-Player.com Samsung Manuals
59
When the wrong
•password
has been
entered.
After a few moments, the screen will
automatically change to the ‘ENTER
PASSWORD’.
Note •The Parental Level Control function is
compatible only with parental level
encoded discs.
If you forget your password, press the
CLEAR button 3 times successively
while in the ‘ENTER PASSWORD’
‘1111’ is the original password that has
been encrypted in the player by the
manufacturer.
•
•
After a few moments, the screen will automatically
return to the ‘RE-ENTER NEW PASSWORD’.
60
DVD
How to set up the Screen Ratios
DVD
SET-UP
As DVD supplies the screen with a 16:9 ratio, you can decide which type of
screen you want to watch.
Ex) For instance, setting up ‘4:3 PAN-SCAN’
1
Press the SET UP/MUTE Button while
in the STOP mode.
4
Press the UP or DOWN
Buttons to select ‘4:3 PAN-SCAN’.
5
Press the ENTER Button.
PAN-SCAN is selected and
•4:3
screen returns to SETUP MENU.
2
1
2
4
3
5
3
LAST
to go to the DISPLAY mode.
Press the ENTER Button.
Press SETUP button when
done.
MEMO
RY
Note •The Screen Ratio settings
depend on What is encoded
on the disc.
Downloaded From Disc-Player.com Samsung Manuals
61
Press the UP or DOWN Button
What are the
16:9 & 4:3 ratios?
When do you select
‘4:3 letter box’?
When do you select
‘4:3 pan-scan’?
the screen ratios.
•They're
The normal TV ratio is ‘4:3’,
when you want to see
•Select
the total 16:9 ratio screen
have a TV with 4:3
•You
screen and you want to see
‘16:9’ is the ratio of wide TV
and is also the ratio used in
movie theaters.
DVD supplies, even though
you have a TV with a 4:3
ratio screen. The top and
bottom of the
picture will be black.
the central portion of the
16:9 screen (sides of movie
picture will be cut off.)
62
How to Set Up Audio Output
DVD
SET-UP
You can configure the digital audio output jack to deliver Dolby Digital (AC-3)
Data to any AC-3 decoding amplifier by using the setup menu.
If you are not using an AC-3 decoding amplifier, you should configure the audio
output as PCM in setup menu.
For instance, setting up AUDIO
Ex) OUTPUT as AC-3
1
Press the SET UP/MUTE Button
when in Stop mode.
4
Press the UP or DOWN Button
to select ‘AC-3’.
5
Press the ENTER Button.
is selected and the screen
•’AC-3’
returns to SETUP MENU.
1
2
Press the UP or DOWN
Button to select AUDIO OUT.
2
4
3
Press the ENTER Button.
3
5
LAST
MEMO
RY
Note •If you’ve configured the audio output as
PCM, the audio output is automatically
changed to AC-3 when you set either
CENTER or SURROUND in SURROUND SOUND as YES.
If you’ve configured the audio output as
PCM, both CENTER and SURROUND
in surround sound are automatically
changed to NO.
How to return to menu screen
during set up.
Press the RETURN Button.
•
Downloaded From Disc-Player.com Samsung Manuals
63
64
How to Set Up Surround Sound
DVD
SET-UP
You can configure analog audio output as surround sound or stereo sound using the setup menu.
If you’ve selected surround sound output, you should specify the status of your speaker system to hear
surround sound suitable for your speaker system.
Ex)
For instance, setting up SURROUND
SOUND audio output for a surround
speaker system which has a center speaker.
1
Press the SET UP/MUTE Button
when in Stop mode.
4
Press the UP, DOWN, LEFT or RIGHT
Buttons to select ‘CENTER YES’.
5
Press the ENTER Button.
YES' is selected and the
•’CENTER
screen returns to SETUP MENU.
1
2
Press the UP or DOWN
Button to select SURROUND
SOUND.
4
3
Press the ENTER
Button.
3
5
2
LAST
MEMO
RY
AC-3 Output Level Control
When AC-3, 5,1 channel encoded discs are played,
the sound volume of the analog output for each channel
can be changed.
1.Press the VOL.CONTROL button during the PLAY mode.
Note •If you’ve configured the digital audio out as PCM, the
selection of ‘SURROUND SOUND’ will not work.
you have only front left and right speakers, you
•Ifshould
set center, surround, subwoofer to ‘NO’.
you have front left, front right and center speakers
•Ifonly,
you should set the center to ‘YES’.
If
you
have only front left, front right, center and
•surround
speakers, you should set the center and
How to return to menu
screen during set up.
Press RETURN Button.
surround to ‘YES’.
2.Press the UP or DOWN button to move to the channel whose
volume you wish to change.
You can change the level by using the
LEFT or RIGHT button.
Downloaded From Disc-Player.com Samsung Manuals
65
all speakers needed for AC-3, you should
•Ifsetyouthehave
center, surround and subwoofer to ‘YES’.
you have configured the audio output as AC-3
•When
and have set the CENTER of the surround sound to
YES, you must have a center speaker connected to
hear the dialogue.
66
VIDEO
CD
VIDEO-CD Playback
VIDEO-CD Features
•The Video-CD contains up to 74 minutes of
both music and video.
•It has the same picture quality as VHS tape
Enjoy live sound and video with VIDEO-CD.
and the same audio quality as CD because it
is encoded with the MPEG 1 system.
VIDEO-CD LOGO
STANDBY
DIMMER
POWER
SKIP/SEARCH
OPEN/CLOSE
Downloaded From Disc-Player.com Samsung Manuals
67
68
How to play a VIDEO-CD
VIDEO
CD
Press your TV and Audio system Power buttons ON.
TV/Audio Selection
How to playback
1
To select the video mode, press
the TV/Video button on the TV.
1
•Video mode may be marked as input.
Press the OPEN/CLOSE Button
after pressing POWER Button.
turns ON, the tray opens and
•Power
the STANDBY indicator light goes out.
2
Load the VIDEO-CD.
•Load the disc label-side up.
3
Press PLAY/PAUSE
Button.
tray closes and playback
•The
begins.
LAST MEMORY
Select 'AUX' or 'CD' in function selection
part of your Audio amplifier
audio amplifier is different. Please refer
•Each
to your audio amplifier owner’s manual.
3
LAST
MEMO
RY
Do you want to stop playback?
Do you want to stop playback
for a moment ?
Press the STOP Button or OPEN/CLOSE Button.
STANDBY
•If you press OPEN/CLOSE button, the
DIMMER
POWER
SKIP/SEARCH
tray opens after playback stops.
OPEN/CLOSE
Press PLAY/PAUSE Button.
LAST MEMORY
•Screen stops, no sound.
To play again
•Press PLAY/PAUSE Button again.
Note •When play is stopped, the unit records the point where STOP was pressed
(RESUME function).
Press PLAY again, and play will resume from this point. When the tray is opened or
STOP is pressed again, the RESUME function will be cleared.
When in VIDEO-CD 2.0 mode (menu on mode), PROGRAM, REPEAT, TIME SEARCH,
DISPLAY and RESUME function are impossible.
If the unit is left in the STOP mode for more than one
minute without any user interaction, a screensaver will be activated, and the TV screen
will fade in and fade out repeatedly. Press PLAY button to resume normal play.
•
•
Downloaded From Disc-Player.com Samsung Manuals
69
•If the unit is left 30 minutes in pause mode during play or menu, it will shut off.
70
To use the Menu Function
VIDEO
CD
1
Press the MENU or
PLAY/PAUSE Buttons.
Menu is only displayed on disc
•The
version 2.0.
2
3
It is not displayed on version 1.1.
or
1
LAST
LAST MEMORY
Main menu
1.The collection of videos
2.Videorche.
3.Music video
4.Movie
5.High defintion static image
2
can also select the desired
•You
number by pressing the UP or
DOWN button.
EX)When selecting No. 1
; The collection of videos.
DOWN button.
EX)When selecting No. 4
; a woman’s day.
or
or
1.Prologue
2.Beauty of Korea
3.Beautiful landscaoe of the South Pacific Ooeen
4.A woman’s day
MEMO
RY
Press the RETURN button
a wrong menu is selected or other menu is
•When
about to be selected, press the RETURN button.
the
Button the next menu will be dis•Press
played.
the
button the previous menu will by
•Press
displayed.
71
Select a number from the
menu and press it.
can also select the desired
•You
number by pressing the UP or
To return to the previous menu
Downloaded From Disc-Player.com Samsung Manuals
3
Select a number from the
menu and press it.
Note
When in VIDEO-CD 2.0 mode
•(menu
on mode), PROGRAM,
REPEAT, TIME SEARCH,
DISPLAY and RESUME function
are impossible.
In disc version 2.0, the MENU
button works as conversion
switch between menu on mode
and menu off mode.
•
72
VIDEO
CD
To use the Disc View Function
Desired music or video display can be accessed directly without using the menu function.
TRACK VIEW is used for showing the begining view of each track and the number of view
is equal to the number of track.
INDEX VIEW is used for showing the equally divided 9 views of the current playing track.
1
Press the TITLE Button.
2
Press Button NUMBER 1
to select TRACK VIEW.
•If disc has only 1 track, the
number of presented video will
be 1 also.
EX) The disc has 11 tracks.
2 2’
4 4’
3
Move the highlight to the number of
the desired view by pressing
UP/DOWN, LEFT/RIGHT Buttons.
can see the remaining 2
•You
views by pressing SKIP Button.
EX)To select the last view.
4
Press the ENTER, PLAY or
TITLE Button.
can also select and playback
•You
the desired view directly by
pressing the number button.
LAST MEMORY
1
4 4’
3
3’
4
LAST
2’
Press Button Number 2 to
select INDEX VIEW.
views are presented with
•Nine
sound.
MEMO
RY
3’
Move the highlight to the number
of the desired view by pressing
UP/DOWN, LEFT/RIGHT Buttons.
Ex) To select the third view.
4’
Press the ENTER, PLAY or
TITLE Button.
can also select and
•You
playback the desired view
directly by pressing the
number button.
LAST MEMORY
Note
Downloaded From Disc-Player.com Samsung Manuals
73
function is possible in VIDEO-CD
•This
1.1 and VIDEO-CD 2.0 menu off mode.
74
CD
CD Playback
CD Features
CD is the most popular af all discs, providing
clear sound and easy maintenance.
are two types of CDs, 5 inch (up to 74 min•There
utes of music program) and 3 1/2 inch (up to 20
minutes).
•CD maintains the same sound quality over time.
❈CD-R (Compact Disc Recordable) cannot be
played in this unit.
CD
CD LOGO
STANDBY
DIMMER
POWER
SKIP/SEARCH
OPEN/CLOSE
75
Downloaded From Disc-Player.com Samsung Manuals
76
How to play a CD
CD
Press POWER Button of your Audio amplifier.
1
Select 'AUX' or 'CD' in the function
selection part of your Audio amplifier
1
audio amplifier is different.
•Each
Please refer to your audio amplifier
Press OPEN/CLOSE Button after
pressing POWER Button.
turns on, the tray
•Power
opens and the STANDBY
owner’s manual.
2
3
Load the CD.
•Load the CD disc label-side up.
Press PLAY/PAUSE
Button.
tray closes and playback
•The
begins.
indicator light goes out.
LAST MEMORY
CD
3
LAST
MEMO
RY
Do you want to stop playback ?
Press the STOP Button or OPEN/CLOSE
Button.
STANDBY
DIMMER
POWER
SKIP/SEARCH
OPEN/CLOSE
•
If you press the OPEN/CLOSE Button, the tray
opens after
playback stops
Do you want to stop playback for a moment ?
LAST MEMORY
Press PLAY/PAUSE Button.
To play again
Press PLAY/PAUSE Button
•again.
Note •When play is stopped, the unit records the point where STOP was
pressed(RESUME function). Press PLAY again, and play will resume from this
point. When the tray is opened or STOP is pressed again, the RESUME function
will be cleared.
If the unit is left 30 minutes in pause mode during play or menu, it will shut off.
•
77
Downloaded From Disc-Player.com Samsung Manuals
78
BASIC
FUNCTIONS
Search and Skip Functions
During playback, you can search quickly through a track or title or use the skip feature to jump to the
next selection.
BASIC
FUNCTIONS
To search through a track or title
BASIC
FUNCTIONS
DIMMER
STANDBY
POWER
SKIP/SEARCH
Press SEARCH Button.
OPEN/CLOSE
you press
Button once playback will advance
•Ifquickly(X2
on DVD, X4 on CD and VCD). Press two
(X8 on DVD, X8 on CD and VCD) or three(X16 on
DVD) times and playback will advance even quicker
and scene by scene. Press the
Button to operate
the search function in the reverse direction. When
playing a DVD, playback will reverse to the beginning
of the current chapter and normal playback will resume.
When using the Main Button on the DVD
depends on how long you press SKIP/SEARCH
•ItButton.
and hold for more than 3 seconds,
SKIP/SEARCH
If you press Search feature operates.
(Long touch)
SKIP/SEARCH
If you press for less than 3 seconds the Skip
(Short touch) feature will operate.
To return to normal speed playback
PLAY/PAUSE
•Press
Button again.
LAST
LAST MEMORY
MEMO
RY
If you want to skip tracks
Press SKIP Button.
playing a DVD, if you press
•When
moves to next chapter. if you press
playing a a VIDEO-CD or CD, if you press
•WhenButton,
it moves to next track and if you press
Button, it moves to the beginning of the track.
One more press makes it move to previous track.
BASIC FUNCTIONS
Button, it
Button, it
moves to the beginning of chapter. One more press
makes it move to previous chapter.
Note •While in high-speed playback or
search, no sound will be heard.
Depending on the disc, SKIP
button may not work.
•
( Only when the length of the track exceeds 15 minutes )
playing a VIDEO-CD, if you press
Button,
•When
it move to the forward 5 minutes passed point. and
if you press
Button. it moves to the backward 5
minutes passed point.
79
Downloaded From Disc-Player.com Samsung Manuals
80
To Perform Time or Chapter Search
BASIC
FUNCTIONS
To playback from a preset time
on the disc
1
Press TIME SEARCH Button.
2
To search for the 2 minute
30 second point of the track.
Set the time you want.
3
Press PLAY/PAUSE or
ENTER Button.
•set 2, 3, 0 for two & half minutes
1
2
2’
Ex)
If you enter a wrong time;
press CLEAR Button.
the time will be erased and the
•Then,
display shows 00:00. You can then
enter the number again.
LAST MEMORY
Note
1’
can only set the time
•You
search for a track currently playing. If you set a time search that
is longer than the track length,
the disc will go the next track.
When playing the VCDs
(Ver 1.1, Ver 2.0 menu off
mode)and CDs, you can
select and playback the
desired track directly by
pressing the number button.
When in VIDEO-CD 2.0
mode(menu on mode),
PROGRAM, REPEAT, TIME
SEARCH, DISPLAY and
RESUME function are
impossible.
Depending on the DVD,
TIME SEARCH button
may not work.
•
•
LAST
MEMO
RY
3
To search desired title or chapter
by pressing title or chapter number
function works with DVDs only.
•This
“TITLE” or “CHAPTER” will flash on the front panel
•display.
2’
Press the RIGHT or LEFT Button for
title or chapter selection and press
the desired title or chapter number.
When the number of chapters is
more than 10
'0 / +10' button and then press the
•press
second number within 3 seconds.
If you want chapter no. 27,
•press
'0 / +10' two times and then press '7'.
•
What is a chapter ?
This is a detailed section of a
movie. A title is usually comprised
of many chapters. Depending on
the disc, a chapter may be referred
to under a different name.
If you enter a wrong number,
•press the correct number again.
81
Downloaded From Disc-Player.com Samsung Manuals
82
BASIC FUNCTIONS
1’
Press the C Button for
chapter number selection.
Ex) To move to chapter 3.
Slow Motion and Step Playback
BASIC
FUNCTIONS
Display Function
BASIC
FUNCTIONS
Refer to the following text to enjoy the screen pictures in slow or step motion. Slow motion & Step
playback only operate in the forward direction.
If you want to know the total track and time, remain track and time on a VCD or CD
and title, chapter, audio and subtitle information on a DVD, press the DISPLAY Button.
For slow motion playback
When playing CDs/VCDs
Press SLOW Button.
1•
pressing the slow Button you can select
•By
slow motion playback for 1/2, 1/4 or 1/8 of
normal speed.
No sound is heard during slow mode.
Press the DISPLAY
Button.
Current track time and total
track time will be displayed.
•
2•
Press the DISPLAY
Button again.
Current track time and
remain track time will be
displayed.
3
Press the DISPLAY
Button to make the
screen disappear.
3•
To make the screen
disappear.
If you want to return to
normal speed
press the PLAY/PAUSE Button.
1
2
3
LAST MEMORY
For step motion playback
Press the STEP Button.
LAST
MEM
ORY
MEMO
RY
1•
Press the DISPLAY
Button.
Current mode will appear.
2•
Press the DISPLAY
Button again.
Current title and chapter
numbers will appear.
Press DISPLAY Button.
BASIC FUNCTIONS
•
•
Each time the button is pressed, a new
frame will appear.
No sound is heard during step mode.
LAST
When playing a DVD
This shows the title and
chapter numbers.
counter
If you want to return to
normal mode
Note
SLOW and STEP buttons do not work
• with
CDs
press the PLAY/PAUSE Button.
LAST MEMORY
Note
When in VIDEO-CD 2.0 mode (menu on mode), PROGRAM,
•REPEAT,
TIME SEARCH,DISPLAY and RESUME function are
impossible.
83
Downloaded From Disc-Player.com Samsung Manuals
84
Repeat Playback
BASIC
FUNCTIONS
Repeat playback allows you to repeat a track, title, or the entire disc.
When playing CDs/VCDs
To repeatedly play a music track
Press REPEAT Button to display
'TRACK REPEAT'.
you press the REPEAT Button,
•When
TRACK REPEAT➝ALL REPEAT➝
REPEAT OFF appear in order.
To repeat the entire disc
To clear repeat function
Press REPEAT Button to display
'ALL REPEAT'.
Press the REPEAT Button to display ‘REPEAT OFF’
you press the REPEAT Button,
•When
TRACK REPEAT➝ALL REPEAT➝
REPEAT OFF appear in order.
When playing a DVDs
To repeatedly play the chapter
To repeat the title
To clear repeat function
Press REPEAT Button to display
'CHAPTER REPEAT'.
Press REPEAT Button to display
'TITLE REPEAT'.
Press the REPEAT Button to display
‘REPEAT OFF’
LAST
ME
MORY
BASIC FUNCTIONS
Note •DVD repeats playback by chapter or
title, CD and Video-CD repeat playback by disc or track.
Depending on the disc, the Repeat
function may not work.
When in VIDEO-CD 2.0 mode
(menu on mode), PROGRAM,
REPEAT, TIME SEARCH,DISPLAY
and RESUME function are impossible.
•
•
85
Downloaded From Disc-Player.com Samsung Manuals
86
BASIC
FUNCTIONS
To Program in desired order
Ex) to program tracks 5,7 and 11 in order
1
Press the PROGRAM Button
while in stop mode.
2
3
Select the desired track.
buttons 5➝7➝11 in order.
•Press
Whenever
buttons, the program
•numbers willyoubepress
selected automatically.
2
Press PLAY/PAUSE Button.
disc will be played back in
•The
programmed order.
1
LAST MEMORY
If you want to cancel the program
Cancel function
press the STOP Button twice.
•
BASIC FUNCTIONS
3
LAST
MEMO
RY
Note :DVDs can be programmed by title.
When you make a
wrong selection during
programming
press the CLEAR Button.
Note •When in VIDEO-CD 2.0 mode
you press the Button, the
•Whenever
programs will be erased one by one.
If you want to correct a track
1
Press SUBTITLE
ON/OFF Button.
2
Press the Button to reach the
desired number to be erased.
The number will blink.
3
Enter the number of the
desired track to replace the
track you want to erase.
(menu on mode), PROGRAM,
REPEAT, TIME SEARCH,DISPLAY
and RESUME function are impossible.
87
Downloaded From Disc-Player.com Samsung Manuals
88
To Playback from the last stop point
BASIC
FUNCTIONS
SERVICE
INQUIRY
Press PLAY/PAUSE button
will begin from the point where
•Playback
you last stopped the disc.
Before Making a Repair Inquiry
Is the unit not operating correctly?
Please check carefully once again.
A lot of problems can be solved if you check them in accordance with the
Owner's Manual.
Before repair inquiry
LAST MEMORY
First read the
Owner's Manual.
Note •When the tray is opened, or the STOP
LAST
MEM
ORY
button is pressed in STOP mode, the
RESUME function will be cleared.
If the power is turned off and the tray
is not opened, the last memory function will still work when power is
turned ON again.
When in VIDEO-CD 2.0 mode
(menu on mode),PROGRAM,REPEAT,
TIME SEARCH,DISPLAY and
RESUME function are impossible.
•
•
If the unit still does not operate
properly, contact a Samsung Authorized
Service Center.
SERVICE
89
Downloaded From Disc-Player.com Samsung Manuals
90
Disc type and characteristics
SERVICE
INQUIRY
SERVICE
INQUIRY
Maintenance and Storage
For trouble free operation, follow the instructions shown below.
•This player can play the following Discs.
Disc Type
DVD
Mark & Play Time
Characteristics
Audio/Video 135 minutes
dynamic audio in
•Excellent,
AC-3, 5.1 Channel theater.
to 8 audio languages can
•Up
be contained on a disc.
1
2
3 /5inch
VIDEO-CD
DISC MARKINGS
Audio/Video 74 minutes
5inch
74 minutes play with
•Max.
5inch CD
with CD sound, VHS
•Video
quality & MPEG1 compression technology
CD
1
5inch Audio 74 minutes
1
3 2 inch Audio 20 minutes
3 2 /5inch
1
Playback Region
Number.
Dolby Digital
NTSC / broadcast system in Korea, Japan,
USA & Canada etc.
Digital Audio disc
Maintenance
Cleaning/Player
Cleaning/Remote Control
not use volatile chemicals or
•Do
detergent.
•Clean with a dry towel.
careful not to spill liquid on the
•Be
remote.
Stereo disc
LP is recorded as an ana•An
log signal with more distortion. CD is recorded as a
Digital Signal with better
audio quality, less distortion
and less deterioration of
audio quality over time.
Cleaning/Disc
the disc by wiping in a
•Clean
straight line from the inside to the
outside of the disc.
•This unit will not work with CDG, CD-ROM and CD-I.
COPY PROTECTION.
discs may be copy protected and could distort the video if the DVD video output is connected through a
•DVD
VCR prior to the television set.
•
91
Downloaded From Disc-Player.com Samsung Manuals
Moisture Condensation.
in normal temperatures, if you pour a cold liquid into a
•When
glass, water vapor in the air will condense on the surface of
SERVICE
To prevent this video distortion, the DVD video output should be connected directly to the television set.
This product incorporates copyright protection technology that is protected by methods claims of certain U.S.
patents and other intellectual property rights owned by Macrovision Corporation and other rights owners. Use of
this copyright protection technology must be authorized by Macrovision Corporation, and is intended for home
and other limited viewing uses only unless otherwise authorized by Macrovision Corporation. Reverse engineering or disassembly is prohibited.
glass. This is called moisture condensation.
When moving the unit from a cold place to heated place, moisture condensation may occur on the operation part or lens.
when this occurs, the unit will not operate.
When moisture condensation occurs, remove the disc and
leave the unit turned on for 1 to 2 hours until the condensation
has completely dried out.
92
SERVICE
INQUIRY
Proper function of your DVD player is mostly dependent on the discs you play. When some of the function indicated in the I/B do not work properly, it is highly probable that the disc is responsible. We strongly recommend you review the instruction book before you start using the player. For your convenience,
we have enlisted some tips to help solve problems you might encounter while using the DVD player.
However, if the same problem occurs repeatedly, please contact your nearest service center.
Disc storage
Be careful not to harm the disc because the data
on these discs is highly vulnerable to the environment.
Do not keep under direct
sunlight.
Troubleshooting Guide
Keep in a cool ventilated area.
Problem
Remote control doesn't
work
Disc does not play
Possible Solution
the SELECT button on the remote control, then try other buttons.
•Check
the battery.
•Check
Point
the
remote control unit at the remote control sensor and operate.
•
Insert the disc with the playback side facing down on the disc tray correctly.
•Check
the region number of the DVD.
•This player
play CD-ROMs, DVD-ROMs, etc.
•Insert a DVD,cannot
a VIDEO-CD or a CD.
I/B
p.15
p.34,70,78
p.91
AC-3 5.1 channel sound is reproduced only when the following conditions
•are
met: 1)The DVD player is connected with the proper amplifier 2)The
AC-3 5.1 channel sound
is not being reproduced
Store vertically.
Keep in a clean protection jacket.
Multi-Language &
Multi-Subtitle feature
doesn't work
Camera Angle feature doesn't work
disc is recorded with AC-3 5.1 channel sound.
Check whether the disc being played has the "Dolby AC-3 5.1ch" mark on
the outside.
Check whether the "AC-3" has been chosen in SETUP MENU.
Check and make sure your audio system is connected and working properly.
•
•
•
The Multi-Language & Multi-Subtitle feature can be selected only if the
•disc
is encoded with Multi-languages & Multi-subtitles.
Multi-angle function can be selected only if the disc contains multi-angles.
•Angle
indication “
” will be shown on the screen when angle
selection is possible.
p.23~30
p.63~66
p.91~92
p.37~38
p.51~56
p.39
p.57~58
p.41~42
Playback mode differs
from the Setup Menu
selection
of the functions selected in the Setup Menu may not work properly
•ifSome
the disc is not encoded with the corresponding function.
p.49~66
The Screen Ratio cannot be changed
•The Screen Ratio is fixed on your DVD.
p.61~62
The password for
Parental Level has been
forgotten
Press the CLEAR button 3 times sucessively while in the "ENTER
•PASSWORD"
p.59~60
If you experience other
problems
Go to the contents(p.1-2) and find the section of the instruction book that
•contains
the explanations regarding the current problem, and follow the
SERVICE
•Check to make sure that the disc has a Menu.
Disc Menu doesn't
appear
procedure once again.
"Before Service Inquiry"(p.90-96) to see if the problem is listed.
•Check
If the problem still cannot be solved, please contact your nearest
•authorized
service center or call 1-800 -SAMSUNG.
93
Downloaded From Disc-Player.com Samsung Manuals
94
SERVICE
INQUIRY
Definition of terms
ANGLE
•Recorded
onto some DVD discs are scenes which have been simultaneously shot from a number of different angles(the same scene
SERVICE
INQUIRY
Specifications
Model : DVD-927
is shot from the front, from the left side, from the right side, etc.) With such discs, the ANGLE button can be used to view the scene
from different angles.
Power Requirements AC 120V/60Hz
CHAPTER NUMBER
•These
numbers are recorded on DVD discs. A title is subdivided into many sections, called chapters, each of which is numbered, and
specific parts of video presentations can be searched quickly using these numbers.
•
General
Dolby Digital(AC-3)
Digital audio compression technology that the Dolby Laboratories Corporation developed, This technology conforms to 5.1-channel
surround. When connecting a component with a built-in Dolby Digital decoder, you can enjoy more real audio presence.
•ADVD
disc that contains up to 8 hours of moving pictures even though its diameter is the same as a CD.
The data capacity of a single-layer and single-sided DVD, at 4.7GB(Giga Byte), is 7 times that of a CD.
Furthermore, the data capacity of a dual-layer and single-sided DVD is 8.5GB, a single-layer and double-sided DVD 9.4GB, and a
dual-layer and double-sided DVD 17GB. The picture data uses the MPEG 2 format, one of the worldwide standards of digital compression technology. The picture data is compressed to 1/40 of its original size, The DVD also uses the variable rate coding technology that changes the data to be allocated according to the status of the picture. The audio data is recorded in Dolby Digital(AC-3) as
well as in PCM, allowing you to enjoy more real audio presence. Furthermore, various advanced functions such as the multi-angle
and multilingual functions are provided with the DVD.
DIGITAL OUT
•TheOPTICAL
optical Digital out enables you to send the signal from the DVD to an amplifier by using an optical fiber cable.
•It PCM
is an abbreviation of pulse code modulation and refers to analog sound.
Playback Control(PBC)
•Signals
encoded on VIDEO-CDs(Version2.0) to control playback. By using menu screens recorded on VIDEO-CDs with PBC
Power Consumption 18W
Weight
11.8 lb
Set Size
W 16.5in x D 13.3in x H 4.7in
Operating Temperature Range +41°F ~ 95°F
Operating Humidity Range 10% ~ 75%
DVD
(DIGITAL VERSATILE DISC)
Approx. Play Time(Single Sided, Single Layer Disc) : 135 minutes
Reading Speed : 3.9 ~ 4.6ft/sec
CD : 5in
(COMPACT DISC) Maximum Play Time : 74minutes
Disc
1
Reading Speed : 3.9 ~ 4.6ft/sec
CD : 3 2 in
(COMPACT DISC) Maximum Play Time : 20minutes
VIDEO-CD
: 5in
REGION NUMBER
•DVD
players and discs have regional numbers. It is impossible to play a disc on a DVD player that has a different region number.
RCA JACK
Pb : 0.70Vp-p
Luminance Signal : 1Vp-p(75Ω load)
Video
output
TITLE NUMBER
•These
numbers are recorded on DVD discs. When a disc contains two or more movies, these movies are numbered as title 1, title 2,
etc.These numbers are recorded on DVD discs. When a disc contains two or more movies, these movies are numbered as title 1,
title 2, etc.
TIME NUMBER
•This
indicates the play time which has elapsed from the start of a disc or a title. It can be used to find a specific scene quickly. (It may
not work with some discs.)
S-VIDEO
Color Signal : 0.286Vp-p(75Ω load)
2 channel
L(1/L). R(2/R)
5.1 channel
F/L, F/R, R/L, R/R, C/T, S/W
Output Level
Analog : 2Vrms(1KHz.)
TRACK NUMBER
•These
numbers are assigned to the tracks which are recorded on video CDs and audio CDs. They enable specific tracks to be located quickly.
•AVIDEO-CD
compact disc that contains moving pictures. The picture data uses the MPEG 1 format, one of the worldwide standards of digital
compression technology. The picture data is compressed 1/140 of its original size. Consequently, a 12cm VIDEO-CD can contain up
to 74 minutes of moving pictures. VIDEO-CDs also contain compressed audio information. Sounds outside the range of human hearing are compressed while the sounds we can hear are not compressed. VIDEO-CDs can hold 6 times the audio information of conventional audio CDs.
There are 2 versions of VIDEO-CDs.
-Version 1.1:You can play only moving pictures and sounds.
-Version 2.0: You can play high-resolution still pictures and enjoy PBC functions.
This player conforms to both versions.
95
Downloaded From Disc-Player.com Samsung Manuals
Y: 1.0Vp-p
Pr : 0.70Vp-p
The playable region number of this DVD player is 1.
be recorded on a DVD disc.
Reading Speed : 3.9 ~ 4.6ft/sec
Maximum Play Time : 74minutes(Video + Audio)
2 channel : 1.0Vp-p
functions, you can enjoy playing simple interactive programs, programs with search functions, and so on.
SUBTITLES
•This
is text which appears at the bottom of the screen which translates or transcribes the dialogue. Up to 32 subtitle languages can
Reading Speed : 11.45ft/sec
Digital : 1.15Vp-p
Audio
output
Frequency
Response
* Frequency Response : 48KHz Sampling 4Hz-22KHz
96KHz Sampling 4Hz-44KHz, S/N Ratio : 110dB
* Dynamic Range : 100dB
* Total Harmonic Distortion 0.003%
Wow/Flutter
Under measureable values
* : Nominal specification
96
SERVICE
INQUIRY
Audio & Subtitle Languages
The DVD disc can contain up to 8 audio languages and 32 subtitle languages. They are represented by
the abbreviations shown below.
When you select audio and subtitle, please refer to the following table.
Table of Languages and Their Abbreviations
Abbreviation Language
97
Abbreviation Language
Abbreviation Language
kn
aa
ab
Afar
fa
fi
Persian
Abkhazian
Finnish
ko
Korean
af
am
Afrikaans
fj
Fiji
Kashmiri
Ameharic
Faroese
ar
as
Arabic
fo
fr
ks
ku
Frisian
ky
la
Kirghiz
ay
az
Aymara
fy
ga
Lingala
Scots Gaelic
ba
be
Bashkir
gd
gl
ln
lo
Galician
lt
Lithuanian
bg
bh
Bulgarian
gn
gu
Guarani
ha
hi
Hauza
Croatian
Armenian
Assamese
Azerbaijani
Byelorussian
Bihari
bi
bn
Bislama
bo
Tibetan
hr
hu
br
Breton
hy
Bengali, Bangla
French
Irish
Gujarati
Hindi
Hungarian
Kannda
Kurdish
Latin
Laothian
lv
mg
Latvian,Lettish
mi
mk
Maori
Malagasy
tr
ts
Turkish
sa
sd
Sanskrit
tt
tw
Tatar
sg
sh
Sangho
uk
ur
Ukrainian
si
sk
Singhalese
uz
vi
Uzbek
Slovenian
vo
wo
Volapük
Samoan
Kinyarwanda
Sindhi
Serbo-Croatian
Slovak
Tsonga
Twi
Urdu
Vietnamese
so
Somali
yo
Yoruba
sq
sr
Albanian
zh
zu
Chinese
ss
st
Siswati
su
sv
Sundanese
sw
ta
Swahili
te
tg
Telegu
th
ti
Thai
Czech
Inupiak
mt
Maltese
Indonesian
Danish
my
na
Burmese
da
de
ik
in
is
Italian
Bhutani
ne
nl
Nepali
dz
el
it
iw
Japanese
English
no
oc
Norwegian
en
eo
ja
i
j
Javanese
Spanish
om
or
(Afan) Oromo
es
et
jw
ka
Kazakh
Basque
pa
pl
Panjabi
eu
kk
kl
km
Cambodian
ps
pt
Pashto, Pushto
Downloaded From Disc-Player.com Samsung Manuals
Russian
Tsonga
Moldavian
cs
cy
Greenlandic
ru
rw
Rumanian
mo
mr
Malay
Estonian
Setswana
Xhosa
ms
Georgian
tn
to
xh
ie
Yiddish
Kirundi
Shona
Interlingue
Esperanto
rn
ro
Tagalog
sn
Interlingua
Greek
Turkmen
Mongolian
ia
Hebrew
tk
tl
Rhaeto-Romance
Malayalam
Corsican
Icelandic
Quechua
ml
mn
Catalan
German
qu
rm
Abbreviation Language
sl
sm
Macedonian
ca
co
Welsh
Abbreviation Language
Marathi
Nauru
Dutch
Occitan
Oriya
Serbian
Wolof
Zulu
Sesotho
Swedish
Tamil
Tajik
Tigrinya
Polish
Portuguese
98
Warranty (for USA users only)
Warranty (for Canada users only)
SAMSUNG
LIMITED WARRANTY
SAMSUNG
LIMITED WARRANTY
Samsung Electronics America Inc.(SEA), warrants that this product is free from defective materials and workmanship.
Samsung Electronics Canada Inc.(SECA), warrants that this product is free from defective material and workmanship.
SEA further warrants that if this product fails to operate properly within the specified warranty period and the failure
is due to improper workmanship or defective materials, SEA will repair or replace the product at its option.
SECA further warrants that if this product fails to operate properly within the specified warranty period and the failure is due to improper workmanship or defective material, SECA will repair or replace the product at its option.
All warranty repairs must be performed by a SEA Authorized Service Center.(The name and address of the location
nearest you can be obtained by calling toll free:1-800-SAMSUNG).
All warranty repairs must be performed by a SECA Authorized Service Center.(The name and address of the location nearest you can be obtained by calling toll free:1-800-SAMSUNG).
LABOR
One year(Carry-in)
PARTS
One year
On carry-in models, transportation to and from the service center is the customer’s responsibility.
The original dated sales receipt must be retained by the customer and is the only acceptable proof of purchase.
It must be presented to the authorized service center at the time service is requested.
EXCLUSIONS (WHAT IS NOT COVERED)
EXCLUSIONS (WHAT IS NOT COVERED)
This warranty does not cover damage due to accident, fire, flood and/or other acts of God; misuse incorrect line
voltage, improper installation, improper or unauthorized repairs, commercial use or damage that occurs in shipping.
Operations explained in the instruction manual are not covered under the terms of this warranty. This warranty will
automatically be voided for any unit found with a missing or altered serial number. This warranty is valid only on
products purchased and used in the United States and Puerto Rico.
This warranty does not cover damage due to accident, fire, flood and/or other Acts of God; misuse, incorrect line
voltage, improper installation, improper or unauthorized repairs, commercial use, or damage that occurs in shipping.
Exterior and interior finish, lamps, glass, are not covered under this warranty. Customer adjustments which are
explained in the instruction manual are not covered under the terms of this warranty. This warranty will automatically be voided for any unit found with a missing or altered serial number. This warranty is valid only on products purchased and used in Canada.
Some states do not allow the exclusions or limitations of incidental or consequential damages,
or allow limitations on how long an implied warranty lasts, so the above limitations or exclusions
may not apply to you. This warranty gives you specific legal rights and you may also have other
rights which vary from state to state.
99
Downloaded From Disc-Player.com Samsung Manuals
100