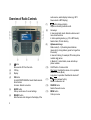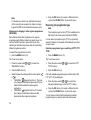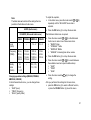
1
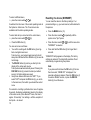
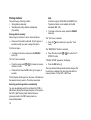
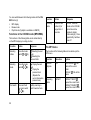
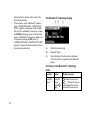
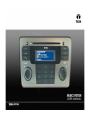
Overview of Radio Controls
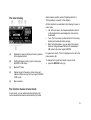
(7)
(8)
(9)
(1)
(2)
(3)
(4)
(5)
(6)
2
button
Removes the CD from the radio.
CD tray
Display
OK button
In radio/CD/MP3/USB/iPod mode: Starts/cancels
Scan function.
In menus: Selects menu item.
AUDIO button
Calls up audio menu for sound settings.
DIS-ESC button
Exits the menu and changes to the display of the
(10)
(11)
(12)
(13)
audio source, selects display modes (e.g. MP3
browse mode in MP3 display).
button (hang-up button)
Rejects an incoming call/ends a call.
Arrow keys
In menus and radio mode: Selects submenus and
menu items/functions.
In other operating modes (e.g. CD or MP3 mode):
Selects track, CD and directory.
Alphanumeric keys
Radio mode (0 – 9): Selecting stored stations
(press short), storing stations (press for longer than
2 seconds).
In menus: Entering, for example, PIN codes, phone
numbers and names
®
In Bluetooth mode: Enters, saves and calls up
phone numbers.
On/Off button / Volume control
Short press: Switches the device on. In operation:
Mutes the device (Mute).
Long press: In operation: Switches the device off.
button (answer button)
Makes or answers a call.
SOURCE button
Selects the audio source.
MENU button
Calls up a menu.
Contents
Overview of Radio Controls
2
Important notes
Observe the following!
6
6
Use as directed
Road safety
Laser product!
Danger for the CD drive!
Cleaning
Disposal of old units
Notes about handling CDs
Startup
Switching the device on/off
Adjusting the volume
Muting the device
Overview of the menu operation
Resetting the device (NORMSET)
USB port
Connecting the USB medium
What characteristics do USB media have to have?
Selecting the USB as audio source
CD formats and inserting and removing CDs
What features do MP3 or WMA CDs have to have?
Inserting and removing a CD
Selecting the CD as audio source
6
6
6
6
7
7
7
8
8
8
9
9
10
11
11
11
12
12
12
13
13
Tuner mode
Set the device to the region Europe, USA or
Thailand
Starting tuner mode for the FM or AM waveband
The tuner display
The function menus in tuner mode
Setting the memory bank/waveband
Tuning into a station
Station seek tuning
Tuning into stations manually
Selecting stored stations
Storing stations
Storing stations manually
Searching and storing stations automatically
Changing the seek tuning sensitivity (SENS)
Scanning all receivable stations (BANDSCAN)
Displaying radio text
Receiving traffic announcements
Switching the priority of traffic reports on/off
Skipping a traffic announcement
Receiving an alternative frequency of a station
Allowing/preventing alternative frequencies (RDS)
Allow/prevent changing to other regional programmes
(REGIONAL)
Receiving the programme type
Selecting a programme type or switching off PTY (PTY
TYPE)
Selecting the programme type language (PTY LANG)
14
14
14
15
15
16
17
17
17
17
18
18
18
19
19
19
20
20
21
21
21
22
22
22
23
3
®
CD mode (audio)
Starting the audio CD mode
The audio CD display
Functions in the CD mode (audio)
The CD menu
CD/USB mode (MP3/WMA)
Starting the CD/USB mode
The MP3 display
Functions in the CD/USB mode (MP3/WMA)
The MP3 menu
The Browse mode
The browse display
Selecting tracks in Browse mode
The Playlist mode
The Playlist display
Selecting tracks in Playlist mode
iPod mode
Starting iPod mode
The iPod display
Functions in the iPod mode
The iPod menu
®
Bluetooth streaming mode
®
Registering and connecting Bluetooth players
®
Automatic connection of the Bluetooth player
®
Starting the Bluetooth streaming mode
®
The Bluetooth streaming display
4
24
24
24
25
25
27
27
27
28
28
29
29
30
30
30
31
32
32
32
32
33
34
34
35
35
36
Functions in the Bluetooth streaming mode
36
AUX mode
Selecting the external audio source and
switching it on/off
Naming external audio sources (AUXEDIT)
Mixing an external audio source with another
audio source (MIX AUX)
37
®
Bluetooth phone call
®
Bluetooth preparation
®
How is a Bluetooth connection established?
®
Opening the Bluetooth menu
Registering the cell phone
Automatic connection of the cell phone
Determining the master telephone
®
Managing registered Bluetooth devices
®
Unregister all registered Bluetooth devices
®
Managing registered Bluetooth devices in the device list
Answering/rejecting a phone call
Making a call (DIAL NEW)
Ending a call
Redirecting an ongoing phone call to the cell
phone
Storing and calling a phone number in the phone
book of the device
Storing phone numbers
Calling a phone number
Editing an entry
Deleting entries
37
37
38
40
40
40
40
41
41
42
43
43
43
44
45
46
46
46
46
47
47
48
The phone book of the cell phone
48
Downloading a phone book
Calling an entry in the phone book
48
49
Calling a phone number from the history
Speed dial
Changing the PIN (PIN NUM)
®
Changing the Bluetooth name of the device
(RAD NAME)
50
50
51
Remote controls
Functions of the steering wheel remote control
53
53
General
FM/AM mode
CD mode
MP3 mode
Functions of the IR remote control
52
53
53
53
53
54
General
FM/AM mode
CD mode
MP3 mode
iPod mode (if iPod box is properly connected)
54
54
54
54
54
Sound settings
Opening the Audio menu
Adjusting bass, treble and volume distribution
Selecting a sound preset (PRESETS)
Equalizer settings
55
55
55
55
56
Which equaliser setting is the correct one?
Sound impression
Changing equalizer settings (EBASS, ETREBLE,
EMIDDLE, EXBASS)
56
56
User settings
Opening the System menu
Changing the welcome text (ON MSG)
Changing volume presettings
Adjusting power-on volume (ON VOL/LAST VOL)
Changing volume presettings for TA, TEL and MUTE
Activating/deactivating the signal tone (BEEP ON)
Changing display settings
Changing the day/night brightness (D-DAY/D-NIGHT)
Changing the background lighting of the display
(DIS ILUM)
Changing the brightness of the button illumination
(KEY ILUM)
Adjusting the display viewing angle (ANGLE)
Changing the scan time (SCANTIME)
58
58
58
58
59
59
60
60
60
61
61
61
61
Displaying version numbers
63
Technical data
64
USB port
64
Appendix
Supported USB devices
®
Supported Bluetooth mobile phones
65
65
66
FCC Information
67
Warranty
Instructions for the customer
Terms and condition
Authorised Service Centers:
68
68
68
71
57
5
Important notes
The device was manufactured according to the state of the
art and established safety guidelines. Even so, dangers
may occur if you do not observe this safety information:
Read these instructions carefully and completely
before using the device.
Keep the instructions at a location so that they are
always accessible to all users.
Store the device card separate from the device outside
of the vehicle.
Observe the following!
Use as directed
The device is designed for mode in a vehicle with 12-V
vehicle supply voltage.
Road safety
Road safety has absolute priority.
Only operate your device if the road and
traffic conditions allow you to do so.
Familiarise yourself with the device before
setting off on your journey.
You should always be able to hear police, fire and
ambulance sirens in good time from inside your
vehicle.
For this reason, listen to your car sound
system at a suitable volume level during your
journey.
6
Laser product!
Do not open or modify the device! The device
contains a Class 1 laser that emits invisible laser
radiation which can cause injuries to your eyes.
Do not attempt to repair the device yourself.
Maintenance should be performed only by
trained personnel.
Danger for the CD drive!
Do not insert any mini CDs (8 cm diameter)
and shape CDs since they destroy the drive!
Do not affix any labels to the top of the CD,
since detaching labels can destroy the drive!
We accept no responsibility for any damage to
the CD drive that may occur as a result of the use
of unsuitable CDs.
Cleaning
Clean the device with a dry or slightly moistened cloth. Do
not use any caustic chemicals, cleaning solutions or harsh
cleaning agents to clean the device.
Disposal of old units
Do not dispose of your old device in the household trash!
Please use the return and collection systems available to
dispose of the old unit.
If a CD becomes soiled, never clean it in a circular motion;
instead, use a soft, lint-free cloth and wipe from the inside
to the outside.
Notes about handling CDs
To ensure proper functioning, use only clean CDs without
scratches and damages. Any contamination or damage of
a CD can lead to read problems.
It is recommended to handle the CD carefully.
Avoid scratches and damages on the CD. If possible,
only grasp the CD at the edge.
Do not affix any labels to the top of the CD and use
only suitable CD markers to label the CD.
Do not expose CDs to direct sunlight.
Keep unused CDs in a protective case.
7
Startup
Adjusting the volume
This chapter contains information about switching the
device on and off, adjusting the volume, performing menu
settings, and resetting the device to the factory settings. It
also provides information about connecting a USB medium
and correctly inserting a CD in the device.
Danger!
High volume
Excessive volume can damage your hearing and you
may fail to hear acoustic warning signals!
The device mutes, e.g. if it changes the audio
source. During this mute phase, the volume may
be changed, but it is not audible. Do not increase
the volume during a mute phase.
Always set the device to a moderate volume.
Switching the device on/off
If the device was switch off with the ignition, it is again
switched on with the ignition. The introductory animation
starts and can be cancelled with the OK button (4). The
device plays the audio source you previously listened to.
To manually switch on the device,
press the On/Off button (10).
To switch off the device,
press and hold the On/Off button (10) for approx. 2
seconds.
Note:
To protect the vehicle battery if the ignition is switched
off, the device automatically switches off after one
hour.
8
Turn the volume control (10).
The current volume is shown on the display and used for
all audio sources.
Notes:
The volume can also be changed during a traffic
announcement/phone call/navigation
announcement using the volume control (10) for
the duration of the phone call or the
announcement.
During traffic announcements/phone
calls/navigation announcements, you can adjust
the volume distribution for the phone call or the
announcement. More information can be found in
the chapter "Sound settings".
Muting the device
Briefly press the On/Off button (10).
The display shows "MUTE".
To cancel the mute function,
briefly press the On/Off button (10) again.
OR:
Turn the volume control (10).
To open a menu,
press the MENU button (13).
By default, the menu of the current operating mode is
opened, e.g. the tuner menu, if the device is in tuner mode
when you press the MENU button (13).
Note:
You cannot call up the menu if the device is muted
("MUTE").
Overview of the menu operation
The different basic settings of the device and many
functions of the different operating modes are available via
menus:
In the System menu, you perform the basic settings for
the device (e.g. display brightness, power-on volume
and volume for traffic announcements, telephone calls
and more, scan time and settings for AUX mode).
In the Audio menu, you perform sound settings (e.g.
bass, treble, volume distribution, equalizer).
In the menu of the respective operating mode (e.g.
tuner or CD mode), you can perform settings for the
current operating mode and select functions.
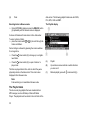
(A)
Option of the selected menu item
(B)
Selected menu item
(C)
Menu items of the selected menu
(D)
Arrows indicate in which direction you can scroll in
the menu
(E)
Menu selection
9
To select a different menu,
press the rocker switch
or
(8).
It switches from the menu of the current operating mode to
the System or Audio menu. The Tuner menu is also
available in all the other operating modes.
To select and call up a menu item in the current menu,
press the rocker switch or (8).
Press the OK button (4).
You can exit a menu as follows:
You confirm a setting with the OK button (4) and go
back one higher menu level.
Text input (e.g. your personal welcome text) should
always be confirmed with the OK button (4) to save the
text change.
The DIS-ESC button (6) returns you directly to the
display of the active audio source.
Text inputs are not automatically saved. Pressing the
DISC ESC button (6) cancels the text input without
saving it. All other settings are saved.
Every menu features the menu item "EXIT". If you
select "EXIT" and press the OK button (4), you return
to the menu level, from which you entered the current
menu.
If no selection or setting is performed in a menu for approx.
8 seconds, the display automatically returns to the display
®
of the audio source (in the Bluetooth menu, this time is
approx. 30 seconds). Your settings – with the exception of
text inputs – are saved.
10
Resetting the device (NORMSET)
You can reset the device to the factory settings. Your
personal settings. e.g. your welcome text, will be deleted in
the process.
Press the MENU button (13).
Press the rocker switch (8) repeatedly until the
system menu "Syst" opens.
Press the rocker switch or
"NORMSET" is selected.
Press and hold the OK button (4) for longer than 4
seconds.
(8) until the menu item
"NORM ON" briefly appears on the display. The factory
settings are restored. The radio briefly switches off and
automatically on again during the process.
Note:
If you press and hold down the OK button (4) for less
than 4 seconds, "NORM OFF" is displayed. Your
personal settings are retained. Press the OK button (4)
to select a different function, or press the DIS ESC
button (6) to exit the menu.
USB port
You can connect the following USB media to the device
and use them as audio source:
USB stick
USB hard disk with max. 800 mA current consumption
via the USB port)
MP3 player with USB port
The device can play MP3 or WMA formats (WMA version
9, without DRM copy protection only).
Note:
The proper functioning of all USB media available on
the market cannot be guaranteed!
Connecting the USB medium
To connect a USB medium, please open the “AUX
“
flap. Insert the USB medium in the USB slot. To locate the
slot in the car, please read the car manual.
Note:
Always switch off the device before connecting or
disconnecting your USB medium! The USB medium is
correctly registered/unregistered only with switching
on/off.
Switch of the car sound system by holding the On/Off
button (10) pressed for longer than 2 seconds.
Connect the USB medium with the USB cable.
What characteristics do USB media have to have?
The device recognises the USB medium only if it is a mass
storage with the following features:
File system
FAT16 or FAT32,
no NTFS!
ID3 tags
Version 1 or 2
Format
Only MP3 or WMA files, folders, playlists
Number
Max. 1,500 files (folders and tracks) per
folder
Naming of
files
File extension ".wma"/".mp3"
Max. 24 characters (more characters are
possible, but they reduce the max. number
of files)
No special characters or umlauts
Bit rate
MP3: 32 to 320 kbps WMA: 32 to 192 kbps
Under Windows 2000/XP, the FAT32 formatting creates a
maximum partition size of 32 GB. If you are using a USB
medium with more than 32 GB, it may result in read errors
for additional partitions.
If a large number of files is stored on your USB medium,
the speed of the file search may be reduced.
11
Selecting the USB as audio source
Press the SRC button (12) repeatedly until "USB"
appears on the display.
The display briefly shows "READING". The playback
starts.
If USB is selected as audio source, the MP3 display is
shown. For further details, please read the chapter
"CD/USB mode (MP3/WMA)".
CD formats and inserting and removing CDs
The device can play the following CD formats:
Audio CD with the CompactDisc logo
Note
The proper functioning of copy-protected CDs cannot
be guaranteed!
CD-R or CD-RW with MP3 or WMA files (WMA version
9, without DRM copy protection only)
Note:
The quality of self-burnt CDs fluctuates due to different
CD blanks, burner software, and burn speeds. For this
reason, it is possible that the device cannot play some
self-burnt CDs.
If you cannot play a CD-R/CD-RW:
Use blanks from a different manufacturer or a different
colour.
Reduce the burn speed when burning CDs.
What features do MP3 or WMA CDs have to have?
The device can only play and display MP3 or WMA CDs
with the following features:
CD format
ISO 9660 (Level 1 or 2) or Joliet
ID3 tags
Version 1 or 2
Format
Only MP3 or WMA files, folders, playlists
Number
Max. 999 tracks
in 99 folders
Naming of
files
File extension ".wma"/".mp3"
Max. 16 characters (more characters are
possible, but they reduce the max. number
of files)
No special characters or umlauts
Bit rate
12
MP3: 32 to 320 kbps WMA: 32 to 192 kbps
Inserting and removing a CD
The CD is automatically drawn in.
CAUTION!
Damaging the CD drive
Labelled or shaped CDs can damage the CD drive.
Do not insert any mini CDs (8 cm diameter) or
shape CDs damage.
Insert only circular CDs with a 12-cm diameter.
Do not attach labels to CDs since the label may
detach during operation.
Note:
Label CDs only by using a marker since it does not
contain any caustic materials. Permanent markers can
damage CDs.
If a CD is in the drive, press the
button (1).
The CD is ejected.
The display briefly shows "READING – WAIT". Next, the
following appears:
The audio CD display if an audio CD is inserted.
The MP3 display if an MP3 or WMA CD is inserted.
The CD starts playing.
Selecting the CD as audio source
You can select an inserted CD as audio source:
Press the SRC button (12) repeatedly until "CD" (for
audio CD) or "MP3" (for MP3 CD) appears on the
display.
Note:
The CD mode can be selected only if a readable CD is
inserted.
To operate the audio CD display, please read the chapter
"CD mode (audio)". To operate the MP3 display, please
read the chapter "CD/USB mode (MP3/WMA)".
Note:
You can also eject the CD, while the device is switched
off.
Remove the CD.
If you do not remove the CD, it is automatically pulled in
again after a few seconds.
Insert the CD with its printed side uppermost into the
CD drive (2) until you feel some resistance.
13
Tuner mode
This device can receive radio stations in the FM and AM
(MW/LW) frequency ranges.
Set the device to the region Europe, USA or
Thailand
The device is set to the frequency ranges and station
technologies of the region in which it was purchased. You
can adjust this setting to the different frequency ranges
and station technologies of Europe, the United States or
Thailand (The setting “Europe” also applies to India). To do
so, the device must be switched off:
Simultaneously press the AUDIO button (5) and the *
button (9) while switching on the device.
The display shows "TUNER AREA" and the current setting
as well as a list of available options.
Press the rocker switch or (8) to switch between
the regions EUROPE, USA and THAILAND.
Confirm the setting with the OK button (4).
Starting tuner mode for the FM or AM
waveband
You can receive radio stations of the FM and AM
wavebands (tuner region USA and THAILAND) or FM, MW
and LW (tuner region EUROPE).
To receive stations of the FM waveband,
14
press the SRC button (12) repeatedly until "FM"
appears on the display.
To receive stations of the AM or MW/LW waveband,
press the SRC button (12) repeatedly until "AM"
appears on the display.
The playback starts immediately with the previously played
station if the vehicle is within the reception area of this
station.
Note:
If the device is set to the tuner region EUROPE, the
station played last in the MW or LW waveband
selected last is played when selecting the AM
waveband. How to switch between the MW and LW
wavebands can be found in the section "Setting the
memory bank/waveband" in this chapter.
The tuner display
details, please read the section "Adjusting stations" or
"Storing stations manually" in this chapter).
All other functions are available in the following 3 menus in
menu mode:
List: In the List menu, the frequencies/stations stored
on the station buttons are displayed in a list and can
be selected.
Tune: The Tune menu provides functions for scanning
stations and automatic station storage.
Band: In the Band menu, you can select the memory
banks or change between MW and LW waveband in
AM mode for the tuner region EUROPE.
(A)
Waveband or memory bank and memory location
of the adjusted station
In regular tuner mode, "Norm" is displayed on the left in the
menu selection (E).
(B)
Traffic information priority (only for tuner region
EUROPE in FM mode)
To change from regular tuner mode to menu mode,
press the DIS-ESC button (6).
(C)
Bluetooth status
(D)
Display range for frequency, station name and
radio text (radio text only for tuner region EUROPE
in FM mode)
(E)
Menu selection
®
The function menus in tuner mode
In tuner mode, you can adjust and store stations in the
current waveband and select stored stations (for further
15
Instead of "Norm", the menu selection (E) displays "List".
The "List" menu is selected. The options of the "List" (F)
menu are displayed
For the tuner region USA and THAILAND, the AM
waveband AM features the 2 memory banks AM and AMT
each with 10 memory locations. For the tuner region
EUROPE, the 2 memory banks MW and LW are available
for the corresponding waveband each with 10 memory
locations.
How to select the memory banks in the current FM or AM
waveband:
(E)
Menu selection
(F)
Options of the current menu
If necessary, press the rocker switch or (8) to
change between the menus "List", "Tune" and "Band".
The options of the selected menu (F) are displayed.
Note:
You exit the menu mode automatically 8 seconds after
the last button press. To change to regular tuner mode
more quickly, press the DIS-ESC button (6).
Setting the memory bank/waveband
The FM waveband features the 2 memory banks FM and
FMT each with 10 memory locations.
16
To change to the menu mode, press the DIS-ESC
button (6).
Press the
menu.
Press the rocker switch or (8) to select the
desired waveband or memory bank.
Press the OK button (4).
rocker switch (8) twice to open the "Band"
The desired waveband or memory bank is adjusted. You
automatically exit the menu mode after a short period of
time. You can now perform the following actions in this
waveband/memory bank:
Tuning into a station
Storing stations
Tuning into a station
Tuning into stations manually
Note:
For the tuner region EUROPE, the manual setting of
stations is possible only if the RDS functions are
deactivated. If the RDS function is activated, you can
scroll in the broadcasting networks in whose reception
area you are located.
There are 3 ways of tuning into a station:
Tuning into stations automatically (station seek tuning)
Tuning into stations manually
Selecting stored stations
Station seek tuning
Press the rocker switch
or
(8).
Note:
If you press and hold the rocker switch or (8),
automatic seek tuning skips the stations found until
you release the rocker switch again.
The tuner searches for the next receivable station in the
current waveband. The adjusted sensitivity of the station
seek tuning (section "Changing the seek tuning sensitivity")
and the following settings are taken into consideration:
"PTY TYPE" setting in the "TUNER" menu (only in FM
mode for the tuner region USA and EUROPE): The
tuner seeks stations that are broadcasting the set
programme type.
"TRAFFIC" setting in the "TUNER" menu (only in FM
mode for the tuner region EUROPE): The tuner sets
exclusively traffic information stations with priority for
traffic announcements.
Press the rocker switch or (8) once or several
times to change the frequency in small steps.
Selecting stored stations
Select the desired waveband or memory bank.
Press one of the station buttons 0 - 9 (9).
Or in the List menu:
To change to the menu mode, press the DIS-ESC
button (6).
The "List" menu is selected.
Press the rocker switch or (8) to select a
frequency or station from the list.
Press the OK button (4).
The stored station is called up, provided that it can be
received at the current vehicle position.
The frequency of the station or the station name appears
on the display.
17
Storing stations
Note:
In the tuner regions THAILAND and EUROPE, the
Travelstore function is not available for the AM
waveband (MW, LW).
There are 2 ways of storing a station:
Storing stations manually
Searching and storing stations automatically
(Travelstore)
Storing stations manually
After tuning into a station, it can be stored as follows:
The "List" menu is selected.
Press one of the station buttons 0 - 9 (9) for approx. 2
seconds to which you want to assign the station.
Or in the List menu:
Press the
menu.
rocker switch (8) to open the "Tune"
The "BANDSCAN" function is selected.
To change to the menu mode, press the DIS-ESC
button (6).
The "List" menu is selected.
Press the rocker switch
STORE" function.
or
(8) to select the "T-
"TRAVEL STORE" appears on the display.
Press the rocker switch
location in the list.
Press and hold down the OK button (4) for approx. 2
seconds.
or
(8) to select a memory
The list displays the frequency or the name of the station at
the selected memory location. The station was stored.
Searching and storing stations automatically
You can automatically search for and store the 10 FM or
AM stations offering the strongest reception in the region in
the FMT or AMT memory bank. Stations that were
previously stored in this FMT memory bank are
automatically deleted.
18
To change to the menu mode, press the DIS-ESC
button (6).
Press the OK button (4).
The tuner starts with the automatic station storage. After
the storing is completed, the radio plays the station at
memory location 1 of the FMT or AMT level.
Changing the seek tuning sensitivity (SENS)
The seek tuning sensitivity determines whether the
automatic station seek tuning locates only strong stations
or also weaker stations. You can adjust the seek tuning
sensitivity separately for the FM and AM or MW/LW
wavebands.
The "List" menu is selected.
Press the
menu.
rocker switch (8) to open the "Tune"
The "BANDSCAN" function is selected.
Press the MENU button (13).
"SCAN" and the current frequency or the station name
appear on the display. The tuner is searching for stations.
As soon as the tuner has located a station, it is played.
Press the rocker switch
"SENS" function.
Press the OK button (4).
Press the rocker switch or (8) to adjust the
sensitivity between "SENS LOW 1" (lowest sensitivity)
and "SENS HIGH 6" (highest sensitivity).
or
(8) to select the
Press the OK button (4) to select a different function,
or press the DIS ESC button (6) to exit the menu.
Scanning all receivable stations
(BANDSCAN)
You can scan all receivable stations of a waveband. The
scan time can be set as described in the chapter "User
settings".
To change to the menu mode, press the DIS-ESC
button (6).
Select the waveband for which you want to set the
seek tuning sensitivity.
The Tuner menu opens.
Press the OK button (4).
To continue listening to the currently scanned station,
press the OK button (4).
After a complete search of the frequency band, scanning
stops. The previously set station is played.
Displaying radio text
Note:
This setting is available only in FM mode for the tuner
region EUROPE.
In addition to your programme, stations can broadcast text
news (radio text) that can be shown on the display.
Select the waveband in which you want to offer the
receivable stations.
19
To switch the display of radio text on/off:
press the MENU button (13).
broadcasting network for the duration of a traffic
announcement.
The Tuner menu opens.
Press the rocker switch
TEXT" function.
Switching the priority of traffic reports on/off
The priority of traffic announcements is switched on if the
traffic jam symbol appears on the display. This setting
limits the station search and scanning (SCAN) for traffic
information stations.
or
(8) to select the "R-
Press the OK button (4).
Switch between the settings with the rocker switch
or (8).
"R-TEXT" : Radio text on.
"R-TEXT" : Radio text off.
Press the OK button (4) to select a different function,
or press the DIS ESC button (6) to exit the menu.
Receiving traffic announcements
Note:
The priority for traffic announcements function is
available only in FM mode for the tuner region Europe.
If you switch on the priority for traffic announcements, the
device uses the RDS services TA (Traffic Announcement)
and EON (Enhanced Other Network). TA switches traffic
reports even if you are currently listening to a different
audio source. The volume for the traffic announcement can
be adjusted (see the chapter "User settings", section
"Changing volume presettings").
If no traffic information station is currently defined, the RDS
service EON ensures that the device automatically
changes to a traffic information station of the same
20
To switch the traffic report priority on/off,
press the MENU button (13).
The Tuner menu opens.
Press the rocker switch
"TRAFFIC" function.
Press the OK button (4).
or
(8) to select the
Switch between the settings with the rocker switch
or (8).
"TRAFFIC" : Priority on.
"TRAFFIC" : Priority off.
Receiving an alternative frequency of a
station
Note:
The functions Alternative Frequency and Regional are
available only in FM mode for the tuner region
EUROPE.
Press the OK button (4) to select a different function,
or press the DIS ESC button (6) to exit the menu.
Note:
For the device to switch through traffic reports, a
station must be defined that supports TA or belongs to
a broadcasting network with traffic information stations.
A signal tone appears if you leave the broadcast area of
the traffic information station or switch to a station that
does not support the traffic information priority. If a different
audio source than the tuner is active, the device
automatically searches for a traffic information station in
the background.
Skipping a traffic announcement
To cancel a traffic announcement without switching off the
priority of traffic announcements,
press the DIS-ESC button (6).
The previously active audio source is played again. If a
traffic announcement is broadcast again, the device
automatically switches it through again.
The device can automatically switch to the best alternative
frequency of the same station if the reception becomes
poor.
Allowing/preventing alternative frequencies (RDS)
To switch RDS on/off,
press the MENU button (13).
The Tuner menu opens, the "RDS" function is selected.
Press the OK button (4).
Switch between the settings with the rocker switch
or (8).
"RDS" : RDS on, allowing alternative
frequencies.
"RDS" : RDS off, preventing alternative
frequencies.
Press the OK button (4) to select a different function,
or press the DIS ESC button (6) to exit the menu.
21
Note:
For the device to switch to an alternative frequency
(AF) in case of poor reception, the station must also
support the RDS function Alternative frequency (AF).
Allow/prevent changing to other regional programmes
(REGIONAL)
Some stations divide their programmes into regional
programmes with different contents at certain times. You
can use the REG function to prevent the device from
switching to alternative frequencies that are transmitting
different programme content.
Press the OK button (4) to select a different function,
or press the DIS ESC button (6) to exit the menu.
Receiving the programme type
Note:
The programme type function (PTY) is available only in
FM mode for the tuner regions USA and EUROPE.
You can select a programme type (PTY) to purposefully
search for stations, for example, that broadcast rock music
or sport events.
To switch the regional function on/off,
press the MENU button (13).
Selecting a programme type or switching off PTY (PTY
TYPE)
Press the MENU button (13).
The Tuner menu opens.
The Tuner menu opens.
Press the rocker switch
TYPE" function.
Press the OK button (4).
Press the OK button (4).
Switch between the settings with the rocker switch
or (8).
"REGIONAL" : Regional function on. The tuner
only changes to alternative frequencies of the set
stations that broadcast the same regional
programme.
"REGIONAL" : Regional function off. The tuner
also changes to alternative frequencies that
broadcast another regional programme.
A list with available programme types and the setting "NO
PTY" (PTY off) are displayed.
Press the rocker switch
"REGIONAL" function.
22
or
(8) to select the
or
(8) to select the "PTY
Press the rocker switch or (8) to select the
desired programme type or the "NO PTY" setting.
Press the OK button (4) to select a different function,
or press the DIS ESC button (6) to exit the menu.
You can locate a station that broadcasts the selected
programme type by using the automatic station seek
tuning. For instructions, please read the section "Station
seek tuning" in this chapter.
If no station with the correct programme type is found, the
display briefly shows "NO PTY FOUND" and the original
frequency is adjusted again.
Selecting the programme type language (PTY LANG)
Note:
This setting is available only in FM mode for the tuner
region EUROPE.
You can select the language in which the programme
types should be displayed. Options include "DEUTSCH",
"ENGLISH" and "FRANÇAIS".
Press the MENU button (13).
The Tuner menu opens.
Press the rocker switch
LANG" function.
or
(8) to select the "PTY
Press the OK button (4).
Press the rocker switch
desired language.
or
(8) to select the
Press the
language.
Press the OK button (4) to select a different function,
or press the DIS ESC button (6) to exit the menu.
rocker switch (8) to switch on the selected
23
CD mode (audio)
The audio CD display
Audio CDs are played in the CD mode (audio). How to
insert and remove CDs is described in the chapter
"Startup".
Starting the audio CD mode
You can select an inserted audio CD as audio source:
Press the SRC button (12) repeatedly until "CD"
appears on the display.
The playback starts.
Note:
As long as the CD is in the drive, the device stores the
current track and the current playing time. After calling
up the audio source, the playback starts at the point
where it was interrupted.
24
(A)
Traffic information priority
(B)
Bluetooth status
(C)
Display area for track number and CD text (album,
artist, track name if available and switched on)
(D)
Random playback (MIX) or repeat function (RPT)
(E)
Playing time
®
Functions in the CD mode (audio)
The CD menu
The functions of the following table can be called directly
on the CD display by touching a button.
The functions of the following table can be called up in the
CD menu.
Function
Action
Display/description
Selecting
tracks
Press the
rocker switch
or (8).
Fast
search
Press and hold
the rocker
switch or
(8).
Audibly scanning a track
forward or back
Scanning
tracks
Press the OK
button (7) for
longer than 2
seconds.
"SCAN": Scans all tracks
on the CD (scan time can
be adjusted: chapter "User
settings"). Press again
briefly: Switches scan off
: Playing the next track
: Playing the previous
track (Repeats the
current track when
pressed once)
Function
Menu item
Options
Random
playback
MIX
"MIX CD" : Mixing the
tracks on the CD.
"MIX CD" : Regular
playback.
Repeating
tracks
REPEAT
"REPEAT TRACK" :
Repeat the current track.
"REPEAT TRACK" :
Regular playback.
Display CD
text
CD-TEXT
: The display shows CD
text.
: The display does not
show CD text.
Switching
scrolling text
on/off
SCROLL
: The track information
appears as scrolling text.
: The track information
does not appear as
scrolling text.
25
To select a function and its desired option in the CD menu,
press the MENU button (13).
The CD menu opens.
To select the desired function, press the rocker switch
or (8).
Press the OK button (4).
Press the rocker switch (8) to switch on the selected
option, or the rocker switch (8) to switch it off.
Press the OK button (4) to select a different function,
or press the DIS/ESC button (6) to exit the menu.
26
CD/USB mode (MP3/WMA)
The MP3 display
In CD/USB mode, you can play CD-Rs or CD-RWs or a
USB medium with MP3 or WMA tracks.
The chapter "Startup" describes what you must observe
when connecting and disconnecting USB media. It also
contains information about inserting and removing CDs.
Starting the CD/USB mode
You can select an already inserted CD-R or CD-RW or a
connected USB data carrier as audio source:
Press the SRC button (12) repeatedly until "CD" or
"MP3" or "USB" appears on the display.
The playback starts.
Note:
The USB mode can be selected only if a valid USB
medium is connected.
(A)
MP3 source ("CD MP3" or "USB")
(B)
Traffic information priority
(C)
Bluetooth status
(D)
Current directory
(E)
Display area for the file name and artist, album or
track (if stored as ID3 tag of the MP3 file)
(F)
Random playback (MIX) or repeat function (RPT)
(G)
Playing time
®
27
You can switch between the following modes with the DISESC button (6):
MP3 display
Browse mode
Playlist mode (if playlist is available on USB/CD)
Function
Action
Response
Scanning
tracks
Press the OK
button (4) for
longer than 2
seconds.
"SCAN": Scans all
tracks on the CD/USB
(scan time can be
adjusted: chapter
"User settings"). Press
again briefly: Switches
scan off
Functions in the CD/USB mode (MP3/WMA)
The functions of the following table can be called directly
on the MP3 display by touching a button.
Function
Action
Response
The MP3 menu
Selecting
folders
Press the rocker
switch or (8).
: Selecting the next
folder
: Selecting the
previous folder
The functions of the following table can be called up in the
MP3 menu.
Selecting
tracks
Fast search
28
Press the rocker
switch or (8).
Press and hold
the rocker switch
or (8).
: Playing the next
track
: Playing the
previous track
(Repeats the
current track when
pressed once)
Audibly scanning a
track forward or back
Function
Menu item
Options
Random
playback
MIX
"MIX FOLDER" : Mix
tracks of the current
folder.
"MIX ALL" : Mix all the
tracks.
Repeating
tracks
REPEAT
"REPEAT TRACK" :
Repeat the current track.
"REPEAT FOLDER" :
Repeat the current folder.
Press the OK button (4) to select a different function,
or press the DIS ESC button (6) to exit the menu.
Function
Menu item
Options
Displaying
track
information
DISPLAY
"ARTIST" : Display the
artist.
"ALBUM" : Display the
album.
"SONG" : Display the
track names.
The Browse mode
Switching
scrolling text
on/off
SCROLL
: The track information
appears as scrolling text.
: The track information
does not appear as
scrolling text.
In the Browse mode, tracks and directories are displayed
the same way they are stored on the MP3 data carrier.
This allows you to purposefully search for and open a
specific directory and select a track stored in that directory
without having to interrupt the current playback.
The browse display
To select a function and its desired option in the MP3
menu,
press the MENU button (13).
The MP3 menu opens.
To select the desired function, press the rocker switch
or (8).
Press the OK button (4).
(A)
To select the desired option among several options,
press the rocker switch or (8).
Marked directory or track (open or playback with
rocker switch (8))
(B)
Directory
Press the rocker switch (8) to switch on the selected
option, or the rocker switch (8) to switch it off.
(C)
Up and down arrows indicate in which direction
you can scroll
(D)
Currently playing track
29
(E)
Track
data carrier. The following playlist formats are valid: M3U,
PLS, WPL, ASX and RMP.
Selecting tracks in Browse mode
During MP3/WMA playback, press the DIS-ESC button
(6) repeatedly until the browse mode is displayed.
The Playlist display
It shows all folders and tracks stored on the data carrier.
To select a track or folder,
press the rocker switch
tracks and folders.
or
(8) to scroll through the
Fast scrolling is achieved by pressing the rocker switches
for a longer time.
Press the rocker switch (8) to change up to a higherlevel folder.
Press the rocker switch (8) to open a folder or to
play a track.
The files are played back in the order in which they were
physically stored on the data carrier. This order is also
displayed in the Browse mode.
Note:
Fast searching is not available in Browse mode.
The Playlist mode
The device can play playlists that were created with an
MP3 manager, such as WinAmp or Microsoft Media
Player. The playlists must be stored in the root folder of the
30
(A)
Playlist
(B)
Up and down arrows indicate in which direction
you can scroll
(C)
Marked playlist (open with
rocker switch (8))
Selecting tracks in Playlist mode
During MP3/WMA playback, press the DIS-ESC button
(6) repeatedly until the playlist mode is displayed.
It shows all playlists stored in the root folder of the data
carrier.
To select a track from a playlist,
press the rocker switch or
playlists.
(8) to scroll through the
Fast scrolling is achieved by pressing the rocker switches
for a longer time.
Press the
rocker switch (8) to open a playlist.
Press the rocker switch
the tracks of the playlist.
Press the
or
(8) to scroll through
rocker switch (8) to play a track.
The tracks are played in the order in which they are stored
in the playlist. This order is also displayed in the Playlist
mode.
Note:
Fast searching is not available in Playlist mode.
31
iPod mode
Note:
To connect an iPod, you require a corresponding
adapter cable and initial settings to be made. Please
contact your TATA service station.
(D)
Number of the list (playlist, album or artist)
(E)
Random playback (MIX) or repeat function (RPT)
(F)
Playing time
Functions in the iPod mode
Starting iPod mode
Function
Action
To select a connected iPod as audio source,
press the SRC button (12) repeatedly until "IPOD"
appears on the display.
Selecting
tracks
Press the
rocker switch
or (8).
: Playing the next track
: Playing the previous
track (Repeats the
current track when
pressed once)
Selecting a
list
Press the
rocker switch
or (8).
: Playing the next list
: Playing the previous list
Fast search
Press and
hold the
rocker switch
or (8).
Audibly scanning a track
forward or back
Scanning
tracks
Press the OK
button (4) for
longer than 2
seconds.
"SCAN": Scan all tracks of
the current list for approx.
10 seconds. Press again
briefly: Switches scan off
The iPod display appears. The playback starts.
The iPod display
(A)
Traffic information priority
(B)
Bluetooth status
(C)
Track number
32
®
Display/response
The iPod menu
The functions of the following table can be called up in the
iPod menu.
Function
Menu item
Options
Random
playback
MIX
"MIX LIST" : Mix the
tracks of the current list.
"MIX ALL" : Mix all the
tracks.
Repeating
tracks
REPEAT
"REPEAT TRACK" :
Repeat the current track.
"REPEAT LIST" :
Repeat the current list.
Press the OK button (4) to select a different function,
or press the DIS ESC button (6) to exit the menu.
To select a function and its desired option in the iPod
menu,
press the MENU button (13).
The iPod menu opens.
To select the desired function, press the rocker switch
or (8).
Press the OK button (4).
To select the desired option, press the rocker switch
or (8).
Press the rocker switch (8) to switch on the selected
option, or the rocker switch (8) to switch it off.
33
Bluetooth® streaming mode
Devices such as MP3 players can also be connected to the
®
device via Bluetooth if they feature the corresponding
equipment. The transfer of audio contents, such as music,
®
®
via Bluetooth is referred to as Bluetooth streaming.
®
For additional information about Bluetooth technology,
®
please refer to the chapter "Bluetooth phone call".
Registering and connecting Bluetooth®
players
®
The device can be registered with up to 5 Bluetooth cell
phones or other devices such as MP3 players. If you
®
register a sixth one, the Bluetooth device registered first is
unregistered.
For additional information about managing more registered
®
®
Bluetooth devices, see the chapter "Bluetooth phone
®
call", section "Managing registered Bluetooth devices".
®
To register a Bluetooth player,
press the MENU button (13).
Press the rocker switch (8) repeatedly until the
system menu "Syst" opens.
The "BT" menu item is selected.
Press the OK button (4) to call up the menu item.
The "PAIR" menu item is selected.
34
Press the OK button (4) to call up the menu item.
Press the rocker switch
menu item is selected.
Press the OK button (4).
or
(8) until the "STREAM"
If necessary, you can enter the PIN number of the
®
Bluetooth player:
Enter the number sequence by pressing the
corresponding buttons of the keys (9).
After entering one digit, the device automatically switches
to the next one. To correct any entry errors, select the
corresponding digit by pressing the rocker switch or
(8) again.
After entering the complete PIN number,
press the OK button (4).
Note:
Entering the PIN of the device (default "1234") may be
®
required in the Bluetooth player to be registered. To
®
do so, follow the instructions of the Bluetooth player.
"START PAIRING" appears on the display. As soon as the
connection is established, "DEVICE CONNECTED" briefly
appears on the display.
Note:
The time required for the connection is dependent
®
upon the Bluetooth player and can differ from device
to device.
Automatic connection of the Bluetooth®
player
During switch-on, the car sound system automatically
®
attempts to establish a Bluetooth connection to the
®
Bluetooth player connected last or to the first device in the
list of registered devices.
button (7). If necessary, attempt to manually establish
®
the connection to the Bluetooth player in the device
®
list (see the section "Managing registered Bluetooth
®
devices in the device list" in the chapter "Bluetooth
phone call").
If the connection has been established, "DEVICE
CONNECTED" is briefly shown on the display, and you
®
can select the connected Bluetooth player as audio
®
source. If the car sound system was in Bluetooth
streaming mode during switch-off, the connected
®
Bluetooth player is automatically selected as current
audio source after the connection is established.
If the transfer of audio data fails, you can select on the
®
Bluetooth player (or the streaming-ready cell phone)
whether you want to allow or disallow the audio
streaming to the car sound system. If necessary,
®
please read the instructions of your Bluetooth player
for further details.
If the connection cannot be established, the display shows
a corresponding message:
CONNECTION FAILED – DEVICE NOT FOUND: The
®
car sound system cannot find the Bluetooth player,
®
e.g. because the Bluetooth player is switched off or its
®
Bluetooth function is deactivated.
CONNECTION FAILED: The car sound system finds
®
the Bluetooth player, but the connection cannot be
®
established due to a Bluetooth error.
In these two cases, the car sound system continues to
attempt the connection in the background. If you
®
attempt to call up a Bluetooth function on the car
sound system, "BLUETOOTH LINK BUSY – PRESS
REJECT KEY TO CANCEL" is displayed. If you want
to cancel the connection attempt, press the
CONNECTION FAILED – PLAY FROM THE DEVICE
VIA BLUETOOTH: The car sound system can
®
®
establish a Bluetooth connection to the Bluetooth
®
player, but the Bluetooth player can transfer audio
data, e.g. since you currently have a menu open on the
®
Bluetooth player.
Starting the Bluetooth® streaming mode
Press the SRC button (12) repeatedly until
"STREAMING" appears on the display.
The playback starts.
Notes:
®
The Bluetooth streaming mode can be selected
®
only if a suitable Bluetooth device is connected.
If a phone call is taking place or the phone book of
a connected cell phone is being transferred in the
®
Bluetooth streaming mode, the audio transfer is
35
interrupted for the duration of phone call or the
phone book download.
®
If the connection is lost in Bluetooth streaming
mode, "CONNECTION LOST – PRESS OK TO
RETRY" appears on the display. Press the OK
button (4) to re-establish the connection, or press
the DIS ESC button (6) to return to the last audio
®
source. If the Bluetooth player is not ready or out
of range when pressing the OK button (4),
"CONNECTION FAILED - DEVICE NOT FOUND"
appears. The device then automatically returns to
the audio source heard last.
The Bluetooth® streaming display
(A)
Traffic information priority
(B)
Bluetooth status
(C)
Track information (The track name is displayed
®
only if this function is supported by the Bluetooth
player)
®
Functions in the Bluetooth® streaming
mode
36
Function
Action
Display/response
Selecting
tracks
Press the
rocker
switch or
(8).
: Playing the next track
:
Playing the previous
track (Repeats the current
track when pressed once)
AUX mode
You can connect different external audio sources to the
device via the AUX input:
Press the rocker switch (8) repeatedly until the
system menu "Syst" opens.
Press the rocker switch
menu item is selected.
Press the OK button (4) to call up the menu item.
Switch between the settings with the rocker switch
or (8).
"AUX" : AUX input on.
"AUX" : AUX input off.
Press the OK button (4) to select a different function,
or press the DIS ESC button (6) to exit the menu.
External audio sources, such as portable CD players,
MiniDisc players or MP3 players.
Apple iPod box
This device is factory-set for the connection of an external
audio source.
To connect an external audio source, please open the
“AUX
“ flap. Insert the connector of the external audio
source in the AUX slot. To locate the slot in the car, please
read the car manual.
Note:
To connect an iPod, you require a corresponding
adapter cable and initial settings to be made. Please
contact your TATA service station.
or
(8) until the "AUX"
Naming external audio sources (AUXEDIT)
For the AUX input, you can enter a separate name that is
shown on the display if you select the connected audio
source.
Press the MENU button (13).
Selecting the external audio source and
switching it on/off
Press the rocker switch (8) repeatedly until the
system menu "Syst" opens.
You can then select the external audio source by pressing
the SRC button (12) repeatedly until "AUX" appears on
the display.
Press the rocker switch or (8) until the
"AUXEDIT" menu item is selected.
Press the OK button (4) to call up the menu item.
If there is no external audio source connected to the AUX
input, you can deactivate the AUX input in the menu.
The current name is displayed. The position digit flashes
and can be changed. You can now enter your own name
with up to 14 characters:
Press the MENU button (13).
37
Enter the name by pressing the corresponding buttons
of the keys (9). Select the desired letter, if necessary
by pressing a button several times.
The volume of the external audio source and the
volume of the audio source of the radio are adjusted
separately:
Adjust the volume for the radio, CD,USB or
®
Bluetooth streaming playback with the volume
control (10).
Use an output on the connected device whose
volume you can adjust (e.g. the headphones
output), and adjust the volume of the external
audio source with the corresponding controller of
the device.
After entering one letter, the device automatically switches
to the next one. To correct any entry errors, select the
corresponding digit by pressing the rocker switch or
(8) again.
After entering the complete name,
press the OK button (4) to store the name entered.
Notes:
To quit the text input without changing the
welcome text, press the DIS-ESC button (6).
If the text entry is interrupted, e.g. by a traffic
announcement, the previous changes are not
stored.
Mixing an external audio source with
another audio source (MIX AUX)
You can play an external audio source simultaneously with
any other audio source of the radio (radio, CD, USB or
®
Bluetooth streaming).
This function allows you, e.g. to connect a mobile
navigation device as external audio source and to play the
navigation announcements via the radio loudspeakers
while listening to one of the other audio sources. Note that
the other audio source is not muted in this case if a
navigation announcement is broadcast.
Note:
38
The simultaneous playback must be activated in the menu.
If "MIX AUX" is switched on, the audio source connected
via the AUX input is played back together with the currently
selected audio source (e.g. radio or CD). If "MIX AUX" is
switched off, only the selected audio source is played in
each case.
To switch "MIX AUX" on/off,
press the MENU button (13).
Press the rocker switch (8) repeatedly until the
system menu "Syst" opens.
Press the rocker switch
menu item is selected.
Press the OK button (4) to call up the menu item.
Switch between the settings with the rocker switch
or (8).
"MIX AUX" : On.
"MIX AUX" : Off.
or
(8) until the "MIX AUX"
Press the OK button (4) to select a different function,
or press the DIS ESC button (6) to exit the menu.
39
Bluetooth® phone call
®
The integrated Bluetooth module in your device allows the
®
handsfree use of a phone via a Bluetooth connection. The
cell phone can remain in the bag or the glove compartment
– you have both hands free for steering.
®
Besides cell phones, you can also connect Bluetooth ready MP3 players with the device and play back audio
®
contents via Bluetooth streaming. For further details,
®
please read the chapter "Bluetooth streaming mode".
Bluetooth® preparation
®
®
Prerequisites for Bluetooth phone calls are a Bluetooth
cell phone and the installation of the supplied microphone
(see the installation instructions).
Note:
Use only the supplied microphone. Conventional
microphones are not suitable for a connection to this
device.
Contact your TATA service station for a list of cell phones
that are compatible with the car sound system.
®
The Bluetooth technology is a wireless connection with a
short range. That is, the cell phone must be located in the
vicinity of the car sound system (in the vehicle).
connection is subsequently established. This connection
remains in effect as long as the cell phone is within range.
If the connection is interrupted, e.g. because you moved
the cell phone outside the range, the connection is
automatically re-established as soon as you are back
within range.
If you want to connect another registered cell phone with
the car sound system, you can do so manually (please
®
read the section "Managing registered Bluetooth devices"
in this chapter). If the device is switched off and on again, it
automatically attempts to establish a connection with the
master telephone (see the section "Determining the master
telephone"). If the master telephone is not within range or
switched off, the device attempts to establish a connection
with another registered cell phone, and in the order in
which the telephones were connected last.
Opening the Bluetooth® menu
®
The Bluetooth menu contains all the required settings and
functions.
®
To open the Bluetooth menu,
press the MENU button (13).
Press the rocker switch (8) repeatedly until the
system menu "Syst" opens.
How is a Bluetooth® connection
established?
The "BT" menu item is selected.
First, the cell phone and the car sound system have to
"become acquainted" with each other, i.e. they must be
®
registered. When you register the devices, a Bluetooth
The Bluetooth menu opens.
40
Press the OK button (4) to call up the menu item.
®
Note:
®
If a Bluetooth process is currently taking place (e.g.
registering a device or downloading a phone book),
®
you cannot open the Bluetooth menu for the duration
of the process. A corresponding message appears on
the display. To return to the current audio source,
press the DIS ESC button (6).
®
last and is available. While the Bluetooth connection is
®
being established, the Bluetooth symbol flashes on the
display. If the connection has been established, "DEVICE
CONNECTED" is briefly shown on the display, and the
®
symbol for the Bluetooth signal strength appears. If no
connection could be established, then "CONNECTION
FAILED" is displayed.
Notes:
The time required for the connection is dependent
upon the cell phone and can differ from cell phone
to cell phone.
®
The Bluetooth signal strength is displayed only if
it is supported by the connected cell phone.
Registering the cell phone
®
The device can be registered with up to 5 Bluetooth cell
phones or other devices such as MP3 players. If you
®
register a sixth one, the Bluetooth device registered first is
unregistered.
To register a cell phone,
®
open the Bluetooth menu.
The "PAIR" menu item is selected.
Press the OK button (4) to call up the menu item.
The Device menu opens. The "PHONE" (cell phone) menu
item is selected.
Press the OK button (4).
®
The display shows the PIN number for the Bluetooth
®
connection. The Bluetooth cell phone can now be
registered.
If requested, enter the PIN displayed in your cell
phone.
The car sound system independently establishes a
®
Bluetooth connection to the cell phone that was registered
Automatic connection of the cell phone
During switch-on, the car sound system automatically
®
attempts to establish a Bluetooth connection to the cell
phone connected last or to the first device in the list of
registered devices.
After the connection is established, "DEVICE
CONNECTED" briefly appears on the display.
If the connection cannot be established, the display shows
a corresponding message:
CONNECTION FAILED – DEVICE NOT FOUND: The
car sound system cannot find the cell phone, e.g.
®
because the cell phone is switched off or its Bluetooth
function is deactivated.
41
CONNECTION FAILED: The car sound system finds
the cell phone, but the connection cannot be
®
established due to a Bluetooth error.
In these two cases, the car sound system continues to
attempt the connection in the background. If you
®
attempt to call up a Bluetooth function on the car
sound system, "BLUETOOTH LINK BUSY – PRESS
REJECT KEY TO CANCEL" is displayed. If you want
to cancel the connection attempt, press the
button (7). If necessary, attempt to manually establish
the connection to the cell phone in the device list (see
®
the section "Managing registered Bluetooth devices in
the device list").
Determining the master telephone
If you register several telephones with the device, you can
determine a master telephone. The master telephone has
a higher priority than the other registered telephones:
If the device is switched on, it first attempts to establish
a connection with the master telephone. Only if the
master telephone is not available, does the device
attempt to establish a connection with the telephone
registered last.
®
If you register a sixth Bluetooth device, the one
registered first is unregistered. During the process, the
master telephone always remains registered, even if it
®
is the first registered Bluetooth device in the list.
®
Instead, the next Bluetooth device in the list is
unregistered.
®
Open the Bluetooth menu.
42
Press the rocker switch
menu item is selected.
or
(8) until the "MASTER"
Press the OK button (4) to call up the menu item.
A list of the registered cell phones is displayed.
Press the rocker switch
telephone.
Press the OK button (4).
or
(8) to select a
The selected telephone is defined as master telephone
and identified by an "M".
To delete the master telephone,
select the master telephone in the list with the rocker
switch or (8).
Press the OK button (4).
The "DELETE" option is selected in the submenu.
Press the OK button (4).
The display briefly shows "DELETED MASTER", and you
are returned to the list of registered cell phones.
Note:
After the deletion, no telephone is defined as master
telephone. However, the former master telephone
remains registered.
Managing registered Bluetooth® devices
®
In the Bluetooth menu, you can manage the registered
®
Bluetooth devices (cell phones and devices such as MP3
player).
The "DEL ALL" function allows you to unregister all
®
registered Bluetooth devices.
The registered devices are displayed on the device list
(DEV LIST). You can do the following:
Disconnect the connection to the currently connected
®
Bluetooth device (DISCON)
Establish a connection to one of the registered
®
Bluetooth devices (CONNECT)
®
Unregister a Bluetooth device (DELETE)
®
Unregister all registered Bluetooth devices
®
Open the Bluetooth menu.
Press the rocker switch
menu item is selected.
or
(8) until the "DEL ALL"
Press the OK button (4) to call up the menu item.
The "YES" menu item is selected.
Press the OK button (4) to leave all registered
®
®
Bluetooth devices as is and return to the Bluetooth
menu.
®
Managing registered Bluetooth devices in the device
list
®
To mange the registered Bluetooth devices in the device
list,
®
open the Bluetooth menu.
Press the rocker switch or
LIST" menu item is selected.
(8) until the "DEV
Press the OK button (4) to call up the menu item.
Use the rocker switch or (8) to select whether cell
phones (PHONE) or devices such as MP3 players
(STREAM) should be managed.
Press the OK button (4).
Select the desired Bluetooth device with the rocker
switch or (8).
Press the OK button (4).
®
Press the OK button (4) to unregister all registered
®
Bluetooth devices.
The display briefly shows "DELETED ALL DEVICES", and
®
you are returned to the Bluetooth menu.
OR:
Use the rocker switch
item "NO" or "EXIT".
or
(8) to select the menu
43
Select one of the following functions with the rocker
switch or (8):
®
"CONNECT": The selected Bluetooth device is
connected.
"DISCON": The connection to the selected
®
Bluetooth device is disconnected.
®
"DELETE": The selected Bluetooth device is
unregistered.
Note:
The "DISCON" function is only available to the
®
currently connected Bluetooth device, the
"CONNECT" function only for the other registered
®
Bluetooth devices.
Press the OK button (4).
Before you are returned to the device list, the following
messages are briefly shown on the display:
44
If you selected "CONNECT": First "CONNECTING"
(the radio attempts to establish the connection), then
"DEVICE CONNECTED" (the connection is
established) or "CONNECTION FAILED – DEVICE
NOT FOUND" (the connection could not be
established).
If you selected "DISCON": "DEVICE
DISCONNECTED" (connection to the device is
interrupted).
If you selected "DELETE": "DELETED DEVICE" (the
device is unregistered). If you selected the last device
from the list, "EMPTY" (empty list) is briefly displayed
®
and you are returned to the Bluetooth menu.
Answering/rejecting a phone call
If you are receiving a call, the display shows "INCOMING
CALL" and the phone number of the caller or his entry in
the phone book. The active audio source is muted and the
ring tone is sent to the loudspeakers. If the cell phone does
not send a ring tone, the device generates its own ring
tone.
In case of an incoming call, you must answer or reject the
call. At this time, it is not possible to perform another
operation using the car sound system.
To reject the call,
press the
button (7).
The display shows "CALL ENDED".
To answer the call,
press the
button (11).
The display shows "IN CALL – HANDSFREE". Your
caller's voice is broadcast via the loudspeakers.
Notes:
During the call, you can change the volume by
means of the volume control (10).
®
During the Bluetooth phone call, no traffic or
navigation announcements are switched through.
Making a call (DIAL NEW)
There are several ways of making a phone call via the car
sound system:
Enter and call a phone number or store it under a
button of the keys (9) (see this section and the section
"Speed dial").
Calling a number stored under a button of the keys (9)
(see the section "Speed dial").
Calling a phone number stored in the phone book of
the device (see the section "Storing and calling a
phone number in the phone book of the device" and
the section "Speed dial"). If the cell phone supports
voice dialing, you can also call a number via voice
dialing with the device (see the section "Speed dial").
Calling a phone number stored in the phone book of
the connected cell phone (also via voice dialing, see
the section "The phone book of the cell phone" and the
section "Speed dial").
Calling a phone number from the history (see the
section "Calling a phone number from the history" and
the section "Speed dial").
To enter a phone number and make a call,
®
open the Bluetooth menu.
Press the rocker switch or
NEW" menu item is selected.
(8) until the "DIAL
Press the OK button (4) to call up the menu item.
Now you can enter a phone number:
Enter the number sequence by pressing the
corresponding buttons of the keys (9).
After entering one digit, the device automatically switches
to the next one. To correct any entry errors, select the
corresponding digit by pressing the rocker switch or
(8) again.
To call the phone numbers entered,
press the
button (11).
The display shows "CALLING" and the dialed phone
number or its entry in the phone book.
To store the number entered under one of the buttons 0 - 9
of the keys (9),
press the OK button (4).
The display shows "Press Number Key To Store OR Press
ACCEPT To Call".
Press the desired key of the keys (9).
"Number Saved" briefly appears on the display. The
number entered is stored under the selected button of the
keys (9) and you are returned to the menu.
Notes:
You can store up to 10 numbers under the buttons
0 - 9 of the keys (9).
If you save a number under a button that already
features a saved number, the existing number is
automatically replaced.
45
If you did not enter a number, "NO NUMBER TO
SAVE" is briefly displayed after pressing the button
0 - 9 (9) and you are returned to the number input.
Ending a call
To end a call,
press the
button (7).
The display shows "CALL ENDED".
Redirecting an ongoing phone call to the
cell phone
By default, the voice of the person calling you is played
back via the loudspeakers of the vehicle during a phone
call. You can also redirect a phone call to your cell phone:
Briefly press the
button (11).
The display shows "IN CALL – HEADSET". The
loudspeakers in the vehicle are muted and the voice of
your caller is redirected to your cell phone. By pressing the
button (11) again, the sound is played back again via
the loudspeakers in the vehicle and the display shows "IN
CALL – HANDSFREE" again.
OR:
Press the On/Off button (10) for longer than 2
seconds.
The car sound system is switched off and your caller is
redirected to your cell phone.
Storing and calling a phone number in the
phone book of the device
The device features its own phone book in which you can
store 10 entries. Every entry consists of a name and a
phone number. The numbers stored in the phone book of
the device are available independent of the currently
connected cell phone.
Storing phone numbers
To store an entry in the phone book of the device,
®
open the Bluetooth menu.
Press the rocker switch or
PBK" menu item is selected.
Press the OK button (4) to call up the menu item.
The "ADD NEW" menu item is selected.
Press the OK button (4).
You can now enter your the name of the entry with up to
14 characters:
Enter the name by pressing the corresponding buttons
of the keys (9). Select the desired letter, if necessary
by pressing a button several times.
After entering one letter, the device automatically switches
to the next one. To correct any entry errors, select the
corresponding digit by pressing the rocker switch or
(8) again.
After entering the complete name,
46
(8) until the "RAD
press the OK button (4).
You can now enter the phone number with up to 14 digits:
Enter the number sequence by pressing the
corresponding buttons of the keys (9).
Editing an entry
To edit an existing entry in the phone book of the device,
®
open the Bluetooth menu.
After entering the complete phone number,
press the OK button (4).
Press the rocker switch or
PBK" menu item is selected.
Press the OK button (4) to call up the menu item.
The new entry is stored. You are returned to the menu.
Calling a phone number
To call a number stored in the phone book of the device,
®
open the Bluetooth menu.
Press the rocker switch or
PBK" menu item is selected.
Press the OK button (4).
Press the rocker switch or
PBK" menu item is selected.
(8) until the "RAD
Press the OK button (4) to call up the menu item.
Press the rocker switch or
PBK" menu item is selected.
Press the OK button (4).
(8) until the "VIEW
The entries of the phone book of the device are displayed.
Select the desired entry with the rocker switch
(8).
Press the
or
button (11) to make the call.
The display shows "CALLING" and the selected entry in
the phone book.
(8) until the "RAD
(8) until the "EDIT
The entries of the phone book of the device are displayed.
Select the desired entry with the rocker switch
(8).
Press the OK button (4).
You can now edit the name of the entry:
If necessary, press the rocker switch
select a position.
or
or
(8) to
Enter the desired character by pressing the
corresponding button of the keys (9) once or several
times.
After editing the complete name,
press the OK button (4).
Now you can edit the phone number:
If necessary, press the rocker switch
select a position.
or
(8) to
47
Enter the desired digit by pressing the corresponding
button of the keys (9).
item and press the OK button (4). Use the rocker
switch or (8) to select "YES" and press the OK
button (4). The display briefly shows "DELETED ALL
CONTACTS" and you are returned to the menu.
After editing the complete phone number,
press the OK button (4).
The modified entry is stored. You are returned to the
menu.
Deleting entries
To delete an existing entry in the phone book of the device,
®
open the Bluetooth menu.
Press the rocker switch or
PBK" menu item is selected.
Press the OK button (4) to call up the menu item.
Press the rocker switch
menu item is selected.
Press the OK button (4).
or
(8) until the "DELETE"
Press the OK button (4).
"CONTACT DELETED" briefly appears on the display. The
selected entry is deleted and you are returned to the menu.
Note:
To delete all entries of the phone book, select the
"DEL ALL" menu item instead of the "DELETE" menu
48
You can upload the phone book of the connected cell
phone to the device and then select and call entries from
the phone book via the device.
Note:
Downloading the phone book means that the entries
are copied from the cell phone to the device. The
phone book of the cell phone is not deleted in the
process.
(8) until the "RAD
The entries of the phone book of the device are displayed.
Select the desired entry with the rocker switch or
(8).
The phone book of the cell phone
The device stores phone book entries of up to 3 cell
phones with up to 500 entries each. Each entry may
contain up to 4 different phone numbers, e.g. for private
and office numbers of a person.
Downloading a phone book
To download the phone book,
®
open the Bluetooth menu.
Press the rocker switch or
DNL" menu item is selected.
(8) until the "PBK
Press the OK button (4) to call up the menu item.
The download of the phone book from the cell phone to the
device starts. "PHONEBOOK DOWNLOADING – PLEASE
WAIT" appears on the display. After the download is
complete, it shows "DOWNLOAD COMPLETE"; if the
download was not successful, it shows "DOWNLOAD
FAILED".
Note:
®
If the device is currently in the Bluetooth streaming
mode when the phone book is being downloaded, the
audio transfer is interrupted for the duration of the
phone book download.
Calling an entry in the phone book
Note:
Only the phone book of the currently connected cell
phone is available (if this phone book has already
been downloaded to the device).
To call an entry in the phone book of the cell phone,
®
open the Bluetooth menu.
Press the rocker switch or
PBK" menu item is selected.
Press the OK button (4) to call up the menu item.
To call the first number of the entry,
press the
button (11).
OR:
To call a different number of the entry,
press the OK button (4).
All numbers stored under this entry are displayed.
Select the desired number with the rocker switch
(8).
(8) until the "MOB
The entries of the phone book are displayed.
Select the desired entry with the rocker switch
(8).
In each case, the first available number for the currently
selected entry is displayed. If additional numbers are
available under the entry, e.g. an office or cell phone
number, it is indicated by means of corresponding symbols
on the display.
press the
or
button (11).
The call is being made. "CALLING" and the name of the
entry are shown on the display.
or
Note:
To reach the desired entry faster, press the button of
the alphanumeric keys (9) with the corresponding
starting letter.
49
Calling a phone number from the history
Note:
The history of the cell phone is available only if it is
supported by the cell phone.
The history of the cell phone is automatically downloaded
®
after establishing the Bluetooth connection. The following
phone numbers are stored in the history of the cell phone:
Numbers dialed
The numbers of received calls
The numbers of missed calls
To call one of these numbers,
®
open the Bluetooth menu.
Press the rocker switch or
LOG" menu item is selected.
(8) until the "CALL
Press the OK button (4) to call up the menu item.
Press the rocker switch or (8) to select one of the
following menu items:
RECEIVED: Received calls
MISSED: Missed calls
DIALED: Numbers dialed
Press the OK button (4) to call up the menu item.
The entries of the corresponding list are displayed. The
date and time are displayed for the selected entry, if
available.
50
Note:
Every list contains up to 5 entries. The order of the list
entries is determined by the cell phone.
Select the desired entry with the rocker switch
(8).
Press the
or
button (11) to make the call.
Speed dial
The speed dial function allows the direct entry of a phone
number and access to numbers that are stored under the
buttons of the keys (9), to the phone book of the device, to
the phone book transferred from the cell phone, to the lists
of the history and to the voice dialing function.
To use the speed dial,
during the playback of the current audio source, simply
press the
button (11).
A menu with the following menu items is displayed:
MOB PBK: Phone book uploaded from the cell phone
RAD PBK: Phone book of the device
RECEIVED: Received calls
MISSED: Missed calls
DIALED: Numbers dialed
VR DIAL: Voice dialing
To enter a number directly,
enter the number sequence by pressing the
corresponding buttons of the keys (9).
The menu for entering numbers opens automatically by
pressing the first number button. After entering one digit,
the device automatically switches to the next one. To
correct any entry errors, select the corresponding digit by
pressing the rocker switch or (8) again.
The voice recognition is activated. "SPEAK NOW" appears
on the display.
Notes:
The duration for which the voice recognition
activated depends on the connected cell phone.
If no cell phone is connected, "VOICE DIAL
FAILED – NO BLUETOOTH CONNECTION"
briefly appears on the display.
If the voice recognition function of the cell phone is
switched off, "VOICE RECOGNITION LINK NOT
ACTIVE" briefly appears on the display.
To call the phone numbers entered,
press the
button (11).
To call a number that is stored under one of the buttons 0
– 9 of the keys (9),
press and hold the corresponding button of the keys
(9) for longer than 2 seconds.
To dial a number from one of the phone books or one of
the lists of the history,
select the desired menu item with the rocker switch
or (8).
Press the OK button (4).
Select the desired entry or the number with the rocker
switch or (8).
Press the
button (11) to make the call.
To use voice dialing,
use the rocker switch
DIAL" menu item.
Press the OK button (4).
Say the name for the desired phone number.
Notes:
If the name spoken is not recognised, "VOICE
RECOGNITION LINK NOT ACTIVE" briefly
appears on the display.
To cancel voice recognition and return to the last
audio source, press the
button (7).
To use voice dialing, this function must be
supported by your cell phone and activated in the
cell phone.
The call is being made.
Changing the PIN (PIN NUM)
or
(8) to select the "VR
If you want to register a cell phone with the car sound
system, you must enter PIN "1234". This PIN can also be
changed:
51
®
®
Open the Bluetooth menu.
Press the rocker switch
menu item is selected.
Press the OK button (4) to call up the menu item.
or
You can now enter a new Bluetooth name:
(8) until the "PIN NUM"
Now you can enter the new PIN:
Enter the number sequence by pressing the
corresponding buttons of the keys (9).
After entering one digit, the device automatically switches
to the next one. To correct any entry errors, select the
corresponding digit by pressing the rocker switch or
(8) again.
After entering the complete new PIN number,
press the OK button (4).
"PIN NUMBER SAVED" briefly appears on the display.
The new PIN number is stored and you are returned to the
menu.
Changing the Bluetooth® name of the device
(RAD NAME)
®
The Bluetooth name of the device under which it is
®
displayed by other Bluetooth devices is set to "TATA" at
the factory. To change this name,
®
open the Bluetooth menu.
Press the rocker switch or (8) until the "RAD
NAME" menu item is selected.
Press the OK button (4) to call up the menu item.
52
Enter the name by pressing the corresponding buttons
of the keys (9). Select the desired letter, if necessary
by pressing a button several times.
After entering one letter, the device automatically switches
to the next one. To correct any entry errors, select the
corresponding digit by pressing the rocker switch or
(8) again.
After entering the complete name,
press the OK button (4).
"RADIO NAME SAVED" briefly appears on the display.
®
The new Bluetooth name is stored and you are returned
to the menu.
Remote controls
The most frequently used functions can also be controlled
with the steering wheel remote control and the infrared
remote control (IR remote control).
Functions of the steering wheel remote
control
General
Left keys:
VOL +
Increases the volume.
VOL –
Decreases the volume.
MUTE
Muting the device/cancelling mute
®
Bluetooth cell phone: Rejects an incoming
call or ends the current phone call
Right keys:
MODE Changes between audio sources
®
Bluetooth cell phone: Answers an
incoming call
FM/AM mode
Right keys:
SEEK
Short press: Increases frequency in
increments
Long press: Starts seek tuning forward to
the next receivable station
SEEK
Short press: Decreases frequency in
increments
Long press: Starts seek tuning backward
to the next receivable station
CD mode
Right keys:
SEEK
Selects the next track
SEEK
Selects the previous track
MP3 mode
Right keys:
SEEK
Short press: Selects the next track
Long press: Selects the next directory
SEEK
Short press: Selects the previous track
Long press: Selects the previous directory
53
Functions of the IR remote control
Selects the next directory
General
SRC
Changes between audio sources
VOLUME +
Increases the volume
VOLUME –
Decreases the volume
Muting the device/cancelling mute
FM/AM mode
Selects the previous directory
Long press: Fast searching forward
Short press: Selects the previous track
Long press: Fast searching reverse
iPod mode (if iPod box is properly connected)
Starts seek tuning forward to the next
receivable station
Starts seek tuning backward to the next
receivable station
Increases frequency in increments
Decreases frequency in increments
CD mode
Selects the next track
Selects the previous track
Short press: Selects the next track
Long press: Fast searching forward
Short press: Selects the previous track
Long press: Fast searching reverse
54
MP3 mode
Selects the next list
Selects the previous list
Short press: Selects the next track
Long press: Fast searching forward
Short press: Selects the previous track
Long press: Fast searching reverse
Sound settings
The following sound settings can be changed in the Audio
menu:
Adjusting bass, treble and volume distribution
Selecting the sound presetting
Changing equaliser settings
Note:
The settings for bass (BASS), middle (MIDDLE) and
treble (TREBLE) are each stored for the current audio
source. For traffic announcements and telephone calls,
the setting of the volume distribution (FADER,
BALANCE) is stored separately.
The currently active setting is represented by a bar display.
Press the OK button (4) to call up the menu item.
To change the setting, press the rocker switch
(8).
Press the OK button (4) to select a different function,
or press the DIS ESC button (6) to exit the menu.
Opening the Audio menu
To call up the Audio menu,
press the AUDIO button (5).
OR:
Press the MENU button (13).
Press the
displayed.
rocker switch (8) until the Audio menu is
Adjusting bass, treble and volume
distribution
To perform settings,
press the rocker switch or (8) in the Audio menu
to select one of these menu items.
"BASS": Bass level between -7 and +7
"TREBLE": Treble between -7 and +7
"BALANCE": Volume distribution left/right between
-9 and +9
"FADER": Volume distribution front/rear between 9 and +9
"X-BASS": Increasing the bass at low volume from
0 (off) to 3
or
Selecting a sound preset (PRESETS)
You can select sound presets for Pop, Rock and Classical.
A sound preset allows adjusting a suitable combination of
bass and treble for the type of music.
in the Audio menu, press the rocker switch or
repeatedly until the "EN AUDIO" menu item is
selected.
Press the OK button (4) to call up the menu item.
(8)
The Enhanced Audio menu is opened.
In the Enhanced Audio menu, press the rocker switch
or (8) repeatedly until the "PRESETS" menu item
is selected.
Press the OK button (4) to call up the menu item.
55
Select one of the following sound presets with the
rocker switch or (8):
"POP"
"ROCK"
"CLASSIC"
Switch the selected sound preset off with the rocker
switch (8) ( ) or on with the rocker switch (8) ( ).
Press the OK button (4) to select a different function,
or press the DIS ESC button (6) to exit the menu.
Notes:
Only one sound preset can be switched on at any
time. To activate no sound preset, switch off the
currently switched-on sound preset.
To obtain a perfect sound, the presettings can be
supplemented further by the equaliser settings
according to personal preferences. If you change
the level setting for bass, treble or middle, the
selected sound preset is switched off in the menu;
but the other level settings of the sound preset are
retained.
Equalizer settings
Your device features a digital 3-band equaliser. It allows
you to adjust the sound to your vehicle and your personal
preferences and eliminate problems, such as droning or
poor voice comprehension.
56
Which equaliser setting is the correct one?
Sound impression
Measures
Frequency (Hz)
Level
Unclean bass,
droning, unpleasant
pressure
100–200
approx. –4
Very transparent,
aggressive sound,
no stereo effect
1000–2500
approx. –4 to –6
Muffled sound, low
transparency,
instruments do not
excel
10000–12500
approx. +4 to +6
Insufficient bass
60–80
approx. +4 to +6
Tip:
Insert a CD which you know very well if you want to
adjust the equaliser. First, set the bass, treble,
balance, and fader to zero. For equaliser settings, first
change the settings of the mid-frequencies, followed by
those for treble and finally bass.
The following table below shows the expanded setting
options for bass (EBASS), treble (ETREBLE), middle
(EMIDDLE) and X-Bass (EXBASS) that can be performed
in the Enhanced Audio menu.
Note:
The table does not contain all the settings that are
possible in the Enhanced Audio menu.
AUDIO (Audio menu)
EN AUDIO (Enhanced Audio menu)
Level
(GAIN)
Frequency
(FREQ)
Quality
factor
(QUAL)
To adjust the equalizer,
in the Audio menu, press the rocker switch or
repeatedly until the "EN AUDIO" menu item is
selected.
EBASS
ETREBLE
EMIDDLE
EXBASS
–
–
-7 to +7
0 to 3
60 Hz,
80 Hz,
100 Hz,
200 Hz
10 kHz
12.5 kHz
15 kHz
17.5 kHz
500 Hz
1000 Hz
1500 Hz
2500 Hz
30 Hz
60 Hz
100 Hz
1.0,
1.25,
1.5, 2.0
–
0.5, 0.75,
1.0, 1.25
–
Changing equalizer settings (EBASS, ETREBLE,
EMIDDLE, EXBASS)
In the Enhanced Audio menu, you can change these
settings:
"GAIN" (level)
"FREQ" (frequency)
"QUAL" (quality factor)
(8)
Press the OK button (4) to call up the menu item.
The Enhanced Audio menu is opened.
Press the rocker switch or (8) in the Enhanced
Audio menu to select one of these menu items.
"EBASS": Bass
"ETREBLE": Treble
"EMIDDLE": Middle
"EXBASS": Increasing bass at low volume
Press the OK button (4) to call up the menu item.
Press the rocker switch or (8) to switch between
the available menu items (see the table above):
"GAIN"
"FREQ"
"QUAL"
Press the rocker switch
setting.
or
(8) to change the
After you performed the settings for all menu items,
press the OK button (4) to select a different function,
or press the DIS ESC button (6) to exit the menu.
57
User settings
In the System menu, you can adjust these presettings to
your preferences:
Welcome text
Volume presettings
Display settings
Scan time
Opening the System menu
Press the MENU button (13).
Press the rocker switch (8) repeatedly until the
system menu "Syst" opens.
Changing the welcome text (ON MSG)
When you switch on the device, an animation appears. It
contains the factory-set welcome text "WELCOME".
To change this text,
in the System menu, press the rocker switch or
(8) repeatedly until the "ON MSG" menu item is
selected.
Press the OK button (4) to call up the menu item.
The current welcome text is displayed. The position digit
flashes and can be changed. You can now enter your own
welcome text with up to 20 characters:
58
Enter the text by pressing the corresponding buttons of
the keys (9). Select the desired letter, if necessary by
pressing a button several times.
After entering one letter, the device automatically switches
to the next one. To correct any entry errors, select the
corresponding digit by pressing the rocker switch or
(8) again.
After entering the complete welcome text,
press the OK button (4) to store the welcome text
entered.
Notes:
To quit the text input without changing the
welcome text, press the DIS-ESC button (6).
If the text entry is interrupted, e.g. by a traffic
announcement, the previous changes are not
stored.
Changing volume presettings
The following presettings can be changed in the System
menu:
Power-on volume (ON VOL)
Volume presettings of traffic announcement (TA VOL),
telephone/navigation announcement (TEL VOL) and
volume reduction (MUTE VOL)
Signal tone (BEEP ON)
Adjusting power-on volume (ON VOL/LAST VOL)
To adjust the power-on volume,
in the System menu, press the rocker switch or
(8) repeatedly until the "ON VOL" menu item is
selected.
If "LAST VOL" is selected, the device is switched on
with the volume adjusted under "ON VOL".
Changing volume presettings for TA, TEL and MUTE
If the device switches a traffic announcement, phone call
or navigation announcement, it always starts with the
volume preset here.
In addition, you can assign a lower volume up to the value
0 (mute) to the volume reduction (MUTE).
Press the OK button (4) to call up the menu item.
The current power-on volume is displayed.
Set the power-on volume with the rocker switch
(8).
or
Press the OK button (4) to select a different function,
or press the DIS ESC button (6) to exit the menu.
In the System menu, press the rocker switch or
(8) repeatedly until one of these menu items is
displayed:
"MUTE VOL": Presets the volume of the volume
reduction
"TEL VOL": Presetting the volume of the phone
call/navigation announcement
"TA VOL": Presetting the volume of the traffic
announcement
Press the OK button (4) to call up the menu item.
Alternately, you can select the "LAST VOL" setting. This
sets the volume at power-on to the volume at the last
switch-off:
In the System menu, press the rocker switch or
(8) repeatedly until the "LAST VOL" menu item is
selected.
Press the OK button (4) to call up the menu item.
Switch between the settings with the rocker switch
or (8).
"LAST VOL" : On.
"LAST VOL" : Off.
The currently set volume is displayed.
Set the volume with the rocker switch
or
(8).
Press the OK button (4) to select a different function,
or press the DIS ESC button (6) to exit the menu.
Press the OK button (4) to select a different function,
or press the DIS ESC button (6) to exit the menu.
Note:
59
Notes:
The volume preset by you will not be used,
if the volume currently listened to is lower than the
set mute level. The device continues playing with
the volume listened to.
if the volume currently listened to is higher than the
set TEL volume. In this case, phone
calls/navigation announcements are reproduced
with the volume listened to.
if the volume currently listened to is higher than the
set TA volume. In this case, traffic announcements
are reproduced with the volume listened to.
Activating/deactivating the signal tone (BEEP ON)
You can deactivate the signal tone that sounds as a
confirmation in the menus or when storing the stations on
the station buttons.
Changing display settings
The following display settings can be changed in the
System menu:
Day/night brightness (D-DAY / D-NIGHT)
Background lighting of the display (DIS ILUM)
Brightness of the button illumination (KEY ILUM)
Adjusting the display viewing angle (ANGLE)
Changing the day/night brightness (D-DAY/D-NIGHT)
The device automatically switching to night mode if you
turn on the light of your vehicle. For this purpose, the
device must be connected with your vehicle via a
corresponding connection as described in the installation
instructions.
You can adjust the display brightness separately for day
and night.
In the System menu, press the rocker switch or
(8) repeatedly until the menu item "D-DAY" (day
brightness) or "D-NIGHT" (night brightness) is
selected.
Press the OK button (4) to call up the menu item.
In the System menu, press the rocker switch or
(8) repeatedly until the "BEEP ON" menu item is
selected.
Press the OK button (4) to call up the menu item.
Switch between the settings with the rocker switch
or (8).
"BEEP ON" : Signal tone on.
"BEEP ON" : Signal tone off.
The current setting is displayed.
Use the rocker switch or (8) to select the desired
setting between 1 and 16.
60
Press the OK button (4) to select a different function,
or press the DIS ESC button (6) to exit the menu.
Press the OK button (4) to select a different function,
or press the DIS ESC button (6) to exit the menu.
Changing the background lighting of the display (DIS
ILUM)
For the background lighting of the display, you can select
one of 16 shades of blue:
In the System menu, press the rocker switch
(8) repeatedly until the "DIS ILUM" (display
illumination) menu item is selected.
or
Press the OK button (4) to call up the menu item.
The current setting is displayed.
Use the rocker switch or (8) to select the desired
setting between 1 and 16.
Press the OK button (4) to select a different function,
or press the DIS ESC button (6) to exit the menu.
Changing the brightness of the button illumination
(KEY ILUM)
You can adjust the brightness of the button illumination
between 1 and 16:
In the System menu, press the rocker switch
(8) repeatedly until the "DIS ILUM" (display
illumination) menu item is selected.
or
Press the OK button (4) to call up the menu item.
The current setting is displayed.
Use the rocker switch or (8) to select the desired
setting between 1 and 16.
Press the OK button (4) to select a different function,
or press the DIS ESC button (6) to exit the menu.
Adjusting the display viewing angle (ANGLE)
The angle at which the driver looks at the display is
dependent upon, among other things, the installation
position of the device, the seating position, and the
physical size of the driver. You can optimise the display
contrast for your viewing angle:
in the System menu, press the rocker switch or
(8) repeatedly until the "ANGLE" menu item is
selected.
Press the OK button (4) to call up the menu item.
The current setting is displayed.
Use the rocker switch or (8) to select the desired
setting between –6 and +6.
Press the OK button (4) to select a different function,
or press the DIS ESC button (6) to exit the menu.
Changing the scan time (SCANTIME)
The scan time of the SCAN function can be adjusted in the
System menu for all audio sources between 5 and 30
seconds.
In the System menu, press the rocker switch or
(8) repeatedly until the "SCANTIME" menu item is
selected.
Press the OK button (4) to call up the menu item.
61
The current setting is displayed.
Use the rocker switch or (8) to select the desired
setting in 5-second increments between 5 and 30.
Press the OK button (4) to select a different function,
or press the DIS ESC button (6) to exit the menu.
62
Displaying version numbers
You can display the version numbers of the different
device components.
Switch off the device.
Simultaneously press the MENU button (13) and the #
button of the keys (9) while switching on the device.
The version display with information about the software is
displayed.
Press the rocker switch
device components.
or
(8) to change between
To exit the version display,
select the "EXIT" menu item with the rocker switch
or (8).
Press the OK button (4).
The display of the audio source previously listened to is
displayed.
63
Technical data
CD player
Frequency response:
Weight:
approx. 1.66 kg
Voltage supply
Operating voltage:
20 – 20,000 Hz
USB port
Current load
max. 800 mA
10 – 16 V
Current consumption
In operation:
max. 10 A
10 seconds after switch-off:
< 3 mA
Amplifier output power
acc. to DIN 45324:
4 x 18 W sine
Input sensitivity
AUX-IN:
2 V / 6 kOhm
Tel./Navi input:
10 V / 1 kOhm
Tuner
Wavebands in the USA
FM: 87.7 – 107.9 MHz
AM: 530 – 1,710 kHz
Wavebands in Thailand and
Europe (also applies to India)
FM: 87.5 – 108 MHz
AM: 531 – 1,602 kHz
FM frequency response:
64
35 – 16,000 Hz
Subject to technical changes!
Appendix
Supported USB devices
Manufacturer
Acer
Aigo
Aigo
Apple
Apple
Apple
Cable&Wireless
Connect 3D
Creative
Dell
Dell
Disgo
Disgo
Disgo
Emprex
FreeCom
Generic
Gigabyte
Technology
Hama
Model
Flash Stick
Mini
Mini
iPod Mini
iPod Nano
iPod Shuffle
518UASD
Pocket Drive
MuVo N200
USB Stick
USB Stick
Disgo Lite
Disgo Lite
Disgo Lite
MicroStorage
DataBar
Flash Disk
Flash Disk
FlashPen Mini
Max. Capacity
256 MB
256 MB
128 MB
4 GB
2 GB
1 GB
1 GB
512 MB
128 MB
256 MB
128 MB
64 MB
512 MB
1 GB
2,5 GB
512 MB
64 MB
1 GB
256 MB
Manufacturer
Hama
IBM
Intelligent
iRiver
Kingston
Kingston
LG
LG
LG
Maxfield
Memorex
m-systems
Netac
Netac
Philips
Philips
Philips
PNY
PNY
PNY
PQI
Samsung
Sandisk
Model
USB 2.0
USB Stick
Stick
H320 Multi-Codec
Jukebox
Data Traveller Elite
Data Traveller Elite
Twister MP 3 Player
USB drive
USB mirror
Blackline MP3
traveldrive
mdrive (disk on key)
OSA128
U160
GoGear
GoGear
FM51FD11B
Atache
Atache
Atache
Traveling Disk
yepp MP 3 Player
Cruzer Micro
Max. Capacity
256 MB
128 MB
128 MB
20 GB
256 MB
1 GB
256 MB
1 GB
1 GB
512 MB
512 MB
128 MB
128 MB
128 MB
512 MB
1 GB
512 MB
512 MB
256 MB
128 MB
256 MB
128 MB
512 MB
65
Manufacturer
Sandisk
Sandisk
Sony
Thomson
Transcend
Trekstor
Trekstor
Trekstor
Trekstor
Trekstor
Twinmos
Verbatim
Victorinox
Zynet
Model
Cruzer Micro
Cruzer
MicroVault
Lyra PDP2456
Store Jet
CS
HDD
I Beat Fun
I Beat Joy 2.0
sw Go
T1 T-drive
Store'n'Go
Swissbit
Zynet
Max. Capacity
1 GB
256 MB
512 MB
256 MB
20 GB
512 MB
80 GB
512 MB
1 GB
256 MB
512 MB
1 GB
128 MB
128 MB
Supported Bluetooth® mobile phones
Manufacturer
Apple
HTC
Motorola
Motorola
Motorola
66
Model
iPhone
S710
K1
Q9h
V3i
Manufacturer
Motorola
Nokia
Nokia
Nokia
Nokia
Nokia
Nokia
Nokia
Sagem
Samsung
Samsung
Samsung
Samsung
Samsung
Samsung
Sony Ericson
Sony Ericson
Sony Ericson
Model
Z3
5200
6111
6233
6300
7500
N80
N95
411x
E250
E390
E840
E900
F300
U600
W580
K800i
W810i
FCC Information
This device complies with Part 15 of the FCC Results.
Operation is subject to the following two conditions:
3. Connect the equipment into an outlet on a circuit
different from that to which receiver is connected.
4. Consult the dealer or experienced radio/ TV
technician for help.
1. This Device may not cause harmful interface, and
2. This device must accept any interference received,
including interference that may cause undesired
operation.
Note:
This equipment has been tested and found to comply
with the limits for CLASS B digital device, pursuant to
Part 15 of FCC Rules. These limits are designed to
provide reasonable protection against harmful
interference when the equipment is operated in a
commercial environment. This equipment generates,
uses and can radiate radio frequency energy and, if
not installed and used in accordance with the
instructions, may cause harmful interference to radio
communications. However, there is no guarantee that
interference will not occur in a particular installation. If
this equipment does cause harmful interference to
radio or television reception, which can be determined
by turning the equipment off and on, the user is
encouraged to try correct the interference by one or
more of the following measures:
1. Reorient or relocate the receiving antenna.
2. Increase the separation between the equipment
and receiver.
67
Warranty
Dear Customer,
Thank you for buying Blaupunkt Car Audio System. This
unit is covered under warranty against manufacturing and
material defects for a period of twenty four (24) months
from the date of sale. Blaupunkt’s standard warranty terms
& conditions in this regard shall apply. In case of a defect,
Blaupunkt undertakes to get the set repaired / replaced as
per company’s discretion.
Instructions for the customer
1. This warranty card has 2 parts. Kindly ensure that the
car dealer fills all parts correctly.
2. Part A must be returned to the car dealer at the time of
purchase of the product. Car dealer need to send this
part to Blaupunkt.
3. Part B is the customer’s copy. It should be retained by
you for record.
4. In the event of a complaint, contact the car dealer or
customer care centre or the nearest Blaupunkt Service
Centre and inform the defect, Model No. & Serial. No.,
for obtaining service.
Terms and condition
1. Warranty will be entertained only when completed
customer and car dealers copy of warranty card and
invoice copy of the vehicle is presented together with
the product.
68
2. Warranty does not cover damage to the equipment
caused by accidents, misuse , repair, additions and
modifi cations carried out by unauthorised dealers or if
tampered with , in any other manner.
3. Warranty will not apply if the type or serial number on
the product has been altered , deleted , removed or
made illegible.
4. Warranty does not cover user attached antennas and
damages by negligence and abuse
5. Warranty does not cover accessories (e.g. cables,
connectors, mic etc).
6. Blaupunkt highlights that in spite of current standards
®
of Bluetooth & USB being implemented in the radio,
complaints may arise even if there aren’t any quality
issues with the product. This is due to compatibility
®
issues with new Bluetooth enabled & USB products.
Such complaints are not part of the scope of warranty.
Part A
DEALER’S COPY
VEHICLE REGISTRATION No: ____________________________
DATE OF PURCHASE: __________________________
RADIO UNIT Sr. No.: ___________________________
CUSTOMER NAME & ADDRESS:
CAR DEALER NAME & ADDRESS:
__________________________________
___________________________________
__________________________________
___________________________________
__________________________________
___________________________________
TEL. ______________________________
TEL. _______________________________
Customer’s Signature
CAR
DEALER’S
SEAL
Dealer’s Signature
This card is valid only if it is filled in and stamped by our authorised dealer on the date of purchase.
69
PART B
CUSTOMER’S COPY
VEHICLE REGISTRATION No: ____________________________
DATE OF PURCHASE: __________________________
RADIO UNIT Sr. No.: ___________________________
CUSTOMER NAME & ADDRESS:
CAR DEALER NAME & ADDRESS:
__________________________________
___________________________________
__________________________________
___________________________________
__________________________________
___________________________________
TEL. ______________________________
TEL. _______________________________
Customer’s Signature
CAR
DEALER’S
SEAL
Dealer’s Signature
This card is valid only if it is filled in and stamped by our authorised dealer on the date of purchase.
For any further information, please contact.
Customer Care Centre: Toll free number: 1-800-425-2528 (for BSNL/MTNL callers)
For callers using mobile: 080-22293001 (from 9 am to 5 pm)
Monday to Friday
70
Authorised Service Centers:
SERVICE DEALER
Asthaa Marketing
Sound Reflex
Mandovi
Sunil Distributor
Mickey Electronics
MD Electronics
Mount Electronics
Classic Auto
Angad Agencies
AS Electronics
Sai Kirpa
Elegant
Blue Strings
Today Electronics
Voice and Vision
Engineer Syndicate
Audiovideo
Electro Electrics
Madhav Enterprises
Reliable Service
Autosonics
Jaika Automobiles
LMC Enterprises
Vishwakarma Sounds
Ekco Electronic
Ambika Services
Ambika Auto
CITY
Ahmedabad
Anand
Bangalore
Bhopal
Bhubaneshwar
Calicut
Chennai
Coimbatore
Dehradun
Ernakulam
Gaziabad
Gurgaon
Indore
Jaipur
Kanpur
Kolkatta
Kollam
Kottayam
Lucknow
Ludhiana
Mumbai
Nagpur
New Delhi
Patna
Pune
Rajkot
Secunderabad
CONTACT
Naveen
Bharath
Shashi
Anil
Dilip
Babu
Suresh
Kannan
Arivinder
Salath
Harish
Bobby
Abha
Vipin
Awasthi
Sujjan
Gerald
Babu
Pal
Gurmeet
Renu
Rishikesh
Sudhir
Pradeep
Suhas
Bala
Ashok
PHONE
079-6858975
02692-256868
080-22233763
0755-4270228
0674-6535012
0495-2770007
044-28410965
0422-2231569
0135-2746999
0484-2805601
0120-4165682
0124-6521746
0731-3266898
0141-2361275
0512-2549793
9830333536
0474-2748192
0481-2571447
0522-2206267
0161-4640438
022-26406726
0712-2546741
011-41726977
9934035353
020-25436127
0281-2465615
040-27893942
MOBILE
9825037377
9825160605
9845473044
9827069388
9437032813
9447276820
9840059917
9843433338
9837000313
9847084286
9810496690
9811006770
9302101961
9828017772
9839809644
9830777410
9846104001
9349501091
9839809644
9872400438
9930310905
9822228287
9811528785
9234887043
9822496733
9998141494
9246522002
71
SERVICE DEALER
Royal Sales
Rounak Electricals
Ganga Marketing
CITY
Surat
Vadodra
Vishakhapatnam
CONTACT
Rakesh
Jayesh
Murthy
PHONE
0261-3225634
0265-2336233
0091-2505805
MOBILE
9898578787
9898401902
9849004688
© 2008 All rights reserved by Blaupunkt. This material may be reproduced, copied or distributed for personal use only.
This product is protected by certain intellectual property rights of Blaupunkt. Use or distribution of such technology outside of this
product is prohibited without a license from Blaupunkt.
Bosch Limited (Blaupunkt),
P.B. No. 3000, Hosur Road, Adugodi, Bangalore 560 030.
Visit us at : www.blaupunkt.com
Write to us at : [email protected]
Toll Free No.: 1-800-425-2528 (for BSNL/MTNL callers)
For callers using mobile: 080-22293001 (from 9 am - 5 pm)
Monday to Friday
Blaupunkt GmbH,
Robert-Bosch-Straße 200, D-31139 Hildesheim
72
73
74
75
8 622 406 208
76