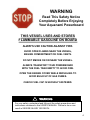
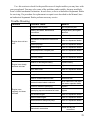
1
AQUANAMI USER’S MANUAL 2012 jetSurf jetKayak jetNami ! WARNING • Read this manual thoroughly before operation. It contains important safety information. • Do not remove this USER’S MANUAL from the powerboard. WARNING Read This Safety Notice Completely Before Enjoying Your Aquanami Powerboard THIS WATERCRAFT DOES NOT HAVE A REVERSE GEAR OR BRAKING DEVICE ALWAYS APPROACH LAND, DOCKS, SWIMMERS OR HAZARDS SLOWLY AND WITH CAUTION TO AVOID COLLISION OR INJURY TO THE RIDER OR SWIMMERS ! WARNING For your safety, understand and follow all the safety precautions and instructions contained in this USER’S MANUAL. Failure to do so can result in SEVERE INJURY OR DEATH. 2 WARNING Read This Safety Notice Completely Before Enjoying Your Aquanami Powerboard EXERCISE EXTREME CAUTION WHEN OPERATING AROUND OTHER BOATS YOU MAY NOT BE VISIBLE TO OTHER BOATERS. YOUR NEW POWERED SURFBOARD OR KAYAK RIDES VERY LOW ON THE WATER COMPARED TO OTHER VESSELS. STEER CLEAR OF OTHER BOATS, UNDER SPEED OR IDLE, WHEN OPERATING YOUR POWERBOARD. NEVER ASSUME ANOTHER BOATER HAS SEEN YOU. BE PREPARED FOR EVASIVE ACTION IF ANOTHER BOATER DOES NOT SEE YOU. ALWAYS CHECK 360 DEGREES (ESPECIALLY BEHIND YOU) FOR OTHER BOATS BEFORE EXECUTING A TURN. ! WARNING For your safety, understand and follow all the safety precautions and instructions contained in this USER’S MANUAL. Failure to do so can result in SEVERE INJURY OR DEATH. 3 WARNING Read This Safety Notice Completely Before Enjoying Your Aquanami Powerboard THIS VESSEL USES AND STORES FLAMMABLE GASOLINE ON BOARD ALWAYS USE CAUTION AGAINST FIRE. AVOID OPEN FLAMES NEAR THE VESSEL, ENGINE COMPARTMENT OR FUEL VENTS. DO NOT SMOKE ON OR NEAR THE VESSEL. ALWAYS TRANSPORT YOUR POWERBOARD WITH THE FUEL TANK EMPTY TO AVOID FIRE. OPEN THE ENGINE COVER WHILE REFUELING TO AVOID BUILD UP OF GAS FUMES. CHECK FUEL CAP IS SECURLY FASTENED. ! WARNING For your safety, understand and follow all the safety precautions and instructions contained in this USER’S MANUAL. Failure to do so can result in SEVERE INJURY OR DEATH. 4 WARNING Read This Safety Notice Completely Before Enjoying Your Aquanami Powerboard ENGINE BREAK-IN TO PREVENT EXCESSIVE WEAR AND DAMAGE TO YOUR ENGINE OPERATE YOUR NEW POWERBOARD AT LOWER RPM’S FOR THE FIRST 4-6 HOURS TO BREAK IN THE ENGINE; HOWEVER BRIEF ACCELERATION AND SPEED VARIATIONS CONTRIBUTE TO A GOOD BREAK-IN; THE SCHEDULED OIL CHANGE DURING THE BREAKING PERIOD IS ALSO REQUIRED. CHECK ALL FLUID LEVELS AND FILTERS AFTER EACH RIDE DURING THE BREAK-IN PERIOD ! WARNING For your safety, understand and follow all the safety precautions and instructions contained in this USER’S MANUAL. Failure to do so can result in SEVERE INJURY OR DEATH. 5 WARNING Read This Safety Notice Completely Before Enjoying Your Aquanami Powerboard RIDERS SHOULD TAKE TIME TO FAMILIARIZE YOURSELVES WITH THE RIDE, STEERING AND THROTTLE CONTROL AT SAFE AND SLOW SPEED BEFORE OPERATING AT FULL THROTTLE YOUR NEW POWERED SURFBOARD OR KAYAK IS UNLIKE ANY OTHER POWERED WATERCRAFT YOU MAY HAVE RIDEN BEFORE. AQUANAMI RECOMMENDS RUNNING YOUR NEW WATERCRAFT AT SLOW SPEED AND AVOID AGGRESSIVE MANEUVER UNTIL YOU ARE COMPLETELY FAMILIAR WITH THE OPERATION AND STEERING OF YOUR WATERCRAFT ! WARNING For your safety, understand and follow all the safety precautions and instructions contained in this USER’S MANUAL. Failure to do so can result in SEVERE INJURY OR DEATH. 6 This USER’S MANUAL utilizes the following symbols: ! The Safety Alert Symbol means ATTENTION! A potential personal injury hazard. Indicates a potentially danger! Failure to follow WARNING instructions could result in serious injury or death. WARNING ! CAUTION: Indicates special precaution, if not followed, could severely damage the machine. NOTE: Provides key information to make information clearer. ! WARNING For your safety, understand and follow all the safety precautions and instructions contained in this USER’S MANUAL. Failure to do so can result in SEVERE INJURY OR DEATH. Keep this USER’S MANUAL in a waterproof bag with the Powerboard at all times even if it is transferred to a new owner. If you have any questions or concerns about your powerboard after reading the manual, please contact an authorized Aquanami Dealer near you or call us. For a list of dealers in your area please visit our web site at www.aquanami.com. 7 TO OWNER/OPERATOR Congratulations on your choice to purchase a Aquanami Powerboard. You have hours of fun and excitement to look forward to as its new owner. Be sure every operator of your Powerboard fully understands its various functions, controls, maintenance and safe riding instructions, and the importance of courteous, responsible riding. Each operator has a responsibility to ensure the safety of other water users. The information and descriptions about the Powerboard, its parts and its related products contained in this User’s Manual are correct at the time of writing. However Aquanami maintains a policy of continuous improvement of its products without imposing upon itself any obligation to install them on products previously manufactured. Aquanami reserves the right at any time to discontinue or change designs, specifications and models without incurring obligation. The illustrations in this document show the typical construction of the different assemblies and may not represent the full detail or exact shape of the parts. However, they represent parts that have the same or similar function. 8 TABLE OF CONTENTS Section 1: Safety Information Page 10 Section 2: Powerboard Information Page 20 Section 3: Operation Page 42 Section 4: Maintenance and Care Page 63 Section 5: Trouble Shooting Page 71 9 Section 1 SAFETY INFORMATION 10 INTRODUCTION Congratulations, you are now the proud owner of a new generation Powerboard, one of the most exciting and fun watercrafts. Your Aquanami Powerboard can provide you, your family and friends the most extraordinary recreational experience, and an opportunity to enjoy the natural beauty and excitement of the world’s waterways. We want you to have a safe, pleasurable riding experience. However great fun and joy needs safe play. So please take a few minutes of your time to completely read this safety section and operate your Powerboard with care. Be sure every operator of your Powerboard fully understands the safety instruction and the importance of courteous, responsible riding. Each operator has a responsibility to ensure the safety of other water users. Although the mere reading of such information does not eliminate the hazard, the understanding and application of the information will promote the correct use of the watercraft. Failure to follow the instructions of this safety section may result in severe injury or death. This safety section is for initial reference and its content is therefore limited. It should be read in conjunction with the rest of this User’s Manual and the on-product warning/caution labels. For your benefit, you may obtain further information concerning “Boating Rules” from a local Coast Guard Auxiliary, Powerboat Squadron or other local boating authorities. Many states or provinces have requirements regarding boating safety and competence certificates. Aquanami strongly recommends that any watercraft operator completes a safety and competence boating course. Check with your local Coast Guard or Power Sail Squadron in your area for course availability. We encourage you to have an Annual Safety Inspection of your Powerboard. Please contact your dealer for further details. Finally, we urge you to visit your dealer regularly for regular and safety maintenance and for any accessories you may require. 11 GENERAL The owner of the watercraft is responsible for the watercraft’s safe operation. The owner also has the responsibility to require that all operators read and understand this User’s Manual and the on-product warning/caution labels before operating the watercraft. Failure to follow this safety information and safe boating rules could result in injury, including the possibility of death to you, the people you lend your watercraft to, or other water users. The safe use and operation of this watercraft is dependent upon the use of proper riding techniques, as well as upon the common sense, good judgment, and expertise of the operator. The performance and function of this watercraft may be significantly different and exceed that of other craft you may have operated. Make sure to become completely familiar with the controls and operation of the watercraft before embarking on your first trip. If you have not had the opportunity to do so, practice driving solo in a suitable traffic free area and feel the response of each control. Be fully familiar with all controls before accelerating above idle speed. Ensure that all operators know how to swim and how to re-board the watercraft from the water. Boarding in deep water can be strenuous. Practice in chest-deep water before operating or embarking your watercraft in deep water. A Powerboard will not self-right if capsized. The operator must know the proper righting procedure as explained in the Operator’s Guide. Make sure engine is off before rolling over the watercraft. Never ride after consuming drugs or alcohol or if you feel tired or ill. BOAT CAPACITY AND OPERATION LIMITATION Aquanami recommends a minimum operator age of 16 years old. A boating safety course is recommended and may be required in your province or state. Like surfboards and kayaks, the maneuverability, stability and speed of Powerboards depend on the total load a Powerboard is carrying. The total load includes operator’s weight, accessories, or equipment. Overloading can affect maneuverability, stability and performance. jetSurf, jetKayak and jetNami Models: Recommended Maximum Load: 91 kg (200 lb) Load is the total weight of operator and cargo. 12 jetKayak GT and jetNami GT Models: Recommended Maximum Load: 114 kg (250 lb) Load is the total weight of operator and cargo. FUELING When fueling, follow the safe boating fueling instructions explicitly, as provided in your User’s Manual and those given to you at the marina. Always verify fuel level before use and during the ride. Always stop the engine before fueling and never allow anyone to remain on the watercraft while fueling. Always remember that fuel is flammable and explosive under certain conditions. Do not smoke or allow open flames or sparks in the vicinity. ! WARNING Follow these safe boating fueling instructions carefully: • Turn off engine. • Do not insert the spout too far in filler neck. • Pour fuel slowly so that air can escape from the tank and prevent fuel flow back. Be careful not to spill fuel. • Fully tighten fuel tank cap. ! WARNING • Always stop the engine before refueling. • Fuel is flammable and explosive under certain conditions. • Always work in a well ventilated area. Do not smoke or allow open flames or sparks in the vicinity. • Fuel tank may be pressurized, turn cap slowly when opening. • When fueling, keep watercraft level. • Do not overfill or top off the fuel tank and leave watercraft in the sun. As temperature increases, fuel expands and might overflow. • Always wipe off any fuel spillage from the watercraft. Periodically verify fuel system. 13 RESPECTFUL USE OF WATERWAY Respect no wake zones, the rights of other water users and the environment. Don’t forget that all persons must assist other boaters in an emergency. TO WEAR The operator must wear a Coast Guard approved Personal Flotation Device (PFD) that is suitable for Powerboard use. The operator of Powerboards must wear protective clothing, including: A wet suit bottom or thick, tightly woven, snug fitting clothing that provides equivalent protection. Severe internal injuries can occur if water is forced into body cavities as a result of falling into water or being near jet thrust nozzle. Normal swimwear does not adequately protect against forceful water entry into the lower body opening(s) of males or females. Some type of lightweight, flexible foot protection is recommended. This will help reduce possible injury, should you step on sharp underwater objects. HELMET Some Important Considerations Helmets are designed to offer some degree of protection in case of impact to the head. In most motorized sports, the benefits of wearing a helmet clearly outweigh the drawbacks. However, in the case of motorized watersports such as riding Powerboard, this is not necessarily true as there are some particular risks associated with the water. BENEFITS A helmet helps to reduce the risk of injury in case of a head impact against a hard surface such as another craft. RISKS On the other hand, in some situations when falling off the watercraft, helmets have a tendency to catch the water, like a “bucket”, and put severe stresses on the neck or spine. This could result in choking, severe or permanent neck or spine injury, or death. Helmets may also interfere with peripheral vision and hearing, or increase fatigue, which could contribute to increase the risk of a collision. You must decide whether to wear a helmet or not based on your particular situation, the particular environment you will be riding in, as well as other factors such as personal experience. If you decide to wear a helmet, you must then decide what type is the most appropriate for the circumstances. Look for helmets that meet DOT or Snell standards, and if possible, choose one designed for motorized watersports. 14 GEARS AND EQUIPMENTS Always carry the regulatory safety items and have them conveniently on board available for use. Check the local regulations or consult your authorized Aquanami dealer. Such required safety items usually include, without limitation, a sound signaling device such as a whistle, a watertight flashlight or approved flares, a buoyant heaving line and rope. A cellular telephone in a waterproof bag or container has also been found to be beneficial to boaters when in distress or just for contacting someone on shore. BEFORE RIDING Read and understand all safety instructions on your Powerboard, and all other safety documents before operating. Check local and federal boating laws applicable to the waterways where you intend to use your watercraft. Know and understand the applicable navigation system (such as buoys and signs). Know the waters in which the watercraft is to be operated. Current, tides, rapids, hidden obstacles, wakes and waves etc. can affect safe operation. A Powerboard is not designed to operate in rough water or inclement weather. For safety reasons and proper care, always perform “Daily Pre-Operation Checks” as specified in your User’s Manual before operating your watercraft. Keep the engine shut-off cord (safety lanyard) attached to the operator’s wrist or PFD at all times so that engine stops if operator falls off. ! • • • • WARNING Avoid Rough Water or Poor Visibility Operation. The watercraft is not intended for rough water usage. Do not jump waves or wakes. Usage on rough water may result in SEVERE INJURY OR DEATH. ! WARNING • jetSurf is not designed for surfing like a regular surf board. • Do not jump waves or wakes. • Usage on rough water may result in SEVERE INJURY OR DEATH. 15 SAFE RIDING • Respect the rights of other recreationists and/or bystanders and always keep a safe distance from all other craft, people and objects. • Your Powerboard may not be visible by other crafts due to the low profile of the product on the water. Always keep a constant lookout for other water users, other boats or objects, especially when turning. Be alert for conditions that may limit your visibility or block your vision of others. • Do not wake or wave jump, ride the surf line or attempt to spray or splash others with your watercraft. You may misjudge the ability of the watercraft or your own riding skills and strike a boat or person. • Unless in an emergency, do not negotiate sharp, high speed turns. Such maneuvers make it hard for others to avoid you or understand where you are going. • Like any other craft, this Powerboard has no brake. Stopping distance will vary depending on initial speed, load, wind, and water conditions. Practice stopping and docking in a safe, traffic free area to have an idea of how long it will take to stop the watercraft under varying conditions. • When riding a jetKayak model, always keep in mind that as the throttle lever is released to idle position, less directional control is available, and as the engine is off, directional control is lost. You need throttle to steer. ! • • • • WARNING Avoid Rough Water or Poor Visibility Operation. The watercraft is not intended for rough water usage. Do not jump waves or wakes. Usage on rough water may result in SEVERE INJURY OR DEATH. ! WARNING • jetSurf is not designed for surfing like a regular surf board. • Do not jump waves or wakes. • Usage on rough water may result in SEVERE INJURY OR DEATH. 16 • • • Ride within your limits and level of riding ability. Avoid aggressive maneuvers to reduce the risk of loss of control, ejection and collision. Understand and respect the performance or your watercraft. Always ride responsibly and safely. Use common sense and courtesy. Do not engage in stunts or jumps as they could lead to serious injuries or even death. For example, you could hurt your back in landing from a jump or you could loose control of the watercraft while attempting to perform a stunt, and collide with your own watercraft or another obstacle. In shallow water, proceed with caution and at very low speeds. Grounding or abrupt stops may result in injury. Debris may also be picked up and be propelled rearward by the jet pump onto people or property. • Powerboards are not designed for night-time operation. Never turn joystick steering while someone is nearby rear of watercraft. Keep away from steering moving parts (nozzle, linkage, etc). • Do not start or operate the watercraft if anyone is behind or nearby the jet. Water and/or debris exiting jet thrust nozzle can cause severe injury. Keep away from intake grate while engine is on. Items such as long hair, loose clothing, or PFD straps can become entangled in moving parts resulting in severe injury or drowning. • • To prevent accidental starting, always detach the safety lanyard from the watercraft during removal of any weeds or debris from the intake grate. • It should be remembered that sun, wind, alcohol, drugs, fatigue and illness, may impair your judgment and reaction time. AFTER RIDING After riding, remove the safety lanyard from Powerboard to avoid unauthorized use by children or others. If operator falls off the watercraft and safety lanyard is not pulled off from its post, the watercraft will not stop. Leave the safety lanyard on its post will drain battery dead slowly. 17 OPERATING RULES Operating a watercraft can be compared with driving unmarked highways and roads. To prevent collisions or avoid other boaters, Navigation Rules must be followed. Remember these Rules of the Road. Know the Right of Way Rules. Generally keep to your right and safely avoid other craft by keeping a safe distance from other craft, people and objects. Crossing zone Yield zone. You must give way Meeting Head-On or Nearly So Situation: Crafts generally pass portside. However, crafts may pass starboard to starboard if proper signals are given. Overtaking zone Right of way rule Stand-on craft Stand-on craft Give way craft Give way craft Crossing Situations: Give right of way to craft ahead and to your right. Never cross in front of a boat. Overtaking Situations: Give right of way to other craft and keep clear. 18 NAVIGATION SYSTEM Refer to the following material: “Federal Requirements and Safety Tips for Recreational Boats” published by United States Coast Guard “Boating and Safety” published by United States Coast Guard and MetLife Auto & Home Or visit www.uscgboating.org, or call 1800-368-5647 for detailed Navigation system and rules. Make sure you know and understand the navigation system applicable to the waterways where you intend to use the Powerboard. Navigational aids, such as signs or buoys, can assist you identify safe waters. Buoys will indicate whether you should keep to the right (starboard) or to the left (port) of the buoy or to which channel you can continue. They may also indicate whether you are entering a restricted or controlled area such as a no wake or speed zone. They may also indicate hazards or pertinent boating information. Markers maybe located on shore or on the water. They can also indicate speed limits, no power craft or boating, anchorage and other useful information. 19 Section 2 POWERBOARD INFORMATION 20 GET TO KNOW YOUR POWERBOARD Before using your Power Board for the first time it is important that you become familiar with all of the features and functions of your watercraft. You should know where everything is and how it is suppose to be used. It is also essential to learn the proper way to fuel your watercraft. It is an easy task that could become quite dangerous if the proper precautions are not taken. Each and every time you operate your Powerboard it is important to go over the Pre-Operation Checklist. This will help you spot any trouble before you get out on the water. While operating it is important to follow the proper techniques to ensure the safety of yourself, others, and the watercraft. After each use the post-operation care is suggested to keep your Power Board working properly. 21 POWERBOARD AND MAIN COMPONENTS jetSurf NOTE: Some components do not apply or are optional on some models. 23,24 5 10 1,2,3,4 21 12 17 28 26 18 18a 18b 27 25 7a 7b 6 22 19, 20 11 16 27 1. Safety Lanyard (engine cut-off cord) 2. Throttle Lever 3. Engine Start/Stop Button 4. Control Handle 5. Armpole 6. Fire extinguisher area 7a. Fuel Tank Cap 7b. Fuel primer bulb 8. Fuel Tank Vent 9. Engine Compartment Cover Latch 10. Air Intake Opening 11. Exhaust Flushing Connector 12. Bilge Drain Plugs 13. Oil Drain Plug (Bottom Of Hull Beneath Engine) 14. Bilge Pump Water Outlet 15 9 8 14 15. Bilge Pump Switch 16. Exhaust By-Pass 17. Jet Pump Nozzle 18. Jet Pump Water Intake 18a. Adjustable Fin box 18b. Removable Fin 19. Control Box 20. Battery 21. Oil Fill Cap 22. Bilge Pump and Water Sensor 23. Coolant Fill/Pressure Valve Cap 24. Coolant Expansion Tank Cap 25. Engine Breathing Oil Retainer 26. Carburetor Drain Screw 27. Fuel Water Separator 28. Automatic Vacuum Siphon Pump 22 13. Oil Drain Plug Access Window 24. Coolant Expansion Tank Cap 27. Fuel Water Separator Bottle 23. Coolant Fill/Pressure Valve Cap 25. Engine Breathing Oil Retainer 19. Control Box 23 POWERBOARD AND MAIN COMPONENTS jetKayak NOTE: Some components do not apply or are optional on some models. 6 23 24 2,3,4 5 10 17 21 29 7a 7b 30 1 1. Safety Lanyard (engine cut-off cord) 2. Throttle Lever 3. Engine Start/Stop Button 4. Steering Handle 5. Information meter 6. Fire extinguish area 7a. Fuel Tank Cap 7b. Fuel Primer Bulb 8. Fuel Tank Vent 9. Engine Compartment Cover Latch 10. Air Intake Opening 11. Exhaust Flushing Connector 12. Bilge Drain Plugs 13. Oil Drain Plug (Bottom of Hull Beneath Engine) 14. Bilge Pump Water Outlet 15. Bilge Pump Switch 27 16. 17. 18. 19. 20. 21. 22. 23. 24. 25. 26. 27. 28. 29. 30. 18 25 9 8 15 12 28 26 20 14 22 19 11 16 Exhaust By-Pass Jet Pump Nozzle & Steering Nozzle Jet Pump Water Intake Control Box Battery Oil Fill Cap Bilge Pump and Water Sensor Coolant Fill/Pressure Valve Cap Coolant Expansion Tank Cap Engine Breathing Oil Retainer Carburetor Drain Screw Fuel Water Separator Automatic Vacuum Siphon Pump Foot Brace Dry Compartment 24 POWERBOARD AND MAIN COMPONENTS jetNami NOTE: Some components do not apply or are optional on some models. 5ii 25 21 24 19 10 20 17 26 27 28 1 2,3,4 5 1. Safety Lanyard (engine cut-off cord) 2. Throttle Lever 3. Engine Start/Stop Button 4. Steering Handle 5. Information meter 6. Fire extinguisher area 7a. Fuel Tank Cap 7b. Fuel Primer Bulb 8. Fuel Tank Vent 9. Engine Compartment Cover Latch 10. Air Intake Opening 11. Exhaust Flushing Connector 12. Bilge Drain Plugs 13. Oil Drain Plug (Bottom of Hull Beneath Engine) 14. Bilge Pump Water Outlet 15. 16. 17. 18. 19. 20. 21. 22. 23. 24. 25. 26. 27. 28. 12 18 28 7b 7a 8 25 23 14 22 6 15 9 27 11 16 Bilge Pump Switch Exhaust By-Pass Jet Pump Nozzle & Steering Nozzle Jet Pump Water Intake Control Box Battery Oil Fill Cap Bilge Pump and Water Sensor Coolant /Fill/Pressure Valve Cap Coolant Expansion Tank Cap Engine Breathing Oil Retainer Carburetor Drain Screw Fuel Water Separator Automatic Vacuum Siphon Pump 25 POWERBOARD AND MAIN COMPONENTS 1). Safety Lanyard (Engine Shut-off Cord) Attach the engine Safety Lanyard (Engine Shut-off Cord) to operator’s life vest or wrist so that the engine stops if the operator falls off. Always disconnect safety lanyard when watercraft is not in operation in order to prevent accidental engine starting or to avoid unauthorized use by children or others or theft. NOTE: Leaving the safety lanyard on its post when engine is not running will slowly discharge the battery. Safety Lanyard Start, Stop, and Throttle Lever ! WARNING While engine can be stopped using the engine stop button, good habits recommend that the safety lanyard also be disconnected when stopping. 2). Throttle Lever When the throttle lever is squeezed, the watercraft accelerates. When fully released, engine automatically slows down to idle speed and watercraft is gradually stopped by water drag. ! WARNING Directional control is reduced when the throttle is released and lost when engine is off. 26 3). Engine Start and Stop Button To start engine, depress and hold the start button. Release immediately after engine is started. To stop engine, fully release throttle lever then depress the stop button. Remember to disconnect safety lanyard from its post. 4. Control Handle for jetSurf and Steering Handle for jetKayak and jetNami Operator grasps the control handle to keep balance and operates safety lanyard, throttle lever, start and stop buttons. The steering handle controls the direction of the watercraft. Turning the steering handle to the right steers the watercraft to the right and inversely. Steering handle of jetKayak Steering handle of jetNami ! WARNING • Check steering handle and corresponding steering nozzle operation before starting. • Never turn steering handle while someone is nearby rear of watercraft. • Keep away from steering moving parts (nozzle, linkage etc.). 5. Armpole for jetSurf and Information Meter for jetKayak and jetNami Armpole links control handle to board, and provides support to operator. When safety Lanyard is plugged in and the start button is depressed once, the information meter reads engine RPM, engine temperature, fuel level, and battery life. Once stop button is depressed or safety Lanyard is pulled off, all the indicators will be turned off. 27 Information meter Fire extinguisher area WARNING ! • The fuel level indicator may provide false reading if the craft is not leveled. • After depressing start button, the information meter is on, which will drain battery if the engine is not running. • Always remove safety Lanyard when the engine is not running. Leave safety lanyard on its post will drain battery dead when engine is not running. 6). Fire Extinguisher Area Use Fire Extinguisher Area to store an approved fire extinguisher (sold separately). Ensure fire extinguisher is properly positioned in its location and tied down firmly. 7a). Fuel Tank Cap Unscrew the cap counterclockwise. After fueling, reinstall cap and fully tighten. 7b). Fuel Primer Bulb When operating the watercraft first time or after long period of non-usage, press the fuel primer bulb 4 times to pump fuel to carburetor. ! WARNING • Always stop the engine before refueling. Fuel is flammable and explosive under certain conditions. • Always work in a well ventilated area. Do not smoke or allow open flames or sparks in the vicinity. • Fuel tank may be pressurized, turn cap slowly when opening. • When fueling, keep watercraft level. • Do not overfill or top off the fuel tank and leave watercraft in the sun. As temperature increases, fuel expands and might overflow. • Always wipe off any fuel spillage from the watercraft. • Periodically verify fuel system. 28 8). Fuel Tank Vent Vent air out from fuel tank when pressure builds up in the tank as temperature increases. This is a one way path only. It lets air out, no air/water gets in. The fuel tank breathing in check valve is inside the engine compartment. 9). Engine Compartment Cover Latch Close and secure the engine compartment cover to keep engine compartment dry. Ensure the cover is well position, and water tight. CAUTION: Removing engine compartment cover while on water might allow water to enter and to fill the bilge. ! WARNING • Components inside engine compartment may be hot. • When starting or operating the engine, do not touch any electrical part. • Never leave any object, rag, tool, etc., in the engine compartment or in the bilge. 10). Air Intake Opening Allows air into the bilge for ventilation purposes and engine supply. The snorkel valve inside the intake opening will be closed when the craft submerges in water or the craft is capsized. However it is not water proof. If the air intake opening is kept under water, water may get inside the bilge under certain circumstances. CAUTION: If the water gets inside the bilge under certain circumstances, it may cause severe damage to internal parts of the engine. 11). Exhaust Flushing Connector A convenient connector is provided to allow easy installation of a garden hose to flush the exhaust system (pipe, muffler, and hoses, etc). Refer to POST-OPERATION CARE section for proper use. CAUTION: Ensure to close the connector with the cap after flushing. Otherwise the cooling water from jet will flow out here, and the exhaust system will not be cooled, which will damage the exhaust system. 29 12). Bilge Drain Plugs Should water be found in the bilge, it can be easily drained by opening the drain plugs when engine is off and watercraft is out of the water. It is suggested to drain bilge when the watercraft is on ramp. CAUTION: Always take the watercraft out of the water prior to open drain plugs. CAUTION: Make sure the drain plugs are properly secured prior to launching the watercraft in the water. 13. Oil Drain Plug Access Window Bilge drain plug 13). Oil Drain Plug Oil drain plug is located at the bottom of hull beneath engine. Make sure that engine is off and warm, but NOT HOT. Place your watercraft on a trailer or a lifting equipment so that you can access to the bottom of hull. Level your watercraft. Use the special wrench tool (supplied) to open the access window to engine oil drain plug at bottom of hull. Keep the “O” ring for later use. Then use a 17mm socket wrench to open oil drain plug. There is a washer, a spring, oil filter screen and a magnet came out with the oil drain plug. Drain dirty oil completely. Clean oil filter and magnet. Refer to Liquids section for detail. Open the oil drain plug, oil will be drained out slowly here. Ensure use proper oil pan to collect the used oil to protect environment. CAUTION: Make sure the drain plug is properly secured after oil change and the access window is properly sealed with “O” ring and properly secured. No water leak! 14). Bilge Pump Water Outlet The outlet exits the water in bilge by the electric bilge pump inside the engine compartment. 30 15). Bilge Pump Switch It is a push button switch to turn on the electric bilge pump manually located inside engine compartment, to evacuate water from the bilge. 16). Exhaust By-Pass Small exit of engine exhaust for easier engine start and smooth idle speed. 17). Jet Pump Nozzle And Steering Nozzle Water exits from the jet pump nozzle. jetKayak and jetNami models are equipped with a steering nozzle. Steering nozzle turns left and right by operating steering handle. WARNING ! • Check steering handle and corresponding steering nozzle operation before starting. • Never start engine and never turn steering handle while someone is nearby rear of watercraft. • Keep away from steering moving parts (nozzle, linkage etc.). 18). Jet Pump Water Intake And Intake Grate The water is drawn in by the impeller through this opening. The water intake grate minimizes the entry of foreign objects into the propulsion system. Jet pump water intake Jet pump nozzle ! WARNING Keep away from intake grate while engine is on. Items such as long hair, loose clothing or personal flotation device straps could potentially become entangled in moving parts resulting in severe injury or drowning. 31 19). Control Box Control Box. It holds CDI and all other electronic components. 20). Battery The battery is located in the engine compartment. Ensure to connect the battery with correct “+” and “-” terminals. Engine oil filling cap and oil dipstick 21). Engine Oil Filling Cap And Oil Dipstick Located in engine compartment. It allows adding oil in the engine when required. Dipstick indicates the engine oil level. Refer to LIQUIDS for more details. ! WARNING Certain components in the engine compartment may be very hot. Direct contact may result in skin burn. 22). Bilge Pump and Water Level Sensor Located in engine compartment. Bilge pump draws water out when water level sensor detects water or when the bilge pump switch is pressed. 23). Coolant Fill/Pressure Cap Located in engine compartment. It regulates engine coolant pressure and provides access to add coolant. Refer to LIQUIDS for more details. CAUTION: Slowly add coolant until it is full. Adding coolant after the first time use. 32 24). Expansion Tank Cap Located in engine compartment. Refer to LIQUIDS for more details. ! WARNING Check coolant frequently with engine cold, especially after first time use. Never add coolant in cooling system when engine is hot. Coolant is under pressure when engine is hot. Open coolant cap and pressure control valve cap may cause severe burn and injury when engine is hot. ! WARNING Certain components in the engine compartment may be very hot. Direct contact may result in skin burn. 25). Engine Breathing Oil Retainer Located in engine compartment. Retain oil mist and oil from engine breathing path. Check the bottle periodically and clean any oil residue to keep engine breathing freely and engine compartment clean. To drain the oil/water in the retainer bottle, simply pull off the hose from the middle nozzle of the bottle, and let the water/oil drain out from the bottom nozzle through the hose to a cup. Refer to LIQUIDS for more details. 33 26). Carburetor Drain Screw Located at the bottom of the carburetor in engine compartment. Use a Philip screw driver to drain water or contaminated fuel in carburetor bowl. Ensure to close the drain screw after cleaning. 27). Fuel Water Separator Located inside engine compartment. Retain water or contaminated fuel. Check the bottle periodically and drain water or contaminated fuel to keep engine run with clean fuel. To drain the water or contaminated fuel in the separator bottle, simply pull off the hose from the middle nozzle of the bottle, and let the contaminated fuel drain out from the bottom nozzle through the hose to a cup. 28). Automatic Vacuum Siphon Pump Located in engine compartment. Evacuate water in bilge by the low pressure generated in jet pump. Check and clean the vacuum siphon pump head, remove any block objects periodically. Refer to LIQUIDS for more details. 29). Foot Brace Provide foot support. 30). Dry Storage Compartment Convenient storage space. 34 LIQUIDS Engine Oil This watercraft is equipped with a 4-stroke engine that requires 4-stroke motor oil for internal engine lubrication. CAUTION: Never use any 2-stroke engine oil. Recommended Oil: Use a 4-stroke, 10W40 grade motor oil. WARNING ! • Oil is flammable. Always wipe off any oil spillage from the bilge. • Certain components in the engine compartment may be very hot. Direct contact may result in skin burn. Oil Level CAUTION: Check oil level frequently and refill if necessary. Do not overfill. it would make the engine smoke and reduce its power. Operating the engine with an improper oil level may severely damage engine. Check the oil level as follows: Before checking the oil level on this engine, watercraft must be level. Check oil level either with watercraft in water or out of water. Engine should be warm. Start engine for 20 seconds to warm up oil if necessary. Reinstall dipstick, push in completely. Remove dipstick and read oil level. It should be between marks. Use a funnel to add oil. You may find it is helpful to attach 12MM (½ in) ID hose of 6 inches long to the funnel for filling oil. Add the recommended oil to the proper level. Do not overfill. Every time oil is added in engine, do following steps to ensure correct oil level: (1). Start engine, idling for 20 seconds, then stop engine. (2). Wait for 1 minute then, rechecking the oil level. This is required to allow the oil to flow evenly in the oil chambers. Otherwise, you will have a false oil level reading. ! WARNING Engine oil may be hot. Certain components in the engine compartment may be very hot. Direct contact may result in skin burn. 35 Change Engine Oil YOU MUST CHANGE ENGINE OIL: • After First 10 Hours Operation • According To Maintenance Schedule In Section 4 • After Your Powerboard Capsize A Couple Of Times • When Water Gets Into Engine Through Carburetor, Exhaust System Or Engine Breathing Hose. STEPS TO CHANGE ENGINE OIL: 1) Oil drain plug is located at the bottom of hull beneath engine. Make sure that engine is off and warm, but NOT HOT. 2) Place your watercraft on a trailer or a lifting equipment so that you can access to the bottom of hull. Make sure the engine is leveled. 3) Use a proper oil pan to collect used oil to protect environment. Place it under the access window to the engine oil drain plug. 4) Use the special wrench tool (supplied) to open the access window to engine oil drain plug at bottom of hull. Keep the “O” ring for later use. 5) Use a 17mm socket wrench to open oil drain plug. There is a washer, a spring, oil filter screen and a magnet came out with the oil drain plug. Put oil filter screen and magnet in a cleaning container. 6) Drain dirty oil completely. 7) Clean oil filter screen and magnet. 8) Re-install back magnet, filter screen, washer and oil drain plug. Close the access window cover. Make sure the “O” ring is in good condition and fit into the cover. 10) Fill new engine oil to the right oil level. 9) CAUTION: • Make sure the drain plug is properly secured after oil change. No oil leak! • Make sure the access window is properly sealed with “O” ring and properly secured. No water leak! 36 Engine Coolant Recommended Coolant: Always use ethylene-glycol antifreeze containing corrosion inhibitors specifically for internal combustion aluminum engines. Cooling system must be filled with water and antifreeze solution (50% demineralized water, 50% antifreeze), or premixed coolant with freezing protection. NOTE: To prevent antifreeze deterioration, always use the same brand. Never mix different brands unless cooling system is completely flushed and refilled. Adding Coolant Procedure: CAUTION: • Ensure engine is cold. • Open Coolant Fill/Pressure Control Cap. • Slowly add coolant until it is full. • Tighten the Cap. • Adding coolant after the first time use. ! WARNING • Check coolant level frequently with engine cold, especially after first time use. • Never add coolant in cooling system when engine is hot. • Coolant is under pressure when engine is hot. Open coolant cap and pressure control valve cap may cause severe burn and injury when engine is hot. Fueling ! WARNING Follow these safe boating fueling instructions carefully: • Turn off engine. • Do not insert the spout too far in filler neck. • Pour fuel slowly so that air can escape from the tank and prevent fuel flow back. Be careful not to spill fuel. • Fully tighten fuel tank cap. 37 ! WARNING • Always stop the engine before refueling. • Fuel is flammable and explosive under certain conditions. • Always work in a well ventilated area. Do not smoke or allow open flames or sparks in the vicinity. • Fuel tank may be pressurized, turn cap slowly when opening. • When fueling, keep watercraft level. • Do not overfill or top off the fuel tank and leave watercraft in the sun. As temperature increases, fuel expands and might overflow. • Always wipe off any fuel spillage from the watercraft. Periodically verify fuel system. • RECOMMEND PREMIUM UNLEADED GASOLINE 91 PUMP OCTANE OR HIGHER • MINIMUM UNLEADED GASOLINE 86 PUMP OCTANE OR HIGHER NOTE: Do not mix oil with fuel. 38 2012 POWERBOARD SPECIFICATIONS ITEM UNIT DATA Number of People 1 Capacity Maximum people Dimensions, weights and recommended maximum loads jetSurf jetKayak jetKayak GT jetNami jetNami GT Length cm (in) 254 (100) Width cm (in) 70 (27.5) Dry weight kg (lb) 50 (110) Recommended max load kg (lb) 91 (200) Length cm (in) 264 (104) Width cm (in) 72 (28.5) Dry weight kg (lb) 58 (128) Recommended max load kg (lb) 91 (200) Length cm (in) 291 (115) Width cm (in) 74 (29) Dry weight kg (lb) 65 (143) Recommended max load kg (lb) 114 (250) Length cm (in) 308 (121) Width cm (in) 70 (27.5) Dry weight kg (lb) 53 (117) Recommended max load kg (lb) 91 (200) Length cm (in) 342(134) Width cm (in) 74(29) Dry weight kg (lb) 59(130) Recommended max load kg (lb) 114 (250) km/h (mph) 40 (25) Performance Max speed 39 2012 POWERBOARD SPECIFICATION (Continued) ITEM UNIT DATA Engine Type 4 stroke Max power kW (hp) Number of cylinders Displacement 7 (9.5) 1 cm3 (cu in) 149.6 (9.2) Bore mm (in) 57.4 Stroke mm (in) 57.8 Compression ratio 10.5:1 Start Electric start Ignition type Spark plug Spark plug gap CDI NGK DPR7EA-9 mm (in) 0.6-0.7(0.024-0.028) Intake mm (in) 0.03 (0.0012) Exhaust mm (in) 0.05 (0.0020) Valve clearance (Cold) Cooling system Engine cooling type Closed loop water cooling. Refer to Liquids section for Coolant Exhaust cooling type Inject water cool. Direct flow from propulsion unit type Oil sump. Refer to liquids section Lubrication system Lubrication 40 2012 POWERBOARD SPECIFICATION (Continued) ITEM UNIT DATA L (US gal) 7 (1.8) hours 2 Fuel system Fuel tank capacity Play time at full throttle Propulsion system Jet pump Transmission Impeller Aluminum/composite, axial flow, single stage Direct drive, forward/reverse (if equipped) Aluminum alloy 41 Section 3 OPERATION 42 ! WARNING Before operating your Powerboard, read this User’s Manual thoroughly, fully understand how the craft works, become familiar with all controls and functions. Consult your Aquanami Dealer for any questions about control and operation you may have. Failure to do so could cause damage to your watercraft and an accident! BREAK-IN PERIOD Your craft is equipped with a 4 stroke closed loop water cooled engine. Having a breaking-in period is crucial to its proper performance and the product life. The engine break-in period allows various components of the engine to wear and polish themselves to the correct operation clearances and conditions. The scheduled oil change during the break-in period is also required. It will prevent excessive wear and damage to the components. Failure to perform the required break-in period may significantly handicap your craft performance, shorten the product life. In certain circumstances, it may void your craft warranty. CAUTION: • Explicitly follow the instructions of this section. Failure to do so may reduce the engine’s life and/or performance. With the 4 stroke closed loop water cooled engine, a break-in period of 10 hours is required before continuous operation at full throttle. To achieve a good break-in, throttle lever should not be depressed more than 3/4, however, brief acceleration and speed variations contribute to a good break-in. • Continued wide open throttle runs and prolonged cruising without speed variations should be avoided, this can cause engine damage during the break-in period. YOU MUST CHANGE ENGINE OIL, REPLACE OR CLEAN OIL FILTER AND MAGNET AFTER FIRST 10 HOURS OPERATION BY AN AUTHORIZED AQUANAMI DEALER! STEPS TO CHANGE ENGINE OIL: 1) Oil drain plug is located at the bottom of hull beneath engine. Make sure that engine is off and warm, but NOT HOT. 2) Place your watercraft on a trailer or a lifting equipment so that you can access to the bottom of hull. Make sure the engine is leveled. 43 3) Use a proper oil pan to collect used oil to protect environment. Place it under the access window to the engine oil drain plug. 4) Use the special wrench tool (supplied) to open the access window to engine oil drain plug at bottom of hull. Keep the “O” ring for later use. 5) Use a 17mm socket wrench to open oil drain plug. There is a washer, a spring, oil filter screen and a magnet came out with the oil drain plug. Put oil filter screen and magnet in a cleaning container. 6) Drain dirty oil completely. 7) Clean oil filter screen and magnet. 8) Re-install back magnet, filter screen, washer and oil drain plug. Close the access window cover. Make sure the “O” ring is in good condition and fit into the cover. 10) Fill new engine oil to the right oil level. 9) CAUTION: • Make sure the drain plug is properly secured after oil change. No oil leak! • Make sure the access window is properly sealed with “O” ring and properly secured. No water leak! 13. Oil Drain Plug Access Window 10-Hour Inspection It is highly recommended that after the first 10 hours of operation, the watercraft be checked by an authorized Aquanami dealer. This inspection will also provide the opportunity to discuss the unanswered questions you may have encountered during the first hours of operation. 44 PRE-OPERATION CHECKS ! WARNING • The pre-operation check is very important prior to operating the watercraft. Always check the proper operation of critical controls, safety features and mechanical components, before starting as listed hereinafter. If not done as specified here, severe injury or death might occur. • Bring all safety equipment required by local laws. Some of the following items may not have been previously covered in this Manual, however they will be described in the MAINTENANCE or SPECIAL PROCEDURES sections. Please refer to these sections to have more detailed information. ! WARNING • Engine should be off and the safety Lanyard should always be removed from its post prior to do any of the following check. Leave safety lanyard on its post will drain battery dead when engine is not running. • Start your craft only after all items have been checked and operate properly. 45 PRE-OPERATION CHECK LIST ITEM TO DO Start and Stop buttons Check operation. Safety Lanyard Check operation. Throttle Check operation. Steering system Check operation. Armpole Check operation. Exhaust pipe cooling Check by-pass outlet. Water mist/drops should come out exhaust by-pass outlet. Bilge plugs Ensure plugs are secured. Exhaust flush cap Ensure the cap is installed. Battery Inspect cables and retaining fasteners. Ensure good condition and fully charged. Fuel tank Check/refill. Engine compartment Check if any water exists. Check if any signs of water leak. Check fuel line connections for tightness. Verify for any fuel leak/odor as well as oil and coolant leaks. Check any loosen parts. Engine oil level Check/refill. Engine coolant Check/refill. Carburetor Periodically drain water or contaminated fuel from the carburetor bowl by loosening the carburetor drain screw. Use a cup to collect the drained liquids. Ensure the drain screw closed after cleaning. Fuel water separator bottle Periodically drain water or contaminated fuel from the bottle. Engine breathing oil retainer Periodically drain the engine breathing oil retainer bottle to clean oil/water residue. Jet pump water intake Inspect/clean. Jet pump water intake seal Inspect any damage or leak. Access window to oil drain plug Check the access window is properly sealed and secured. No water leak. Hull Inspect. Dry storage compartment covers Ensure they are closed and properly sealed. 46 Engine Start/Stop Button and Safety Lanyard Make sure that both switches operate properly. Start engine and stop it using each switch individually. Lanyard could be securely attached to the kill switch post. It shuts electric system and engine off when being pulled off its post. ! WARNING • Should the stop/start button not work properly, refer to an authorized Aquanami dealer immediately. Fail to do so may result in SEVERE INJURY OR DEATH. • Should the safety lanyard be loose or not work properly, replace it immediately in order to avoid unsafe use. Throttle Check the throttle lever for free and smooth operation. It should return to its initial position immediately after it is released. ! WARNING Check throttle lever operation before starting the engine. Steering System For jetKayak and jetNami For jetKayak and jetNami, check steering operation for free movement with the assistance of another person. When the steering handle is in the center position, the jet pump nozzle should be in the straight ahead position. Ensure the jet pump nozzle pivot easily. ! WARNING • Check steering handle and corresponding steering nozzle operation before starting the engine. • Never turn steering handle while someone is nearby the rear of the watercraft. Keep away from steering moving parts. 47 Armpole for jetSurf Armpole provides support to operator during operation. It also houses control cables and electric wires. Having a damage free and fully functioning Armpole is important to your safety as well as other waterway users. CAUTION: Check the Armpole housing looking for cuts, tears or any other kind of damage. Ensure that the Armpole housing is securely connected to the housing anchor and the handle. The Armpole should remain securely attached to the jetSurf when the handle is pulled. Additionally ensure that there are no loose and/or missing screws. If the Armpole sustains any damage consult your Aquanami Dealer. ! WARNING Damage to the Armpole, Armpole housing and/or the handle can result in SEVERE INJURY OR DEATH. Exhaust Pipe Cooling CAUTION: To ensure it is properly working, check by-pass outlet. Water mist/drops should come out exhaust by-pass outlet. If the exhaust from the by-pass is not wet, stop engine and consult your Aquanami Dealer. ! WARNING • The exhaust pipe is cooled by the water from the jet pump. If the water flow from jet pump to exhaust pipe is blocked, the exhaust pipe and connecting components could be damaged. • Close and tight the exhaust flush cap (garden hose connector cap) after flushing exhaust system. • Exhaust system will be burned, damaged or caught fire if the exhaust flush cap left open! CAUTION: Never run the engine without supplying water to the exhaust cooling system when watercraft is out of water. If out of water, level the craft. Install a garden hose to the flushing connector. Refer to POST-OPERATION CARE and follow the procedure. CAUTION: Failure to flush exhaust cooling system, when engine is out of water, may severely damage the exhaust system. CAUTION: Never run engine longer than 1 minute when watercraft is out of water. Drive line seal has no cooling when watercraft is out of water. 48 Bilge Plugs Should water be present in the bilge, press manual bilge pump switch to start the electric bilge pump. If some water remains in bilge, tilt the watercraft to the rear and unscrew drain plugs to completely empty the bilge. Ensure all plugs securely closed before operating your Powerboard. Exhaust Flush Cap (Garden Hose Connector Cap) Ensure the exhaust flush cap (garden hose connector cap) is closed. Running the engine while leaving the cap open will damage the exhaust system. ! WARNING Always close the exhaust flush cap (garden hose connector cap) after flushing the exhaust system. Running the engine with the cap open will damage the exhaust system. Battery Pay attention to battery “+ and “-” signs. Ensure the battery is correctly connected, tighten and secured. ! WARNING The battery must always be fully charged and in good condition. Loss of battery power may leave you stranded. Never operate the watercraft if the battery does not have sufficient power or if it shows any other signs of decreased power. Always remove safety lanyard from its post when engine is not running. Leave safety lanyayd on its post will drain battery dead when engine is not running. Fuel Tank With the watercraft horizontal, fill the fuel tank. Refer to Liquids section for checking fuel level and fueling. Engine Compartment Check if any water exists. Check if any signs of water leak. Check fuel line connections for tightness. Verify for any fuel leak/odor as well as oil and coolant leaks. Check any loosen parts. 49 Engine Oil Level Ensure oil level is appropriate as specified in LIQUIDS section. Check for oil leaks on engine and in engine compartment. Engine Coolant Ensure coolant tank is full as specified in LIQUIDS section. Check for coolant leaks on engine, in bilge and from ride plate. Check Carburetor Water or contaminated fuel in carburetor bowl will cause engine suddenly stop when you depress throttle lever, or you may not be able to start engine. Periodically drain water or contaminated fuel from the carburetor bowl by loosening the carburetor drain screw. Use a cup to collect the drained liquids. Ensure the drain screw closed after cleaning. Check Fuel Water Separator Bottle Periodically drain water or contaminated fuel from the separator bottle. Use a cup to collect the drained liquids. To drain the contaminated fuel in the separator bottle, simply pull off the hose from the middle nozzle of the bottle, and let the contaminated fuel drain out from the bottom nozzle through the hose to a cup. Ensure reconnect the drain hose back to the middle nozzle of the separator bottle. Clean Engine Breathing Oil Retainer Check the bottle periodically and clean any oil residue to keep engine breathing freely. To drain the oil/water in the retainer bottle, simply pull off the hose from the middle nozzle of the bottle, and let the water/oil drain out from the bottom nozzle through the hose to a cup. Ensure reconnect the drain hose back the middle nozzle of the oil retainer bottle. ! WARNING Do not inspect the water intake or intake grate without removing the lanyard from the post. 50 Jet Pump Water Intake Check the seal between the jet pump intake and the ride plate. A damaged seal will let air get into the jet pump. The jet looses its propulsion force. Although the jet pump is equipped with weed cutter. It is still recommended that check jet pump. Remove weeds, shells, debris or anything else that could restrict the flow of water and damage cooling system or propulsion unit. Clean as necessary. If any obstruction can not be removed, refer to an authorized Aquanami dealer for servicing. Inspect leading edges of the impeller, if they have nicks or bends performance will be greatly reduced. Hull Inspect hull for cracks or damage. Dry Storage Compartment Cover Ensure the cover is tight. Seal is in good condition. Remove any water from the dry storage compartment. 51 OPERATING INSTRUCTIONS WARNING ! Before operating your Powerboard, read this User’s Manual thoroughly, fully understand how the craft works, become familiar with all controls and functions. Consult your Aquanami Dealer for any questions you may have. Failure to do so could cause damage to your watercraft and an accident! Propulsion Principle The engine is directly coupled to a drive shaft which, in turn, rotates an impeller. The water is drawn up from underneath the watercraft, then flows through the impeller to a venturi. The venturi accelerates the water and produces thrust to move the watercraft. By depressing the throttle lever, an operator increases engine speed and therefore watercraft speed. ! WARNING Whenever the engine is to be started, the operator should always be properly sitting or standing on jetSurf model, or sitting on jetKayak models and be wearing protective clothing including a Coast Guard approved PFD and a wet suit bottom. ! WARNING Keep away from intake grate while engine is on. Items such as long hair, loose clothing or personal flotation device straps can become entangled in moving parts resulting in severe injury or drowning. Turn Left and Right jetSurf Models: As surfing or wakeboarding, an operator makes a turn by shifting his/her body weight. The Powerboard turns right when operator leans right and inversely. jetKayak Models Turning the steering handle pivots the jet pump nozzle which controls the watercraft direction. Turning the handle to the left will turn the watercraft to the left and inversely. The throttle should be applied to turn the watercraft. 52 ! • • • WARNING For jetKayak models, throttle should be applied and steering handle turned to change the direction of the watercraft. Unlike a car, a watercraft needs some throttle to turn. Practice in a safe area applying the throttle and turning away from an imaginary object. This is a good collision avoidance technique. Directional control is reduced when the throttle is released and lost when engine is off. CAUTION: Combustion engines need air to operate; consequently this watercraft cannot be totally watertight. Maneuvers that cause the air intake opening to be under water may cause severe engine problems due to water ingestion. Refer to SPECIAL PROCEDURES and LIMITED WARRANTY section. Boarding the Watercraft As with any watercraft, boarding should be done carefully and engine should not be running. ! WARNING Engine should be OFF when boarding the watercraft. Keep limbs away from jet or intake grate. ! WARNING Inexperienced riders should practice how to get aboard close to shore first before venturing into deep water. Boarding from a Dock or in Shallow Water When boarding in shallow water or from a dock, board the watercraft from the side. Ensure there is at least 60 cm (2 ft) of water. Once aboard, take the appropriate riding position. CAUTION: Starting the engine or operating the watercraft in shallow water can draw sand, pebbles, or rocks through the jet pump, which might damage the impeller or other pump components. 53 Boarding in Deep Water Swim to the side or front of the watercraft. Put your hands on the board and pull yourself up then get on. Once aboard, take the appropriate riding position. Boarding in deep water is very difficult, especially on the jetNami models. Taking kayaking lessons and training is helpful and necessary. Many universities, colleges, kayak tutor schools, kayak rental places offer kayak lessons. You could find them on line. WARNING ! • Boarding in deep water is very difficult, especially on the jetNami models. • For your safety, take kayaking safety training and lessons before operating your jetKayak. Starting Engine Before unloading the watercraft on to water, it can be started for about 20 seconds to verify proper operation. ! WARNING • Components inside the engine compartment may be hot. • Keep away from electrical parts or jet pump area when engine is running. • Attach the safety lanyard to your wrist and snap the cap to its post before starting the engine. ! WARNING Before starting the engine, the operator should always be properly seated on jetKayak models, seat, knee or stand on jetSurf models. 54 CAUTION: • Ensure there is at least 60 cm (2 ft) of water when you are onboard prior to starting the engine. Otherwise damage to the impeller or other jet pump components might occur. Do not accelerate abruptly. • To start engine, depress and hold the engine start button. If engine fails to start after 15 seconds, wait a few seconds then repeat procedure. Follow the procedure below for cold engine starting. NOTE: • First time use of the watercraft takes longer time or repeated procedures to allow the fuel pump to draw fuel from fuel tank to carburetor first. • Depress and hold the engine start button, If engine fails to start after 15 seconds, wait a few seconds then repeat procedure. CAUTION: • Do not hold the start button more than 30 seconds to avoid starter overheating. A rest period should be observed between the cranking cycles to let the starter cool down. Be careful not to discharge battery. • Release the engine start button immediately once the engine is started. Cold Engine Start Slightly depress the throttle lever (1/5 of throttle range) to assist starting engine when it is warm or cold. 55 Riding • Evenly accelerate to increase speed and reach deeper water. • Do not apply full throttle until the engine is warm. The safe use and operation of this watercraft is dependent upon the use of proper riding techniques, as well as upon the common sense, good judgment, and expertise of the operator. ! ! WARNING Do not apply full throttle until the engine is warm, otherwise you may damage engine cylinder and piston. ! WARNING • Never attempt to perform jumps or stunts as they could lead to serious injuries or death. • To make sure your riding position allows you to remain in control and locate any upcoming craft or obstacle. ! WARNING • Avoid Rough Water or Poor Visibility Operation. The watercraft is not intended for rough water usage. Usage on rough water may result in SEVERE INJURY OR DEATH. • jetSurf is not designed for surfing like a regular surf board. • Do not jump waves or wakes. CAUTION: Although your watercraft is equipped with a weed cutter. It is recommended to avoid operating the watercraft in weeded areas. ! WARNING In the event of a fall, do not hold on to the handle. Attempting to do so could result in an injury. 56 Stopping/Docking The watercraft is slowed down by water drag. The stopping distance will vary depending on the watercraft size, weight, speed, water surface condition, presence and direction of wind and current. The rider should become familiarized with the stopping distance under different conditions. Release the throttle at a sufficient distance before the expected docking area. Moving a foot slightly forward or rearward may help to reduce speed to idle. ! WARNING For jetKayak models, directional control is reduced when the throttle is released and lost when engine is off. Shutting Off the Engine To shut off the engine, completely release throttle lever and press the engine stop button. Remove safety lanyard from watercraft. ! WARNING For jetKayak models, directional control is reduced when the throttle is released and lost when engine is off. ! WARNING Never leave the safety lanyard on its post when watercraft is not in operation in order to prevent accidental engine starting or to avoid unauthorized use by children or others or theft. Leave safety lanyard on its post will drain battery dead when engine is not running. 57 POST-OPERATION CARE ! WARNING Allow engine to cool before performing any maintenance. General Care Take the watercraft out of the water every day to prevent marine organism growth. Should any water be present in the bilge, open the drain plugs and tilt the watercraft rearward in order to allow water to flow out. Wipe off any remaining fluid in the engine compartment (engine, battery, etc.) with clean dry rags (this is particularly important in salt water operation). Additional Care for Foul Water or Salt Water When the watercraft is operated in salt water, additional care should be taken to protect the watercraft and its components. Rinse off watercraft's bilge area with fresh water. CAUTION: Failure to perform proper care such as: watercraft rinsing, exhaust cooling system flushing or anticorrosion treatment, when watercraft is used in salt water, will result in damage to the watercraft and its components. Never leave the watercraft stowed in direct sunlight. Exhaust Cooling System Flushing Flushing the exhaust cooling system with fresh water is essential to neutralize corroding effects of salt or other chemical products present in water. Flushing should be performed when the watercraft is not expected to be used further the same day or when the watercraft is stowed for any extended time. Proceed as follows: 1. Clean ride plate up and bottom, and heat exchange by using spray water 2. Clean jet pump by spraying water in its inlet and outlet. 3. Connect a garden hose to exhaust flushing connector, do not open the water tap and do not start engine yet. 4. 5. 6. 7. 8. To flush the exhaust cooling system, start the engine then immediately open water tap. Run the engine about 30 seconds at a fast idle between 3000 - 4000 RPM. Disconnect the garden hose first, and keep engine running another 10 seconds. Stop the engine. Install the exhaust flush connector cap to close the connector. 58 CAUTION: • Never flush a hot engine. • Always start the engine before opening the water tap. • Open water tap immediately after engine is started to prevent overheating. • Never run engine without supplying water to the exhaust cooling system when watercraft is out of water. • Never run engine longer than 1 minute. Drive line seal has no cooling when watercraft is out of water. • Close the water tap, then stop the engine. • Always close the water tap before stopping the engine. • Ensure to install the connector cap back after flushing The user should not start water flow into flush water connector until the engine is started; adding that running water into the flush system without the engine first running will result in engine damage that will not be covered under warranty. Anticorrosion Treatment To prevent corrosion, spray a corrosion inhibitor (salt water resistant) over metallic components in engine compartment. Apply dielectric grease (salt water resistant) on battery posts and cable connectors. ! WARNING Certain components in the engine compartment may be very hot. Direct contact may result in skin burn. Do not touch any electrical parts or jet pump area when engine is running. 59 SPECIAL PROCEDURES Water In Carburetor Once water gets into carburetor bowl, engine will not work properly. It may loose power and suddenly stop when you depress throttle lever, or you may not be able to start the engine. When it happens, drain carburetor and fuel water separator bottle. Use a screw driver to loose the carburetor drain screw to drain the water or contaminated fuel in the carburetor bowl. Drain contaminated fuel in the fuel water separator bottle by pulling off the hose from the middle nipple of the bottle. Use a cup to collect the drained liquids. After cleaning, ensure to tight the carburetor drain screw and reconnect the hose to the middle nipple of the fuel water separator bottle. Engine Overheating CAUTION: If the information meter shows engine overheating, stop engine as soon as possible. • Check engine coolant. Refer to LIQUIDS. • Check jet pump and drive shaft to see any weeds, shells or debris, and clean them. See the following cleaning procedure. • If engine still overheats, flush exhaust cooling system when back to shore, If engine still overheats, refer to an authorized Aquanami dealer for servicing. Jet Pump Water Intake and Impeller Cleaning Weeds, shells or debris can get caught on the intake grate, drive shaft and/or impeller. A clogged water intake may cause troubles such as: • Cavitations: Engine speed is high but watercraft moves slowly due to reduced jet thrust, jet pump components may be damaged. • Overheating: Since the jet pump operation controls the flow of water to cool the exhaust system, a clogged intake will cause the engine to overheat and damage engine internal components. 60 A weed clogged area can be cleaned as follows: Stop engine and remove the Lanyard from its post to prevent accidental engine starting before cleaning the jet pump area. Manually remove the weeds, shells or debris from drive shaft and jet. Start engine and make sure watercraft operates properly. If system is still blocked, move the watercraft out of the water and remove blockage manually. CAUTION: Inspect water intake grate and impeller for damage. Refer to an authorized Aquanami dealer for repair as necessary. ! WARNING Always remove the Lanyard from its post to prevent accidental engine starting before cleaning the jet pump area. Leave safety lanyard on its post will drain battery dead when engine is not running. Capsized Watercraft If watercraft turns over, it will remain capsized. When watercraft is capsized, do not attempt to restart the engine. Operator should always wear approved personal flotation devices. To return the watercraft upright, ensure the engine is off and the Lanyard is NOT on its post. • In shallow water, lift one side of the watercraft to upright. • In deep water, lean your body on one side and grab the other side of watercraft, then use your body weight to rotate the watercraft in any direction. • The bilge pump should automatically start to drain water in bilge. If the water sensor failed to start the bilge pump, push the bilge pump switch to drain the water in the bilge. CAUTION: • If watercraft has been capsized for LESS THAN 3 minutes, wait until the bilge pump stop working. Then start the engine. • If the watercraft has been capsized for MORE THAN 3 minutes, check bilge first. If bilge has less than 3 inches of water, wait until the bilge pump stop working or manually turn on the bilge pump if the water sensor failed to turn on the bilge pump. Then start the engine. • If the watercraft has been capsized for MORE THAN 3 minutes, and the bilge has more than 3 inches of water, wait until the bilge pump stop working or manually turn on the bilge pump if the water sensor failed to turn on the bilge pump. Drain the carburetor bowl first by loosing carburetor drain screw, and drain the fuel water separator bottle by pulling off the hose from middle nipple of the bottle to drain contaminated fuel. Then start the engine. 61 • If failed to drain the water from the bilge, do not attempt to crank engine to avoid water ingestion that would damage the engine. Bring the watercraft to the shore and drain the water in bilge as soon as possible. • If the engine does not crank, do not attempt to start engine anymore. Otherwise engine could be damaged. See an authorized Aquanami dealer as soon as possible. Submerged Watercraft To limit damages to the engine, drain bilge as soon as possible. If it was submerged in salt water, spray bilge and all components with fresh water using a garden hose to stop the salt corroding effect. CAUTION: Never try to crank or start the engine. Water trapped in intake manifold would flow towards the engine and may cause severe damage to the engine. Bring the watercraft to be serviced by an authorized Aquanami dealer as soon as possible. CAUTION: The longer the delay before you have the engine serviced, the greater the damage to the engine will be. Water-Flooded Engine CAUTION: Never try to crank or start the engine. Water trapped in intake manifold would flow towards the engine and may cause severe damage to the engine. Bring the watercraft to be serviced by an authorized Aquanami dealer as soon as possible. CAUTION: The longer the delay before you have the engine serviced, the greater the damage to the engine will be. Failure to have the engine properly serviced may cause severe engine damage. Fuel-Flooded Engine When the engine does not start after several attempts, the engine may be fuel-flooded. Proceed as follows. Open engine cover, leave it open for 30 minutes. If engine still does not start, remove the spark plug, let fuel inside cylinder ventilate for 30 minutes, clean spark plug or using a new spark plug, try to start engine. If the engine continues to flood, see an authorized Aquanami dealer. CAUTION: Never run engine for more than 30 seconds without supplying water to the exhaust cooling system when watercraft is out of water. 62 Section 4 MAINTENANCE AND CARE 63 MAINTENANCE CHART Routine maintenance is necessary for all mechanical products. A periodic inspection contributes to the product’s good performance, life span and operation safety. Regular watercraft service should be performed by you and/or by an authorized Aquanami dealer following the maintenance chart. The schedule should be adjusted according to operating conditions and use. IMPORTANT: Schedule for watercraft rental operations or higher number of hour use, will require greater frequency of inspection and maintenance. The maintenance is very important, if you are not familiar with safe service practices and adjustment procedures, see your authorized Aquanami dealer. In many instances proper tools and training is required for certain servicing or repair procedures. Never attempt repairs unless the appropriate tools are available. If required, contact your authorized Aquanami dealer for further servicing information. Adhere to the prescribed maintenance schedules to maintain the watercraft and equipment in top condition at all times. An annual inspection of the watercraft is always a good recommendation that should be followed. 64 Product Maintenance Chart 10 hrs ITEM 50 hrs or 100 hrs or 200 hrs or 6 months 12 months 24 months GENERAL Lubrication/corrosion protection L L L L Engine oil R R R R Exhaust system and fasteners I I Engine support and rubber mount I I Engine breathing oil retainer C C C C Carburetor C C C C Fuel water separator C C C C Airbox I I Hose and fasteners I I Coolant I R R Exhaust flushing I I I I Throttle cable IL IL IL IL Fuel lines, connections, pressure relief valves I ENGINE COOLING SYSTEM FUEL SYSTEM Fuel filter I R R R R ELECTRICAL Spark plug I I Battery and fasteners I I Circuit breaker I I Electric connectors and fasteners I I Steering cable and connections I I Steering set I I STEERING SYSTEM 65 PROPULSION SYSTEM Jet set (including impeller) I I Mechanic seal set (drive shaft) I Automatic vacuum siphon pump IC Sacrificial anode (if so equipped) I IR Ride plate and water intake grate I I Ride plate seal I IC I I I I I IC IC I I Hull Snorkel airintake I I Engine compartment seals I I Hull I I A: ADJUST C: CLEAN I: INSPECT L: LUBRICATE R: REPLACE 66 General Inspection Check engine compartment for any damage and for leaks of fuel, coolant or oil. Ensure all hose clamps are properly secured and no hose is cracked, kinked or presenting any other damage. WARNING ! If any gasoline leak and/or odor are present, do not start the engine. Have the watercraft serviced by an authorized Aquanami dealer. Inspect muffler, battery and fuel tank. Visually check electrical connections for corrosion and tightness. Inspect hull and jet pump water intake grate for damage. Replace or have damaged parts repaired. Cleaning The bilge should be cleaned to remove any fuel/oil/electrolyte deposits and mildew. Occasionally, wash the body with water and soap (only use mild detergent). Remove any marine organisms from engine and/or hull. Apply non-abrasive wax such as silicone wax. CAUTION: Never clean fiberglass and plastic parts with strong detergent, degreasing agent, paint thinner, acetone, etc. Lubrication and Anticorrosion Protection Throttle Cable Lubricate the throttle cable with XP-S Lube or equivalent. Depressing and releasing the throttle lever should operate smoothly. Throttle lever should return to its initial position without any hesitation. There must be a small amount of free-play when throttle lever is released. Refer to an authorized Aquanami dealer if necessary. Electrical Connections As necessary, apply anticorrosion product such as dielectric grease on battery posts and all exposed cable connectors. Additional Lubrication XP-S Lube or equivalent will help prevent corrosion of metallic parts and maintain proper operation of moving mechanisms. ! WARNING • Do not alter or tamper with throttle cable adjustment or routing. • If throttle lever does not automatically return, do not operate watercraft and see your authorized Aquanami dealer. 67 Engine Change oil according to oil change schedule. See the Liquid section. The oil change should be performed by an authorized Aquanami dealer. Drain carburetor to remove any possible water in the carburetor bowl. Open the carburetor drain screw at the bottom of the carburetor. Use a bottle to collect the soiled/watered gas in the carburetor bowl. Cooling System Antifreeze should be replaced every 100 hours or every 2 years to prevent antifreeze deterioration. The antifreeze replacement and a density test should be performed by an authorized Aquanami dealer. Connect a garden hose to flush the exhaust system as explained in EXHAUST COOLING SYSTEM FLUSHING under POST-OPERATION CARE. CAUTION: Properly follow the instructions given in the flushing procedure. Fuel System ! WARNING • Gasoline is highly flammable and explosive. Failure to check and repair for any fuel leakage could resulting in fire or explosion, which can cause severe injury or death. • Shut off engine and remove the Lanyard from its post. • Do not smoke. And keep away any fire or sparks. • Fuel line is pressurized. Fuel can spray out and cause accident. • Do not attempt run engine with fuel line disconnected. Electrical Spark plug could be degraded over time. Inspect spark plug according to maintenance chart. Replace bad spark plug. Inspect battery power and check the fasteners and connecters. Inspect electric connectors for loose connections. Water could be trapped in electric connectors if being submerged in water for a long period of time, which will cause short circuit. The engine will not work properly or will not start when it happens. Clean and dry the connectors as soon as possible. If the electric bilge pump does not start and the battery is not charged. Check the circuit breaker. Depress the circuit breaker reset button to reset only after the root cause of the problem has been cleared. 68 ! WARNING If the circuit breaker is opened, source of malfunction should be determined and corrected before reset. See an authorized Aquanami dealer or servicing. Steering System Check steering mechanism to ensure steering operates smoothly, and no excessive lash in the system. Propulsion System Remove the Lanyard from its post to prevent accidental engine starting before inspecting and cleaning the jet pump area. Inspect impeller, intake grate, ride plate, to see any damage. Inspect all fasteners. Clean and lubricate for corrosion prevention. Refer to Post Operation Care. Automatic vacuum siphon pump uses a low pressure area in the jet pump to siphon the water out of the bilge when the engine is operating. Inspect the pump head for obstructions, clean as necessary. Inspect and replace sacrificial anode if equipped. Hull Inspect hull for cracks and any possible leaks. Check all seals in good conditions. STORAGE If any repairs are needed to body or to the hull, contact your authorized Aquanami dealer. Apply a good quality marine wax to the body. If the watercraft is to be stored outside, cover it with an opaque tarpaulin to prevent sun rays and grime from affecting the plastic components, watercraft finish as well as preventing dust accumulation. CAUTION: The watercraft should never be left in water for storage. Never leave the watercraft stored in direct sunlight. Never store watercraft in a plastic bag. 69 PRE-SEASON PREPARATION CHART Use the following chart for preseason preparation. Since technical skills and special tools are required, some operations should be performed by an authorized Aquanami dealer. Preseason Preparation Chart GENERAL ENGINE Lubrication/corrosion protection Operator Exhaust system condition and fasteners Dealer Condition of seals and fasteners Dealer Oil level Dealer /Operator Inspection of cooling system coolant level, hoses COOLING SYSTEM and components if antifreeze was not changed for Dealer storage, drain and replace with new antifreeze. Inspection of carburetor. Check throttle vale for smoothness. And check fuel bowl if necessary for possible corrosion or fuel path blocking. FUEL SYSTEM ELECTRICAL SYSTEM STEERING SYSTEM Fuel system; check valves, lines, fasteners Dealer Filler neck, fuel tank and fuel cap condition Dealer Fuel tank straps Operator Refill fuel tank Operator Battery condition/charging and reinstallation. Dealer Starter connections and routing Dealer Steering system adjustment/inspection Dealer Propulsion system inspection Dealer Inspection of vacuum siphon pump Dealer PROPULSION 70 Section 5 TROUBLE SHOOTING 71 Use this section to check for the possible cause of simple troubles you may have with your powerboard. You may solve some of the problems rather quickly, but may need help from a skilled mechanical technician. In such cases, refer to an authorized Aquanami Dealer for servicing. If a procedure for replacement or repair is not described in the Manual, have an Authorized Aquanami Dealer perform necessary service. Trouble Shooting TROUBLE Engine does not turn over Engine turns slowly, but does not start Engine turns regularly, but does not start POSSIBLE CAUSE REMEDY Lanyard is not in place put Lanyard on post battery runs down, bad terminal connection charge battery and tighten terminal fault start motor refer to a Aquanami dealer bad electric connectors of start motor cables refer to a Aquanami dealer seized jet pump refer to a Aquanami dealer seized engine refer to a Aquanami dealer faulty stop button, Lanyard post refer to a Aquanami dealer bad start switch refer to a Aquanami dealer bad relay switch refer to a Aquanami dealer weaken or discharged battery replace battery bad battery cable connection tighten worn start motor refer to a Aquanami dealer empty fuel fill stale or contaminated fuel tank clean and refill watered/contaminated carburetor drain carburetor, and drain fuel water separator bottle fouled or defective spark plug replace spark plug cap not connected or loose tighten fuel flooded engine refer to a Aquanami dealer water flooded engine refer to a Aquanami dealer disconnected or faulty fuel pump refer to a Aquanami dealer defective electronic control box refer to a Aquanami dealer Bad electric connectors Clean and dry the connectors 72 TROUBLE Engine runs irregularly or stalls Weak spark plug Engine smoke Engine overheat Powerboard can not reach top speed, engine does not have power POSSIBLE CAUSE REMEDY empty, stale or contaminated fuel siphon tank and refill watered carburetor and watered fuel water separator bottle drain carburetor bowl and drain fuel water separator bottle fouled or defective spark plug replace electric wire loose connection or bad connectors tighten, or see a Aquanami dealer. defective electric control box refer to a Aquanami dealer fouled or weak spark plug replace faulty ignition coils (inside electronic control box) refer to a Aquanami dealer internal engine damage refer to a Aquanami dealer coolant too low; air trapped in cooling system; coolant leak; damaged cooling system fill coolant according to Liquid section coolant low; trapped air in cooling system; clogged exhaust cooling system; coolant leak; damaged cooling system; garden flushing connector is not closed; clogged jet. fill coolant; flushing exhaust cooling system; clean jet; or refer to a Aquanami dealer; close garden flushing connector weeds and debris trapped inside jet Remove and clean water or contaminated fuel in carburetor bowl and fuel water separator bottle drain and clear watered or contaminated fuel clean and refill damaged impeller refer to a Aquanami dealer fouled carburetor replace air box is blocked by alien objects such as cloth or tower remove and clean air leak between ride plate and intake pipe, damaged water intake seal refer to a Aquanami dealer weak spark plug replace damaged engine by water injection refer to a Aquanami dealer engine oil level too high drain oil and check blocked engine breathing hose; blocked shut off valve clean and remove blockage foul throttle lever refer to a Aquanami dealer person and cargo weight is too heavy 73 TROUBLE POSSIBLE CAUSE REMEDY Abnormal vibration misalignment at the coupler between engine output shaft and jet drive shaft refer to a Aquanami dealer engine compartment cover not properly closed install cover properly bad seal replace automatic siphon pump head is blocked clean fouled bilge pump replace bilge pump bad drive shaft mechanic seal refer to a Aquanami dealer hull leak refer to a Aquanami dealer loose drain plug tighten bad air intake valve check and replace Water in bilge AQUANAMI Phone: 1-562-613-5001 (USA) Fax: 1-562-286-6691 (USA) Email: [email protected] Distributor Name: Address: Country: Phone: Fax: Email: 74