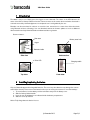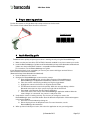
1
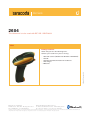
User Guide
2604
This document is to be used with BC / BL / BLR 2604
2604
Package contents
Check that you have the following items.
Contact your reseller if any item is missing.
1 barcode scanner (BC2604 or BL2604 or BLR2604).
1 Cradle
1 CD Rom with documentation and software
1 AC charger
2 Batteries
© Baracoda™ - September 2004
•
•
•
•
•
Baracoda, Inc. (US Office)
45 Main street - Suite 616 - Brooklyn, NY 11201
Ph: 718 488 9600 - Fx: 718 488 9601
Baracoda SA (Europe Office: France)
30 Avenue de l’Amiral Lemonnier - 78160 Marly-Le-Roi
Ph: +33 1 30 08 89 00 - Fx: +33 1 30 08 89 98
The bluetooth name and Bluetooth registered trademarks are owned by Bluetooth SIG, Inc., and are used by Baracoda under license. The Baracoda names and Baracoda trademarks are
own by Baracoda. All specification are subject to change without notice - Non contractual pictures © Baracoda - All rights reserved
2604 User Guide
Table of contents
1
2
3
4
5
6
Introduction.............................................................................................................................. 2
Installing/replacing batteries ....................................................................................................... 2
Proper scanning position ........................................................................................................... 3
Quick Start Up guide................................................................................................................. 3
LED and Beep signals Summary ................................................................................................. 4
Configuring your scanner ........................................................................................................... 5
6.1
Usage modes..................................................................................................................... 5
Real-Time Mode (default setting) ..................................................................................... 5
Batch Mode ................................................................................................................. 5
Master mode ................................................................................................................ 5
6.1.1
6.1.2
6.1.3
6.2
Reading mode.................................................................................................................... 5
Trigger mode (default setting) ......................................................................................... 5
Autoscan mode............................................................................................................. 5
6.2.1
6.2.2
6.3
Symbology......................................................................................................................... 6
6.4
Data format........................................................................................................................ 6
Acknowledgment: ......................................................................................................... 6
Prefix/suffix ................................................................................................................... 6
Baracoda Header .......................................................................................................... 6
Barcode Identifier .......................................................................................................... 6
6.4.1
6.4.2
6.4.3
6.4.4
6.5 Beeps and LEDs ................................................................................................................ 6
Other functions......................................................................................................................... 7
7.1 Power management............................................................................................................ 7
7.2 Sniff period ........................................................................................................................ 7
7.3 Low battery........................................................................................................................ 7
7.4 Security ............................................................................................................................. 7
7.5 Firmware upgrade .............................................................................................................. 7
8
Safety/Regulatory...................................................................................................................... 8
7
© Baracoda 2003
Page 1/8
2604 User Guide
1 Introduction
The 2604 is easy to use. Simply press the trigger to scan a barcode. The colour of the LED indicates the
status of the device. A beep indicates when the scanner connects to the remote device and when a barcode is
scanned successfully. Acknowledgement of a completed scan is configurable by the user.
Barcodes can be transmitted in real-time or stored for later transmission to remote host devices/terminals
using Bluetooth wireless technology. You can download software & firmware updates as well as additional
documentation from http://www.baracoda.com/download after registration.
Scanner features:
Scan area
Battery cover lock
Trigger
Batteries inside
Side view
Bottom view
Tri Color LED
Charging cradle
Top view
Front view
2 Installing/replacing batteries
Only use Baracoda approved rechargeable batteries. The use of any other batteries may damage the scanner
and void the warranty. Please remove the batteries when you are storing the scanner for more than 30 days.
1. To insert batteries into the 2604, push the lock button away from the battery cover.
2. Slide the battery lid downwards.
3. Insert the two (2) AA batteries as indicated inside the battery compartment.
4. Slide the cover up and lock.
Notice: Fully charge batteries before first use.
© Baracoda 2003
Page 2/8
2604 User Guide
3 Proper scanning position
Position the scanner so the light beam fully overlaps and crosses the bar code.
The scanner will emit a beep when the scan is successful.
Sample Bar code
* 1 2 3 4 5 6 7 8 - *
4 Quick Start Up guide
Find below how to quickly verify that your scanner is working correctly, using the BaracodaManager:
1- Make sure that your host device (PC or PDA) is bluetooth enabled. If not, please contact your reseller.
2- Install the BaracodaManager. (update can be downloaded from http://www.baracoda.com/download.
) Make sure that your Bluetooth software is compatible with BaracodaManager.
For instructions, see the BaracodaManager user guide.
If your Bluetooth software is not compatible, you can test your scanner with Hyper terminal. Refer to
Communication Protocol documentation.
(Download on http://www.baracoda.com/download.)
3- Insert the batteries in the scanner.
4- Configure the BaracodaManager to connect to the scanner.
a. Start the BaracodaManager by selecting Start> Programs> BaracodaManager>
BaracodaManager. The application automatically searches for wireless scanners.
b. Place the scanner in discovering mode by pressing the trigger button.
c. Highlight the scanner in the Devices in range box and click add.
d. The Bluetooth connection asks for the passkey. While the message displays, click the
Bluetooth connection icon in the system tray at right side of the task bar.
e. Enter 0000 in the Bluetooth Passkey Request dialog box.
f. Look at the status of the scanner in the BaracodaManager application window. When the
status changes to “connected”, the scanner is ready to be used.
5- Verify that the scanner is working correctly. The first time you configure a scanner, the
BaracodaManager opens a terminal window. Scan the barcode sample below. If information appears
in the terminal window.
a. Close the Terminal window by clicking exit
b. Select the plug-in from the drop down menu. For more information, see the
BaracodaManager documentation.
6- When you have finished your session, click exit on the application to save your configuration.
© Baracoda 2003
Page 3/8
2604 User Guide
5 LED and Beep signals Summary
The LED color indicates the operating mode:
Red
Orange
Green
Full memory or empty battery
Batch mode
Real-time mode
LED Blinking indicates RF status
Single Blinks (e.g. *pause*pause*…)
Double Blinks (e.g. **pause**pause**…)
The scanner is ready to be connected
The scanner is connected
Red LED indicates a problem
Single Red Blink
Solid Red LED
Batteries are empty
The memory is full
Beep Codes
Single beep
Double beep
Connection created
Disconnection
© Baracoda 2003
Page 4/8
2604 User Guide
6 Configuring your scanner
There are two ways to configure your scanner:
When connected to host device, you can use the BaracodaManager for multiple settings (refer to
BaracodaManager documentation). Or, you can use configuration barcodes (refer to the programming guide).
To reset the scanner to its “default settings”, use BaracodaManager Software (should you experience any
problems, please contact your reseller).
6.1 Usage modes
The 2604 has three usage modes. These modes can be changed only with the BaracodaManager.
Refer to the BaracodaManager documentation to change usage mode of your scanner.
6.1.1 Real-Time Mode (default setting)
In real-time mode, the barcode is decoded and transmitted to a remote device without delay.
o Once connected to a host device, the scanner emits a beep.
o If you disconnect the scanner from its host, it emits a double beep.
In this mode, the scanner is considered as a slave: the Bluetooth connection is initiated by the
host device.
6.1.2 Batch Mode
In batch mode, the barcode is read and stored into the scanner’s non-volatile memory for later transmission to
the host. The memory can hold up to 1 000 barcodes.
* Non-volatile memory: when the scanner is turned off, the data in memory is retained.
Once the batch mode is selected, the scanner emits an orange flash.
- Scan the barcodes
- When the LED is red, the memory is full. To upload barcodes, refer to the BaracodaManager user manual.
6.1.3 Master Mode
This mode allows the barcode scanner to initiate the Bluetooth connection to a pre-determined host when you
scan a barcode. Then barcodes are decoded and transmitted without delay (as in real-time mode). This mode
is to be used when the scanner needs to send barcodes to any host that does not have any dedicated user
interface such as a printer, a payment terminal, etc….
You can configure host device address through the BaracodaManager.
6.2 Reading Mode
The 2604 has two reading modes. These modes can be changed with both the BaracodaManager and the
programming guide.
6.2.1 Trigger mode (default setting)
Simply press the trigger when you want to scan a barcode.
6.2.2 Autoscan mode
This mode enables you to scan continuously. By using the cradle, the 2604 can be used as a “presentation”
scanner while it is recharging. In autoscan mode, the scan beam is continuously on.
© Baracoda 2003
Page 5/8
2604 User Guide
6.3 Symbology
You can enable/disable type of barcode decoders with both the BaracodaManager and the programming
guide.
6.4 Data format
6.4.1 Acknowledgment:
You are given an acknowledgment if the scan is successful.
You can configure or disable the scanner acknowledgement through BaracodaManager.
Acknowledgment is disabled in default settings.
6.4.2 Prefix/suffix
You can add a prefix and/or a suffix to every barcode sent to the host device.
You can configure prefix/suffix through both BaracodaManager and programming guide.
There is no prefix/suffix in default settings
6.4.3 Baracoda Header
It is a proprietary data encapsulation. It is necessary to activate the Baracoda header in 2 cases:
• to use the Baracoda keyboard emulation (KEmul) and Hyper terminal
• to use the acknowledgment function.
You can configure Baracoda Header through BaracodaManager.
The Baracoda header is enabled in default settings
6.4.4 Barcode Identifier
The scanner can transmit max. 2-digit barcode identifier code for different types of barcodes (symbologies).
List of 2-digit identifier codes can be found in the programming guide.
You can configure barcode identifier through programming guide.
The barcode identifier is disabled in default settings
6.5 Beeps and LEDs
You can customize types of Beeps/LED Lightening using both BaracodaManager and programming guide.
Default settings are shown in Status Display Summary section of this guide.
© Baracoda 2003
Page 6/8
2604 User Guide
7 Other functions
7.1 Power management
You can configure your scanner to work at 20 dBm (default setting) or 10 dBm through BaracodaManager.
Due to local law, you may not use 20 dBm in some countries (like Italy).
Please refer to your local law before using your scanner.
7.2 Sniff period
The higher the sniff period is, the higher is the latency and the smaller is power consumption.
Default value is 150ms.
7.3 Low battery
A red blinking LED indicates that the battery level is low. Recharge batteries. When the LED is continuously
red, you can no longer scan barcodes.
• How to recharge the battery:
Plug the cradle connector into the AC wall adapter, then place the 2604 in the cradle.
When the scanner is inserted into the cradle and charging, the LED is red (solid).
When the scanner is fully charged, the LED will become a solid green.
A full recharge (from completely drained batteries) takes approximately 5 hours.
When the original batteries wear out, please contact your Baracoda reseller for replacements.
7.4 Security
The Bluetooth connection is secured with a PIN code authentication.
You can configure security (enable/disable/change PIN code) through BaracodaManager.
The Security is enable in default settings: Default PIN code is 0000.
7.5 Firmware upgrade
You can upgrade your scanner with latest version of the firmware through the BaracodaManager.
Upgrades can be downloaded on www.baracoda.com/download after registration.
© Baracoda 2003
Page 7/8
2604 User Guide
8 Safety/Regulatory.
Emissions:
FCC Class A
EN60950 & EN60825-1
VCC1-B
Electronical:
UL, TUV
Changes or modifications not expressly approved by the party responsible for compliance could void the
user's authority to operate the equipment. (In accordance with FCC Part 15.21).
Specific to Laser scanners BL2604 and BLR2604
Laser safety
The BL2604 employs a laser: do not remove the cover or attempt to service this device due to the possibility
of eye damage.
Caution!
Use of the product or procedures other than those specified herein may result in hazardous laser radiation
exposure.
Laser Classification:
CDRH Class II
IEC825 class 2
Limited Warranty
Manufacturer warrants that the product will be free of defects in material and workmanship for one (1) year
from the date of shipment. Manufacturer will, at its option, either repair, replace or refund the purchase price
paid by buyer for the defective products.
Such repair, replacement or refund shall be buyer's sole remedy in the event of Manufacturer's breach of this
limited warranty. Repaired or replaced parts or product may include new, reconditioned or remanufactured
parts and equipment at Manufacturer's option. All costs associated with shipment to Manufacturer for warranty
service, including but not limited to freight, duties, insurance and customs fees are buyer's responsibility.
Manufacturer will pay the freight costs (duties, insurance, customs and any other fees are buyer's
responsibility) associated with the return shipment to buyer. The method of shipment will be at Manufacturer's
discretion. Repair or replacement of any parts or equipment does not extend the period of warranty provided
for herein. THIS LIMITED WARRANTY IS MANUFACTURER'S ONLY WARRANTY. MANUFACTURER DOES
NOT GIVE WARRANTIES OF MERCHANTABILITY OR WARRANTIES OF FITNESS FOR A PARTICULAR
PURPOSE. To take advantage of this warranty, buyer should contact the seller not the Manufacturer. The
warranty set forth herein does not cover and Manufacturer will have no obligations hereunder if any nonconformance is caused in whole or in part by; accident, transportation, neglect, misuse, alteration,
modification, or enhancement of the products or incorporation, interfacing, attachment of any feature, program,
or device to the Products by a person or entity other than Manufacturer, failure to provide a suitable installation
environment, use of the products for other than the specific purpose for which the products are designed or
any use of the product not in accordance with the User Guide or other misuse or abuse of the product. The
warranty does not cover problems linked to batteries.
© Baracoda 2003
Page 8/8