1
===!T§
Deutsche
Telekom
User Guide
T-Eumex 704PC LAN.
Experience High-speed Internet Access
for the Entire Network with T-DSL.
Before You Install or Operate Your Eumex 704PC LAN...
a
… please make sure you read the instructions in this user guide. The law
requires us to inform you about important safety precautions, both for
your own safety and to avoid damage to your equipment.
If you ignore this guide, Deutsche Telekom will not accept any liability
for damages resulting from negligent or wilful disregard of the instructions contained in it.
Only equipment supplying safety extra low voltage (SELV) and/or complying with standard ETS 300 047 should be connected to the Eumex
704PC LAN. Equipment operated in accordance with its purpose complies with this regulation.
Do not open the housing yourself. Unauthorised opening of the housing
and improper repairs may endanger the user. In addition, the guarantee
will be invalidated.
Do not allow fluids to penetrate inside the Eumex 704PC LAN, as this
could result in short circuits or electric shocks.
Please commission your Eumex 704PC LAN as described in the section
on Mounting and Commissioning.
Symbols Used
a
b
d
c
t
q
g
k
r
*
#
1 to 0
General note
Important safety precautions
Lift the handset
Replace the handset
Hold your conversation
Dial telephone number or select code digit
You hear an acknowledgement tone
Your telephone rings
3-party conference
Press the R-key (aka the flash or enquiry key)
Use the star key to activate or deactivate a feature
Use the hash key to quit programming
Dial specific digits.
Contents
General .............................................................................................................1
A Word of Welcome..................................................................................................................1
The Features of the Eumex 704PC LAN ..............................................................................2
Supported ISDN Features .......................................................................................................3
Safety Precautions....................................................................................................................4
Power Failure .............................................................................................................................4
Scope of Delivery......................................................................................................................5
Mounting and Commissioning ...........................................................................5
Scope of Delivery......................................................................................................................5
What Does the Eumex 704PC LAN Require?......................................................................6
Mounting and Installation Sequence ....................................................................................7
Mounting Location....................................................................................................................8
Choosing a Location for Your Eumex 704PC LAN..............................................................9
Tools for Wall Mounting ...........................................................................................................9
Wall Mounting............................................................................................................................9
Connecting Devices.........................................................................................10
Connection Diagram..............................................................................................................10
Connecting..............................................................................................................................10
Connecting the Eumex 704PC LAN to T-ISDN..................................................................11
Connecting the Eumex 704PC LAN to T-DSL ...................................................................11
Connecting Analogue Terminals to the Eumex 704PC LAN ..........................................12
Connecting a Computer to the Eumex 704PC LAN.........................................................12
Connecting the Eumex 704PC LAN to the Power Supply...............................................13
Sockets ....................................................................................................................................14
Additional Terminals on the S0 Bus ....................................................................................15
Interpreting the LEDs .............................................................................................................15
Setting the Dialling Mode for the Analogue Terminals.....................................................16
Commissioning................................................................................................17
The Eumex 704PC LAN Default Settings on Delivery......................................................17
Accepting Calls.......................................................................................................................18
Automatic and Manual External Line Seizure....................................................................18
Telephoning ....................................................................................................18
Making Internal Calls .............................................................................................................19
Making External Calls ............................................................................................................19
Making Calls Using Speed Dialling.....................................................................................20
Enquiry Calls ...........................................................................................................................20
Transferring Calls without an Announcement ...................................................................21
Transferring Calls with an Announcement .........................................................................22
Speaking with Two Subscribers Alternately (Toggling)....................................................23
Speaking with Two Subscribers Simultaneously (3-party Conference) ........................24
Picking up Calls......................................................................................................................25
Picking up Calls from an Answerphone .............................................................................25
Automatic Callback on Busy (CCBS)..................................................................................25
Automatic Callback on No Reply (CCNR)..........................................................................26
Contents
DTMF Post-dialling .................................................................................................................27
Malicious Call Identification (MCID)....................................................................................27
Calling Your T-NetBox............................................................................................................27
Staying in Touch ..............................................................................................28
Call Forwarding ......................................................................................................................28
Activating Call Forwarding....................................................................................................28
Deactivating Call Forwarding ...............................................................................................29
Accepting or Rejecting Call Waiting....................................................................................30
Activating Call-waiting Protection ........................................................................................31
Deactivating Call-waiting Protection ...................................................................................31
Charge Accounts....................................................................................................................32
Emergency Numbers.............................................................................................................32
External Line Access and Speed-dialling Numbers .........................................................32
Call Data...................................................................................................................................32
Configuration via Telephone ............................................................................33
Starting the Configuration Mode .........................................................................................34
Exiting the Configuration Mode ...........................................................................................34
Editing the PIN ........................................................................................................................35
Storing Telephone Numbers (MSNs) ..................................................................................36
Saving Telephone Numbers (MSNs)...................................................................................36
Call Assignment......................................................................................................................37
Resetting the Call Assignment: ............................................................................................38
Manual External Line Seizure with 0 ...................................................................................39
Automatic External Line Seizure..........................................................................................39
Number Busy ..........................................................................................................................40
Activating "Number Busy" .....................................................................................................40
Deactivating "Number Busy" ................................................................................................40
Configuring the Device Type for the Internal Lines...........................................................41
External Line Access..............................................................................................................42
Storing Emergency Numbers ...............................................................................................43
Deleting Emergency Numbers.............................................................................................43
Deleting Individual/All Speed-dialling Numbers...............................................................44
Storing Numbers for Speed Dialling ...................................................................................44
Blocking/Releasing Speed Dialling for Internal Lines without External Line Access.45
Programming a Telephone Number (MSN) for Transmission .........................................46
Always Call Anonymously (Restrict Telephone Number).................................................46
Always Transmit Number (Restrict Telephone Number: Cancel) ...................................47
Charge per Unit of Time ........................................................................................................48
Resetting/Deleting the Charge Counter.............................................................................48
Setting a Charge Limit ...........................................................................................................49
Activating/Deactivating the Charge Limit ..........................................................................49
Managing Call Forwarding ...................................................................................................50
Activating Call Forwarding in the Exchange ......................................................................50
Activating Call Forwarding in the Eumex 704PC LAN .....................................................50
Deleting All Call Forwarding.................................................................................................51
Contents
Activating/Deactivating Call Data Recording ....................................................................51
Activating/Deactivating Call Transfer (ECT).......................................................................52
Call Transfer in a Communications System .......................................................................52
Activating/Deactivating T-NetBox Signalling.....................................................................53
SMS in a Fixed-line Network.................................................................................................54
Resetting the Communications System .............................................................................55
Restoring the Default Settings..............................................................................................55
Remote Configuration......................................................................................56
The PC Software..............................................................................................57
General ....................................................................................................................................57
System Prerequisites..............................................................................................................58
About the Software.................................................................................................................59
Installing the Software .....................................................................................60
Installing the Software and Configuring Internet Access ................................................60
Connecting to / Disconnecting from the Internet ..............................................65
Connecting to the Internet ....................................................................................................65
Disconnecting from the Internet ..........................................................................................65
Configuring the System....................................................................................66
Configuring the Eumex 704PC LAN ...................................................................................66
Menu: External ISDN / Telephone numbers ......................................................................67
Menu: Call assignment / Incoming .....................................................................................68
Menu: Internal subscribers ...................................................................................................69
Menu: Central data.................................................................................................................72
Menu: Charges .......................................................................................................................74
Menu: Speed dialling / Settings...........................................................................................76
Menu: Network / Router configuration ...............................................................................77
Starting a Program from the Windows Taskbar .................................................78
CAPI Control....................................................................................................79
FlashLoad .......................................................................................................80
FlashLoad (Updating the Communications System Software).......................................80
Teledat RVS-COM ............................................................................................83
Basic Functions ......................................................................................................................83
Program Modules...................................................................................................................83
WinPhone........................................................................................................85
Basic Functions ......................................................................................................................85
User Interface..........................................................................................................................85
PageMobil .......................................................................................................86
Basic Functions ......................................................................................................................86
User Interface..........................................................................................................................86
Contents
Home Network.................................................................................................87
Installation ...............................................................................................................................87
Data Transfer (Sharing and Mapping Drives).....................................................................88
The Web Configurator......................................................................................90
Starting the Web Configurator .............................................................................................90
ISDN - Basic Settings .............................................................................................................91
T-DSL Access Data.................................................................................................................92
ISDN Access Data ..................................................................................................................93
PPP Settings............................................................................................................................94
Filter ....................................................................................................................................95
Router Configuration .............................................................................................................96
Status ....................................................................................................................................97
Appendix.........................................................................................................98
Technical Specifications .......................................................................................................98
Glossary ...................................................................................................................................99
Audio Signals / Ringer Cadences.....................................................................................105
Index of Key Words ..............................................................................................................106
Declaration of Conformity...................................................................................................108
Returning Old Communications Systems........................................................................108
Returning Your Old CD-ROM .............................................................................................108
Warranty.................................................................................................................................108
Dealing with Faults...............................................................................................................110
Customer Service.................................................................................................................111
General
A Word of Welcome
The Eumex 704PC LAN is an ISDN communications system enabling you to connect
up to four analogue devices to a basic ISDN connection.
In addition the Eumex 704PC LAN has an Ethernet 10BaseT network with four ports.
One of the Ethernet ports is used to make direct connections to T-DSL, while the
remaining three can be used to connect PCs.
A PC connected via the separate USB port is integrated in the network. Furthermore,
you can also connect additional PCs via Ethernet hubs (known as "cascading").
The built-in router enables all of the connected PCs to use an active Internet connection simultaneously (time-sharing procedure). To connect to the Internet you merely
have to start a Web browser. Automatic monitoring disconnects you from the Internet
after a certain configurable time, e.g. three minutes, has elapsed without any data
traffic flowing.
Two completely separate external calls (e.g. a telephone call and a data application)
can take place simultaneously on the two B-channels of an ISDN line.
In this way you can, for example, make telephone calls while other PCs are surfing in
the Internet. If your access to the Internet is via T-DSL, you can even surf while both
ISDN B-channels are busy with telephone calls.
The Eumex 704PC LAN complies with the statutory regulations for telecommunications equipment. You are permitted to mount and install it yourself.
The Eumex 704PC LAN should only be operated on an ISDN multi-terminal connection. It complies with the DSS 1 protocol. The Eumex 704PC LAN is not designed for
use on dedicated ISDN connections (system connection).
You can operate analogue devices with either dual tone multi-frequency (DTMF)
dialling and a flash function or with pulse dialling on the Eumex 704PC LAN.
A caller’s telephone number will only be displayed on telephones supporting this feature.
Please note: You require telephones with DTMF dialling and a flash function in order to be
able to use the full range of Eumex 704PC LAN features. Telephones with pulse dialling
support neither the flash function (e.g. for enquiry calls) nor the star and hash keys for
the control of features.
1
General
The Features of the Eumex 704PC LAN
• Call waiting
• Call pick-up from terminals and answerphones
• Automatic callback ("on no reply" and "on busy")
• CLIP (display of calling line number) on analogue terminals
• Four Ethernet 10BaseT ports (one wired for T-DSL)
• USB interface to PC
• T-DSL connector
• Connector for additional Ethernet hubs (cascading)
• Five external line access levels
• Call data recording via a PC program
• Manual/automatic external line access
• Speed-dialling memory locations for 100 numbers
• Internal/external call transfer
• Connector for multi-purpose terminal
• Configuration via PC
• Configuration via telephone
• Toggling
• Ten multiple subscriber numbers (MSNs)
• DTMF post-dialling
• Programmable emergency numbers (these can always be dialled)
• Enquiry calls
• Call forwarding ("immediately," "on busy" and "after a specified time")
• Supports SMS in a fixed-line network
2
General
Supported ISDN Features
• Call waiting
• Call forwarding ("immediately," "on busy" and "after a specified time")
• 3-party conference (two 3-party conferences can take place simultaneously)
• Enquiry calls
• Callback on busy (CCBS)
• Callback on no reply (CCNR)
• Toggling
• Multiple subscriber numbers (on a multi-terminal ISDN connection)
• Calling number restriction (CLIR)
• Restrict display of your number on called subscriber’s device (COLR)
• Advice of charge (AOCD/AOCE)
• Explicit external call transfer (ECT)
• Identification of malicious callers (MCID)
• Visual T-NetBox message-waiting indicator (MWI)
Please note:
Certain features must first be ordered from your telephone network provider before you
can use them.
3
General
Safety Precautions
Do not open the housing. Unauthorised opening of the housing and improper repairs
can endanger the user. In addition, the warranty is invalidated.
Do not continue using damaged or defective plugs or AC adapters with defective
housings as these could cause electric shocks. Replace these components immediately with spare parts made by the same manufacturer.
Only equipment supplying safety extra low voltage (SELV) and/or complying with
standard ETS 300 047 may be connected to the Eumex 704PC LAN. Equipment
operated in accordance with its purpose complies with this regulation.
Do not allow fluids to penetrate inside the Eumex 704PC LAN, as this could result in
short circuits or electric shocks.
Do not install the Eumex 704PC LAN during a thunderstorm, or attach or remove
cables, as this could lead to an electric shock.
The Eumex 704PC LAN is designed for indoor operation only. Lay the cables so that
they cannot be walked on or tripped over.
Do not connect any devices that use the a/b lines for earthing to the analogue ports
(TAE sockets, plug-in terminals). The a/b lines must not be connected to earth, as this
could damage the device.
Power Failure
Data backup: in the case of a power failure, all the data in the memory (program and
user data) is retained without any changes. Merely the date and time are reset to their
default settings when power is restored. The internal clock is automatically set to the
correct time when the next charged call is made.
All callbacks are deleted.
You cannot telephone during a power failure.
4
Mounting and Commissioning
Scope of Delivery
Check to make sure that the contents of the package are complete:
• 1 Eumex 704PC LAN ISDN communications system
• 1 plug-in AC adapter
• 1 ISDN connector cable
• 1 USB connector cable for PC
• 1 CD-ROM with Windows 98/Me/2000/XP installation software
• 1 Eumex 704PC LAN user guide (this document)
• 4+1+1 brief user guides for analogue devices
• 1 "Quick Installation" leaflet
• 1 brief user guide entitled "Tips and Tricks"
• 1 drilling template
• 1 set of 6 mm rawlplugs and screws
On the CD-ROM you will find the following:
• The driver set-up software with the Common ISDN Application Programming Interface (CAPI), as well as CapiPort, CapiControl and the configuration software
• The complete ISDN software Teledat RVS-COM for Win 98/Me/2000/XP for data
transfer, class 3 and 4 faxes, PC telephony, answerphone function, and SMS in the
wired network
• Deutsche Telekom’s T-Online software
5
Mounting and Commissioning
What Does the Eumex 704PC LAN Require?
Certain prerequisites must be met for the smooth installation and operation of the
Eumex 704PC LAN, the configuration software and the Teledat RVS-COM communications package:
• You must have a basic Euro-ISDN connection with a network terminator (NTBA) as
supplied by Deutsche Telekom (DSS 1). The Eumex 704PC LAN is not designed to
be operated on any other type of connection and any attempt to do so will lead to
faulty operation.
• Only equipment supplying safety extra low voltage (SELV) and/or complying with
ETS 300 047 may be connected to the Eumex 704PC LAN. Equipment operated in
accordance with its purpose complies with this regulation.
• In order to be able to use the full range of the Eumex 704PC LAN features, you
should only use analogue telephones with DTMF dialling and a flash function (70 330 ms).
The minimum system prerequisites for the installation of the Teledat RVS-COM communications software are as follows:
• IBM-compatible PC with hard disk and CD-ROM drive
• CPU speed of 233 MHz or faster
• 64 MB RAM
• Microsoft Windows 98/Me/2000/XP
• One free USB or Ethernet 10BaseT port (network card).
Please note that your PC must have a network card in order to be able to connect to a
LAN port on the Eumex 704PC LAN. If your PC does not have one, please install a
card in accordance with the manufacturer’s instructions.
The data transfer rate of the LAN port on the Eumex 704PC LAN is 10 Mbit/s.
Please note:
Before you install the Eumex 704PC LAN driver software, you must first remove any existing ISDN card and uninstall any existing CAPI drivers.
6
Mounting and Commissioning
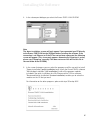
Mounting and Installation Sequence
The Eumex 704PC LAN consists of various components. This User Guide first
describes how to mount the communications system and how to connect terminals
such as telephones. You can subsequently operate the devices.
However, we recommend that you configure the Eumex 704PC LAN according to your
personal requirements before using it for the first time. You can configure the system
via a telephone or use a menu-driven configuration program on a connected PC.
Please proceed as follows:
1. Mount the Eumex 704PC LAN and connect the devices as described in the following sections.
2. Configure the communications system. You can do this in three different ways
• PC configuration: menu-driven configuration via a PC. In order to do this, all the
drivers on the CD supplied must be installed. Please refer to the chapter entitled
"Installing the Software" on p. 60 for instructions on how to do this.
• Configuration via a telephone connected to your communications system.
Please refer to the chapter entitled "Configuration via Telephone" for instructions
on how to do this.
• Remote configuration: you can have your system remotely configured by TeleService for a fee.
For remote configuration, call: 0180 2 55 66 55.
PC configuration:
3. Install the CAPI driver. This procedure is described in the chapter entitled "The PC
Software" on p. 57 ff.
4. Install and configure the Teledat RVS-COM communications software as described
in the chapter entitled "Teledat RVS-COM" on p. 83.
With regard to points 2, 3 and 4 above, please note the system prerequisites listed in
the section entitled "What Does the Eumex 704PC LAN Require?"
Using the Web Configurator you can also configure the system from other operating
system platforms. For more information, please refer to "The Web Configurator" on
p. 90 ff.
In the Appendix you will find a glossary, an index of key words, and a diagram of the
Eumex 704PC LAN audio signals and ringer cadences.
7
Mounting and Commissioning
Mounting Location
The ambient operating temperature for the Eumex 704PC LAN must not be lower than
+5 °C or higher than +40 °C. For this reason, do not mount the Eumex 704PC LAN
• above or in front of sources of heat (e.g. radiators),
• in direct sunlight,
• behind curtains,
• in small, unventilated rooms,
• outdoors,
• on or near inflammable material.
In addition, please ensure that
• the room is dry and as free of dust as possible,
• no high-frequency equipment (e.g. transmitters, radiation-emitting devices or similar units) is nearby,
• no fluid can drop onto the Eumex 704PC LAN and possibly penetrate inside the
device through the ventilation slits,
•in the case of wall mounting, the wall is flat and capable of bearing the load.
The following criteria should be taken into account when selecting a mounting location:
• The availability of an earthed power socket for the plug-in AC adapter nearby.
• The length of the cables supplied. Please note that the maximum length of a USB
cable is 5 m. The maximum length of a category 5 Ethernet cable is 100 m.
• The length of the cables connecting the analogue devices must not exceed 300 m.
a
8
In order to exclude any possibility of danger to life or property, the earthed power
socket for the 230 V~ mains supply must be installed by a qualified electrician.
Mounting and Commissioning
Connect the Eumex 704PC LAN to a separate 230 V~ mains circuit. This prevents
the communications system from being affected by possible short circuits in any
other household equipment.
We recommend you to install a surge protector for protection against sudden high
voltages such as those sometimes occurring during thunderstorms. Consult your
electrician or Deutsche Telekom for advice.
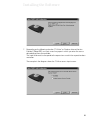
Choosing a Location for Your Eumex 704PC LAN
You can simply place the Eumex 704PC LAN on a solid surface, e.g. a table. Please
note that under certain circumstances the rubber pads on the base of the Eumex
704PC LAN can leave unseemly marks on furniture.
Tools for Wall Mounting
You will require the following tools for wall mounting:
• 6 mm masonry drill bit (the type of drill bit depends on the type of wall)
• Hammer or percussion drill
• Screwdriver (to fit the screws supplied)
Get the rawlplugs, screws and drilling template (all supplied) ready before you start
mounting the device.
Wall Mounting
a
Make sure that there are no pipes, cables or similar objects running through the wall
near the planned drill holes, as these could be damaged.
Use the drilling template supplied and a 6-mm bit to drill holes for the two mounting
screws 180 mm apart.
Insert the rawlplugs and screw the screws into the wall so that a space of 4 mm
between the head of the screw and the wall remains.
Place the mounting holes in the base of the Eumex 704PC LAN over the screws, and
pull downwards slightly.
9
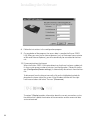
Connecting Devices
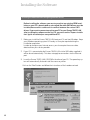
Connection Diagram
Power
T-ISDN
B-Kanal 1
External S0
B-Kanal 2
Message
Verbindungsdaten
USB
Router
LAN 2
LAN 1
T-DSL / LAN 4
LAN 3
AC adapter
USB
T-DSL
1a/b 2a/b 3a/b 4a/b
T-ISDN
Internal telephone
numbers
11 12 13 14
PC 1 to 3
LAN 1
LAN 2
LAN 3
T-DSL
LAN 4
Connecting
a
Do not connect the Eumex 704PC LAN during a thunderstorm, as this could lead to
you getting an electric shock.
a
Lay all the cables so that they cannot be walked on or tripped over.
Ensure that the power and connecting cables are not bent, pulled, or in any way
under mechanical pressure.
10
Connecting Devices
Connecting the Eumex 704PC LAN to T-ISDN
Regulations permit the general public to connect the Eumex 704PC LAN to the
Deutsche Telekom network. You can thus connect the Eumex 704PC LAN yourself if
the following conditions are met:
• The device may only be connected to a basic Euro-ISDN connection. Do not under
any circumstances connect it to lines or equipment in the analogue network. Never
connect it to an ISDN tie line. Failure to observe these conditions can result in
faulty operation or damage to the Eumex 704PC LAN as well as to the network.
• The basic Euro-ISDN connection must be used in conjunction with a network terminator (NTBA) as supplied by Deutsche Telekom. The connection must be the
multi-terminal type.
Insert the Eumex 704PC LAN connector cable in the corresponding socket of the
NTBA. Insert the other end in the socket marked "ISDN" on the bottom left-hand side
of the Eumex 704PC LAN.
Connecting the Eumex 704PC LAN to T-DSL
Connect the devices to one another as shown in the diagram. Please refer to the
installation, mounting and commissioning guides for details on the splitter (broadband connector unit) and the modem (broadband network terminator).
NTBA
Splitter
(BBAE)
Eumex 704PC
LAN
T-ISDN
PC
(Ethernet
or USB)
T-DSL
Modem
(NTBBA)
NTBBA
ADSL
10BaseT
In this configuration, both ISDN B-channels as well as the T-DSL connection are available simultaneously. You can thus surf in the Internet (via T-DSL) and still have two
lines free for making telephone calls and fax transmissions.
11
Connecting Devices
Connecting Analogue Terminals to the Eumex 704PC LAN
You can connect up to four analogue terminals to your communications system.
We recommend you to deploy terminals that feature DTMF dialling and a flash function. Terminals with pulse dialling cannot perform functions requiring the R-key (e.g.
enquiry calls), or the star or hash keys (e.g. setting features). Please refer to the section entitled "Setting the Dialling Mode" on p. 16.
You can connect the analogue terminals directly to the TAE ports on the Eumex
704PC LAN, or you can run 2-wire cable to remote TAE sockets. In order to do this,
push the cover off the TAE socket and remove it. Connect the cables to connectors
1a/b to 4a/b. Then use a pair of narrow, flat-nosed pliers to break out the cable inlets.
Replace the cover and close the compartment.
The distance between the Eumex 704PC LAN and the terminals must not exceed
300 m.
Connecting a Computer to the Eumex 704PC LAN
Insert the correct end of a USB or Ethernet cable in the corresponding socket
on the Eumex 704PC LAN, and the other end in the corresponding socket on the PC.
You do not need a computer to operate and configure the Eumex 704PC LAN. However, a PC simplifies the system programming, while the communications software
includes a range of further useful applications.
The software on the CD-ROM supplied is easiest to install on your PC before you
connect it to the Eumex 704PC LAN.
For further details, please refer to p. 60 ff.
12
Connecting Devices
Connecting the Eumex 704PC LAN to the Power Supply
Connection to the 230V mains supply is not dangerous, providing you adhere strictly
to the following instructions.
a
Danger! Under no circumstances should you commission or continue operating
the device if the AC adapter is damaged. Failure to observe this could result in
loss of life due to an electric shock.
• Lay the AC adapter power cable so that it cannot be walked on or tripped over.
• Ensure that the power socket and AC adapter are easily accessible, so that the
adapter can be removed from the socket quickly in case of danger! Removing the
adapter from the socket is the only way of disconnecting the Eumex 704PC LAN
from the mains completely, as it does not have a power switch of its own.
• Never pull the adapter cable. If you want to disconnect the adapter from the mains,
always pull out the adapter itself.
• Only use the AC adapter supplied. Use of other adapters could result in faulty operation or even electric shocks or damage to property.
If the adapter is plugged in and damaged:
• First remove the fuse for that power circuit before pulling the adapter out of the
socket.
• You must not attempt to repair the AC adapter yourself. Please acquire a new one
from T-Service.
• Never remove the AC adapter from the power cable supplied. Failure to observe
this can result in loss of life due to an electric shock! If the power cable is too short
to reach the socket, purchase a suitable extension cable from a recognised dealer.
13
Connecting Devices
Sockets
The operation of a communications system can be impaired by interference in the
power supply caused by other equipment, especially photocopiers, laser printers,
electric typewriters, air conditioning, fan heaters, vacuum cleaners and refrigerators.
For this reason, please:
• Connect the Eumex 704PC LAN to a socket as far away as possible from sockets
used for the above-mentioned equipment. The best solution is to use a separate
circuit for the Eumex 704PC LAN.
• Ensure that the AC adapter is always seated securely in its socket. Adapters or
sockets not firmly secured can lead to faulty operation and possibly fires!
Have such sources of danger repaired by qualified personnel without delay.
• Only use multiple sockets that are adequately safe. This can be assumed only if the
multiple socket displays the proof of its compliance with safety standards (e.g. the
CE symbol). Failure to observe this can lead to faulty operation of the Eumex
704PC LAN, and even fires.
Connect the Eumex 704PC LAN to the mains supply. The connector socket for the AC
adapter is on the lower side of the Eumex 704PC LAN. Insert the corresponding power
cable plug into the socket marked
, then insert the AC adapter into the mains power
socket.
When the T-ISDN LED lights up, it means that the NTBA is operational. If the LED
flashes, it means that external calls are not possible.
Now you can make and accept internal and external calls. In this setting, incoming
calls are signalled simultaneously on all terminals. External calls can only be made to
specific terminals when you have assigned them MSNs. Please refer to the chapter
entitled "Configuring the System" for information on this procedure.
In the case of faulty operation, please also refer to the notes in the Appendix (p. 110).
14
Connecting Devices
Additional Terminals on the S0 Bus
Besides the Eumex 704PC LAN, you can operate additional ISDN terminals (e.g.
ISDN telephones) on the NTBA. To simplify the connection of additional devices, you
will find an external S0 port on the lower side of the Eumex 704PC LAN. This is the
looped-through S0 bus from the NTBA.
NTBA
Eumex 704PC
LAN
Additional terminals
T-ISDN
External S0
S0 bus
You can use the external S0 port to connect an additional ISDN terminal or a multiple
ISDN socket for more than one terminal. A fixed installation from the NTBA should
only be done by a qualified electrician.
Interpreting the LEDs
• Power on: your Eumex 704PC LAN is operational.
• T-ISDN is illuminated: the NTBA is operational.
• T-ISDN flashes: the NTBA is not operational.
• B-channel 1 is illuminated: B-channel 1 is busy.
• B-channel 2 is illuminated: B-channel 2 is busy.
• Message flashes: there is a voice or fax message in your T-NetBox (also see the
note on p. 53).
• Call data is illuminated: your Eumex 704PC LAN has saved between 1 and 39 call
data records.
• Call data flashes: your Eumex 704PC LAN has saved between 40 and 50 call data
records. Note: when 50 call data records have been saved, each new record overwrites the oldest one.
• Call data is not illuminated: no call data records have been saved.
• Router on: one of the connected PCs is connected to the Internet via the router.
15
Connecting Devices
• USB on: the USB interface to the connected PC is busy.
• USB flickers: data is being transferred to the connected PC.
• LAN 1 on: there is a connection to the connected PC.
• LAN 1 flickers: data is being transferred between the router and the connected PC.
• LAN 2 on: there is a connection to the connected PC.
• LAN 2 flickers: data is being transferred between the router and the connected PC.
• LAN 3 on: there is a connection to the connected PC.
• LAN 3 flickers: data is being transferred between the router and the connected PC.
• T-DSL/LAN 4 on: there is a connection to the connected PC .
• T-DSL/LAN 4 flickers: data is being transferred between the router and the connected PC.
Setting the Dialling Mode for the Analogue Terminals
The communications system automatically recognises analogue terminals with DTMF
dialling and a flash function; you do not have to set anything.
Analogue terminals with pulse dialling must be enrolled before they can be used:
pick up the handset, dial any digit other than 1, then replace the handset.
16
Commissioning
The Eumex 704PC LAN Default Settings on Delivery
The following default settings and features are active on delivery:
• The PIN is set to "0000."
• External incoming calls are signalled on all connected terminals.
• External line access: all terminals have international access rights.
• When you lift the handset, you hear an external dialling tone (= automatic external
line seizure).
• Your own MSN is transmitted to the called party in an external outgoing call.
• All ports are configured for telephones.
• Call-waiting protection is off.
• Call data records are not saved.
• External call transfer is off.
• T-NetBox signalling ("Message" LED) is off.
• Charge limit (charge account) is off.
• The emergency numbers 110 and 112 are available.
• Identification of malicious callers (MCID) is deactivated.
We recommend you to configure the Eumex 704PC LAN to meet your own requirements before using it (see the chapter entitled "Configuring the System").
You can reset the system to the default settings at any time (see the chapter entitled
"Configuring the System" on p. 66 or the chapter entitled "Configuration via Telephone” on p. 33).
If desired, T-Service will remotely configure your communications system for you. Call
us on 0180 2 55 66 55 (your call will incur a charge). Unfortunately we cannot configure your browser or your PC operating system for you.
17
Telephoning
In order for you to be able to use all the features provided by your telecommunications system, the terminals must be set to DTMF dialling with a flash function. Terminals with pulse dialling cannot perform functions requiring the R-key, the star or the
hash keys.
Accepting Calls
g
Your telephone rings: internal or external call. Please see the table in the Appendix for
the different ringer cadences.
b
c
d
Lift the handset.
Have your internal or external conversation.
Replace the handset to end the call.
Automatic and Manual External Line Seizure
You can configure your Eumex 704PC LAN so that when you lift the handset, an
external line is automatically seized, or so that you have to select the code digit 0 first
to seize the line manually.
r
Automatic seizure (the default setting on delivery): when you pick up the handset,
you hear the external dialling tone and can dial an external number immediately. If
you want to make an internal call, you press the R-key. You then hear an internal
dialling tone and can dial an internal number (11 - 14).
If the system is set to automatic external line seizure, you cannot dial internal numbers using analogue terminals with pulse dialling.
0
Manual seizure: when you pick up the handset, you hear an internal dialling tone
and can dial an internal number immediately. If you want to make an external call, you
dial 0. This seizes an external line, and you hear an external dialling tone. You can
then dial an external number.
Please note: avoid using DTMF dialling (e.g. with a multi-frequency transmitter)
to establish a connection on a terminal with pulse dialling. Your terminal will otherwise be blocked for further dialling and will have to be released again by
dialling any digit other than 1.
18
Telephoning
Making Internal Calls
An internal call is a call made to another subscriber on the same Eumex 704PC LAN.
Automatic external line seizure (the default setting on delivery):
b
r
t
Lift the handset. You hear an external dialling tone.
Press the R-key.
Dial the desired internal number (11 to 14). You hear internal call signalling: the call is
signalled on the internal subscriber’s device.
Manual external line seizure:
b
t
Lift the handset. You hear the internal dialling tone.
Dial the desired internal number (11 to 14 ). You hear internal call signalling: the call
is signalled on the internal subscriber’s device.
Please note the difference between automatic and manual external line seizure
using the digit 0 in all dialling procedures from here on.
Making External Calls
In the case of automatic external line seizure (default setting on delivery):
b
t
Lift the handset. You will hear an external dialling tone.
Dial the external number.
In the case of manual external line seizure:
b
0t
Lift the handset. You will hear an internal dialling tone.
Dial 0. You hear an external dialling tone. Dial the external number.
19
Telephoning
Making Calls Using Speed Dialling
The Eumex 704PC LAN saves up to 100 speed-dialling numbers (or "destinations").
Every internal subscriber can be granted the right to use these speed-dialling numbers. (You edit the relevant settings in the configuration mode.)
b
r6
6
t
c
Lift the handset. You hear an internal or external dialling tone.
In the case of automatic external line seizure: press the R-key and select the code
digit 6.
In the case of manual external line seizure: select the code digit 6.
Then select a double-digit speed-dialling code number between 00 and 99.
Conduct your conversation.
Speed dialling during an enquiry call is not possible.
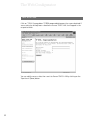
Enquiry Calls
Let’s say you want to hold your current call in order to make an enquiry call. The subscriber who is on hold cannot hear your enquiry call. External subscribers on hold
hear an announcement from the telephone exchange.
c
r
t
You are having a conversation with the first subscriber.
Press the R-key (R). You hear an internal dialling tone.
You now have the following options:
• dial an internal number,
• dial 0 and an external number, or
r0
if you want to terminate the first call and continue speaking with the subscriber
involved in the enquiry call, press the R-key and dial 0.
r1
if you want to terminate the first call and continue speaking with the subscriber
involved in the enquiry call, press the R-key and dial 0.
d
20
Replace the handset to end the call.
Telephoning
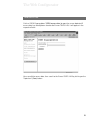
Gespräch weitergeben
Transferring Calls without an Announcement
Let’s say you want to transfer a call internally or externally. Dial the internal subscriber’s number or 0 and the external number, then replace the handset. The subscriber’s telephone signals the call. When he lifts the handset he accepts the call.
c
rtd
You are having a conversation.
Press the R-key. You hear the internal dialling tone. Dial the internal number or 0 followed by the external number. The subscriber’s telephone signals the call.
Replace the handset.
If the called subscriber lifts the handset, he takes over the call.
If the called subscriber does not lift the handset, the number will be redialled after
approximately 45 seconds. When you lift the handset, you will be reconnected with
the first subscriber, i.e. the person with whom you originally spoke.
In order to transfer an external call to another external subscriber, the ISDN
Explicit Call Transfer service must be active for your connection. For up-to-date
details of this service, please contact your T-Punkt or Customer Service department on 0800 33 01000.
r
If you hear a busy tone when you have dialled the internal or external number, press
the R-key again to be reconnected with the first subscriber.
Note: If you use ECT to transfer an external call to an external subscriber, this call is
switched in the telephone exchange. In the case of direct-dialled calls, the call will be
billed to your own account. You will also have no control over the duration of the
transferred call. The ECT function can be deactivated in the configuration
mode.vornehmen.
21
Telephoning
Gespräch weitergeben
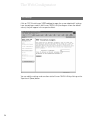
Transferring Calls with an Announcement
You want to transfer a call internally or externally, but you first want to speak to the
other subscriber.
crt
cd
You are having a conversation. Press the R-key. You hear the internal dialling tone.
Dial the internal number or 0 followed by the external number.
The subscriber’s telephone signals the enquiry call. He lifts the handset.
Have your conversation. Announce the call transfer. Replace the handset to connect
the two subscribers.
In order to transfer an external call to another external subscriber, the ISDN
service "ECT" must be active for your connection. For up-to-date details of this
service, please contact your T-Punkt or Customer Service department on
0800 33 01000.
r
If you hear a busy tone when you have dialled the internal or external number, press
the R-key again to be reconnected with the first subscriber.
You can also transfer an internal call to an external subscriber.
Please proceed as described above.
Note: If you use ECT to transfer an external call to an external subscriber, this call is
switched in the exchange and (in the case of calls you dialled yourself) billed to your
own account. You have no control over the duration of the transferred call. The ECT
function can be deactivated in the configuration mode.
22
Telephoning
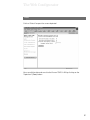
Speaking with Two Subscribers Alternately (Toggling)
Using the Eumex 704PC LAN you can toggle between two subscribers, i.e. speak to
them alternately. They can be internal or external subscribers. External subscribers
who are on hold hear an announcement from the exchange.
c
r
You are having a conversation and want to make an enquiry call to a second subscriber.
Press the R-key.
You now have the following options:
t
• dial an internal number or
• dial 0 and an external number.
c
r2
dial 0 and an external number.
r1
When you want to terminate the call with the active subscriber, press the R-key and
the code digit 1. You are then connected with the subscriber on hold.
Press the R-key and the code digit 2 to toggle between the first and the second subscriber.
r
If the currently active subscriber replaces the handset during the call, press the R-key
to return to the subscriber on hold.
c
d
Continue your conversation.
Replace the handset to terminate the call.
External calls without call transfer (ECT): If you are making a call with two external subscribers and you replace the handset, the conversation with the active
subscriber is terminated and you are automatically recalled by the subscriber
who is on hold.
External calls with call transfer (ECT): If you are in a call with two external subscribers and you replace the handset, the two external subscribers are connected.
23
Telephoning
Speaking with Two Subscribers Simultaneously (3-party Conference)
Used on a multi-terminal connection the Eumex 704PC LAN enables two 3-party conferences to be held simultaneously. One internal and two external subscribers can
participate in a conference. One B-channel must be free in order for a conference to
take place. You can initiate a conference during a call.
b
t
c
r
0t
c
r3
Lift the handset.
Dial the first external subscriber’s number.
Have your external conversation.
Press the R-key for an enquiry call.
Dial 0 and the second external number.
Have your second external conversation. The first external subscriber is held.
Press the R-key and the code digit 3.
k
Have the conference. A subscriber admitted into the conference can replace his
handset at any time. In this case, the initiating subscriber continues the conversation
with the remaining subscriber.
d
The initiating subscriber terminates the conference by replacing the handset. This
disconnects all calls
or
r2
24
by pressing the R-key and the code digit 2, the last subscriber on hold (in this case
the first external subscriber, see above), is held again. The conference is terminated,
and you speak with the last subscriber to be admitted. You can now use R2 to toggle
between the two subscribers.
Telephoning
Picking up Calls
You can pick up an external call signalled on another terminal on the Eumex 704PC
LAN:
b
4
Lift your handset.
c
Have your conversation.
Select the code digit 4. Press the R-key first in the case of automatic external line
seizure.
Picking up Calls from an Answerphone
You can pick up a call from an analogue answerphone even if it has already started
running. In order to do this, the analogue line must be configured to "Answerphone"
(see the chapter entitled "Configuring the Device Type for the Lines" on p. 41).
b
75
c
Your answerphone has taken a call. Lift your handset.
Select the code digits 75. Press the R-key first in the case of automatic external line
seizure.
Have your conversation.
Automatic Callback on Busy (CCBS)
If the called external subscriber is busy, you can make a callback request. As soon as
the subscriber is free again, your telephone rings for 20 seconds. When you lift the
handset, the previously busy subscriber’s number is automatically dialled.
c
7
You have dialled an external number and you hear a busy tone:
Select the code digit 7 ,
or
25
Telephoning
*37
#
q
d
press the star key, select 37, then press the hash key. On some telephones, this
sequence is pre-programmed for a single key.
You hear a positive acknowledgement tone.
Replace the handset. As soon as the called subscriber is free again, you will receive
the callback. When you lift the handset, the subscriber’s number is dialled.
Callback requests are deleted after 45 minutes, or when they have successfully been
carried out. Only one callback per subscriber is possible.
Automatic Callback on No Reply (CCNR)
If the ISDN Completion of Calls on No Reply service is available, you can also make a
callback request to contact a free subscriber. The procedure is the same as for a busy
subscriber.
c
7
You have dialled an external number, but the subscriber does not lift the handset.
Select the code digit 7
or
*37
#
q
d
press the star key, select the code digits 37, then press the hash key. On some telephones, this sequence is pre-programmed for a single key.
You hear an acknowledgement tone.
Replace the handset. As soon as the other subscriber has used his telephone again,
you receive the callback. When you lift the handset, the subscriber’s number is
dialled.
For the latest details of this service, please contact your T-Punkt or Customer
Service department on 0800 33 01000.
26
Telephoning
DTMF Post-dialling
DTMF post-dialling is only possible during external calls when, for example, an automatic announcement prompts you to post-dial digits and symbols (1 to 0, * and #),
during fax polling, during a remote answerphone enquiry, or when communicating
with a voice mailbox or other application.
c
t
c
There is an external call. You hear e.g. the answerphone signal or an automatic
announcement.
You can now post-dial.
The external call remains connected.
Malicious Call Identification (MCID)
Using this ISDN service, you can have the data of a malicious call recorded in your
telephone network provider’s exchange. The service must have been requested prior
to use and is charged for. For further details, please contact your network provider.
c
r#0
You receive a call from an undesirable caller.
Press the R-key, then the hash key, and dial 0.
Calling Your T-NetBox
If you have a T-NetBox from Deutsche Telekom, saved messages or incoming faxes
are signalled by the "Message" LED (see the note on p. 53). Please refer to the T-NetBox User Guide for instructions on how to retrieve information.
In order to call the T-NetBox and retrieve your messages, you must always use a
telephone to which you have assigned the first MSN, because the LED signalling
is always transmitted to this number (cf. the section entitled "Call Assignment" on
p. 37).
Example: if you have configured your communications system so that calls to the
MSN with the code digit 1 are signalled on telephones 11 and 12, you can then use
both these telephones for T-NetBox enquiries.
27
Staying in Touch
Call Forwarding
You can forward calls from an internal to an external terminal, or from one internal to
another internal terminal. Depending on the configuration, the call is forwarded in the
Eumex 704PC LAN or in the exchange (where a charge is incurred). In order to use
internal call forwarding, the "Call forwarding in the Eumex 704PC LAN" function must
be activated in the configuration mode (see p. 50).
Call forwarding is configured for the connection and its MSNs. For this reason, your
MSNs must be saved and assigned before you can use call forwarding (see the section entitled "Storing Telephone Numbers (MSNs)" on p. 36).
There are three types of call forwarding:
"Immediately": incoming calls are forwarded without being signalled on the terminal
that was originally dialled.
"After a set time": calls are signalled first on the terminal that was dialled, and after a
certain period, are forwarded to the specified destination. The period is set to approx.
20 seconds.
"On busy": if the terminal is busy, the call is forwarded to the other specified destination.
If you hear a special dialling tone instead of the normal one, it means that immediate
call forwarding is active in the exchange.
Note
In the case of immediate call forwarding to the T-NetBox, the Eumex 704PC LAN
does not indicate a message waiting.
If "Call forwarding in the exchange" is active, internal calls cannot be forwarded.
Activating Call Forwarding
b
*
t
28
Lift the handset.
Press the star key.
Select the code digit for the type of call forwarding you want to activate:
Staying in Touch
• "Immediately": code digits 21
• "After a set time": code digits 61
• "On busy": code digits 67.
*
t
Press the star key.
Enter the call forwarding destination number: an internal number (only if call forwarding in the Eumex 704PC LAN is active), or an external number without a leading 0 for
the manual external line seizure.
Only destinations for which the subscriber has access rights are possible as call forwarding destinations.
Do not forward to the following numbers: 011, 012, 014, 018, 019, 11.
#
q
d
Press the hash key.
You hear a positive acknowledgement tone.
Replace the handset.
All calls for your internal number and the MSN assigned to your terminal will be
forwarded.
Deactivating Call Forwarding
b
#
t
Lift the handset.
Press the the hash key.
Select the code digit for the type of call forwarding you want to deactivate:
• "Immediately": code digits 21
• "After a set time": code digits 61
• "On busy": code digits 67
#
q
d
Press the hash key again.
You hear a positive acknowledgement tone.
Replace the handset.
29
Staying in Touch
Accepting or Rejecting Call Waiting
You are having a conversation and an external subscriber calls. The call is signalled
on your terminal by means of a call-waiting tone. Internal callers always hear a busy
tone when you are having a conversation.
You have the following options:
db
1. You can terminate the current call by replacing the handset, and accept the call
that is waiting by picking the handset up again.
r0
2. On an analogue terminal you can reject the waiting call by pressing the R-key and
the code digit 0. Your previous call remains connected.
r1
3. You can terminate the current call and accept the waiting call by pressing the R-key
and the code digit 1 (see also the section entitled "Toggling" on p. 23 in this chapter).
r2
4. You can hold the current call by pressing the R-key and the code digit 2 to accept
the waiting call (see also the section entitled "Toggling" on p. 23 in this chapter).
5. You can ignore the call-waiting tone and continue your conversation.
30
Staying in Touch
Activating Call-waiting Protection
If you want to have a conversation without being disturbed by any further callers, you
can activate call-waiting protection for the line to which your terminal is connected.
Any further callers then hear a busy tone.
Call-waiting protection remains active until it is deactivated again.
b
#
43
#
q
d
Lift the handset.
Press the hash key.
Select the code digits 43.
Press the hash key.
You hear a positive acknowledgement tone.
Replace the handset.
Deactivating Call-waiting Protection
b
*
43
#
q
d
Lift the handset.
Press the star key.
Select the code digits 43.
Press the hash key.
You hear a positive acknowledgement tone.
Replace the handset.
31
Special Settings/Features
Charge Accounts
In the configuration mode you can assign every internal subscriber a charge limit
(charge account). When the amount set is reached during a call, the call will either be
disconnected (if advice of charge during the call is active) or completed (if advice of
charge at the end of the call is active). Further external calls are then no longer possible. If you attempt to dial an external number, you will hear a busy tone. The three
emergency numbers programmed can be dialled even if the charge limit has been
reached.
Emergency Numbers
In the configuration mode you can set up three emergency numbers that can be
dialled at any time, regardless of the subscriber’s external line access rights.
You can also use the emergency number memory location to save an area code (e.g.
030 for Berlin). Telephones without external line access can thus be used to call numbers in this area, while all other external calls remain blocked.
External Line Access and Speed-dialling Numbers
If you have limited an internal subscriber’s external line access rights in the configuration mode, the subscriber concerned can still call external destinations in the speeddialling memory locations. This depends on the settings (see the chapter entitled
"Speed-dialling Destinations" on p. 45 or the Internal subscriber menu; see the chapter entitled "Configuring the System" on p. 69).
Call Data
Your Eumex 704PC LAN saves up to 50 call data records, which you can view or print
out using a PC and a printer. Data recording is signalled by means of an LED on the
Eumex 704PC LAN housing (see the section entitled "Interpreting the LEDs" on
p. 15). When 50 data records have been saved, each new record overwrites the oldest entry. The following data is recorded:
• Internal number
• Number (MSN), outgoing
• Date/time, start and finish
• Dialled number
• Charge amount
32
Note: For technical reasons it is not always possible to transmit all charge information
from the exchange. Discounts, special rates and premium services can lead to discrepancies between the data saved in the communications system and the telephone
bill. Please refer to Deutsche Telekom’s terms of business for the conditions applying
to the transmission of charge information.
Deutsche Telekom’s itemised telephone bill provides a detailed overview of your
charges. To order this type of billing, please call our freephone number
0800 33 0 1000.
Configuration via Telephone
You can edit the presettings and configure the Eumex 704PC LAN according to your
personal requirements. There are three ways of doing this: you can use a PC and
menus (see the chapter entitled "Configuring the System" on p. 66), a connected telephone (only possible with DTMF telephones), or the remote TeleService (0180 2 55 66
55). (0180 / 2 55 66 55).
Please see the chapter entitled "Remote Configuration" on p. 56.
To configure the system using a telephone, please proceed as follows:
• Start the configuration mode with your PIN (default setting is 0000).
• You start each configuration procedure by lifting the handset, and complete it by
replacing the handset again after hearing a positive or negative acknowledgement
tone.
• If you hear a negative acknowledgement tone, it means that the procedure has
been aborted and your input has not been saved. Start the procedure again and
make your input. When you hear a positive acknowledgement tone, this means that
your input has been saved.
• Exit the configuration mode. If you do not exit the configuration mode manually,
this will be done automatically four minutes after the last input.
As long as the configuration mode is active, call protection is automatically activated
on the telephone used, which means that you cannot be called.
When you lift the handset in the configuration mode, you always hear a special internal dialling tone.
If you attempt to configure the Eumex 704PC LAN via a telephone while it is already
being configured via another telephone or a PC, you will hear a busy tone.
33
Configuration via Telephone
Starting the Configuration Mode
To start the configuration mode:
b
(r)
Lift the handset.
Press the R-key
(only in the case of automatic external line access).
You hear an internal dialling tone.
8
*
t
#q
d
Select the code digit 8.
Press the star key.
Enter your PIN (the default setting on delivery is 0000).
Press the hash key. You hear a positive acknowledgement tone.
Replace the handset. The configuration mode is now active.
When you lift the handset, you hear a special internal dialling tone. You can now edit
your settings.
Exiting the Configuration Mode
b
8
#q
d
Lift the handset. The configuration mode is active and your hear a special internal
dialling tone.
Select the code digit 8.
Press the hash key. You hear a positive acknowledgement tone.
Replace the handset.
If you do not exit the configuration mode manually, this will be done automatically
four minutes after the last input.
34
Configuration via Telephone
Editing the PIN
You require a personal identification number (PIN) to start the configuration mode.
The default setting on delivery is 0000. We recommend you to change this PIN and
keep the new one in a safe and secret place.
To edit the PIN:
b
902
t
*
t
*
t
#q
d
Lift the handset. The configuration mode is active and you hear a special internal
dialling tone.
Select the code digits 902.
Enter the old four-digit PIN (the default setting on delivery is 0000).
Press the star key.
Enter the new four-digit PIN.
Press the star key.
Enter the new four-digit PIN again.
Press the hash key. You hear a positive acknowledgement tone.
Replace the handset.
If you forget your PIN, you can only change it with the help of TeleService.
The hotline number is 0180 2 55 66 55 (please note that your call will incur a
charge).
35
Configuration via Telephone
Storing Telephone Numbers (MSNs)
In order for incoming calls to be signalled on specific terminals, you have to save the
MSNs allocated to you by Deutsche Telekom in the Eumex 704PC LAN. The MSNs
are saved without an area code. Please make a note of the saved MSNs in the table
on p. 37.
Saving Telephone Numbers (MSNs)
b
02
t
Lift the handset. The configuration mode is active and you hear a special internal
dialling tone.
t
#q
d
Enter the first MSN, without an area code.
Select the code digits 02.
Select the code digit 1 for the first number (2 – 9 for the second to ninth numbers or 0
for the tenth). These code digits are required for call assignment (see the table on
p. 37).
Press the hash key. You hear a positive acknowledgement tone.
Replace the handset.
Save all further MSNs (up to ten are available) in the same way.
If you want to delete a specific MSN, enter the code digit without an MSN and confirm
your entry with the hash key. Any MSN assigned to this code digit is then deleted.
It is a good idea to keep a list of all the code digits and their assigned MSNs, because
you will need these code digits again for other procedures, e.g. call assignment.
36
Configuration via Telephone
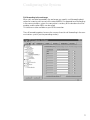
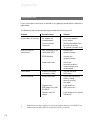
Call Assignment
In order for incoming calls to be signalled on specific terminals, you have to program
call assignment. Here you specify which terminal rings when a certain MSN is called.
You do this by assigning every external number (MSN) to one or more internal lines,
which then signal the call.
Please make a note of your call assignment in the table below.
Code digit
for MSN:
1
2
3
4
5
6
7
8
9
0
Calls for MSN:
Signalled on telephone:
11 12 13 14
b
03
t
t
Lift the handset. The configuration mode is active and you hear a special internal
dialling tone.
*t
If you want to assign additional internal numbers, press the star key each time (you
hear the positive acknowledgement tone), and enter the additional internal numbers
(max. four).
#q
d
Press the hash key. You hear a positive acknowledgement tone.
Select the code digits 03.
Select the code digit (1 to 9 or 0) to which the MSN is assigned.
Enter the internal number (11 - 14) on which a call to this MSN is to be signalled.
Replace the handset.
37
Configuration via Telephone
Reset the Call Assignment
To reset the call assignment, proceed as follows:
b
905
#q
d
Lift the handset. The configuration mode is active and you hear a special internal
dialling tone.
Select the code digits 905.
Press the hash key. You hear a positive acknowledgement tone.
Replace the handset.
Incoming external calls are signalled on all telephones as your call assignment has
been deleted.
38
Configuration via Telephone
Manual External Line Seizure with 0
When this setting is active, you have to dial 0 before dialling an external number.
b
050
#q
d
Lift the handset. The configuration mode is active and you hear a special internal
dialling tone.
Select the code digits 050.
Press the hash key. You hear a positive acknowledgement tone.
Replace the handset.
You now have to dial 0 before dialling an external number.
Automatic External Line Seizure
This is the default setting, which enables you to dial an external number immediately.
Please note that when this setting is active, it is not possible to dial internal numbers
using telephones with pulse dialling.
b
051
#q
d
Lift the handset. The configuration mode is active and you hear a special internal
dialling tone.
Select the code digits 051.
Press the hash key. You hear a positive acknowledgement tone.
Replace the handset.
39
Configuration via Telephone
Number Busy
With this setting you can specify whether incoming calls for an MSN during an external call are signalled as call waiting by ringing on other telephones, or whether the
caller hears a busy tone.
Activating "Number Busy"
If you want the second caller to hear a busy tone when the MSN is busy, you activate
the "number busy" feature:
b
061
#q
d
Lift the handset. The configuration mode is active and you hear a special internal
dialling tone.
Select the code digits 061.
Press the hash key. You hear a positive acknowledgement tone.
Replace the handset. Second calls for busy MSNs are not signalled.
Deactivating "Number Busy"
b
060
#q
d
Lift the handset. The configuration mode is active and you hear a special internal
dialling tone.
Select the code digits 060.
Press the hash key. You hear a positive acknowledgement tone.
Replace the handset.
A second call is signalled as call waiting or by ringing on other telephones.
40
Configuration via Telephone
Configuring the Device Type for the Internal Lines
You can configure a device type (e.g. fax, answerphone) for every internal line so that
the Eumex 704PC LAN can manage the respective devices correctly. This ensures
that fax transmissions are not interrupted by call-waiting tones, for instance.
You configure the device types for the internal lines as follows:
b
t
Lift the handset. The configuration mode is active and you hear a special internal
dialling tone.
Select the code digits for the device type:
• 10 for a telephone
• 11 for an answerphone
• 12 for Class 2/3 fax machines
• 13 for a data modem
• 14 for a multi-purpose termina
t
#q
d
Select the internal line number (11 - 14).
Press the hash key. You hear a positive acknowledgement tone.
Replace the handset.
Repeat the above procedure for the other lines.
Note: To ensure that your fax machine can receive all faxes, select device type 14,
"multi-purpose terminal", for the corresponding line.
41
Configuration via Telephone
External Line Access
You can set external line access to one of five levels for every internal line. If a subscriber dials an external number for which that line has no access rights, he hears the
busy tone. The emergency numbers can always be dialled (see the section below).
You set external line access as follows:
b
t
Lift the handset. The configuration mode is active and you hear a special internal
dialling tone.
Select the code digits for external line access:
Access:
t
#q
d
Code digit:
Meaning:
International
21
All numbers can be dialled
without restrictions
National
22
International access code 00 is
blocked
Local access
24
Codes 0 and 00 are blocked
Outward restricted
25
Outgoing external calls are
blocked, whereas incoming calls are
unrestricted
None
(internal only)
26
Only internal calls are permitted, but
external calls can be transferred from
other subscribers.
Select the internal line number (11 - 14).
Press the hash key. You hear a positive acknowledgement tone.
Replace the handset.
Repeat the above procedure for the other internal lines.
42
Configuration via Telephone
Storing Emergency Numbers
Your Eumex 704PC LAN can save up to three emergency numbers. These numbers
can always be dialled from every telephone, independent of the external line access
rights that otherwise exist.
You save the emergency numbers as follows:
b
62
t*
t#q
d
Lift the handset. The configuration mode is active and you hear a special internal
dialling tone.
Select the code digits 62.
Enter the number of the memory location (01, 02 or 03), and press the star key.
Enter the emergency number (up to 24 digits are possible) and press the hash key.
You hear a positive acknowledgement tone.
Replace the handset.
Repeat the above procedure for each emergency number. Please refer to the note in
the chapter entitled "Special Settings/Features" on p. 32.
Deleting Emergency Numbers
You delete emergency numbers as follows:
b
63
t#q
d
Lift the handset. The configuration mode is active and you hear a special internal
dialling tone.
Select the code digits 63.
Enter the memory location you want to delete (01, 02 or 03), and press the hash key.
You hear a positive acknowledgement tone.
Replace the handset.
43
Configuration via Telephone
Storing Numbers for Speed Dialling
Your Eumex 704PC LAN can save up to 100 telephone numbers, which you can then
dial conveniently using the speed-dialling code digits 00 to 99.
b
61
t
Lift the handset. The configuration mode is active and you hear a special internal
dialling tone.
t
rq
d
Enter the telephone number (up to 24 digits are possible). Do not enter a leading 0,
even in the case of manual external line access seizure.
Select the code digits 61.
Select a double-digit memory location number from 00 to 99
(= speed-dialling code).
Press the R-key. You hear a positive acknowledgement tone.
Replace the handset.
Repeat the above procedure for every telephone number/speed-dialling code.
Tip: You can also save all procedures containing the star and hash keys as "telephone numbers." You can thus save the entire call transfer procedure (see p. 28) as a
speed-dialling telephone number, and then activate or deactivate it by means of the
double-digit speed-dialling code.
Deleting Individual/All Speed-dialling Numbers
44
b
60
t
Lift the handset. The configuration mode is active and you hear a special internal
dialling tone.
#q
d
Press the hash key. You hear a positive acknowledgement tone.
Select the code digits 60.
Enter the memory location (i.e. the speed-dialling code, 00 to 99) of the number to be
deleted. If you want to delete all speed-dialling numbers, press the star key twice
instead of the memory location.
Replace the handset.
Configuration via Telephone
Blocking/Releasing Speed Dialling for Internal Lines without External Line Access
Internal lines with outward restricted or no external line access can (in the default setting) can still use speed-dialling numbers to dial destinations falling outside their
external line access levels. If you want to prevent this, you can block speed dialling as
follows:
b
27
28
t
#q
d
Lift the handset. The configuration mode is active and you hear a special internal
dialling tone.
Select the code digits 27 to block speed dialling
or the code digits 28 to release speed dialling again.
Select the number of the internal line (11 - 14) you want to block or release.
Press the hash key. You hear a positive acknowledgement tone.
Replace the handset.
45
Configuration via Telephone
Programming a Telephone Number (MSN) for Transmission
You can program which of the MSNs is to be transmitted to the called subscriber. If
you do not program anything, the first MSN for which your telephone signals calls is
transmitted (see the chapter entitled "Call Assignment"). You must program this setting for each internal number (11 - 14) individually. Correct internal call data recording is only possible when the MSNs are programmed for transmission.
b
04
t
Lift the handset. The configuration mode is active and you hear a special internal
dialling tone.
t
#q
d
Select your internal line number (11 - 14).
Select the code digits 04.
Select the code digit for the telephone number (MSN)
(see the chapter entitled "Storing Telephone Numbers" on p. 36).
Press the hash key. You hear a positive acknowledgement tone.
Replace the handset.
Always Call Anonymously (Restrict Telephone Number)
If this service has been ordered from Deutsche Telekom, you can prevent your telephone
number (MSN) from being shown on the telephone of the external subscriber you have
called. You must program this setting for each internal number (11 - 14) individually.
You restrict the display of your telephone number (MSN) for individual internal lines
as follows:
b
30
t
#q
d
46
Lift the handset. The configuration mode is active and you hear a special internal
dialling tone.
Select the code digits 30.
Select the internal line number (11 - 14).
Press the hash key. You hear a positive acknowledgement tone.
Replace the handset.
Configuration via Telephone
Always Transmit Number (Restrict Telephone Number: Cancel)
You can only cancel the restriction of the telephone number display for all lines simultaneously:
b
31
#q
d
Lift the handset. The configuration mode is active and you hear a special internal
dialling tone.
Select the code digits 31.
Press the hash key. You hear a positive acknowledgement tone.
Replace the handset.
Your telephone numbers (MSNs) are now displayed on the external subscriber’s
phone again.
47
Configuration via Telephone
Charge per Unit of Time
Enter the charge per unit of time for call-charge registration in cents, e.g. 0006 (the
default setting is 0.06 euros). You can edit the currency under "CAPI-Control\Einstellungen (Settings)\Gebühreneinstellungen (Charge settings)\Währung (Currency)."
b
41
t
#q
d
Lift the handset. The configuration mode is active and you hear a special internal
dialling tone.
Select the code digits 41.
Always enter a four-digit number. Add leading zeros if necessary.
Press the hash key. You hear a positive acknowledgement tone.
Replace the handset.
Resetting/Deleting the Charge Counter
b
904
#q
d
48
Lift the handset. The configuration mode is active and you hear a special internal
dialling tone.
Select the code digits 904.
Press the hash key. You hear a positive acknowledgement tone.
Replace the handset.
Configuration via Telephone
Setting a Charge Limit
You can set a charge limit (charge account) for every internal line, which you can then
activate and deactivate as the need arises. When the limit has been reached, no further outgoing external calls are possible on this line (the subscriber hears a busy
tone). The pre-programmed emergency numbers can still be dialled, however.
b
44
t*
t#q
d
Lift the handset. The configuration mode is active and you hear a special internal
dialling tone.
Select the code digits 44.
Select the number of the internal line (11 - 14) for which you want to limit the charge,
and press the star key.
Enter the charge limit (always enter four digits, two for the euros, two for the cents,
e.g. "1050" for 10.50 euros), and press the hash key. You hear a positive acknowledgement tone.
Replace the handset.
Activating/Deactivating the Charge Limit
b
42
Lift the handset. The configuration mode is active and you hear a special internal
dialling tone.
Select the code digits 42 to activate
or
43
t#q
d
the code digits 43 to deactivate the charge limit.
Select the number of the internal line (11 - 14) and press the hash key. You hear a
positive acknowledgement tone.
Replace the handset.
49
Configuration via Telephone
Managing Call Forwarding
You can specify whether call forwarding for external calls is to take place in the
Eumex 704PC LAN (= the default setting) or in the telephone exchange. Both procedures have certain advantages. Call forwarding in the exchange must be ordered
from Deutsche Telekom.
Call forwarding in the exchange forwards the MSN assigned to the telephone that
activated call forwarding.
Call forwarding in the Eumex 704PC LAN seizes both B-channels simultaneously, i.e.
no further external calls are possible while the call is being forwarded.
Activating Call Forwarding in the Exchange
b
71
#q
d
Lift the handset. The configuration mode is active and you hear a special internal
dialling tone.
Select the code digits 71.
Press the hash key. You hear a positive acknowledgement tone.
Replace the handset.
Activating Call Forwarding in the Eumex 704PC LAN
b
70
#q
d
50
Lift the handset. The configuration mode is active and you hear a special internal
dialling tone.
Select the code digits 70.
Press the hash key. You hear a positive acknowledgement tone.
Replace the handset.
Configuration via Telephone
Deleting All Call Forwarding
You can use the following procedure to delete all call forwarding:
b
906
#q
d
Lift the handset. The configuration mode is active and you hear a special internal
dialling tone.
Select the code digits 906.
Press the hash key. You hear a positive acknowledgement tone.
Replace the handset.
Activating/Deactivating Call Data Recording
You can activate and deactivate the recording of your outgoing call data
(up to 50 call data records are possible):
b
72
Lift the handset. The configuration mode is active and you hear a special internal
dialling tone.
Select the code digits 72 to activate
or
73
#q
d
the code digits 73 to deactivate call data recording.
Press the hash key. You hear a positive acknowledgement tone.
Replace the handset.
51
Configuration via Telephone
Activating/Deactivating Call Transfer (ECT)
If the ISDN service ECT is available in the exchange, you can activate and deactivate
it as required:
b
990
71
Lift the handset. The configuration mode is active and you hear a special internal
dialling tone.
Select the code digits 990.
Select the code digits 71 to activate
or
70
#q
d
the code digits 70 to deactivate ECT.
Press the hash key. You hear a positive acknowledgement tone.
Replace the handset.
Call Transfer in a Communications System
If your Eumex 704PC LAN is installed as a secondary system behind another communications system, it may be necessary (depending on the type of primary system) to
edit the following setting in order to transfer calls in the primary system:
b
990
81
Lift the handset. The configuration mode is active and you hear a special internal
dialling tone.
Select the code digits 990.
Select the code digits 81 to activate
or
80
#q
d
52
the code digits 80 to deactivate call transfer in the primary communications system.
Press the hash key. You hear a positive acknowledgement tone.
Replace the handset.
Configuration via Telephone
Activating/Deactivating T-NetBox Signalling
You can activate and deactivate the LED ("Message" LED) that signals messages waiting and faxes received:
b
990
51
Lift the handset. The configuration mode is active and you hear a special internal
dialling tone.
Select the code digits 990.
Select the code digits 51 to activate
or
50
#q
d
the code digits 50 to deactivate signalling.
Press the hash key. You hear a positive acknowledgement tone.
Replace the handset.
Please note
In order to signal messages waiting in your T-NetBox, the ISDN service "MWI"
must be available via your ISDN connection.
For the latest details of this service, please contact your T-Punkt or Customer
Service department on 0800 33 01000.
Only messages to the number you have entered as MSN 1 will be signalled.
53
Configuration via Telephone
SMS in a Fixed-line Network
Your Eumex 704PC LAN supports the "SMS in a fixed-line network" function. This
function can only be used on analogue telephones that explicitly support the "SMS in
a fixed-line network" feature.
For correct operation of this service, the SMS Service Centre telephone number must
be configured and the SMS call assigned to the desired analogue line.
Configuring the SMS Service Centre number (01930100)
b
50t
#q
d
Lift the handset. The configuration mode is active and you hear a special internal
dialling tone.
Select the code digits 50 and enter the Service Centre number (01930100).
Press the hash key. After a moment you will hear a positive acknowledgement tone.
Replace the handset.
Configuring the SMS line
b
51t
#q
d
Lift the handset. The configuration mode is active and you hear a special internal
dialling tone.
Select the code digits 51 and enter the number of the line.
Press the hash key. After a moment you will hear a positive acknowledgement tone.
Replace the handset.
Deleting the SMS line
b
52
#q
d
54
Lift the handset. The configuration mode is active and you hear a special internal
dialling tone.
Select the code digits 52.
Press the hash key. After a moment you will hear a positive acknowledgement tone.
Replace the handset.
Configuration via Telephone
SMS Service Centre number
The Deutsche Telekom SMS Service Centre number is 0193 0100.
Notes on the line configured for SMS
When calls from the SMS provider are forwarded to the 704PC LAN SMS line,
- there is no compatibility check
- any call forwarding configured for this line is not performed
- there is no validation check
- call waiting is not signalled.
If there is a telephone call on the SMS line, calls from the SMS provider will be
rejected, i.e. a short message does not trigger off a call-waiting signal.
Resetting the Communications System
You can deactivate or delete all activated features and activate all default settings
instead. This resets your system to the delivery state (i.e. the factory settings are active
again).
Restoring the Default Settings
The secret PIN is reset to 0000.
b
900
#q
d
Lift the handset. The configuration mode is active and you hear a special internal
dialling tone.
Select the code digits 900.
Press the hash key. After a moment you hear a positive acknowledgement tone.
Replace the handset.
55
Remote Configuration
Fernkonfiguration
Remote Configuration
If you decide not to configure your Eumex 704PC LAN yourself, you can have it configured remotely by TeleService for a fee. Call TeleService for advice, and list your
configuration requirements. TeleService will then remotely configure your communications system.
Please follow the TeleService advisor’s instructions. Call 0180 2 55 66 55.
56
The PC Software
General
The communications software supplied enables you to use the ISDN data transfer service, class 3 and 4 fax and e-mail transmission and reception, a mailbox, an answerphone function and Internet applications on up to four PCs via the USB or one of the
Ethernet 10BaseT ports.
You can use network functions on the PCs as soon as the connections are established.
You can thus transfer data between the PCs or play games on the various PCs in the
network, for instance.
Note
In order to use the network function, the Eumex 704PC LAN software must be installed
on every PC in the network. The software is easiest to install before the PC is connected
to the Eumex 704PC LAN.*
You can configure the Eumex 704PC LAN, changing the preset values to meet your
own requirements. You can do this in three ways: menu-driven configuration via a PC,
configuration via a telephone connected to your communications system (see the
chapter entitled "Configuration via Telephone" on p. 33), or you can have your Eumex
704PC LAN remotely configured by TeleService for a fee (call 0180 2 55 66 55).
If you attempt to configure the system from a PC while configuration from a connected telephone is taking place, a warning will appear on your screen. Similarly, if
there is an attempt to configure the system from a connected telephone while configuration from a PC is taking place, a busy tone will be signalled.
Configuration does not impair operation of the communications system or interrupt
calls. The new settings are only active after you have exported the configuration file to
the Eumex 704PC LAN .
You can only configure the Eumex 704PC LAN after entering a valid PIN. The default
setting on delivery is 0000 (i.e. the digit "zero" four times).
Using the command "Save file as …," you can save a number of different configuration
files. You can then export them to the Eumex 704PC LAN as required, thus reconfiguring the system with a mouse-click.
* Of course you can also install the software when the PC has already been connected. If the connection is via USB, the Windows hardware wizard will report finding
a new device and prompt you for the driver. Insert the Eumex 704PC LAN CD-ROM in
the drive and enter the correct path if necessary.
57
The PC Software
System Prerequisites
The system prerequisites for the installation of the Eumex 704PC LAN software on
your PC are as follows:
• IBM-compatible PC with a hard-disk and CD-ROM drive
• CPU speed of 233 MHz or faster
• Minimum of 64 MB RAM
• Microsoft Windows 98/Me/2000/XP
• One free USB or Ethernet 10BaseT port (network card).
Please note that your PC must have a network card in order to be able to connect to a
LAN port on the Eumex 704PC LAN. If your PC does not have a network card, please
install one in accordance with the manufacturer’s instructions.
The data transfer rate of the LAN port on the Eumex 704PC LAN is 10 Mbit/s.
Important Note
Before you install the Eumex 704PC LAN driver software, you must first remove any existing ISDN card and uninstall any existing CAPI drivers.
58
The PC Software
About the Software
On the CD-ROM supplied you will find the following software:
• The Eumex 704PC LAN system software contains the software necessary for
operating the Eumex 704PC LAN including the CAPI, CAPI Port, CAPI Control
and TAPI drivers, as well as the configuration program for programming the communications system..
• Teledat RVS-COM is a suite of PC applications:
- RVS CommCenter is activated automatically when Windows is started. As long
as the PC is running, it enables continuous reception for data transfer, fax and
answerphone with remote enquiry.
- RVS Fax enables the transmission and reception of class 3 and 4 faxes.
- RVS Terminal is a terminal emulation enabling the establishment of connections to mailboxes, for instance.
- RVS Telephone, in conjunction with a full-duplex soundcard, microphone and
loudspeaker, acts as an ISDN telephone with answerphone.
- RVS TransferMaster enables the transfer of files complying with the Euro-file
transfer standard to and from other PCs.
- RVS VideoPhone establishes a connection to a partner with an RVS VideoPhone, the TELES.VISION system or an H.320-compatible video telephone.
Calls can be made to RVS VideoPhone just like a normal video telephone.
- RVS Address Manager has a central address book, which can be used in all
Teledat RVS-COM applications.
- RVS SMS enables you to create, send and receive short messages.
• WinPhone Lite is a convenient dialling wizard with which you can plan and log
calls and identify callers by means of a subscriber database on your PC.
• T-Online Software is the software suite necessary for access to T-Online.
• The Microsoft Internet Explorer and Netscape Communicator are browsers with
which you can surf the Internet or send and receive e-mails.
• PageMobil enables you to send short messages to mobile telephones and emails.
59
Installing the Software
Installing the Software and Configuring Internet Access
Before installing the software, you must ensure that any existing ISDN installation on your PC is deactivated or uninstalled. No other CAPI drivers must be
installed, because this could result in conflicts between the various CAPI
drivers.If you want to connect more than one PC to your Eumex 704PC LAN
after installing the software on the first PC, you must run the "Expressinstallation" (quick installation) on every additional PC.
1. Before you install the Eumex 704PC LAN, boot your PC and start Windows. Keep
your Windows operating system CD handy, as it may be required during the
installation procedure.
In order to configure your Internet access, you also require the access data
obtained from your service provider.
2. If your PC is connected to the Eumex 704PC LAN via the USB cable supplied, it
will be found automatically. This does not apply to connections via the Ethernet
port.
3. Insert the Eumex 704PC LAN CD-ROM in the drive of your PC. The operating system will automatically find and install the necessary driver.
Click on the "Next" button and follow the instructions of the hardware wizard.
60
Installing the Software
4. In the subsequent dialogue you select the Eumex 704PC LAN CD-ROM.
Note
The above installation screens will only appear if you connected your PC directly
to the Eumex 704PC LAN via the USB port before installing the software. If the
connection is via Ethernet, or if the PC has not yet been connected, the following
screen will appear. (This screen only appears automatically if Autostart is active;
please start "Setup.exe" manually if this does not occur. You will find this file in
the root folder of the CD-ROM.)
5. In the screen that opens you can select the programs and files you wish to install;
"Expressinstallation" (quick installation) only installs the Eumex 704PC software.
"Vollständige Installation" (full installation) installs all the program modules
included in the quick installation, plus WinPhone and the T-Online software.
"Benutzerdefinierte Installation" (custom installation) enables you to select the
modules on the CD that you want.
For information on the other programs, please refer to p. 59 and p. 83 ff.
61
Installing the Software
Follow the instructions in the installation program. If the installation wizard
reports finding newer files, please do not overwrite them.
To connect your PC to the Eumex 704PC LAN, select the desired port.
Please note that your PC must have a network card in order to be able to connect
to a LAN port on the Eumex 704PC LAN.
During the installation process, additional explanations are displayed in the relevant screens.
When the installation is complete, you are prompted to restart your PC.
6. Restart your PC.
When the PC is started for the first time subsequent to the installation of the
Eumex 704PC LAN software, a configuration program will start automatically.
The program will prompt you to enter data for the central Internet connection via
the built-in router, which is then saved to the Eumex 704PC LAN. You must enter
this data in order to be able to access the Internet conveniently by merely starting
a Web browser on any of the connected PCs.
If you subsequently want to edit the access data, you can run the program
(located in the folder "Programs / Eumex 704") at any time.
62
Installing the Software
7. Depending on the following selection ("T-Online" or "Anderer Internet Service
Provider" (Other ISP)), an input screen may open in which you enter the access
data obtained from your provider.
The input field names correspond to the expressions used in the respective documentation.
The example in the diagram shows the T-Online access input screen.
63
Installing the Software
8. Follow the instructions in the configuration program.
9. On completion of the program, the access data is saved to the Eumex 704PC
LAN. When you now start an Internet browser (such as Netscape Communicator
or Microsoft Internet Explorer), you will automatically be connected to the Internet.
10. Disconnecting from the Internet
When the Eumex 704PC LAN router determines that there has been no data traffic for a certain preset number of minutes (see Konfiguration / Router-Einstellungen (Configuration/Router settings)), it automatically disconnects from the Internet.
To disconnect from the Internet manually, click on the highlighted symbol displayed on the lower right of the screen in the Windows taskbar with the righthand mouse button and select "Trennen" (Disconnect).
"Anzeigen" (Display) provides information about the current connection such as
the data transfer speed, the duration of the connection and the amount of data
sent and received.
64
Connecting to / Disconnecting from
the Internet
Connecting to the Internet
Whenever a Web browser (e.g. Internet Explorer or Netscape Communicator) or an email client is started on any one of the PCs connected to the Eumex 704PC LAN, a
connection to the Internet is established automatically.
If a browser or an e-mail client is then started on one or more of the other PCs in the
network, the bandwidth available for the Internet access is shared amongst those
PCs.
Note
The first time you start a Web browser, the Internet Connection Wizard will open. You
can use the wizard to configure the Internet connection conveniently. If the wizard
does not appear automatically, you can invoke it using "Start > Settings > Control
Panel > Internet > Connection > Connect," or by clicking the menu item "Internet
Options" when Internet Explorer is running.
The Eumex 704PC LAN driver installation also installs support for the USB port,
which enables easy switching between both types of connection. However, as a result
of this, Windows 2000 shows the USB connection separately when the connection to
the system is via a LAN. This does not affect the correct operation of your system in
any way.
Disconnecting from the Internet
Start the configuration software to edit the many Eumex 704PC LAN settings.
Access to the configuration program is PIN-protected. In the default setting on delivery, this PIN is 0000 (i.e. nought four times).
This is the same as the PIN you need to
start the configuration mode from a telephone. You can edit the PIN via the menu
item "Extras" (Tools) in the configuration
program menu bar, or from a connected
telephone (see also "Editing the PIN" on
p. 35).
Click the desired key word in the menu
items appearing on the left-hand side to
open the corresponding screen.
65
Configuring the System
Configuring the Eumex 704PC LAN
Start the configuration software to edit the many Eumex 704PC LAN settings.
Access to the configuration program is PIN-protected. In the default setting on delivery, this PIN is 0000 (i.e. nought four times). This is the same as the PIN you need to
start the configuration mode from a telephone. You can edit the PIN via the menu
item "Extras" (Tools) in the configuration program menu bar, or from a connected telephone (see also "Editing the PIN" on p. 35).
Click the desired key word in the menu items appearing on the left-hand side to open
the corresponding screen.
66
Configuring the System
Menu: External ISDN / Telephone numbers
Type in the telephone numbers (MSNs) assigned to you for your ISDN connection by
Deutsche Telekom, without an area code.
Storing telephone numbers (MSNs).
67
Configuring the System
Menu: Call assignment / Incoming
Assign the connected terminals one or more telephone numbers (MSNs). External
incoming calls for the corresponding MSN will then be signalled on the assigned terminals.
SMS in a fixed-line network
Your Eumex 704PC LAN supports the "SMS in a fixed-line network" function. This
function can only be used on analogue telephones that explicitly support the "SMS in
a fixed-line network" feature.
For correct operation of this service, the SMS Service Centre telephone number must
be configured and the SMS call assigned to the desired analogue line. Enter the
Deutsche Telekom SMS Service Centre number (01930100) and select the analogue
line on which you want to operate your SMS-capable telephone.
Notes on the line configured for SMS
When calls from the SMS provider are forwarded to the 704PC LAN SMS line,
- there is no compatibility check
- any call forwarding configured for this line is not performed
- there is no validation check
- call waiting is not signalled.
If there is a telephone call on the SMS line, calls from the SMS provider will be
rejected, i.e. a short message does not trigger off a call-waiting signal.
68
Configuring the System
Menu: Internal subscribers
Settings
You can edit various settings for each connected device. When the device is selected,
the optimum settings for the respective device type will be selected automatically
(e.g. "Call waiting" -> "off" for faxes and modems).
Notes:
•The telephone numbers available for transmission are the numbers
(MSNs) you entered under "External ISDN."
•The charge account function depends on the availability of call charge
information at your connection (AOCD / AOCE, see glossary).
•When "Kurzwahlberechtigung" (Speed-dialling access rights) is marked in
"Externberechtigung" (External line access), connected terminals
whose external access is outward restricted or internal only can still be used
to dial the saved speed-dialling destinations, even if those destinations fall
outside their external access levels.
The call forwarding input screen depends on the type of call forwarding selected
under "Zentrale Daten / Einstellungen" (Central data /Settings) ("in the exchange" or
"in the telecommunications system").
69
Configuring the System
Call Forwarding
The call forwarding input screen depends on the type of call forwarding selected ("in
the exchange" or "in the communications system").
Call forwarding in the communications system (Anrufweiterschaltung in der
Anlage)
When calls are to be forwarded in the communications system, you specify a call forwarding destination for incoming calls to each of the connected terminals.
If calls are forwarded to an external destination, both B-channels are busy for the
duration of the outgoing call; the connection is thus busy. Call charges incurred for
the forwarded call are billed to the line from which the call was forwarded.
You have the following options:
Call forwarding immediately (Anrufweiterschaltung sofort): every incoming call is
immediately forwarded to the given destination.
Call forwarding after a specified time (Anrufweiterschaltung nach Zeit): the call is
forwarded to the given destination if the terminal called does not lift the handset
within approx. 20 seconds.
Call forwarding on busy (Anrufweiterschaltung bei Besetzt): if the terminal called is
busy and call-waiting protection is active, every further call is forwarded to the given
destination.
70
Configuring the System
Call forwarding in the exchange
When calls are to be forwarded in the exchange, you specify a call-forwarding destination for incoming calls to each of the entered MSNs. As opposed to call forwarding
in the communications system, the connection is not busy for the duration of call forwarding, and the other MSNs can be called.
This feature must be available on your ISDN connection.
The call forwarding options here are the same as those for call forwarding in the communications system (see the preceding section).
71
Configuring the System
Menu: Central data
Settings
Here you can edit your communications system settings. These settings apply to all
connected devices.
Please note
In order for messages waiting in your T-NetBox to be indicated, the ISDN "MWI"
service must be available for your ISDN connection.
For the latest details of this service, please contact your T-Punkt or Customer
Service department on 0800 33 01000.
Only messages to the telephone number configured as MSN 1 can be signalled.
72
Configuring the System
Emergency numbers
The emergency numbers entered here can always be dialled, regardless of the external line access levels (see the "Teilnehmer intern / Einstellungen" (Internal subscribers / Settings) menu on p. 69).
73
Configuring the System
Menu: Charges
Summary
In this screen you can see the charges incurred by a specific MSN in the left-hand column, and the charges incurred by for a specific terminal in the right-hand one. You
can edit the factor, read out the current status from the communications system, or
reset the counter.
Setting a charge limit
To set a charge limit, enter the cost per unit of time in cents, e.g. 0006 (the default setting is 0.06 EUR). You can edit the currency under "CAPI-Control \ Einstellungen \
Gebühreneinstellungen \ Währung" (CAPI control / Settings / Currency settings /
Currency).
74
Configuring the System
Call data records
Call data records consist of information about the device (line), the busy telephone
number (MSN), the beginning and the end of the call, the telephone number called
and the charges incurred.
75
Configuring the System
Menu: Speed dialling / Settings
The communications system can save up to 100 telephone numbers (00 - 99) as
speed-dialling codes. Depending on speed-dialling rights (see the "Teilnehmer intern
/ Einstellungen" (Internal subscribers / Settings) menu on p. 69), connected terminals can be used to call the speed-dialling destinations by means of the corresponding codes in the left-hand column.Deleting individual/all speed-dialling number memory locations
urzwahlspeicher
Kurzwahlspeicher einzeln/alles löschen
76
Configuring the System
Menu: Network / Router configuration
Here you can enter the data for Internet access via the router. On your monitor (as
opposed to the diagram), the corresponding fields are filled in.
This is the data you entered on installation. You can edit this data: please note that
any changes you make here will affect Internet access for all PCs connected to the
Eumex 704PC LAN.
Please note
A retention time of 0 sec. does not lead to automatic disconnection.
Note
You can edit the router configuration conveniently by invoking the router settings program via the "Start > Programs > Eumex704PC LAN > Routereinstellung" (Router settings) menu item. When you install the Eumex 704PC LAN, this menu will open automatically.
The Eumex 704PC LAN driver installation also installs support for the USB port,
which enables easy switching between both types of connection. However, as a result
of this, Windows 2000 shows the USB connection separately when connection is via
a LAN. This does not affect the correct operation of your system in any way.
77
Starting a Program from the Windows
Taskbar
Starting a Program from the Windows Taskbar
In the lower right-hand corner of the Windows
taskbar you find the depicted icon in the form
of an LED for each of the B-channels. The
colour of the LEDs indicates the CAPI status.
The colours have the following meanings:
red
- deactivated
yellow - no connection to device
grey - connection to device
green - connection to ISDN
After a click with the right-hand mouse
button, the pop-up menu enables you to
start one of the following programs or edit
settings:
FlashLoad (FlashLoad): starts the program that updates your Eumex 704PC
LAN system software (see p. 80).
Setup (Einrichtung): starts your Eumex
704PC LAN configuration software (see
p. 66).
Activate/deactivate CAPI (CAPI deaktivieren/aktivieren): switches the CAPI on
or off, depending on the current status.
Display (Anzeigen): specifies the size of
the active CAPI connection display. You
can select from "kompakt" (compact),
"standard" (default and "erweitert"
(detailed).
Settings (Einstellungen): opens the CAPI
Control program. You can use this to edit
various CAPI settings (see p. 79).
78
CAPI Control
CAPI Control
The CAPI Control program provides you with comprehensive information about an
existing connection, and enables you to edit a number of CAPI settings.
Windows starts this program automatically, and you can invoke it via the taskbar.
For further information about each of the available tabs, click on the Help button.
You can set the currency (see diagram).
Setting the charge factor in CAPI Control has no affect on the setting in your Eumex
704PC LAN.
79
FlashLoad
FlashLoad (Updating the Communications System Software)
You can update your Eumex 704PC LAN system software yourself. This may be necessary when new features become available. You can download the newest version
from the Internet under the following address:
http://www.telekom.de/faq, where you click on "Endgeräte und Downloads"
(Devices and Downloads) in the next screen on "T-ISDN," then on "ISDN-Telefonanlagen" (ISDN communications systems) and finally on "Eumex 704PC LAN." There
you click on "Treiber/Software" (Drivers/software), then select the file you want to
download.
Downloadable system software generally has the file name extension "*.efw." The file
name indicates the corresponding device (in this case "E704_*.efw" for the Eumex
704PC LAN), as well as the version (e.g. "E704_v100.efw" for version 1.00).
Save the new system software in the "Eumex 704" folder, in which the system software current at the time of delivery has already been copied by the installation program.
Note
You can only update the system software if the PC is connected via the USB port.
While the software is uploading to the Eumex 704PC LAN, the communications system is deactivated, i.e. no calls can be made and any existing calls are disconnected.
The procedure takes approximately one minute, after which the Eumex 704PC LAN is
fully operational again. The update does not affect your current configuration.
The system software update program can be found in the folder created by the installation program when the complete installation described at the beginning is carried
out.
You start the FlashLoad program by double clicking, by selecting the Windows Start
button, or by invoking it in the CAPI icon pop-up menu (see p. 78) and following the
instructions on the screen.
80
FlashLoad
Select the system software to be loaded and open this file. You see the software version information.
When you use the FlashLoad feature for the first time, your PC operating system will
install the necessary software modules. You cannot use the "Next" button until this
procedure has been completed.
81
FlashLoad
Before the upload procedure begins, the screen depicted opens with important information about what to do during this procedure.
A monitoring screen keeps you informed about the current status of the upload.
When the data transfer is complete, the program is automatically terminated, and the
Eumex 704PC LAN restarts.
82
Teledat RVS-COM
Basic Functions
The RVS-COM communications software enables you to emulate a fax machine, an
answerphone or a terminal on your PC.
The prerequisite for installation is that you have already installed the CAPI (Common
ISDN Application Programming Interface) with the Eumex 704PC LAN system software.
All RVS-COM functions are available only when the PC is switched on.
Program Modules
The Teledat RVS-COM software package enables you to use all the ISDN services
conveniently on your PC. Teledat RVS-COM consists of the following modules:
1. RVS TransferMaster is a file manager enabling fast and secure file transfer, e.g. to
colleagues in the field.
2. RVS Fax enables you to send faxes directly from a text-processing program and to
receive faxes on your PC.
83
Teledat RVS-COM
3. RVS Telefon acts as an ISDN telephone with answerphone on your PC. To use this
function, your PC must have a full-duplex soundcard.
4. RVS Terminal is a terminal emulation enabling your PC to establish connections to
ISDN mailboxes.
5. RVS VideoPhone establishes a connection to a partner with an RVS VideoPhone,
TELES.VISION system or an H.320-compatible video telephone. Calls can be
made to RVS VideoPhone just like a normal video telephone.
6. RVS Adressmanager has a central address book which can be used in all RVSCOM applications.
7. RVS SMS enables you to send and receive SMS.
8. An analogue modem on a virtual COM port is emulated for other applications.
This makes it possible to transfer data to destinations without ISDN connections.
COMM Center is started automatically when the PC is booted. You can confirm this
by looking at the round icon in the Windows taskbar. The colour of the icon indicates
the current status.
For more information about the individual modules, please use the comprehensive
RVS-COM online help function.
84
WinPhone
Basic Functions
The convenient dialling wizard enables you to plan and log telephone calls using a
subscriber database. If a caller’s number is transmitted, he/she can be identified by
means of the entry in this database.
User Interface
For further information, please refer to the comprehensive help file ("Hilfe" (Help)
menu item and the on-line help).
85
PageMobil
Basic Functions
PageMobil is a program that enables you to send short messages.
User interface
For further information, please refer to the comprehensive help file ("Hilfe" (Help)
menu item and the on-line help).
86
Home Network
Installation
The installation of the Eumex 704PC LAN system software fulfils all the prerequisites
for network operation. Every PC connected to the system can be accessed as a network PC and can, in turn, access the other PCs in the network or their hard disk
drives if this is not restricted by personal settings.
Please note that your PC must have a network card in order to function as a network
computer. If your PC does not have one, please install a card in accordance with the
manufacturer’s instructions.
The data transfer rate of the LAN port on the Eumex 704PC LAN is 10 Mbit/s.
87
Home Network
Data Transfer (Sharing and Mapping Drives)
Sharing a Drive
In order to share a drive (e.g. a partition of your hard disk or a built-in ZIP drive), click
on that drive with the right-hand mouse button, select the "Sharing" tab, and grant the
rights as desired.
If the "Sharing" tab does not appear, you must first activate file and print sharing
under "Network" in the Control Panel.
After "Apply" and "OK," the drive can be mapped by other PCs in the network.
Mapping a Drive
If a drive on another PC has been shared, you can map this drive as an additional
drive on your PC. Here you must take into consideration the rights granted for the corresponding drive in the "Sharing" tab (see "Access type" in the screenshot depicted).
Click on the "My Computer" symbol with the right-hand mouse button and activate
"Map network drive." Enter the path to the drive you want to map as follows:
\\<name>\<shared drive> (enter the password if necessary)
or select a drive from the list.
By ticking the "Reconnect at logon" option you can also specify whether the given
drive is to be mapped to your PC automatically when you boot (if the corresponding
PC is running).
88
Home Network
Displaying the Network Neighbourhood
Double-click the "Network Neighbourhood" symbol on your PC desktop to display all
available PCs and their shared drives.
Finding a Specific PC in the Network
You can find a specific PC in the network by invoking a dialogue via the "Find/Computer" item in the "Start" menu. When you then double-click one of the PCs displayed,
all the available drives on that PC are listed.
89
The Web Configurator
Starting the Web Configurator
The Web Configurator enables you to edit settings on the Eumex 704PC LAN using
operating systems other than Windows.
If the necessary requirements are met, you can edit some of the settings using a simple Web browser (Microsoft Internet Explorer, version 4.0 and up is recommended)
running under Linux or Mac OS. In order to do this, the respective PC must be connected to the Eumex 704PC LAN via a LAN interface.
The Web Configurator does not provide the full scope of the configuration program (see p. 66ff).
After starting the browser, please type "http://eumex/" in the address line and press
Return. A dialogue will open, prompting you for the user name and password. The
password is the PIN (see p. 17), which is set to 0000 on delivery. Entering a user
name is optional.
After you have completed your input, the screen
depicted - the Start page - will open.
90
The Web Configurator
You open the topics listed on the left-hand side by clicking on them and can then edit
the settings.
When you have completed editing the settings, please click on the "Änderungen
aktivieren" (Activate changes) button. All your changes will then be applied and the
Eumex 704PC LAN restarted.
ISDN - Basic Settings
Click on "ISDN-Grundeinstellungen" (ISDN - Basic settings) to open the screen
depicted. If telephone numbers (MSNs) have already been assigned to the Eumex
704PC LAN, they will appear in the respective fields.Rufnummer speichern
You can edit, delete or enter new MSNs, then save them to the Eumex 704PC LAN by
clicking on the "Speichern" (Save) button.
91
The Web Configurator
T-DSL Access Data
Click on "T-DSL Zugangsdaten" (T-DSL access data) to open the screen depicted. If
access data has already been saved to the Eumex 704PC LAN, it will appear in the
respective fields.
You can edit the access data, then save it to Eumex 704PC LAN by clicking on the
"Speichern" (Save) button.
92
The Web Configurator
ISDN Access Data
Click on "ISDN Zugangsdaten" (ISDN access data) to open the screen depicted. If
access data has already been saved to the Eumex 704PC LAN, it will appear in the
respective fields.
You can edit the access data, then save it to the Eumex 704PC LAN by clicking on the
"Speichern" (Save) button.
93
The Web Configurator
PPP Settings
Click on "PPP Einstellungen" (PPP settings) to open the screen depicted. If settings
have already been made in the Eumex 704PC LAN (the diagram shows the default
values), they will appear in the respective fields.
You can edit the settings and save them to the Eumex 704PC LAN by clicking on the
"Speichern" (Save) button.
94
The Web Configurator
Filter
Click on "Filter" to open the screen depicted. If settings have already been made in
the Eumex 704PC LAN (the diagram shows the default values), they will appear in the
respective fields.
You can edit the settings and save them to the Eumex 704PC LAN by clicking on the
"Speichern" (Save) button.
95
The Web Configurator
Router Configuration
Click on "Routerkonfiguration" (Router configuration) to open the screen depicted. If
settings have already been made in the Eumex 704PC LAN (the diagram shows the
default values), they will appear in the respective fields.
You can edit the configuration data and save it to the Eumex 704PC LAN by clicking
on the "Speichern" (Save) button.
96
The Web Configurator
Status
Click on "Status" to open the screen depicted.
You can edit the data and save it to the Eumex 704PC LAN by clicking on the
"Speichern" (Save) button.
97
Appendix
Technical Specifications
Mains power supply
230 VAC ; 50 Hz for the AC adapter
Rated power
23 W
Safety class
2
1 x Euro-ISDN external
(looped through)
for the basic connection
DSS1 protocol
Supply voltage
40 V ± 10%
Range
100 m passive bus
4 analogue ports
Range
98
300 m
Permissible temperatures
Stationary, weatherproofed
+5°C to +40°C
Dimensions (W x H x D)
approx. 283 x 160 x 57 mm
Weight (system)
approx. 495 g
Appendix
Glossary
3-party conference
A call with one internal and two external subscribers.
10BaseT
This is an Ethernet connection with a transfer rate of 10 Mbit/s. The connection is via
twisted-pair cable.
ADSL
Stands for Asymmetric Digital Subscriber Line
This is a transfer technology that uses the conventional copper-cable network to
realise broadband data connections. The downstream channel (to the user) is broadband, while the upstream channel is narrowband and designed primarily for transmitting control information messages.
AOCD
Advice of charge during an outgoing call.
AOCE
Advice of charge at the end of an outgoing call.
B-channel
This is the "bearer" channel of an ISDN line, used for voice and data traffic, and it has
a transmission rate of 64 kbit/s.
Call assignment
Every MSN is assigned to the internal analogue terminals (11 - 14) which are to signal
calls for the respective MSN.
Call forwarding
Call forwarding in the exchange means that you can always be contacted under your
own MSN, irrespective of where you are. From your telephone you enter the desired
destination number: every subsequent call to your telephone is then automatically
forwarded to this number. There are three types of call forwarding: immediate, on
busy and after a specified time. Calls can be forwarded world-wide to all telephone
and mobile radio connections.
Call pickup
You can pick up an external call at your telephone when another telephone signals
the call.
Call waiting
A tone during a conversation which signals that another subscriber is calling you.
99
Appendix
Call-waiting protection
Activate call-waiting protection if you do not want to be disturbed by other subscribers calling during a conversation.
CAPI
CAPI stands for "Common ISDN Application Programming Interface." This is a programming interface enabling Windows programs to utilise the functions of ISDN
devices on a computer.
CAPI port driver
A Windows driver that emulates a serial interface with connected modem. This
enables programs expecting a conventional modem to utilise ISDN.
CCBS (Completion of Calls to Busy Subscriber)
This is an ISDN feature that enables a caller to program an automatic callback when
the called number is busy. The callback is triggered as soon as the busy subscriber
has replaced the handset.
CCNR (Completion of Calls on No Reply)
This is an ISDN feature, similar to CCBS, that enables a caller to program an automatic callback when the called number does not reply. The callback is triggered as
soon as the called subscriber has made a call and replaced the handset.
CLIP (Calling Line Identification Presentation)
This is an ISDN feature transmitting the caller’s number to the called subscriber,
where it appears on his display.
CLIR (Calling line identification restriction)
If this service has been ordered from Deutsche Telekom, you can restrict the display
of your MSN at the called subscriber.
Communications system
Communications systems are private branch exchanges (e.g. the Eumex 704PC
LAN). For the purpose of external communication, they are connected to the public
network. Communications systems are not restricted to telephony, but also offer complete office communications services (voice, text, data and video transfer).
Configuration mode
In the configuration mode you can set certain parameters and edit preset values for
your communications system.
D-channel
This is the control channel of an ISDN connection, and it has a transmission rate of
16 kbit/s (S0). It is used for the transmission of control information, service indicator,
MSN, tariff information, etc.
100
Appendix
Dial-up network
Your computer can use the Microsoft Windows dial-up network facility to connect to
an Internet service provider via a modem.
DTMF
Stands for "dual tone multi-frequency," also known as voice frequency dialling. The
dialling signals and control functions are transmitted in the form of tones at various
frequencies.
DTMF post-dialling
DTMF post-dialling is only possible during an external call when, for example, an
automatic announcement prompts you to post-dial digits and symbols (1 - 0, * and
#), during fax polling or other applications, e.g. T-NetBox.
ECT (Explicit Call Transfer)
An ISDN feature enabling two external calls to be switched together in the telephone
exchange.
E-mail
E-mail is a written message transmitted via an on-line service or the Internet to
another subscriber’s e-mail address. The e-mail protocols used in the Internet enable
the attachment of data (pictures, programs, etc.) to the e-mail.
Enquiry
You can hold a call and make an enquiry call to another internal or external subscriber, then return to your first call.
Exchange
A node in the public telecommunications network.
External line access
External line access levels regulate access to an external line. You can, for example,
specify which subscribers are not allowed to make long-distance calls.
External line seizure
Depending on the configuration, an external line can be seized automatically or by
dialling 0. This means that when you want to make an external call and you lift the
handset, you hear an external dialling tone either immediately or after dialling 0.
IAE
This is a unit consisting of the socket and plug for connecting ISDN devices in
Deutsche Telekom’s ISDN.
ISDN
ISDN stands for "Integrated Services Digital Network."
101
Appendix
ISDN socket
The standardised socket for connecting ISDN devices in Deutsche Telekom’s ISDN.
LED
Light emitting diode: an electronic component for visual signalling.
MCID (Malicious Call Identification)
An ISDN feature enabling malicious callers to be identified in the telephone
exchange.
ML PPP
Multilink point-to-point protocol, which bundles two B-channels to achieve a higher
transfer rate.
Multiple Subscriber Number (MSN)
A multi-terminal connection can be assigned up to ten multiple subscriber numbers.
These numbers enable the connected devices to be addressed (i.e. called, faxed)
individually. ISDN telephones can be assigned several MSNs.
Multi-terminal connection
You can operate up to three terminals without power supplies and five additional terminals with their own power supplies on a multi-terminal connection. You can install a
total of 12 ISDN ports, using the free ports to plug in your ISDN terminals at different
locations.
MWI
Message waiting indication. There is a voice or fax message waiting in your T-NetBox.
NDIS
Network Driver Interface Specification – a driver structure developed by Microsoft
enabling the connection of several PCs in a network.
NTBA
Network Termination Basic Access. This is the network terminator, a small box that
converts a 2-wire line to an internal 4-wire line to the S0 port.
NTBBA
T-DSL modem. This is the network terminator for T-DSL.
Personal identification number (PIN)
You need the PIN to start the configuration mode. The default setting on delivery is
0000. We strongly recommend you to change this PIN and keep the new one in a
safe, secret place, in order to prevent unauthorised persons from gaining access to
the configuration mode.
102
Appendix
PPP
This stands for "point-to-point protocol," a network protocol used for connecting to the
Internet via a modem.
Pulse dialling
A dialling procedure in which the dialling signals are transmitted in the form of electrical impulses, as used by telephones with rotary dialling disks, for instance.
Reset communications system
You can deactivate or delete all activated features and activate the default (factory)
settings instead.
Router
A component of the system software that uses the time-sharing procedure to distribute data streams between the Internet and the connected PCs.
SMS
Short Message Service, i.e. short messages transmitted to and from mobile telephones and fixed-line networks.
S0 port
The international standardised ISDN interface for connecting communications systems and/or up to eight ISDN devices.
Speed dialling
You can store up to 100 numbers and dial them using a two-digit speed-dialling
code.
TAE
The standardised units for connecting analogue devices in the telephone network in
Germany are the TAE socket and the TAE plug.
TAPI
Stands for "Telephony Application Programming Interface," and is a programming
interface in Microsoft Windows used by Windows programs to control telephony functions, e.g. dialling wizards.
TCP/IP
Stands for "Transmission Control Protocol/Internet Protocol," and is a transmission
protocol for networks also used for connecting to the Internet.
T-DSL
Broadband Internet access with transfer rates of up to 768 kbit/s downstream and
128 kbit/s upstream.
103
Appendix
T-NetBox
Digital answerphone with a fax buffer in Deutsche Telekom’s telephone network. The
Eumex 704PC LAN signals messages waiting in the T-NetBox.
Toggle
Switching back and forth between two calls. You can accept incoming calls even
though you are already making a call, or have an enquiry call with other participants
involved in the call.
USB
Stands for "Universal Serial Bus," a fast serial interface with a transfer rate of up to
12 Mbit/s. A (theoretical) maximum of 127 devices can be operated on a single USB
interface, and the devices can be plugged in or unplugged while the computer is still
running.
User-to-user signalling (UUS)
User-to user signalling enables the exchange of messages between devices via the
data channel while the call is being established or cleared down. One of the main
areas in which this is used is data communication. UUS enables password queries or
automatic query routines from host to client computers.
104
Appendix
Audio Signals / Ringer Cadences
The following diagram shows the duration and intervals of the individual audio signals and ringer cadences.
Audio signals
Time in seconds
0
1
2
3
4
5
6
Ring tone
Busy tone
Internal dialling tone
External dialling tone
Positive acknowledgement tone
Negative acknowledgement tone
Internal special dialling tone
External special dialling tone
Call-waiting tone
Rings
External call
Internal call
Recall
105
Appendix
Index of Key Words
3-party conference..................................24
A
Anonymous calls.....................................46
Answerphone call...................................25
Audio tones............................................105
Automatic and manual external line
seizure .......................................................18
Automatic callback on busy (CCBS) ..25
Automatic callback on no
reply (CCNR)............................................26
Automatic external line seizure............39
B
Basic settings...........................................17
C
Call and charge data..............................32
Call assignment................................37, 68
Call assignment, reset............................38
Callback .............................................25, 26
Call data records.....................................75
Call forwarding .................................50, 70
Call forwarding, activating ....................28
Call forwarding, deactivating................29
Call forwarding in the exchange..........71
Call forwarding in the communications
system........................................................70
Call pick-up...............................................25
Call transfer (ECT),
activating/deactivating...........................52
Call transfer in a
communications system .......................52
Call waiting...............................................30
Call-waiting protection ....................31, 69
CAPI Control ............................................79
CCBS.........................................................25
CCNR.........................................................26
CD-ROM .................................................108
Central settings........................................72
Charge accounts..............................32, 69
Charge limit .......................................32, 69
Charge limit, activating and
deactivating..............................................49
Charge limit, setting.........................49, 74
Charge per unit of time..........................48
106
Class of service........................................42
Communications software....................57
Configuration mode ...............................34
Configuring the Eumex 704PC LAN ..66
Conformity, declaration of ..................108
Connecting...............................................10
Connecting to the Internet ....................65
Currency, changing the ...........48, 74, 79
D
Data transfer (sharing and mapping
drives) ........................................................88
Dealing with faults ................................110
Default settings........................................17
Delivery settings ......................................17
Delivery status, resetting to...................55
Device type........................................41, 69
Dialling tone, special internal ...............33
Dialling wizard .........................................85
Disconnecting from the Internet..........65
Drives, sharing and mapping...............88
DTMF post-dialling..................................27
E
ECT.............................................................52
Emergency numbers.......................32, 73
Emergency numbers, deleting......43, 73
Emergency numbers, saving.........43, 73
Enquiry ...............................................20, 23
External line access..................17, 42, 69
External line access rights and
speed–dialling numbers .......................32
F
Factory setting, restoring.......................55
Filters..........................................................95
Finding a specific PC in the network..89
FlashLoad .................................................80
H
Home Network ........................................87
I
Invoking a program from the Windows
taskbar.......................................................78
Appendix
M
Malicious call identification (MCID) ....27
Manual external line seizure.................39
Mapping and sharing drives.................88
MCID..........................................................27
Menu: Rufzuordnung / kommend
(Call assignment / Incoming)...............68
Menu: Zentrale Daten (Central data) ..72
Menu: Entgelte (Charges) ....................74
Menu: ISDN-Extern / Rufnummern
(External ISDN /Telephone numbers)67
Menu: Teilnehmer intern (Internal
subscribers)..............................................69
Menu: Kurzwahl / Einstellungen
(Speed dialling / Settings) .............76, 77
Mounting .....................................................9
Mounting location .....................................8
N
Network functions............................57, 88
Network neighbourhood,
displaying the...........................................89
Number, always transmit.......................47
Number busy ...........................................40
Number, never transmit .........................46
Number restriction..................................46
Number restriction: cancel ...................47
Numbers, save for speed dialling........44
Numbers, saving .......................36, 67, 91
Number, transmitting..............................69
P
PageMobil.................................................86
PC software..............................................57
Picking up an answerphone call.........25
Pick-up.......................................................25
PIN................................................17, 35, 55
Power failure ...............................................4
PPP settings .............................................94
Programs, invoking from the Windows
taskbar.......................................................78
R
Recycling................................................108
Remote configuration ............................56
Resetting system data............................55
Ringer cadences ..................................105
Router configuration .......................77, 96
RVS Adressmanager..............................84
RVS Fax .....................................................83
RVS SMS...................................................84
RVS Telefon..............................................84
RVS Terminal............................................84
RVS TransferMaster................................83
RVS VideoPhone ....................................84
S
Safety precautions.....................................4
Service ....................................................111
Sharing and mapping drives................88
SMS in a fixed-line network............54, 68
Short messages ......................................86
Software components,
installation of............................................60
Software, information about.................59
Speaking with two subscribers alternately (toggling).......................................23
Special Internal dialling tone................33
Speed dialling, access to ...............45, 69
Speed-dialling memory locations .......76
Speed-dialling memory locations,
deleting all/individual......................44, 76
Surge protection........................................9
System data, resetting............................55
System prerequisites..............................58
System software, updating the.............80
T
T-DSL ..................................................11, 92
Teledat RVS-COM...................................83
T-NetBox, calling .....................................27
T-NetBox signalling, activating /
deactivating..............................................53
Toggling ....................................................23
Tools .............................................................9
Transferring a call.............................21, 22
U
Updating the system software..............80
W
Wall mounting ............................................9
Warranty..................................................108
Web Configurator....................................90
WinPhone .................................................85
Wizard, dialling ........................................85
107
Appendix
Declaration of Conformity
CE sign
This device meets the requirements laid down in the following EC Directive:
1999/5/EC Directive on Radio Equipment and Telecommunications Terminal Equipment and the mutual acknowledgement of their conformity.
The CE symbol on the equipment is proof of its conformity with the aforementioned
Directive.
The Declaration of Conformity can be viewed at the following address:
Deutsche Telekom AG
Geschäftsbereich Endgeräte
CE-Testlab Steinfurt
Sonnenschein 38
D-48565 Steinfurt
Returning Old Communications Systems
You can return decommissioned communications systems that have been purchased
or leased from Deutsche Telekom free of charge to any T-Punkt, where they will be
professionally dismantled and recycled.
Returning Your Old CD-ROM
When you no longer require it, you can return your CD-ROM free of charge to any TPunkt, where it will be recycled.
Warranty
If you have purchased the product directly from Deutsche Telekom, e.g. in a TPunkt store or by T-Versand, the following warranty applies:
Deutsche Telekom AG provides a 2-year warranty on material and workmanship of
the telecommunications device from the time of purchase.
In the event of a defect the purchaser’s rights shall in the first place be limited to
remedial measures. Remedial measures constitute either repair or supply of a
replacement product. Returned equipment or parts thereof become the property of
Deutsche Telekom AG.
108
Appendix
If repairs are unsuccessful, the purchaser may either request a reduction in the purchase price or rescind the contract and, insofar as Deutsche Telekom is accountable
for the defects, demand compensation.
The purchaser shall report any ascertained defects to Deutsche Telekom without
delay. Proof of warranty must be provided in the form of a valid purchase receipt or
invoice.
The warranty shall become null and void if the equipment has been tampered with by
the purchaser or an unauthorised third party. Damage caused by improper handling,
operation or storage or due to force majeure or other external influences is not
included under the warranty. The same applies to the use of consumables, e.g.
printer cartridges and rechargeable batteries.
No charge will be made if defects covered by this warranty are repaired by a
Deutsche Telekom AG service point. Freight and shipping charges for the least
expensive form of return within the Federal Republic of Germany will be paid by
Deutsche Telekom AG.
If you have purchased the product from a specialist retailer or store, the following
warranty applies:
All claims under warranty must be addressed to the dealer from whom you purchased the equipment.
The dealer provides a 2-year warranty on material and workmanship of the telecommunications device from the time of purchase.
In the event of a defect the purchaser’s rights shall in the first place be limited to
remedial measures. Remedial measures constitute either repair or supply of a
replacement product. Returned equipment or parts thereof become the property of
the dealer.
If repairs are unsuccessful, the purchaser may either request a reduction in the purchase price or rescind the contract and, insofar as the dealer is accountable for the
defects, demand compensation.
The purchaser shall report any ascertained defects to the dealer without delay. Proof
of warranty must be provided in the form of a valid purchase receipt or invoice.
The warranty shall become null and void if the equipment has been tampered with by
the purchaser or an unauthorised third party. Damage caused by improper handling,
operation or storage or due to force majeure or other external influences is not
included under the warranty. The same applies to the use of consumables, e.g.
printer cartridges and rechargeable batteries.
109
Appendix
Dealing with Faults
If your system does not function as desired, first try getting it to work with the help of the
table below.
The following notes are designed to help you deal with the fault yourself:
Problem
Possible cause
Solution
System does not function
AC adapter not
seated properly
Check that adapter is
firmly seated
System functions
incorrectly
Remove the adapter from
the mains for at least
30 seconds (network reset)
Your connection is not
switched to ISDN
Contact your
network provider
NTBA defective
Contact your
network provider
Cable malfunction
Check that
connecting cable is
seated correctly and
not damaged
CAPI conflict
Another CAPI driver
is already installed
Uninstall the other
CAPI driver
Device not found
Cable malfunction
Check that connecting
cable is seated
correctly and not
damaged
Problems with
AMD processor under
Win 98 SE
Install bugfix for 1
AMD processors*
Problems with Via
chipset
Install bugfix for Via chipset
USB driver*2
ISDN LED flashes
continuously
*1
*2
110
Download under: http://support.microsoft.com/support/kb/articles/Q240/0/75.asp
Download under: http://www.via.com.tw/drivers/index_new2.htm
Appendix
Problem
Possible cause
Solution
Router does not establish
connection*3
Incomplete
Check the settings
configuration in the router
configuration
All LEDs flash
FlashLoad
failed
Repeat
FlashLoad
USB cable is too short
Use an active
USB extension cable
(max. 5 x 5 m permissible)
Windows 2000 shows
the USB connection
separately when the
connection to the system
is via LAN
No action necessary,
as the correct operation
of your system is not
affected in any way
If the problem persists, our Hotline is there to assist you. You will find the telephone
number in the chapter entitled "Customer Service" below.
*3
You can use the router to connect only to those providers who allow dial-up network
ing.
Customer Service
If you experience any technical problems with your communications system, call our TService Hotline on 0180 51990 (please note that you will be charged for your call).
Experienced technicians can also advise you on the operation of your system. Please
have the serial number of the communications system at hand when you call. (You will
find this number on the base of the housing.)
If you suspect that your ISDN connection is faulty, please contact your network
provider’s Customer Service department. Deutsche Telekom’s freephone T-Service
number is 0800 330 2000.
111
Important telephone numbers
In case of faults:
Sales enquiries:
Please enter the telephone number
when handing over the device.
Published by:
Deutsche Telekom AG
Right to changes reserved.
As of: 16.08.2002