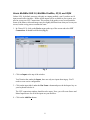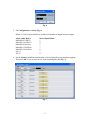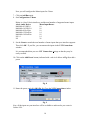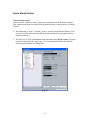
1
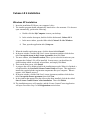
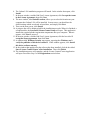
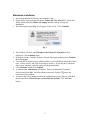
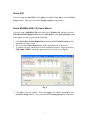
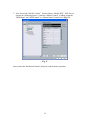
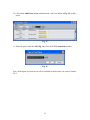
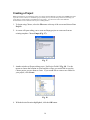
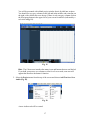
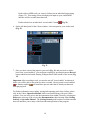
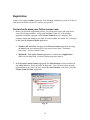
Steinberg Cubase LE 4 Software Setup Guide
Contents:
Cubase LE 4 Installation .................................................................................................. 2
Windows XP Installation ................................................................................................ 2
Windows Vista Installation............................................................................................. 3
Macintosh Installation..................................................................................................... 5
Setting up Cubase with your Alesis Audio device.......................................................... 6
General Setup (for all devices) ....................................................................................... 6
Alesis IO|2 ...................................................................................................................... 7
Alesis MultiMix USB (1.0) Series Mixers ..................................................................... 7
Alesis MultiMix USB 2.0, MultiMix FireWire, IO|14, and IO|26 ................................. 8
Alesis MasterControl .................................................................................................... 11
Creating a Project ........................................................................................................... 16
Registration ..................................................................................................................... 19
Find and write down your Soft-eLicenser code............................................................ 19
Register Cubase LE 4 with Steinberg ........................................................................... 20
Request an Activation Code for Cubase LE 4 .............................................................. 21
Activate your installation of Cubase LE 4.................................................................... 21
1
Cubase LE 4 Installation
Windows XP Installation
1. Insert the installation DVD into your computer’s drive.
2. The installer program should automatically launch after a few moments. If it does not
open automatically, perform the following:
a. Double-click the My Computer icon on your desktop.
b. In the window that opens, double-click the disk named, Cubase LE 4.
c. In the next window, open the folder titled, Cubase LE 4 for Windows.
d. Then, open the application titled, Setup.exe
3. When the installer application opens, click the button labeled Install
4. In the next window, read the End-User License Agreement, and then click the box
titled I accept the terms in the License Agreement, then click Next.
5. The next window, titled Install Location, allows you to select the location on your
computer that Cubase LE 4 will be installed. In most cases, you should use the
default settings which are already selected here, and simply click Next.
6. Then, on the next screen, click Install.
7. A progress bar will be displayed while the installation proceeds. When it is finished, a
second installer, the Syncrosoft License Control Setup will open. This application
installs the required product registration components onto your computer. When it
appears, click Next to proceed.
8. In the next window, read the End-User License Agreement, and then click the box
titled I accept the license agreement, then click Next.
9. In the window that appears after the software has been installed, click the box titled
Start ‘License Control Center’ after installation. Then click Finish.
10. The installation process will complete, and the License Control Center Application
will open. Proceed to Step 2 of the Registration section below.
2
Windows Vista Installation
1. Insert the installation DVD into your computer’s drive.
2. A window titled “AutoPlay” (Fig. 1) may appear. If it does, double-click Run
Autorun.exe
Fig. 1
3. A window titled “User Account Control” (Fig. 2) may then appear reporting that An
unidentified program wants access to your computer. Click Allow.
Fig. 2
4. In the window that opens, double-click the folder titled Cubase LE 4 for Windows.
5. In the next window, double-click the program titled Setup.
3
6. The Cubase LE 4 installation program will launch. In the window that opens, click
Install.
7. In the next window, read the End-User License Agreement, click I accept the terms
in the License Agreement, then click Next.
8. The next window, titled Install Location, allows you to select the location on your
computer that Cubase LE 4 will be installed. In most cases, you should use the
default settings which are already selected here, and simply click Next.
9. Then, on the next screen, click Install.
10. A progress bar will be displayed while the installation proceeds. When it is finished, a
second installer, the Syncrosoft License Control Setup will open. This application
installs the required product registration components onto your computer. When it
appears, click Next to proceed.
11. In the next window, read the End-User License Agreement, click the box titled I
accept the license agreement, then click Next.
12. A window titled Windows Security may appear, reporting that Windows can’t
verify the publisher of this driver software. If this window appears, click Install
this driver software anyway.
13. In the window that appears after the software has been installed, click the box titled
Start ‘License Control Center’ after installation. Then click Finish.
14. The installation process will complete, and the License Control Center Application
will open. Proceed to Step 2 of the Registration section below.
4
Macintosh Installation
1. Insert the installation DVD into your computer’s drive.
2. On the DVD, locate and open the folder, Cubase LE 4 for Mac OS X. Inside, this
folder, double-click the Cubase LE 4.mpkg installer package to begin the
installation.
3. The following message (Fig. 3) will appear on the screen. Click Continue
Fig. 3
4. This window will close, and Welcome to the Cubase LE 4 Installer will be
displayed. Click Continue again.
5. In the next window, read the Software License Agreement, and then click Continue,
then click Agree.
6. You will then be asked to select which hard drive you would like to install the Cubase
onto. Choose a drive, and click on its name to select it. If you only have only hard
disk in your computer, only one option will be presented here.
7. Click Continue, and then click Install.
8. A window titled Authenticate will appear. Enter your Macintosh Username
icon in the
Password and click OK. For help with this password, click the
bottom-left of the window.
9. A progress bar will be displayed while the installation proceeds. When it is finished,
the screen will read The Software was installed Successfully. Click the Close
button.
5
Setting up Cubase with your Alesis Audio device
General Setup (for all devices)
1. Connect your USB device to a USB port on your computer. Some Alesis USB audio
devices have power cords, and some do not. If your device has a power cord, connect
to an electrical outlet, and turn on the device.
2. Launch the Cubase LE 4 application.
•
Windows XP and Vista: Navigate to the Cubase LE 4 application by using the
Start menu at the bottom-left of your screen: select Start > Programs > Steinberg
Cubase LE 4 > Cubase LE 4.
•
Macintosh: The Cubase LE 4 application is located in the “Applications” folder
on your Hard Disk. Double-click the program to open it.
3. Depending on your computer configuration, the first time you launch Cubase, you
may be presented with an error message indicating some problem with the sound
setup. By going through this setup guide, and properly setting up Cubase LE 4, any
such errors will be resolved. If an error is displayed at startup, click OK to continue.
4. Once Cubase LE 4 is completely started up, select the Devices menu from the top of
the screen and choose Device Setup.
5. In the window that opens, select VST Audio System from the left-hand side of the
screen.
6. The ASIO Driver field on the right-hand side is where you select the audio
input/output device that Cubase LE 4 will use. Below is a list of Alesis Audio
interfaces, and the correct ASIO Driver selection for each device for Windows and
Macintosh platforms. Make the appropriate ASIO Driver selection for your device.
Alesis Audio Device
Windows ASIO Driver
Macintosh ASIO Driver
MultiMix USB Series………... ASIO DirectX Full Duplex Driver.. USB Audio CODEC
MultiMix USB 2.0 Series……. Alesis USB Audio Device………... Alesis USB Audio Device
MultiMix FireWire Series…….Alesis FireWire…………………... Alesis 1394
IO|14 and IO|26……………… Alesis FireWire…………………… Alesis 1394
MasterControl...………………Alesis FireWire…………………… Alesis 1394
IO|2 …………………………... Alesis IO|2 USB ASIO…………… io|2
When you change the selected ASIO Driver, a window which reads, Do you want to
switch the ASIO driver? may appear. If it does, click Switch.
6
Alesis IO|2
If you are using the Alesis IO|2, click Apply (if available), then OK to close the Device
Setup window. Then proceed to the Creating a project section below.
Alesis MultiMix USB (1.0) Series Mixers
If you are using a MultiMix USB Series Mixer on a Windows PC, and have selected
ASIO DirectX Full Duplex Driver for the ASIO Driver in the General Setup section
of this guide (see above), perform the following:
1. Click ASIO DirectX Full Duplex Driver underneath VST Audio System on the
left-hand side of the screen.
2. Then, click the Control Panel button on the right-hand side of the screen.
3. A window will open which has two white rectangular sections. Place an X next to
USB Audio CODEC in both the upper and lower sections as (see Fig. 4).
Fig. 4
7. Click OK to close the window. Then, click Apply (if available), then OK to close
the Device Setup window. Now proceed to the Creating a project section below.
7
Alesis MultiMix USB 2.0, MultiMix FireWire, IO|14, and IO|26
Cubase LE 4, by default, starts up with only two inputs enabled, even if you have an 18
input sound card or interface. Before all the inputs will be available to your system, you
need to set up your VST Connections. This section of the guide covers several products.
Some of the names, titles and images may be slightly different from what you see on your
screen, but the set up process remains the same.
1. In Cubase LE 4, click on the Device menu at the top of the screen and select VST
Connections. It should look like this (Fig. 5):
Fig. 5
2. Click on Inputs at the top of the window.
You’ll notice that, under the Inputs, there are only two inputs showing up. You’ll
need to create a new configuration.
3. Click on the input titled under the Bus Name column and press the backspace key on
your keyboard to delete it.
The VST connections window should now be empty. Next, you will create Stereo and
Mono Input Busses for all of the inputs on your interface.
4. Click on the Add Bus button.
8
Fig. 6
5. Set Configuration to Stereo (Fig. 6).
Below is a list of Alesis interfaces, and the total number of supported stereo inputs.
Alesis Audio Device
MultiMix 8 USB 2.0
MultiMix 16 USB 2.0
MultiMix 8 FireWire
MultiMix 12 FireWire
MultiMix 16 FireWire
I/O 14
I/O 26
Stereo Input Busses
5
9
5
7
9
7
13
6. Set the Count to match the total number of stereo inputs that your interface supports.
Then click OK. Your screen will now look something like this (Fig. 7):
Fig. 7
9
Now you will configure the Mono inputs for Cubase.
7. Click on Add Bus again.
8. Set Configuration to Mono.
Below is a list of Alesis interfaces, and the total number of supported mono inputs.
Alesis Audio Device
Mono Input Busses
MultiMix 8 USB 2.0
10
MultiMix 16 USB 2.0
18
MultiMix 8 FireWire
10
MultiMix 12 FireWire
14
MultiMix 16 FireWire
18
I/O 14
14
I/O
26
9. Set the Count to match the total number of mono inputs that your interface supports.
Then click OK. If you like, you can rename the inputs in the VST Connections
window.
It is recommended that you save VST Connections settings so that they may be
easily recalled.
10. Click on the Add Preset button (indicated with a red circle below in Fig. 8) to add a
preset
Fig. 8
11. Name the preset, and click OK (Fig. 9). Close the VST Connections window.
Fig. 9
Now, all the inputs on your interface will be available to audio tracks you create in
Cubase LE 4.
10
Alesis MasterControl
Control surface setup
Cubase uses the “Mackie Control” protocol to communicate with the MasterControl.
This configuration must be set up before the MasterControl’s control surface will begin
to work.
1. Ensure that the “Cubase / Nuendo” preset is selected via the MasterControl’s LCD
screen. Press Preset/Home on the MasterControl and turn the top-right encoder to
make this selection.
2. In Cubase LE 4, click on the Device menu and then choose Device Setup. From the
top of the menu, click the “plus” sign. The screen should look like this, with the
relevant portion highlit in red (Fig. 10):
Fig. 10
11
3. Now, choose the “Mackie Control.” (Do not choose “Mackie HUI.” HUI devices
operate on a different protocol.) Once the “Mackie Control” is added, assign the
“MIDI Input” and “MIDI Output” to “MasterControl Control Port” (Fig. 11):
Fig. 11
Once you do this, the MasterControl is ready for control surface operation.
12
Audio configuration
Cubase LE 4, by default, starts up with only two inputs enabled, even though the
MasterControl allows for 26 simultaneous inputs. Before all the inputs will be available
to your system, you need to set up your VST Connections.
1. In Cubase LE 4, click on the Device menu at the top of the screen and select VST
Connections. It should look like this (Fig. 12):
Fig. 12
2. Click on Inputs at the top of the window.
You’ll notice that, under the Inputs, there are only two inputs showing up. You’ll
need to create a new configuration.
3. Click on the input titled under the Bus Name column and press the backspace key on
your keyboard to delete it.
The VST connections window should now be empty. Next, you will create Stereo and
Mono Input Busses for all of the inputs on your interface.
4. Click on the Add Bus button.
Fig. 13
5. Set Configuration to Stereo (Fig. 13).
13
6. Set the Count to match the total number of stereo inputs that you want to use
simultaneously. Then click OK. Your screen will now look something like this (Fig.
14):
Fig. 14
Now you will configure the Mono inputs for Cubase.
7. Click on Add Bus again.
8. Set Configuration to Mono.
9. Set the Count to match the total number of mono inputs that you want to use
simultaneously. Then click OK. If you like, you can rename the inputs in the VST
Connections window.
It is recommended that you save VST Connections settings so that they may be
easily recalled.
14
10. Click on the Add Preset button (indicated with a red circle below in Fig. 15) to add a
preset
Fig. 15
11. Name the preset, and click OK (Fig. 16). Close the VST Connections window.
Fig. 16
Now, all the inputs you want to use will be available to audio tracks you create in Cubase
LE 4.
15
Creating a Project
Note: This document is not intended to replace your Cubase Operation Manual (accessable from the Help menu at the
top of the screen in Cubase). It is intended to get you started your very first time using Cubase LE, and to help you
ensure that your Alesis interface is installed and set up properly. You will need to refer to this additional
documentation to learn to make the most of your recording software.
1. To begin using Cubase, select the File menu at the top of the screen and choose New
Project.
2. A screen will open asking you to create an Empty project or create one from an
existing template. Choose Empty (Fig. 17).
Fig. 17
3. Another window will open asking you to “Set Project Folder” (Fig. 18). Use the
mouse to choose the location on your hard drive where you would like to save the
Cubase project you are about to create. If you would like to create a new folder for
your project, click Create.
Fig. 18
4. With the desired location highlighted, click the OK button.
16
You will be presented with a blank project window that is divided into sections.
You should see two grey columns on the left and in the middle, and a timeline on
the right, with a black ruler over the top. If there is only one grey column click on
the first square button in the upper left of your screen to enable it (indicated by a
red circle in Fig. 19).
Fig. 19
Hint: The Cubase user interface has many icons and buttons that are not labeled.
If you hold your mouse over a button or icon for a few seconds, some text will
appear that describes the button’s function.
5. Select the Project menu from the top of the screen and choose Add Track and then
Audio (Fig. 20).
Fig. 20
A new Audio track will be created.
17
Each Audio or MIDI track you create in Cubase has an individual input setting
(Figure 12). This setting selects which physical input on your Audio/MIDI
interface will be recorded onto that track.
Each track also has an individual “record enable” button
(Fig. 21)
6. On the left-hand panel of the Cubase window, select an input for your Audio track
(Fig. 21)
Fig. 21
7. Once you have selected the input for your track (Fig. 21) and your track or tracks
have been “record enabled,” you can begin recording by pressing the master Record
button which located on the floating Transport Panel at the bottom of the screen (Fig.
19).
Important: After recording a track, you need to turn off “record enable” on that track
before you will be able to hear what you have recorded. Having a track record enabled
or monitor enabled
will sometimes prevent audio that is already on that track
from playing back.
For further information on recording, mixing and exporting music from Cubase, please
refer to the Cubase Operation Manual which was installed along with your Cubase
software. You can easily access this documentation from within Cubase by selecting the
Help menu at the top of the screen, then Documentation, then choosing either Getting
Started, or Operation Manual. The Getting Started guide has three excellent tutorials
that will introduce you to many of the functions and operations of the program.
18
Registration
Cubase LE 4 requires online registration. After finishing installation, you have 30 days or
3000 starts left before you have to register your product.
Find and write down your Soft-eLicenser code
1. Before you begin the registration process, you will need to locate, and write down
your Soft-eLicenser number. Along with installing Cubase LE 4, the installer
application installed a program called License Control on your computer. This
program assigns and manages your Soft-eLicenser number for Cubase LE 4. Navigate
to and open the License Control application:
•
Windows XP and Vista: Navigate to the License Control application by using
the Start menu at the bottom-left of your screen: select Start > Programs >
Syncrosoft > License Control Center.
• Macintosh: The License Control application is located in the Applications
folder on your Hard Disk. Double-click the program to open it.
2. In the License Control Center application, the Soft-eLicenser is listed as shown in
red in Fig. 20 below. Write down the 20 digit code. You will need it later on in the
registration process. Once you have written the Soft-eLicenser code down, close the
License Control Center application.
Fig. 22
19
Register Cubase LE 4 with Steinberg
1. Launch the Cubase LE 4 application.
•
Windows XP and Vista: Navigate to the Cubase LE 4 application by using the
Start menu at the bottom-left of your screen: select Start > Programs > Steinberg
Cubase LE 4 > Cubase LE 4.
•
Macintosh: The Cubase LE 4 application is located in the Applications folder
on your Hard Disk. Double-click the program to open it.
2. When you launch Cubase LE 4 you will be prompted to register. If you have an
internet connection, click Register Now. An internet connection is required to
register Cubase LE 4. If the program is not registered, it will cease to function after
30 days or 3000 starts.
3. Clicking Register Now will open your web browser, taking you to Steinberg’s
registration page for Cubase LE 4. Click the link titled Start Cubase LE 4
activation now at the bottom of the page.
4. On the next page, click the link titled Create user account.
5. On the next page, select your country from the drop-down list and then click, Next.
Fill in your contact information on the next page, making sure to complete all required
fields with a “*” next to them. Click Create account now. The next page will read
Account successfully created, an e-mail has been sent to your e-mail address.
6. Check your email, and look for a new message from MySteinberg with the subject
Log into MySteinberg. Open this email, scroll to the bottom, and click the link
below the text Please activate your account by clicking on the link below.
7. You will be taken back to the MySteinberg website. Enter the login and password
information (which you chose when you created your MySteinberg account) and click
Log In.
8. On the next page, under the heading Register a product, click the link titled More.
9. Again, on the next page, under the heading Register a product, click the link titled
More.
10. Select Product with Steinberg Key or Soft-eLicenser on the next page, and click
Next.
11. Enter the 20-Digit (case-sensitive) Soft-eLicenser code you wrote down earlier into
the field titled number* (see Step 2 of the Find and write down your SofteLicenser code section above)
12. Enter Cubase LE 4 into the field titled Please enter a name.
13. Click the Register product(s) button.
14. If you entered your code correctly, the next screen will read The Steinberg Key
[YourCodeHere] has been registered, but does not contain any active licenses.
20
Request an Activation Code for Cubase LE 4
Note: If you are beginning this section of the guide, and are not already logged on to your
MySteinberg account, visit https://www.steinberg.net/1069_1.html and log in using the
username and password you selected in Steps 3-8 of the Registering Cubase LE 4 with
Steinberg section above. Once logged in to your My Steinberg account, proceed with the
steps below.
15. Click the link titled Activation & Reactivation on the left-hand side of the page.
16. Then click the link titled Cubase LE 4 on the left-hand side of the page.
17. Under the heading Permanent Activation, click the link titled More.
18. Enter the 20-Digit (case-sensitive) Soft-eLicenser code you wrote down in Step 2
above into the filed titled Soft-eLicenser number
19. In the field titled Hardware Manufacturer, select Alesis from the drop-down menu.
20. Click Request Activation Code.
21. If you entered your code correctly, the next page will read The Soft-Licenser
number [YourCodeHere] you just have entered is correct.
We have sent an Activation Code for Cubase LE 4 to the email address
[YourEmailHere].
22. Check your email, and look for a new message from Steinberg Media Technologies
GmbH with the subject Activation Code – Cubase LE 4. Open this email.
23. This email contains your Cubase LE Activation code. Print this email out for your
records. You will also need to have this code handy to complete the registration
process. Copy the Activation Code by highlighting the text the email with your
mouse, then select the Edit menu at the top of the screen and choose Copy.
Activate your installation of Cubase LE 4
24. Launch the License Control application by following the instructions from Step 1 of
the Registration Section above.
25. Select the Wizards menu at the top of the screen, and choose License Download.
26. When License Download Wizard opens, click Next.
27. In the next window, enter the 32-Digit (case-sensitive) Activation code from the
email you just received. If you copied the text from your email in Step 23 above, you
can use the paste command to enter it all at once. Click on the first white field at the
top of the screen, and type [Ctrl+V] on Windows, or [Apple+V] on the Macintosh
to paste the text you copied earlier.
28. Once the Activation code has been entered, click Enter, then lick Next.
29. On the next page, click Start.
30. The License Download process will begin, and a progress bar will be displayed on the
screen. When the process is finished, a window will appear indicating that the
process has completed. Click OK to close this window, then click Finish to close the
License Download Wizard. You will be returned to the License Control Center.
31. Close the License Control Center.
7-51-0274-B.
November 10, 2008.
© Alesis, LLC. All rights reserved.
21