1
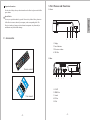
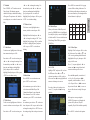
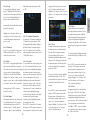
DVB415
August International Ltd
United Kingdom
Telephone:+44 (0) 845 250 0586
www.augustint.com
Freeview HD Receiver and Media Player
Récepteur de TV DVB-T2 et Lecteur Media
DVB-T2 Empfänger und Media Player
DVB-T2 Ricevitore TV e Media Player
Receptor de TV DVB-T2 y Lector Media
Quick Start Guide
DVB415
Thank you for purchasing this August Receiver. You may already be
familiar with using similar products but please take the time to read these
instructions carefully. They are designed to familiarise you with the
product’s many features and to ensure that you get the very best from
your purchase.
Safety
Please read the Safety Instructions before using this product to ensure
your safety and the safety of others.
Disposal
Please ensure the product and its accessories are disposed in compliance
with WEEE (Waste Electrical and Electronic Equipment) Directive and
any other applicable regulations. Please check with your local authority
for current disposal regulations.
Customer Service
If you need help, please contact our Customer Service:
Telephone: +44 (0) 845 250 0586
Email: [email protected]
2. Connect the device with a monitor via HDMI or SCART. Connect the device to the
mains power, press the Power button on the remote to switch on the device.
3. When turning on the device for the first time, “Installation Guide” will show. Follow
the instructions to select the desired OSD Language and Country, then press <OK>.
The auto search will then start. Once the search has finished, press <▲> or <▼> to
select channels. Press <TV/RADIO> to switch between Freeview TV and Radio
channels.
4. If you have done the first time installation before, and would like to search for Digital
Freeview channels again, or if you have moved to a different region and need to search
channels again, press <MENU>, move to the “Installation” menu, select Auto Search
and press <OK> to start the search. Once the search has finished, press <▲> or <▼>
to select channels. Press <TV/RADIO> to switch between Freeview TV and Radio
channels.
5. To play music, photos, movies or PVR from a USB memory stick, insert the memory
stick into the USB port, press <MENU>, move to Media Player menu, select “Music”,
“Image”, “Video” or “PVR”, press <OK> to view the file list. Select a file and press
<OK> to Play.
6. Please note that the signal strength in some areas may not be sufficient to support TV
reception using a portable aerial. The distance from the closest transmitter and other
factors such as surrounding buildings, the walls of your house, weather and electromagnetic interference caused by power and telecommunication infrastructure may
affect signal strength. Changing location may improve signal reception and a rooftop
aerial designed for digital TV can be used to achieve the best possible reception.
7. For any further queries, please telephone August International Ltd helpline
+44 (0) 845 250 0586 or email [email protected]
English
User Manual
1. It is suggested that you use a roof top aerial when searching for TV channels for the
first time.
1. Safety Instructions
Storage and Use
1. Safety Instructions
1
2. Accessories
2
3. Part Names and Functions
3
4. Connection
7
5. Unit Operation
8
6. Specifications
24
7. Troubleshooting
25
8. Warranty
26
Keep the
Receiver away
from water or
damp
environment.
Never expose
the Receiver to
moisture,dust
oil or smoke.
Avoid
dropping or
exposing to
impacts.
Never put this
machine in
containers that
are unstable as
this may cause
damage.
Never extrude
or chafe this
machine with
sharp objects.
Maintenance
Please unplug all connection wires before cleaning this machine.
Please wipe this
machine
and buttons with
a softcloth. Only
clean the screen
with professional
LCD TV screen
cleanser.
-1-
Alcohol
Never wipe this
machine with an
abrasive cloth,
detergent
powder, alcohol
and benzene etc.
various
propellants or
chemical
cleaning products.
English
Contents
Keep this
machine away
from hot or
cold places.
Working
temperature of
this device is
0゚C ~ 50゚C,
storage
temperature is
-10゚C ~ 60゚C.
Operation Precautions
3. Part Names and Functions
For the sake of safety, when you do not intend to use the Receiver, please switch off the
power button.
3.1 Front
English
Special Notice
Never try to repair this machine by yourself. In case of any fault or failure, please turn
off the Receiver at once, and notify our company or the corresponding dealer. The
Receiver is made up of many precision electronic components. Any disassembly or
modification may lead to further damage.
2. Accessories
1
2
3
1. Display
2. Power Indicator
3. IR receiver window
4. USB Port
3.2 Rear
Remote control
5
DV
3
1
2
B41
5
User manual
-2-
4
1. SCART
2. HDMI Port
3. Coaxial
4. RF Out
5. RF In
-3-
4
3.3 Remote Control
3.3.1 Remote Button Functions
1
4
5
2
6
7
8
9
10
12
11
14
16
15
17
18
13
19
24
20
21
26
22
27
28
29
31
32
30
33
34
36
35
37
40
23
25
38
-4-
Mute/unmute the sound
Power
Favourite channel list
Subtitle
Information
Teletext (not available in UK)
Numbers
Change back to the previous channel
Channel List
Enter the main menu
Exit
Up
Down
Left
Right
Confirm
Electronic Program Guide
SWAP
Page down
Page up
Channel up
Channel down
Volume up
Volume down
Rewind
Forward
Previous track
Next track
Play
Stop
Pause/Timeshift
Audio language
Record
USB
TV and Radio switch
Repeat mode
Zoom in
Aspect ratio
Resolution
Schedule
39
-5-
English
3
1.
2.
3.
4.
5.
6.
7.
8.
9.
10.
11.
12.
13.
14.
15.
16.
17.
18.
19.
20.
21.
22.
23.
24.
25.
26.
27.
28.
29.
30.
31.
32.
33.
34.
35.
36.
37.
38.
39.
40.
4. Connection
English
3.3.2 Use of the Remote Control
Please remove the PVC packaging before using the remote control for the first time.
1. Do not expose the remote control to direct sunlight or very strong/bright light.
2. Do not drop or step on the remote control or subject it to shocks.
3. Keep the remote control away from extreme hot or humid environments.
4. Keep the remote control away from water.
Operating range
1. The IR sensor on the remote control should aim
directly to the sensor on the front of the device.
It may not be possible to operate the device if
there are obstacles between it and the remote sensor.
2. Use the remote control no further than 5 meters away
from the sensor.
3. The receiving angle range should be ±30°.
<5m
30° 30°
Replacing the battery
If the remote control does not function or if the operating range becomes reduced, replace
the old battery with a new one.
Pull out the battery holder
and remove the old battery.
Insert the new battery into the battery
holder with the + side facing upwards.
Push back the holder.
*Note:
1. Please ensure proper disposal of used batteries.
2. To prevent leakage of fluid from the batteries, remove the battery when not using
the remote control for a long period of time. If the battery leaks fluid, carefully wipe it
out of the battery case, then change to new batteries.
-6-
-7-
5. Unit Operation
At the end of the search, confirm the
search end by pressing <OK> and you
can start watching channels which
have been found. Press <TV/RADIO>
to switch between TV and Radio
channels. If no channels are found,
the main menu will open. You can try
a different location or use a rooftop
aerial, then press <◄> or <►> to
select the “Installation” menu
followed by <OK>, highlight
“DVBT/T2 Auto Scan” and press
<OK>, then set the correct Country,
FTA Only as Yes, and T2 Signal Only
as No by using the <▲> and <▼>,
and <◄> or <►> buttons, then
highlight “Search” and press <OK>.
Press <▲> and <▼> to select the desired
channel, then press <OK> to confirm. Press
<EXIT> to close the list.
To stop recording, press <■>. A pop up
window will display to confirm recording
stop. Select “Yes” or “No”, and press <OK>.
5.2 Channel Information
Press <INFO> in TV or Radio mode to show
Now and Next program information for the
current station. The display also shows
whether subtitles and EPG information are
available.
Press <INFO> again to show detailed
information including signal strength and
quality.
5.4 Recall
Press <RECALL> in TV display mode to
change back to the last channel that was
being watched.
5.6 Time Shift
To use time shift it needs to be enabled and
a USB memory stick with sufficient free
space needs to be plugged into the USB
socket. To enable or disable Time Shift refer
to section 5.8.4.10.
With timeshift enabled press <||> pause to
show the timeshift OSD and go into
timeshift operation.
Press <◄> or <►> to move the slide to the
left or right and press <OK> to begin
5.5 Record
playing from that point. Press <◄◄> and
Plug a USB memory stick with sufficient free <►►> for slow backwards or forwards.
space into the USB socket, then press <REC>
to record the channel being watched. A
Press <|◄◄> or <►►|> to jump the
window will pop up asking for Record Type.
recording backwards or forwards by the
Select PS to record in .mpg format, or TS to
amount of time set for Jump. See section
record in .ts format, then press <OK>. A
5.8.4.10 for details on setting Jump.
recording status window will open for 5
seconds, then ●REC will show on the right Press <■>stop to end the timeshift playing
of the picture to show recording is in progress. mode.
5.3 Channel List
Press <OK> or <LIST> in TV or Radio mode
to show the channel list. Press [TV/Radio] to
switch between the TV and Radio channel list.
-8-
-9-
English
5.1 Initial Installation
After you first switch-on your device, a
Welcome screen is displayed that allows
you to set your preferences and search for
channels. Select the values for Region,
Language, Display Mode and Aspect Mode
as required. Note that the Display Mode
requires <OK> to be pressed to show a list.
Once complete, highlight “OK” and press
<OK> on the remote control to begin the
Auto Scan or press <EXIT> to enter the
main menu.
<◄ > or < ►> to change the settings. Use
the number keys and <◄ > or < ►>to set
date, time and duration, then highlight
[Save] and press<OK> to confirm, or
highlight [Cancel] and press <OK> or press
<EXIT> to exit without editing.
5.7.3 Delete Event
To delete an event, highlight the timer
memory with the event and press <OK>.
5.7.1 Add Event
To add an event, highlight one of the empty
timer memories and press <OK>.
Press <▲> or <▼> to select an item, press
<◄ > or < ►> to change the settings. Press
the number keys and <◄ > or < ►> to set
date, time and duration, then highlight
[Save] and press<OK> to confirm, or
highlight [Cancel] and press <OK> or press
<EXIT> to exit without saving.
Highlight Timer Mode and press <◄ > or
< ►> to change the setting to “Off” , then
highlight [Save] and press <OK> to confirm
the delete, or highlight [Cancel] and press
<OK> or press <EXIT> to exit without
deleting.
Press <RED> to rename the file. A pop up
screen will allow editing of the name. Use
the following table and press the number on
the remote control to cycle through until the
desired character is displayed:
0
5.8.1 Media Player
When you first enter a Media Player sub
menu, the USB/HDD device is highlighted.
Press the [Down] key to move the highlight
to folders and files. You can switch between
Music/Image/Video/PVR by pressing the
[SWAP] key.
1
<space> 1 . ,
*?!@
_-0
5
jkl5
6
2
3
4
abc2
def3
ghi4
7
8
9
m n o 6 p q r s 7 t u v 8 wxyz9
5.8.1.2 Video Player
Highlight “Video” and press <OK> to show
the Video menu. Press <▲> or <▼> and
<OK> to navigate through the folders and
highlight the file to play, then press <OK>
to play in full screen.
5.8.1.1 PVR
Highlight “PVR” and press <OK> to show
5.8 Main Menu
Press <MENU> to enter the main menu,
press <EXIT> to exit the menu.
In the main menu, press <◄> or <►> to
select between the Media Player, Edit
Channel, Installation, System Setup and
Tools submenus. Press <OK> to enter a
submenu or press <EXIT> to exit the main
5.7.2 Edit Event
menu.
In a submenu, press <▲> or <▼> to select an
To edit an event, highlight one of the timer
memories with an event set and press <OK>. item, then press <OK> or press <◄> or <►>
to change the settings. Press <EXIT> to save
the settings and go back to the previous menu.
Press <▲> or <▼> to select an item, press
-10-
the PVR menu. Press <▲> or <▼> to
select an item and press <OK> to play in
full screen. Press <■> to stop playback and
return to selection preview screen.
Press play <►> to play in the preview
screen, <||> to pause, and <■> to stop
playback.
Press <||> to pause playback, <►> to
resume, and <■> to stop playback and
return to selection preview screen.
Press <◄◄> repeatedly to rewind at x2,
x4, x8, x16, x24 speed, press <►►>
repeatedly to fast forward at x2, x4, x8,
x16, x24 speed. Press <|◄◄> to move to
the previous file, and <►►|> to move to
the next file when not in single file repeat
mode.
In the preview screen pressing the
<REPEAT> button to cycle through the
options of Play file once, Play file
repeatedly, Play all files in folder repeatedly.
Press <BLUE> to show the edit options.
-11-
English
5.7 Schedule
Press <TIMER > in TV mode to enter the
Timer Setting. This function supports
scheduled viewing or scheduled recording
of Programs. The options are off, schedule
a recording once, or record at the same time
daily.
5.8.1.2.1 Rename
5.8.1.3.1 Play List
Highlight a file and press <RED> to rename Press <RED> to play all music in the Play
List. To add a music file to the Play List
it. See Section 5.8.1.1 for details.
mark it as a Favourite.
5.8.1.2.3 Delete
Highlight a file and press <YELLOW> to
mark it for deletion. A “X” symbol will
appear next to the file. To cancel the deletion
mark highlight the file, then press
<YELLOW> again. To delete the file move
to another folder either by highlighting the
folder and pressing <OK>, or pressing
<EXIT> to move up folder and a window
will pop up to confirm the delete of the
marked files.
5.8.1.2.4 New Folder
To create a new folder, press <BLUE> then
give the folder a name in the pop up window
using the number keys and referring to the
table in Section 5.8.1.1.
5.8.1.3 Music Player
Highlight “Music” and press <OK> to show
the Music menu. Press <▲> or <▼> and
<OK> to navigate through the folders and
highlight the file to play, then press <OK>.
5.8.1.3.3 Favourite All
Press <YELLOW> to mark all files in a
folder as Favourite. Press <YELLOW>
again to clear the Favourite mark from all
files in the folder.
5.8.1.3.4 Edit
Press <BLUE> to enter the edit functions.
Refer to Section 5.8.1.2 for details. Press
<MENU> to return to the Music Player
screen.
5.8.1.4 Image / Photo Player
Highlight “Image” and press <OK> to show
the Image menu. Press <▲> or <▼> and
<OK> to navigate through the folders and
highlight the file to view, then press <OK>.
The photos in the folder will be shown in
sequence with random transition effects.
Press <◄ > or < ►> to rotate the photo 90°
left or right respectively.
Press <||> to pause the slide show, and
press <||> again or <►> to resume. When
paused press <▲> or <▼> to step through
the photos. Press <EXIT> to stop the slide
show and return to the preview screen.
5.8.1.3.5 Sort
To sort the files according to Name / Time /
Size / Favourite, press “1” then highlight the
option and press <OK>.
5.8.1.3.6 Repeat
Pressing the <REPEAT> button to cycle
through the options of Play file repeatedly,
Play all files in folder repeatedly.
5.8.1.3.7 Exit
Press <EXIT> to step up through the folders
and return to the Media Player main menu.
If Favourites or Play List have been changed,
a pop up window will appear asking to
confirm save of the play list to USB disk.
Highlight “Yes” and press <OK> to save the
changes, or press <◄ > or < ►> to highlight
No and press <OK> to cancel the operation.
-12-
5.8.1.4.1 Play List
Press <RED> to show all the photos in the
Play List. To add a photo to the Play List,
mark it as a Favourite (see below).
To change the order that photos show,
highlight a photo and press the <RED>
move button then press <▲> or <▼> to
move the photo to the desired position in
the list, and press the <RED> move button
again.
<OK>. Press <EXIT> to exit the slide show
and return to the preview screen.
To delete a photo from the Play List,
highlight it and press the <GREEN> delete
button.
To delete all photos from the Play List,
press the <YELLOW> Delete All button.
A confirmation window will pop up asking
“Are you sure to delete all items in
playlist?”, default Yes. Press <OK> to
delete all photos from the Play List and
return to the preview screen, or press
<◄ > or < ►> to highlight No and press
<OK> to cancel the operation.
5.8.1.4.2 Favourite
Highlight a photo and press <GREEN> to
mark it as a Favourite. Highlight the photo
and press <GREEN> again to unmark it as
a Favourite.
5.8.1.4.3 Favourite All
Press <YELLOW> to mark all photos in a
folder as Favourite. Press <YELLOW>
again to clear the Favourite mark from all
photos in the folder.
5.8.1.4.4 Edit
Press <BLUE> to enter the edit functions.
Refer to Section 5.8.1.2 for details. Press
<MENU> to return to the photo preview
screen.
5.8.1.4.5 Sort
To sort the photos according to Name /
Time / Size / Favourite, press “1” then
highlight the option and press <OK>.
When the photos are in the desired order
highlight the first photo to show and press
-13-
English
5.8.1.2.2 Copy
5.8.1.3.2 Favourite
Highlight a file and press <GREEN> to copy
Highlight a music file and press <GREEN>
it. Press <▲> or <▼> and <OK> to
to mark it as a Favourite. Highlight the music
navigate through the folders and press
file and press <GREEN> again to unmark it
<GREEN> again. A pop up window will ask as a Favourite.
for confirmation.
Continue pressing <EXIT> to return to
normal TV viewing.
a pop up window saying “Are you sure to
save?” will ask to confirm the changes.
Highlight “Yes” and press <OK> to save the
changes, or “No” and press <OK> to discard
the changes.
automatically rerun the slide show when all
photos have been shown.
Highlight “Save” and press <OK> to save
the changes, or “Cancel” and press <OK>
to discard the changes and return to the
preview screen.
5.8.1.4.7 Multiview
Press “3” to view all photos for the current
folder in a tiled display. Press <EXIT> to
return to the preview screen.
5.8.2.1 TV and Radio Channel List
To manage the TV channels, highlight the
TV Channel List option and press <OK>.
To manage the Radio channels, highlight
the Radio Channel List option and press
<OK>. To switch between TV and Radio
whilst managing the channel lists, press the
<TV/RADIO> button.
5.8.1.4.8 Exit
Press <EXIT> to step up through the folders
and return to the Media Player main menu.
If Favourites or Play List have been changed,
a pop up window will appear asking to
confirm save of the play list to USB disk.
Highlight “Yes” and press <OK> to save the
changes, or press <◄ > or < ►> to highlight
No and press <OK> to cancel the operation.
5.8.2.1.1 Favourite
To save channels into favourite groups press
the <FAV> button and the FAV icon at the
top of the screen is highlighted. Highlight
the channel to put into a favourite group,
then press <OK> and a pop up window will
show with the eight favourite groups.
Highlight a group to make the channel a
favourite in, and press <OK>. A favourite
blue heart icon will be shown next to the
favourite group. To remove a channel from
Continue pressing <EXIT> to return to
a favourite group, highlight the group
normal TV viewing.
marked as favourite and press <OK> again.
A channel can be stored in multiple
5.8.2 Edit Channel
Edit Channel enables the user to manage the favourite groups by highlighting another
group and pressing <OK>.
TV and Radio channel lists. To access the
Edit Channel functions press <MENU>
Press <EXIT> to return to the TV channel
list and press <EXIT> again to return to the
whilst receiving a TV or Radio channel,
Program options. If changes have been made
then press <◄ > or < ►> to highlight the
-14-
5.8.2.1.2 Lock
Locking a channel requires a password to
be entered in order to watch that channel.
Press the <RED> Lock button and the
Lock icon at the top of the screen is
highlighted. Highlight the channel to lock
then press <OK> and a pop up window for
the password appears. Enter the password
to lock the channel. The system default
password is “0000”.
To remove a lock from a channel, highlight
a locked channel and press <OK>. The
password will not be required if it has been
entered before whilst still in the Lock
function.
Press <EXIT> to return to the channel list
and press <EXIT> again to return to the
Program options. If changes have been
made a pop up window saying “Are you
sure to save?” will ask to confirm the
changes. Highlight “Yes” and press <OK>
to save the changes, or “No” and press
<OK> to discard the changes.
5.8.2.1.3 Skip
Skipped channels are not found whilst
browsing up and down channels. To skip
or unskip a channel press the <GREEN>
Skip button and the Skip icon at the top of
the screen is highlighted. Highlight the
channel to skip then press <OK> and skip
channel arrow icon appears on the channel
line.
To un-skip a channel, highlight the channel
marked with the skip icon and press <OK>
again.
Press <EXIT> to return to the channel list
and press <EXIT> again to return to the
Program options. If changes have been
made a pop up window saying “Are you
sure to save?” will ask to confirm the
changes. Highlight “Yes” and press <OK>
to save the changes, or “No” and press
<OK> to discard the changes.
5.8.2.1.4 Move
To change the position of a channel in the
list press the <YELLOW> Move button
and the Move icon at the top of the screen
is highlighted. Highlight the channel to
move then press <OK> and the move double
arrow icon appears on the channel line.
Press <▲> or <▼> to move the channel
to the desired position in the list, and press
the <OK> to set it there.
-15-
English
5.8.1.4.6 Setup
Edit Channel menu item and press <OK>
To set up the photo slide show options,
or <▼>.
press “2”. Highlight Slide Show Time to
choose between Off or display time between
1 and 9 seconds. Highlight Slide Show
Repeat to choose between Off/On to
5.8.2.1.5 Edit
Edit allows the user to sort, rename and
delete channels. Press the <BLUE> Edit
button and the Icons at the top of the screen
change to Sort, Edit and Delete.
up window saying “Are you sure to save?”
will ask to confirm the changes. Highlight
“Yes” and press <OK> to save the changes,
or “No” and press <OK> to discard the
changes.
Edit
Edit allow the user to rename a channel. To
change the name of a channel in the list
press the <GREEN> Edit button and the
Edit icon at the top of the screen is
highlighted. Highlight the channel to rename
then press <OK> and Rename window will
pop up with the channel name. Use the table
in 5.8.1.1 for the desired characters, and the
<RED> button to turn capital letters on and
off, and the <GREEN> button to delete a
character at the cursor position.
Sort
Press the <YELLOW> OK button to accept
Press the <RED> Sort button to bring up a
the edited name, or the <BLUE> CANCEL
menu allowing channels to be sorted in
button to discard any changes.
order of Name(A-Z), Name(Z-A), Free to
view/Scrambled, Locked. Highlight the
Press <EXIT> to come out of edit mode, and
desired option by pressing the <▲> or <▼> <EXIT> again to return to the channel list.
buttons and press <OK>. Press the <EXIT> If changes have been made a pop up window
button to return to the edit list without sorting. saying “Are you sure to save?” will ask to
confirm the changes. Highlight “Yes” and
Press <EXIT> to return to the Program
press <OK> to save the changes, or “No”
options. If changes have been made a pop
and press <OK> to discard the changes.
-16-
channels. Highlight “Yes” and press <OK>
to delete all channels, or “No” and press
<OK> to cancel and return to the Edit
Channel menu.
Delete
Delete permanently removed a channel from
the listings and selection screens. To delete a
channel in the list press the <BLUE> Delete
button and the Delete icon at the top of the
screen is highlighted. Highlight the channel
to delete then press <OK> and channel is
marked for delete with an X icon. Any
number of channels may be marked in this
way. To un-mark a channel highlight it when
it has the X icon, and press <OK>.
English
Press <EXIT> to return to the channel list
and press <EXIT> again to return to the
Program options. If changes have been
made a pop up window saying “Are you
sure to save?” will ask to confirm the
changes. Highlight “Yes” and press <OK>
to save the changes, or “No” and press
<OK> to discard the changes.
5.8.3 Installation
The Channel Search menu allows you to
search for channels and change channel
search settings. The selected countries
settings will be used. Use auto scan to
search for new channels if the receiver is
moved to a different TV area.
To delete the channels press <EXIT> to come
out of delete marking mode, and <EXIT>
again to return to the channel list. If changes
have been made a pop up window saying
“Are you sure to save?” will ask to confirm
the channel delete. Highlight “Yes” and press
<OK> to save the changes, or “No” and press
5.8.3.1 Channel Scan
<OK> to discard the changes.
Channel Scan is used to search for channels
on a specific frequency. Highlight Channel
Scan and press <OK>.
5.8.2.2 Delete All
To clear all channels from the listing
highlight the “Delete All” and press <OK>.
A window will pop up to confirm delete all
Highlight Scan Mode and press <◄ > or
< ►> to select search by Channel or
Frequency.
When searching by Channel, highlight
Channel No. and press <◄ > or < ►> to
select the channel then press the <▲> or
<▼> buttons to highlight Search and
press <OK>.
-17-
or press <OK> for a drop down menu to
choose the aspect mode from, Auto /
4:3PS / 4:3LB / 16:9 and press <OK> to
select, or <EXIT> to cancel changing the
aspect mode.
5.8.4 System Setup
5.8.4.1 Language
Language is used to set the OSD language,
First audio language, Second audio language
and Teletext. Highlight the option, and press
<◄> or <►> to select the language for that
option.
the level and press <OK> to select, or
<EXIT> to cancel changing the value. The
levels vary between 0 and 100, except for
Sharpness which is 0 to 10.
Highlight Video Out and either press <◄>
or <►> to select the video output mode
in real time, or press <OK> for a drop down
menu to choose the video output mode from
CVBS / RGB and press <OK> to select, or
<EXIT> to cancel changing the video output
mode.
Highlight Digital Audio Out and either press
<◄> or <►> to select the digital audio
output mode, or press <OK> for a drop
down menu to choose the digital audio
output mode from BS Out / LPCM Out and
press <OK> to select, or <EXIT> to cancel
changing the digital audio output mode.
5.8.3.2 Auto Scan
Select Auto Scan and press <OK> to start
searching for channels on all frequencies.
The selected countries settings will be used.
Use this option if new channels have been
added to the local transmitter, or the receiver
has been moved to a different TV area.
5.8.3.3 LCN
The LCN option is used to turn Logical
Channel Numbers On or Off.
5.8.4.2 TV System
TV System is used to change the Video
Resolution, Aspect Mode, Video Output
mode and Digital Audio Out mode.
Highlight Video Resolution and either
press <◄> or <►> to select the resolution
in real time, or press <OK> for a drop down
menu to choose the resolution from, By
Source / By Native TV / 480i / 480p / 576i /
576p / 720p_50 / 720p_60 / 1080i_25 /
1080i_30 / 1080p_50 / 1080p_60/1080p_25/
1080p_30/1080p_24, and press <OK> to
select, or <EXIT> to cancel changing the
resolution.
Highlight Aspect Mode and either press
<◄> or <►> to select the aspect mode,
-18-
English
When searching by Frequency, highlight
Frequency and enter the frequency in
Kilohertz using the number buttons on the
remote control. Set the bandwidth as
required for the local transmitter. Highlight
BandWidth press <◄ > or < ►> to select
the bandwidth from 6 MHz/7MHz/8MHz.
Note: The frequency in Kilohertz is
Megahertz multiplied 1000. i.e. to set
482MHz as the search frequency enter
“482000”. When the frequency is set, press
the <▲> or <▼> buttons to highlight
Search and press <OK> to start the search.
5.8.4.3 Display Setting
Display setting is used to alter the Brightness,
Contrast, Saturation, Hue and Sharpness of
the picture.
5.8.4.4 Local Time Setting
Local Time Setting allows the user to
change the Region and time settings for the
device.
Highlight Region and press <◄> or <►>
to select the region, or press <OK> for a
drop down menu. Press <OK> to select, or
<EXIT> to cancel.
GMT Usage allows the user to change the
method of time setting for the device. Press
<◄> or <►> to select between By
Region / User Defined / Off. By Region
uses the Region setting, User Defined
allows the user to set the local time by
GMT offset, and Off allows the user to set
the date and time manually by using the
numeric buttons on the remote control.
Highlight the option required and press <◄>
or <►> to select the level in real time, or
press <OK> for a drop down menu to choose
-19-
5.8.4.5 Timer Setting
Timer Setting allows the user to edit up to
eight timed viewing and recording events.
To lock the menu system, highlight Menu
Lock and press <◄> or <►> to select Off /
On.
To enable time shift, highlight the
“Timeshift” option and press <◄> or
<►> to set “On” or “Off”.
Highlight the timer to set and press <OK>.
To set the age rating for the system, highlight
Rating Lock and press <◄> or <►> to
select between Off / AGE 10 / AGE 12 /
AGE 14 / AGE 16 / AGE 18.
The “Jump” setting is used to set the
amount of time that is jumped during time
shift playback when the <|◄◄> or <►►|>
keys are pressed.
In the setting screen press <◄> or <►> to
select Timer Mode Off / Once / Daily, and
Timer Service Record/Channel.
Select the Wakeup Channel either by
pressing <◄> or <►>, or press <OK> and
select the channel from the drop down
menu, and press <OK>.
Set the Wakeup Date, Time and Duration of
the recording or viewing by using the
number buttons on the remote control.
To set a new password, highlight New
Password and using the number keys on the
remote enter a new four digit password. On
the fourth digit the Confirm Password
becomes highlighted. Type the four digit
password again and a pop up window will
confirm the password changed successfully
if correct. Press <OK> to return to the
System Setup menu.
PS Record is used to change between saving
in ts and mpg file formats by selecting No /
Yes. Use “No” for .ts and “Yes” for .mpg
format.
5.8.4.6 Parental Lock
Parental Lock allows the user to password
protect the menu system, apply an age rating
to the system, and set a new password. When
entering the Parental Lock menu a password
is required. The default system password is
“0000”.
5.8.4.7 OSD Setting
OSD Setting allows the user to change the
timeout and transparency of on screen
displays. OSD timeout can be set between 1
and 10 seconds by pressing <◄> or <►> or
pressing <OK> and selecting the value from
the drop down menu.
OSD Transparency can be set between Off
and 40% in 10% increments by pressing
<◄> or <►> or pressing <OK> and
selecting the value from the drop down menu.
-20-
5.8.4.8 Favourite
Favourite allows the user to Rename the
names of the Favourite Group. Highlight a
group name and press <OK> to print up a
window to allow editing. When completed
press <BLUE> OK, or <EXIT> to quit
without saving any changes.
“Timeshift to Record” is used to control
whether the time shift part is added to a
recording when the <REC> record key is
pressed to record a live program. Setting to
“Off” will record from the current time and
setting to “On” will add the time shift part
to the recording.
“PS Record” is used to record in PS or TS
mode.
5.8.4.9 PVR Storage Information
This option is only available when a USB
memory device is plugged in. It displays
information about the USB memory device,
allows formatting of the USB memory device, 5.8.4.11 Other
and sets the allowed DVR modes between
Record / Timeshift / REC&TMS (Record
and Timeshift).
5.8.4.10 PVR Setting
This option is only available when a USB
memory device is plugged in.
5.8.4.11.1 Antenna Power
The device can output 5V power from the
coaxial antenna socket, press <◄> or
<►> to select Antenna Power ON if your
external antenna has an amplifier that takes
5V input via its coaxial plug. Warning: Do
-21-
not set this option to ON if your antenna
does not have an amplifier that takes 5V
input.
5.8.4.11.2 Auto Standby
Enabling auto-standby allows the device to
automatically go into standby mode after a
period of about 3 hours.
5.8.4.11.3 RF Loop In Standby
The device can provide a loop-through of
signal for a second receiver when it is in
standby mode. Press <◄> or <►> to
enable or disable this function.
5.8.5 Tools
5.8.5.1 Information
Press <OK> to display information on the
device mode and current software.
5.8.5.3 Othello
Press <OK> to play the Othello game.
Highlight “Start” and press <OK> to start a
new game. A pop up menu will ask “Do you
want to be the black side?”. Highlight “Yes”
and press <OK> to play black, or “No” and
press <OK> to play white. Black side starts
first.
Press the arrow keys to move the cursor to a
valid square and press <OK> to place a disc.
The DVB415 will then take it’s turn to place
a disc. The running total of discs for each
colour is displayed on screen. Continue
placing discs until one side wins.
Press <EXIT> to quit the game and return to
the Othello menu. A pop up window will
confirm that you want to quit.
Setup sets the level of the game. Press <OK>
to change between Class 1/2/3.
Highlight CANCEL and press <OK>, or
press <EXIT> to return to the Tools menu.
5.8.5.2 Factory Setting
Press <OK>, then press <◄> or <►> to
highlight “Yes” and press <OK> to reset the
device to factory default settings, or highlight
“No” and press <OK> or press <EXIT> to
return to the system menu.
Note: Resetting to Factory Setting will erase 5.8.5.4 Sudoku
all memorized channels and user settings
Press <OK> to play the Sudoku game.
from the device.
Highlight “New Game” and press <OK> to
start a new game. Press the arrow keys to
move the cursor and press a number to enter
in the square. To abandon the game press
<EXIT>, then highlight “Yes” in the
confirmation window and press <OK>.
Select “Replay” to continue the current game.
-22-
Select “Solve” to fill in all the squares and
see the solution.
To change the difficulty, highlight “Setup”
and press <OK> to cycle between level 1/2/3.
Select “Cancel” or press <EXIT> to return to
the Tools menu.
5.8.5.5 Upgrade By USB
This function is for manufacturers use only.
Warning: Damage to the unit can occur if a
wrong software version is uploaded.
5.8.5.6 Remove USB device safely
This option should be used before a USB
device is removed from the unit. Press <OK>
to bring up the Disk Remove menu and use
the arrow keys to highlight “OK” and press
<OK> to disconnect the USB device, or
“Cancel” and <OK> to leave the USB device
connected.
-23-
6. Specifications
7. Troubleshooting
RF Input Connector X1
D-Type, IEC-169-2, Female
RF Output Connector X1
D-Type , IEC -169-2, Male (Loopthrough)
Frequency Range
174MHz ~ 230MHz (VHF) and
470MHz to 862MHz (UHF)
Signal Level
-10 dBm to -70 dBm
Transport Stream
MPEG-2 ISO/IEC 13818-1
Profile Level
MPEG-1 MPEG-2 MP@ML
Video Profile and Level
MPEG-4 AVC/H.264 HP@L3/H.264/AVC HD
Max. 80Mbit/s @ MPEG2
Input Rate
Max. 60Mbit/s @ H.264/AVC
Video Format
4:3/16:9 Switchable
Audio Format
MPEG Layer I & II 32/44.1/48KHz
Video Output
CVBS RGB
Video Output Connectors
HDMI, SCART
USB Port
USB 2.0
Power Input
AC 220-240V 50-60Hz
Standby Power Consumption
Maximum 0.5W
Power Consumption
Maximum 6W
USB Maximum Load
DC 5V 500mA
Dimensions
150 x 108 x 35 mm
Net Weight
232g
Problems listed below do not necessarily signify a fault with the unit. Please check this list
before requesting repairs.
Problems
Possible Causes and Solutions
No Power
Plug the power cord into the outlet tightly and turn on the
device.
No image
Check che connection to tthe monitor.
Check the video output, TV format in Display menu.
No sound
Cancel Mute. Press MUTE button.
Increase volume. Prss VOL+ buton
Check the connection to the target audio device.
Restore the factory default, then try again.
Picture freezing, and/or
sound distorting
Signal too weak, please check the aerial. Try to use a
proper roof top aerial or an amplified aerial.
No signal
Signal too weak, please check the aerial. Try to use a
proper roof top aerial or an amplified aerial.
Remote control does not work
Change the batteries.
Operate within normal range. (max 5 meters, 30°)
The sensor is pointed to by bright light
Snowstorm
No recording
Motors/Trains/High Voltage Lines and Neon Lights may
affect the signal.
No USB memory is connected.
No free space on the storage.
Warning
This operation instruction is only intended for reference. No further notice is available to
any modification of all information contained therein. Due to continuing improvements,
the features and design are subject to change without notice.
Media Formats
Music
mp3,wma, ogg
Photo
jpg, jpeg, bmp
Movie
mpg, mpeg, dat, ts, trp, tp, m2ts, vob, mp4, mov,
mkv, divx, avi, 3gp
Warning
No user serviceable components are fitted inside this Receiver. Do not attempt any repairs,
as this will invalidate the warranty. Any repairs must be carried out by either the
manufacturer or their nominated service centre. Parts inside this set are subject to high
voltage.
-24-
-25-
8. Warranty
This product is guaranteed for twelve months from the date of the original purchase. In
the unlikely event of any defect arising due to faulty materials or workmanship, the unit
will be either replaced or repaired free of charge (where possible) during this period. An
alternative product will be offered in case the product is no longer available or repairable.
This warranty is subject to the following conditions:
The warranty is only valid within the country where the product is purchased
The product must be correctly installed and operated in accordance with the
instructions given in the user's manual.
The product must be used solely for domestic purposes.
The warranty only covers the main unit, and does not cover the accessories.
The warranty does not cover the damage caused by misuse, negligence, accident and
natural disaster.
The warranty will be rendered invalid if the product is resold or has been damaged
by inexpert repairs. The manufacturer disclaims any liability for incidental or
consequential damages.
Please consult our customer service before returning any product; we are not
responsible for any unexpected product returns.
Any faulty products must be kept and returned in the original packaging with all the
accessories and the original copy of the purchase receipt.
The warranty is in addition to, and does not diminish, your statutory or legal rights.
Customer Service:
Telephone:
+44 (0) 845 250 0586
Email:
[email protected]
-26-
-27-